Crisis Core Reunion: How To Get Precise Restoration Trophy
Learn how players can get the Precise Restoration trophy by completing an objective in chapter 4!
With an adaptive storyline, there are trophies that players can collect, such as Crisis Core Reunion Precise Restoration. However, getting it can be a little tough, so players might need assistance achieving it. The game is an enthralling prequel to its original storyline, which most players had played in their childhood. Thus, a re-mastered version would bring the child back out again as an adult.
- Precise Restoration trophy is achieved when players have progressed through chapters 1,2 and 3 and then get to a semi-mid point of chapter 4.
- The trophy itself is quite missable, and it can be very easy to skip past the objective and continue with the main quest.
- The best way to get the trophy is by completing the objective the machine asks you to do.
- The main benefit of getting the trophy will simply be that you can add one more to your collection.
Pre-Requisites
To earn this trophy, players must have progressed well into the main story until Chapter 3. The opportunity to obtain the trophy arises during Chapter 4 while protecting Professor Hojo.
However, players must be cautious not to interact with Professor Hojo prematurely. If they do, the storyline progresses, and the chance to interact with the machines in the room is lost. Missing this opportunity can result in missing the trophy altogether.
Therefore, it’s crucial not to interact with Professor Hojo until after interacting with the machines and completing the necessary steps to earn the trophy. Failure to do so may require restarting the game or forfeiting the trophy. There may also be other machines to interact with, so careful attention is necessary.
Starting Out
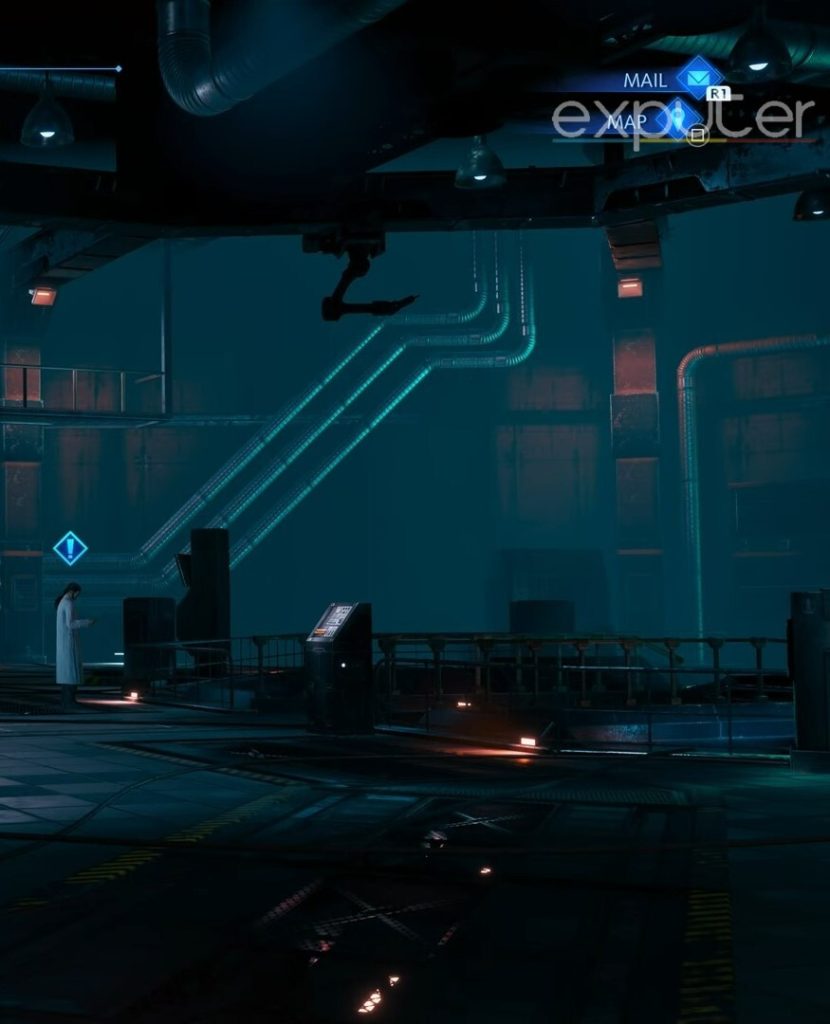
- Room’s Appearance: The room is filled with machinery. Yellow lines in a hexagonal shape mark off restricted areas. Tall machinery is to your left, and machinery related to trophies is on your right. Behind you, there’s a glass window marked “CR-02,” suggesting its importance.

Room Appearance (Image Credits Exputer) - Professor Hojo: Look behind you, and you’ll spot Professor Hojo standing before the “CR-02” machine. He has a blue square with an exclamation mark as a quest marker, indicating interaction. However, avoid talking to him for now.

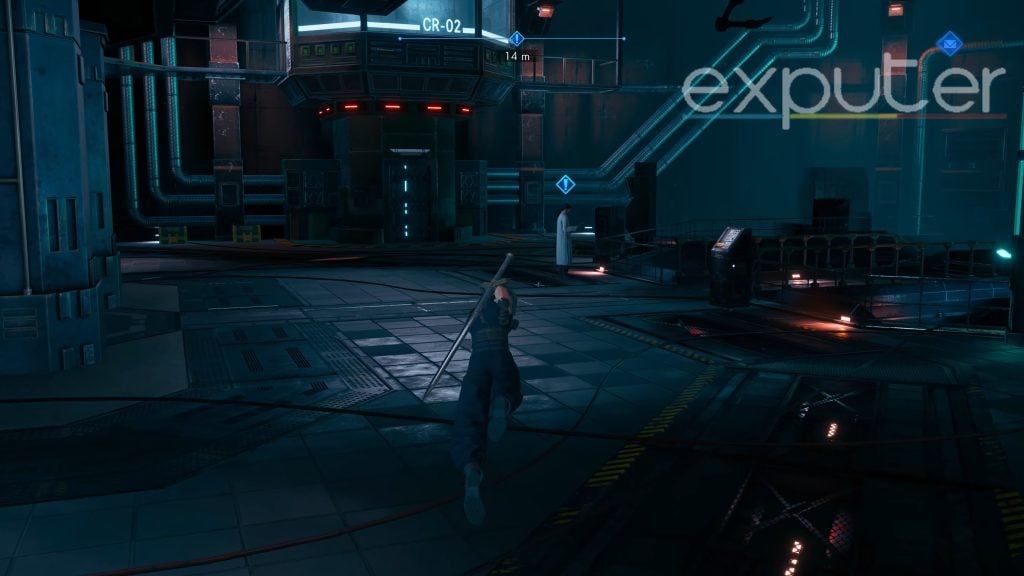
Professor Hojo (Image Credits Exputer) - Heading Towards the Machine: Instead, run toward Professor Hojo, standing by the balcony overlooking a glass-covered machine. A mint-green light illuminates his work. Across from him is a large box with a light red glow and four symbol squares.
- A recognizable giant machine is next to it, featuring two lit blue-green monitors.
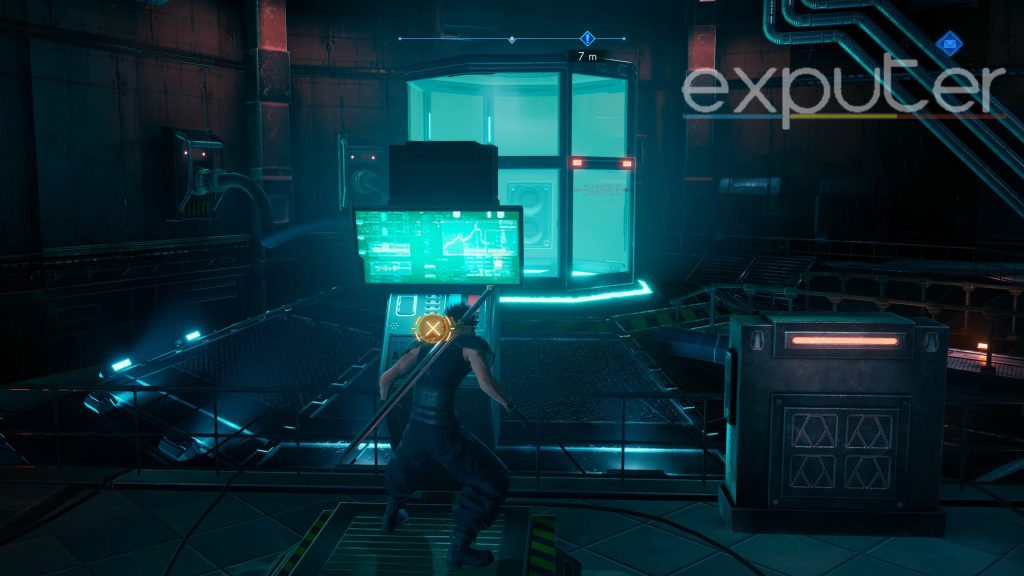
- Approach this machine and step onto the platform with a yellow X marker inside a yellow circle.
Heading Towards The Machine (Image Credits Exputer)

Interact with the marker to gain access to the machine.
Starting The Objective
Starting the objective:
- Interact with the machine to trigger a brief cutscene, granting access to the platform.
- You’ll see a blue box labeled “Mako Recovery Unit Prototype” with subheadings: “Auto Termination,” “Under Maintenance,” and “Manual Termination,” suggesting a malfunction.
- It’s advisable to save the game at this point to avoid redoing the objective.
- In the second blue box, you’ll learn about a malfunction affecting the countdown operation. The countdown won’t display “2, 1, and 0” seconds after reaching 3 seconds, making the objective more challenging.
- The machine advises against operation due to potential hazards.
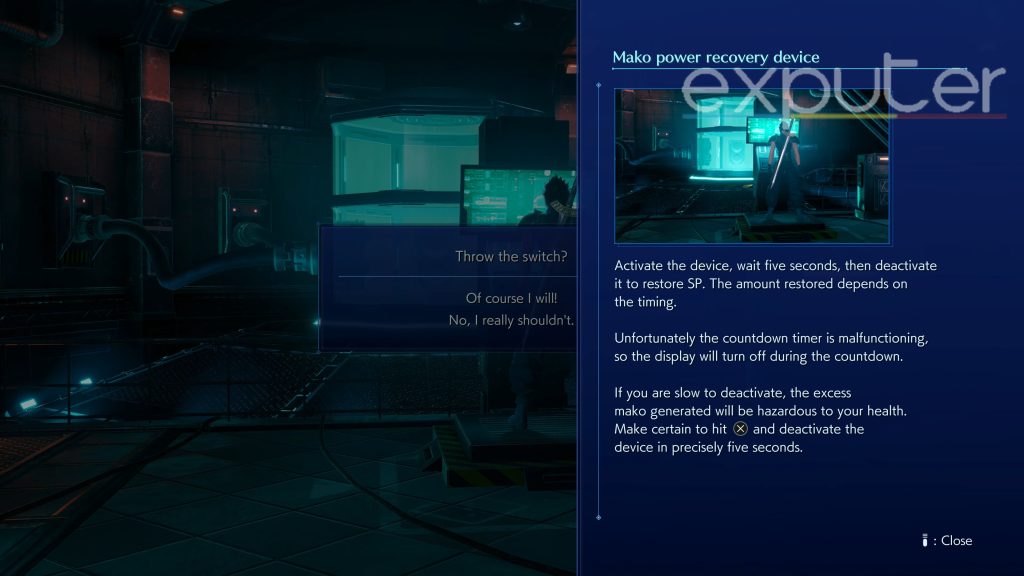
- Interact with the machine again, and you’ll face a question: “Throw the switch?” You have two options:
- “Of course, I will!” (Choose this for the “Crisis Core Reunion Precise Restoration” trophy.)
- “No, I really shouldn’t.” (Choose this to opt-out of pursuing the trophy.)
Select your preferred option to proceed or walk away from the machine.
The Main Objective
Now, when it comes to the device’s objective, after you choose the option to throw the switch, another blue popup message will appear and be placed towards the left of your screen. The screen will be instructions that the player needs to follow to proceed with the objective.
- The objective will start by telling the player that they need first to activate the device.
- When they do so, the payers will have to wait for a total of 5 seconds, after which you will be able to go ahead and deactivate it, which will be needed to restore SP.
- The amount of SP that will be restored will fully depend on the timing of the countdown that you carry out.
- The device will then tell you that, unfortunately, due to the malfunction, the countdown timer won’t operate as it should.
- The display will end up turning off during the countdown is active.
Suppose the player proceeds with the objective but is too slow to complete deactivation. In that case, any extra mako created will harm the player’s overall health. Players, therefore *need* to deactivate it in exactly five seconds.
Doing The Objective
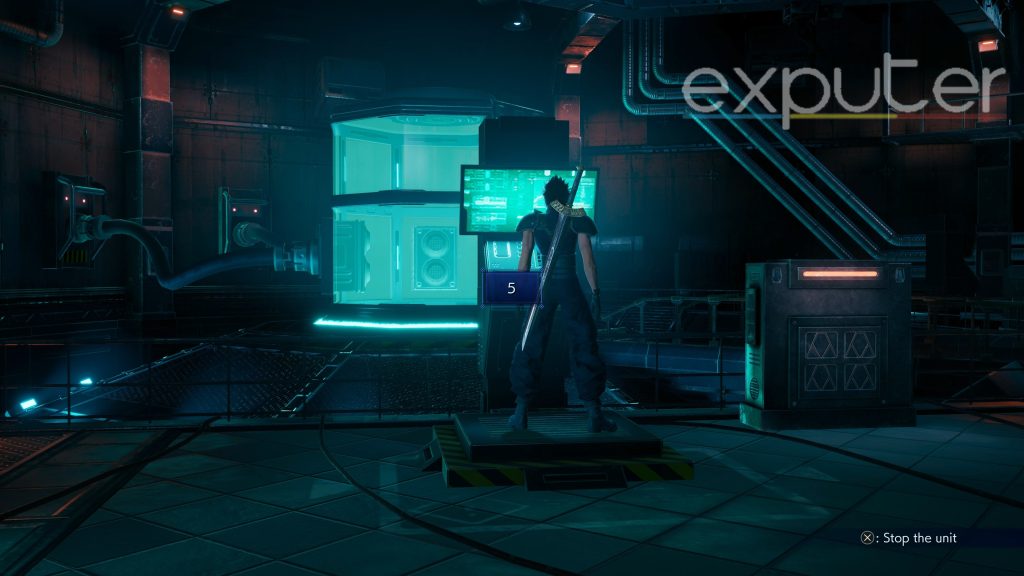
Now, to carry out the objective, players will first interact with the appropriate buttons again, which will be to press X on PS, or if you’re playing on XBOX, then players will need to press A.
The main objective here is to time the countdown perfectly and then click the button when the countdown ends up reaching 0. The thing is, though, since the countdown timer has been malfunctioning, the number 0 will not be displayed on the screen, which makes this a little bit tougher on the players.
So the way that this entire thing will work is that it will display the countdown timer as 5 seconds, 4, then 3, but then the 2, 1, and 0 will not be displayed. Therefore the player will have to keep count in their mind and make sure not to delay a second too long, or it can end up benign hazardous, and you basically fail the objective.
- After the blue bar disappears, another popup will say “system activated”, indicating that the objective has started. After that, it will say begin a countdown, and this is where you need to keep count.
- So, the 5 appears, then 4, and then 3, and while the 5, 4, and 3 appear, payers should automatically be counting these seconds in their minds too.
-

Trophy (Image Credits Exputer)
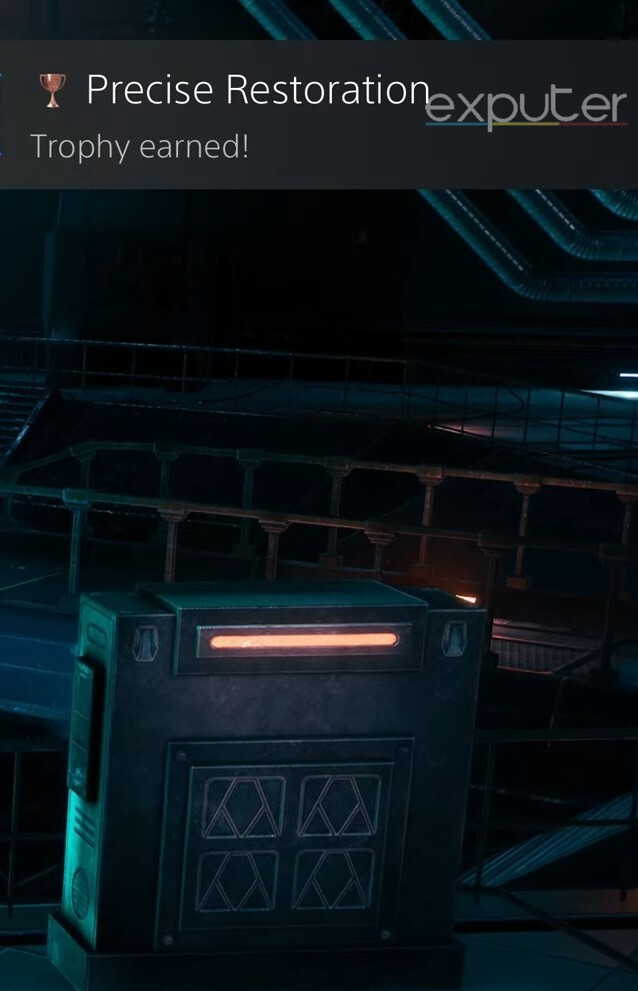
Once you mentally reach 0, press the button, and you will see your character interact with the machine. And if you successfully complete it, a popup will show up that will display the words “100% of mako delivery completed, Subject’s SP will be recovered”. You will then see the message that the SP has been replenished. And after that occurs, the Precise Restoration trophy will appear on the top right of the screen.
Leading Up Quests
Now, before players can even get to the part where they can get their hands on the trophy, there will be a total of 4 chapters that players will need to play through to get to the middle of the fourth chapter, where the trophy can be retrieved.
Prologue Quest
Whenever payers start off with the game, you will instantly be told to get through the objective, which will say “defeat the sentries,” which will basically introduce players to how the in-game combats will work. You will have to defeat the enemies to progress further.
After that, players will then be introduced to another boss that will have to get rid of, and this is where the next objective will pop up, which will tell players to “fight Behemoth,” and the boss itself will have the following stats:
- 7870 HP
- 122 MP
- 16 SP
Chapter One
- Read tutorial emails.
- Examine mission boards and complete a basic combat mission successfully.
- Discover the supply pod to equip a bronze bangle.
- Speak to Angeal and proceed to MT Tamblin.
- Storm the mountain fort, and defeat Vajradhara Tai and Vajradhara Wu.
- Defeat additional opponents and then face Ifrit.
Chapter Two
- Head to sector 8 and meet Tseng in the briefing room.
- Go to Banora Village, and search for info about Angeal.
- Regroup with Tseng, enter a factory, and complete an objective within a timer.
- Defeat Bahamut in Banora Village.
Chapter Three
Moving on, chapter three will be a lot longer, but the objectives presented to players in the Shinra Building will be as follows.
- Explore Shinra’s Soldier floors.
- Go to the director’s room and defeat opponents trying to take over.
- Defeat G Eraser.
- Meet Sephiroth in Mako reactor five.
When you make your way over to the Mako Reactor five where, there will be even more objectives to do:
- Defeat A-sahagin.
- Explore and search for clues.
- Chase Hollander and defeat Shot, Pile, and cutter machines.
Chapter Four involves objectives in the Sector 5 and Sector 0 areas, ultimately leading to protecting Professor Hojo.
And there we have it! A detailed walkthrough on how players can get the trophy, and with that, we will wrap up our Precise Restoration guide!
If you are new to the game, then you might want to check out our Crisis Core FFVII Reunion Max Level guide so that you can figure out how to progress fast and get to the max level as quickly as possible!
Up Next:
- Crisis Core Reunion Goddess Materia Locations
- Crisis Core Reunion Dresser Key
- Crisis Core Reunion Wutai Spies Locations
Thanks! Do share your feedback with us. ⚡
How can we make this post better? Your help would be appreciated. ✍