Monster Hunter Rise Sunbreak Hammer Build [Top 5]
This Hammer Build guide will uncover 5 early, mid-game and end-game builds for players!
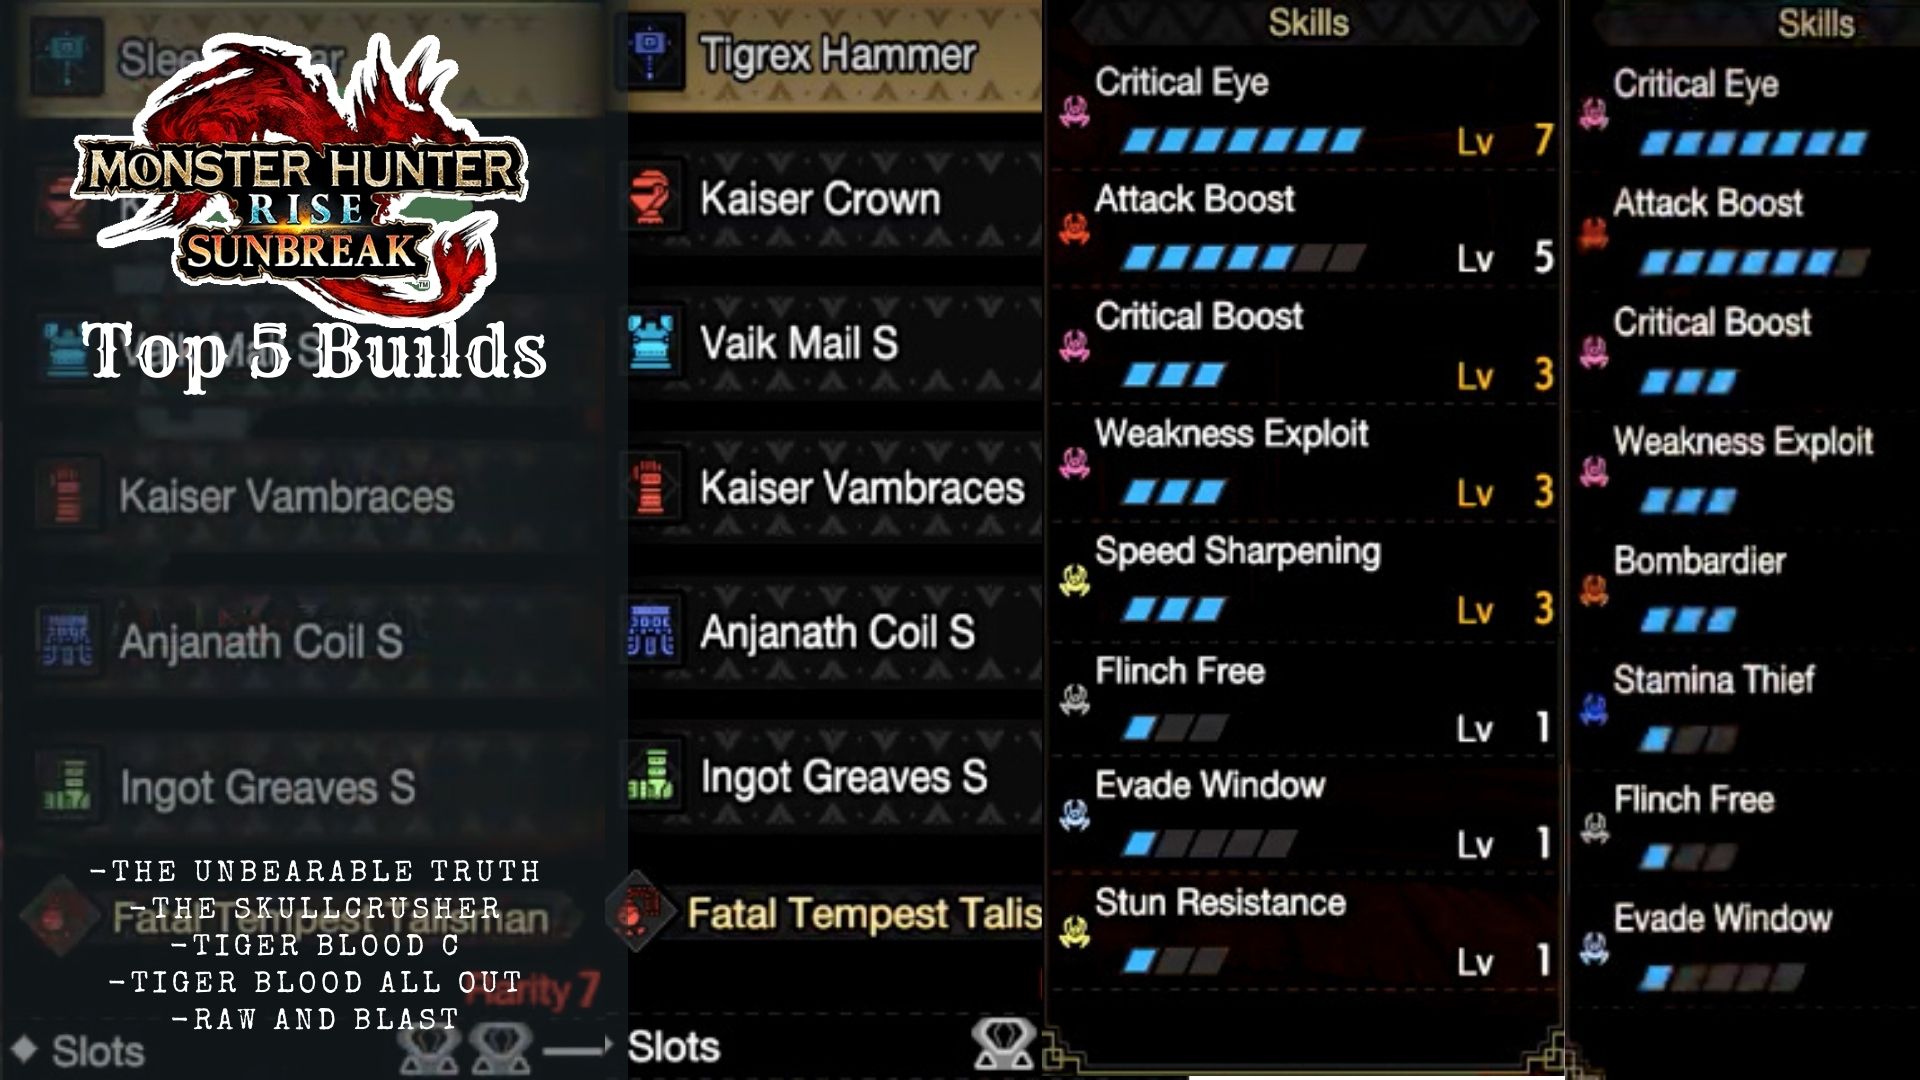
With how popular the Hammer is, our Monster Hunter Rise Sunbreak Hammer Build guide will showcase the top 5 builds, including some that are comfortable, some that are meta-focused, and all in all, the best-used builds!
- Unbearable Truth Hammer build: Prioritizes relaxation and comfort, uses Sleepy Bear (130 attack, 38 base sleep).
- Skullcrusher build: Meta-focused for high damage, relies on the Atlas Hammer (230 base attack).
- Tiger Blood C: Focuses on high damage and comfortable play with the Tigrex Hammer (220 damage).
- Tiger Blood All Out: A high-damage build using Tigrex Hammer (220 damage, blue sharpness, -20% affinity).
- Raw and Blast build: Geared for mid-game players, excels in high damage with the Mighty Souldevourer (310 base damage).
Here is a quick look at the Build summaries of our top five picks in Monster Hunter Rise Sunbreak:
| BUILD | WEAPONS | ARMOR | SKILLS | DECORATIONS |
|---|---|---|---|---|
| The Unbearable Truth | -Sleepy Bear | -Kaiser Crown -Kaiser Vambraces -Anjanath Coil S -Ingot Greaves S | -Critical Eye -Attack Boost -Critical Boost -Weakness Exploit -Bombardier -Stamina Thief -Flinch Free | -Tenderizer Jewel 2 -Attack Jewel 2 -Critical Jewel 2 -Brace Jewel one-piece -Bomber Jewel 1 -Drain Jewel |
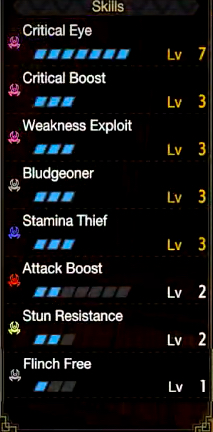
| The Skullcrusher | -Atlas Hammer | -Kaiser Crown -Lagombi Vambraces -Vaik Mail S -Anjanath Coil S -Kadachi Greaves S | -Critical Eye -Critical Boost -Weakness Exploit -Bludgeoner -Stamina Thief -Attack Boost -Stun Resistance -Flinch Free | -Tenderizer Jewel 2 -Blunt Jewel 2 -Critical Jewel 2 -Brace Jewel 1 -Steadfast Jewels 1 -Drain Jewels 1 |
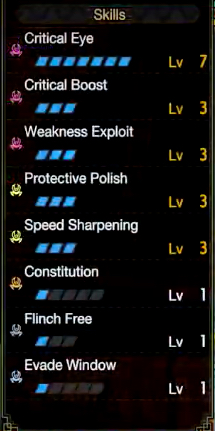
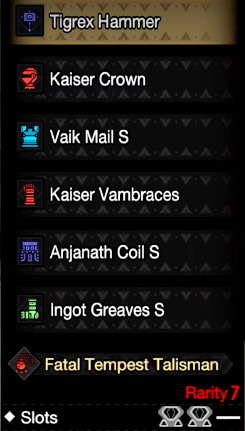
| Tiger Blood C | Tigrex Hammer | -Kaiser Crown -Vaik Mail S -Kadachi Greaves S -Kaiser Vambraces | -Critical Boost -Weakness Exploit -Protective Polish -Speed Sharpening -Flinch Free | -Tenderizer Jewel 2 -Sharp Jewel 2 -Critical Jewel 2 -Brace Jewel -Expert Jewel 1 -Grinder Jewels 1 |
| Tiger Blood ALL Out | -Tigrex Hammer | -Kaiser Crown -Vaik Mail S -Kaiser Vambraces -Anjanath Coil S -Ingot Greaves S | -Critical Eye -Attack Boost -Critical Boost -Weakness Exploit -Speed Sharpening -Evade Window -Flinch Free | -Tenderizer Jewels 2 -Sharp Jewel 2 -Critical Jewel 2 -Brace Jewel -Brace Jewel 1 -Expert Jewel 1 -Grinder Jewels 1 -Attack Jewel 2 -Steadfast Jewel 1 |
| Raw and Blast Build | -Mighty Souldevourer | -Lunagaron Helm -Anjanath Vambraces -Rathalos Coil -Ingot Greaves | -Attack Boost -Critical Eye -Weakness Exploit -Slugger -Stamina thief -Blast Attack -Earplugs -Focus | -Attack Jewel 2 -Expert Jewels 2 -Critical Jewels 2 -Tenderizer Jewel 2 -Brace Jewel 1 -Drain Jewels 1 |
The Unbearable Truth
Let’s start things with The Unbearable Truth Hammer build, which is a build that is mostly focused on being comfortable and chill. It is also insanely fun to play, considering it does not require the most optimal sets, skills, or decorations. However, that is not to say that it can’t still kill bosses since it can easily defeat enemies.
One of the main positives of using this Hammer build in Monster Hunter is that while it can easily clear content, it does not require the highest amount of input from the player’s end.
Weapon and Armor
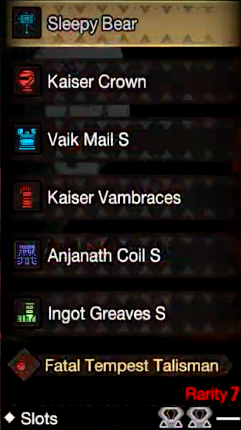
The weapon of choice here will be the Sleepy Bear, which will have an overall attack of 130, and it will also have 38 base sleep so that players can easily wreck enemies and, at the same time, look funny as hell trying to smack opponents with a literal teddy bear.
As for the armor, the armor of choice will end up being the Kaiser Crown, and for the chest; the Vaik Mail S is a solid option! Apart from that, players who want to use the Hammer mid-game can use the Kaiser Vambraces, Anjanath Coil S, and the Ingot Greaves S.
Skills
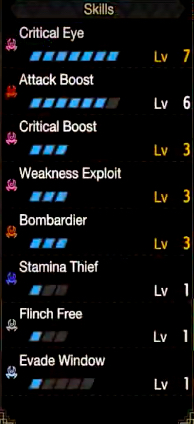
For skills, players can use the eight mentioned below:
- Critical Eye
- Attack Boost
- Critical Boost
- Weakness Exploit
- Bombardier
- Stamina Thief
- Flinch Free
Decorations
As for the Decorations used in the Hammer Build, perhaps the best decorations to use will be Tenderizer Jewel 2, but make it three of those, which can help buff up the player.
With that, the next piece of decoration that can aid players will be the Attack Jewel 2, and players can use two of those. Another decoration piece that can be used can be the Critical Jewel 2, and one piece will be used from that.
Alongside that, the Brace Jewel one-piece and the Bomber Jewel 1 make it three pieces, and the Drain Jewel piece can help the player quite a bit.
The Skullcrusher
Next up, let’s move on to a rather Meta-focused build; the Skullcrusher build entails using a heavier weapon to deal insane amounts of damage, and it will be able to obliterate several difficult opponents.
Alongside that, despite hitting very hard, the build itself is pretty easy to use, and players can get their hands on the weapon and the skills and armor pieces with quite ease. With a high damage output and solid survivability, the Skullcrusher build can help players clear a lot of mid-game to end-game content.
Weapon And Armor
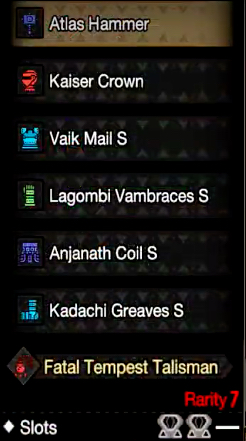
The weapon players can use will be the Atlas Hammer, which will have a higher damage output than the Sleepy Bear weapon we mentioned before. The base attack will be around 230, making it a solid option for decimating enemies while present on the battlefield.
With a lot of green sharpness, it grants the players an ample amount of damage output, which they can use to their advantage and advance toward their deadliest foes, and with a few hits from the Atlas Hammer, they can easily take them down.
As for armor pieces, the Kaiser Crown for the head, the Vaik Mail S piece for the chest and the Lagombi Vambraces can protect the arms. Lastly, the Anjanath Coil S and the Kadachi Greaves S.
Skills
The skills used will be mentioned below:
- Critical Eye
- Critical Boost
- Weakness Exploit
- Bludgeoner
- Stamina Thief
- Attack Boost
- Stun Resistance
- Flinch Free
Decorations
For decorations, this meta build will use six different pieces of decoration, one of them being the Tenderizer Jewel 2, and players will use 3 of those pieces.
Another piece that will be crucial to this build is the Blunt Jewel 2, and three pieces will be used. The Critical Jewel 2 will require two different pieces that will come in handy. One Brace Jewel 1, 2 Steadfast Jewels 1, and 3 Drain Jewels 1 will be used.
Tiger Blood C
The next build we would like to mention is Tiger Blood C, which is the culmination of a hard-hitting build that equates to players destroying their enemies, just like they did with the Skullcrusher build. The damage output is pretty viable, which makes it all the more desirable to use the Hammer Build and bash mid and large-sized monsters.
Apart from being a damage-focused build, the Tiger Blood C build will also be pretty comfortable to use since it means that players will wield weapons that won’t restrict their overall mobility. The restriction would have otherwise stopped players from comfortably traversing across the battlefield and launching attacks against their enemies.
Weapon and Armor
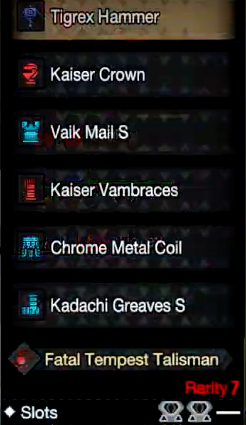
The weapon of choice that players can go for will be the Tigrex Hammer. Once again, its base damage will be around 220, enough for the player in the combat field to continue advancing their way to the enemy and consistently launch attacks at foes. These attacks will be enough to take them down or deplete a certain amount of their HP.
The best options for armor will be the original Kaiser Crown and the Vaik Mail S, which we have already mentioned in our previous two builds. They are being reused because they are so versatile, and have a solid amount of damage negation.
The vambraces will be the Kaiser Vambraces, and as for the choice of Coils, the chrome Metal Coil is an option. Tie it all together with the Kadachi Greaves S, and you have a full set!
Skills
For skills, the same eight will be used, except for a few changes:
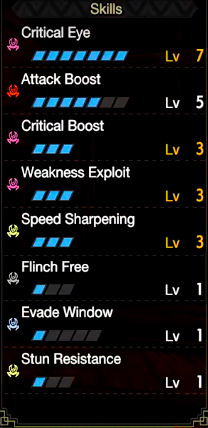
- Critical Eye
- Critical Boost
- Weakness Exploit
- Protective Polish
- Speed Sharpening
- Flinch Free
Decorations
After finishing off the Build, let’s take a quick peek at the types of decorations players will use up in the build.
The first decoration will be the Tenderizer Jewel 2, a Rarity 6 gem, and players will use three pieces. The Sharp Jewel 2 will be the next decoration used in the field, and players will typically use three pieces, too. The last four pieces to be used will be one Critical Jewel 2 piece, 1 Brace Jewel, 1 Expert Jewel 1, and three pieces of Grinder Jewels 1.
Tiger Blood ALL Out
Another amazing build option is the Tiger Blood All Out, which completely devastates all enemies in front of you. Anytime the player is in a fierce battle with the enemies, whether they are easier single-target mobs or one of the hardest end-game content to exist.
With a build that is solely focused on being as heavy-hitting as possible, it removes all aspects of “comfort”. It switches players’ direction to continue focusing on the highest damage output. It makes the build all the more interesting since players can go all out and equip more decorations to buff themselves up.
Weapon and Armor
The weapon players can reuse for the build will be the Tigrex Hammer, considering that this build is a heavier damage-focused version of the original Tiger Blood C build. For the armor pieces, the best options, as usual, will be the Kaiser Crown, and the Vaik Mail S.
The Kaiser Vambraces, Anjanath Coil S, and the Ingot Greaves S can be a solid option for the rest of the armor. Make sure to read our Monster Hunter Rise Sunbreak Best Armor sets if you want to know about more armor sets!
Skills
Let’s look at the skills players can use, keeping in mind that most of the same will be the same as usual:
- Critical Eye
- Attack Boost
- Critical Boost
- Weakness Exploit
- Speed Sharpening
- Flinch Free
- Evade Window
- Stun Resistance
Decorations
Players can use 3 Tenderizer Jewels 2, as I mentioned before. They can also use 3 Sharp Jewel 2 decorations, 1 Critical Jewel 2, 1 Brace Jewel 1, and the Brace Jewel, but only one piece from it. With that, they will also use 1 Expert Jewel 1, 3 Grinder Jewels 1, 1 Attack Jewel 2, and 1 Steadfast Jewel 1.
Raw and Blast Build
Lastly, let’s look at the Raw and Blast builds players can use. With the build being more focused on being a mid-game build rather than an end-game build, the weapons will have a higher base attack, which can obliterate foes.
The damage output will be comparatively higher compared to some low-ranking Hammer Build. With its overall high damage output, players can go on the battlefield and deplete enemies and murder them.
If it is compared to some other builds, rather than being focused on comfort-based builds, it will be only damage-focused. The main purpose of the build is to simply deal as much raw damage as possible when players are in the middle of being mid-game players and facing issues with higher HP opponents.
Weapon and Armor
For the weapon choices, perhaps the Mighty Souldevourer is an option that cannot be switched out simply because of its high base damage of the 310 attacks. The weapon’s sharpness is one of the winning points, and though it doesn’t have any affinity, it is still worth mentioning.
For the armor options, go for the Lunagaron Helm and the Jelly Vest. For the rest of the armor pieces, the Anjanath Vambraces are another option, alongside Rathalos Coil being used as well. Last but not least, the Ingot Greaves are good.
Skills
The skills that will be used will yet again be the same, except for a few exceptions:
- Attack Boost
- Critical Eye
- Weakness Exploit
- Slugger
- Stamina thief
- Blast Attack
- Earplugs
- Focus
Decorations
Last but not least, the decorations that can be used up will be that of 1 Attack Jewel 2, alongside 3 Expert Jewels 2.
Four more jewels/decorations will be used: 2 Critical Jewels 2, 1 Tenderizer Jewel 2, 1 Brace Jewel 1, and 3 Drain Jewels 1. Overall, the build can be insanely helpful while in the presence of enemies.
These were the top 5 best builds that can come in handy for early, mid, and end-game players. With that, we will wrap up our Monster Hunter Rise Sunbreak Hammer Build!
Build Inspiration and Photo Credit: Yokai Nox
Thanks! Do share your feedback with us. ⚡
How can we make this post better? Your help would be appreciated. ✍