 Fact Checked By
 Whether you own the latest Nvidia flagship RTX card or have an older GTX one, you’ll need to optimize its settings to get the most performance out of it. These Control Panel settings will boost general PC and gaming performance. Therefore, it’s about time you got familiar with all the options!
- Make sure to update your Nvidia GPU drivers for the latest performance improvements and new settings in the Nvidia Control Panel.
- Access the Nvidia Control Panel by right-clicking on the desktop and selecting the Nvidia Control Panel option.
- The most important settings to configure are in the 3D settings section.
- In the 3D settings, select the “Use the Advanced 3D image settings” option and apply changes.
- In the detailed 3D settings, turn off Image Sharpening, Anisotropic Filtering, FXAA, and Gamma Correction-Antialiasing for best performance.
To properly utilize the horsepower of your GPU, Nvidia Control Panel offers several features you can play around with. Each feature in the Nvidia Control Panel has its own use, and figuring out the right combination is a bit tiresome.
Lucky for you, we did a bit of research of our own and a heck of a lot of testing to bring you the best Control Panel settings there are. So, whichever Nvidia card you are rocking, this guide will unlock your GPU’s hidden potential and allow it to perform noticeably better in games.
Install The Latest Nvidia Drivers

You’ll need to open up the Nvidia Geforce Experience Application on your PC to check for updates. Here’s how you can do that.

- Click on the taskbar and expand it by clicking on the “^” icon.
- Right, Click on the Nvidia Logo and select “Nvidia GeForce Experience” from the context menu.
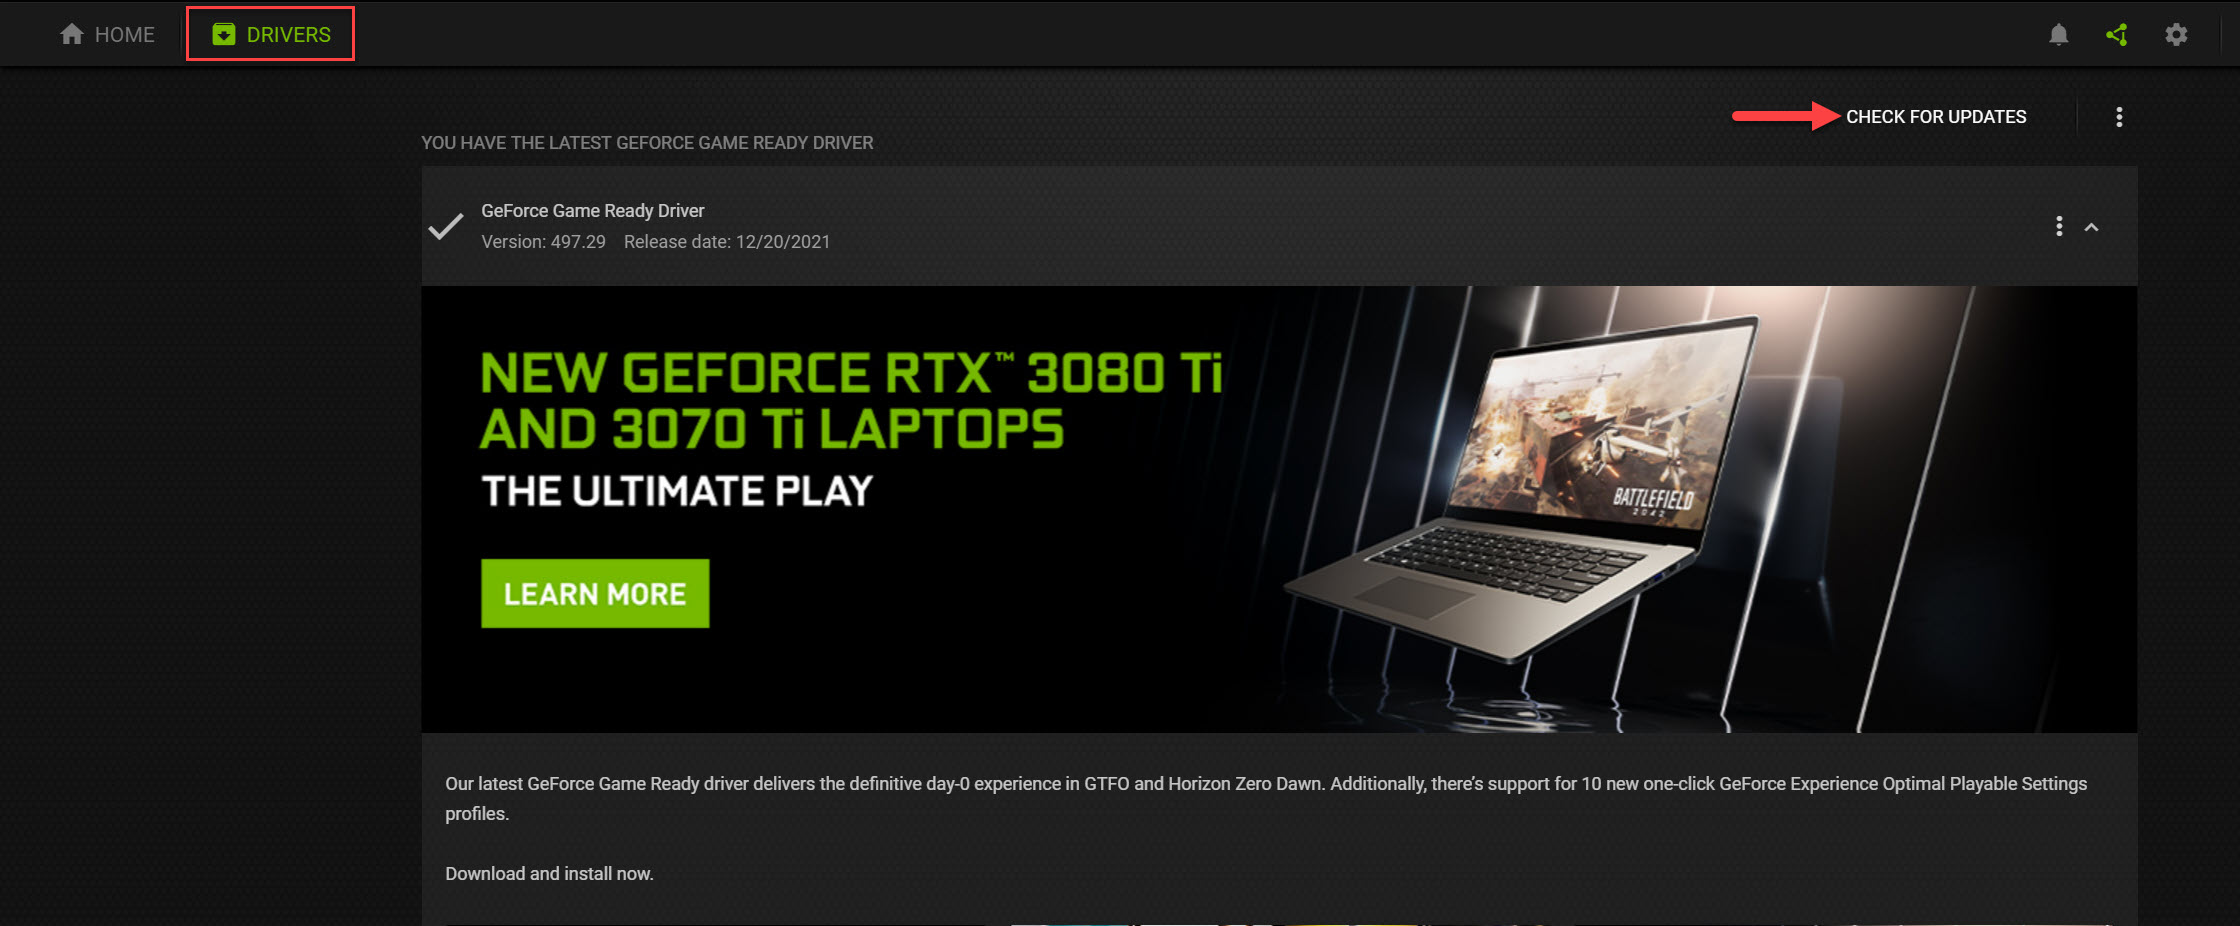
- Once you open Nvidia Geforce Experience, open the “Driver” tab. This will take you to the driver updating section of the Geforce Experience.
- Click on the “Check for Updates” option to see if you have any new updates for your Nvidia GPU. If you have updates, a button will prompt you to download it and later “Express Install” it. If it doesn’t show any new updates after the scan, it means you’ve already got the latest drivers.
After updating your Nvidia GPU drivers, let’s start applying the other Control Panel settings.
Best Nvidia Control Panel Settings
Now that we’ve updated the GPU driver to the latest version, it’s time to go through each setting in the Nvidia Control Panel and select the best ones. To access the Nvidia Control Panel, simply follow the steps below.
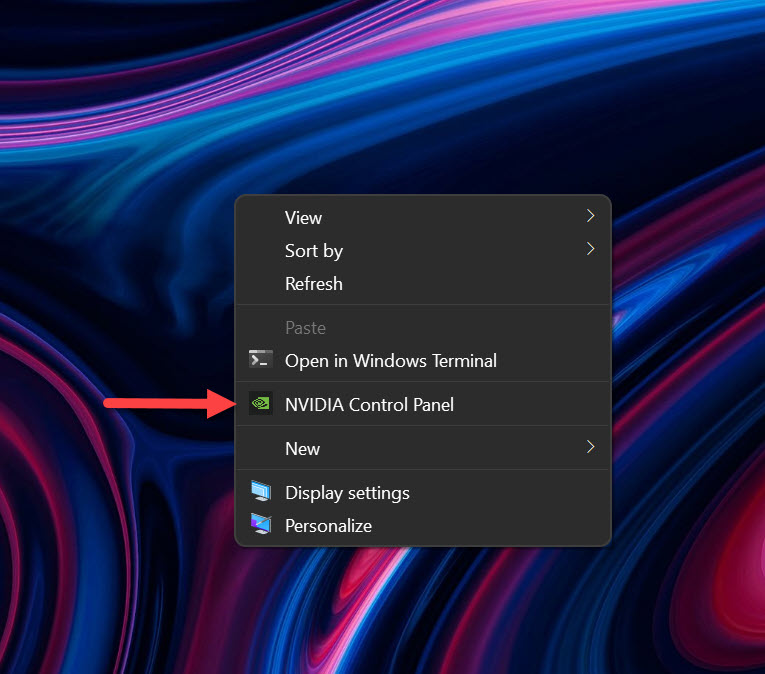
- To access the Nvidia Control Panel, you only have to “Right-Click” anywhere on the desktop.
- After the context menu has opened, select the Nvidia Control Panel option.
NOTE: Depending on if you’re on a laptop or desktop, some settings might be available to you while some won’t. So don’t worry if you can’t find a specific setting in your Nvidia Control Panel.
3D Settings
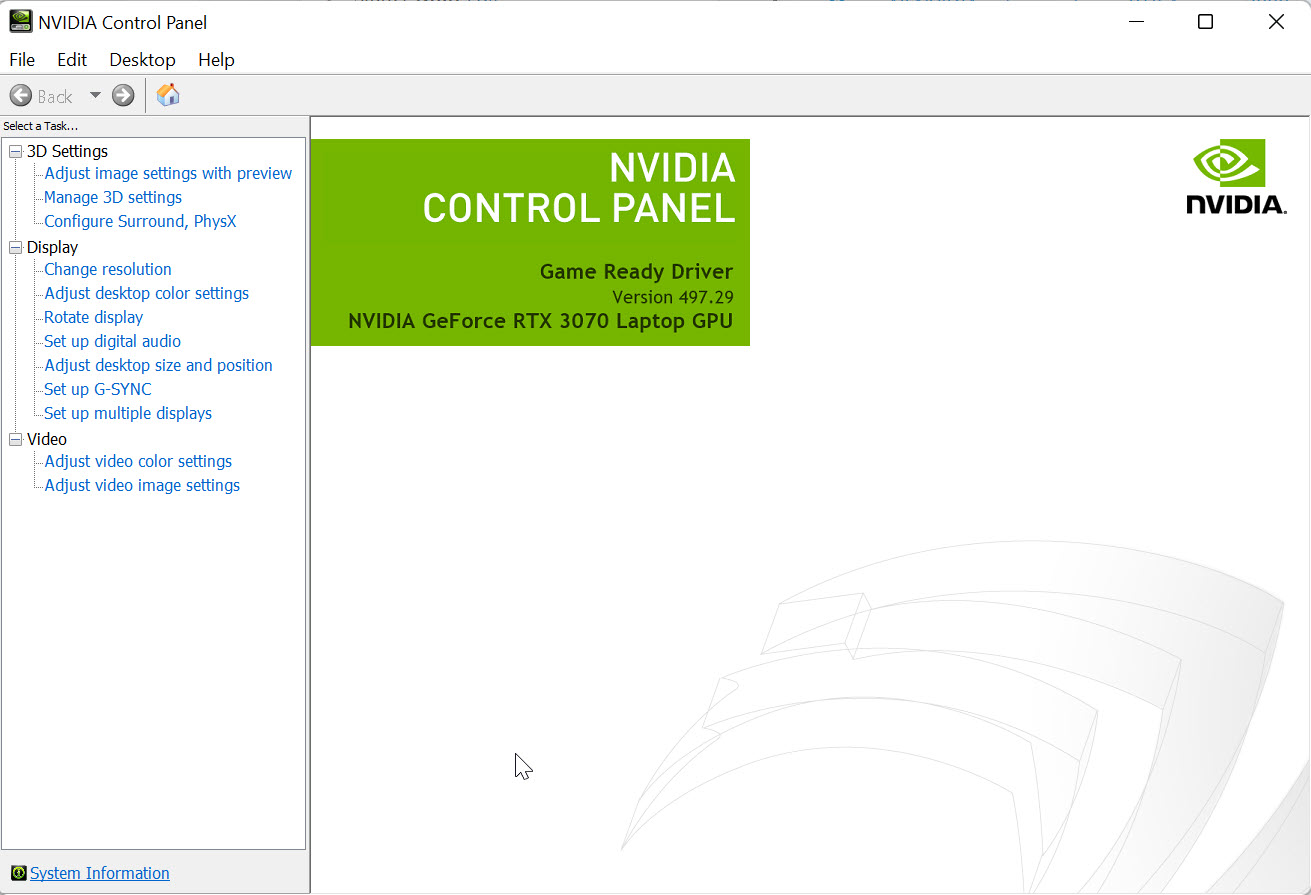
When you open the Nvidia Control Panel, 3D settings are the first row of settings that you’ll need to configure. This is the most important section to help you achieve optimal graphical performance in games.
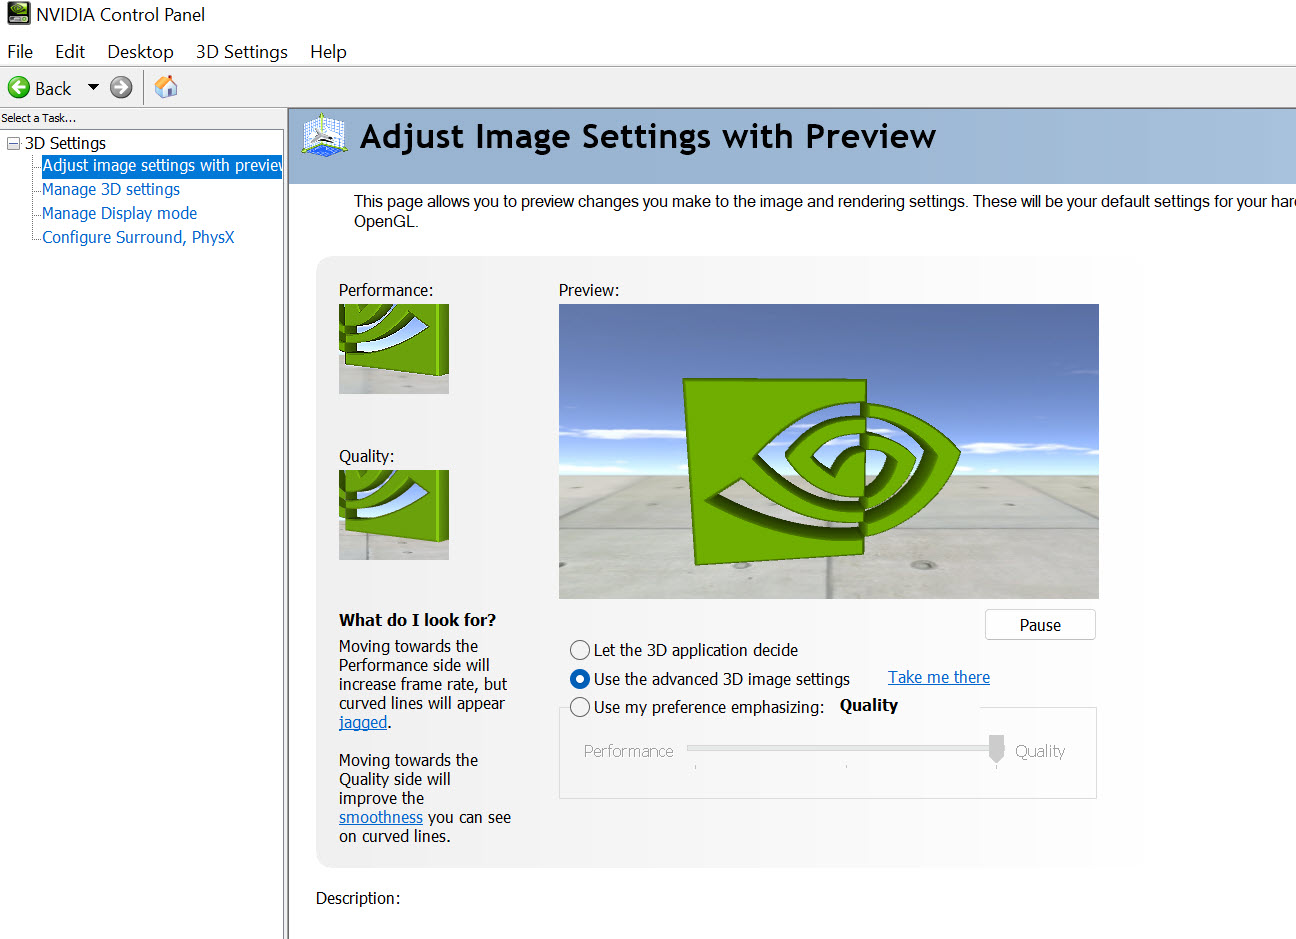
- Here, click on the first tab, and on the right, you’ll see Nvidia Icon spinning.
- Select the second option that says, “Use the Advanced 3D image settings.”
- After selecting the second option, apply the changes.
- Once you’re done, click the “Take Me There” option next to the second option to open detailed 3D settings.
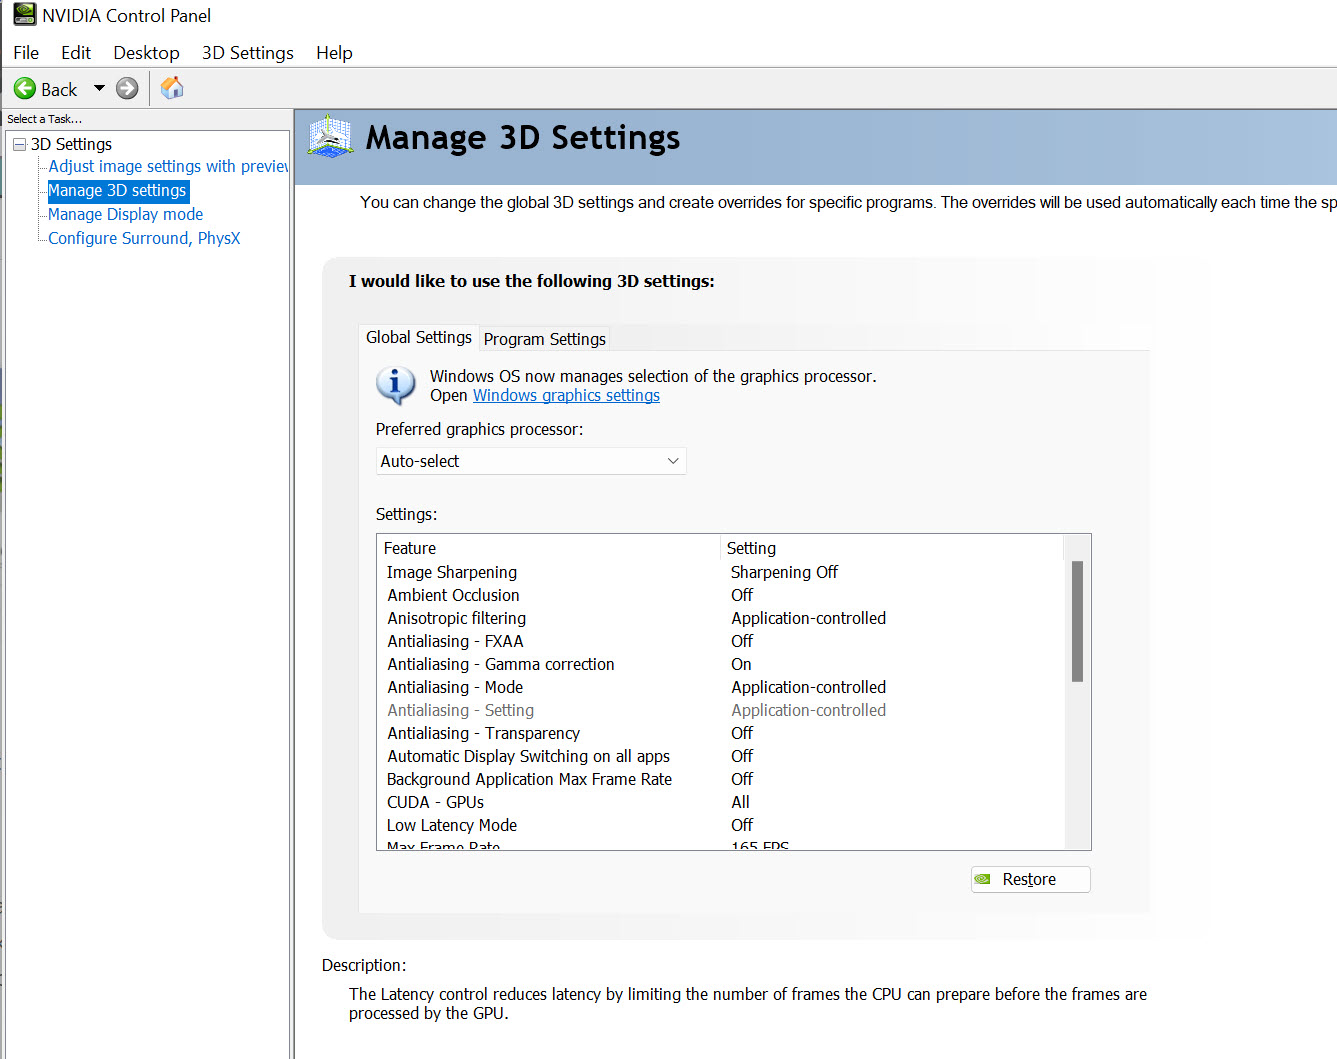
| Image Sharpening | Off |
| Anisotropic Filtering | Off |
| FXAA – Antialiasing | Off |
| Gamma Correction – Antialiasing | Off |
| Mode – Antialiasing | Off |
| Background Max Frame Rate | 20 |
| CUDA – GPUS | All |
| Low Latency Mode | Ultra |
| Max Frame Rate | Desired Value or Off |
| OpenGL Rendering GPU | Select GPU here |
| Power Management Mode | Prefer Max Performance |
| Shader Cache | Driver Default |
| Monitor Technology | Depends on Monitor |
| Multi-Frame Sampled AA (MFAA) | Off |
| Anisotropic Sample Optimization – Texture Filtering | On |
| Negative LOD Bias – Texture Filtering | Allow |
| Quality – Texture Filtering | High Performance |
| Trilinear Optimization – Texture Filtering | On |
| Threaded Optimization | Auto |
| Triple Buffering | Off |
| Vertical Sync | Off |
Image Sharpening: Off
Since we’re setting up a global setting, we don’t need to apply image sharpening across the board. If you want, you can individually apply sharpening to the games you want through program settings.
Anisotropic Filtering: Off
Anisotropic Filtering is an option that’s configured in the in-game settings. So, there’s no point turning it on in the global settings.
FXAA – Antialiasing: Off
Fast approximate anti-aliasing, or FXAA, is a great mode of anti-aliasing that helps you improve textures in-game at a lower cost. However, we don’t need to turn it on across the board. So, best to keep it off.
Gamma Correction – Antialiasing: Off
Turn Gamma Corrections off. It helps you improve image quality, specifically in OpenGL programs, which is why turning it on globally is a waste.
Mode – Antialiasing: Off
Similar to FXAA, set Antialiasing Mode to off, and these settings are best configured within the in-game settings.
Background Max Frame Rate: 20
If you Alt+Tab out of your games more often and want to save up some GPU power, then turn Background Max Frames to 20. This helps you limit the resources dedicated to your game when you minimize it, giving breathing room to your other tasks.
CUDA – GPUS: ALL
You should select all CUDA GPUs here.
Low Latency Mode: Ultra
Low Latency Mode is one of the most amazing features Nvidia provides to its GPU owners. It helps reduce latency in competitive games significantly without affecting FPS negatively. However, not every game requires this feature, so it’s best not to enable it globally.
Max Frame Rate: Desired Value or Off
If you want to cap your framerate in every application, use the Max Frame Rate feature. It’s a good alternative to V-Sync and simply caps your frame to your desired value, reducing tearing. It also helps you avoid pushing your GPU more than needed. You could disable it if you don’t want to cap your FPS in games.
Open GL Rendering GPU: Select GPU here
Select your GPU here if you ever want to run any OpenGL games. This way, all OpenGL games will run through your GPU for the best performance.
Power Management Mode: Prefer Max Performance
If you own a laptop, then leave this option as it is to avoid maxing out your GPU at all times. Instead, set power management to max only for individual games. However, if you want the best performance and all other concerns are secondary, set Power Management Mode to Prefer Maximum Performance.
It’ll ramp up your GPU and give you a noticeable boost in FPS. This will also solve any FPS drops that you’re experiencing.
Shader Cache: Driver Default
Leave this selection as it is. Compiling and storing the game’s shader data on your PC requires the Shader Cache.
Monitor Technology: Depends on Monitor
If you have a monitor with variable refresh rate technology, select G-sync here. If you don’t see this option and you’re on a laptop, chances are Intel Optimus is blocking this option, and there’s nothing much you can do to use Gysnc. Unless your laptop has a MUX switch or Advanced Optimus that will let you activate G-sync.
Multi-Frame Sampled AA (MFAA): Off
MFAA is Nvidia’s proprietary anti-aliasing technology that’s not very useful in most games. Turning it globally might negatively affect your PC’s performance so best keep it off.
Anisotropic Sample Optimization – Texture Filtering: On
Anisotropic Sample Optimization drastically improves the visual quality in games with no major performance impact. Turn it on for the best visual clarity and optimized game performance.
Negative LOD Bias – Texture Filtering: Allow
Set Negative LOD Bias – Texture Filtering to Allow for texture sharpening in games.
Quality – Texture Filtering: High Performance
Set the Texture Filtering – Quality option to high performance. As you can already tell, this will result in better performance in exchange for minor visual clarity. If you have a high-end PC, you can set this to Quality.
Trilinear Optimization – Texture Filtering: On
Turn on Texture Filtering – Trilinear Optimization to make textures sharper. This won’t only make textures better but also positively affect your gaming performance.
Threaded Optimization: Auto
The setting for Threaded Optimization is Auto. Maintain it that way to utilize multiple CPU cores. This guarantees reliable performance in video games.
Triple Buffering: Off
Since we’re not using V-Sync, we don’t need to activate Triple Buffering. So simply turn it off.
Vertical Sync: Off
Here, disable V-Sync because it limits the in-game frame rate to the refresh rate of your monitor. Turn on V-Sync in the game rather than the Nvidia Control Panel if you are experiencing screen tearing.
In the end, make sure to click on the “Apply” button to save all the settings.
That wraps up Nvidia’s best Control Panel Settings for managing the 3D settings section. These settings will give you improved performance on your PC. Other than these, there aren’t any more settings in the Control Panel you can tweak to increase performance.
If you’re on a desktop or using a laptop with a mux switch, you’ll have access to the following settings. Even though these settings don’t give you better FPS in games, they’re essential to optimize.
The latest gaming laptops have Intel Optimus or AMD’s smart access graphics features. A display controller called IGP essentially switches the workload between your integrated GPU and the dedicated GPU to favor efficiency or performance.
Now, whichever GPU is currently running an app on your laptop, its signal is passed through the IGP controller. This controller becomes a bottleneck and oftentimes limits the performance of your GPU.
What MUX switch does is directly let your display connect to the dedicated GPU, boosting performance and letting you use GPU-specific features. However, it’s a nightmare for battery life.
These settings can give you the best performance, but there might be game errors that you might need to tackle.
Changing Resolution In Nvidia Control Panel
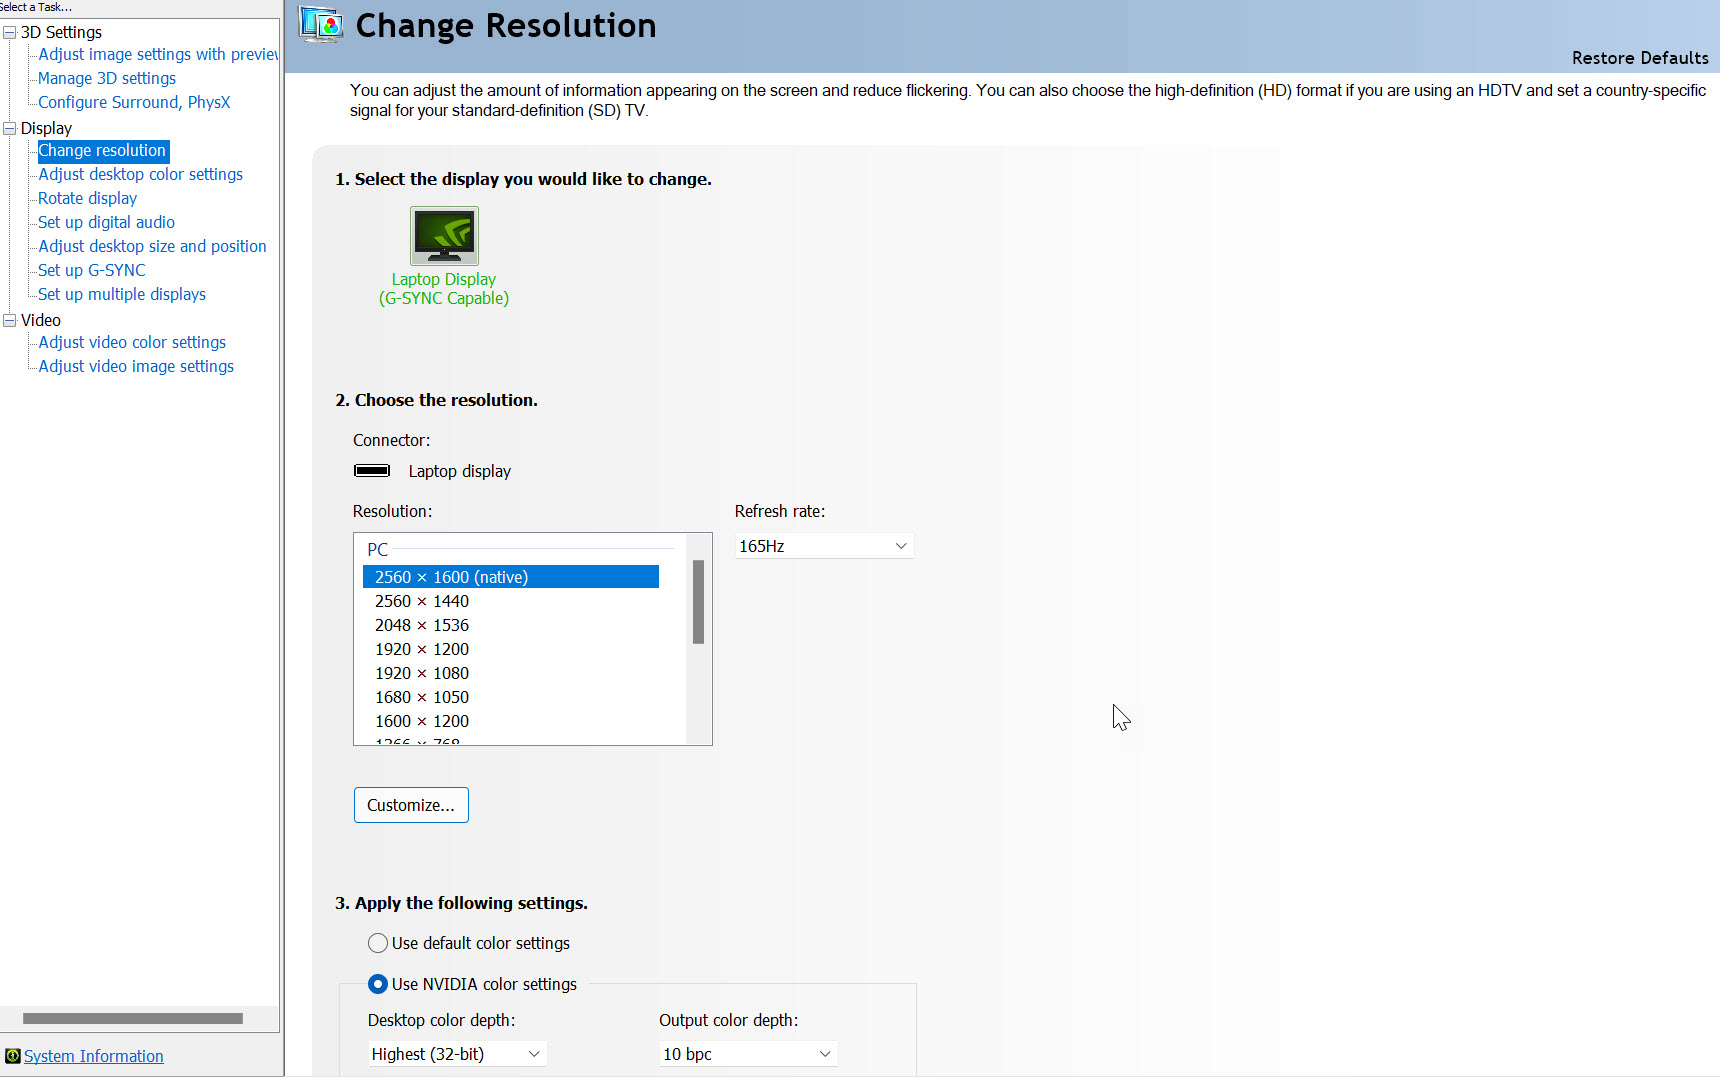
- Change the resolution to your monitor’s native resolution e.g. 1920×1080, 2560×1440, etc.
- In the refresh rate section, choose the highest value available.
- The “Customize” button will allow you to create custom resolutions. Leave this option for now unless you specifically need it.
- In the color settings, select “Use Nvidia Color Settings.”
- Select the “Highest (32-bit)” option in the Desktop Color Depth option.
- Set Output Color Depth to 10bpc.
- Click Apply to save changes.
These settings will mainly improve your display’s visual quality and improve color depth.
Set-Up G-Sync In Nvidia Control Panel
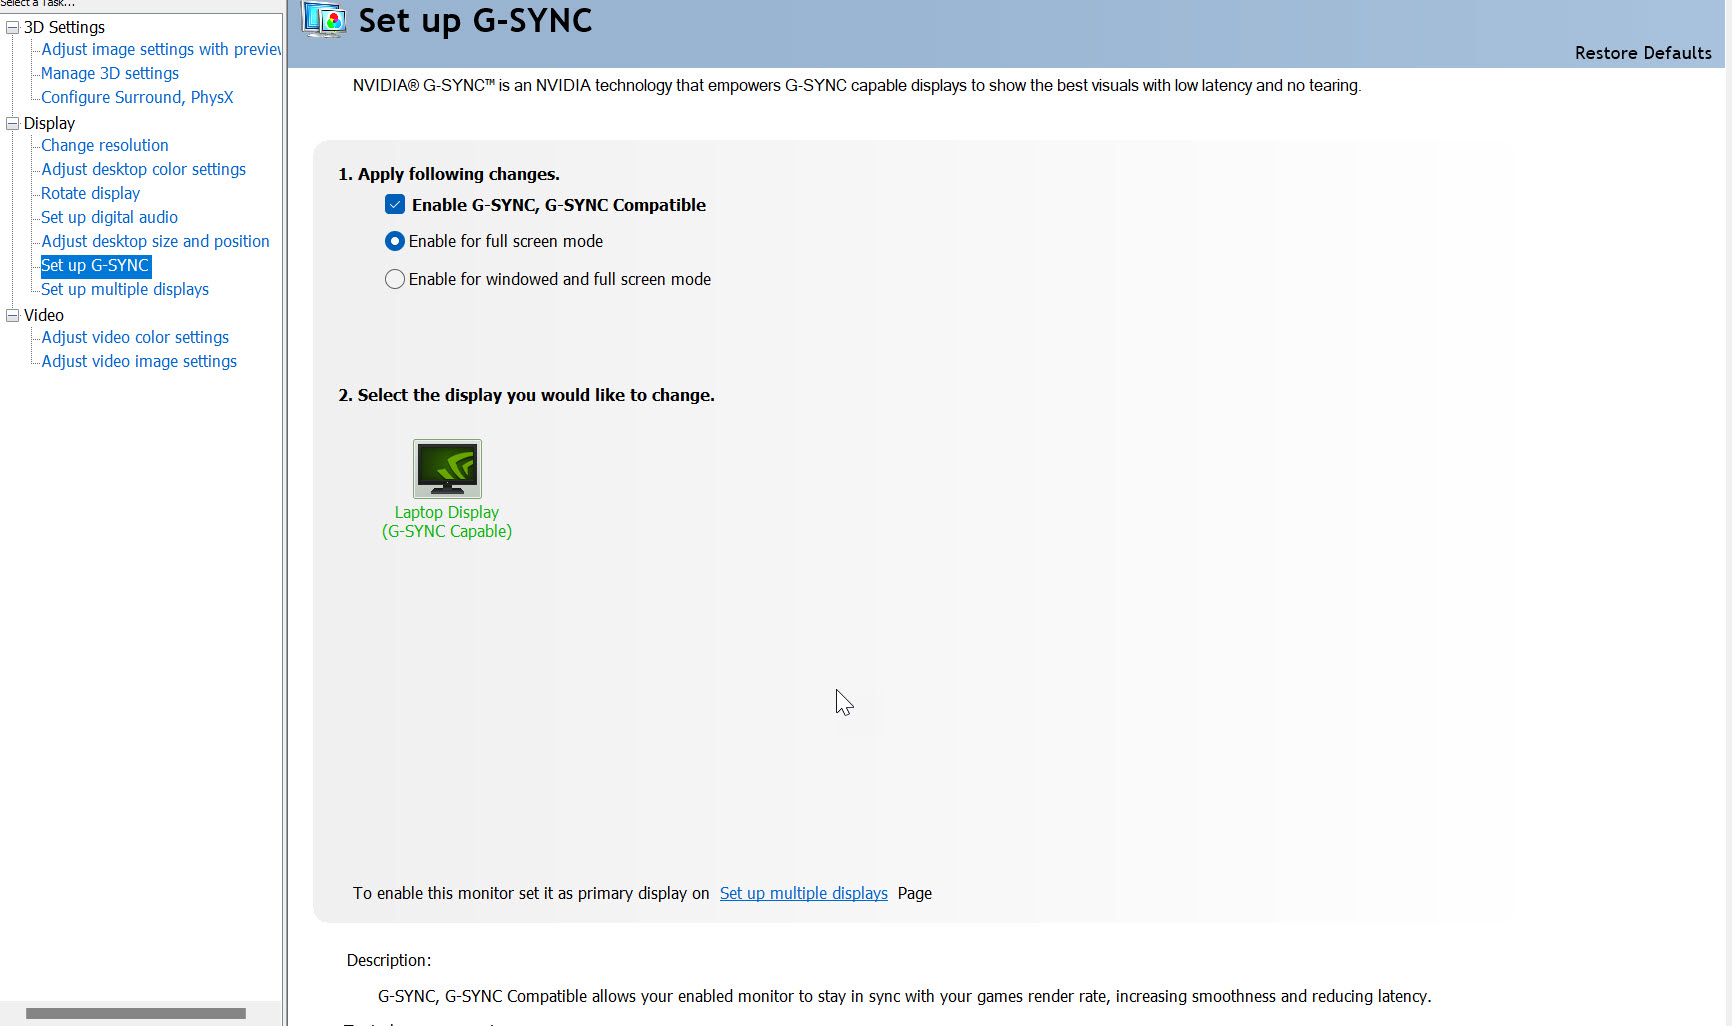
- Go to the Set-Up G-Sync tab on the Nvidia Control Panel sidebar.
- Select the “Enable G-Sync, G-Sync Compatible” option.
- If you mostly play your games in exclusive fullscreen mode, select the “Enable for Full-Screen Mode” option. If you’re also playing games in windowed or borderless windowed modes, select “Enable for windowed or full-screen mode.” This second option will enable G-Sync for all applications.
- Click Apply to save changes.
Nvidia Control Panel is an amazing place where you can freely tweak several options according to your preferences. The settings conveyed in this guide were thoroughly tested and results showed visible FPS improvement in games. However, your mileage may vary.
FAQs About Nvidia Control Panel Settings
You don’t have to download the Nvidia Control Panel separately as it comes packaged with your Nvidia GPU driver package. After you install drivers, simply restart your PC and right-click on the desktop to see Nvidia Control Panel option.
The reason you see limited Nvidia Control Panel settings is that you’re on a laptop whose display is connected to an integrated GPU (i.e. Intel UHD 6xx, etc.) You’ll have access to other settings only if either you’re on a PC or your laptop has a mux switch. A Multiplexer (MUX) switch disables Optimus and connects your laptop’s display directly to Nvidia GPU. This not only gives you a 15-20% boost in performance but also gives you complete control of Nvidia Control Panel settings
Not at all. Nvidia Control Panel and Geforce Experience are two separate software that comes with your GPU drivers.
Thanks! Do share your feedback with us. ⚡
How can we make this post better? Your help would be appreciated. ✍
Thanks!
nice tips and easy to follow
Nicely done my friends, I now have things tweaked to perfection!
Thank you for this, it helped A LOT!!! :)
THX VERY MUCH
DSR was not mentioned.
Great
Thankyou. Very clear and easy to follow instructions for a beginner like me
Great information!
Love you ❤️
I could not believe the enhanced graphics awesome
Awesome guide! easily understandable and simple to do, thank you!
topp
best
Good
Great advice Thank you
was easy to follow
thanks for the help, : ]
thank you so much for your wonderful helps
Learned something new, cheers.
Thanks! Everything has worked like I want it to so far!
Clear and Concise. Totally Helpful, Thank you!
Thanks a lot!
Very helpful.thanks.
very cool, helped a lot
Thank you
very helpful...many thanks
good job
helped me improve my game settings a lot!
Really Great!
Actually a useful straight to the point guide, thanks
Didn\'t know these settings did so much goodness
Amazing, works a treat on Lenovo Legion Laptop.
Ty
Thanks
very helpful and thorough steps for maximizing your performance
Thanks for this, I\'ve needed it.
Thank you very much
Thank you, very helpfull
Thanks!
mark setting for pc and laptop
Mor FPS Thanks
GoodWork
thanky
THANK YOU so much. I had no idea what to do in Nvidia Control Panel
Thanks for an indepth guide on NVIDIA settings.
Thank you. i dont know why the Control Panel is too tough to maneuver through
NICE