Overwatch 2 offers many changes compared to the previous version, including new character designs, brand-new maps, and modes. Each class in the game has a distinctive play style. It is important to know about the setup of the game, so we have covered the Best Overwatch 2 Controller Settings in this guide.
- Overwatch 2 will offer you the best in-game shooting experience if you know the best controller settings.
- You can adjust Aim, Gyro, and Reticle settings differently based on your preferences or by noticing what you are most comfortable with.
- As far as it depends on the user’s preferences, there is no doubt that a keyboard and mouse are a far better option for playing Overwatch 2.
- Why Trust Us: Usama Qaisar has spent 800+ hours on Overwatch 2 which is why he has managed to test out multiple controller settings!
Best Controller Settings
Some players prefer playing Overwatch 2 using a controller. Along with mastering your character, you need to have the best settings, especially using a controller. Personal Preferences play a huge role in determining the best settings for players.
Since it is a fast-paced shooter game, it can be tricky to decide on the controller settings. We have categorized the controller settings into the following three types.
- Aim Settings
- Gyro Settings
- Reticle Settings
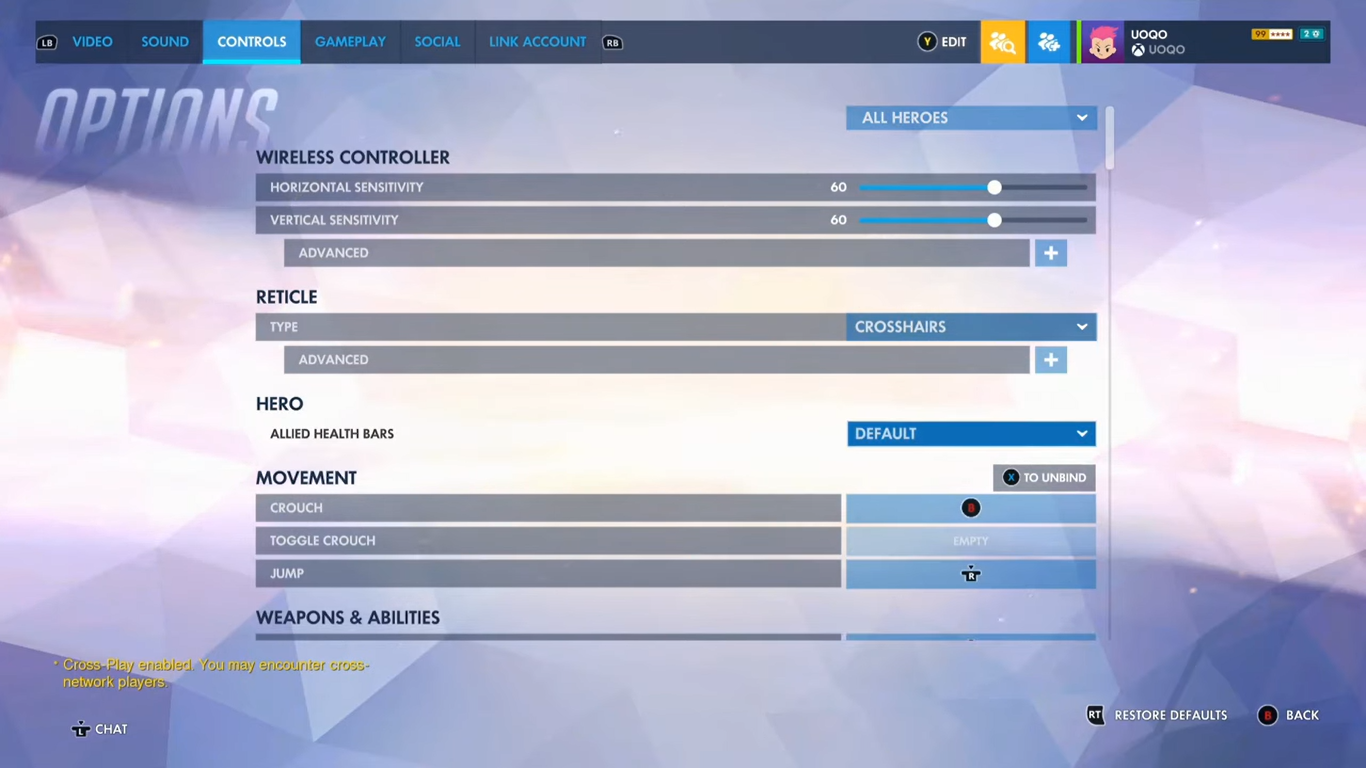
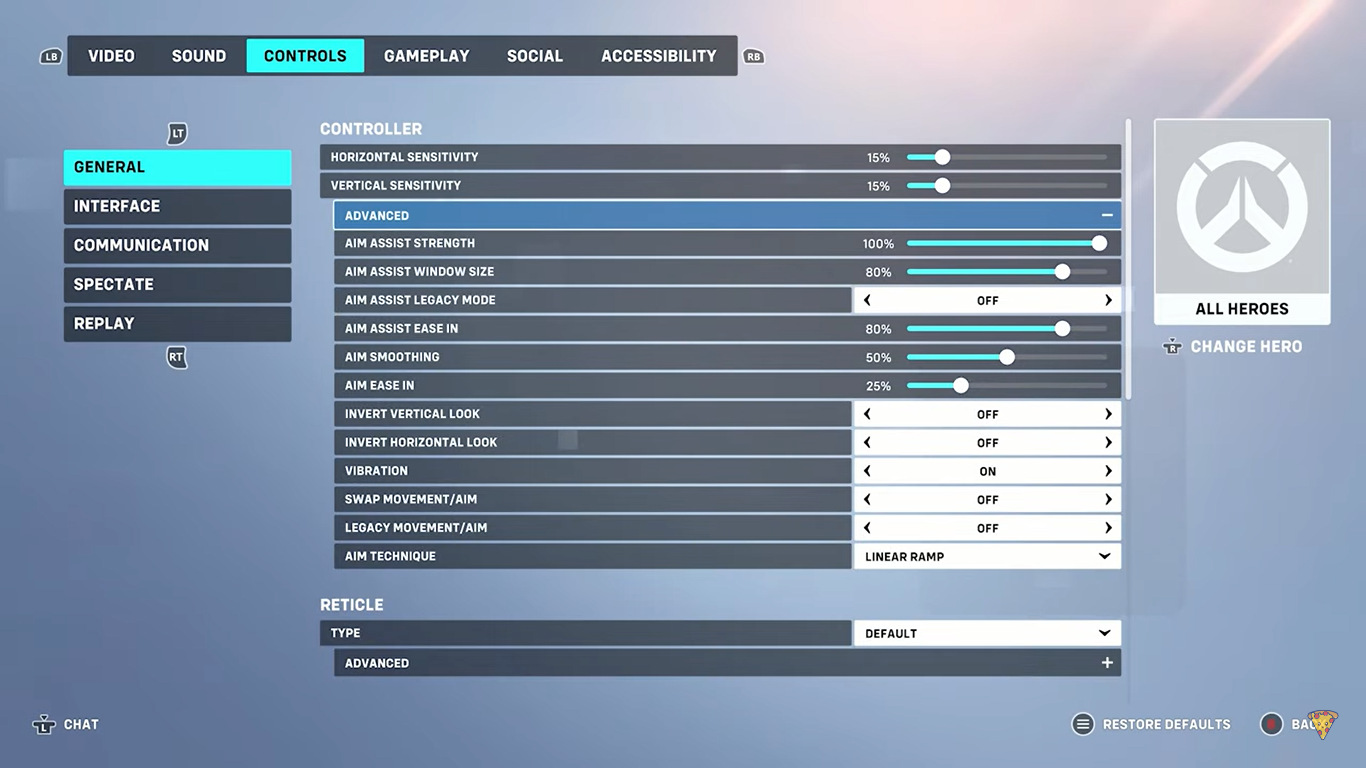
Aim Settings
Aim settings should have vertical sensitivity lower than the horizontal sensitivity in Overwatch 2. This is because you will be able to aim at enemies much smoother, even from different heights and angles.
Horizontal sensitivity should be 65, and vertical sensitivity should be 45 for a better outcome of the controller use. However, horizontal sensitivity can g up to 90, and vertical sensitivity can go up to 70 or above. We have mentioned the advanced aim settings in the table below to help you pick the best aim settings.
| Advanced Settings | Explanation |
| Aim Ease-In | 0-20 |
| Aim Smoothing | 95 |
| Aim Assist Ease-In | 0-20 |
| Aim Assist Window Size | 70 |
| Aim Assist Legacy Mode | Off |
| Aim Assist Strength | 100 |
| Aim Technique | Linear Ramp or Dual Zone |
| Invert Horizontal Look | Off |
| Invert Vertical Look | Off |
| Legacy Sticks | Off |
| Switch Movement and Look Sticks | Off |
| Vibration | On or Off (Preference) |
It is important that you make the most out of Aim Assist using the Controller. If you set Aim Assist on 100, Aim Assist Ease-In, and Aim Assist Ease on 0-20, you will be able to get your target a lot faster than on any other settings.
You will be required to act with more precision while using Linear Ramp. If you are not confident with your aims and their precision, you can use Dual Zone, as it will be more efficient for you.
Gyro Settings
Gyro Settings are very diverse and flexible, so you can use our guide provided below to begin using these settings. However, playing around with settings is best, and see what fits best for your playstyle by exploring various options and combinations.
You should know that Gyro settings are for players who prefer playing on the Nintendo Switch with motion controls, so use these settings only if you plan to play on Nintendo Switch. The general Gyro settings require you to turn on Gyro Aiming and Gyro Aiming Aim Assist while keeping Gyro option presets on Custom.
We have highlighted the advanced Gyro Settings in the following table to assist you unless you find suitable settings for yourself.
| Advanced Settings | Explanation |
| Disable Gyro While Using Stick | On |
| Gyro-Aiming Pitch Axis Sensitivity | 0 |
| Gyro-Aiming ROLL Axis Sensitivity | 30 |
| Gyro-Aiming YAW Axis Sensitivity | 75 |
| Invert Gyro-Aiming Pitch Axis | Off |
| Invert Gyro-Aiming Roll Axis | Off |
| Invert Gyro-Aiming YAW Axis | On |
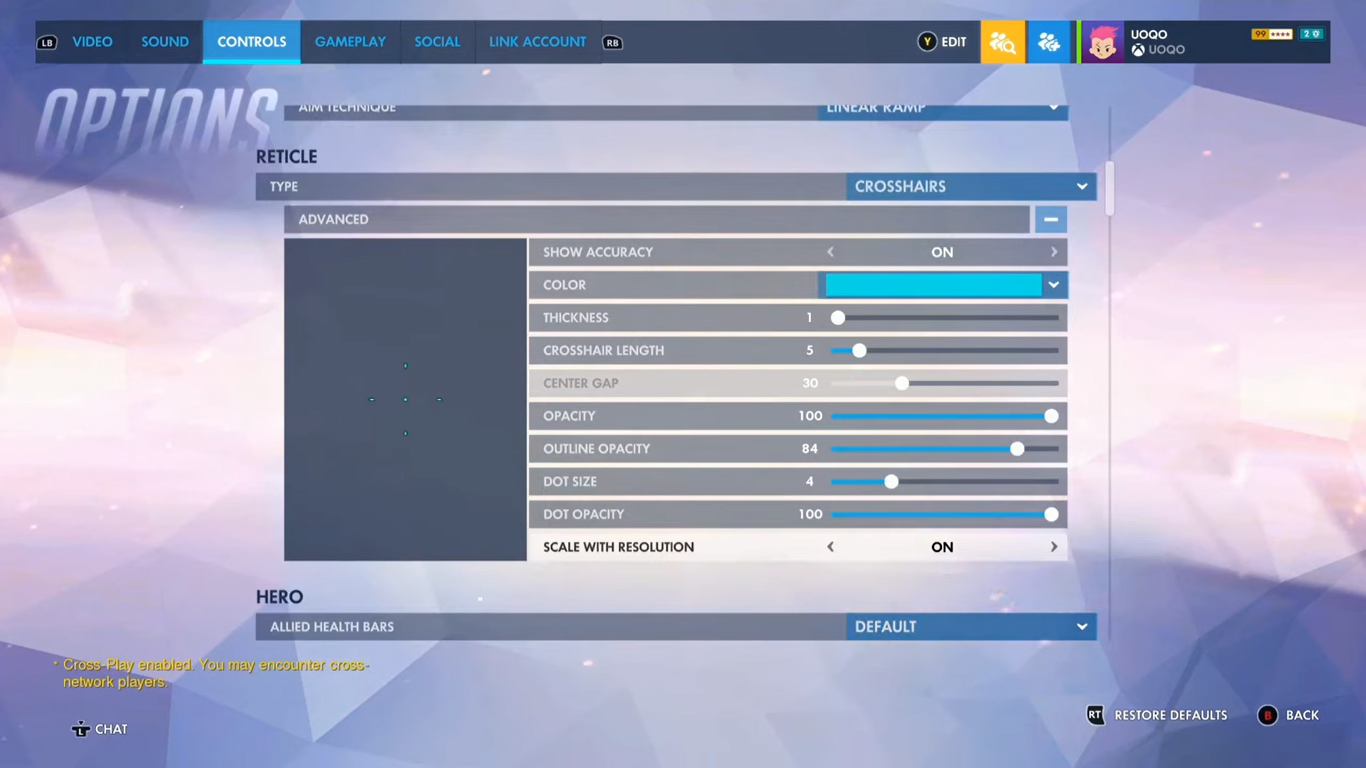
Reticle Settings
Reticle settings are crosshairs, and it depends on you to decide the color, thickness, length, and various other features of crosshairs. It is recommended to keep the crosshair smaller than the default, as you will be able to aim better using this. We have listed a few settings below that you need to adjust for the crosshair.
- Color
- Center Gap
- Crosshair Length
- Dot Size
- Dot Opacity
- Show Accuracy
- Scale With Resolution
- Thickness
Functions Of Specific Settings
We have listed the functions of deciding specific settings in the game Overwatch 2, so you customize these settings accordingly.
Aim Assist Strength
You will still need aim assistance no matter how strong or best your aim is. The higher the strength of the aim assists, the more advantages it will offer. With time, you will be able to get the hang of it more efficiently.
Aim Ease In
Aim Assist sometimes feels a bit unnatural, so you need to smoothen this transition using Aim Ease In. It will assist you in getting rid of this snappy feeling you will encounter after enabling Aim Assist.
Vibration
The vibration setting is there to enhance your experience during an intense game. Sometimes, it will not be of great help, as you will lose your focus while landing an intense shot. However, you can give it a try while playing PvE game modes.
Controller Key Bindings
If you plan to use a controller instead of a mouse or keyboard, you also need to have an idea of controller key bindings.
| Keys | Actions |
| Aim | Right Analogue Stick |
| Fire Primary | Right Trigger |
| Fire Secondary | Left Trigger |
| Jump | South Face Button |
| Crouch | East Face Button |
| Melee | Right Stick Click |
| Ping | Left D-Pad |
| Movement | Left Analogue Stick |
| Secondary Ability | Right Bumper |
| Swap Weapons | Right D-Pad |
| Primary Ability | Left Bumper |
| Ultimate Ability | North Face Button |
| Reload | West Face Button |
Disadvantage Of Controller Over A Keyboard And A Mouse
As far as it depends on the user’s preferences, there is no doubt that a keyboard and mouse are far better options for playing Overwatch 2. A mouse will allow you to have better aims, specifically precise aims. You will have your wrist translation directly on the screen.
On the contrary, you will be required to translate your aiming movements through an analog stick in the case of a controller. It means there are more chances to miss your aims in the case of the controller.
Simply, you can pick what suits your playstyle the best, as many players find it easy to play using a controller, as it offers an in-game feel during an intense fight. If you find the best controller settings, you can play even more precisely than the mouse.
The game features many new modes you can play using multi players. However, the game remains relatively similar to the previous version. Also, consider reading our guide on Overwatch 2 Changes From The First Game to learn how different the new version or watch our video on the subject:

Summary
The game offers the best game modes to have the best shooter experience, but it is extremely important to know its controller settings. W have discussed all the controller settings you need to know for Overwatch so that you can make the best use of a controller. Use the above guide to start your journey of using a controller, but you can always customize your settings according to your preferences.
Next: Overwatch 2 Beta Login Error
Thanks! Do share your feedback with us. ⚡
How can we make this post better? Your help would be appreciated. ✍