God of War Ragnarok and its nine realms offer an enticing storyline with multiple chapters to get through, after which players can access a few locations on the map that were otherwise not available. Players might need help figuring out God of War Ragnarok How To Get To Sanctuary Grove since it does have quite a few prerequisites!
- The Sanctuary Grove is an end-game location in God of War Ragnarok.
- Players must complete all main missions to unlock access to the grove.
- An interaction with Ratatoskr involves hitting a charm to progress further.
- To unlock the mystic gateway in the Sanctuary Grove, players need a realm seed.
- Located in the Midgard area, the Sanctuary Grove is one of the nine realms in the game.
Unlocking Sanctuary Grove
Sanctuary Grove is located within the realm of Midgard, one of the nine realms accessible during the main storyline. To find it, go to Sindri’s house and locate the mystic gateway. From there, you can hover over the nine realms and select Midgard as your destination.
Once you exit the animation, the mystic gateway will deactivate, allowing you to freely explore Sanctuary Grove and its mysteries.
- Locate Midgard: Visit Sindri’s house and find the mystic gateway. Choose Midgard as your destination.
- Follow the Path: After the animation, turn towards Sindri’s house, then head left along the wooden path with purple and blue grass patches.
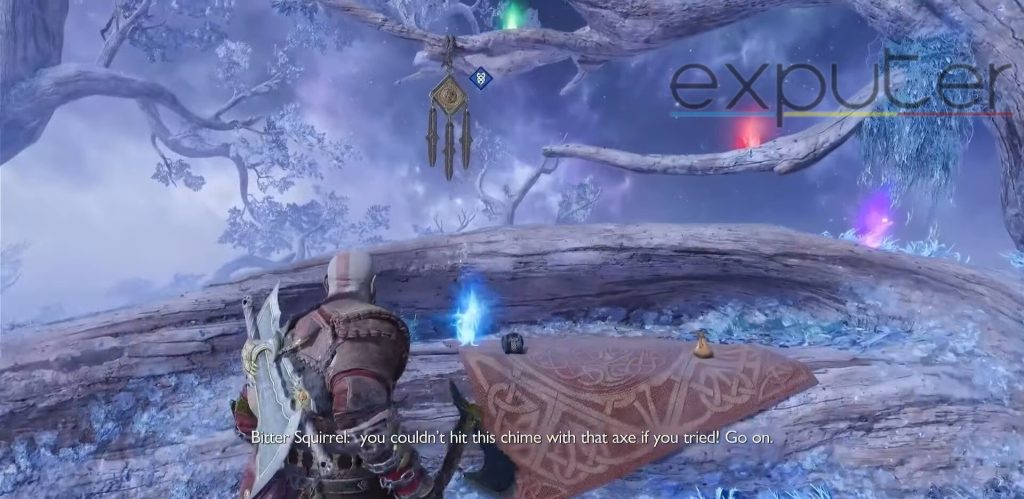
- Encounter Bitter Squirrel: Proceed until you reach a giant tree. Along the way, a bitter squirrel will challenge you to hit a chime with your axe.

Talking To Bitter Squirrel (Image Credits Exputer) - Hit the Chime: Aim your axe at the charm with a blue quest marker and throw it to make a ringing sound.

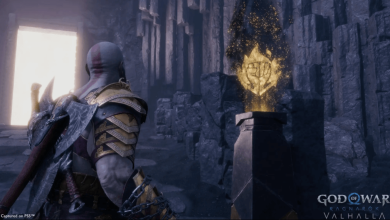
Chime On Tree (Image Credits Exputer) - Interact with Ratatoskr: Approach Ratatoskr and receive realm seeds as a thank-you for saving him.

Interacting With Ratatoskr (Image Credits Exputer) - Acquire Pouch of Yggdrasil Seeds: Interact with the black-blue pouch on the mat near Ratatoskr to obtain the seeds, essential for unlocking mystic gateways.

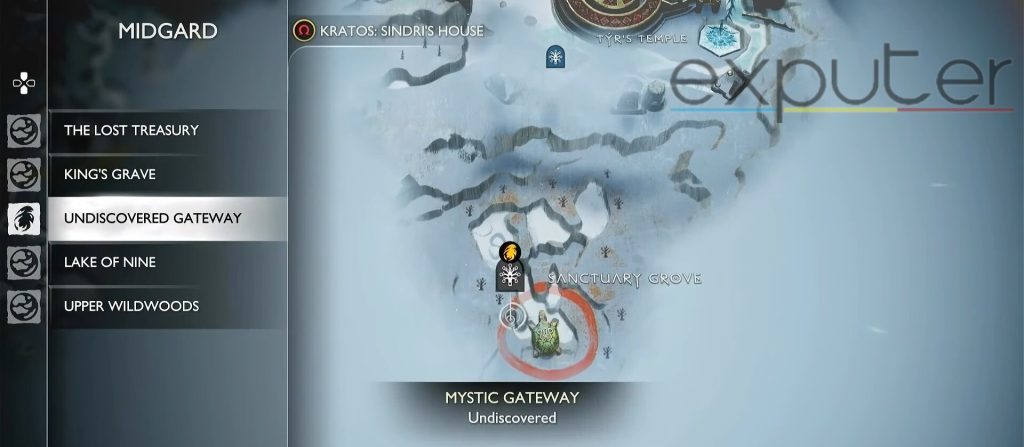
Pouch Of Seeds (Image Credits Exputer) - Return to Mystic Gateway: Head back to the mystic gateway, assemble the stones, and open the map to locate Sanctuary Grove.

Heading Back To Gateway (Image Credits Exputer) - Discover the Gateway: Find the Sanctuary Grove location marked by a red circle on the Midgard map. Discover the gateway and confirm to establish a pathway to Sanctuary Grove.


Sanctuary Grove Area

To reach Sanctuary Grove:
- Enter the mystic gateway after assembling it.
- Proceed a few steps inside the gateway to reveal a white misty door.
- Pass through the misty door, and you’ll arrive in Sanctuary Grove, surrounded by snow.
- Follow the main stone pathway, which is not covered in snow but may be slippery.
- As you walk, Freya will ask if you’re returning to Chaurli, and Kratos will respond with a simple “yes.”
- Continue along the pathway, which will have a few tilting stones. Freya will express concern about Chaurli, and Kratos will reassure her with a “No.”
- Look to the left, and you’ll see a giant tree trunk blocking the snowy path. Freya will hop over it, and you can follow suit by having Kratos jump over the trunk.
- Keep following Freya along the snowy path, which features orange patches of grass and a tall, giant turtle sculpture if you look up.
- Eventually, you may hear Freya softly say, “Chaurli…” She’ll stand in front of the giant turtle sculpture and apologize to it for neglecting it.
Collectibles
In Sanctuary Grove, you can collect a flower called Mirkweed. Here’s how to get it:
- Enter Sanctuary Grove through the mystic gateway and follow the snowy pathway downhill with Freya.
- Jump over the first dislodged branch blocking your path.
- Continue down the snowy pathway until you reach a point where Freya stands in front of a giant turtle sculpture and interacts with it.
- Beyond this point, you’ll see a shining item buried in the snow at the end of the path.
- Approach the item and press the triangle button on your controller to interact with it.
- Freya will pick up the item, which is the Mirkweed flower.
- This flower is part of the favor “Nine Realms in Bloom,” which involves finding flowers in all the realms.
Collecting the Mirkweed flower in Sanctuary Grove is one step closer to completing the Nine Realms in Bloom favor.
Prerequisites
Last but not least, let’s briefly skim through the prerequisite objectives that players need to do in previous chapters in order to get to Sanctuary Grove.
Chapter One
In chapter one, the following objectives will be found.
| Obj. No | Objectives |
| 1 | Head Home |
| 2 | Track Atreus |
| 3 | Defeat Bjorn |
| 4 | Return home with Atreus |
| 5 | Defeat Thor |
| 6 | Return home with Atreus |
| 7 | Follow Atreus into forest |
| 8 | Defeat THe Huntress |
| 9 | Follow Atreus Into the forest again |
| 10 | Return home |
| 11 | Follow Sindri |
Chapter Two
In chapter two, these objectives can be found.
| Obj. No | Objective |
| 1 | Journey to Nidavellir |
| 2 | Explore the area |
| 3 | Boat to Durlin’s office |
| 4 | Exit Durlin’s office to the port |
| 5 | Reach the mind beyond the mountain |
| 6 | Reach the front of the train that is broken |
| 7 | Defeat Dreki |
| 8 | Reach the front of the train that is broken |
| 9 | Fix the broken train |
| 10 | Ride the train towards the mines |
| 11 | Search the mines in search for Tyr |
| 12 | Pursue Tyr |
| 13 | Exit the mines with Tyr |
| 14 | Escape through the mystic gateway |
Chapter Three
As for chapter three, these objectives will be required to be beaten.
| Obj. No | Objective |
| 1 | Enter the mystic gateway |
| 2 | Speak to Jormungandr |
| 3 | Head back towards the mystic gateway |
| 4 | Speak to Freya |
Chapter Four
Now when it comes to chapter four, these objectives can be found.
| Obj. No | Objective |
| 1 | Reach Groa’s shrine which is at the top of the temple |
| 2 | Descend the Light Well |
| 3 | Defeat Alva |
| 4 | Descend the light well |
| 5 | Make your way to the mystic gateway |
Chapter Five
Moving onto chapter five, it will lead players further into knowing God of War Ragnarok How To Get To Sanctuary Grove with these objectives.
| Obj. No | Objectives |
| 1 | Explore the Ironwood area with Angrboda |
| 2 | Meet Angrboda at the shrine area |
| 3 | Help Angrboda with the “giant stuff” |
| 4 | Follow Angrboda throughout the canyon area |
| 5 | Head back to Jalla |
| 6 | Investigate the hidden pathway |
| 7 | Clear the Wretches from the sinkhole |
| 8 | Climb back up towards the surface |
| 9 | Head home through the marshes |
| 10 | Free the wolf from Gryla’s grip |
| 11 | Free the wolf |
| 12 | Defeat Gryla |
| 13 | Go back to Angrboda’s home |
| 14 | Explore the treehouse. |
Chapter Six
As for chapter 6, the following are the objectives that need to be done.
| Obj. No | Objectives |
| 1 | Meet Brok at the gateway |
| 2 | Locate the source for the curse put on Freya |
| 3 | Speak to Freyr |
| 4 | Continue to seek the curse source |
| 5 | Defeat the forest ancient |
| 6 | Continue to find more info on the curse |
| 7 | Cross the valley in order to reach the watchtower |
| 8 | Find a way to cross the bridge that is broken |
| 9 | Press onward for the curse |
| 10 | Defeat Fiske |
| 11 | Press onwards |
| 12 | Defeat the Nidhogg |
| 13 | Return to Freyr’s camp |
| 14 | Retrieve Mimir |
| 15 | Depart Freyr’s camp. |
Chapter Seven
To clear chapter 7, the following are the objectives that need to be done.
| Obj. No | Objectives |
| 1 | Find shelter |
| 2 | Investigate Freya’s abandoned house |
| 3 | Light a fire to help Chaurli |
| 4 | Follow the raven that belongs to Odin |
| 5 | Climb the wall |
| 6 | Follow Heimdall and go in order to meet Odin |
Chapter Eight
To complete chapter 8, the following are the objectives that need to be done.
| Obj. No | Objectives |
| 1 | Search for the Mask Fragment |
| 2 | Investigate the shrine of Surtr |
| 3 | Resume the search for the mask fragment |
| 4 | Go back to the quarters that belong to Atreus |
Chapter Nine
As for chapter 9, the following are the objectives that need to be done.
| Obj. No | Objectives |
| 1 | Travel to midgard |
| 2 | Find that wolves that are at the kennel |
| 3 | Open the gate |
| 4 | Follow the wolves toward the Norns |
| 5 | Continue tracking the Norns |
| 6 | Return to the wolves |
| 7 | Find the Norns that are the well of Urd |
| 8 | Defeat the Frost Phantom |
| 9 | Find the Norns again |
| 10 | Leave the Norns |
Chapter Ten
To complete chapter 10, the following are the objectives that need to be done.
| Obj. No | Objectives |
| 1 | Find a path toward the surface |
| 2 | Head to the forge with the help of Brok |
| 3 | Destroy the nightmare haunt |
| 4 | Ride the lift up |
| 5 | Repair the switch |
| 6 | Forge the weapon |
| 7 | Find a path downwards from the mountain. |
Chapter Eleven
To clear chapter 11, the following are the objectives that need to be done.
| Obj. No | Objectives |
| 1 | Find the last mask fragment |
| 2 | Find a way back to Asgard |
| 3 | Find Odin and explain everything |
| 4 | Return back to Atreus’ quarters. |
Chapter Twelve
To clear chapter 12, the following are the objectives that need to be done.
| Obj. No | Objectives |
| 1 | Approach Ratatoskr |
| 2 | Find Garm in Helheim area |
| 3 | Pursue Garm further |
| 4 | Defeat Garm |
| 5 | Leave Helheim |
| 6 | Run! |
| 7 | Keep going after Garm |
| 8 | Return back tot the mystic gateway |
Chapter Thirteen
Moving on, for chapter 13, the following are the objectives that need to be done.
| Obj. No | Objectives |
| 1 | Find Skoll and hati |
| 2 | Recover the moon that is stolen |
| 3 | Go after the Einherjar Thief |
| 4 | Return back to Skoll and Hati |
| 5 | Return back to Freyr’s camp |
| 6 | Beat the two Dreki |
| 7 | Go back to the camp |
| 8 | Rescue Freyr from the Einherjar |
| 9 | Beat Gulltoppr |
| 10 | Beat Heimdall |
| 11 | Regroup with Freyr’s allies |
| 12 | Escape back from the prison |
Chapter Fourteen
As for chapter 14, the following are the objectives that need to be done.
| Obj. No | Objectives |
| 1 | Seek out Huginn in Midgard |
| 2 | Speak to the All-father |
| 3 | Find Thor |
| 4 | Go back to find the last mask fragment |
| 5 | Defeat the Frost Ancient |
| 6 | Finally, find the mask fragment |
Chapter Fifteen
Now onto the next one, for chapter 15, the following are the objectives that need to be done.
| Obj. No | Objectives |
| 1 | Hunt with Atreus |
| 2 | Find Sindri |
| 3 | Return home and prepare for the war |
Chapter Sixteen
Moving on, to chapter 16, the following are the objectives that need to be done.
| Obj. No | Objectives |
| 1 | Reach the Surtr’s Forge |
| 2 | Defeat the flame phantom |
| 3 | Go towards the surtr’s forge |
| 4 | Approach the ashen man |
| 5 | Get rid of the Soul Eaters |
| 6 | Approach the ashen man again |
| 7 | Follow Surtr |
| 8 | Defeat the Hrist and Mist |
| 9 | Approach the spark of the world |
Chapter Seventeen
Lastly, as for chapter 17, the following are the objectives that need to be done.
| Obj. No | Objectives |
| 1 | Get a bit of rest |
| 2 | Sound Gjallarhorn |
| 3 | Fight to reach the war machines |
| 4 | Protect the refugees |
| 5 | Find Odin |
| 6 | Defeat Thor |
| 7 | Get rid of Odin |
| 8 | Find Father |
| 9 | Follow Angrboda |
Summary
And there we have it. These are all the steps that players need to take in order to get to Sanctuary Grove, and with that, we will wrap up our God of War Ragnarok How To Get To Sanctuary Grove guide!
Up Next:
- God Of War Ragnarok Mission List
- God Of War Ragnarok Secrets
- God Of War Ragnarok Frozen Flames Locations
Thanks! Do share your feedback with us. ⚡
How can we make this post better? Your help would be appreciated. ✍