Counter-Strike 2 has been released, and you’ve got it installed to relive the fun of CS: GO and check out the new stuff. The big difference in CS2 is that it uses a better engine called Source 2, which makes the game look prettier with improved graphics and maps.
However, this new engine needs a little more computer power, so let’s talk about adjusting the game’s graphics settings to make it run even smoother on your PC and get the best performance for competitive play.
Update: Devs fixed the threading issue in a CS2 update on 4/2/2024 which was causing frame rate hitches in the game.
I’ve benchmarked Counter Strike 2 on a PC with the following specs:
OS: Windows 11 Pro 23H2
System: Lenovo Legion 7i Laptop
CPU: Intel i7-11800H
GPU: NVIDIA RTX 3070 8GB
RAM: 32GB DDR4
Storage: Samsung 1TB SSD Gen 4
Key Takeaways
CS2 requires you to have at least an Intel i5 750 for CPU, DX11 compatible GPU, and 8 GB of RAM for CS2 to run on your PC.
The following settings affect CS2 performance on your PC:
Multisampling Anti-Aliasing Mode
Global Shadow Quality
Model / Texture Detail
Particle Detail
Ambient Occlusion
Counter-Strike 2 is a pretty lightweight game that doesn’t require a high-end PC. I’ve also not encountered much bugs or glitches in the game. Despite upgrading the visuals from CS: GO (as discussed in Asad’s review of CS2), the game still runs like butter and doesn’t have problems like stuttering or FPS drops.
Best Counter Strike 2 Video Settings
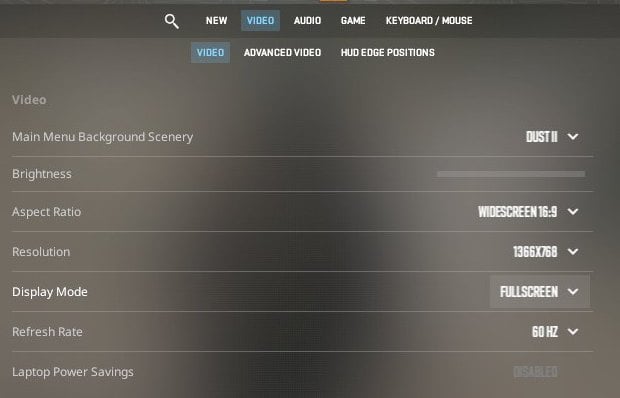
Counter Strike 2 Video Settings – [Image captured by eXputer]Counter-Strike 2 hasn’t become overly demanding on your GPU (graphics card). To achieve the best performance, you’ll need to explore and optimize these video settings, which can lead to higher FPS. More FPS generally results in a smoother and more responsive game, giving you an advantage over your in-game opponents.
Counter Strike 2 Basic Video Settings – [Image captured by eXputer]
Show Full Text
Here’s a summary of the both basic and advanced video settings in CS2 you should be using:
Main Menu Background Scenery
Personal Preference
Brightness
Your Choice
Aspect Ratio
16:9 / 4:3
Resolution
Monitor’s Native Resolution
Display Mode
Fullscreen
Laptop Power Savings
Off
Global Shadow Quality
Low
Model / Texture Detail
Medium
Texture Streaming
Disabled
Effect Details
Medium – High
Shader Details
Low
Boost Player Contrast
Disabled
Multicore Rendering
Enabled
Multisample Anti-Aliasing Mode
None
FXAA Anti-Aliasing Mode
On
Texture Filtering Mode
Trilinear (Low-end PCs) or 8x / 16x
Wait For Vertical Sync
Disabled
And there you have it, you have the best in-game video settings to boost your FPS in CS2.
I’ve compared some graphics settings here to show you to difference between their different presets:
Texture Filtering
Model and Textures Detail
Anti-Aliasing Quality
Ambient Occlusion
Particle Detail
Global Shadows
Bonus Window Optimization Tips
Window Settings For Counter Strike 2 – [Image captured by eXputer]Now we’ll adjust a few things in your Windows 10 or 11 settings to make your game run faster and more smoothly so you don’t run into problems like frame drops.
Update Windows: Ensure your system is up to date to fix issues and improve performance.
Enable Game Mode: Enhances gaming performance by prioritizing resources for your game.
Show Full Text
Set CS2 to High Priority: Prioritize Counter Strike 2 in Task Manager to allocate more resources to the game.
Enable Ultimate Performance: Boost your computer’s performance by enabling Ultimate Performance mode in Power Options.
These settings should give you high FPS while maintaining excellent visual quality for spotting enemies. Just make sure your Nvidia drivers are up to date. You can either check for updates on the Nvidia website or use GeForce Experience to do so.
Quick note: The changes you make in the Global Settings of the Nvidia Control Panel will affect all your games. If you want to adjust settings specifically for Counter Strike 2, head to “Program Settings” add the game here, and then tweak the settings.
AMD
A quick run-down of the best AMD Radeon settings to use for CS2:
Graphics Profile
eSports
Radeon Anti-Lag
Enabled
Radeon Chill
Disabled
Radeon Image Sharpening
Enabled
Sharpness
Player’s Choice
Radeon Enhanced Sync
Disabled
Wait For Vertical Refresh
Always Off
Anti-Aliasing Level
2x
Anti-Aliasing Method
Multisampling
Morphological Anti-Aliasing
Disabled
Anisotropic Filtering
Disabled
Texture Filtering Quality
Performance
Anti-Aliasing
Override Application Settings
Surface Format Optimization
Enabled
Tessellation Mode
Override Application Settings
Maximum Tessellation Level
8x
OpenGL Triple Buffering
Disabled
We have tried and tested dozens of settings, but these AMD settings are the most balanced. First, make sure that your AMD Drivers are updated to the latest version. Only then you be able to reap the most benefits out of these settings.
Counter-Strike 2 Audio Settings In-Game
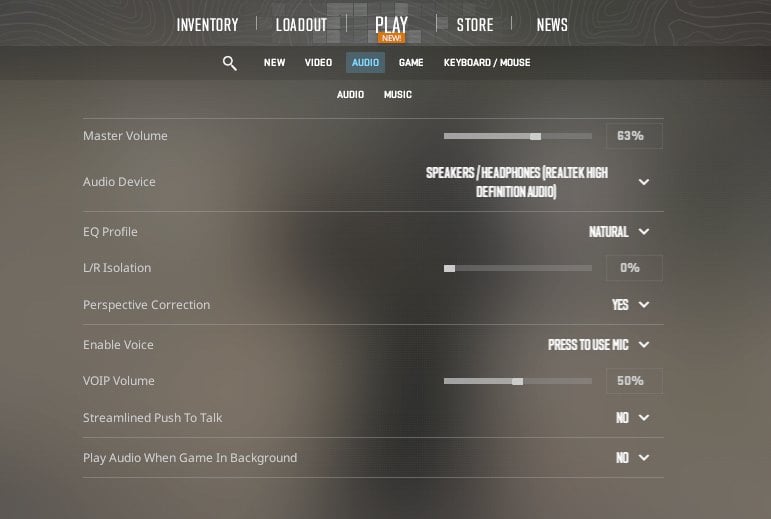
Counter Strike 2 Audio Settings – [Image captured by eXputer]
Music Volume
0%
Audio Device
Stereo Headphones
L/R Isolation
0%
VOIP Volume
50%
Perspective Correction
Yes
Show Full Text
Counter Strike 2 Best Audio Settings – [Image captured by eXputer]Counter Strike 2, you can adjust how the game sounds to fit your preferences, but there’s no one-size-fits-all setting. Listening to things like gunshots and footsteps helps you know where enemies are These settings are a good starting point; you can tweak them until you’re comfortable with the in-game audio.
Bonus: Enable Loudness Equalization
In Windows, there’s a feature called “Loudness Equalization” for your sound devices. It makes the soft sounds louder, and the loud sounds a bit softer, making everything more even. This change applies to all the sounds on your computer, but it can make the audio in Counter Strike 2 sound clearer and better.
Sound System for Counter Strike 2 – [Image captured by eXputer]
To use this feature, go to the search bar and type “System Sounds”. Click on the first result to open the window’s audio settings.
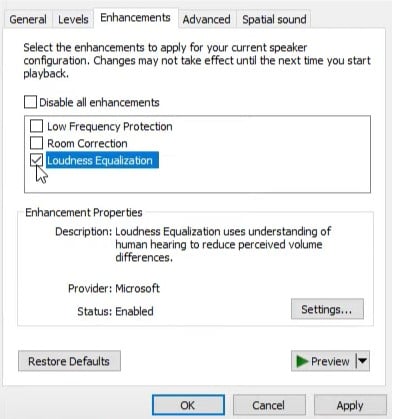
After accessing Windows sound settings, go to the “Playback” tab and right-click on your current audio device (headphones). Then, select properties. Counter Strike 2 Loudness Equalization – [Image captured by eXputer]
Go to the “Enhancements” tab and select “Loudness Equalization.” Click on OK to save the changes.
Now, audio sources in CS2 will be much clearer and louder, even at lower volumes.
Best Crosshair Settings For Counter Strike 2
Best Counter Strike 2Crosshair Settings – [Image captured by eXputer]In CS2, crosshairs play a major role in aiming properly. Having a good crosshair can mean the difference between nailing headshots with pinpoint accuracy and missing by a few pixels.
If you play competitively and want to have the same best settings the Counter Strike 2 Pros use, then this section is for you. Here are the best crosshair settings (in my opinion) for CS2. Your preference may vary.
Show Full Text
Color
Red / Green / Blue
Crosshair Style
Classic Static
Center Dot
Removed
Crosshair’s Length
3.0 or 3.5
Thickness
1.1
Gap
-3.0
Crosshair Outline
Disabled
Deployed Weapon Gap
No
Show Player Crosshairs To Everyone
Enabled
Choosing these settings helped me get a much more accurate crosshair in the game, making nailing those pinpoint shots much easier.
You can also adjust your crosshair to resemble the ones Pros use, but I recommend using the one you feel comfortable with.
Best Launch Options For Counter Strike 2
Best Counter Strike 2 launching options – [Image captured by eXputer]To get the best performance in Counter Strike 2, it’s crucial to use the right launch options. There are many launch options to choose from, and each has its own purpose.
However, knowing what each option does is important because using them incorrectly can cause unexpected problems. For an optimal gaming experience in the game, I suggest experimenting with our recommended launch options, which have been selected to help you achieve the best performance.
Show Full Text
To set these launch options, follow these straightforward steps:
Open Steam and locate Counter-Strike: Global Offensive 2 in your game library.
Right-click on Counter Strike 2 and select “Properties.”
In the Properties window, click on “Set Launch Options.”
Paste the provided lines into the designated box and click “OK.”
This option enables the developer’s console command without activating it in the game.
Set CS2 as Priority
-high
Utilize this setting to instruct your computer to prioritize CS2, impacting the performance of other applications running outside the game. We do not recommend using this if, for instance, you are streaming CS2.
Adjust Framerate Cap
+fps_max 0
Replace the zero in this command with a specific number to set a framerate cap for the game. Setting it to zero, however, removes the framerate cap altogether.
Disable Joystick/Controller Input
-nojoy
This option turns off input from a joystick or controller, potentially enhancing performance.
Skip Intro Video
-novid
This option eliminates the intro video before launching the game, saving several seconds for a quicker entry into the game.
Turn Off Soft Particles
-softparticlesdefaultoff
Enhance game performance by using this command to turn off soft particles in the game.
Disable Blood and Gore Effects
+violence_hblood 0
If you’re squeamish or simply prefer not to see blood and gore particle effects in the game, you can use this command to disable them.
Best Mouse Settings
Counter Strike 2 Best Mouse Settings – [Image captured by eXputer]In Counter Strike 2, your mouse is like your main weapon. You need to set up your mouse correctly and practice with those settings to get good at the game.
Now, there’s no one-size-fits-all mouse setting that works for everyone. So, in this section, I’ll help you figure out the best mouse settings that suit you.
Show Full Text
Low DPI Settings: Ranging from 100 to 400, these offer precision but require larger hand movements, ideal for long-range weapons.
Medium DPI Settings: Between 600 to 1000, they balance precision and speed, making them versatile for various playstyles.
High DPI Settings: Starting from 1200, these allow for swift movements but may be harder to control, beneficial for quick flick shots but not ideal for long-range weapons.
Best Keybinds For Counter Strike 2
Counter Strike 2 BEST KEY BINDINGS – [Image captured by eXputer]Selecting the right keybindings can make a big difference in your success rate. You need quick access to all your tools to be highly effective in combat.
This means that you can instantly throw a Molotov or grenade at your enemy when an opportunity arises. Keybindings should match your style of play, but I’ve gathered some of the most commonly used ones in Counter Strike 2, including those favored by professional players. Let’s take a look at them.
Show Full Text
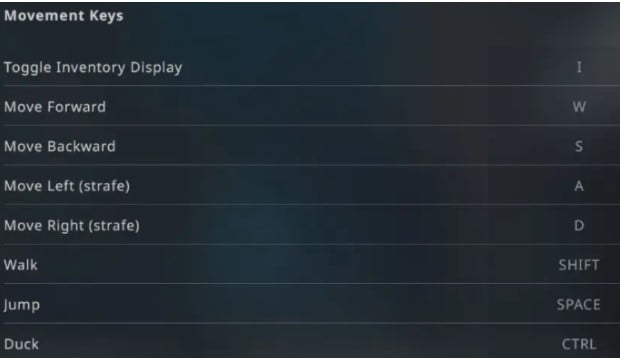
Movement Keybinds
Counter Strike 2 Movement Keys – [Image captured by eXputer]
Toggle Inventory Display, Set it to I
The Movement Keys will be W, A, S, and D by default, which is the best option.
The Strafing keys should be set to A & D for better evasive movements.
Set the Walk to Shift. People are known to use caps lock to toggle walking but it’s not the most popular choice as CS2 now lets you choose to toggle walk.
The Spacebar is always the default for Jump
For Duck, you can either use CTRL or C
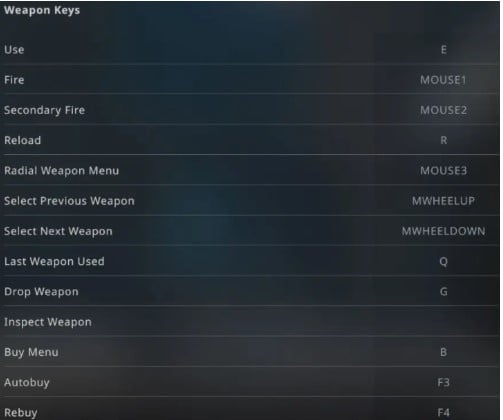
Weapon & Tools Keybinds in Counter Strike 2
Counter Strike 2 Best Weapon Keys – [Image captured by eXputer]
The Use function should be set to either F or E
Fire and Secondly Fire are defaulted to the right and left mouse clicks
For Reload, the best key bind is also the default one, R
Use Mouse3 for Radial Weapon Menu
Using the scroll up and down is the most intuitive for Next and Previous Weapons.
Last Weapon Used is a really important feature and should be set to your extra mouse side buttons or Q
Other key binds are the best in the default state. Let’s move over to tools keybinds.
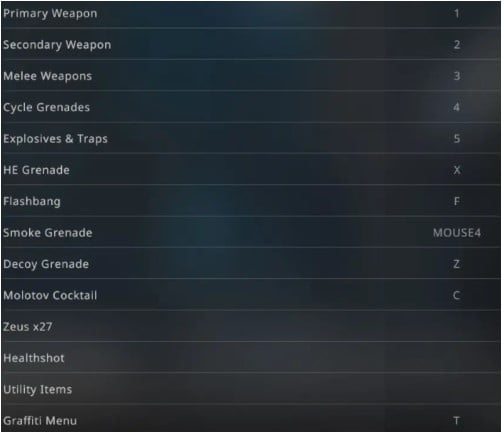
Counter Strike 2 Items Keys – [Image captured by eXputer]Here, most of the key binds will stay in default form. Only the important ones are as follows:
Set the Explosive & Traps to 5 key
Put the HE Grenades to X
The Flashbang Grenades should be set to F
The Smoke Grenades can be bound to side-mouse buttons, i.e. mouse4
Set the Decoy Grenade to Z
Put the Molotov Coctail to C
Using these tools quickly in the heat of the battle can turn the tide. So, putting them in easy-to-access keybinds can help you use them in time of need.
Ending Words
Considering I ran CS2 on a laptop version of Nvidia RTX 3070, I was getting consistence 120-160 FPS on 1600p resolution with my tested/optimized settings. Now, these FPS may sound like overkill but higher frames do give you a significant edge in competitive play.
I am fairly confident this is a one-off thing as developers do keep pushing out performance passes for the game. If you’re one of those players inflicted with low FPS in CS2, try using the settings I’ve recommended in this guide. You’ll be amazed at how much of a difference they make in improving the performance of CS2 on your PC.
Did you find this helpful? Leave feedback below.
Thanks! Do share your feedback with us. ⚡
How can we make this post better? Your help would be appreciated. ✍
Community Feedback
gg
ty
nice
NICE INFORMATION TY !
Awesome guide!
THANK YOU SO MUCH
Summary
Counter-Strike 2 has been released, and you’ve got it installed to relive the fun of CS: GO and check out the new stuff. The big difference in CS2 is that it uses a better engine called Source 2, which makes the game look prettier with improved graphics and maps. However, this new engine needs a…
Haider Khan is our error guides writer who loves to tinker around with operating systems and game files to find practical solutions to video game issues. He then crafts easy-to-follow error fix guides based on his findings. He’s also a Battlefield veteran who likes to rack up some Ws in his spare time. Learn some more about his gaming journey on his Steamprofile.Experience: 3+ Years || Education: Bachelor's in Journalism || Successfully Troubleshot Over 200 Games || Mainly Covers Error Fix & Game Settings
Enjoyed this article? Discuss the latest gaming news, get expert help with guides and errors, and chat about all things gaming on eXputer Forums and Discord Server. Connect with fellow gamers who share your passion by becoming a part of eXputer's community.
 Texture Filtering