Windows 11 is easily one of the best operating systems for gaming or productivity. It proves to be a great successor to the already successful Windows 10 despite 11’s rocky launch. So without sounding like Uncle Bill trying to sell you Windows, I’m going to discuss the best Windows settings and tweaks you can apply to gain significant performance.
The optimization tweaks I’ll be discussing ahead are not only great if you’re looking to boost gaming performance, but also improve your overall productivity with Windows. There are tons of helpful optimization methods you can employ to boost your system performance. However, the article only mentions the ones I’ve personally tested and seen results from over the years.
Update: This article was recently updated to showcase the best optimization tweaks for Windows 11 as well as Windows 10.
Key Takeaways
Make sure to create a System Restore Point, in case you accidentally tweak some unwanted settings.
Here is a quick run-down of some of the best Windows 10/11 optimization settings:
Turn on Windows Game Mode.
Turn off unnecessary animations.
Update the system drivers.
Change the Windows Power Plan to Ultimate Performance.
Disable Hardware Acceleration in applications.
Install Windows 10/11 on an SSD.
Clear out unnecessary space.
Remove any viruses or malware in your PC.
Close any unnecessary background applications.
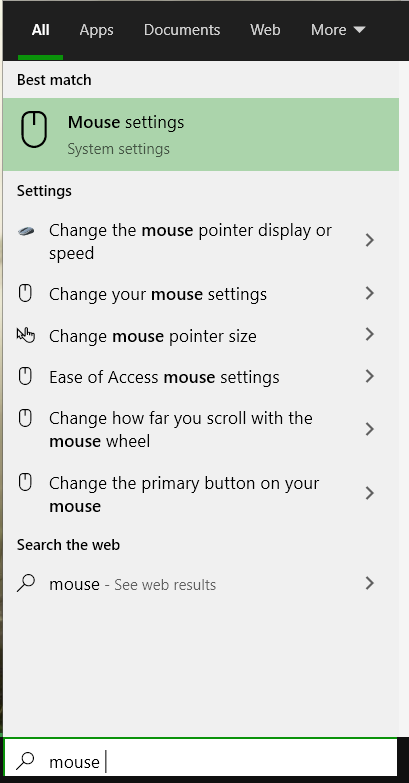
Here is a quick look at all the settings you need to tweak in the Windows 10 and 11 Settings menu:
Setting
Option
Game Mode
On
Unnecessary Animations
Disable Most Of Them
Ultimate Performance Power Plan
On
Hardware Acceleration
Off
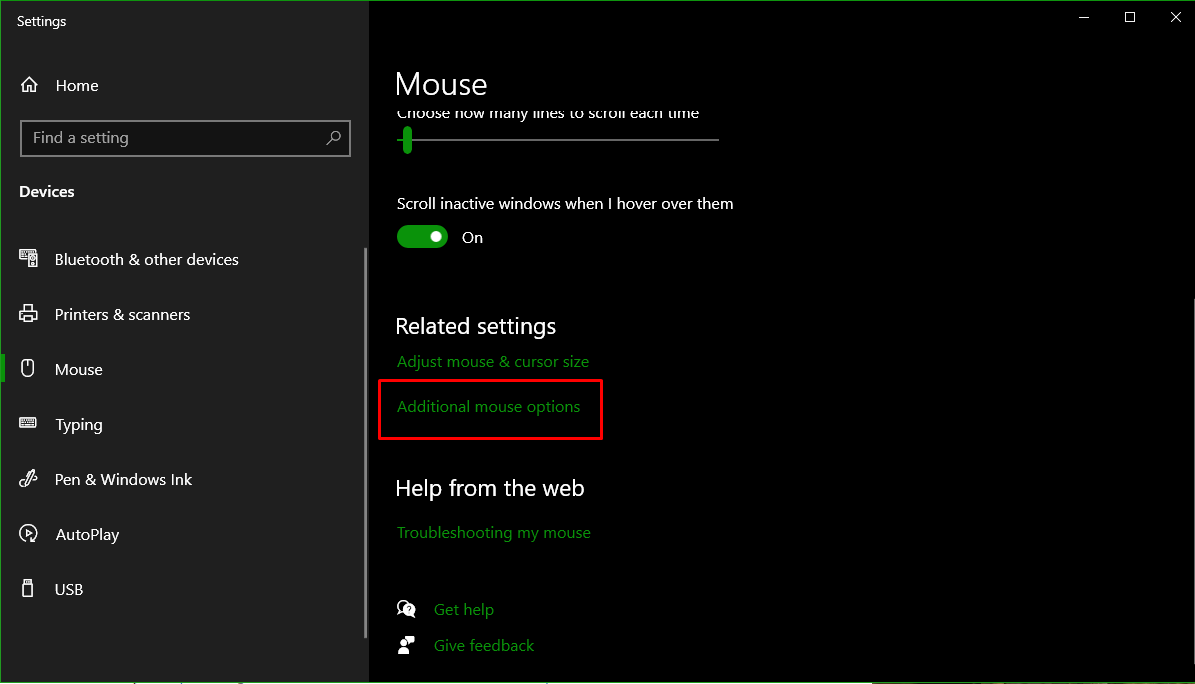
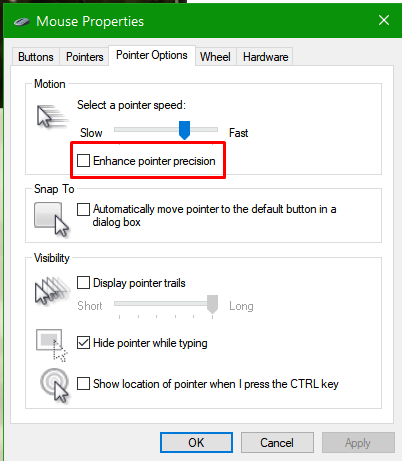
Enhance Pointer Precision
Off
Background Applications
Quit the ones you don't need
Page File Size
Increase according to your system
One-Drive Synchronization
Off
Search Indexing
Off
Xbox Game Bar
Disable
VPN
Off
We’ve compiled a list of optimizations and tweaks in no particular order. We’ve tested all the tweaks and found that each positively impacts your Windows 10/11 PC’s performance in one way or another.
After performing these optimizations, you should expect a good performance boost. These settings will help you turn off unnecessary background applications, allow the game to utilize your GPU properly, disable unwanted overlays, and more.
Turn on Game Mode
Windows Game Mode can help improve your gaming experience by turning off unnecessary background services and tasks while playing a game. It can also help you achieve a more stable frame rate in-game, preventing Windows Update from performing driver installations and disabling notifications.
To enable or disable Windows Game Mode:
Press the Start button on your keyboard, type Settings in the search box, and then select Settings.
Choose Gaming > Game Mode.
Turn the Game Mode On or Off.
Windows Game Mode. – Image: eXputer
Turn Off Unnecessary Animations
Windows 11 and 10 have a lot of unnecessary animations that could potentially hurt the overall performance of your PC. The difference might not be that noticeable on High-end PCs, but it could make a difference when working with a Low-end PC.
I will show you how to disable these unnecessary animations and get a performance boost on your PC.
In the Start Menu > Type and Open View Advanced System Settings. Advanced System Settings. – Image: eXputer
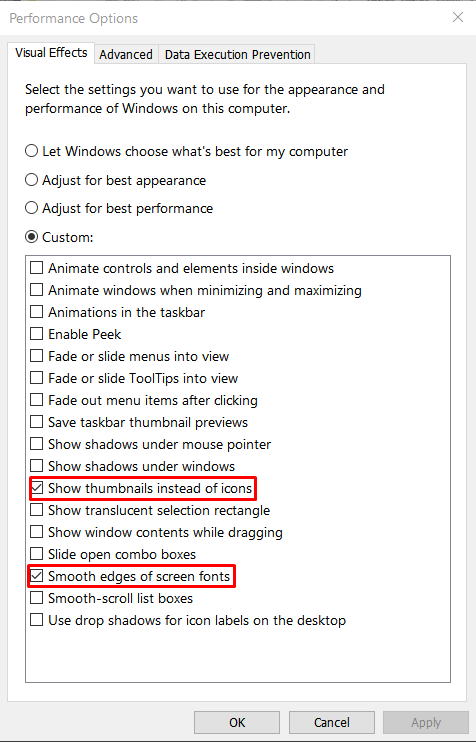
Head over to the Advanced tab > Settings > Checkmark Custom and select only the options in the screenshot below. Once done, don’t forget to hit Apply.
Visual Effects. – Image: eXputer
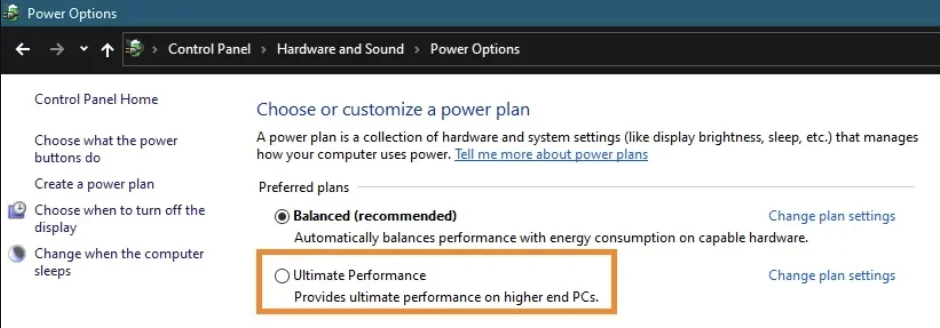
Enable Ultimate Performance
Windows 10 and 11 typically operate with a very balanced and optimal power plan that, by default, places a power cap on your computer. By switching your PC’s power plan from Balanced to Ultimate Performance, you can resolve this. By doing this, you can run your CPU at a higher frequency and full capacity.
In order to activate Ultimate Performance mode, do the following:
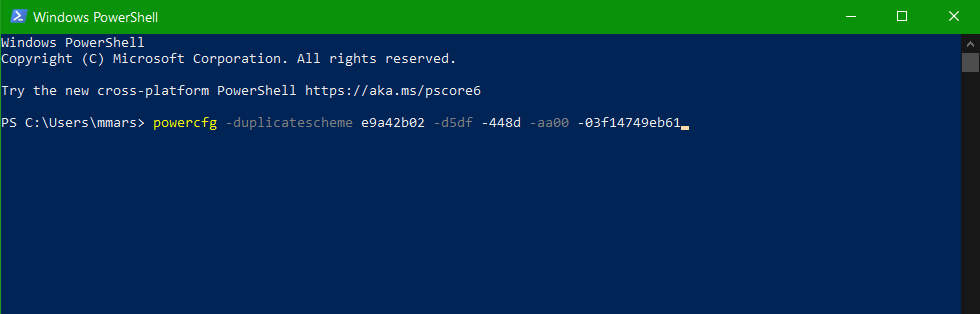
Open Command Prompt or Windows PowerShell With Administrator Privileges and paste the code given below. Windows Powershell. – Image: eXputer
Once done, you can see the Ultimate performance mentioned in the code.
Afterward, go to Start > Edit Power Plan > Power Options. Power Plan. – Image: eXputer
Then checkmark Ultimate performance and you are done.
Select Ultimate Power Plan here – Image by eXputer
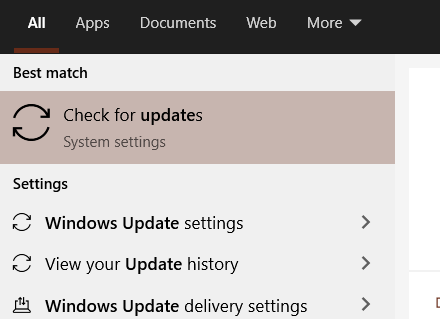
Update Your Windows 10 or 11
Any bugs causing performance issues and other hardware-related problems may occasionally be fixed by Windows Updates. Updating your Windows to the latest version could potentially fix any performance issues and help boost your PC performance.
Here’s how to update your Windows 10/11 to the latest version:
Open the Windows Search Menu by pressing the Windows key on your keyboard.
Type Windows Update in the search box, and select the Check for updates option. Windows Update. – Image: eXputer
Click on Check for updates & Windows will search and download the latest update. Check for Updates. – Image: eXputer
After the download is complete, restart your computer to install the update.
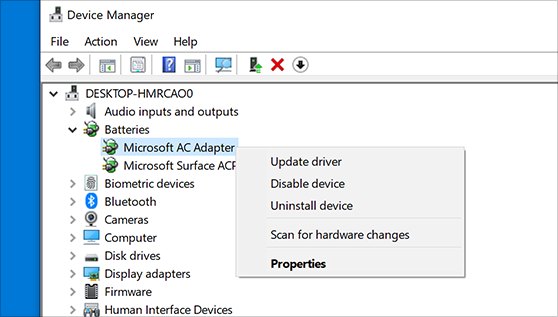
Keep Your Drivers Up To Date
To ensure all of the devices in your PC are working properly up to their full potential, it is highly recommended to keep your Windows drivers up to date.
Most of the Driver updates for your Devices, like network adapters, printers, monitors, and graphic cards, are included in the Windows Update. So you don’t need to download the drivers for each device manually.
In case the drivers are not up to date, here’s how you can do it manually:
Update The Device Driver
Open the Windows Search Box on the taskbar, type device manager, and open it.
Click on a category to see the name of the devices, then right-click on the device you want to update.
Select Search automatically for updated driver software.
Click on Update Driver.
Updating Drivers – – Image: eXputerIf Windows cannot find a new driver, you can try looking for one on the device manufacturer’s website and follow their instructions.
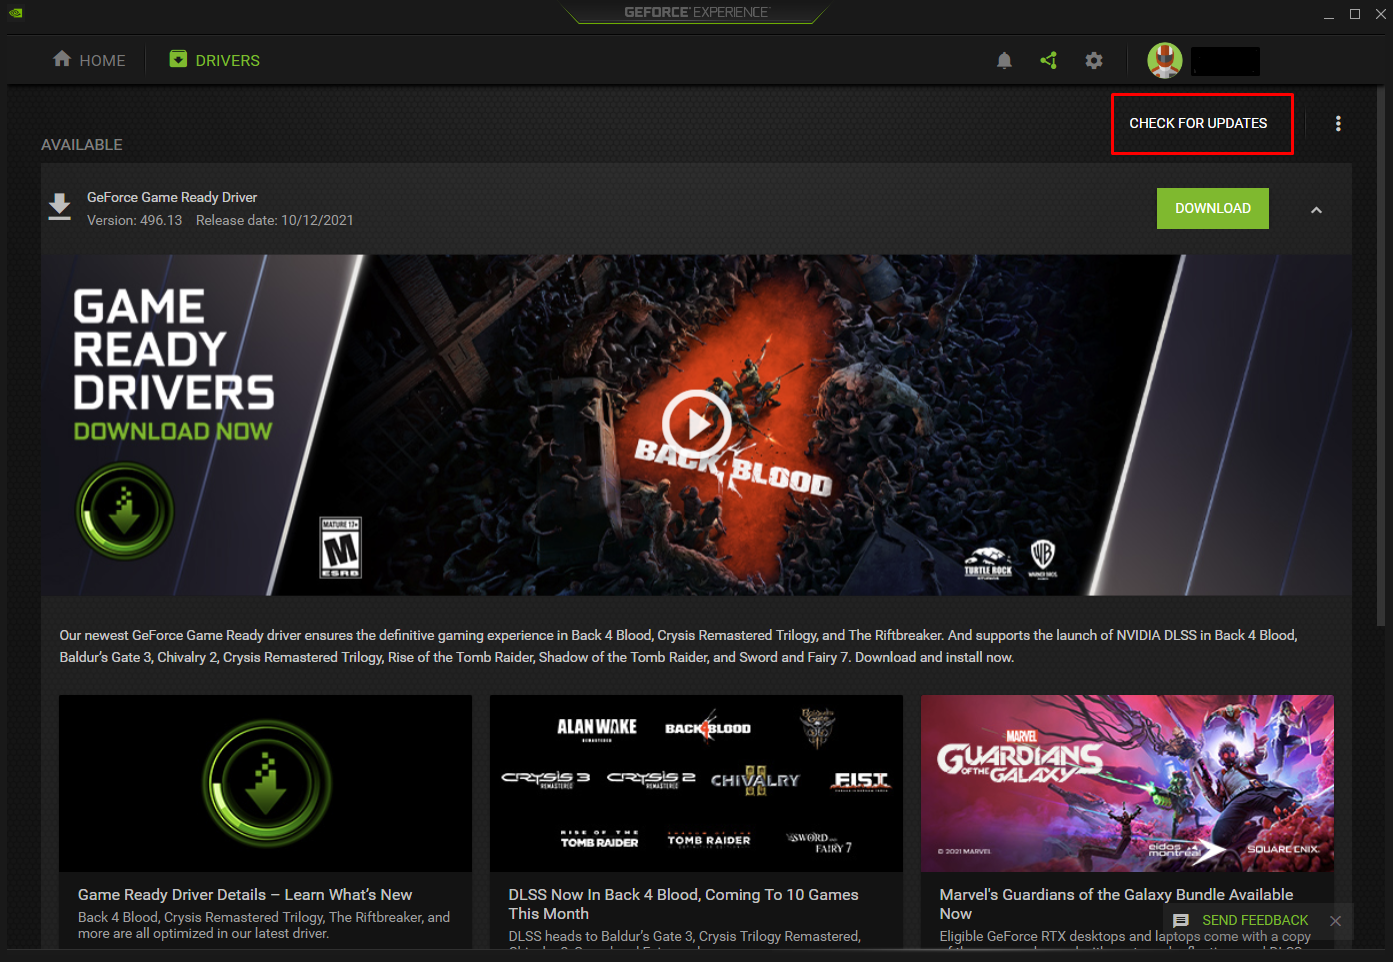
Download the Latest Game Ready Drivers For Your Nvidia GPU
It is highly recommended that you update your graphics card drivers to newly released Game Ready Drivers By Nvidia. You can do that through the GeForce Experience or manually download them through the Nvidia website.
Open GeForce Experience > Click on Check For Updates.
Geforce Experience. – Image: eXputer
If you don’t have the latest version > Click on the Download button.
After the download completes > Click on Express Installation to finalize installing the drivers.
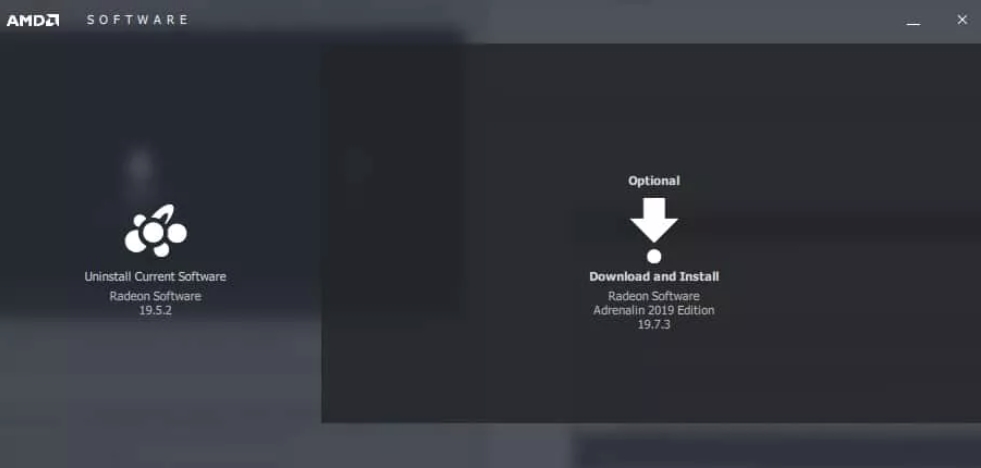
Use the AMD Radeon Update Tool for AMD Graphic Cards
Make sure that your AMD Drivers are updated to the latest version. You can search for the latest drivers on the AMD website.
AMD also provides an auto-detection tool compatible with all Windows 7 and Windows 10/11 PCs with Radeon graphics cards installed. This tool can detect the graphics card model and Windows version installed on your PC, allowing you to install the latest compatible driver.
Here’s how to install it:
Go to the AMD support page and download the Auto-Detect tool for Radeon Graphics drivers.
Open the download and Install the application.
Accept the License Agreement.
AMD will find the latest drivers for your system that can be installed with one click.
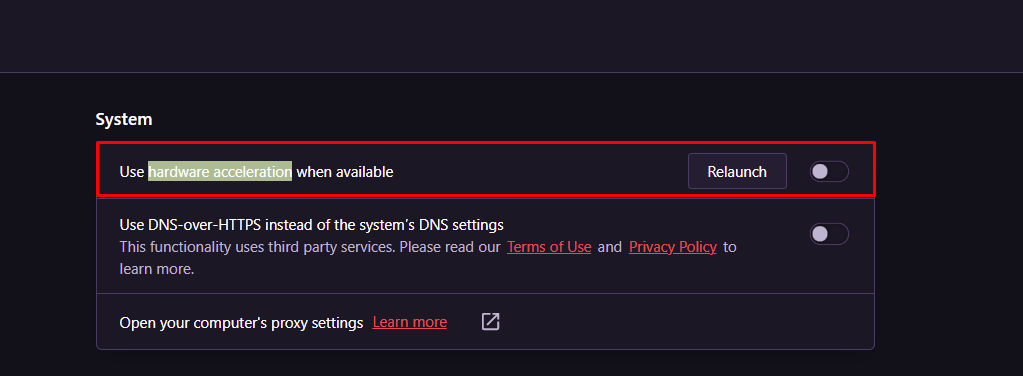
Hardware Acceleration is great for running your heavy application smoothly. It shifts some processing load to specialized hardware like the GPU aiding in the smooth operation of the application.
However, as your GPU is already busy juggling different application tasks together, it won’t be able to give you the maximum performance in the games or applications you need the most. Numerous widely used third-party programs, including Discord, Google Chrome, Opera, etc., use it. Disabling this won’t affect the applications’ primary function and will only enable resource savings.
Hence, your computer’s performance can be greatly enhanced by disabling Hardware Acceleration inside the various programs running in the Windows Background.
In Opera > Open Settings > Advanced > Browser > Under System > Disable “Use hardware acceleration when available. Opera Hardware Acceleration. – Image: eXputer
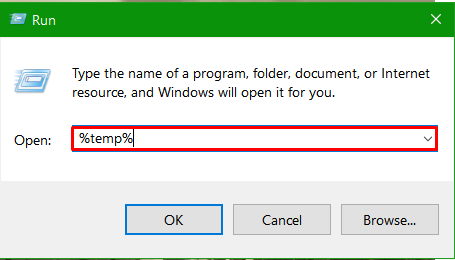
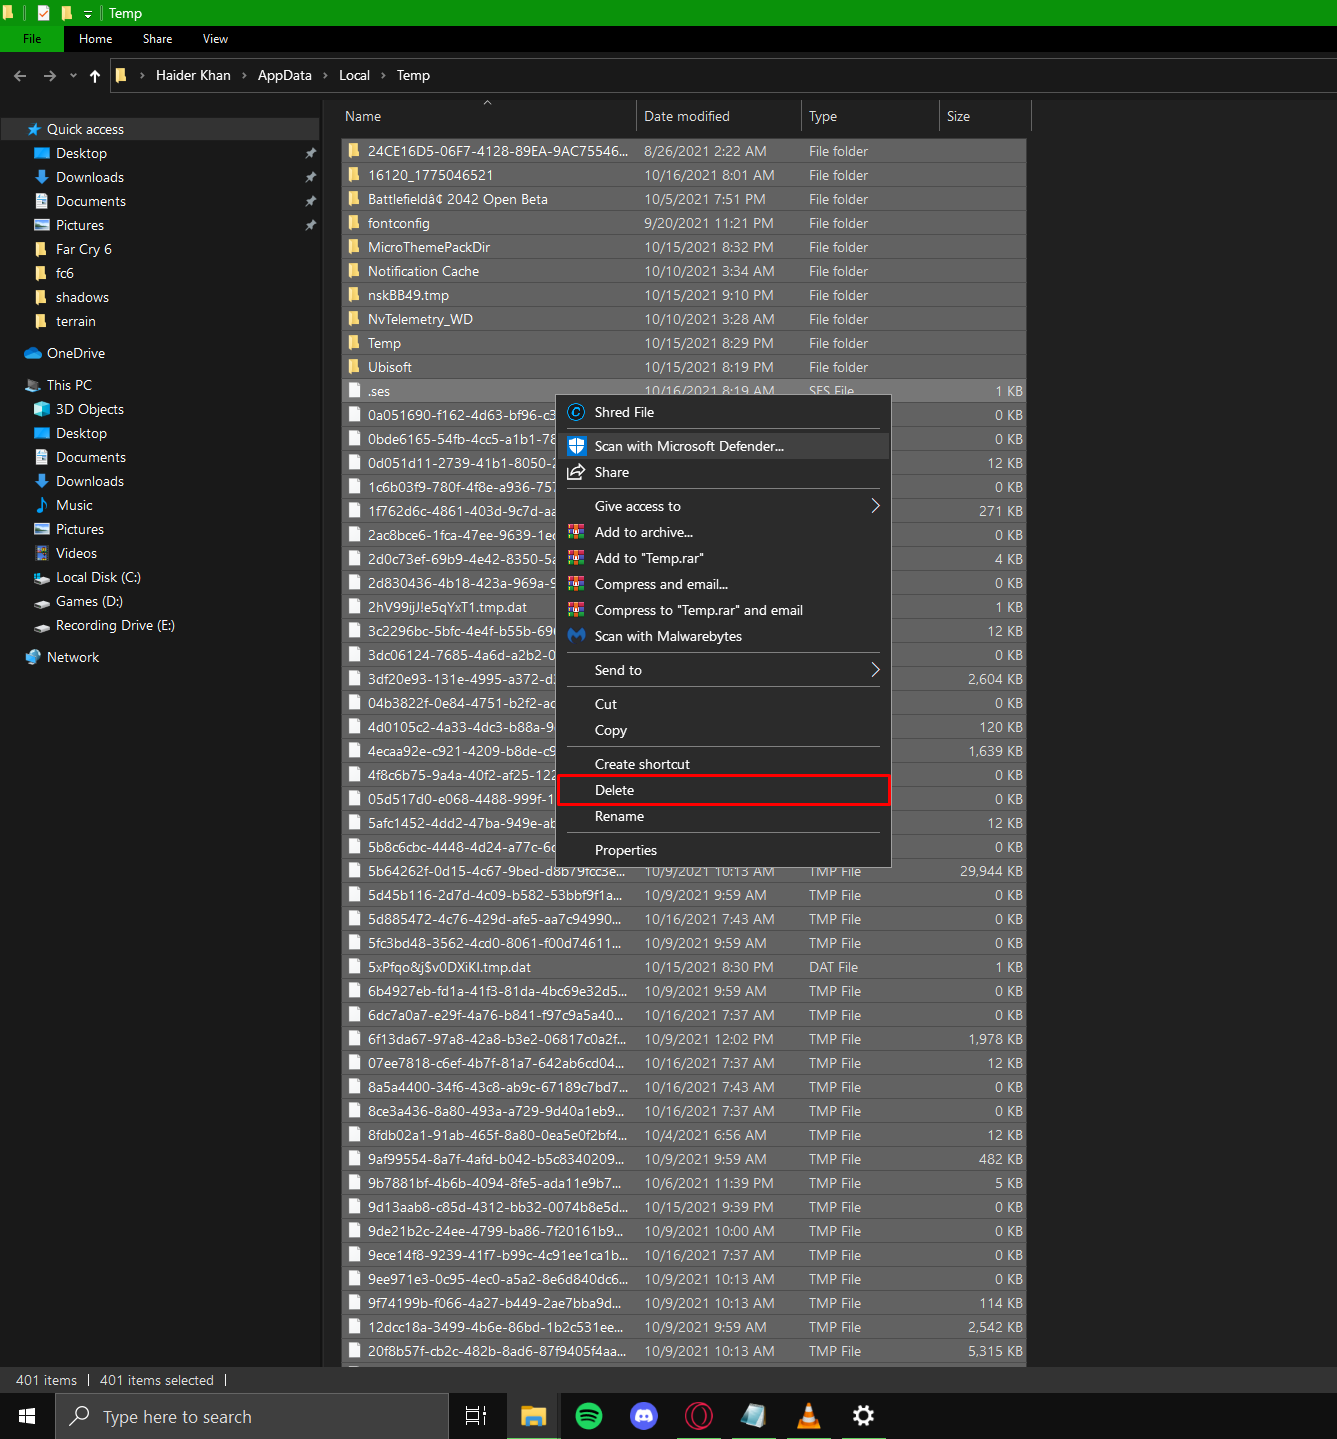
There are times when deleting a program from your computer doesn’t completely remove all of its remnants, leaving a large number of temporary files and folders on your Windows drive. These files eventually fill up a lot of storage space on your PC and cause it to run slowly. Clean up any temporary files using the steps below to free up disk space and improve PC performance.
Under Start > Type Run > write and enter %temp% Windows Run- Image Credits [eXputer]%temp%- Image Credits [eXputer]
Inside the folder, Press CTRL + A on the keyboard > Press Shift + Delete on your keyboard.
Cleaning Temp Folder- Image Credits [eXputer]
Disable All Unnecessary Applications Running In The Background
Suppose you’re experiencing low frame rates and annoying stutter issues in COD: Vanguard. It could be due to unnecessary applications and Windows Services running in the background that squeeze a big chunk of your memory.
Aside from the background application, You should also disable any unnecessary Windows Services that consume much of your PC’s memory.
To do this, do the following steps:
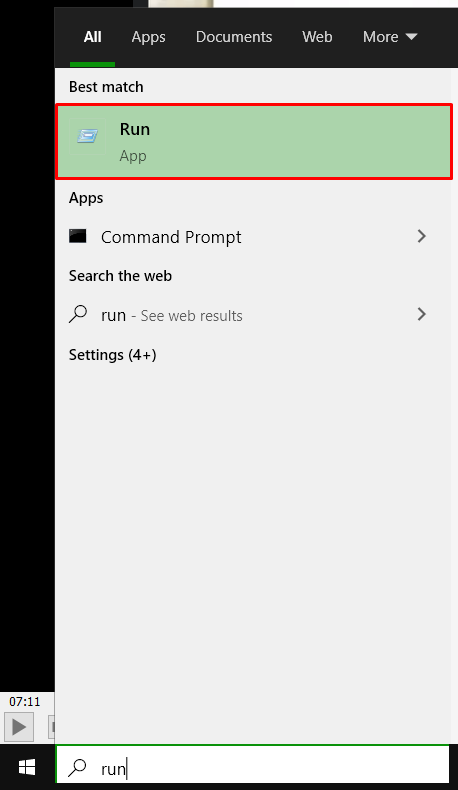
In the Start Menu, Search for Windows Run Application. Windows Run- Image Credits [eXputer]
Type and Enter “msconfig”. MSConfig- Image Credits [eXputer]
Go to the services tab and checkmark “hide all Microsoft Services.” This will remove the important ones from the list. Afterward, uncheck all services you feel are irrelevant. MSConfig Services Tab- Image Credits [eXputer]Restart- Image Credits [eXputer]
After you are done with services, Head to the Startup tab in Task Manager and disable all the irrelevant applications.
Analyze the apps that you dont need and disable them- Image Credits [eXputer]
Turn off Overlay Apps
Sometimes the Overlay feature of other applications could cause performance problems and crashing issues. With this feature enabled, we recommend turning off any in-game overlay feature in apps like Origin, Discord, or any other application.
Note: I didn’t go much in-depth into the disabling overlays for applications as there’s already a disabling overlays guide on eXputer. I recommend checking it out.
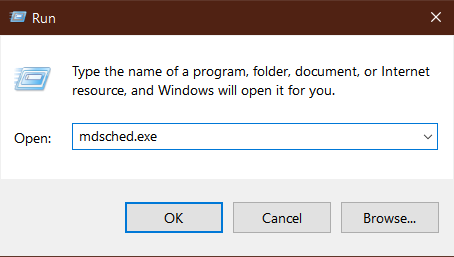
Run the Memory Diagnostic Tool
Your computer’s memory can be scanned to find any potential errors using the Memory Diagnostic Tool in Windows. To use this tool, you must restart your computer.
Note: The Memory Diagnostic Tool does not support mouse use. To move around, press the arrow keys.
Follow these steps to run the MDT:
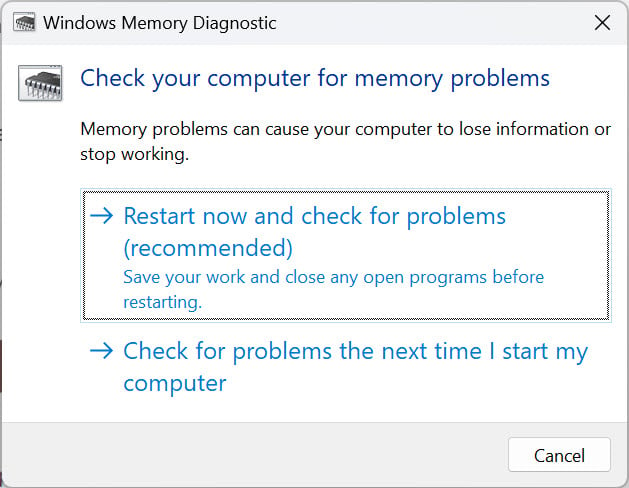
Press the Windows Key and R at the same time on your keyboard.
Type mdsched.exe in the Run box and tap Enter. Windows Run- Image Credits [eXputer]
Press Restart now and check for problems.
Memory Diagnostic Tool – Image by eXputer
Your PC will reboot and open the Memory Diagnostic Tool to run a memory test.
Press F1 to stop this test and head to the Options Screen.
Select Extended
Press F10
When the memory test is finished, see if any errors are reported
Press ESC to exit the tool.
Defragment Your HDD
If you don’t use an SSD, your PC will eventually lose performance as a result of fragmented data on your hard drive.
This might also result in other errors, like games crashing when they first launch. For best results, defragmenting your hard drive should be done at least once per month.
These are the steps you need to follow to defragment your hard drive:
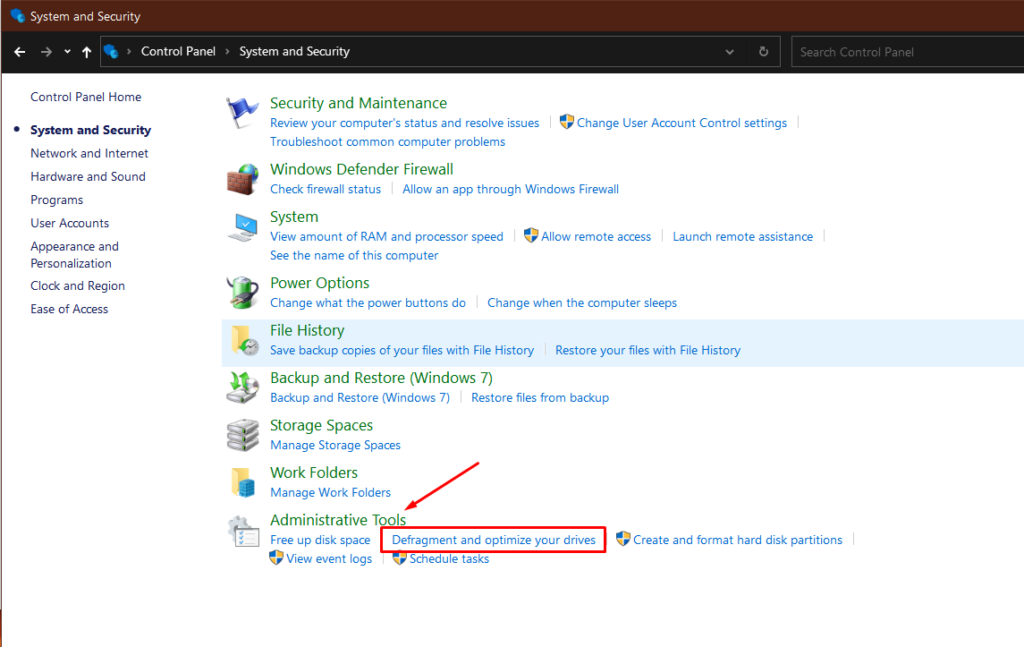
Open the Start Menu by pressing the Windows key.
Select Control Panel, then System and Security.
Under Administrative Tools, select Defragment your hard drive. Disk Defragmentation- Image Credits [eXputer]
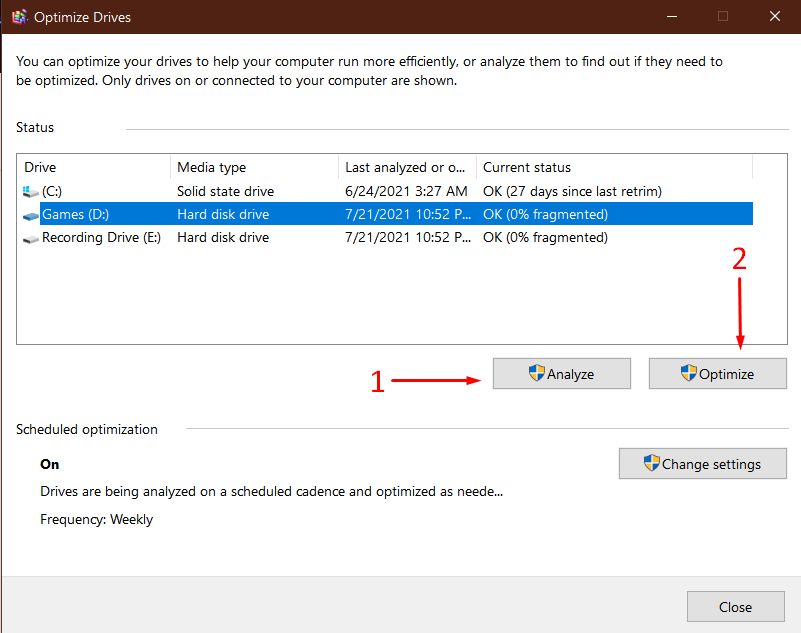
Select Analyze disk. The report will indicate if you need to defrag your disk. Disk Defragmentation- Image Credits [eXputer]
If you need to defrag your disk manually, press Defragment disk.
Depending on the size and level of fragmentation of your hard disk, Disk Defragmenter may take some time to finish. When the computer is being defragmented, you can continue to use it.
Upgrade Your Windows Drive To An SSD
The most important thing to keep on your Solid-State Drive is your Windows Operating System. Installing Windows in your SSD will greatly increase the speed and performance of all Windows functions like booting up, launching programs, copying files, shutting down, and other tasks. So, when you finally get an SSD, ensure you have your Windows OS installed.
Upgrade Your RAM
Most of the time, 8GB of RAM can be enough for your daily tasks in Windows. However, PC games are becoming increasingly demanding with the arrival of every new big AAA game. Soon, even 16GB of Memory will become insufficient for a smooth gaming experience.
If you like to use a lot of programs simultaneously and want to play the latest video games without facing any performance issues, then it might be time for you to upgrade it.
Increase The Page File Size
Increasing the page file size can prevent Windows from instability and crashes. The page file is a space on your primary drive where the data moves if it’s been in the RAM too long and the CPU hasn’t used it for a while. Increasing the page file size will make more memory available for all running processes.
On computers that have 8 GB of RAM, the suggested paging file size is 16 GB.
Open Start > Run and type sysdm.cpl and press Enter.
Click the Advanced tab.
Click Change in the Virtual Memory section.
If required, clear the Automatically manage paging file size for all drives check box.
Browse the list of drives and select the drive containing the paging file.
Choose Custom Size.
Reset the initial size and max size to higher values.
Click Set.
Click OK.
Turn Off One-Drive Synchronization
OneDrive frequently syncs your data to online servers. This process can consume resources and slow down your PC. If you have not chosen many files to sync, the problem might not be serious. However, in most cases, it is recommended to turn OneDrive off as it can boost PC performance.
If you don’t want to use OneDrive, the easiest solution is to unlink it.
You won’t lose files or data by unlinking OneDrive from your computer. You can always access your files by signing in to OneDrive.com.
Here’s what to do:
Open OneDrive settings > Select the OneDrive cloud icon in your notification area > Select the OneDrive Help and Settings icon.
Click on Settings.
Go to the Account tab.
Select Unlink this PC.
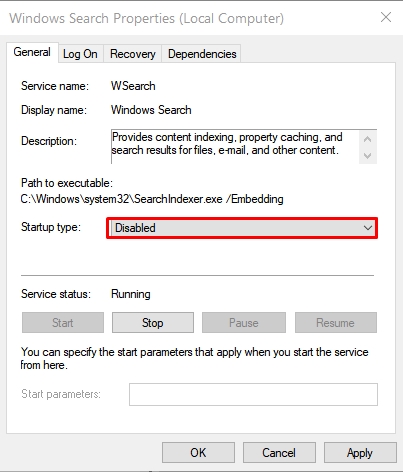
Disable Search Indexing
The Windows Search indexer is needed to search directories and files. You can turn it off if you’re not using Windows Search to find specific files or media. Disabling the Windows Search Indexer also greatly improves performance.
The Microsoft Search Index cannot be completely uninstalled because it is system-protected. But you can disable the Windows Search Indexer service in the services tab of Windows Settings.
Follow these steps to disable Windows Search Indexing.
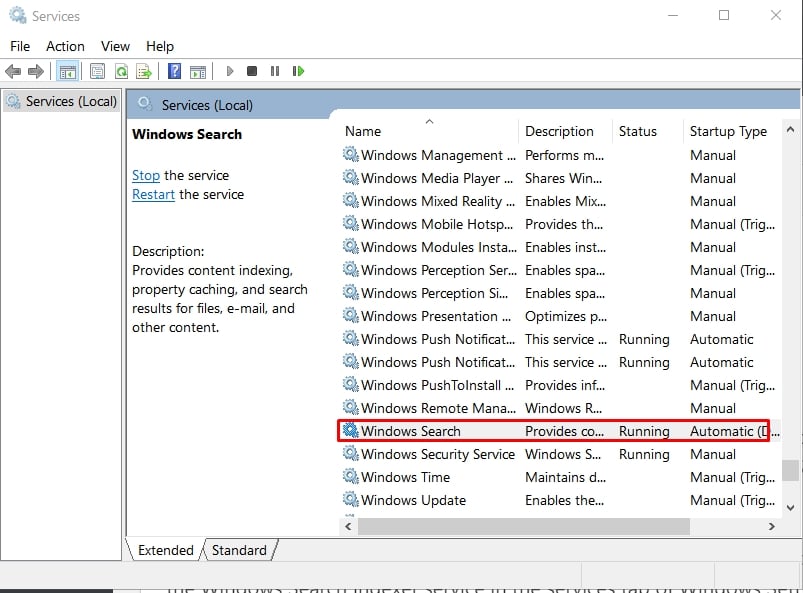
Open Windows Search by pressing the Win key, then type Services.
Open the Services App and find Windows Search in the list of services.
List of Services – Image by eXputer
Double-click Windows Search and set Startup Type to Disabled.
Keep it Disabled – Image Credits [eXputer]Click Stop under Service Status to completely disable the service.
Click OK to close the Windows Search Properties window.
Windows Search indexing will be disabled after you Restart the computer.
If any issues occur, change the startup type of Windows Search to automatic in the properties.
Scan for Malware
Malware and other Viruses may be slowing down your Windows PC. Scanning your PC for any malware or viruses at least once a week is recommended to ensure it is free from harmful files or malware. You can scan for malware using a third-party Anti-virus or the Windows Security Tool to look for any malware on your PC.
Important: Before using Windows Defender Offline, save any open files and close apps and programs.
Open your Windows Security settings.
Click on Virus & Threat Protection> Scan options.
Select Windows Defender Offline scan, and then click on Scan Now.
The Windows Defender Offline scan takes about 15 minutes to run, and then your PC will restart.
View The Results Of Your Scan
Open your Windows Security settings.
Select Virus & threat protection > Protection history.
The Windows Defender Offline scan will automatically detect and remove or quarantine malware.
Clear Out Some Space
Having less than 10% space on your storage devices can negatively affect your gaming experience by causing stutters and long loading times. If your Windows device is running low on disk storage, here are a few ways to free up some drive space.
Delete files with Storage Sense.
Click on the Start menu and select Settings > System > Storage. Open Storage settings.
Click on Configure Storage Sense or run it now, and below Temporary Files, select when you want each type of file deleted.
To delete unnecessary files manually instead, scroll down and select Clean under Free up space now.
Uninstall apps you don’t use anymore
Open the Start Menu> Settings > Apps > Apps & features.
Search for an app or sort them by size to see which ones take up the most space.
When you find an app you want to delete, please select it from the list and then select Uninstall.
Move files to another drive.
Suppose you want to free up space but don’t want to lose any important data. Move the files to another drive or an external USB or hard drive.
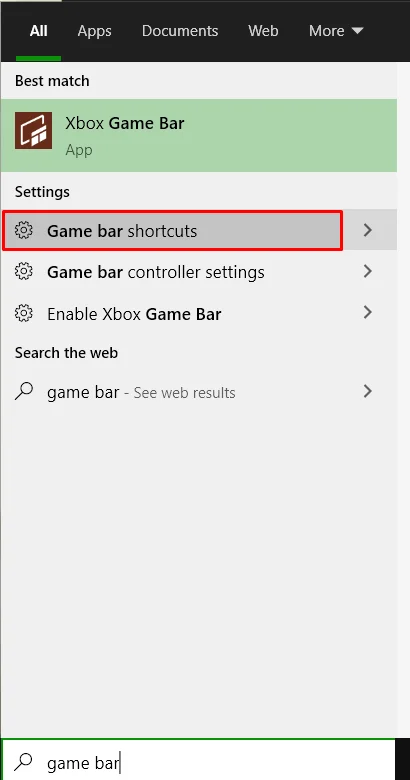
Disabling the Xbox Game Bar
Lastly, we will do some Windows 10/11 Optimizations related to the Xbox Game Bar and other Windows notifications that you can disable to boost PC performance. Windows 10 and 11, by default, have Xbox Game Bar activated, which significantly reduces the performance of your computer by running continuously in the background.
It could also start recording the screen if you hit the wrong button. We will teach you how to disable the Xbox Game Bar and notifications that pile up in the task center, which could slightly impact your PC’s performance.
To do this, follow the steps below.
In the Start Menu, type and open the Game bar shortcuts. Game bar shortcut – Image by eXputer
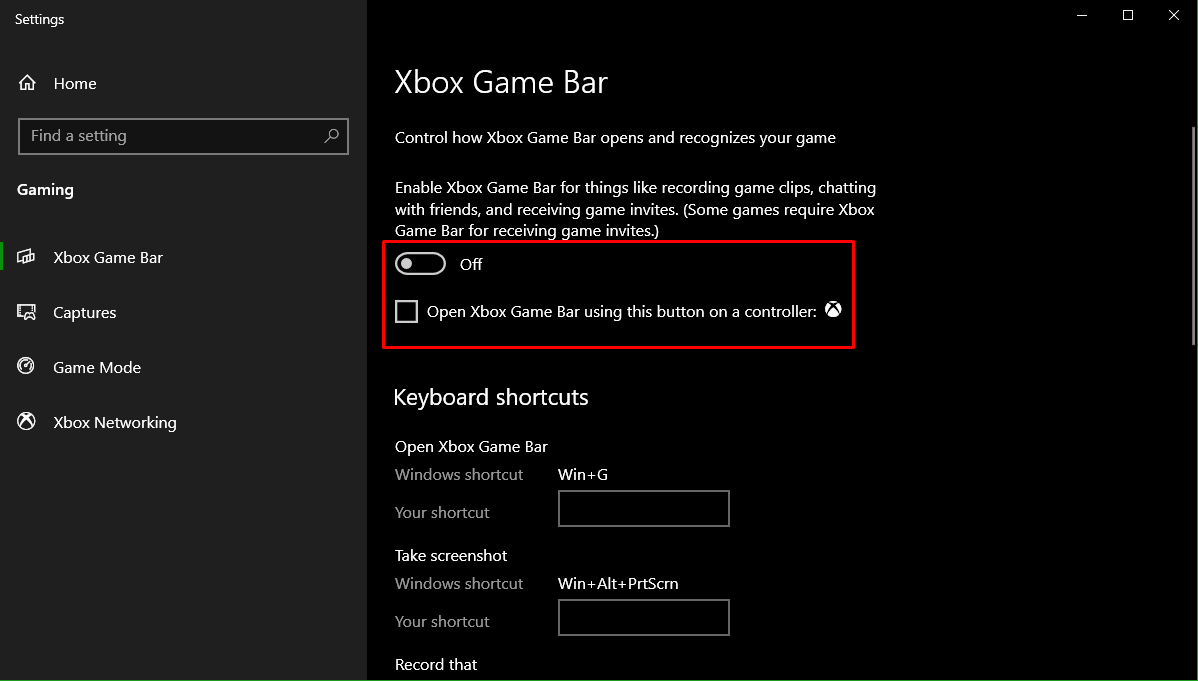
Disable everything in the Game Bar Tab and Captures Tab. Xbox Game Bar.- Image Credits [eXputer] Capture Tab – Image by eXputer
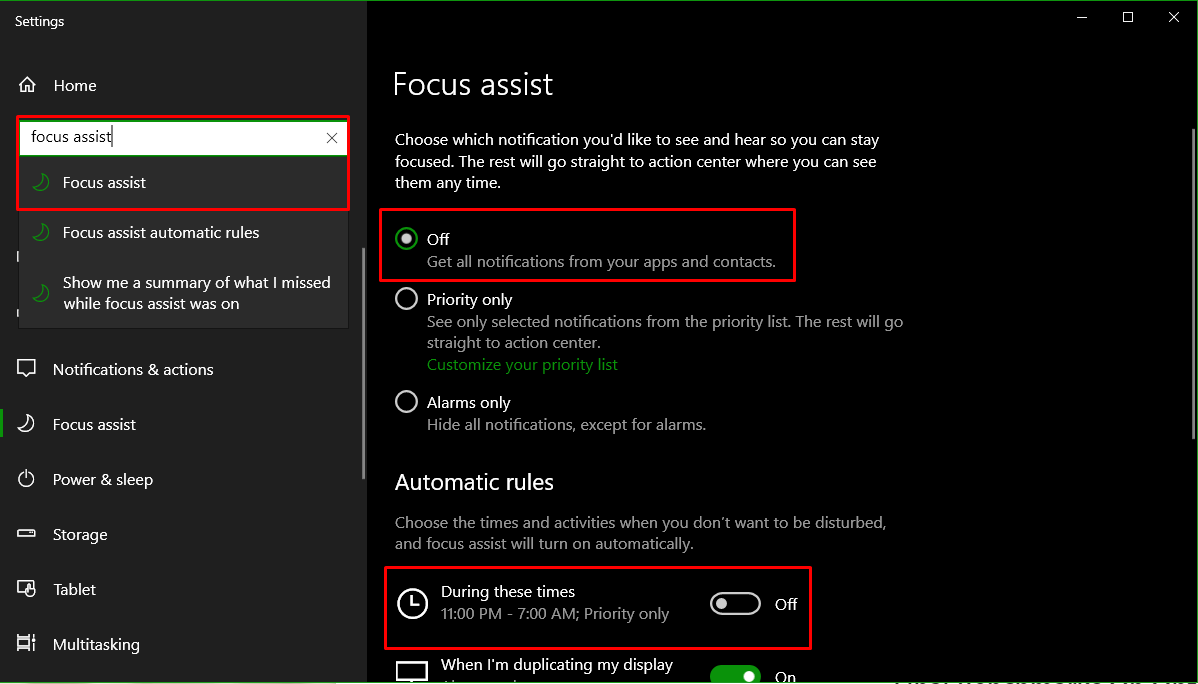
Afterward, open Focus Assist Settings and Disable them accordingly.
Focus Assist – Image by eXputer
Disabling Windows Firewall
Windows Defender Firewall protects your PC from malware and viruses. However, there can be times when we have to disable it. For instance, there may be an application that only works when the Firewall is disabled. There are a total of four ways to disable the Windows Firewall, and you read about them below.
Using Firewall & Network Protection
Windows Firewall can be disabled quickly through the Firewall & network protection settings.
To do it, follow the steps mentioned below.
Go to the Windows Search Bar.
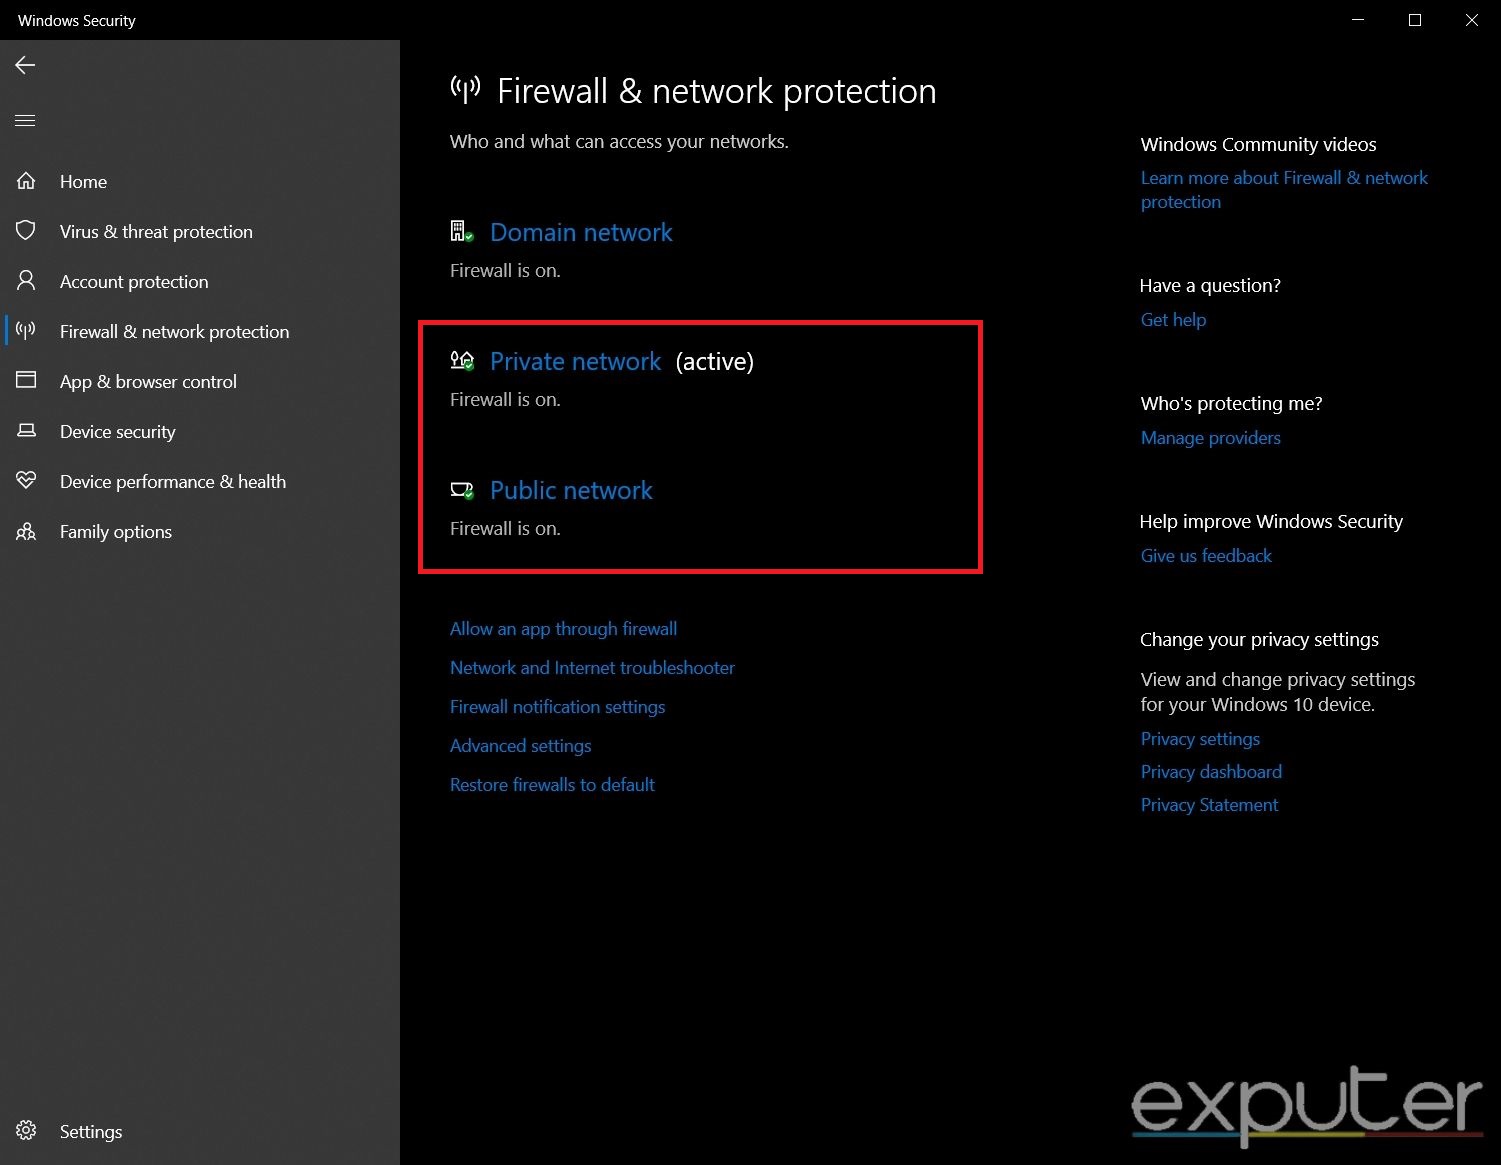
Type ‘Firewall & network protection‘ and click on the first option that appears.
Here, you will see both the Private network and the Public network. Firewall and network protection – Image Credits [eXputer]
Open one of them, click on the toggle button under “Microsoft Defender Firewall,” and turn it off. Turn off Private Network firewall – Image Credits [eXputer]
Once done, go back, and repeat the process for the other network.
Using Control Panel
You can also go to the Control Panel to disable the Firewall. This is the place where you will find almost every important feature and setting of your system.
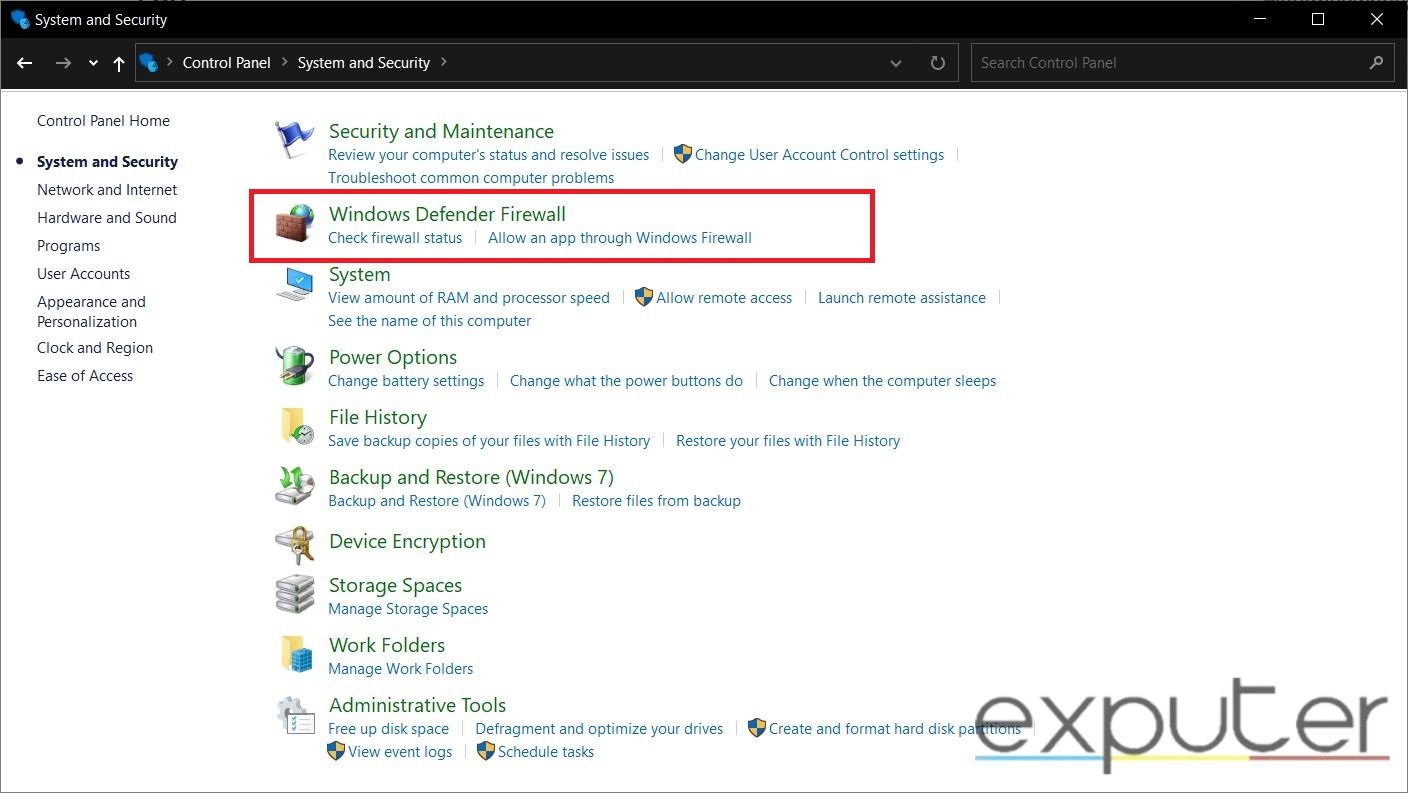
Open the Control Panel by searching its name in the Windows Search Bar.
Click on ‘System and Security.’
Now, click on ‘Windows Defender Firewall.’ System and Security Settings – Image Credits [eXputer]
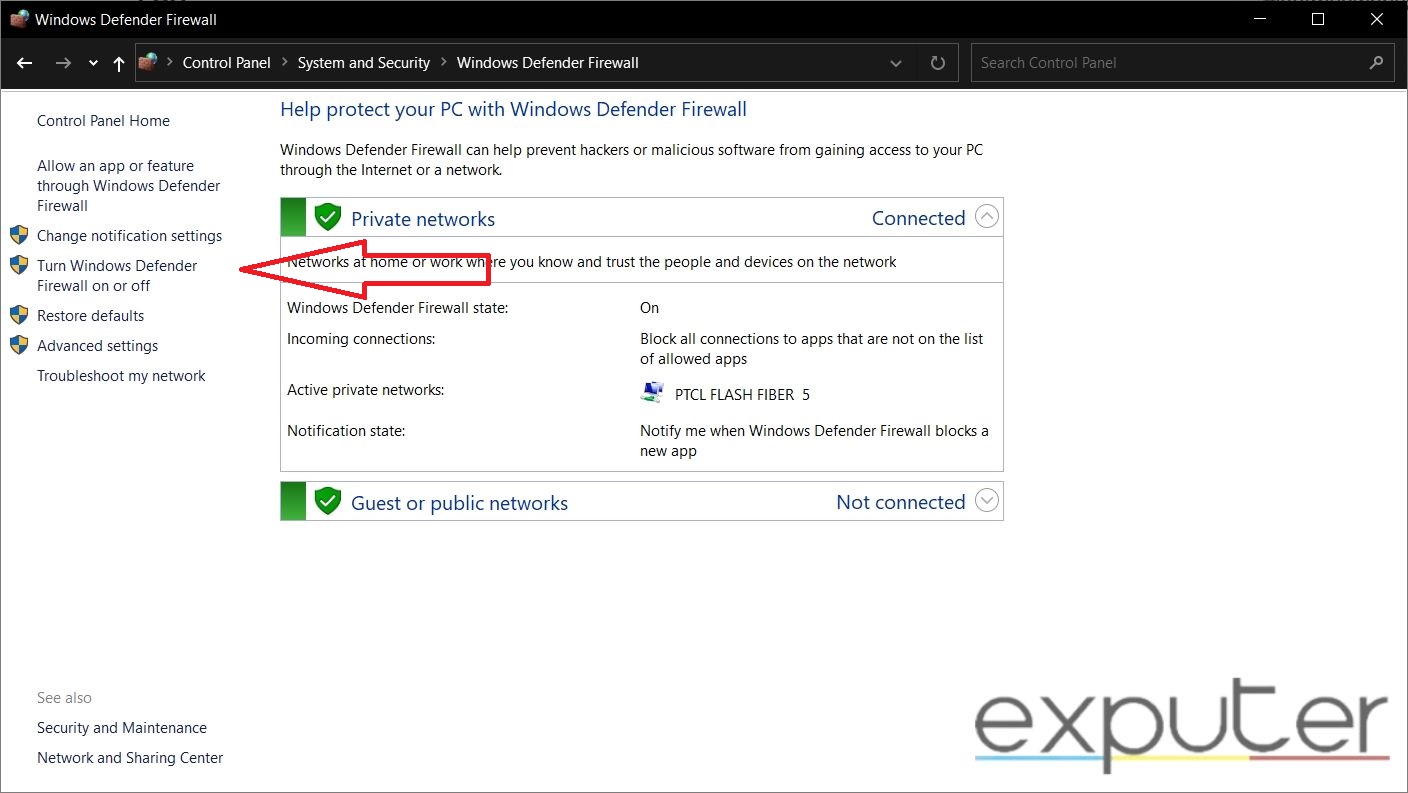
On the left side, you’ll see an option ‘Turn Windows Defender on or off.” Open it. Turn off option – Image Credits [eXputer]
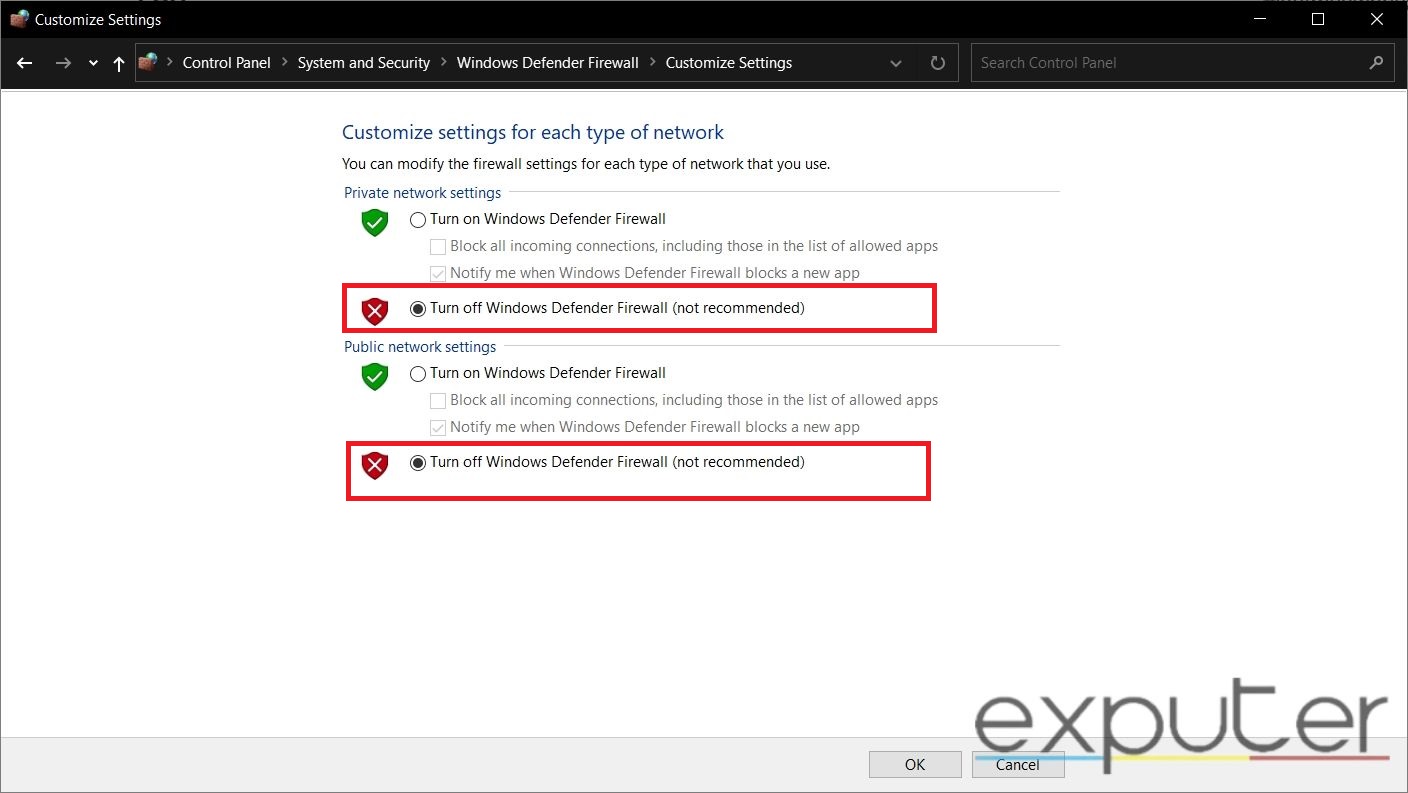
Now, tick the boxes next to the turn-off option for both networks. Turn Firewall off – Image Credits [eXputer]
Once done, the Windows Firewall will be disabled.
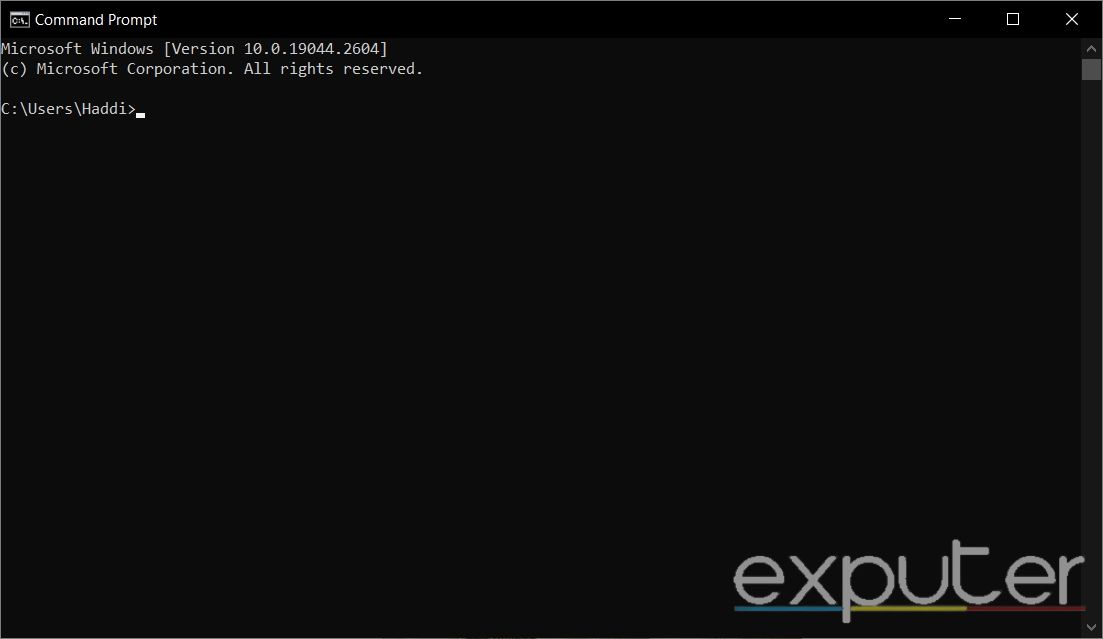
Using The Command Prompt
The Command Prompt allows you to quickly make changes to your system with the help of commands. It also allows you to quickly disable the Firewall.
Type ‘Run‘ in the Windows Search Bar and then type ‘Cmd‘ in the box.
Click ‘Ok’ and wait for the Command Prompt to launch. Command Prompt – Image Credits [eXputer]
Type the following commands to disable the Firewall for both the Private and Public networks:netsh advfirewall set privateprofile state off netsh advfirewall set publicprofile state off
You need to press enter after entering each code. If you enter both codes simultaneously, it will not work.
Once done, you will be notified about the Windows Firewall getting disabled.
Using PowerShell
Just like the Command Prompt, PowerShell is another excellent tool that helps with completing tasks by using commands.
Search PowerShell in the Windows Search Bar and open it.
Make sure to run it as administrator, which can be done by pressing right-click on it.
Enter the following command in the PowerShell:Set-NetFirewallProfile -Profile Domain,Public,Private -Enabled False
Once done, press Enter to execute the command. PowerShell – Image Credits [eXputer]
The Windows Firewall will now be disabled on your system.
Disabling Your VPN
While a VPN helps you protect your privacy by masking your IP address, there will be times when you will need to disable it as it harms your gameplay experience. The process is pretty straightforward, and you will hardly spend a minute on it.
Following are two methods through which you can quickly disable VPN on your PC.
Through Network And Internet Settings
VPN can be disabled on a PC through the Network and Internet settings. Here are the steps you need to follow for the process:
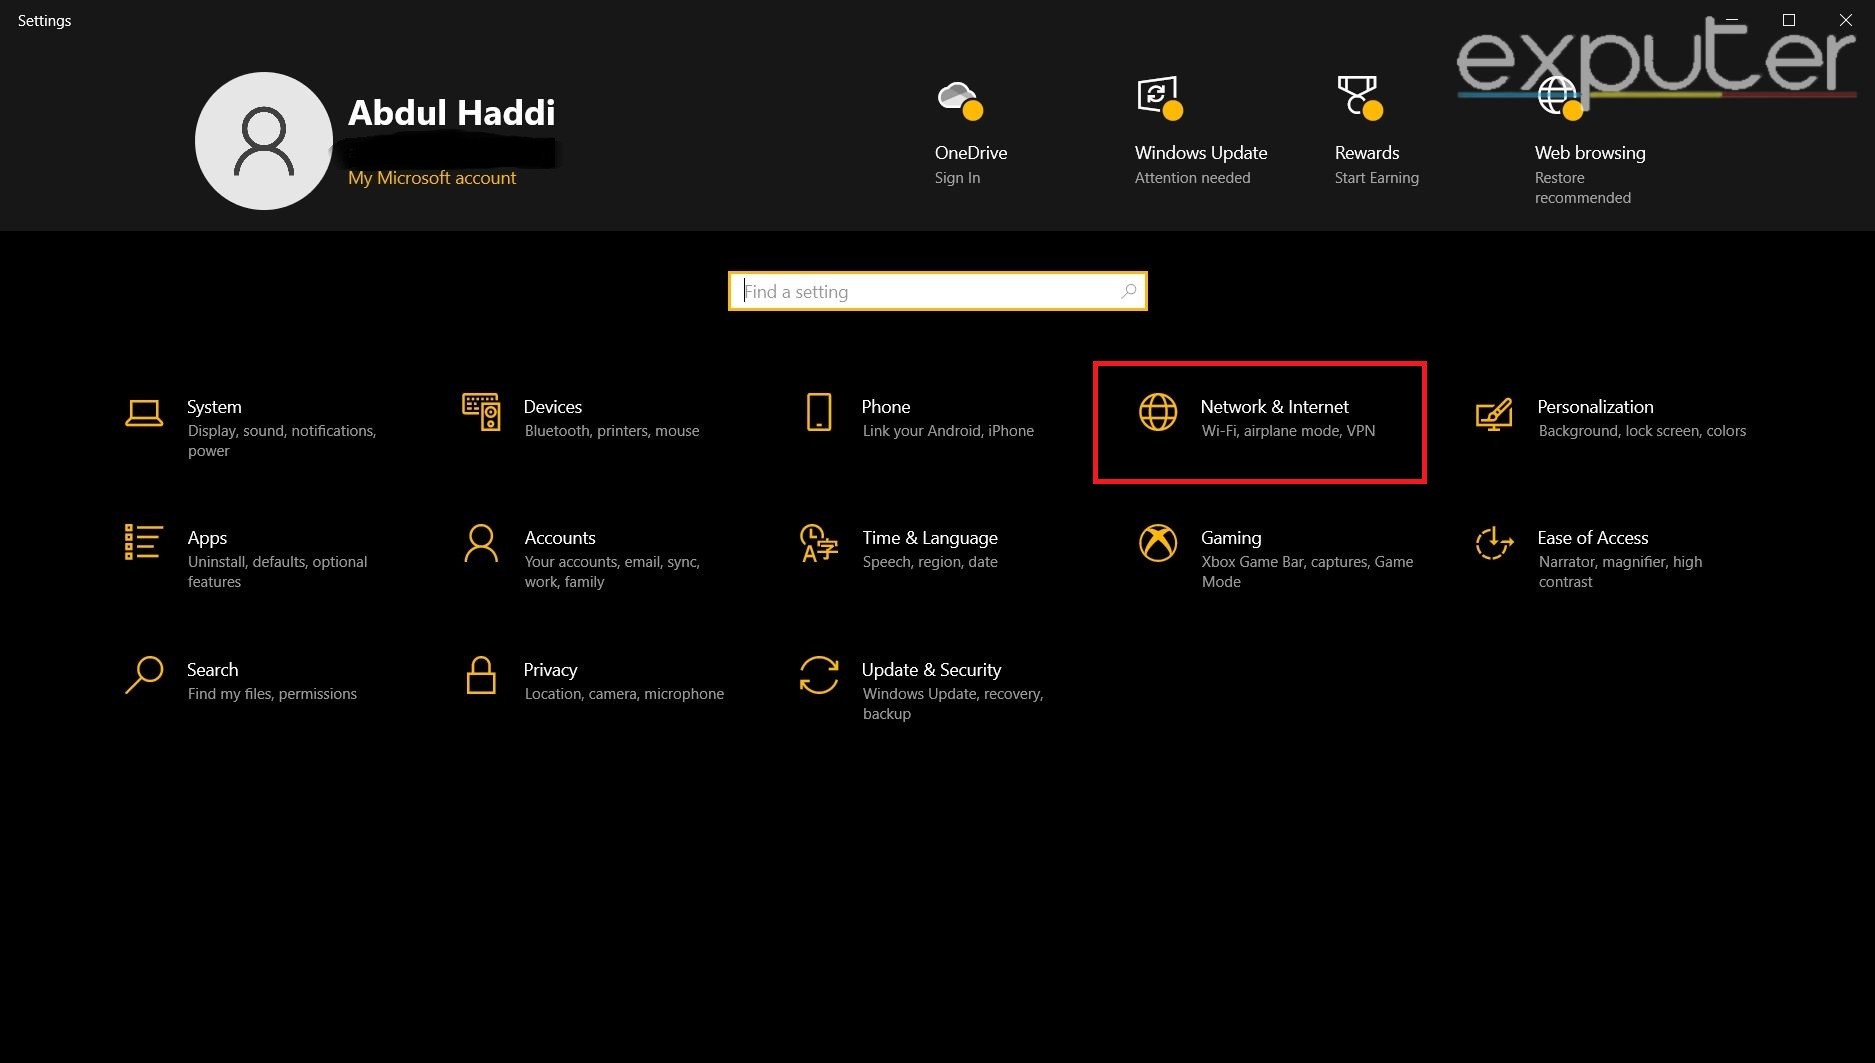
Search for ‘Settings‘ in the Windows Search Bar.
Open Settings and click on “Network & Internet,’ which will be the fourth option. Settings – Image Credits [eXputer]
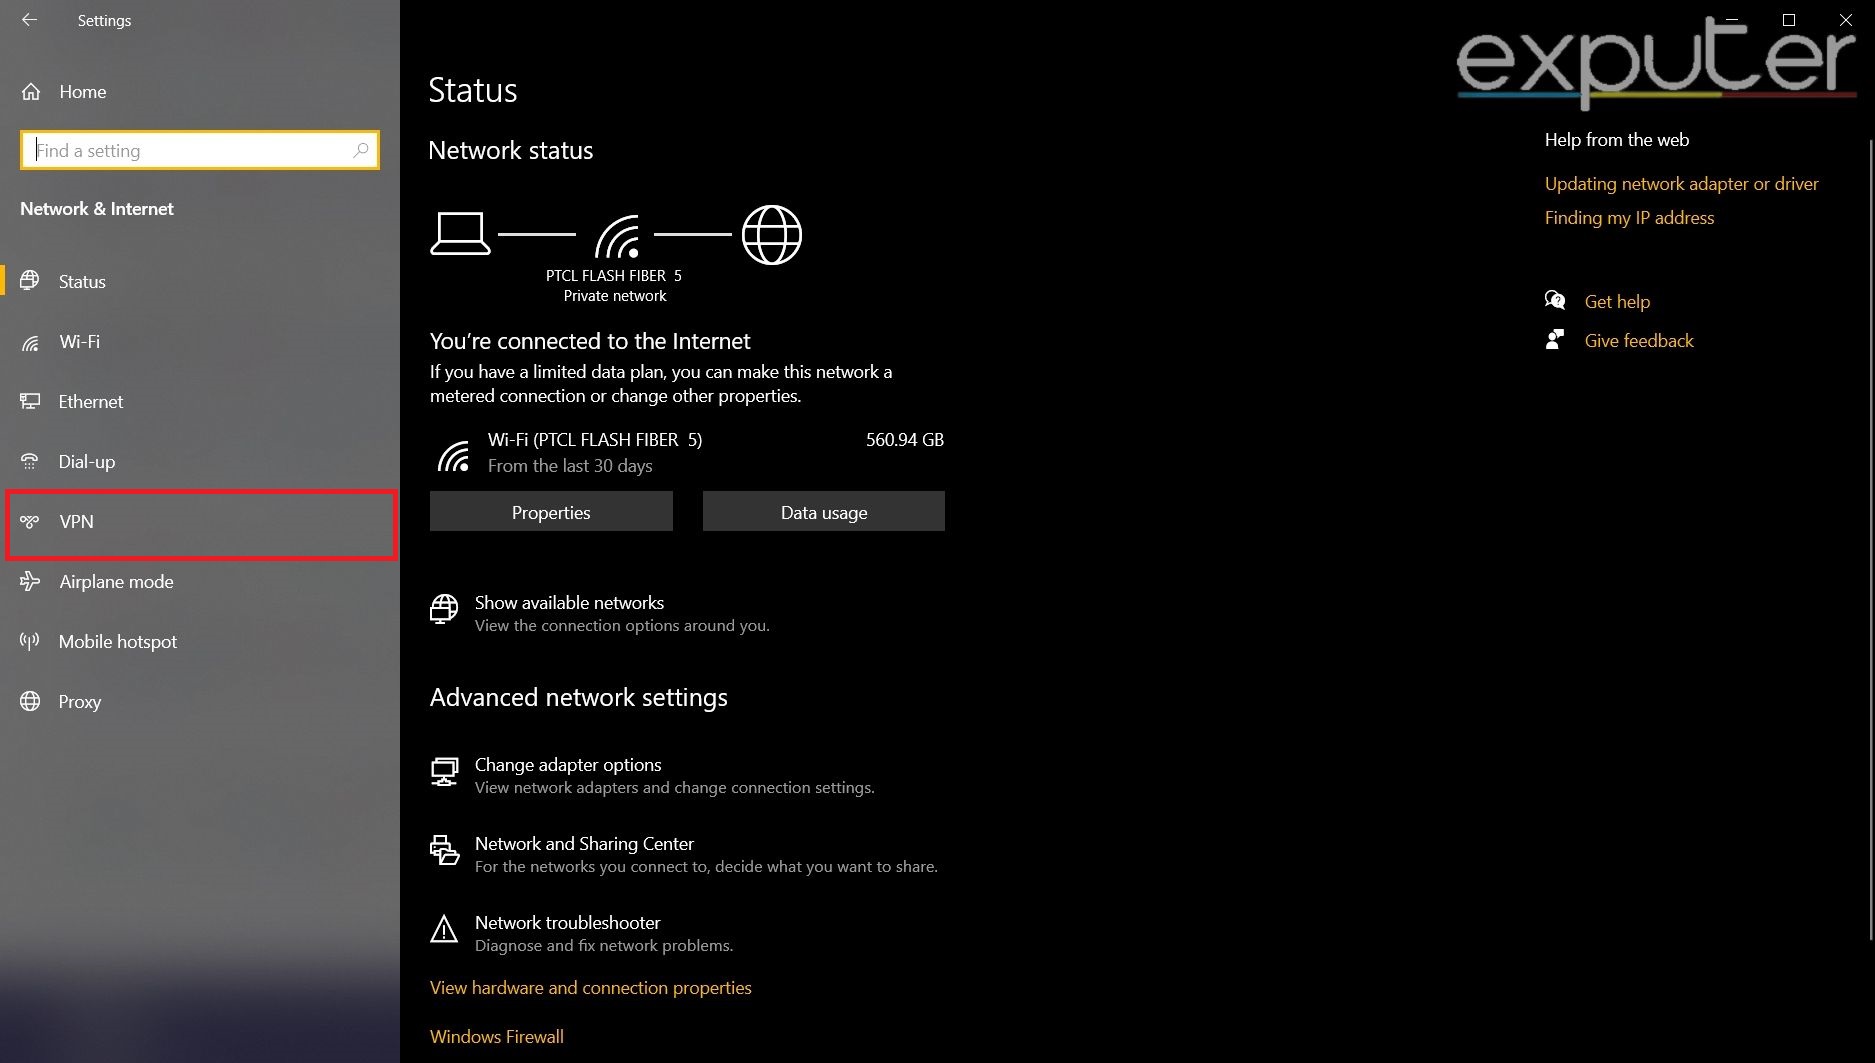
Click on ‘VPN,’ which is located on the left side. VPN option – Image Credits [eXputer]
Now, click on the VPN you’re using, and then select ‘Disconnect.’
Once done, the VPN will be disabled on your system.
Through VPN Application
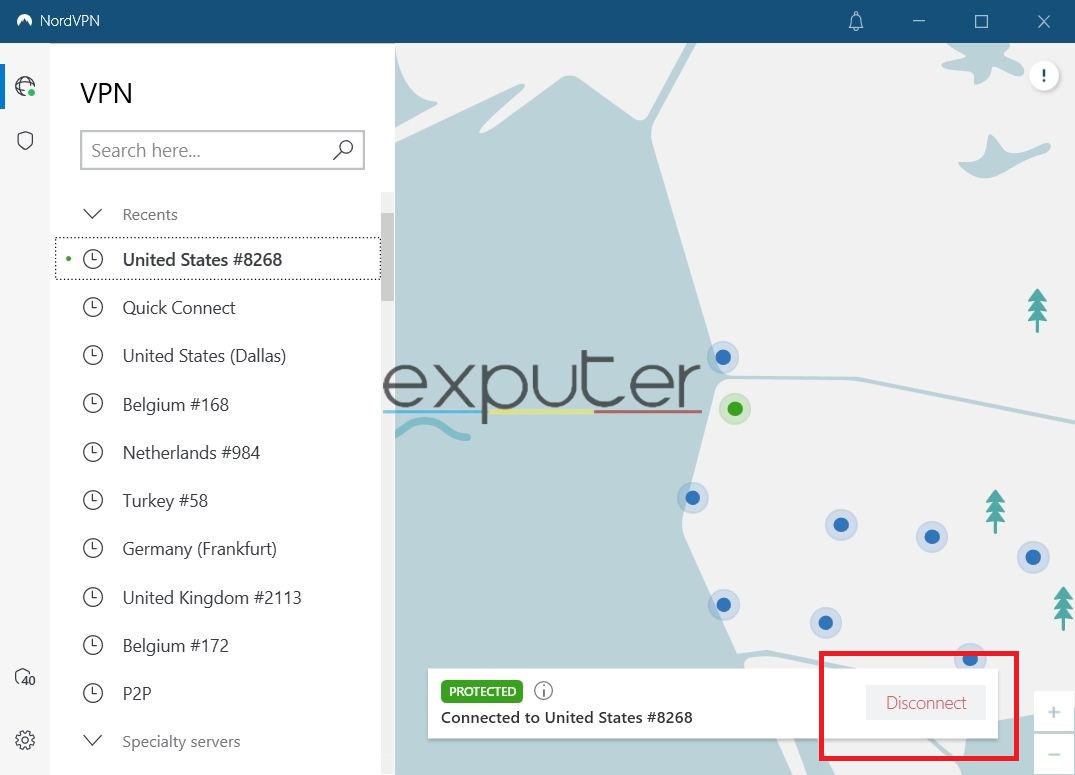
In some cases, you will need to disable the VPN directly from the application. For instance, if you have NordVPN installed on your PC, you will need to open it to turn it off.
Find and open the VPN application.
Click on the Power Icon or the ‘Disconnect‘ button. Nord VPN disconnect button – Image Credits [eXputer]
Wait for the connection to get disconnected.
If the button is not working, you can exit the application to disable the VPN. To do this, right-click on the application’s icon in the System Tray and select ‘Exit.’ This will not only quit the application but will also disable your VPN connection.
Why Does Windows 10/11 PC Need Optimization?
Now your PC might be a fully specced-out beast that can easily handle everyday tasks and gaming without breaking a sweat.
However, Windows 10 and 11’s performance can degrade over time due to several factors. Whether junk files are stacking up or malware is breaking your apps, your Windows can slow down for many reasons.
So, these tweaks and fixes aim to unlock your PC’s untapped potential. So let’s get to it.
That concludes our guide on Optimizing Windows 10 and 11 for maximum performance. These settings and tweaks will greatly improve PC performance, whether you’re running a lower-end PC or a high-end one. We hope you were able to unlock your PC’s full potential after performing these tweaks. You should notice a huge increase in gaming performance and other Windows tasks.
How can we make this post better? Your help would be appreciated. ✍
Summary
Windows 11 is easily one of the best operating systems for gaming or productivity. It proves to be a great successor to the already successful Windows 10 despite 11's rocky launch. So without sounding like Uncle Bill trying to sell you Windows, I'm going to discuss the best Windows settings and tweaks you can apply…
Haider Khan is our error guides writer who loves to tinker around with operating systems and game files to find practical solutions to video game issues. He then crafts easy-to-follow error fix guides based on his findings. He’s also a Battlefield veteran who likes to rack up some Ws in his spare time. Learn some more about his gaming journey on his Steamprofile.Experience: 3+ Years || Education: Bachelor's in Journalism || Successfully Troubleshot Over 200 Games || Mainly Covers Error Fix & Game Settings
Enjoyed this article? Discuss the latest gaming news, get expert help with guides and errors, and chat about all things gaming on eXputer Forums and Discord Server. Connect with fellow gamers who share your passion by becoming a part of eXputer's community.