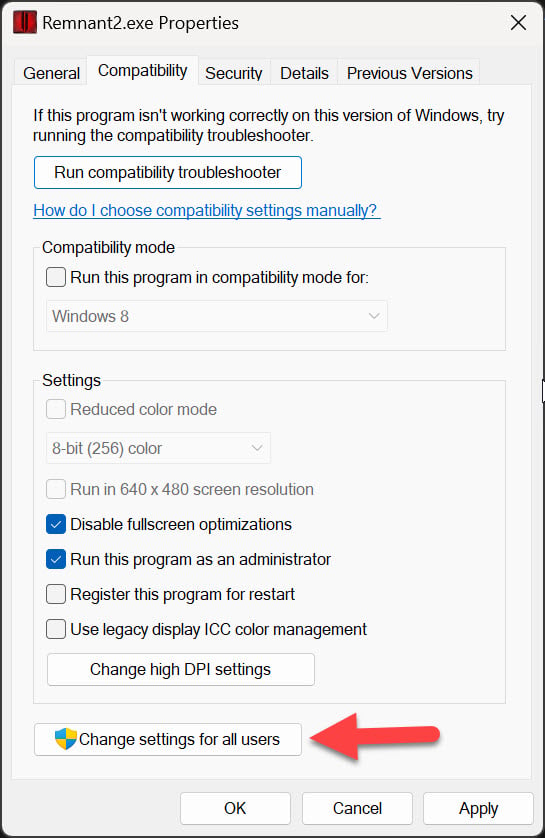
When browsing inside the properties of any executable program file, you’re bound to see these two main options in the compatibility section; Run as administrator and Disable fullscreen optimizations.
Whenever you read some of our error fix guides on eXputer, you’ll often find me suggesting readers run their games as administrators and disable fullscreen optimizations. This helps resolve any problems, most prominently, crashing, you might face. We will dive deeply into this particular fix and help you understand why it is necessary.
Here are all the methods to run an application with administrative privileges:
- Right Clicking On The Shortcut
- Shortcut In The Start Menu
- Through The Windows Search
- Running Pinned Application Through Taskbar
- Accessing Appllication’s Main Executable File
- Setting Up Run As Admin In Properties
- Run As Admin From Task Manager
Here are all the ways you can Disable the Fullscreen Optimization:
- In Application Properties (For Current User)
- In Application Properties (For All Users)
- Disable Fullscreen Optimization Via Registry Editor
Why Run A Program As An Administrator?
Sometimes, a game or a program on your system can’t access your system resources properly. This leads to you encountering errors or hard crashes randomly. You can try running the game or application with administrative privileges to resolve this issue. This grants your program admin rights, bypassing any restriction preventing it from accessing your PC’s resources.
Why Disable Fullscreen Optimizations?
Fullscreen Optimization is one of the features baked into Windows 10 and 11 that’s geared towards enhancing the experience of fullscreen applications. It’s a hybrid borderless-fullscreen window mode that makes it easier for users to alt+tab out of fullscreen apps, most notably games.
But sometimes, the feature can cause conflicts with some programs, causing them to display a black screen or crash randomly. Symptoms can include the program not launching or simply crashing without any error message. If these issues sound familiar to you, it’s best that you also disable fullscreen optimization. We’ll show you how in a second.
How Do You Run Your Programs As An Administrator?
Running your game or application as an administrator is one of the easiest things you can do. And guess what? There are several ways you can pull this off. We’ll illustrate each method so you can choose the one that suits you best.
- Here’s an official guide from Microsoft on running programs as an administrator.
Right Clicking On The Shortcut
This one is the easiest and most direct way to launch a program or game with administrator privileges.
Here’s how you can launch it with administrative privileges right then and there:
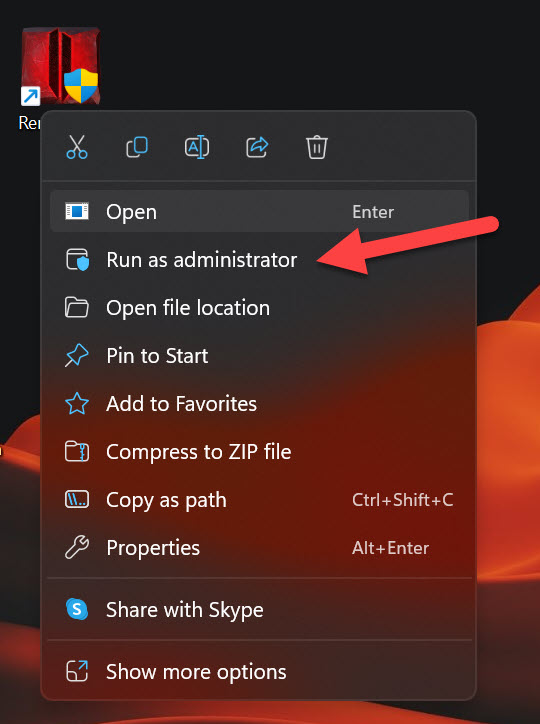
- Locate the application > Once located, right-click on it.
- As you right-click on the application > you must click the “Run As Administrator” option from the context menu.
And that’s it. Now, the application will launch with administrative privileges. You won’t face that issue if you face any errors or lack of functionality due to missing permissions.
Shortcut In The Start Menu
Another way you can launch your programs as an administrator is through the start menu.
- First, you need to open up the start menu and locate the game or application you want to launch as administrator.
- Once you find the application you want to launch as an administrator > simply right-click it > Once the context menu opens up > click on Run as an Administrator.

Start Menu (Image by eXputer)
This will launch the application as an administrator from the start menu. However, what if you can’t find the application you’re trying to launch in the Start Menu?
You need to pin it here by following the steps below:
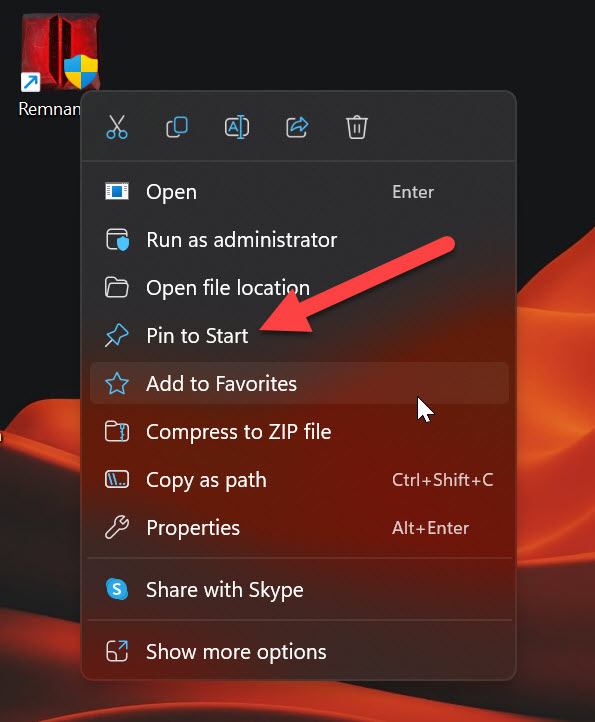
- Simply locate the application you want to add to start for easy access > Once you locate it > simply right-click on it and then > select the Pin To Start option.

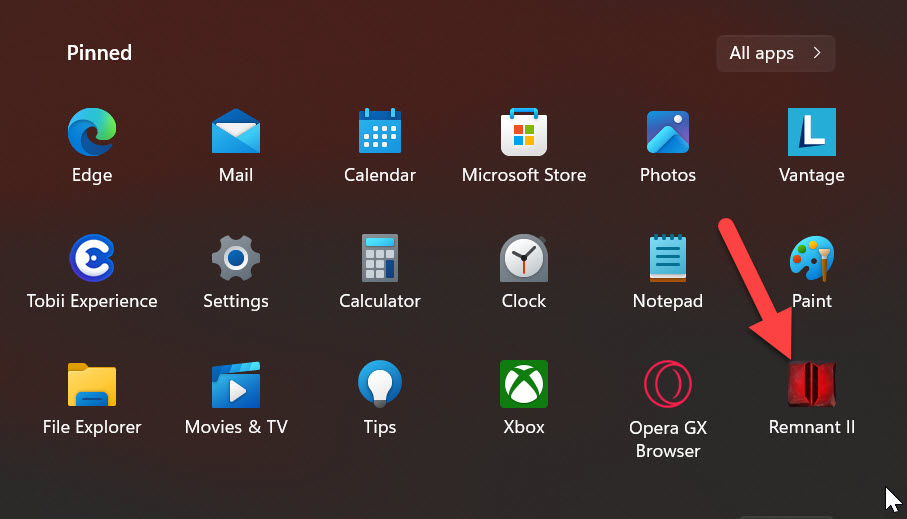
Pin To Start (Image by eXputer) - Once you click on the Pin To Start option > simply click on the Win key to open up the start menu > You’ll spot that application here.
- Now, you’ll have to right-click on it > click on Run As Administrator.

Application Pinned To Start (Image by eXputer)
This is how you can launch an application with administrative privileges from the start menu. It’s quite an easy way for people who don’t like to put their apps on a desktop and instead rely on the start menu to launch them quickly.
Through The Windows Search
You can also search for a particular application in the Windows Search and then launch it as admin from there. It’s also a quick and easy way to launch your application as an administrator, especially for applications you don’t have shortcuts for and use infrequently.
Here’s how to do it:
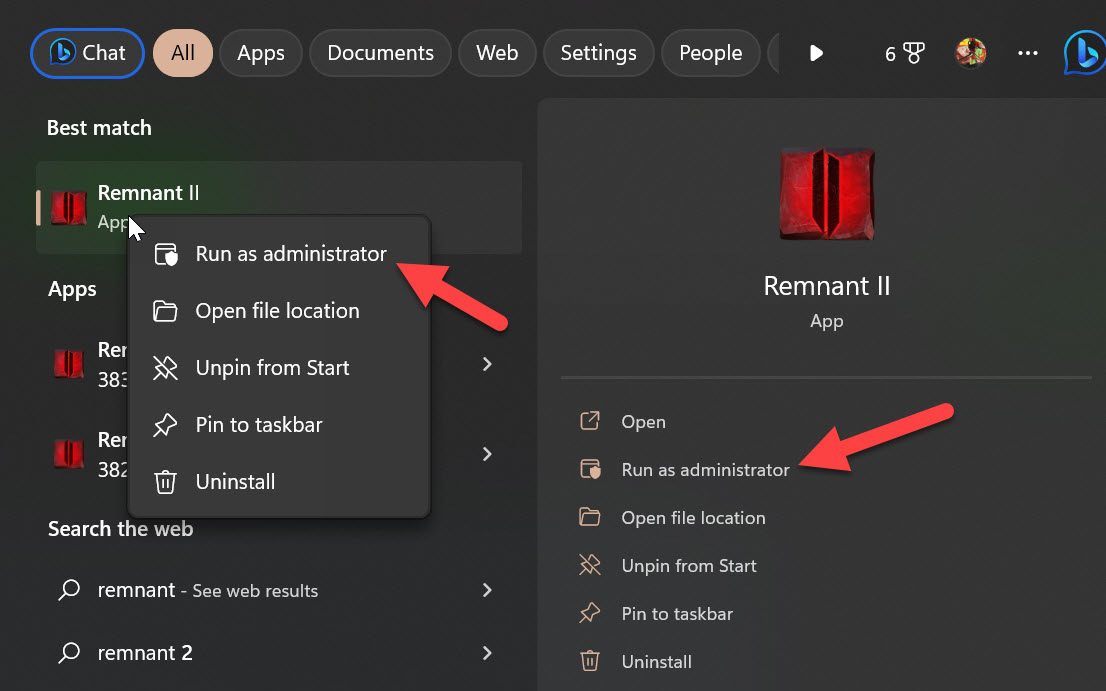
- Open up Windows Search by clicking on it > type the application name you want to launch.
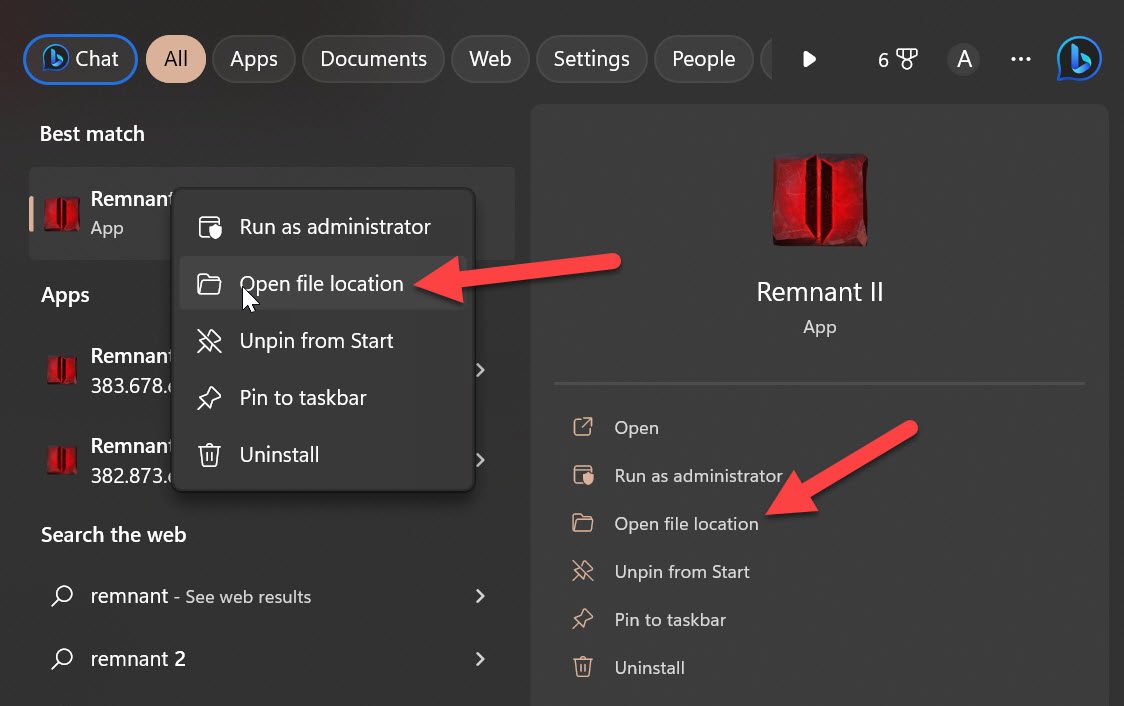
- Once the application shows up > you can right-click on it and run it as administrator. Or you can simply check it out in the right-side window > click on run as administrator.

Run Application As Admin From Windows Search (Image by eXputer) - Once you do it, the Windows Search will collapse > Your application or game will run with administrator privileges.
Running Pinned Application Through Taskbar
You can also pin your applications or games you need to launch as an administrator straight to the taskbar for easy access.
Here’s how you can do it:
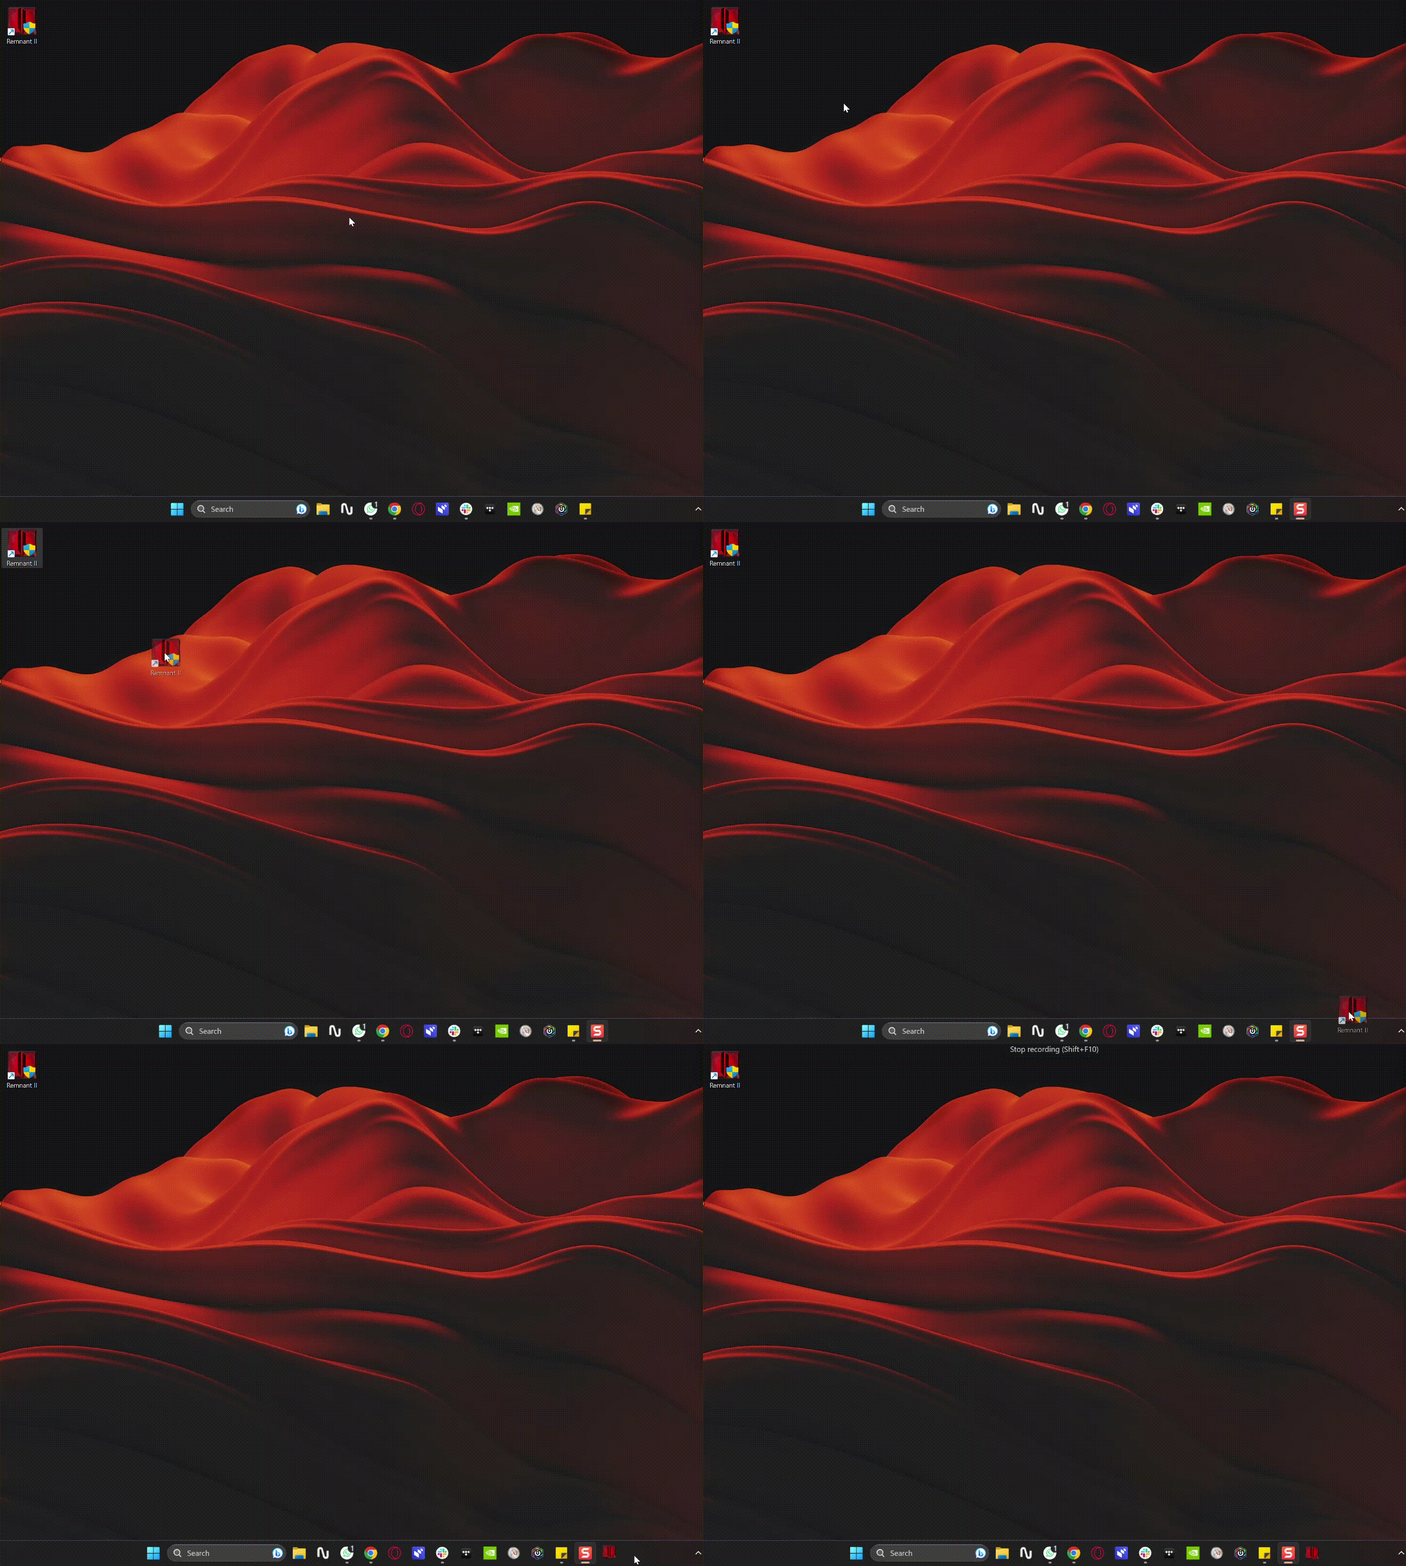
- First, locate the application that you need to pin to your taskbar > It could be a shortcut of an application or the main application itself.
- Once you locate the application > you must drag and drop it to the taskbar > it will be pinned.

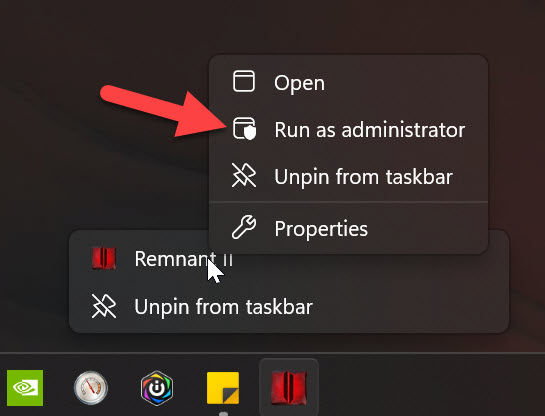
Pin An Application To The Taskbar (GIF by eXputer) - Once you’re done > simply right-click on the pinned application on the taskbar and then another right-click on the application name to open a context menu > In this menu you need to select Run Application As Administrator.

Run Application As Admin From The Taskbar (Image By eXputer)
And now you’re all set. With this method, you can launch any application or game with administrative privileges from practically anywhere on your system.
Accessing the Application’s Main Executable File
You can also run an application or game as an administrator from the main executable file. All you need to do is locate the local installation directory of that app or game and launch that application with administrative privileges.
Here’s how to do it:
- First, you must locate the application you want to launch as an administrator > After locating its shortcut > simply right-click > click on Open File Location.

Locate Main Application Executable Location (Image by eXputer) - Once you open the application or game’s installation directory > locate the main executable file and right-click on it.
- In the context menu > you can simply click on Run As Administrator. And that’s it.

Run Program As Admin Through Main Program Executable File (Image by eXputer)
Your application will run as administrator from the main executable file. This method is different in that any launch parameters you’ve used in the shortcut of this application won’t be active. So, this is one of the best ways to launch your application as an administrator.
Setting Up Run As Admin In Properties
Do you always require an application to launch with administrative privileges without the extra steps? This method is for you as it makes you configure the application properties once, and then the app or game will always launch as an administrator.
Here’s how to Set up run as Admin in properties:
- By following the previous method, you must locate the application or game you want to run as admin > Go to its installation folder.
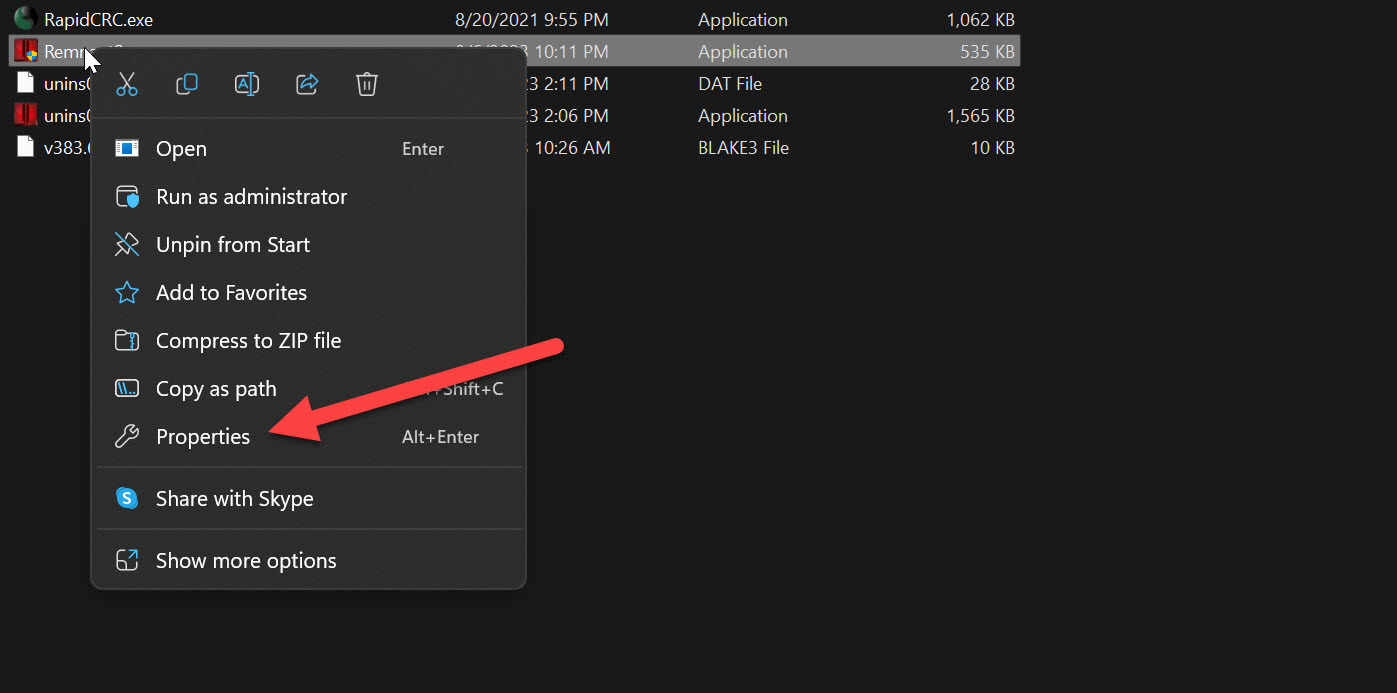
- Once in the installation folder > you must right-click on the main executable file and go to its properties.

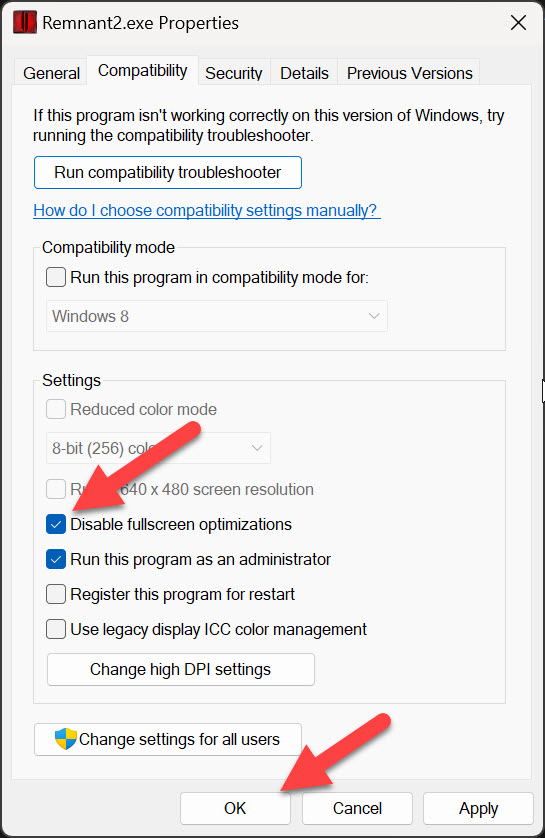
Access the application properties (Image by eXputer) - Inside the properties, you’ll need to head over to the compatibility tab > Checkmark the option that says.

Set Application to always run as Administrator (Image by eXputer) - Once you’re done toggling this option > Click OK to save the settings.
Now you’re all set. You can launch the application from its shortcuts on the desktop, taskbar, start menu, or Windows search, and it will always launch with administrative privileges.
Run As Admin From Task Manager
The final way to launch an app or game as an administrator is through the task manager.
Here’s how to do it:
- First, you must launch the Task Manager by hitting the shortcut key CTRL+SHIFT+ESC.
- As the task manager opens up > click on the option on the top that says Run New Task.
- Now, a window will open; here > you can type up the name of the executable file of your application or game.
- Once you browse your program or game’s executable file > checkmark the option that says Create This Task With Administrative Privileges.

Run App As Admin Through Task Manager (Image by eXputer) - After you’ve checkmarked the option > Click OK to launch that application or game.
Now, the game will launch with administrative privileges through the Task Manager. You can use these methods as an administrator to launch an application or game. Some methods may suit you, and some won’t, so we listed all the possible ways to help you find the one that suits you the best.
How To Disable Fullscreen Optimization In Windows
Now that we’ve covered all the possible ways to launch an application or game with administrative privileges, it’s time to look at ways to disable fullscreen optimization.
In Application Properties (For Current User)
You might have an application or game that is incompatible with the Windows Fullscreen Optimization feature. This means that said application/game is constantly crashing or performing poorly due to fullscreen optimizations in Windows.
- First, you need to locate the application you need to disable fullscreen optimizations > Once you find it > right-click it and select the open file location.

Locate Installation Directory (Image by eXputer) - You need to find the main executable file > right-click on it, and select properties.
- Inside the properties > you need to head over to the compatibility tab > where you need to toggle on the option Disable Fullscreen optimizations.

Disable Fullscreen Optimizations (Image by eXputer) - Once you’re done, simply click OK to save changes.
This will disable the fullscreen optimization feature for the current user who launches this particular application or game. If you want to disable fullscreen optimization for all the users of this Windows PC for this app, follow the upcoming steps.
In Application Properties (For All Users)
If you want to disable fullscreen optimizations for all the users of your PC when it comes to a particular application, you can do that, too.
Here’s how:
- Following the steps discussed in the previous method, follow them exactly until step 3.
- In addition to this step > You need to click the Change Settings for All Users button.

Change Program Settings For All The Users (Image by eXputer) - This will open up an identical menu to the one you just saw > However, these compatibility settings will affect all the users of your PC > Simply repeat the process by toggling on the Disable Fullscreen Optimization option and clicking ok.

Disable Fullscreen Optimizations for all the users of your PC (Image by eXputer) - Click OK to save changes once you’re back in the original compatibility settings.
Following the step above, you’ll simply disable the Windows Fullscreen Optimization feature for all the users using this particular application or game. In other words, they won’t have to repeat this process to have stable performance when launching this particular game or application.
Disable Fullscreen Optimization Via Registry Editor
Aside from disabling fullscreen optimization from settings, you can also disable it via the registry editor. To disable it via the registry editor, make sure to follow the steps given below:
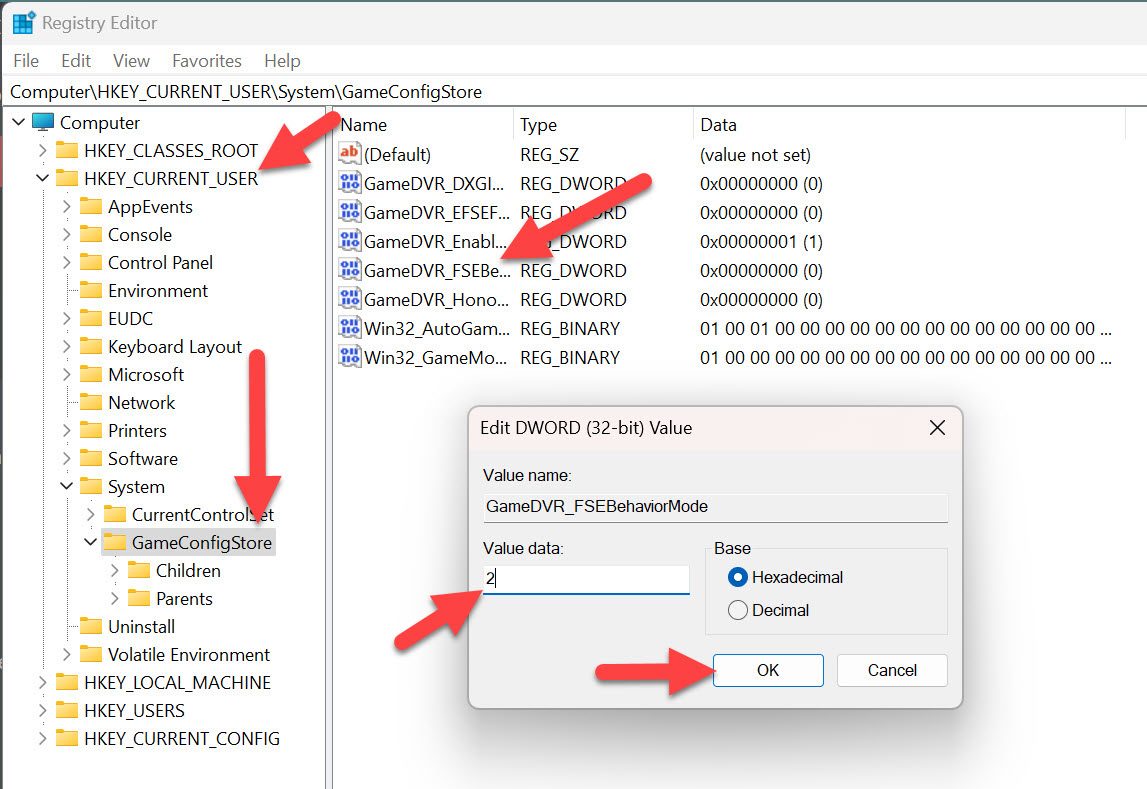
- First press the Windows key > R together to open the run dialog.
- Type regedit in the box > click ok to continue.
- Navigate to the HKEY_CURRENT_USER\System\GameConfigStore folder in the registry editor window.
- Right-click on the right side > Choose New>DWORD (32-bit) value to continue.
- Name it the GameDVR_FSEBehaviour.
- Double-click it to change its value data > Set its value data to 2 to disable the fullscreen optimization feature.
After that, save these changes and exit the registry editor window. After completing all the steps, you have successfully disabled fullscreen optimization.
Benefits Of Running Your Program As Administrator
You can expect the following benefits from running an application or game with administrative privileges.
- Permissions: Granting proper permissions to the program lets it have uninterrupted access to your system resources.
- Control: The program gets more control of your system and functions better.
- No Interference: No other application interferes with the program’s operations as it has the highest privileges on your system.
- Improved Performance: In some cases, the performance is improved for an application or game since your PC directs resources better to your program.
Benefits Of Disabling Fullscreen Optimization
If you’re disabling Fullscreen Optimization for your application or games, you can expect the following benefits:
- Performance improvement: By disabling fullscreen optimizations, your game or program will run in either exclusive fullscreen mode or borderless Windows mode.
- Input lag reduction: People have reported that disabling the fullscreen optimization feature has actually helped them improve gaming latency and reduce input lag.
- Fix Overlays: If you’ve noticed that some overlays are not working on your games (given you’ve not disabled these third-party overlays yourself), then fullscreen optimizations may be the culprit here. Disabling it lets you summon your in-game overlays to use them without any problems.
Ending Words
And there you have it. I’ve shared every bit of the method when running your games or applications as administrators or disabling Fullscreen Optimizations. Please contact me in the comments below if you have any lingering questions my guide couldn’t answer.
FAQs
Running your program as an administrator gives your program the highest operational privileges. This grants the application all the permissions it needs to function smoothly.
Running a program as administrator basically gives it full control of your PC. So, if you try to run a malicious application as an administrator, it could bypass your system security layers and cause harm to your personal data.
One of the features in Windows 10, which was developed by Microsoft, is Fullscreen optimization. The main purpose of this feature is to provide clear and smooth visuals, reduce input latency and improve overall performance.
You could face performance degradation and input lag if you turn on Fullscreen Optimization for an application or a game. However, it’s not true for all applications.
Here are some more Windows guides on Windows that you’ll find interesting:
- Best Windows Optimization/Settings Guide
- How To Restart The Modem
- Methods To Restart Your PC
- Test Your Network Connection
- How To Reset The IP Address
- Disable Third-party Applications Overlay
- Whitelist Your Application From Antivirus
- Allow Your Applications Through Firewall
Thanks! Do share your feedback with us. ⚡
How can we make this post better? Your help would be appreciated. ✍

