Several GPU-hungry applications require direct GPU access and VRAM to run properly. If you aren’t using your dedicated GPU, it can lead to a lackluster application/gaming experience. To combat this problem, you’ll need to learn how to force use your dedicated GPU on your laptop or computer. This can often unleash the real powers of the user’s system, experiencing smoother graphics, faster rendering, and a better gaming experience.
- Reasons like superior performance, multiple display support, better graphics, and GPU acceleration should motivate you to force use your dedicated GPU on your laptop/setup.
- You can check if your system has a dedicated GPU through the devise manager.
- There are multiple ways how you can use the dedicated GPU forcefully.
- You can set GPU usage for specific apps from Windows Settings.
- If you have an NVIDIA Graphics Card, we recommend you use the NVIDIA Control Panel.
- For AMD users, we have the AMD Catalyst Control Center.
- You can even alter the preferred GPU from the UEFI.
- Through Google Chrome, you can check if the changes you made are applied.
- However, reasons like high cost, increased power and heat, and specific system requirements can make you double-think if you want to use the dedicated GPU.
How To Check If Your System Has A Dedicated GPU
The first step in using a dedicated GPU to perform your tasks is to see if your system has one. The procedure is extremely simple, so follow along!
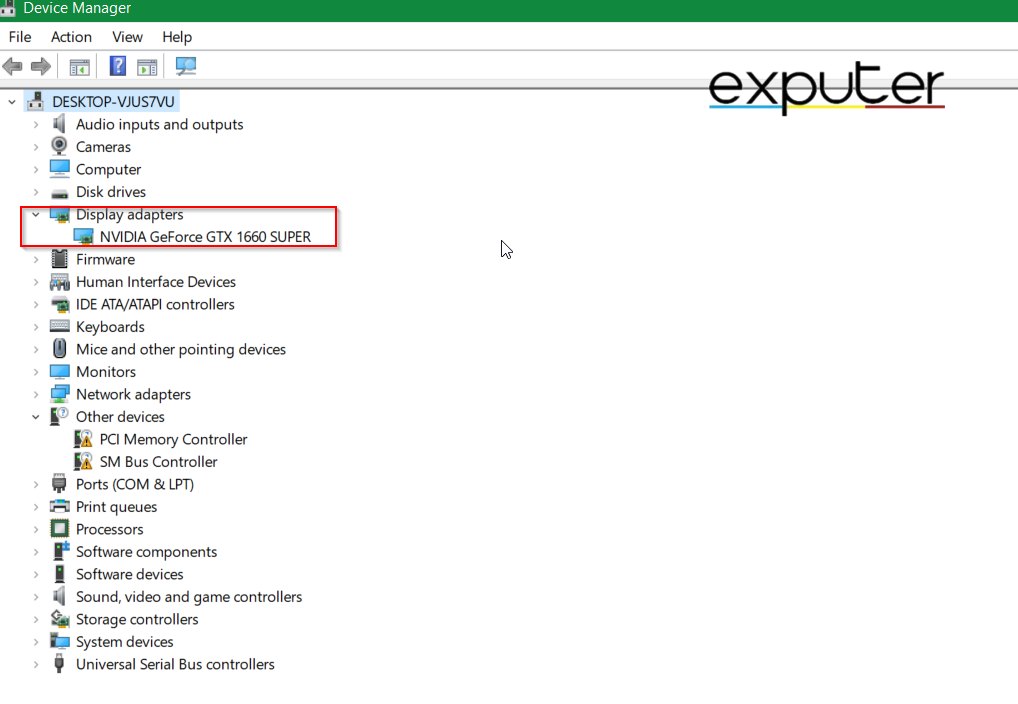
- Press Win, and search for Devise Manager.
- Navigate to the option for Display Adapters.
- Click on the right arrow to display its details.

Check if your system has a dedicated GPU (Image by eXputer) - This will show which GPU your system is using.
How To Force Use Your Dedicated GPU
There are many ways to force use your dedicated GPU on your laptop or computer, and I will guide you through them. This will make sure you harness the true power of your system.
Set Preferred GPU Using Settings
You can use the settings app in Windows to set a preferred GPU for any specific app you want. Follow the method below to do this.
- Press Win, and search for Settings.
- Once you are in settings, click System.
- Navigate to Graphics Settings. It will be sitting on the bottom of your screen.
- Once you are in Graphics Settings, click on the toggle bar for graphics performance settings and click on Microsoft Store App.
- Next, click whichever app you want.
- Click on Add.

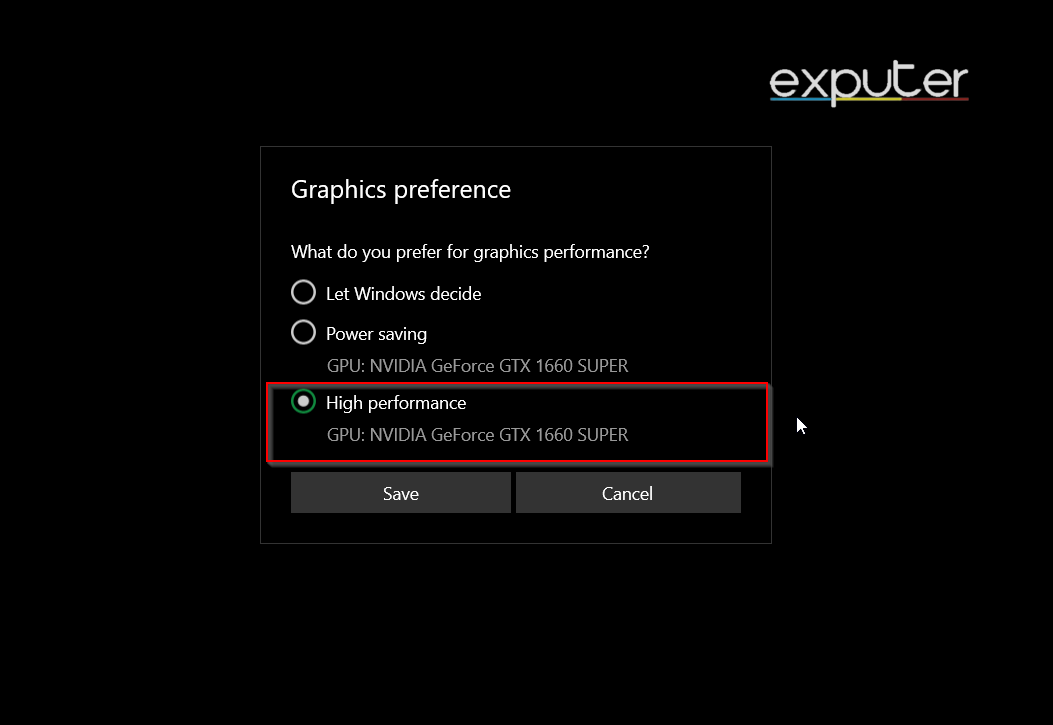
Force Use Your GPU using Settings (Image by eXputer) - Now, click on options.
- Once you choose options, you select which GPU you want to use and if it should be high or low performance.

Set GPU to High Performance (Image by eXputer)

Boom! You are all done. If the app you selected were graphics intensive, you would notice a significant improvement in performance.
Use the NVIDIA Control Panel
A dedicated GPU must be used for gaming and other graphics-intensive tasks such as 3D Modeling, coding, and rendering. However, oftentimes you might notice that certain applications are not using the dedicated GPU. If you have an NVIDIA GPU, you can use this method to correct this.
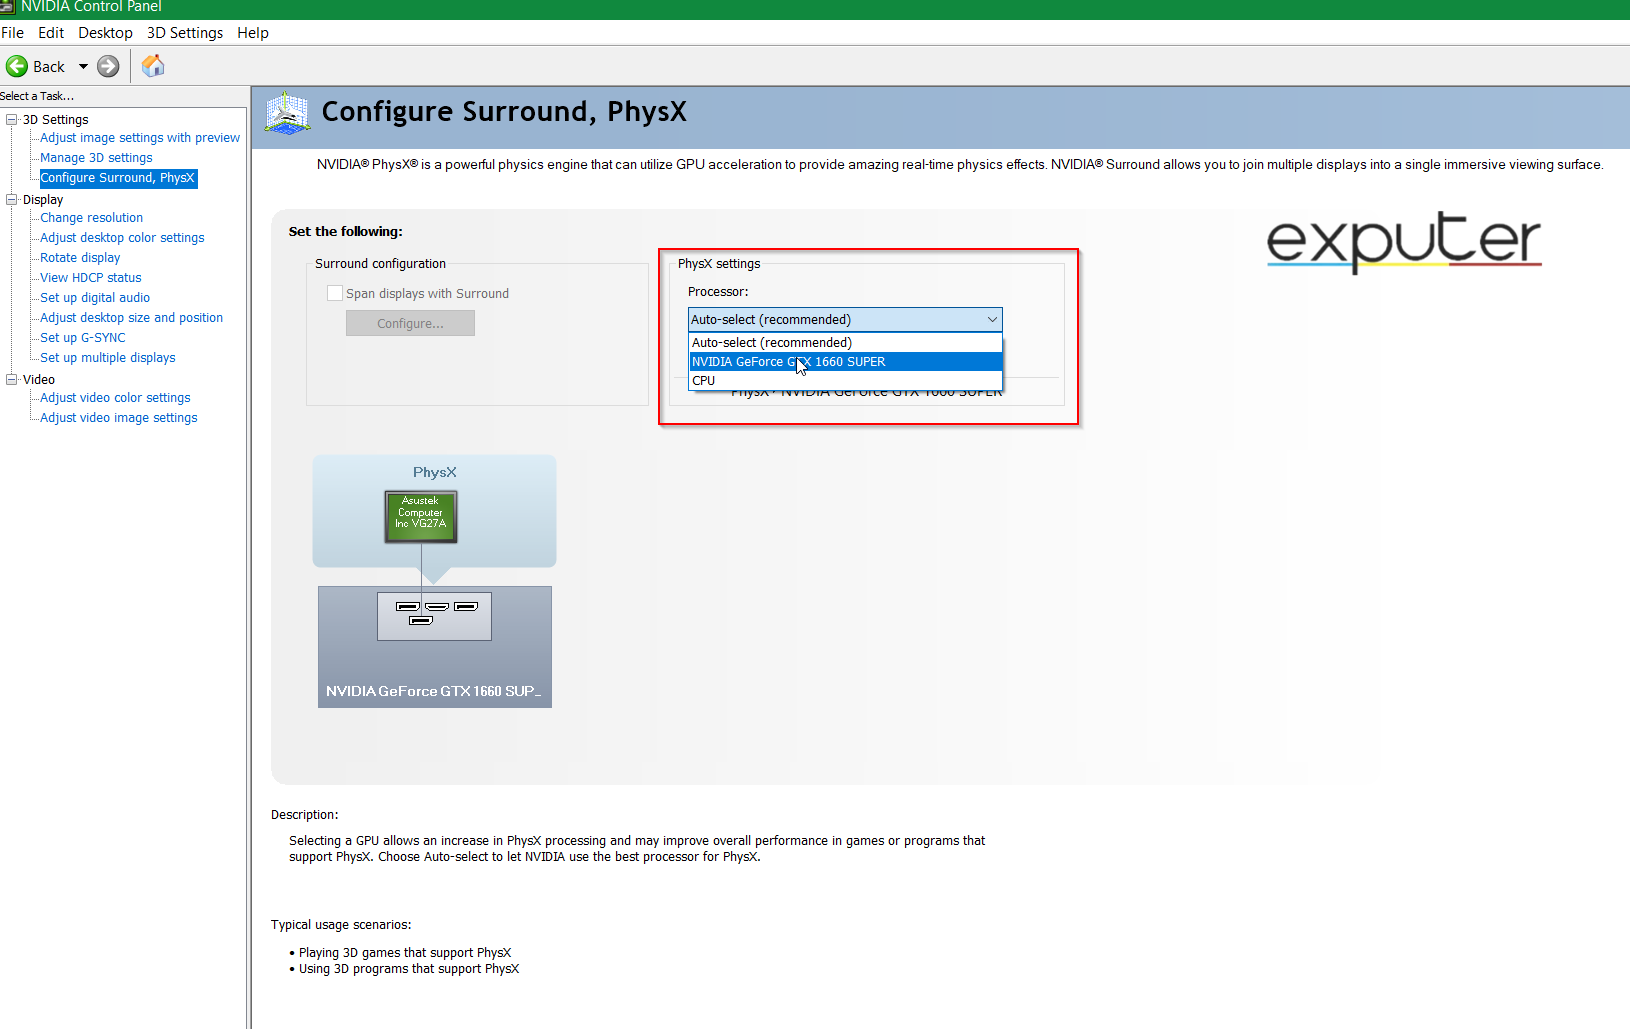
- Right-click on your desktop to find an option for NVIDIA Control Panel.
- Otherwise, press Win and search for NVIDIA Control Panel.
- Once you are in NVIDIA Control Panel, select Configure Surround and PhysX.
- Now, you have to select your preferred processor. From PhysX settings, select the drop-down menu and select the dedicated GPU to force use your dedicated GPU.
- Close the panel. Your PC will now run on your newly selected processor.

Force Use Dedicated GPU through NVIDIA Control Panel (Image by eXputer)
After you finish this, I recommend reading our Best Nvidia Control Panel Settings guide to optimize your experience further. Your gaming, coding, and rendering experiences will be much smoother now.
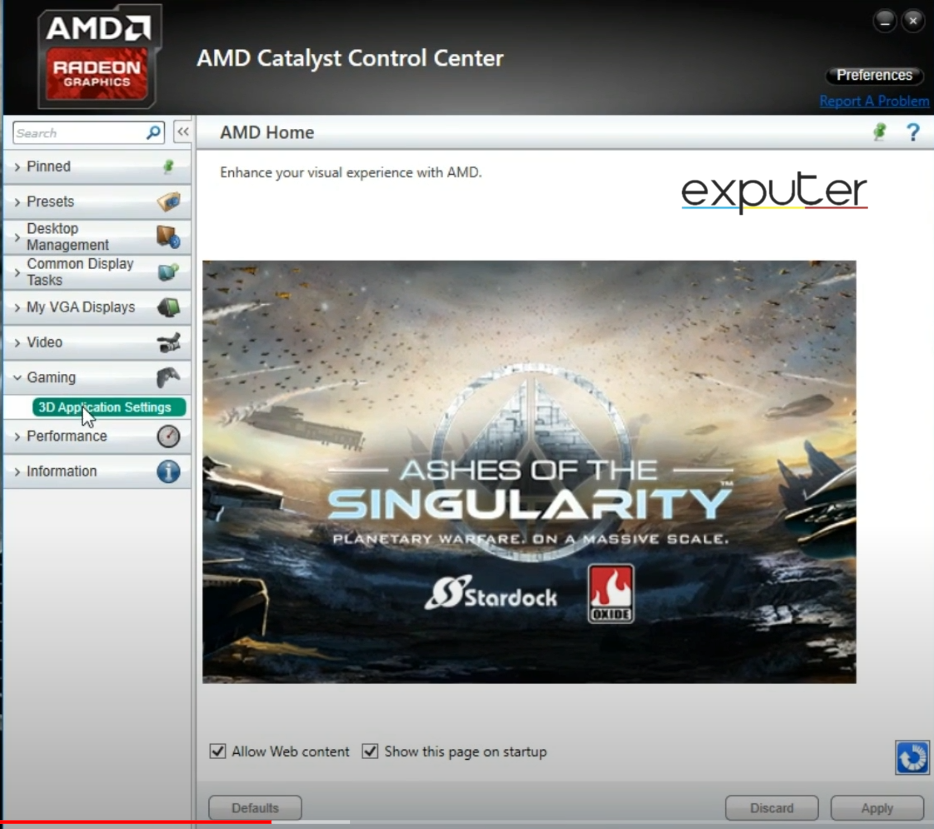
Use the AMD Catalyst Control Center
In contrast to the NVIDIA Control Panel, the AMD Catalyst Control Center does not feature a context menu. As a result, adjusting the preferred GPU for applications requires following the steps outlined below.
Sometimes, users do not have the AMD Catalyst Control Center installed on their system. You can download it from here.
- Press Win, and search for AMD Catalyst Control Center. Or right-click on the desktop and access the control center from there.

AMD Catalyst Control Center (Image by eXputer) - Go to Switchable Graphics Application Settings. Typically when you launch the control centre, you will already be here.
- Click on Add Application.
- Select any application you want from your file explorer.
- Change its option from based on power to High performance.
Now, this application will always use your dedicated AMD GPU. You can further optimize the driver’s performance using the best AMD settings in Radeon Panel.
Using Intel 3D Control Panel
If you have Intel Iris GPU, you can force your system to use that too. This can be done through the Intel 3D Control Panel. However, you may have to download this application first. You can do this via the Microsoft Store or by updating your drivers.
Once all that is set up, you can follow the steps below to force the use of the dedicated intel GPU on your laptop or setup.
- Press Win and search for the Intel 3D Control Panel or right-click on your Desktop.

Intel 3D Control Panel (Image by eXputer) - Once you are there, click on 3D.
- Now set the 3D Preference to Performance.
- Next., you have to untick the Application Optimal Mode option.
- After that, go to the power tab and click on Maximum Performance.
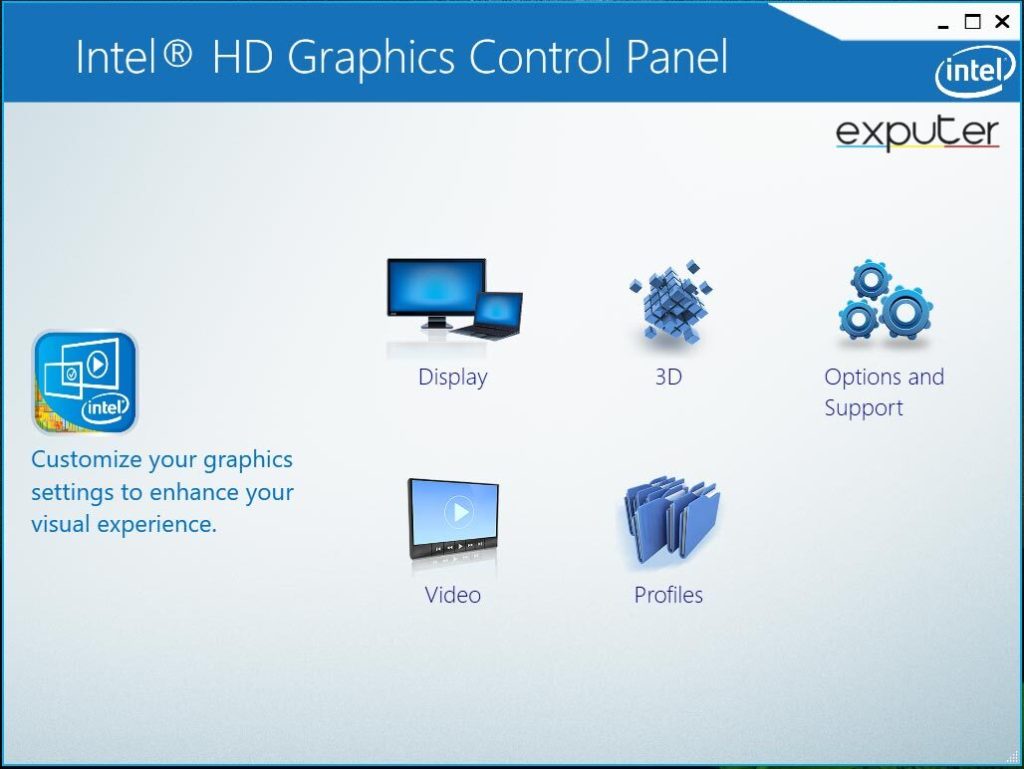
By following these series of steps, your PC will force use your Intel Iris GPU.
Using The UEFI/BIOS
You can even use the BIOS/UEFI of your system to make use of your dedicated GPU.
- First, you need to shut down your system.
- Turn it back on when it is booting up, and press DEL or F2, depending on the make and model of your PC.

Bios Settings (Image by eXputer) - Once in the UEFI settings, navigate to the graphics settings.
- In the PCIe section, set the graphics to dedicated.
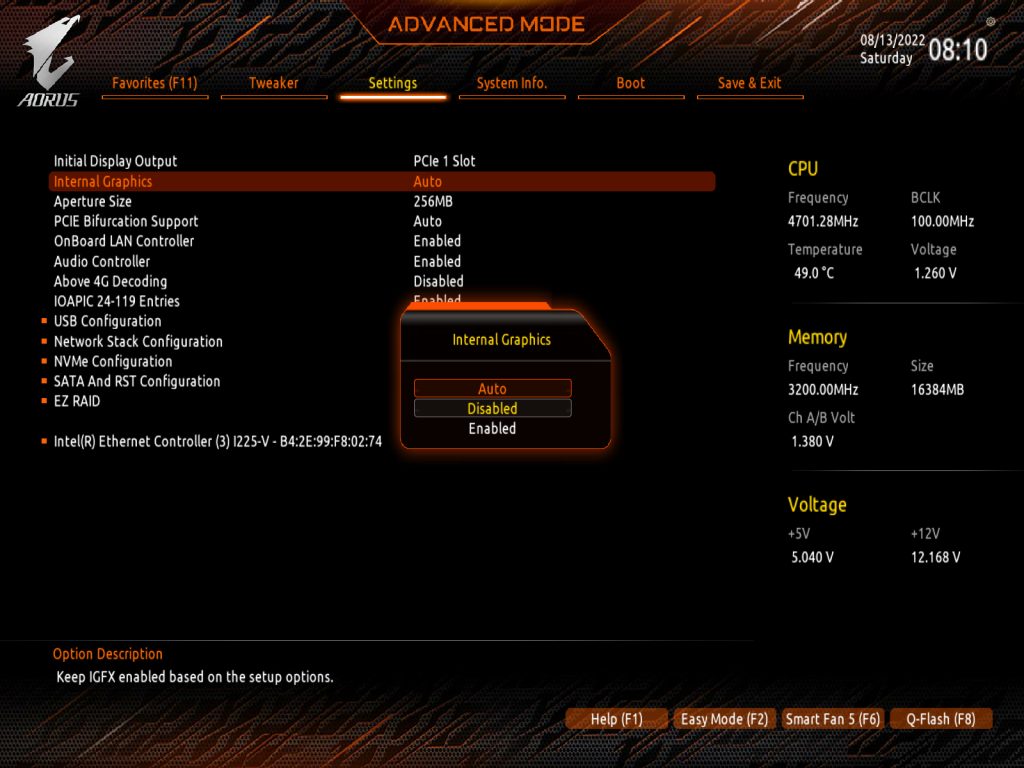
This will set the GPU to be the dedicated one globally.
Check If The Dedicated GPU Is Being Used
If you globally set the dedicated GPU and want to check it, we got you! We can use Google Chrome for this. The following are simple and easy steps to check this.
- Press Win, and search for Google Chrome.
- Type chrome://gpu/ in the search bar and press enter.
- Press CTRL+F at the same time to open a search bar on the right corner of your screen.
- Type in GL_RENDER.

Check If a Dedicated GPU is being used. (Image by eXputer) - Here you can see whether the dedicated GPU is being used or the integrated one.
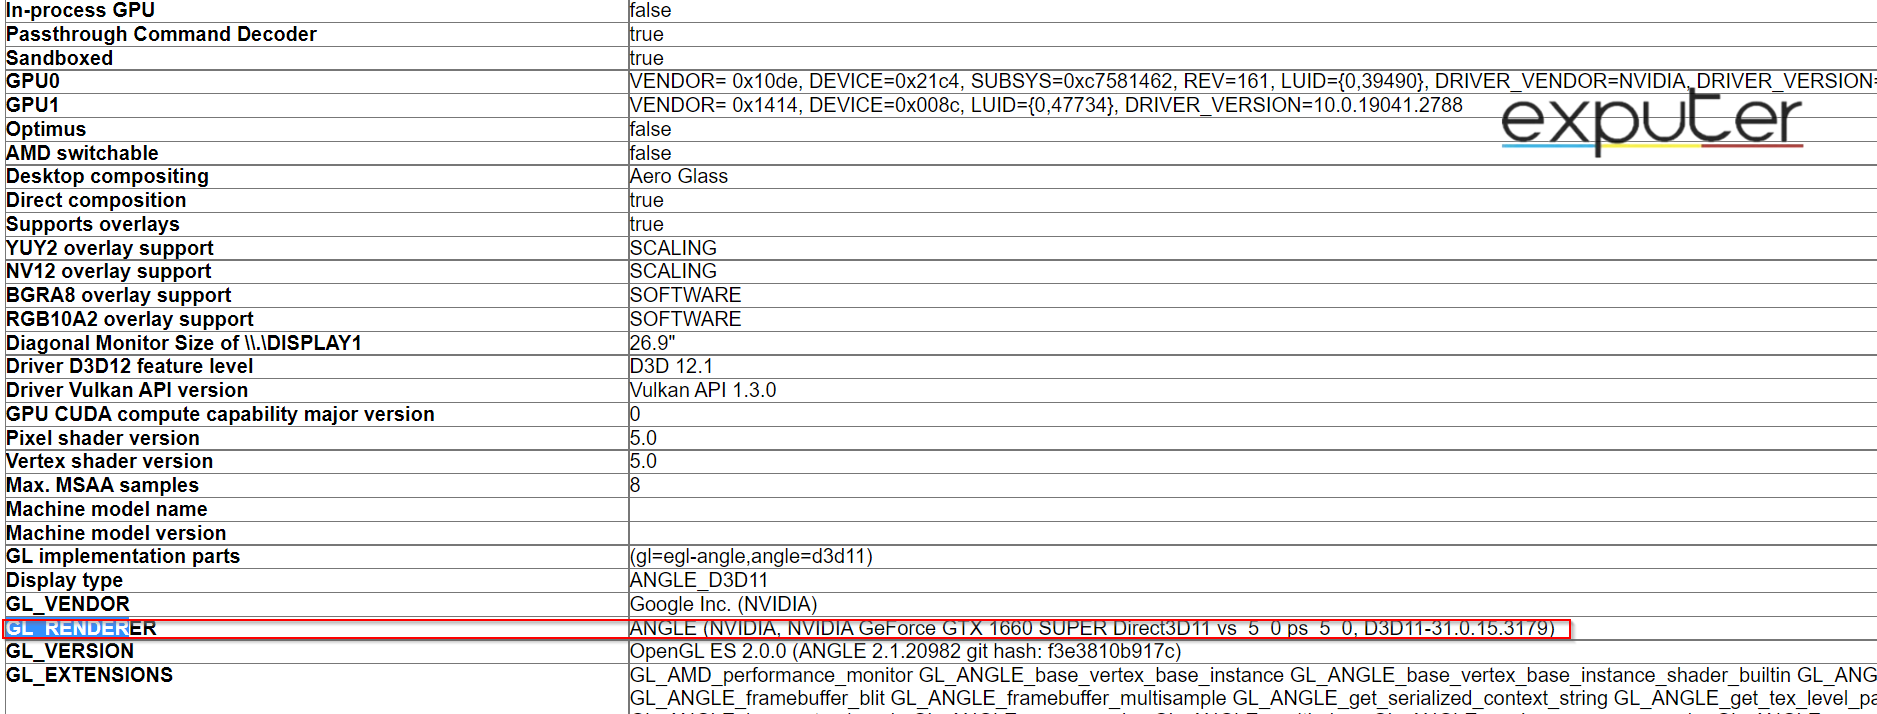
If this shows your dedicated GPU, you are all done!!
Benefits Of Using Your Dedicated GPU
There are countless advantages to using a dedicated GPU over an integrated graphics card or not utilizing the power of the GPU at all. Some of these advantages are listed below.
Superior Performance
Dedicated graphics cards have much more computational power than their integrated graphics card counterparts. This is due to the fact that dedicated GPUs are bigger and have more execution units. Even the most powerful chipsets, like the Apple M2 chipset, are 1/3 of the size of dedicated GPUs.
Another reason for higher performance is that dedicated GPUs have their own dedicated RAM. On the other hand, integrated GPUs have to share the system RAM. This can cause bottlenecks and overall sluggish performance on GPU-intensive tasks.
Multiple Display Support
If you are using more than one monitor for increased productivity or a more immersive gaming experience, using a dedicated GPU can benefit you greatly. Dedicated GPUs often offer much more multi-monitor support than integrated GPUs.
Enhanced Graphics Performance
Dedicated GPUs are specifically designed for tasks that are graphics-intensive, for example, gaming, video editing, and 3D modeling. Since these chipsets have dedicated video memory and specialized hardware for graphics-intensive tasks, you can immerse yourself in smoother gaming and higher frame rates.
GPU Acceleration
Countless applications like programming platforms and 3D modeling can use GPU to accelerate their computations. This can significantly improve the speed of tasks that require processing, simulations, and complex calculations.
However, depending on the configuration of your system, some applications tend to slow down when the hardware is accelerated. You can learn more about this by reading our article on How to Disable Hardware Acceleration.
Disadvantages Of Using Your Dedicated GPU
When it comes to using a dedicated GPU, there are a lot of fruitful benefits you can utilize, however, there are a few disadvantages you should keep in mind.
Dedicated GPUs Are Expensive
Modern computer hardware is expensive as it is. However, dedicated GPUs are astronomically expensive, making it impossible for a normal user to buy them.
Increased Power Consumption
Compared to integrated graphics, dedicated GPUs consume a lot more power. So, when you force to use your dedicated GPU on your laptop, it can drain its battery life much quicker. However, if you have a setup, you will face increased electricity bills.
Heat Generation
Dedicated GPUs consume a lot of power, which means they also generate high amounts of heat during intensive tasks. This can cause your system to overheat, which can cause a multitude of problems. Make sure you have a proper cooling system before you use these GPUs.
System Requirments
If you have decided to get a separate dedicated GPU for your system, you must ensure you have a compatible motherboard. Also, you would need a sufficiently powerful PSU (Power Supply Unit) and enough physical space in the PC case to accommodate cooling components.
Final Words
I hope I helped you in forcing the use of your dedicated GPU. If you want to increase your gaming performance further, we would recommend checking out our article for the best settings to optimize Windows 10 for gaming.
If you want to optimize settings for a specific game, you can check our best settings page and elevate your gaming experience to the next level.
FAQs
For high-end and intensive tasks, 100% GPU usage is not considered bad, so you do need to worry.
95 degrees Celsius is a dangerously high GPU temperature. This can cause problems with your hardware and will also cause thermal throttling.
A normal GPU temperature can range from anywhere between 30 degrees Celsius to 45 degrees Celsius when idol. When it is used, it can reach temperatures around 75 degrees Celsius. During graphically intensive tasks, it can reach up to 85 degrees Celsius.
Thanks! Do share your feedback with us. ⚡
How can we make this post better? Your help would be appreciated. ✍