Hogwarts Legacy, an open-world game, allows players to get the most out of it by hiding easy and complex puzzles in plain sight and tougher puzzles that require extreme brainpower to solve, and the Hogwarts Legacy Bridge Puzzle is one such example.
To solve the Bridge Puzzle in Hogwarts Legacy, follow these steps:
- Locate the Bridge Puzzle in the courtyard area of the castle, at the transition point from the circular courtyard to the longer bridge.
- Your objective is to light up the braziers on the bridge and match the symbols on the stones at the bridge’s edges with Roman numerals.
- At the start of the bridge, you’ll find a circular plate with symbols that correspond to the braziers and Roman numerals.
- Light up the braziers and ensure they match the corresponding symbols and Roman numerals on the stones.
- Successfully solving the puzzle by correctly aligning and lighting all four braziers will reward you with three chests.
Puzzle Map
To solve the puzzle, players should keep in mind that rushing through it may lead to mistakes. Take your time to fully understand and solve the puzzle correctly.
Here are some steps to help you navigate the puzzle in Hogwarts Legacy:
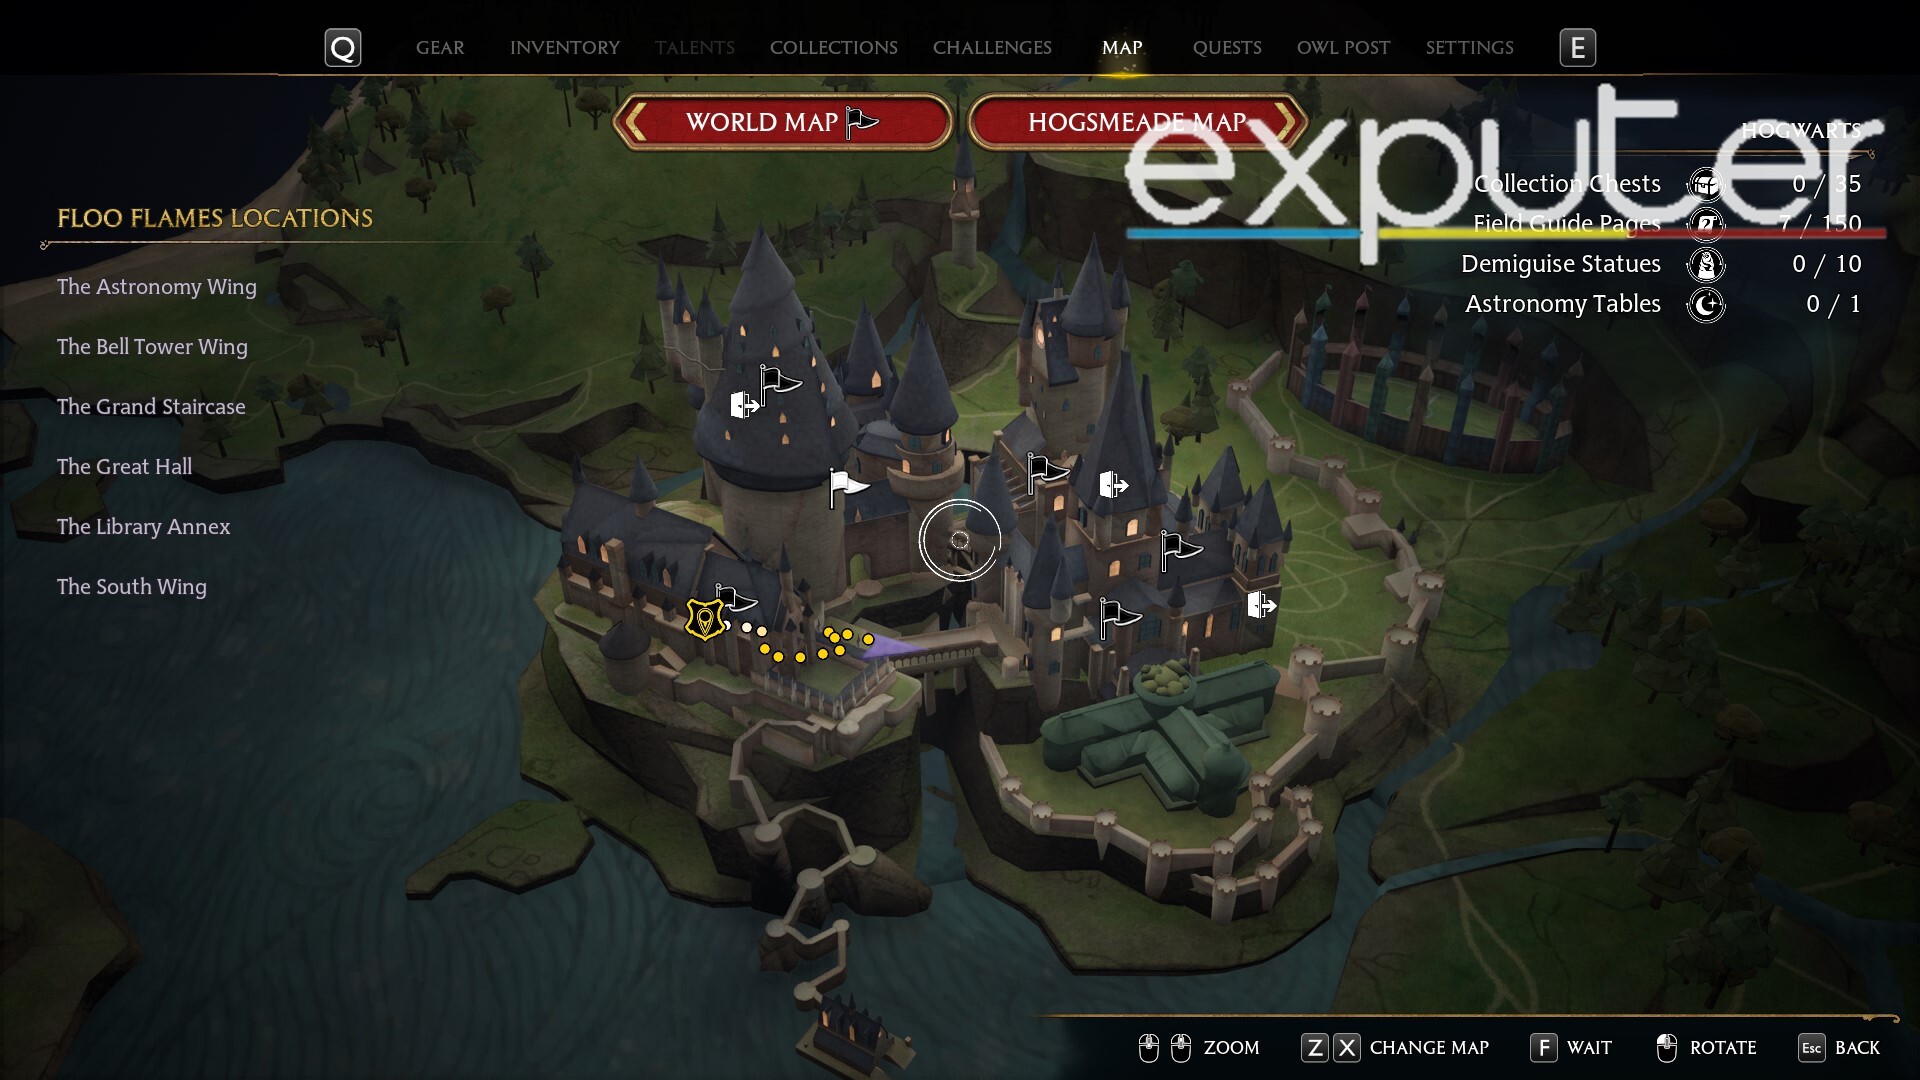
- Open the map of the castle, showcasing walls, stairs, rooftops, lit/dimmed rooms, grassy areas, and water features.
- Locate Floo Flames on the left side: Astronomy Wing, Belltower Wing, Great Hall, Grand Staircase, Library Annex, Secret Rooms, and South Wing.
- At the top, access the world map; to the right, find collectibles like Collection Chests, Field Guide Pages, Demi Guise Statues, and Astronomy Tables.
- Move to the bottom for the castle bridge connection.
Remember to take your time, explore the castle’s various locations, and refer to the map and the puzzle clues as needed to solve it successfully.
Puzzle Location
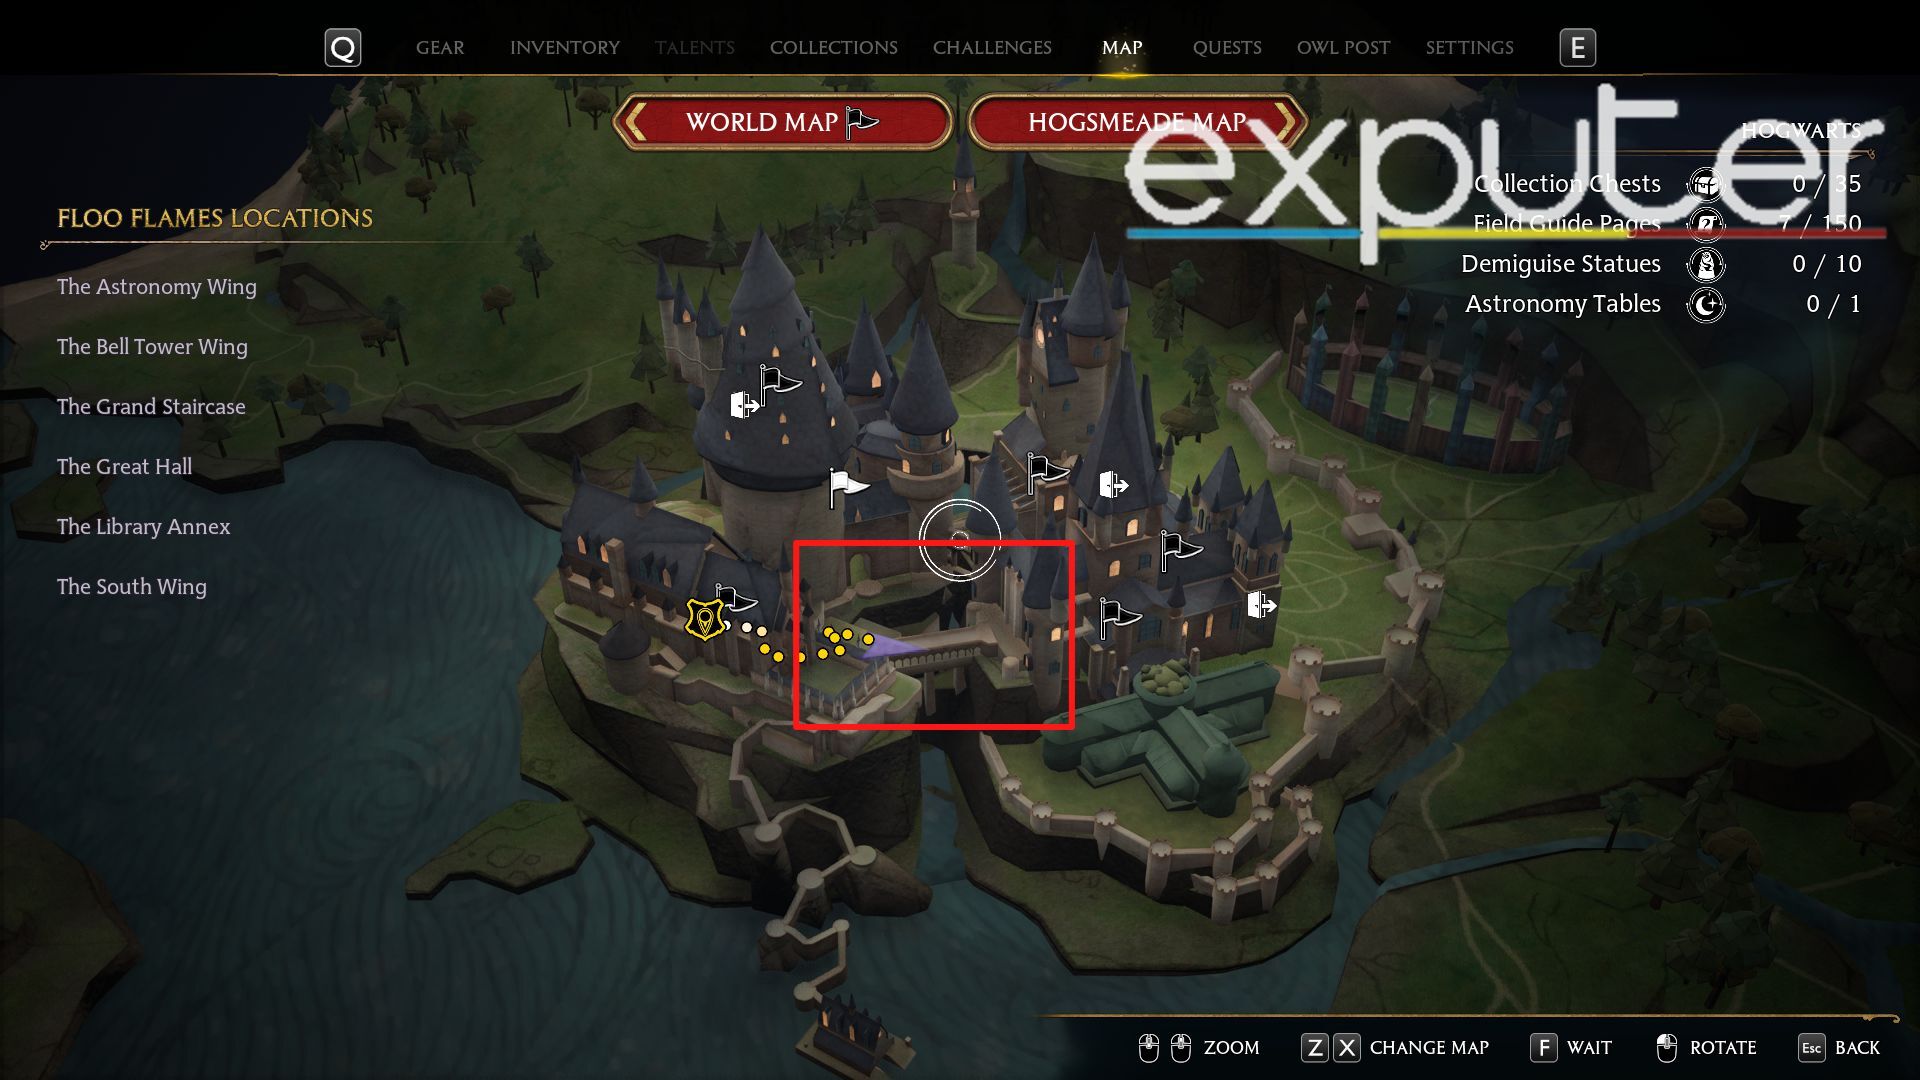
Moving closer and more in-depth with the map, if we look down from a top-down view, we can see the bridge is present in the general courtyard area where the Puzzle is located!
- On the map, the bridge runs on top of a massive gap between one cliff and the next.
- Some ledges are on either side of the bridge, conveniently displayed on the map, where the bridges connect to the cliff’s bottom.
- Where the bridge ends, players can see that there is a green patch of land that starts instead.
The Hogwarts Legacy Bridge Puzzle itself is part of one of the achievements that players need to do, which is the Solve I Hogwarts Secret, and it is a part of it through which players can get their hands on a secret Solver’s Bathing Costume that players can claim.
Bridge Area
Upon reaching the location of the Bridge Puzzle, you’ll find yourself in a massive circular courtyard in the middle of the castle. Surrounding the circular courtyard are stone ledges.
Here’s what you’ll notice in this area:
- Circular Courtyard: The courtyard is circular in shape, with stone ledges surrounding it.
- Central Circle: In the middle of the courtyard, there is a smaller circle within a larger one.
- Long Bridge: Ahead of you, there’s a long bridge, and the edges of the bridge are somewhat asymmetrical.
- Stone Ledges: On the left side of the bridge, you can see squared-off stone ledges, perfect for placing decorative items.
- Lamps/Vases: On the first squared-off stone ledge at the beginning of the bridge, there are lamps or vases placed on both the right and left sides of the bridge.
- Benches: Along the middle of the bridge, there are benches where people can sit and rest.
- Tall Lamps: Beside each bench, there’s a tall lamp, likely used for lighting the area at night. These lamps are evenly spaced along the bridge.
Keep these observations in mind, as they might be useful for solving the puzzle on the bridge.
First Brazier
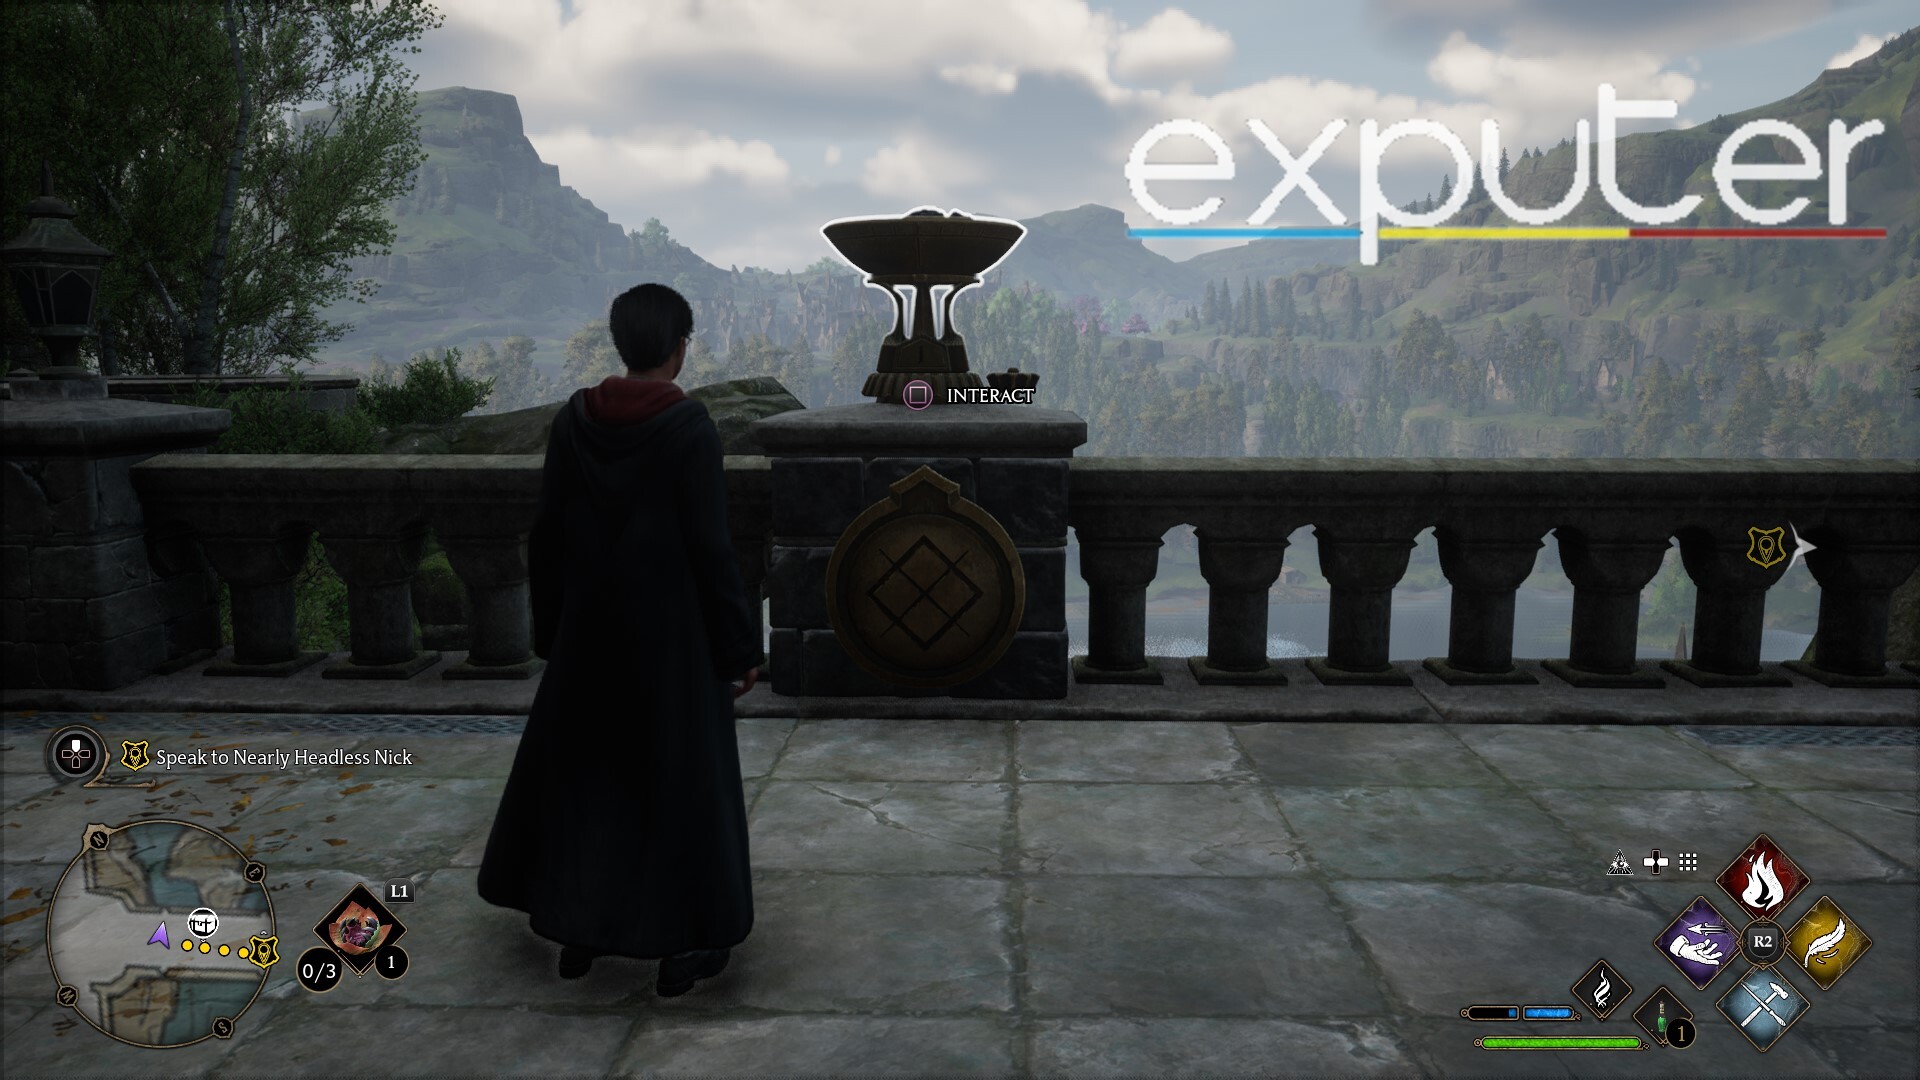
To solve the Bridge Puzzle, players need to match the symbols on the ground plate with the braziers located on the bridge.
Here’s how it works:
- Brazier Correspondence: Each brazier on the bridge corresponds to a specific symbol on the ground plate.
- Roman Numerals: At the base of each brazier, there are Roman numerals I-IV.
- Matching Symbols: Players must rotate the Roman numerals on the braziers until they match the symbol displayed on the ground plate.
Second Brazier
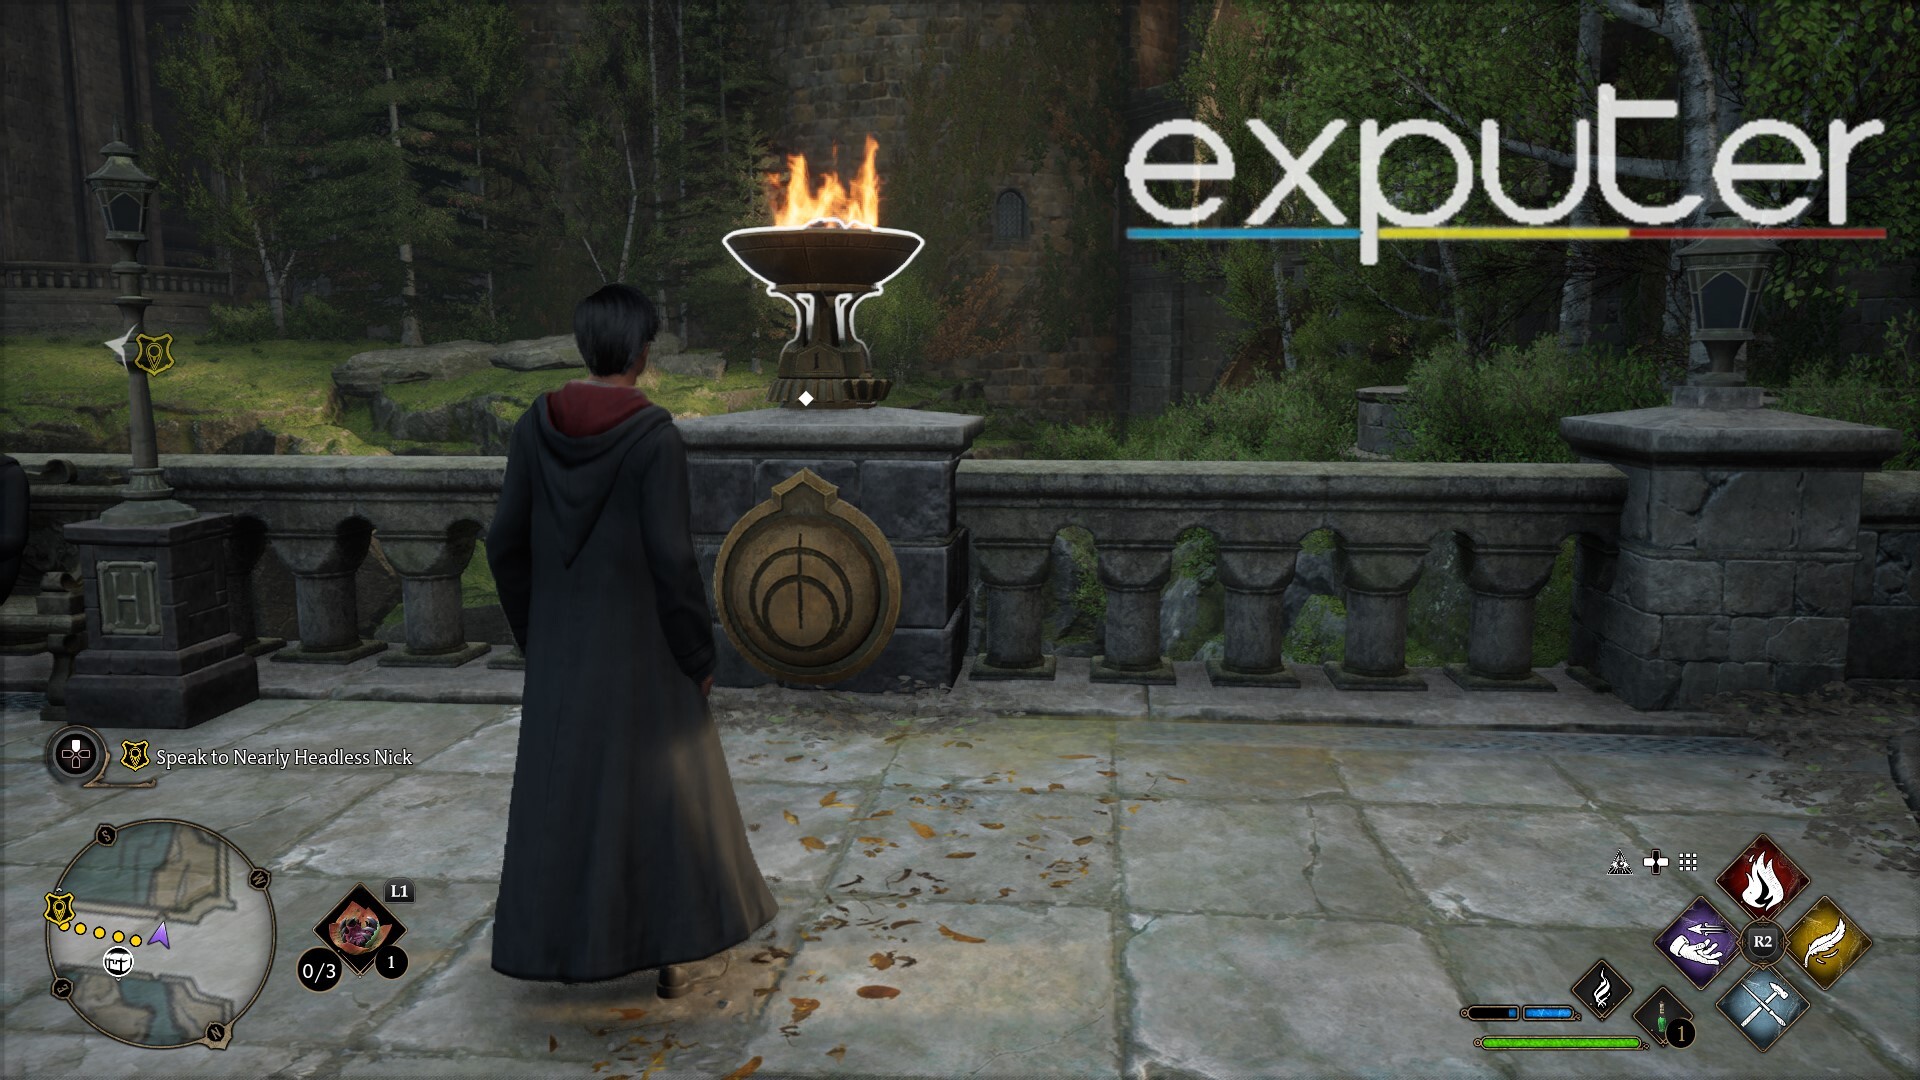
For the second brazier in the Bridge Puzzle, follow these steps:
- Location: The second brazier is located on the right side of the bridge. You can find it to the right of a bench where two people are sitting.
- Symbol and Roman Numeral: At the front of the stone ledge near this brazier, there is a circular symbol with a pointed edge at the top. In the middle of this circle, there is a smaller circle with a crescent-shaped moon symbol.
- Matching Roman Numeral: To solve this part of the puzzle, first, light the lamp on top of the ledge. Then, rotate the Roman numeral on the brazier until it reaches “II,” corresponding to the circular symbol with the crescent-shaped moon.
Third Brazier
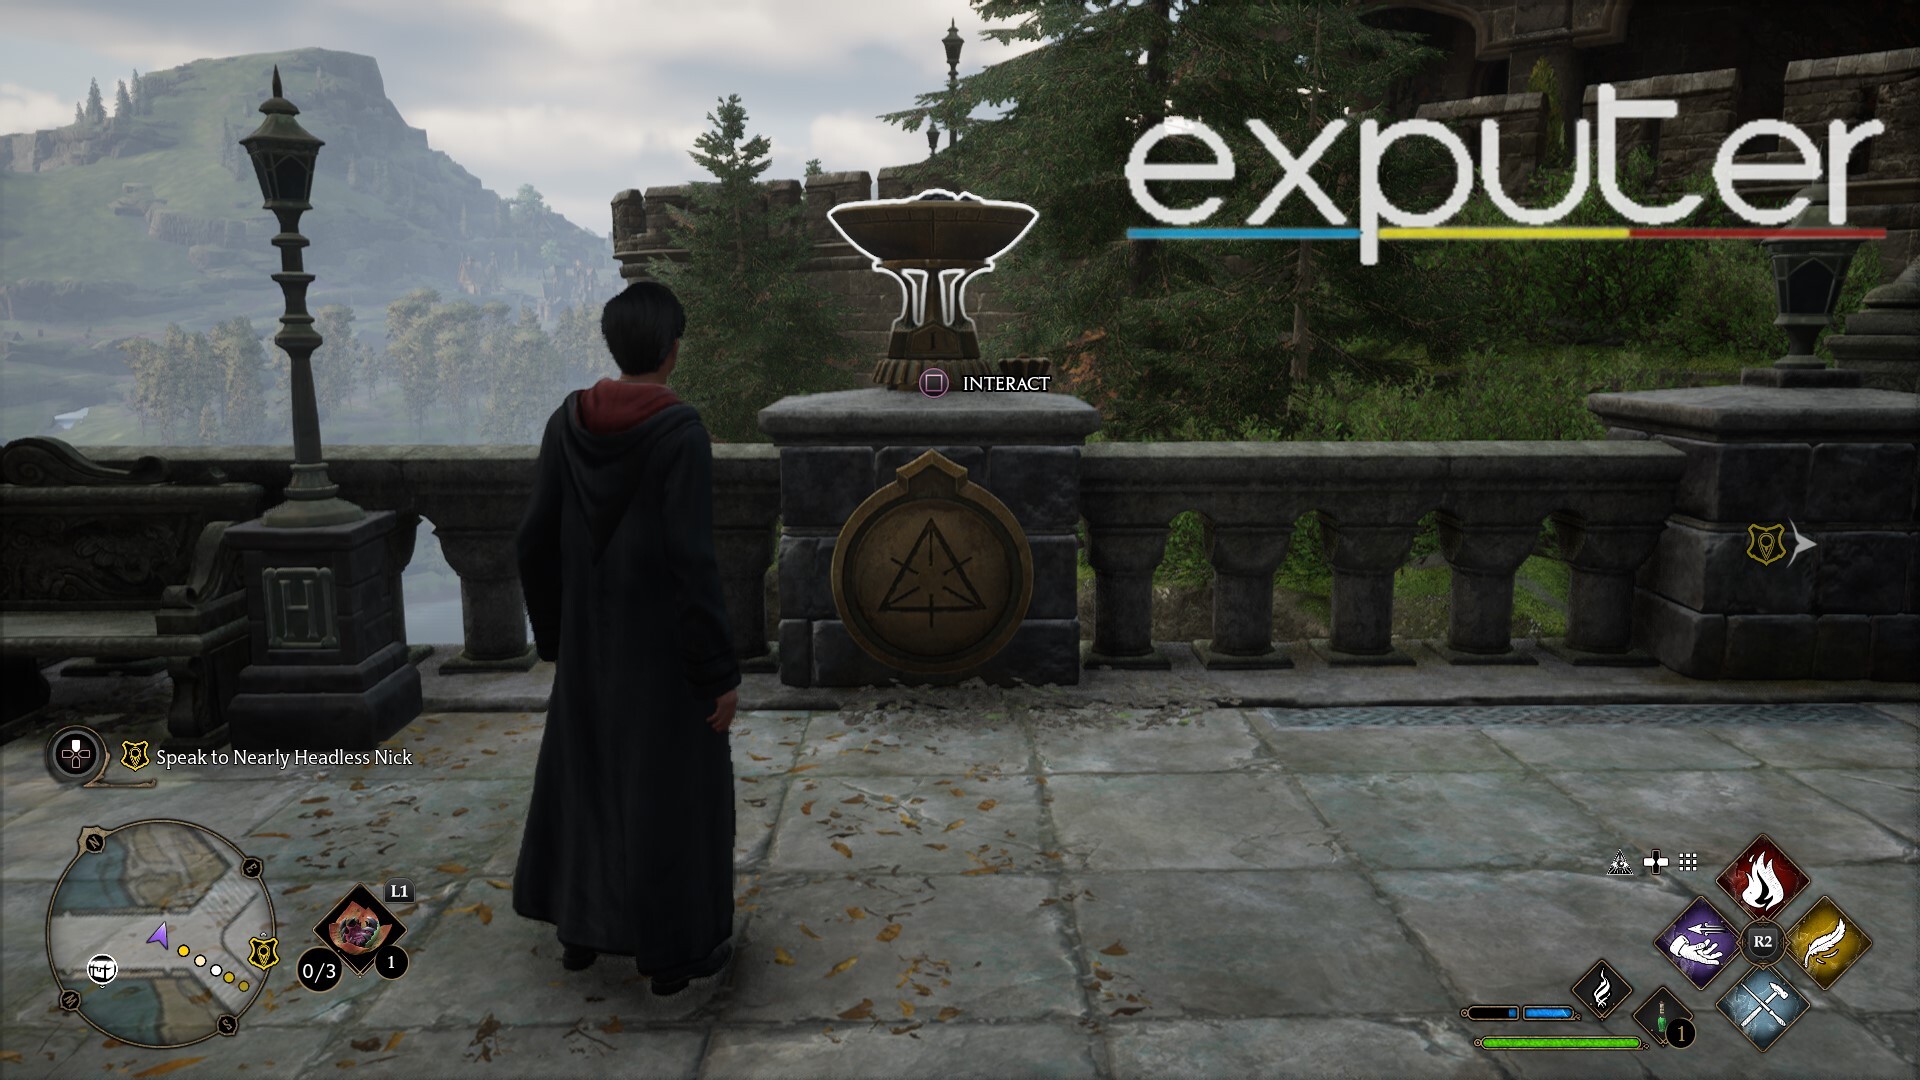
When you want to head towards the brazier that is present towards the top left of the bridge, the first thing that you can see is another circular item that is placed towards the center of the bridge. At the same time, there is also a bench with a man sitting on it and a lamp that has been placed there too.
- Circular symbol on the stone ledge has a matching triangle, identical to the one on the plate.
- Triangle has three lines from each corner, meeting in the middle, and three lines from the middle of the edges independently.
- Objective: Align the Roman numeral I with the symbol.
Fourth Brazier
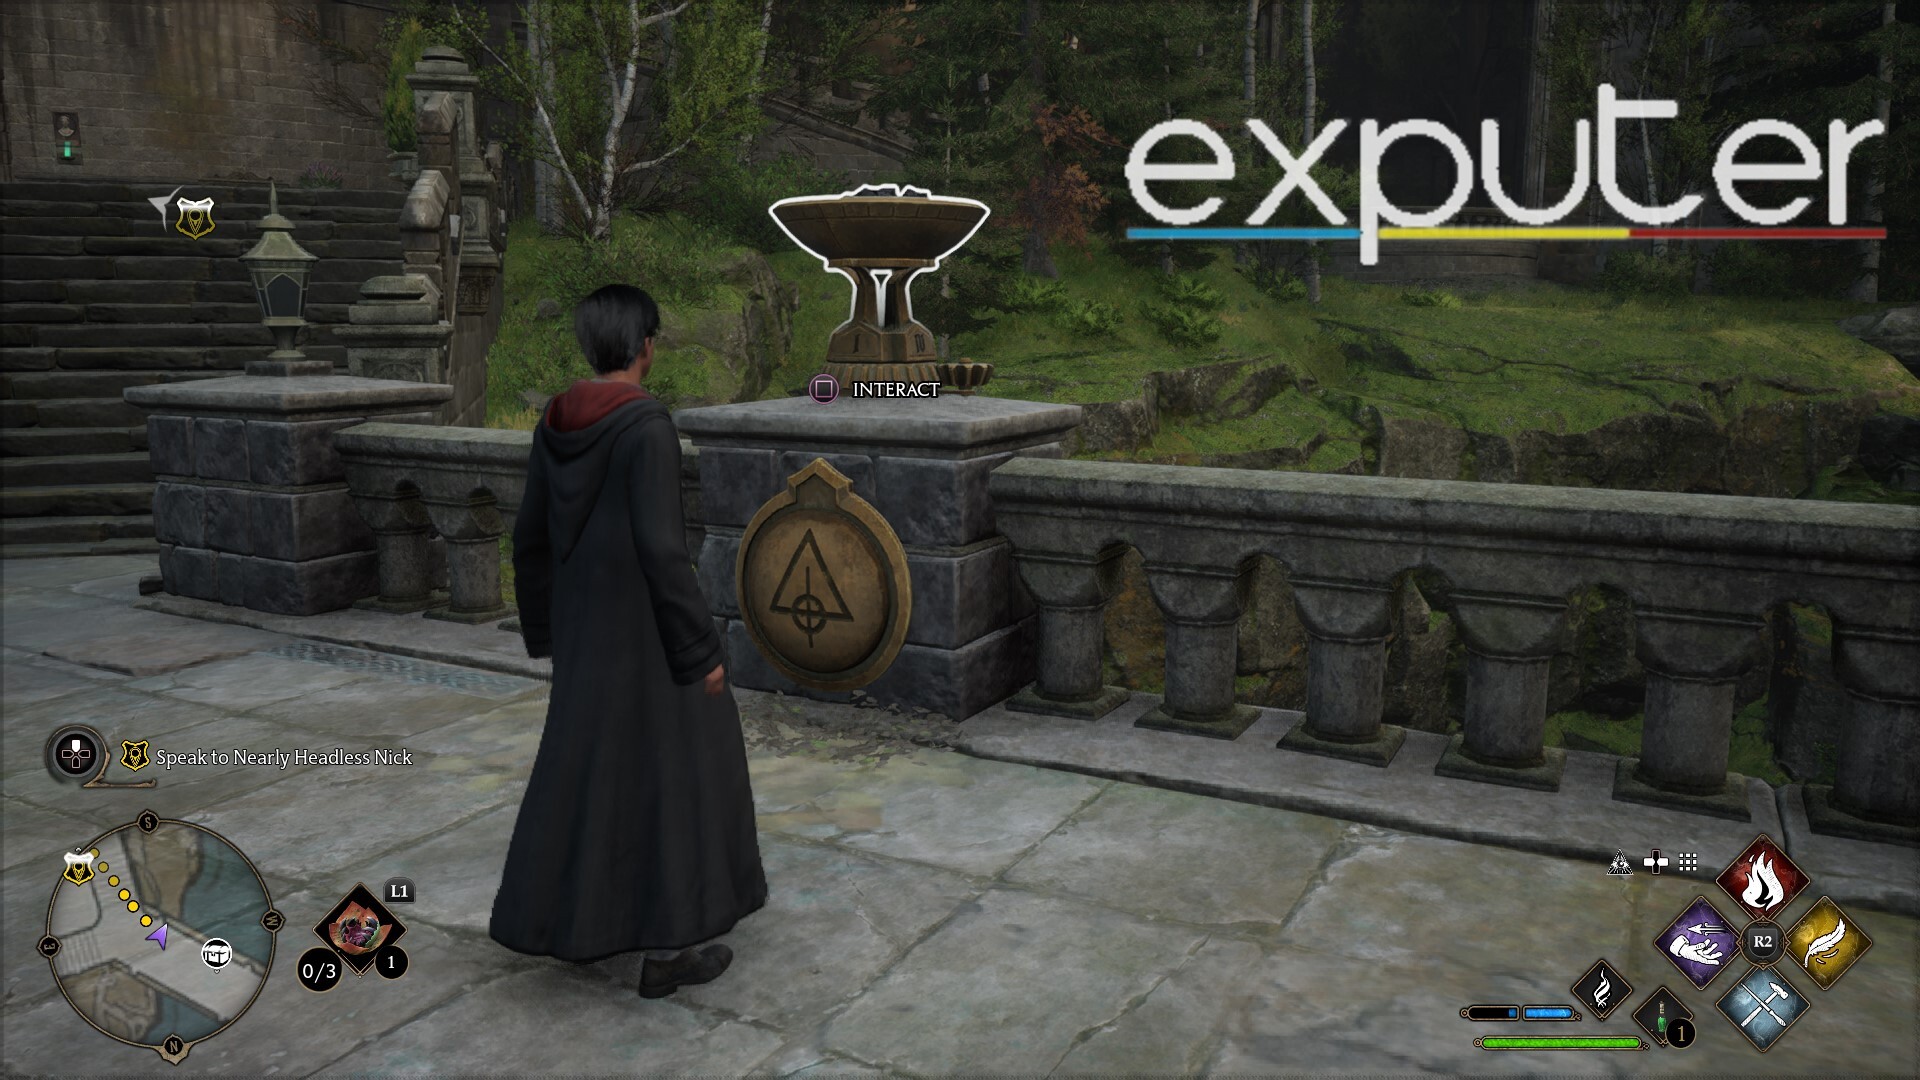
As for the fourth brazier, players simply need to make a 180-degree turn from the position that they are in, and they can see the statute that has been placed on the stone ledge towards the top right of the bridge.
- On the front of the ledge, there is a triangle that has a small circle on the base of it, with a line running down the center.
- Players need to have it match the Roman numeral III.
Getting The Chests
Once players have managed to rotate each dial properly and lit everything on fire, they can turn right back around, and they are able to run directly back to the plate on which all of the Roman numerals and symbols for the statue were placed.
- The plate has been opened up, and it only reveals the Roman numerals now; instead of going straight down, there is a ladder that allows players to descend down safely.
- There are two smaller chests, one that is present towards the edges of the canal and one larger chest towards the end of the tunnel.
And there we have it! All that players need to know about Hogwarts Legacy Bridge Puzzle guide! And with that, we will wrap up our guide! Players might want to read up on our Hogwarts Legacy Unlock Depulso so that you can know all the different methods with which you can get your hands on the Depulso spell! With that, you should also read up on our Dogweed And Deathcap Guide so that you can know where it is located!
Up Next:
- Hogwarts Legacy House Choices
- Hogwarts Legacy Unlock Glacius
- Hogwarts Legacy Gobstone Locations
- Hogwarts Legacy Diffindo
Thanks! Do share your feedback with us. ⚡
How can we make this post better? Your help would be appreciated. ✍