For ages, players have battled against their inventory space, deciding what to keep and drop. Inventory space is a common game mechanic in RPGs, especially in Witcher, Skyrim, and even Horizon Forbidden West. However, Horizon Forbidden West handles inventory space elegantly by allowing players to expand it through pouches and pouch upgrades.
- Upgrading your Pouch in Horizon Forbidden West will allow you to have more Inventory space which will overall improve your gameplay.
- There are five major Pouches: Resource Pouch, Food Pouch, Trap Pouch, Ammo Pouch, and Portion Pouch.
- Upgrading your Pouches requires two things. Shards and animal harvest.
- For the Animal Harvest, you need to hunt animals that can be found in their natural habitat. Or you can simply buy the materials from a Hunter.
Horizon Forbidden West All Pouches
There are five major pouches in the Horizon Forbidden West, with subcategories for each type:
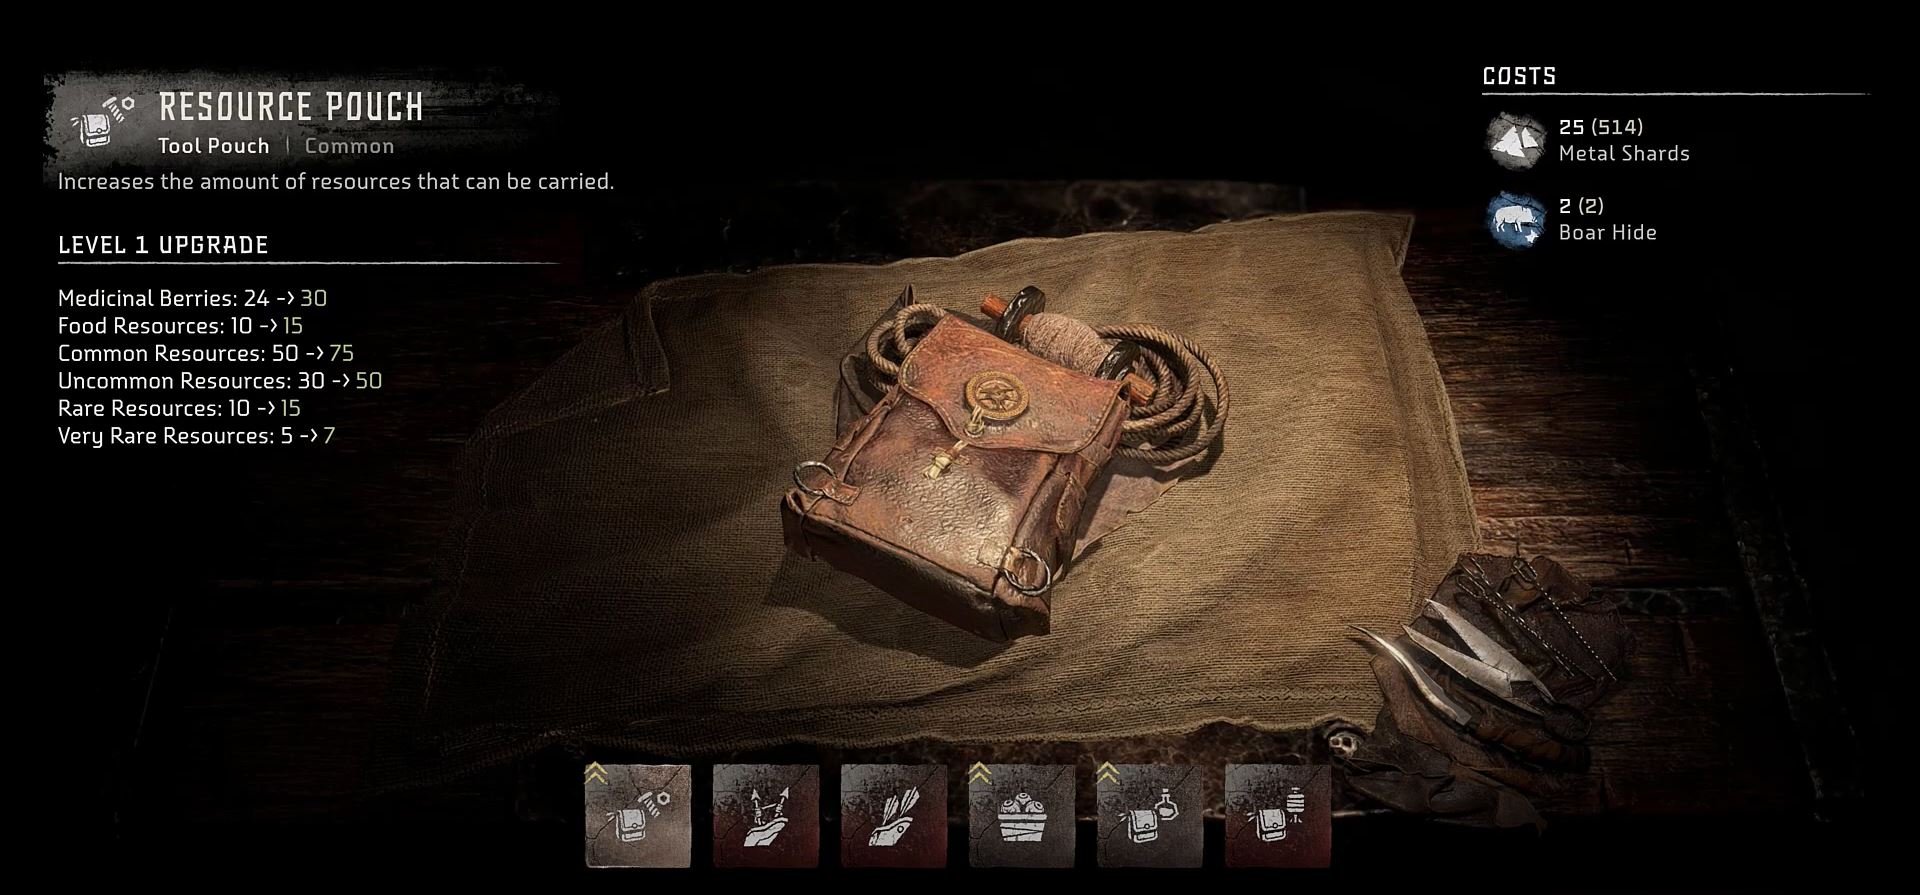
- Resource Pouch: Obtained at the game’s start through resource gathering in the main quest.
- Food Pouch: Unlocked by purchasing any food item in large settlements or towns from the local Cook.
- Trap Pouch: Available from the beginning, tied to the initial mission requiring trap crafting.
- Ammo Pouch: No universal “ammo pouch”; various pouches for each ammo type are acquired as you progress, detailed in the ingredient requirements section.
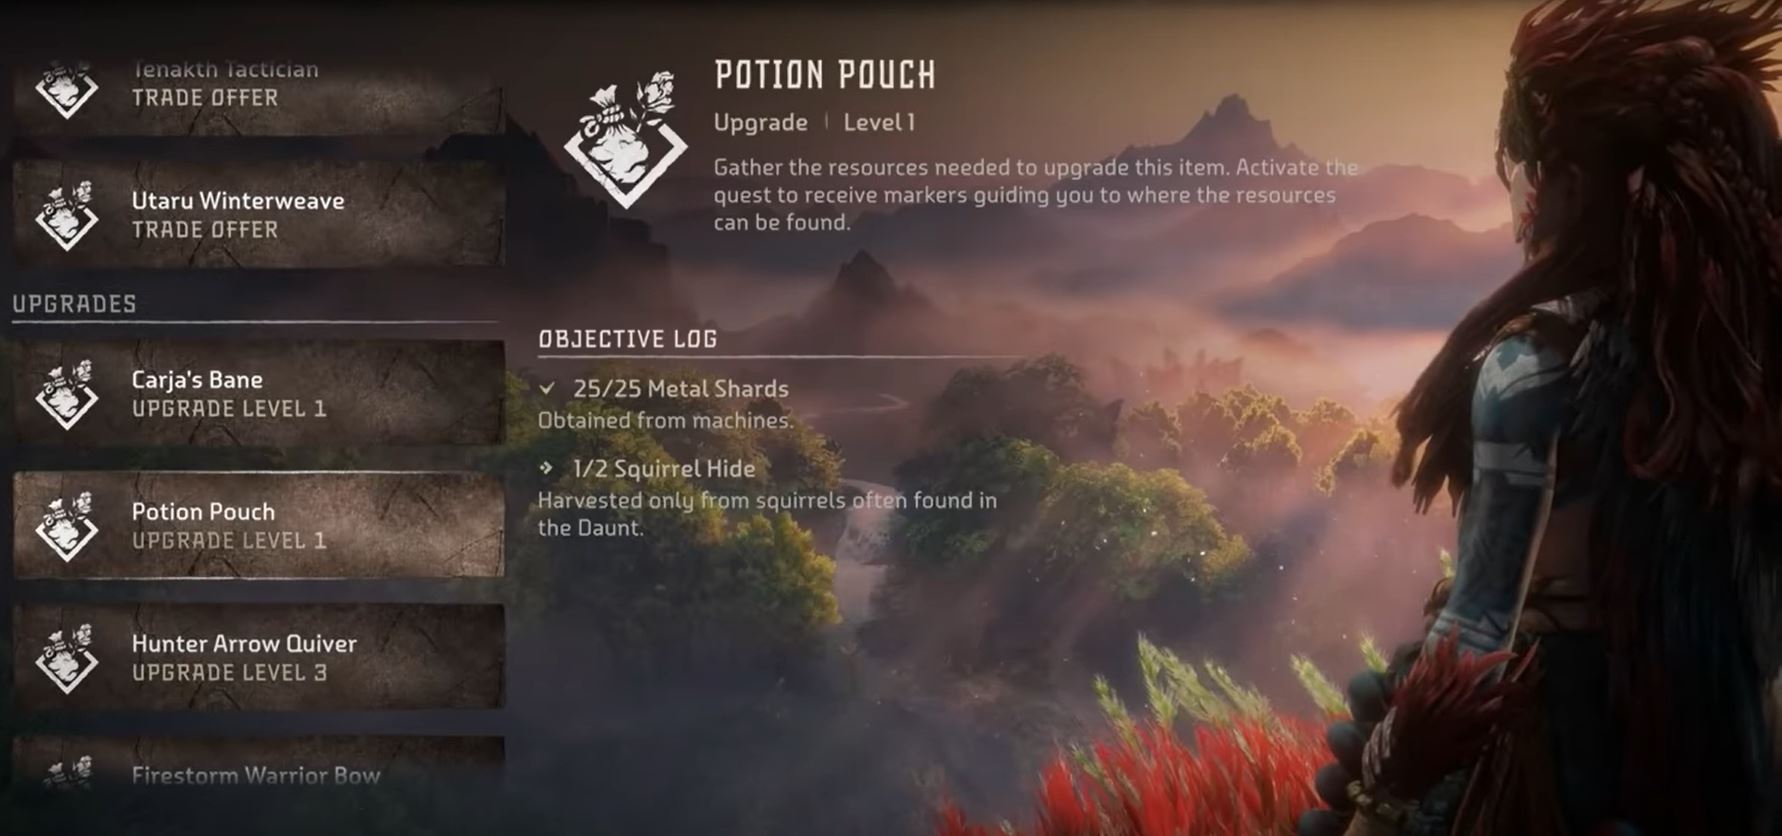
- Potion Pouch: Unlocked by purchasing a potion from a Herbalist/Remedies vendor or finding one in resource chests.
You Might Find This Interesting: Horizon Forbidden West Survey Drones
Why Upgrade Aloy’s Pouches
Horizon Forbidden West pouches certainly have a variety to them. However, despite the various pouches for each item, you will eventually run out of space. And when you do, you will need to upgrade your pouch. Luckily, upgrading pouches this time around is not as time-consuming as it was in the prequel, Horizon Zero Dawn.
- Most pouches have three upgrade levels, with some reaching level 4. Upgrades progressively cost more resources: 25 shards and animal harvest initially, doubling for each subsequent level (50, 100, 200).
- To upgrade, visit a workbench, navigate to “pouch upgrades,” and select pouches with available materials. Upgrading all pouches totals 5275 shards, obtained through hunting or purchasing materials.
Upgrade Materials For Pouches In Horizon Forbidden West
For upgrading your pouches, you mostly need two things. Shards and animal harvest. This is exactly why you would need to either hunt for materials or buy them from merchants.
The animal loot that is being used in the upgrades consist of three rarities:
- Common – Grey colored
- Rare – Blue colored
- Very rare – Purple colored
Hunting
Hunting animals for Horizon Forbidden West Pouch upgrades is made easier by their increased abundance due to modern technology.
Animals, fitting their natural habitats, are found in specific regions. Forests host boars, squirrels, foxes, and rabbits, while beaches near the sea are home to pelicans, and deserts feature vultures. Detailed locations are discussed in the article, but an easier method exists.
Instead of constantly searching for locations, use the “create job” feature for any craftable item in Horizon Forbidden West. This feature streamlines resource gathering for various tasks, including pouch upgrades.
To use the job feature for pouch upgrades in Horizon Forbidden West, navigate to the desired pouch and press the triangle button to create a job. Access these jobs in your quests log and activate them at any time. This feature calculates material locations, highlighting the area and placing a waypoint on your map.
- While the map location is guaranteed, animals may be closer; consult the objective log for common locations.
- Use your “focus” while hunting, especially for fast-moving smaller animals. Highlighting them with the focus makes it easier to keep track and ensure a successful hunt.
Buying from Hunters
If you want to take the short route and skip all the grinding and hunting, you can just buy some of the materials from hunters.
- Mostly in some of the larger settlements, hunters are willing to sell uncommon and rare animal parts.
- However, the number of materials is limited so you might not be able to get everything for every upgrade.
- As with the theme of the game, you pay with shards and sometimes valuables gained from other animals.
Aloy’s Pouch Ingredient Requirements
It’s good to know in advance what exactly you need for each level so you can start hoarding all the right items. That is why I have the list of all the ingredients required to upgrade Horizon Forbidden West’s pouches. The items needed are as follows:
Food
- Level 1 – 25 Shards, 1 Fox Hide
- Level 2 – 50 Shards, 1 Peccary Bone, 1 Prairie Dog Hide
- Level 3 – 100 Shards, 2 Duck Feather, 1 Salmon Bone
Resource
- Level 1 – 25 Shards, 2 Boar Hides
- Level 2 – 50 Shards, 1 Horned Lizard Bone, 1 Goose Feather
- Level 3 – 100 Shards, 2 Bass Skin, 1 Iridescent Crab Shell
Potion
- Level 1 – 25 Shards, 2 Squirrel Hides
- Level 2 – 50 Shards, 1 Prairie Dog Bone, 1 Rabbit Hide
- Level 3 – 100 Shards, 2 Carp Skin, 1 Bighorn Sheep Bone
Trap
- Level 1 – 25 Shards, 1 Squirrel Bone
- Level 2 – 50 Shards, 3 Horned Lizard Skin
- Level 3 – 100 Shards, 1 Duck Wishbone, 2 Bighorn Sheep Hide
Ammo pouches/quivers/satchels
As mentioned earlier in the guide, these are the subcategories of the ammo pouch and tend to have four levels instead of three.
Light arrow
- Level 1 – 25 Shards, 2 Jay Feathers
- Level 2 – 50 Shards, 1 Vulture Wishbone, 1 Prairie Dog Hide
- Level 3 – 100 Shards, 3 Salmon Skin, 1 Owl Wishbone
- Level 4 – 200 Shards, 1 Moonfish Bone, 2 Bass Skin, 1 Gull Wishbone
Hunter Arrow Quiver
- Level 1 – 25 Shards, 2 Raccoon Hide
- Level 2 – 50 Shards, 1 Rabbit Hide, 1 Peccary Bone
- Level 3 – 100 Shards, 3 Bighorn Sheep Skin, 1 Salmon Bone
- Level 4 – 200 Shards, 1 Iridescent Lobster Shell, 2 Peccary Hide, 1 Pelican Wishbone
Precision Arrow Quiver
- Level 1 – 50 Shards, 1 Fox Bone
- Level 2 – 100 Shards, 1 Vulture Wishbone, 1 Horned Lizard Skin
- Level 3 – 200 Shards, 3 Moonfish Skin, 1 Owl Wishbone
- Level 4 – 300 Shards, 3 Bass Skin, 1 Moonfish Bone, 1 Iridescent Lobster Shell
Tripwire pouch
- Level 1 – 25 Shards, 1 Jay Wishbone
- Level 2 – 50 Shards, 3 Rabbit Hide
- Level 3 – 100 Shards, 1 Bighorn Sheep Bone, 3 Owl Feathers
- Level 4 – 200 Shards, 3 Crab Shell, 1 Iridescent Lobster Shell, 1 Gull Wishbone
Bomb Satchel
- Level 1 – 25 Shards, 1 Boar Bone
- Level 2 – 50 Shards, 3 Vulture Feather
- Level 3 – 100 Shards, 1 Salmon Bone, 3 Owl Feather
- Level 4 – 200 Shards, 3 Lobster Shell, 1 Iridescent Crab Shell, 1 Peccary Bone
Spike Holster
- Level 1 – 25 Shards, 2 Fox Hides
- Level 2 – 50 Shards, 1 Rabbit Bone, 1 Peccary Hide
- Level 3 – 100 Shards, 3 Owl Feather, 1 Duck Wishbone
- Level 4 – 200 Shards, 1 Bass Bone, 2 Crab Shell, 1 Peccary Bone
Boltclip Satchel
- Level 1 – 50 Shards, 2 Peccary Hides
- Level 2 – 100 Shards, 1 Pelican Wishbone, 1 Peccary Hide
- Level 3 – 200 Shards, 3 Gull Feather, 1 Bighorn Sheep Bone
- Level 4 – 300 Shards, 1 Iridescent Lobster Shell, 1 Iridescent Crab Shell
Rope Pouch
- Level 1 – 50 Shards, 1 Fox Bone
- Level 2 – 100 Shards, 1 Bass Bone, 1 Duck Feather
- Level 3 – 300 Shards, 1 Iridescent Crab Shell, 2 Moonfish Skin, 1 Bass Bone
- Level 4 – 300 Shards, 1 Iridescent Crab Shell, 2 Moonfish Skin, 1 Bass Bone
Shredder Satchel
- Level 1 – 50 Shards, 2 Pelican Feathers
- Level 2 – 100 Shards, 1 Iridescent Crab Shell, 1 Duck Feather
- Level 3 – 200 Shards, 3 Moonfish Skin, 1 Bighorn Sheep Bone
- Level 4 – 300 Shards, 1 Bass Bone, 2 Peccary Hide, 1 Iridescent Lobster Shell
Animal Locations For Pouch Resources
In case you are distrustful of the “create a job” feature and the location it describes, I have a list of animals and their most common locations:
- Squirrel, Jay, Boar, Raccoon: Abundant south of the bonfire near Redhew Quarry in The Daunt.
- Fox: South of the Cinnabar Sands Tallneck, especially prevalent after leaving The Daunt post-Embassy.
- Carp: Found in the waters south of the Plainsong.
- Horned Lizard, Scorpion, Vulture: Abundant southwest of The Base, east of Arrowhand, along the road. Use focus for small scorpions.
- Peccary: Numerous east of Arrowhand.
- Salmon: Found west of Salt Bite, northwest of Scalding Spear, north of the middle region, below the Sunwing site in a water body.
- Bighorn Sheep: Abundant in mountainous regions and above the salmon pool below the Sunwing site.
- Owl: Located near the Salmon pool, north of it. Be quick to approach before they fly off.
- Prairie Dog: North of Salt Bite, near the giant lake on the river banks.
- Goose, Rabbit, Duck: North of Scalding Spear, around a large lake. Retry if they don’t spawn immediately.
- Pelican: Near the Clawstrider campfire on the sandy west coast.
- Lobster: Sandy west coast, northwest from Thornmash near the Thunderjaw.
- Crabs, Gull: Found anywhere on the sandy west coast.
Summary
With that being said, that is everything about Horizon Forbidden West pouches. I have listed everything in my guide from pouch types to upgrading them and the materials needed. I wish you the best of luck and if you have any questions, let me know in the comments below.
Next: Horizon Forbidden West Face Paint
Thanks! Do share your feedback with us. ⚡
How can we make this post better? Your help would be appreciated. ✍