HDR, or High Dynamic Range, enhances picture quality on TVs and monitors. In video games like Last of Us, HDR settings can be adjusted for brightness and contrast. However, not all TVs have the same HDR quality, so settings may vary. It’s crucial to ensure your TV supports HDR; otherwise, images may appear washed out. This is why in today’s topic, we will guide you through the best HDR settings in Last of Us Part 1.
- HDR (High Dynamic Range) enhances display picture quality.
- Ensure your display supports HDR for in-game use.
- Contrast brightens dark areas, recommend decreasing to -1 or -2.
- Brightness adjusts overall screen lightness, increase to 1.
- HUD Brightness adjusts HUD brightness, adjust based on preference.
- Review HDR settings for optimal picture quality and gaming experience.

Enabling HDR In Last Of Us Part 1
Before you start to play around with the HDR settings in Last of Us, it is important to activate HDR on your PS5 first. If you don’t, activating HDR in the game will mess up your image quality, and the result will be extremely washed-out graphics.
So it’s very important to have your HDR enabled on the PS5 before you turn it on inside the game.
Activating HDR In PS5
- Bootup your PS5 and click on the settings icon in the top-left corner of the screen.
- Clicking on the settings icon will open a utility window with various options. Select Screen and Video, located just beneath the “Option” tab.
- Then select the Vide Output tab, which will take you to a screen where you can toggle different settings, including HDR.
- Select HDR and turn it on.
Enabling HDR
- Launch Last of Us Part 1.
- Go to Options and select Display.
- Once there, click on Brightness which will open a new window where you can turn HDR on or off.
Best HDR Settings For Last Of Us Part 1
As we mentioned above, depending on your monitor, you might have to play around with your settings in order to have the best result. After you turn the HDR on, you will see three settings and details about them are discussed below:
Here’s a table of the best HDR Settings:
| Setting Name | What to Set it to |
|---|---|
| HDR | Ensure your TV or monitor supports HDR and it is enabled in PS5 settings before adjusting HDR settings in the game. |
| Contrast | Slightly decrease the contrast to -1 or -2 to add more details to shadowy or darker areas without making the game look washed out. Avoid extreme negative values or high positive values. |
| Brightness | Increase brightness from 0 to 1 to make the overall image slightly brighter. Avoid extreme values unless your TV has low peak brightness. |
| HUD Brightness | Adjust to your preference to make HUD elements like hints, subtitles, and health bar more or less noticeable depending on your preference. |
Contrast
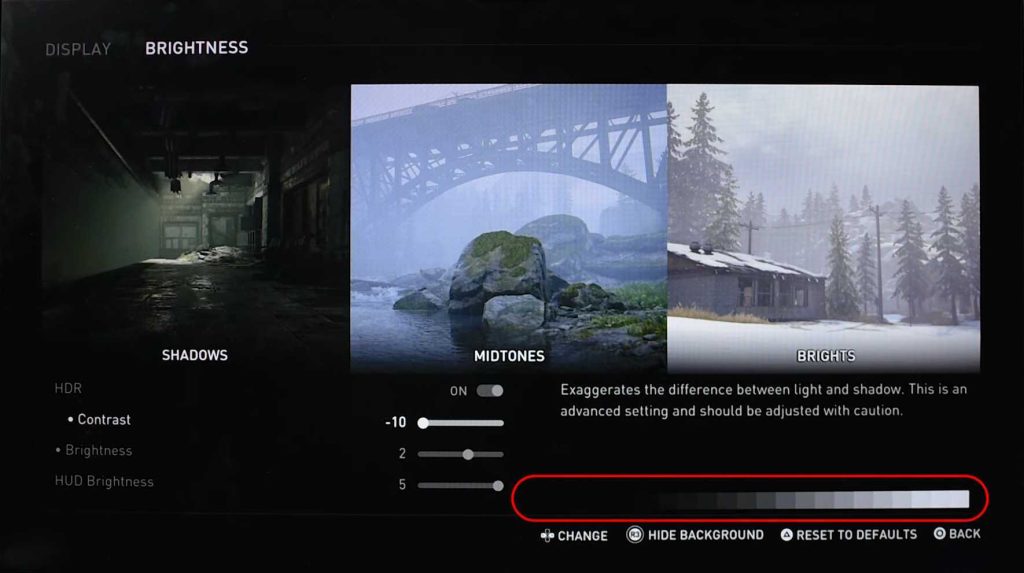
The first option we have here is contrast. Now contrast is used to add details or, in other words, “brighten up” the dark areas of the game. If you decrease contrast, the shadowy or darker areas of the game will brighten up, adding more details to those areas and allowing you to see the darker areas of the game much more easily.
However, it’s definitely not recommended to just take the slider to the negative extreme of the bar or to -10. Doing this will just destroy the beautiful colors of the game and make it look very washed out.
On the other hand, if you increase the contrast, the background areas or the overall environments of Last of Us Part 1 will become darker. Last of Part 1, for the most part, is a very dark game, and I mean it literally. So, there is no point in increasing the contrast and making the game look darker than it already is.
So our recommendation for the contrast is to decrease it slightly and set it to -1 or -2, which will basically add more details to the shadowy or darker areas and objects of the game.
Increasing it doesn’t make much sense because doing that will make the game look like you are traversing the world with some kind of everlasting darkness surrounding you. Only increase it if you feel like the balance between the darker objects and the lighter parts of the image isn’t right.
Brightness
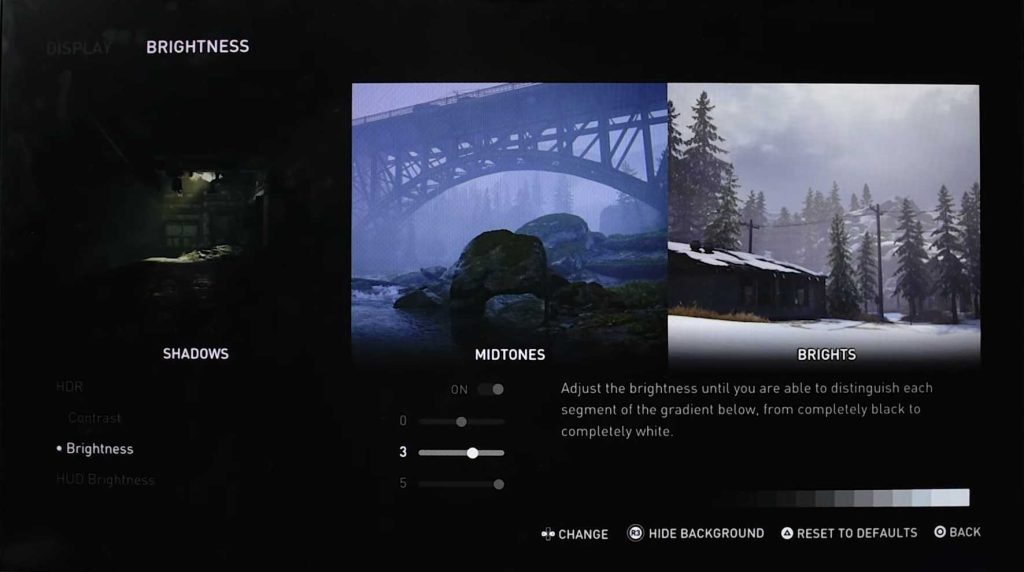
The brightness essentially helps you to increase or decrease the lightness of the overall image. Before you get confused between brightness and contrast, let’s clear this confusion since, on the surface, they both do the same thing.
Contrast helps you in adjusting the difference between the lighter and darker objects of the game, while on the other hand, brightness helps with adjusting the mid-tones and the overall peak brightness of the game.
Increasing the brightness will amplify the peak brightness of your TV, so only increase it if the peak brightness of your TV is low. You can look up the peak brightness of your monitors by analyzing their Nits value, which is the unit for measuring the brightness of electronics.
Decreasing the brightness, on the other hand, in Last of Us Part 1 will make the overall image look darker, which isn’t a sensible thing to do unless the game on your monitor looks very bright by default.
So our recommendation for the brightness would be to increase it from 0 to 1 only. This will help in making the overall game look slightly brighter.
HUD Brightness
As the name suggests, this option will allow you to adjust the brightness of the game’s HUD. The HUD of the game includes hints, tutorial messages, interaction prompts, weapon and ammo displays, a health bar, and subtitles.
HUD, in general, doesn’t cause much of an issue in terms of brightness for most people, but if you feel like the HUD is too distracting or you are having trouble reading the subtitles or noticing interaction prompts. Increasing or decreasing the HUD brightness can help you eliminate that issue.
Summary
The original Last of Us on PS3 definitely set new standards for the upcoming generations in terms of fidelity and performance, and it’s safe to say that its remake, The Last of Us Part 1, looks absolutely phenomenal as well and sets a new benchmark for this generation of consoles too.
So it’s definitely worth the trouble of going through HDR settings and adjusting its brightness and contrast in order to have the best picture quality because you certainly wouldn’t want these things to mess up your experience.
We hope our guide helped in understanding all you needed to know about the HDR settings of Last of Us Part 1. Let us know what you think about the guide in the comments below.
Next: Last Of Us Part 1 BEST Controller Settings
Thanks! Do share your feedback with us. ⚡
How can we make this post better? Your help would be appreciated. ✍