BEST Rocket League Settings [Camera, Controls, Video & More]

Learn the best settings for Rocket League to boost your performance in Rocket League.

With myriad alterations available, we have covered the best Rocket League settings after experiencing the gameplay, which even covers the minute details. Using this, you will stand out as a player in the competitive world of Rocket League. While presets are available on Liquipedia used by Pros who participate in the Rocket League Championship Series (RLCS), we recommend you follow our guide.

Rocket League Settings Takeaway
  • Camera Settings: Optimize gameplay quality with camera presets, field of View, camera shake, stiffness, swivel speed, and angle settings.
  • Control Settings: Fine-tune your steering, aerial sensitivity, dead zones, ball camera mode, and vibration for improved in-game performance.
  • Key Binds: Mastering key binds is essential for player progress. Follow recommended controls for long-term performance.
  • Video Settings: Enhance visual quality in three subcategories – window, essential, and advanced settings. Adjust resolution, FOP, render quality, VSync, and Texture details.
  • Audio Settings: Customize gameplay and background music to your preferences.

Why Trust Us: Daniyal Sultan Malik has spent 30+ hours on Rocket League, making him highly trustworthy!

All Settings Options In Rocket League 
Picture showing main settings of Rocket League (Picture Credits: eXputer)
Settings of Rocket League (Picture Credits: eXputer)

The settings of the game are divided into the following sections, which include countless features:

  • Camera Settings.
  • Control Settings.
  • Binds.
  • Video Settings.
  • Audio Settings.

You must focus on these sections to get the best Rocket League settings.

Camera Settings
Picture showing camera settings of Rocket League (Picture Credits: eXputer)
The image shows the camera settings of Rocket League (Picture Credits: eXputer)
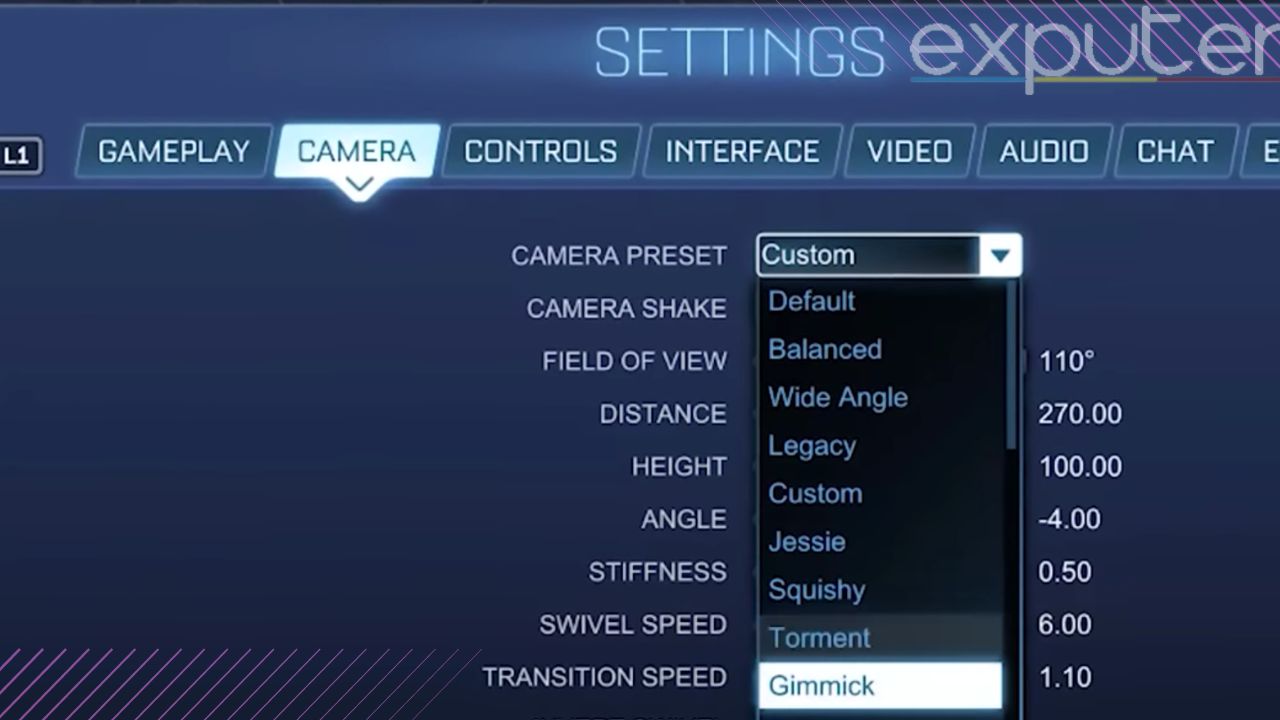
Camera Preset Custom
Camera Shake Off
Field of View (FOV) 110
Camera Distance 270
Height 100
Angle -4
Stiffness 0.5
Swivel Speed 7
Transition Speed 1.2
Invert Swivel ON
Show Full Text

Camera Preset – Custom

This is only available if you have BakkesMod installed. It is an excellent feature that allows you to blend in pro camera settings instantly.

Camera Shake-Off

Keeping camera shake adds quality visuals but significantly impacts precision for performance.

Field of View (FOV) – 110

It should be kept at the maximum level to increase your vision for accurately locating your enemies and the ball.

Camera Distance – 270

This is the distance between you and your car; you can choose from a range of 260-280 to have a broad view.

Height – 100

It determines how high or low are you against your car. Ideally, 100 will be suitable for efficient surveying but you can choose between 90-110.

Angle – (-4)

It is the angle from which you look at your car. Any angle from -3 to -5 would a good option.

Stiffness – 0.5

It affects the motion by controlling how locked-in the camera will be as you accelerate the car. Keeping it too high or too low would not be much efficient.

Swivel Speed – 7

Swivel Speed determines how quickly your camera will pitch around the field. It should be kept high between 5-10, depending on your controllability. 

Transition Speed – 1.2

It is related to the rate of toggling between your car camera and the ball camera. A low range between 1 and 1.4 is suitable, as keeping it high would be disorienting the gameplay.

Invert Swivel – ON

It means you want to set the key down for moving down or up for moving up while moving the camera.

These were the best Rocket League Camera settings to ensure quality and performance. Now, let’s move on to the control settings.

Control Settings

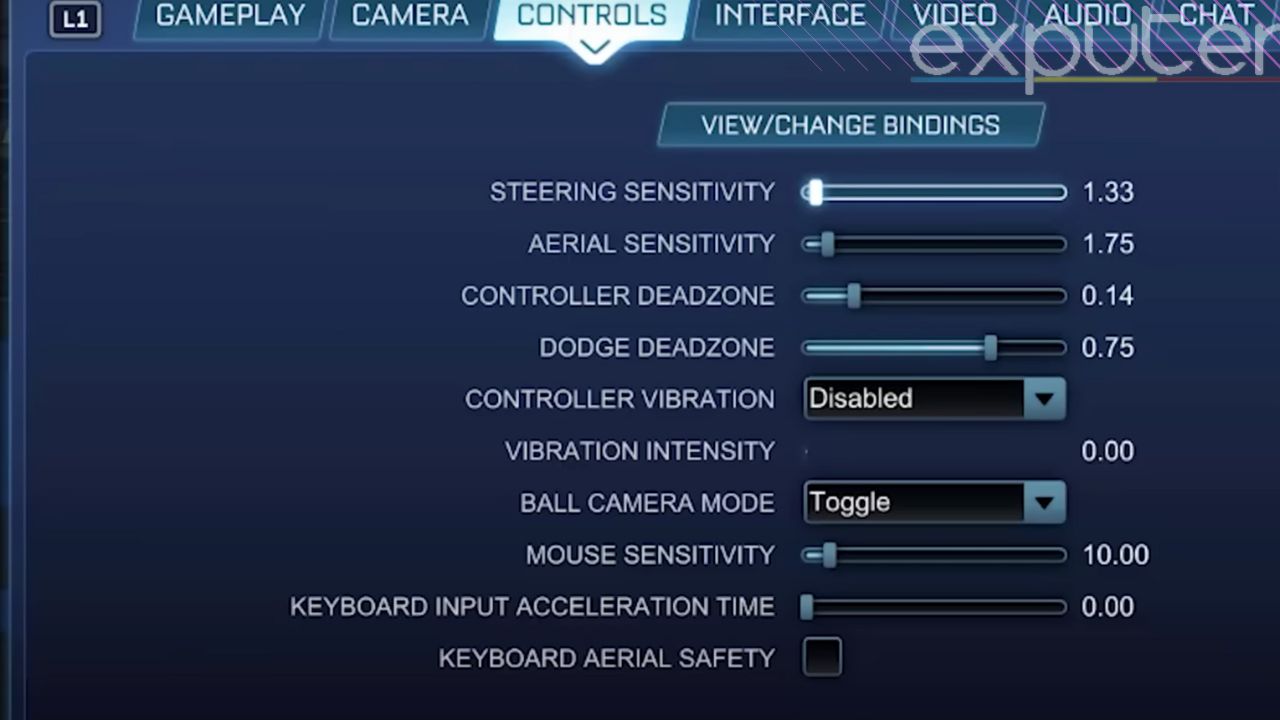
Control Settings of Rocket League (Picture Credits: eXputer)
Image showing control settings of  Rocket League (Picture Credits: eXputer)
Steering And Aerial Sensitivity (steering 1.2 and Aerial 1.4)
Controller Deadzone 0.04 – 0.10
Dodge Deadzone 0.6
Controller Vibration Disabled
Vibration Intensity 1
Ball Camera Mode Toggle
Other Settings
  • Mouse Sensitivity (0)
  • Keyboard Input Acceleration Time (0)
  • Keyboard Axial Safety (OFF)
Show Full Text

In Shooter games like PUBG, sensitivity plays a very significant role in terms of performance in Rocket League. Unlike other typical racing games like NFS Unbound or Forza Horizon 5, where sensitivity is neglected, having the best control settings in Rocket League is very crucial for scoring. 

Steering And Aerial Sensitivity – According To Rank

Car in air in Rocket League (Picture Credits: eXputer)
Picture showing Car in the air in Rocket League (Picture Credits: eXputer)

Steering and Aerial Sensitivity in Rocket League:

  • Interconnected Precision: In Rocket League, the sensitivity settings for steering and aerial control are closely related.
  • On-Ground Precision: For intermediate ranks like Diamond or Champ, prioritize accuracy over speed. Set both sensitivities between 1.2-1.4, but never lower than 1.2. 1.2 is ideal for steering, while 1.4 is optimal for aerial control. If you’re an experienced player, 1.9 may suit you better.
  • Starting Point: If you’re experiencing sluggish movement or missing basic shots, begin with lower sensitivities. As your consistency and control improve in both ground and aerial play, gradually increase these settings. Always maintain a lower steering sensitivity compared to aerial.
  • Training Benefits: Shifting your sensitivity settings can enhance your training regimen. Studies suggest that changing settings can improve your focus, leading to faster skill development.

Controller Deadzone – 0.04

This function controls the extent to which you need to move your joystick in order to register a movement. This is a very sensitive setting as subtle changes like 0.05 can cause an enormous amount of change in actual controller movement.

Normally, you would want your movement to be very quick and responsive. Whereas, in a constant-motion game like Rocket League, we recommend keeping the controller dead zone low between 0.04 and 0.10.

Dodge Deadzone – 0.60

It determines how far you have to move your joystick to dodge while in the air. People generally find fast aerial difficult, which requires aerial training. The higher you go, the more protected you will be against accidental backflipping during fast aerial.

Controller Vibration – Disabled

Coordination may be affected by rumble effects

Vibration Intensity – 1.00

This is unaffected if the controller vibration is turned off.

Ball Camera Mode – Toggle

Choosing toggle will enable you to switch between ball-focused and free-view camera

Other Settings

Since KBM is not recommended for the game, so we won’t be using the following features.

  • Mouse Sensitivity – 0
  • Keyboard Input Acceleration Time – 0
  • Keyboard Axial Safety – OFF

These were the best control settings for Rocket League which are very crucial to make progress.

Binds 

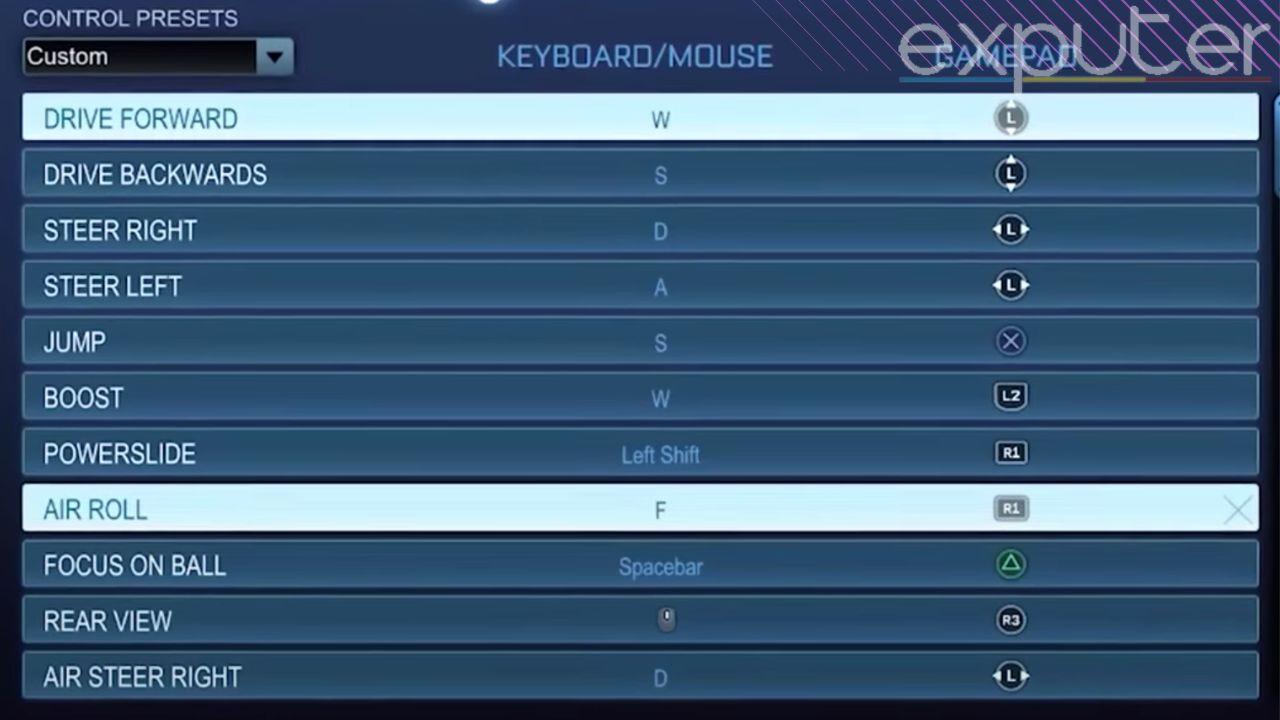
Picture showing key binds of Rocket League (Picture Credits: eXputer)
binds of Rocket League (Picture Credits: eXputer)
Drive Forward/Backward L3
Jump X
Boost L2
Powerslide/Air Roll R1
Rear View R3
Air Roll Left/Right □ (square button)
Camera Swirl R3
Other Keybinds
  • Camera Pitch Max
  • (Right Stick)
  • Air Steer Right/Left (L3)
  • Ball Camera (△ or ○)
  • Steer Right/Left (L3)
Show Full Text

Key binds are the most important aspect of making progress in the game. There are countless key combinations available on the internet that can work; some of them are hard to adapt, while others may need to be changed later on. For instance, for higher-level mechanics, you cannot press 2 critical points instantly at the same time if you have chosen poor key binds. Due to this reason, many pro players have to change their key binds.

Our controls are a little exceptional but are designed to give you maximum accessibility and performance in the long run

Drive Forward/Backward – L3

Driving forward and backward is very unconventional, but using them using the same stick rather than with X or O buttons will free up space for other functions.

You can always use typical key binds for driving if using the left stick does not suit you

Jump – X

It should be set at X, near Boost.

Boost – L2

You should place Jump and Boost near, as they are frequently a lot. Since Boost is used most of the time at higher levels, it is set at the back of the controller. Using this orientation, you will be able to control aerial and jump input efficiently by using your thumb for air roll and jump while boost will be controlled by your middle fingers.

Powerslide/Air Roll – R1

Since both air roll and power slide cannot occur simultaneously, they should be set to the same key. Power slide only happens on the ground, whereas air roll can be performed only in the air.

Rear View – R3

Rear View is not used very often.

Air Roll Left/ Right – Square Button

Since Learning both rolls is not needed and they consume a lot of time and muscle memory, we highly recommend you train only one directional air roll. In this way, you can free up the other joystick for some other use.

Air roll and jump can be performed easily with the same square button

Camera Swirl – R3

Though these key binds are a bit unconventional, but they are one of the best combinations for Rocket League for guaranteed accessibility.

Other Keybinds

These keybinds can be set according to your comfort level or you can follow ours.

  • Camera Pitch Max – Right Stick
  • Air Steer Right/Left – L3
  • Ball Camera –  △ or ○
  • Steer Right/Left – L3

Interface Settings

Name Scale 200
Colour Blind OFF
Display Scale 99%
Force Default Team Colours ON
Team Coloured Boost Meter ON
Match Notifications Time Update Only
Ball Cam Indicator OFF
Ball Arrow ON
Performance Graphs None

You can adjust the interface settings according to your usage. 

Show Full Text

Name Scale – 200 

You can set the size of name tags of other players by adjusting the name scale. It is kept high to spot enemies from afar.

Colour Blind – OFF

It will enhance colors; you can turn it on if you have color blind issues.

Display Scale – 99 %

Interface scale and display scale adjusts the size of your screen

Force Default Team Colours – ON

You can turn it off if you want the overall theme of arena, goal posts, lighting to be in accordance with your club in a club match. We recommend keeping it ON as a simple color theme of orange and blue will make you more focused on the match.

Team Coloured Boost Meter – ON

Keep it on to ensure your boost meter is in either blue or orange.

Match Notifications – Time Update Only

It gives notifications during gameplay when you score a goal or when the last 60 seconds are left. Setting it to ‘all’ will give a lot of notifications which will eventually be a distraction, or setting it to ‘Only Kickoffs’ will hardly pop a notification. ‘Time Update Only’ is fair enough.

Ball Cam Indicator – OFF

It indicates if your ball camera is ON or off at the bottom of your screen. It proves to be a distraction.

Ball Arrow – ON

Keeping the ball arrow ON is very important as it points towards your ball even if your ball camera is off.

Performance Graphs – None

Data regarding CPU/GPU can be shown on the top right, and It can be set according to your preference.

Other Settings

Set the following settings according to your suitability, or you can also follow them as we have done.

  • Team- Coloured Boost Meter – ON
  • Notifications During Gameplay – OFF
  • Force Default Team Colours – OFF
  • Nameplate Scale – 180 %
  • Nameplate Mode – Default
  • Convert Platform Friends – ON
  • Connection Quality Indicators – OFF
  • Interface Scale – 93 %
  • Metric – OFF

Video Settings 

Gameplay of Rocket League (Picture Credits: eXputer)

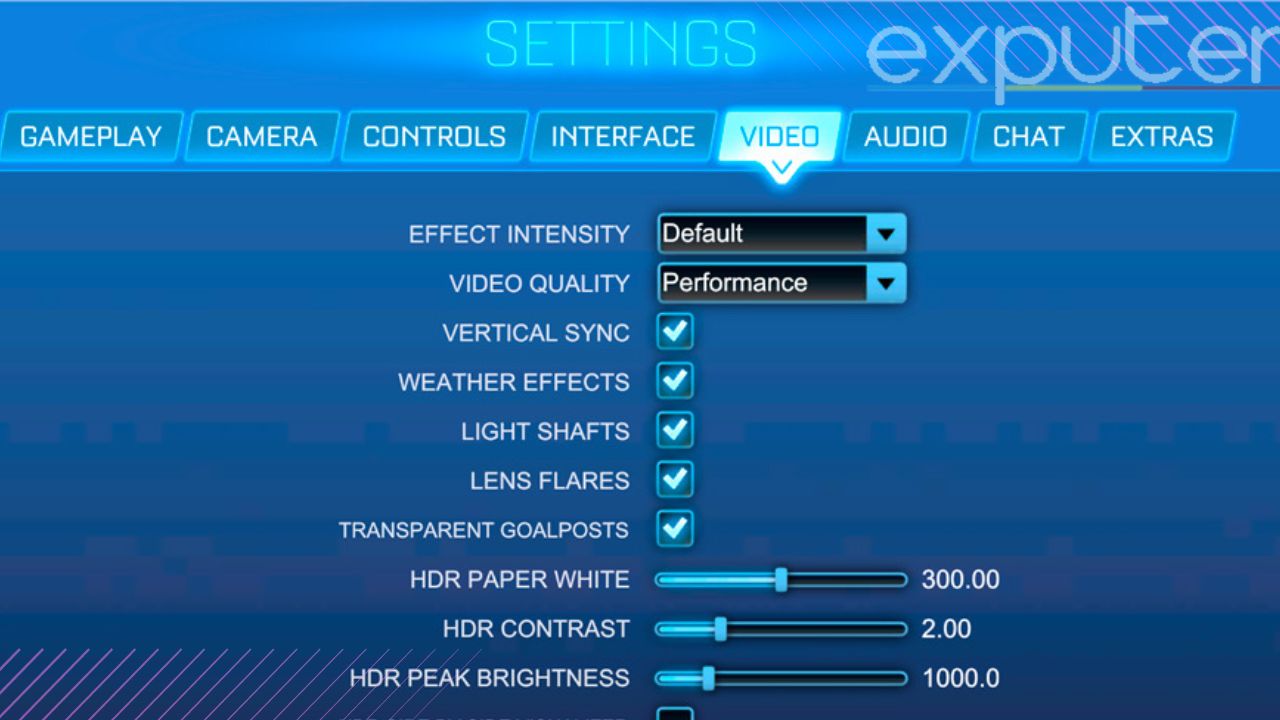
Video settings determine the appearance of the game on the screen and how quickly it runs. They also change factors like reaction time and input delay, which consequently affect scoring and conceding in the game. Ultimately, video settings affect performance, which is the most important parameter in the game.

Window Settings

Resolution Set it to 1920×1080 or appropriate to the resolution of your monitor
Display Mode Full Screen
VSync Off

These settings mainly include resolution and display split.

Show Full Text

Resolution – According To The Monitor

The resolution affects the performance of your game. Set it to 1920×1080 or appropriate to the resolution of your monitor. However, if you are on a low-end PC, you should set low resolution. As a result, you may not have up to the mark quality appearance, but your performance will be boosted drastically.

Display Mode – Fullscreen

Display mode should always be fullscreen. Any other setting can cause noticeable input lag because the gameplay is very fast-paced.

VSync – Off

It adds cinematic effects to the gameplay, causing input lag. You can turn it on if you are experiencing consistent screen tearing.

Basic Settings

Render Quality High
Render Detail Custom
Frames Per Second (FPS) Set FPS more than your monitor can support to decrease input lag

These include render quality, render detail, and FPS. These are crucial for quality gameplay.

Render Quality – High

By setting it to high, you will have sharp-quality pixels. You can decrease render quality to improve gameplay but it will cause the ball to look blurry. Hence, it will be difficult to score or concede goals.

Render Detail – Custom

It is custom due to the personalized advanced settings set, which is covered ahead.

Frames Per Second (FPS) – According To The Monitor

We recommend you use FPS more than your monitor supports. For example, if your monitor can output 240, set it at 360. The setting may seem unfamiliar, but the reason behind it is increasing FPS massively decreases input lag,

Advanced Settings

Texture Details High Quality
World Details Performance
Particle Details Performance
Effect intensity Low
High Quality Shaders ON
Ambient Occlusion OFF
Depth Of Field OFF
Bloom ON
Light Shaft OFF
Lens Flare OFF
Dynamic Shadows OFF
Motion Blur OFF
Weather Effects OFF
Transparent Goal ON
Show Full Text

Advanced settings deal with game quality. If you are a performance-oriented gamer who wants to make progress, you should turn the majority of the things off. 

Texture Details – High Quality

You can choose high quality as it would not affect the FPS as Rocket League’s Graphics are accessible.

World Detail – Performance

Opting for performance will increase your focus because external background distractions are eliminated.

Particle Detail – Performance

Particles have a significant impact on usage; keep it at performance for best results.

Effect Intensity – Low 

You should opt for low as it deals with lighting effects during the game, like flashing; this will help to stay focused.

High Quality Shaders – ON

It should be turned off if your PC lags.

Ambient Occlusion – OFF

Turning it on will help to locate shadows of enemies, but it causes extra load on performance of the PC.

Depth Of Field – OFF

Turn it off to get rid of blur in the gameplay.

Bloom – ON 

Bloom causes lightning effects. Keep it ON as most of the maps are equipped by low level lightening neon.

Light Shaft – OFF

Keeping the light shaft off eliminates light rays coming from sources like the sun. 

Lens Flare – OFF

You should keep Lens Flare OFF because it prevents blinding effects from light sources.

Dynamic Shadows – OFF

This drains frames a lot, as it helps to identify enemy shadows. Since enemies are easily visible, so there is not much of a need to turn it ON.

Motion Blur – OFF

Blurriness will make it difficult to score or concede a goal.

Weather Effects – OFF

Keeping this ON will add more quality visuals but is unnecessary with respect to making progress.

Transparent Goal Post – ON

This is the most important parameter of advanced settings. Keeping this on will allow you to see up and out of your net when you are inside it; it is beneficial when you are defending.

Audio Settings 

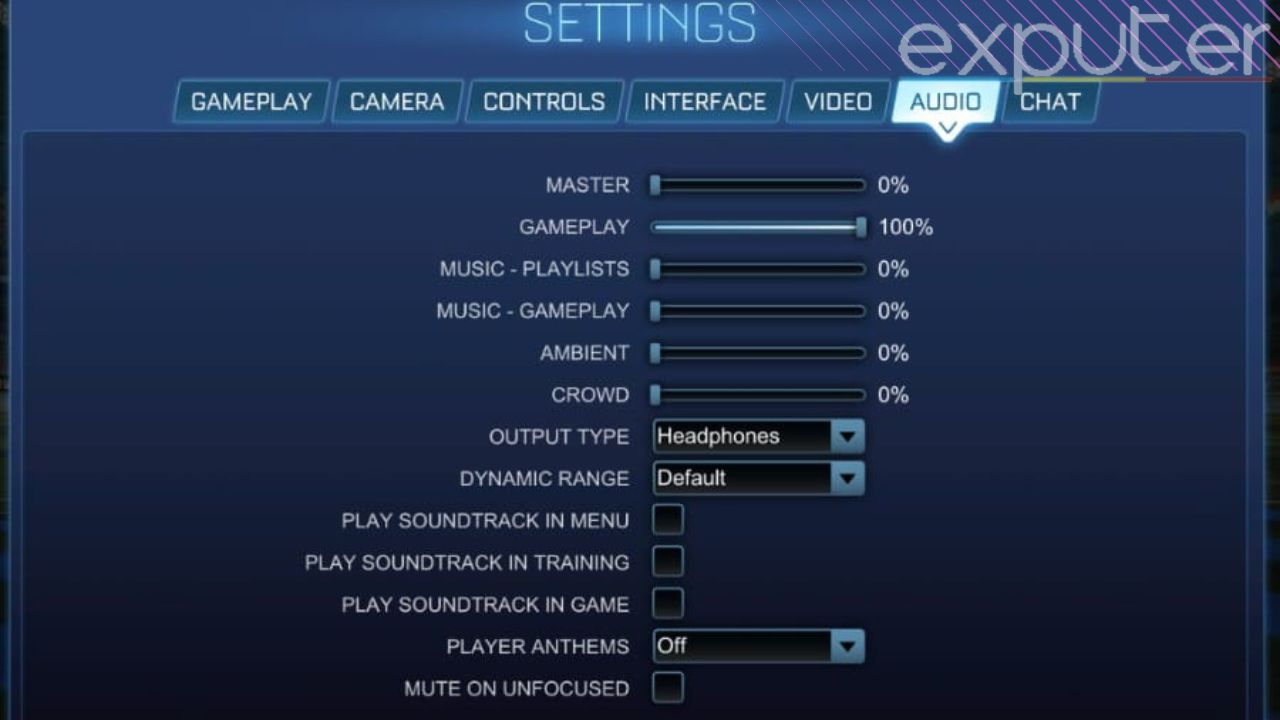
Image showing audio settings of rocket league
Page showing Audio Settings of Rocket League (Picture Credits: eXputer)

You should choose Audio settings according to your comfort, except for the following settings

  • Music Gameplay – OFF
  • Music Playlists – OFF
  • Ambient – Off
  • Crowd – Off
Show Full Text

Background music and other soundtracks, like commentary, crowd distract you from the game. In order to increase your focus, you should keep these off.

System Requirements 

If the game is still not running smoothly enough, you should check your PC compatibility. For your convenience, we have added both minimum and optimum system requirements. Furthermore, you can use these tools to check whether your PC is suitable or not. However, Rocket League is not a high-end demanding game like Cyberpunk 2077 or Call Of Duty: Modern Warfare 2; we expect your PC to run the game.

Minimum System Requirements 

Here are the least PC specifications needed to run Rocket League on low settings.

  • OS: Windows 7 (64-bit) 
  • Processor: 2.5 GHz Dual Core
  • RAM: 4 GB
  • Graphics: Nvidia GeForce GTX 760 or AMD Radeon R9 270X
  • DirectX: DirectX Version 11.0
  • Storage: 20 GB

Recommended System Requirements

Here are the suggested PC specifications to run Rocket League on medium to high settings smoothly.

  • OS: Windows 7 or 10 (64-bit) 
  • Processor: 3.0 GHz Quad Core
  • RAM: 8 GB
  • Graphics: Nvidia GeForce GTX 1060 or AMD Radeon RX 470
  • DirectX: DirectX Version 11.0 OR 12.0
  • Storage: 20 GB

This marks the end of our guide. We have covered the best Rocket League settings in our guide to enhancing your scoring abilities. Unlike any other competitive racing game, Rocket League is more of an arcade racing game that requires the best possible settings.

We hope this guide will massively help you to get better in the game. Feel free to leave any comments or ask any questions in the comment section below.

Next:

Did you find this helpful? Leave feedback below.

Thanks! Do share your feedback with us. ⚡

How can we make this post better? Your help would be appreciated. ✍

Community Feedback

Thanks

Subscribe to our newsletter and get up-to-speed gaming updates delivered to your inbox.

We don’t spam! Read more in our privacy policy.


Daniyal is a Guides Writer and Editor at eXputer with over one year of experience in content writing. He's had a passion for tech and gaming for more than 15 years. Ever since his first console, the PS2, he's constantly branching off to different genres, and his go-to at the moment is the Souls experience pioneered by FromSoftware, which is evident by his 1,500+ hours of game time on Elden Ring. You can learn some more about Daniyal's gaming journey on his Steam & Xbox profiles.

Experience: 1+ Years || Mainly Covers Guides || Education: Bachelors in Computer Sciences.

Related Articles

Join Our Community

Enjoyed this article? Discuss the latest gaming news, get expert help with guides and errors, and chat about all things gaming on eXputer Forums and Discord Server. Connect with fellow gamers who share your passion by becoming a part of eXputer's community.