ALC stands for Advance Look Control Settings in Apex. As the name suggests, it controls the viewing aspect of the game. However, it does more than just control your looks. Excellent ALC controller settings can turn you into a pro player, such as Imerialhal, with god-like aim-accuracy. The amount of accuracy you get just by changing these settings is unreal. Not just accuracy in your aim, but your recoil control will improve significantly.
That is why we have curated the Apex Legends ALC settings guide so that you can master these settings and become a professional player such as Shroud or Dizzy in the game.
ALC Settings are for Apex Legends controller players. These basically adjust the sensitivity of your aim stick on the controller.
- Deadzone: Adjusts reaction speed; beneficial but may cause drift on cheap controllers.
- Per Optic ADS Sensitivity: Set sensitivity for each scope multiplier.
- Yaw & Pitch Speed: Determines left/right and up/down sensitivity.
- Turning Ramp-up Time: Increases time to reach maximum speed, enhancing aim precision.
- Aimed Down Sight setting: Keep slightly lower than other settings for optimal results.
- Target Compensation: Automatically adjusts aim, essential for new players.
- Melee Target Compensation: Similar to above, but for melee weapons only.
ALC Apex Legends Settings
The ALC Settings in Apex Legends can be set up by going to the Controller Settings. Here are detailed steps to find and customize the ALC settings.
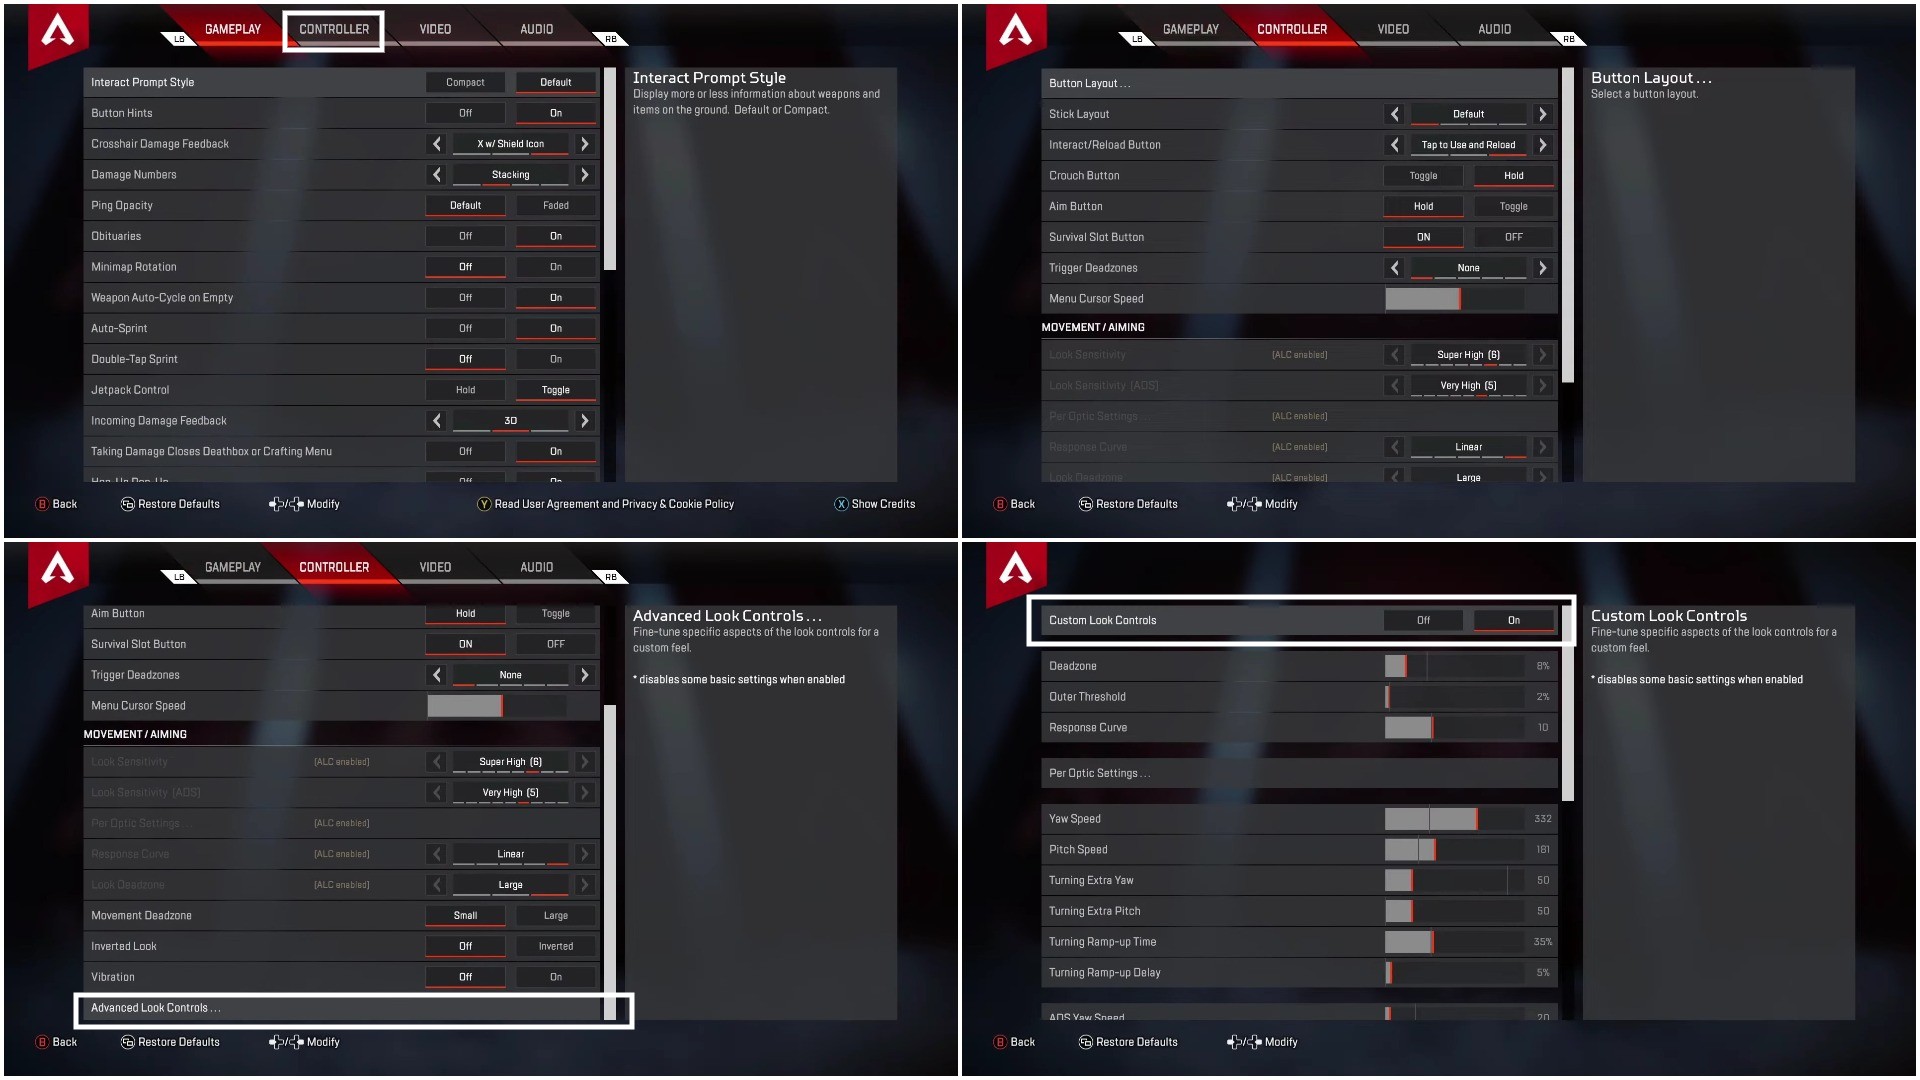
- Firstly, go to settings. You can go there by clicking the settings icon from the main menu.
- In the settings, press R1 or RB to get the Controller Portion
- Lastly, scroll down to the Movement / Aiming. You will find the ALC option at the very bottom in Movement / Aiming.
- Click it, and inside there, enable ALC Settings.
Once enabled, ALC Settings disables some of Apex’s basic Movement / Aiming settings. The ALC settings let the player control their aiming and sensitivity settings to a much greater level. In ALC, there are two main settings that get affected; the first is hip firing, and the second is ADS. There are many settings in ALC, and this guide will explain each one of those.
There are many settings in ALC, and this guide will explain each one of those.
-
Deadzone:
- Determines when your controller inputs are registered. Lower values result in more immediate response but may cause drift on older controllers.
- It is something ACEU does while playing competitive plays in Apex Legends.
-
Outer Threshold:
- Controls the point at which your inputs reach maximum speed. Higher values make your aim reach maximum speed more quickly but may sacrifice control.
-
Responsive Curve:
- Adjusts the speed at which your reticle moves after moving the thumbstick. Experiment with different settings to find a balance between speed and control.
-
Per Optic ADS Sensitivity:
- Allows customization of sensitivity settings for each optic. Useful for advanced players who prefer specific sensitivities for different magnifications.
-
Yaw & Pitch Speed:
- Determines the speed at which you look horizontally (yaw) and vertically (pitch). Adjust according to personal preference and playstyle.
-
Turning Extra Yaw & Pitch:
- Provides a boost to yaw and pitch speed when reaching their limits. Use cautiously to avoid losing control during fast movements.
-
Ramp-up Time:
- Adjusts the time it takes for your aim to reach maximum speed. Higher values introduce a delay, while lower values provide more immediate response.
-
Ramp-up Delay:
- Determines when the extra yaw and pitch speed settings kick in. Keep it off for more consistent aiming.
-
Aimed Down Sight (ADS) Settings:
- Similar to regular ALC settings but specifically for aiming down sights. Customize these settings to match your ADS preferences.
-
Target Compensation:
- Functions like an aim assist or aimbot, helping players aim more accurately. Useful for beginners but optional for advanced players.
- Melee Target Compensation:
- Similar to target compensation but specifically for melee attacks. Recommended for all players to improve melee accuracy.
Best ALC Settings In Apex Legends
Now that we have learned what each ALC setting does in Apex Legends let’s look at some of the best settings. Below we have listed three settings for all players: beginners, pros, or average players.

Best Beginner ALC Settings
As a beginner, you will see a lot of Apex ALC setting guides on the Internet, especially Youtube. Most of these ALC Settings guides are for Advanced Players, or a Pro Apex Player uses them. But as a beginner, those settings are not suited for you whatsoever. ALC is complicated, and just by copying settings, no one is going to be a better player.
That’s why it’s recommended to stick with beginner-friendly Apex ALC Settings. Down below are detailed Beginner ALC settings for Apex. You can make slight changes to these settings to match your preference and once you have a good handle of the game, change to Pro Apex ALC settings.
| Deadzone: | 6% |
| Outer Threshold: | 0% |
| Responsive Curve: | 5 |
| Per Optic ADS Sensitivity: | OFF |
| Yaw Speed: | 200 |
| Pitch Speed: | 160 |
| Turning Extra Yaw: | 170 |
| Turning Extra Pitch: | 0 |
| Turning Ramp-up Time: | 25% |
| Turning Ramp-up Delay: | 0% |
| ADS Yaw Speed: | 120 |
| ADS Pitch Speed: | 85 |
| ADS Turning Extra Yaw: | 40 |
| ADS Turning Extra Pitch: | 35 |
| ADS Turning Ramp-up Time: | 70% |
| ADS Turning Ramp-up Delay: | 15% |
| Target Compensation: | ON |
| MeleeTarget Compensation: | ON |
Best Pro ALC Settings
The Apex ALC settings below are taken from Genburten, the Apex Controller Demon. Geburten is so great that he is the most reported player globally. That’s due to his amazing skills in Apex Legends, so some people might consider him to be the best Apex Player in the World. Part of the reason he is so great is because of his Best Pro ALC Settings. Down below are all the ALC Settings used by Genburten.
| Deadzone: | 2% |
| Outer Threshold: | 3% |
| Responsive Curve: | 0 |
| Per Optic ADS Sensitivity: | OFF |
| Yaw Speed: | 500 |
| Pitch Speed: | 500 |
| Turning Extra Yaw: | 0 |
| Turning Extra Pitch: | 0 |
| Turning Ramp-up Time: | 0 |
| Turning Ramp-up Delay: | 0 |
| ADS Yaw Speed: | 130 |
| ADS Pitch Speed: | 130 |
| ADS Turning Extra Yaw: | 0 |
| ADS Turning Extra Pitch: | 0 |
| ADS Turning Ramp-up Time: | 0 |
| ADS Turning Ramp-up Delay: | 0 |
| Target Compensation: | ON |
| MeleeTarget Compensation: | ON |
No Recoil ALC Settings
These are extra settings we decided to throw into this guide. The No Recoil ALC Apex Legends settings will do as the name suggests. With these settings, you will not have to deal with any recoil. They are a great way to win games without much effort and win most of your battles. Below are the detailed Apex No Recoil ALC Settings.
| Deadzone: | 1% |
| Outer Threshold: | 2% |
| Responsive Curve: | 10 |
| Per Optic ADS Sensitivity: | OFF |
| Yaw Speed: | 500 |
| Pitch Speed: | 170 |
| Turning Extra Yaw: | 250 |
| Turning Extra Pitch: | 0 |
| Turning Ramp-up Time: | 33% |
| Turning Ramp-up Delay: | 0% |
| ADS Yaw Speed: | 160 |
| ADS Pitch Speed: | 85 |
| ADS Turning Extra Yaw: | 30 |
| ADS Turning Extra Pitch: | 30 |
| ADS Turning Ramp-up Time: | 0 |
| ADS Turning Ramp-up Delay: | 25% |
| Target Compensation: | ON |
| MeleeTarget Compensation: | ON |
Final Verdict
That’s pretty much every single thing you need to know about the ALC Settings in Apex. But a word of advice for players who still find it hard to adjust with Apex Legends ALC Settings. These settings are essential, but they are not required. Some players may find them helpful, while others won’t. So if you didn’t improve with these settings, feel free to turn ALC Settings off. Because some Apex Pro players play without the ALC settings enabled. Everything boils down to personal preference at the end of the da. So, choose what you want, and watch this video if you need further help setting up ALC in Apex Legends.
That concludes today’s guide. If you found it helpful or have any questions left, let us know in the comments below.
Thanks! Do share your feedback with us. ⚡
How can we make this post better? Your help would be appreciated. ✍
Great read
the no recoil settings were amazing and thanks to you I am now top 500 predator :) my username is chaoticmuch
-10000%reciroll