How To Get High FPS In Apex Legends? [Best Methods]

The list of settings is long, but worth it.

Players are seeing massive FPS losses in Apex Legends and the overall performance isn’t entirely good. But, don’t worry because, in this guide, I’ll teach you some effective methods that will really take your Apex Legends FPS to the next level.

Key Highlights
  • To improve FPS in Apex Legends first make sure your computer is above the minimum specifications required for the game.
  • You can then follow some basic FPS-boosting steps, such as;
    • Enable Game Mode in your windows to boost FPS, as background apps are closed by the OS itself.
    • Enabling Ultimate Performance in your power plan can help; it has to be enabled by running a script in the CMD first.
    • If you need performance more than aesthetics, disable all animations in Windows to get a few more frames.
    • Clearing cache data by deleting all files in the Temp folder will slightly boost the performance of your device.
    • You can also clear the drive by using the Disk Cleanup feature.
    • Using MSConfig, close all useless background apps that you don’t need during the game.
    • Set the CPU Priority to high for the game. This can be done in the Task Manager under the Details menu.
    • You need to turn off Full Screen Optimization for the game.
    • Using your NVidia Control Panel, change the 3D settings. Lower the resolution down and make sure you have turned all extra graphic features to low. (ONLY FOR NVIDIA GRAPHIC CARD USERS)
    • (FOR AMD GPU USERS) You can change the game mode to Esports. The software will automatically set everything for you.
    • In the Apex Legends Game Settings, you need to turn everything to low.
    • You can automatically enhance some settings like Model Detail and Effects Detail to Medium. This will benefit you with better visuals, and the balance of Frames and Graphics will be fantastic.

Make sure your System Specifications are on par or above the minimum system requirements of Apex Legends.

  • OS: 64-bit Windows 7
  • CPU: Intel Core i3-6300 3.8GHz / AMD FX-4350 4.2 GHz Quad-Core Processor
  • RAM: 6GB
  • GPU: NVIDIA GeForce GT 640 / Radeon HD 7730
  • GPU RAM: 1 GB
  • HARD DRIVE: Minimum 22 GB of free space

Also, make sure you make the following changes in the in-game settings of Apex Legends:

SettingWhat to Set it To
Display ModeFull Screen
Aspect Ratio16:9 (or Native)
Resolution1920×1080 (Highest Available or Native)
BrightnessPersonal Preference
Field of View110 (Personal Preference, adjust as desired)
V-SyncDisabled
Adaptive Resolution FPS Target0.0
Anti-AliasingNone
Texture Streaming BudgetNone
Texture FilteringBilinear
Ambient Occlusion QualityDisabled
Sun Shadow CoverageLow
Sun Shadow DetailLow
Spot Shadow DetailDisabled
Volumetric LightingDisabled
Dynamic Spot ShadowsDisabled
Model DetailLow
Effects DetailLow (or Medium if preferred)
Impact MarksDisabled
RagdollsLow

Enable Game Mode To Improve Performance in Apex Legends

When Game Mode is enabled, Windows 10 automatically sets the game priority high and likewise, end task’s all other irrelevant applications running in the background. Game Mode is a built-in feature within Windows 10 that is completely gaming oriented. Make sure, you are taking all its perks. Here is how you can enable Game Mode.

  1. Open Start > Type Game Mode > Click on First Result.
  2. Once Opened, Simply Enable Game Mode and Exit.

Enable Ultimate Performance

Times and times again I’ve explained the importance of Ultimate Performance. If you don’t know, well by default Windows 10 runs on Balanced Power Plan. This plan quite frankly, never allows your PC to use the 100% Power from both CPU and GPU. Therefore, you experience lag and low frames. When Enabled, Windows 10 removes the power threshold and allows the PC to consume as much as it wants. We are certainly going to need it for Apex Legends.

  1. Firstly, Unlock Ultimate Performance Plan by Entering the Code Below in Command Prompt.
  2. powercfg -duplicatescheme e9a42b02-d5df-448d-aa00-03f14749eb61
  3. If you properly copied and pasted in the code. The operation will be successful, and a message like this mentioning Ultimate Performance will appear.
  4. Afterward, Open Search > Edit Power Plan.
  5. Once Opened > Click on Power Options as I’ve pointed below.
  6. In Power Options, you will see the Ultimate Performance Option. If you don’t click on Hidden Additional Plans, as I’ve pointed in Blue.
    Ignore my dozens of Ultimate Performance Plans. They are all duplicates, as I’ve been consistently enabling them for Guides.

    You can now Select Ultimate Performance, and close the window. Experience some crazily fast speeds from now on.

Disabling Useless Animations to Increase Performance and Responsiveness

Like I previously said, Windows 10 by default is packed with a really balanced eco-system. Now if you want really the best out of your PC. You have to ensure that some of these settings are disabled. Subsequently, we are going to disable all those useless animations that consume tons of memory and CPU usage. When disabled, expect good frames and high performance in Apex Legends.

  1. Go To Start > Type “Advanced System Settings” > and click on the first option.
  2. Now you will be inside System Properties and Advanced Tab.
  3. Now click on Settings under Performance > Custom, and only enable the following two options.
  4. Show Thumbnails Instead of Icons Smooth Edges of Screen Fonts

Clear Out Temp Files and Perform a Disk Cleanup

One of the most effective methods to increase FPS is by actually deleting the Temp Files. These files compile into a huge chunk and can take a lot of space. Other than this, they also impact your performance, because they are leftover from a lot of things you delete. Disk Cleanup is clearing out the leftover infected files and much more that can have a negative impact on your Drive. Here is how you can clear temp files and perform a disk cleanup.

  1. Go To Start > Search and Open Run.
  2. Under Run, Type, and Click %temp%.
  3. Press CTRL + A on your Keyboard To Select All > Right Click Any File > Delete.

Further, Optimize Apex Legends By Performing Disk Cleanup

  1. Now Head over to My Computer > Right Click The Drive where Apex Legends Is Installed > Properties.
  2. Click On Disk Cleanup > Pay Close attention to the files you checkmark. Sometimes there are folders as well, and they will be completely wiped out.

Disable Useless Services and Applications Running in Background

One of the biggest factors that highly impact your performance is all the useless applications and services running in the background. These applications and settings usually startup with your PC, and they consistently squeeze dozens of power from your PC. We can easily disable them by the following steps.

  1. Go To Start > Run > Enter “msconfig”.
  2. Now Under Services, Click on “Hide All Microsoft Services. This will hide all the essential services, that you shouldn’t disturb.
  3. Afterward, go through the list of services, and disable the ones you don’t need.
  4. Once Done, Hit Apply, and Head Over to the Startup Tab.
  5. Under Startup Tab, Disable all the Useless Applications. Once Disabled, your boot time along with Apex Legends Performance will significantly improve.

Approaching Section 2 and 3 of the guide

Well, good job on making all the changes above. If you have followed the steps properly, I can guarantee that you will already be seeing a massive improvement in Apex Legends. Not only that, but you will also experience a very smooth and responsive Windows 10 from now on.

Some of you might be wondering, why I did not jump straight to Apex Legend Settings or Graphic Card Settings. Well, there is no point, because if your base Windows settings aren’t optimized. You’ll never get the performance you always wanted. Anyhow, let’s proceed to the second section, where we’ll be Optimising Apex Legends Application and Setting up Nvidia Control Panel to get the best possible performance.

Set High Graphics Priority For Apex Legends

Windows 10 also allows you to change the performance preference for certain applications or games. When you set their Performance to High in the Graphics Settings. The Game is then allowed to cross the Usage barrier and can get the most of the Graphics Card. Here is how you can do it.

  1. Go To Start > Graphics Settings
  2. Now Click On Browse and Find The Apex Legends Application, wherever you have installed it.
  3. Once You Have Opened it, Simply change its Graphics Performance Preference from Normal to High Performance.

Set High CPU Priority For Apex Legends

Once you are done with maximizing GPU Performance for Apex Legends. It’s time that we also set CPU preference max for Apex Legends. Once again, this feature will allow Apex Legends to get the most out of your CPU, thus increasing performance. Follow the steps below.

  1. Open Apex Legends and then Minimise The Game
  2. Afterward, Open Task Manager by Right-Clicking on Taskbar > Task Manager
  3. Then proceed to details, and search for r5apex.exe
  4. Once you are able to find it, Right Click on r5apex.exe > set priority > High

Setting High Priority for the application is going to increase FPS. On top of that, the frames will be very consistent and gameplay will be buttery smooth. The only drawback of this method is that it’ll slow down minimizing time of Apex Legends.

Disable Enhance Pointer Precision

We can further optimize Apex Legends by disabling Enhance Pointer Precision. If you are a competitive gamer, this feature is completely useless. Enhance Pointer Precision will change your mouse sensitivity and DPI every minute. It does it in such a manner that you do not notice, but it has a big hand behind inconsistency in the game. That is to say, it constantly uses CPU and Memory Power to change DPI every other minute. You can assume this feature is stealing 5-10 frames from your game.

  1. Open Start > Search Mouse Settings
  2. Now Click on Additional Mouse Options
  3. Under the new tab, head over to Pointer Options, and Make sure that Enhance Pointer Precision is disabled. Other than FPS Increase, I can assure you that you will get better at Apex Legends or any other FPS game you play.

Optimizing Apex Legends Application for High FPS

The last change we are going to make in section 2, is that we will disable Full-Screen Optimization and Override DPI settings for r5apex.exe. Doing this is very important because it’ll take the responsiveness to the next level. Along with that, it’ll also improve minimizing, which was slightly increased after setting High Priority for Apex Legends in the steps above.

  1. Firstly Locate your r5apex.exe application. You can do this by going to Origin, Right-Clicking Apex Legends > Locate its folder.
  2. Once you are able to find the directory of the game. Right Click r5apex > Properties.
  3. Under Properties go to compatibility, and Enable “Disable Full-Screen Optimisations”. Then Hit Apply.
    Guide: How To Get High FPS In Apex Legends
  4. Secondly, click on “Change high DPI settings” that I’ve highlighted in Green in the picture above.
  5. Afterward, Enable “Override high DPI scaling behavior”. And under Scaling performed by, chose Application. Once done click Ok, and do the same in the tab below.
  6. Guide: How To Get High FPS In Apex Legends

Nvidia Settings For Apex Legends

To ensure that you are getting high frames and the Best Performance in Apex Legends. We must configure its advanced Settings from Nvidia Control Panel. These Settings are normally not found within the game, and many people completely ignore it. Changing these settings for Apex Legends application will have a larger effect than any other method in this guide. Pay close attention to all settings, and check them twice while you are it.

  1. Right-Click Desktop > Click on Nvidia Control Panel.
  2. Under Nvidia Control Panel > Firstly, Go to “Adjust Image Settings with Preview”Best Nvidia Settings For Apex Legends
  3. Enable Use the advanced 3D Image Settings, and afterward, click on “Take me there” that is highlighted in blue.
  4. Afterward, you will be taken to the Manage 3D Settings Tab. Now click on Program Settings > and locate r5apex.exe under “Select a Program to Customize”.Best Nvidia Settings For Apex Legends

Once you have added Apex Legends, change the settings from default to these:

  1. Anisotropic Filtering – Off
  2. Antialiasign – FXAA – Off
  3. Antialiasing – Gamma Correction – Off
  4. Antialiasing – Mode = Application Controlled
  5. Antialiasing – Transparency – Off
  6. CUDA – GPUs – All
  7. Maximum pre-rendered frames – 1
  8. Multi-Frame Sampled AA (MFAA) = Off
  9. OpenGL Rendering GPU = Select the Graphics Card you use for gaming. Not the built-in Intel/AMD Card.
  10. Power Management Mode = Prefer Maximum Performance
  11. Prefered Refresh Rate (Your Monitor) = Highest Available
  12. Shader Cache – On
  13. Texture Filtering – Anisotropic Sample Optimization = On
  14. Texture Filtering – Negative LOD Bias – Allow
  15. Texture Filtering – Quality = High Performance
  16. Texture Filtering – Trilinear Optimization = On
  17. Threaded Optimization = Off
  18. Triple Buffering = Highly Recommended to Turn it Off
  19. Vertical Sync = Off, else you will experience input lag and locked frames.
  20. Virtual Reality pre-rendered frames = 1

AMD Settings For Apex Legends

AMD users, don’t worry because we have also got you covered with some incredible settings. Before you go on to make all the changes. Make sure your drivers are updated to the latest version. The latest AMD Drivers can be downloaded from the AMD Control Panel or AMD’s website. Moreover, the settings I’ll mention below are completely aimed for those who want 100% performance and do not care much about visuals.

  1. Open AMD Radeon Control Panel by Right-Clicking on Desktop
  2. Once Opened, head over to the Graphics Tab, and under Profiles, Select eSports. Now, change the settings from default to these.Best AMD Settings For Apex Legends
  3. Radeon Anti-Lag = Enabled
  4. Radeon Chill = Disabled
  5. Raden Boost = Enabled
  6. Minimum Resolution = 83.3%
  7. Radeon Image Sharpening = Enable
  8. Sharpness = 80%
  9. Radeon Enhanced Sync = Disabled (Highly Recommended)
  10. Wait for Vertical Refresh = Always off

Advanced Tab

  1. Anti-Aliasing = Enhance Application Settings
  2. Anti-Aliasing Method = Multisampling
  3. Morphological Anti-Aliasing = Disabled
  4. Anisotropic Filtering = Disabled
  5. Texture Filtering Quality = Performance
  6. Surface Format Optimization = Enabled
  7. Tessellation Mode = AMD Optimized
  8. Maximum Tessellation Level = 8x
  9. OpenGL Triple Buffering = Disabled
  10. 10-Bit Pixel Format = Disabled
  11. CPU Workload = Graphics

AMD Display Settings for Apex LegendsBest Apex Legends PC Settings

  1. AMD FreeSync – Off
  2. Virtual Super Resolution – Enabled
  3. GPU Scaling – Disabled
  4. Scaling Mode – Full Panel
  5. Integer Scaling – Disable

Apex Legends Launch Options for High FPS

Like Steam, Origin also allows you to enter advanced launch options that are meant to tweak your graphics. We are going to take advantage of this feature by using certain commands, that will further optimize Apex Legends, and get us the Max Possible Frames. Before I force you to copy and paste the code, I’ll give you a short description of each code so you can know the benefits. Here is the code first

-refresh 144 -dev -preload -threads 8 -forcenovsync -fullscreen -high

So firstly the -refresh command will ensure the game is utilizing the refresh rate value of your monitor. Make sure, you are entering the right refresh rate value. I have got an XG2401 from Viewsonic, and its refresh rate is 144.

The -dev command as many people on forums has noticed. It actually enables the Source Engine of Apex Legends. According to many people, this command has significantly improved performance. If you didn’t see any difference, try to use -console instead of -dev.

The -preload has a remarkable function because it preloads certain game assets. This slightly improves loading times and many users have seen a significant increase in overall stability.

-Threads code will ensure that Apex Legends is fully utilizing all the threads available. Make sure you are entering the correct number of threads available in the value. For my 4 Core Processor, there are 8 threads.

-forcenovsync won’t be entirely necessary if you have followed our guide properly. We disabled V-sync everywhere, but in case you didn’t, forcenovsync will ensure that v-sync is always disabled.

The -fullscreen command is more like a high priority. When enabled, you will see more consistent frames and better responsiveness. If you hate to minimize the game, simply skip on this command. Likewise, if you are struggling with windowed and half screen bugs, enable it.

Well, we already went through Taskmanager and chose High Priority for Apex Legends. If you missed on it, go back to the heading where I mentioned: “Set High CPU Priority For Apex Legends”. Anyway, the -high command does the same exact thing, as it’ll ensure the priority for Apex Legends Application is high.

Now that you know what are the functions of these launch options. Let’s learn how you can enter one.

  1. Go To Start > Type Origin > Open the first result.
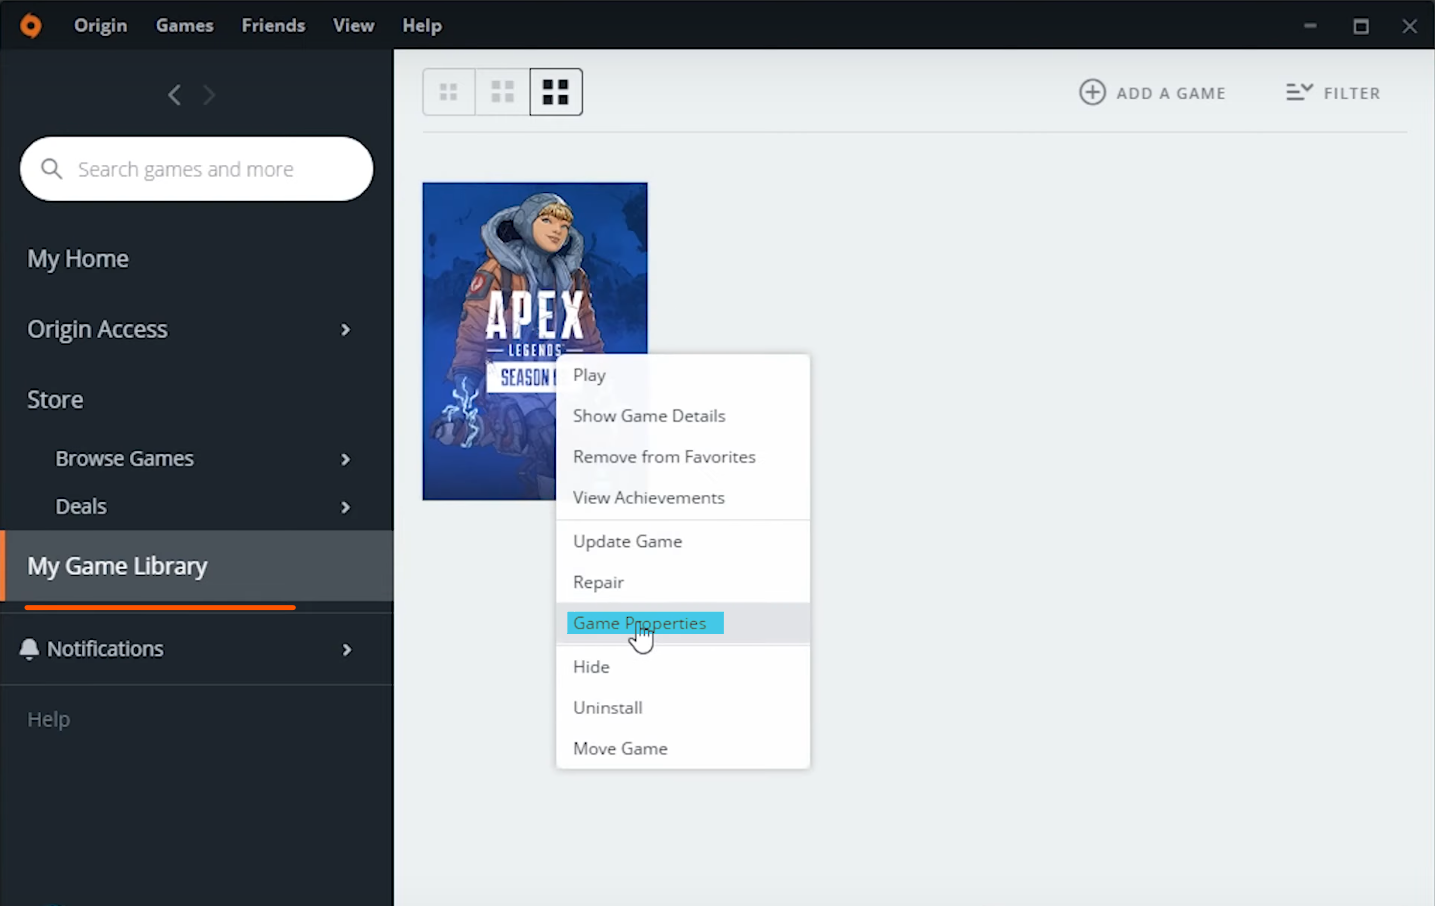
  2. Now Head over to the “My Games Library” > Find Apex Legends > Right Click Game Properties.Best Apex Legends Launch Options
  3. Now You’ll see Advanced Launch Options, and under “Command Line arguments” enter the code we mentioned above.

Best Apex Legends PC Settings for High FPS

The final and most important step is to configure Apex Legends in-game settings. If configured properly, these settings can do wonders for you and you can really expect some incredible performance. I’ll guide you through the settings, and just to clarify once again. My settings are entirely aimed at those who want to have excellent frames and stable performance. Players like us always focus on getting better at the game, and we really don’t want unstable frames to hold us back.

By the way, all the changes we made above in Graphics Card Settings are perfectly going to work with these. The combination of adequately configuring Graphics Card and In-Game Graphics is really important. Here is how you can make these changes.

  1. Open Apex Legends > Click On Settings Icon that is on Bottom Right
  2. Head Over to the Video Tab, and copy the following settings.Best Apex Legends PC Settings
  3. Display Mode = Full Screen
  4. Aspect Ratio = 16:9 (Personel Preference, but chose Native)
  5. Resolution = 1920×1080 (Go with Highest Available, if you are not using any Custom Resolutions)
  6. Brightness = Personel Preference
  7. Field of View = 110, ( The more field of view, the fewer frames you get. I was getting rock-solid Frames, so I increased my FOV all the way from 90 to 110. This reduced frames a little bit, but the much wider view is worth it)
  8. V-Sync = Disabled (Must Disabled it)
  9. Adaptive Resolution FPS Target = 0
  10. Anti-Aliasing = None
  11. Texture Streaming Budget = None
  12. Texture Filtering = Bilinear
  13. Ambient Occlusion Quality = Disabled
  14. Sun Shadow Coverage = Low
  15. Sun Shadow Detail = Low
  16. Spot Shadow Detail = Disabled
  17. Volumetric Lighting = Disabled
  18. Dynamic Spot Shadows = Disabled
  19. Model Detail = Low
  20. Effects Detail = Low (You can keep it on Medium if you want)
  21. Impact Marks = Disabled
  22. Ragdolls = Low

Takeaways

So you might be thinking, why I set everything Low and Mostly Disabled? Firstly, you have to see how many frames you can get with all the settings I’ve mentioned in this guide. Once you see the max frames, and there is room for some tweaks. You can automatically enhance some settings like Model Detail and Effects Detail to Medium. This will benefit you with better visuals, and the balance of Frames and Graphics will be fantastic.

In FPS games like Apex Legends, you always have to get the best possible frames. If your frames are inconsistent and you cannot play the game smoothly. There is no way you can win games, and get better at it. Secondly, players who are using gaming monitors like me should always be aware that gaming monitors with high refresh rates are kind of useless. If you aren’t able to match the frames to their refresh rate. Knowing these two things, you can configure settings according to your needs.

I won’t entirely suggest making any changes to the ones listed in this guide. Because these are tested by many players and they are literally the best. Not only will you get good frames, consistent performance, stability, but you will also experience very sharp and smooth graphics. Lastly, Windows 10 experience is now going to be flawless.

Did you find this article helpful?

Thanks! Do share your feedback with us. ⚡

How can we make this post better? Your help would be appreciated. ✍

Feedback From Our Fellow Gamers

Outstanding Job!

tysm guys!!!!

Many powerful information that i had no idea about even tho i have decent knowledge about games and pcs, thanks!

Get up-to-speed gaming updates delivered right to your inbox.

We don’t spam! Read more in our privacy policy.


Haider Khan is our error guides writer who loves to tinker around with operating systems and game files to find practical solutions to video game issues. He then crafts easy-to-follow error fix guides based on his findings. He’s also a Battlefield veteran who likes to rack up some Ws in his spare time. Learn some more about his gaming journey on his Steam profile. Experience: 3+ Years || Education: Bachelor's in Journalism || Successfully Troubleshot Over 200 Games || Mainly Covers Error Fix & Game Settings 

Related Articles