Rainbow Six Siege is one of the best Tactical FPS Games out there. One of the biggest problems while benchmarking Best Rainbow Six Siege Settings in my opinion, is the optimization. The game runs well on some hardware, but the frames are known to drop consistently in close combat. This is no big surprise, considering that the fights in Rainbow Six Siege are close. On top of that, there is just so much chaos, and the graphics are way too good.
I’ve benchmarked Rainbow Six Seige on a PC with the following specs:
- OS: Windows 11 Pro 23H2
- System: Lenovo Legion 7i Laptop
- CPU: Intel i7-11800H
- GPU: NVIDIA RTX 3070 8GB
- RAM: 32GB DDR4
- Storage: Samsung 1TB SSD Gen 4
You’ll at least need an AMD Phenom II X4 945 or Intel Core i3 560 CPU, AMD Radeon HD5770 or NVIDIA GTX 460 GPU, and 6 GB of RAM to run R6 Seige on PC.
The following settings can significantly reduce your in-game FPS:
- Texture Quality
- Shading Quality
- Shadow Quality
- Reflections
- Antialiasing
Rainbow Six Seige is an extremely optimized game now with little to no performance issues. It had issues in the past, from uninteresting gameplay to a load of bugs and performance issues. But now it’s an esports-level multiplayer shooter that gives me 100+ FPS on 1440p in high-ultra settings.
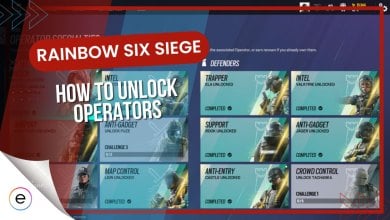
Best Rainbow Six Siege Settings
We’ll configure the in-game graphics settings. These settings are the most crucial as these will have the most impact on performance.
| Resolution | Maximum Resolution |
| Display Mode | Fullscreen |
| Refresh Rate | Highest Possible |
| Aspect Ratio | Monitor’s Default |
| Vsync | Always Off |
| Widescreen Letterbox | Off |
| Field of View | 90 |
| Overall Quality | Custom |
| Texture Quality | Low |
| Texture Filtering | Anisotropic 16x |
| LOD Quality | High |
| Shading Quality | Medium |
| Shadow Quality | Medium |
| Reflection Quality | Low |
| Ambient Occlusion | Off |
| Lens Effects | Off |
| Zoom-In Depth Of Field | On |
| Anti-Aliasing | FXAA |
- Resolution – Choose The Highest Available For Best Visibility. If you want a wider resolution, you can also make the custom and choose that.
- Display Mode – Always Full Screen.
- Refresh Rate – Select The Highest Available Refresh Rate.
- Aspect Ratio: Select the monitor’s default Aspect Ratio.
- VSync – Always Off.
- Widescreen Letterbox – Off.
- Field of View – I like to Keep It at 90 because you get the best visibility and FPS. However, if you are getting Low FPS in 90, you can lower it and get more frames. In FPS Games, 90 FOV is ideal for most players. Note that increasing it also means lower frames.
- Overall Quality – Choose Custom and Make the following changes.
- Texture Quality – Low; we have already enhanced it through the Graphics Card Control Panel, so no need to bump it up.
- Texture Filtering – Anisotropic 16x. This is important because, without this, the image quality looks very blurry, and spotting enemies can become a challenge.
- LOD Quality – High, makes a terrific graphics difference but does not have a lot of impact on FPS.
- Shading Quality – Medium.
- Shadow Quality – Medium. These two settings can allow you to see the enemy’s shadows and can be helpful sometimes. If you have a Low-End PC, you can set it to Low.
- Reflection Quality – Low.
- Ambient Occlusion – Off.
- Lens Effects – Off.
- Zoom-In Depth of Field – On.
- Anti-Aliasing – FXAA.
Here’s a quick comparison of the most impactful graphics settings:
 Lighting


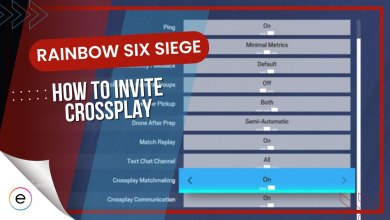
Best Nvidia Settings For Rainbow Six Siege
Now we’ll be turning your Nvidia GPU settings. These settings are much more complex, and each set can entirely shift the meta graphics of the game. Don’t worry about the tricky part, because I’ve got you covered with the best Nvidia Settings for Rainbow Six Siege.
| Image Sharpening | Off |
| Anisotropic Filtering | Off |
| Antialiasing FXAA | Off |
| Antialiasing Gamma Correction | On |
| Antialiasing Mode | Off |
| Antialiasing Setting | None |
| CUDA GPUs | All |
| Antialiasing Transparency | Off |
| Low Latency Mode | Ultra |
| Max Frame Rate | Off |
| Monitor Technology | G-Sync / FreeSync |
| Multi-Frame Sampled AA (MFAA) | Off |
| OpenGL Rendering | Use Your GPU |
| Power Management Mode | Prefer Maximum Performance |
| Preferred Refresh Rate | Highest Available |
| Shader Cache | On |
| Texture Filtering – Anisotropic Sample Optimization | On |
| Texture Filtering – Negative LOD Bias | Allow |
| Texture Filtering Quality | High Performance |
| Texture Filtering – Trilinear Optimization | On |
| Threaded Optimization | On |
| Triple Buffering | Off |
| Vertical Sync | Off |
| Virtual Reality Pre-rendered Frames | Use Global Settings |
Best AMD Radeon Settings For Rainbow Six Siege
In AMD’s case, we’ll be making changes to the global settings. Here’s a summary of all the AMD settings you should pick to increase R6 Seige performance:
| Radeon Anti-Lag | Enabled |
| Radeon Chill | Disabled |
| Radeon Image Sharpening | Enabled & Sharpness – 80% |
| Wait for Vertical Refresh | Always Off |
| Anti-Aliasing | Use Application Settings |
| Anti-Aliasing Method | Multisampling |
| Morphological Anti-Aliasing | Disabled |
| Anisotropic Filtering | Disabled |
| Texture Filtering Quality | Performance |
| Surface Format Optimization | Enabled |
| Tessellation Mode | Override Application Settings |
| Maximum Tessellation Level | Disabled |
| OpenGL Triple Buffering | Disabled |
| Reset Shader Cache | Reset |
| Radeon FreeSync | Off |
| Virtual Super Resolution | Disabled |
| GPU Scaling | Disabled |
| Scaling Mode | Full Panel |
| Vari–Bright | Your Choice |
| Custom Color Selection | Personal Preference |
Windows 10 Optimizations For Rainbow Six Siege
Before we make these dozens of changes and ultimately jump to Best Rainbow Six Siege Settings, I’d like to clarify that all settings are entirely safe, and apart from giving you benefits in-game. These settings will significantly improve your general experience on Windows.
- Update Windows To the Latest Version
- Clean Up Useless Cache in Windows
- Activate Ultimate Performance Plan
- Disable Unnecessary Background Applications
- Enable Windows Game Mode
- Disable Hardware Acceleration In Discord
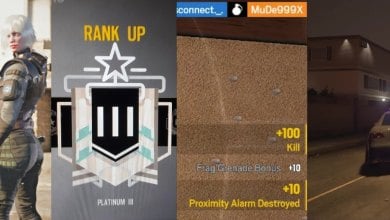
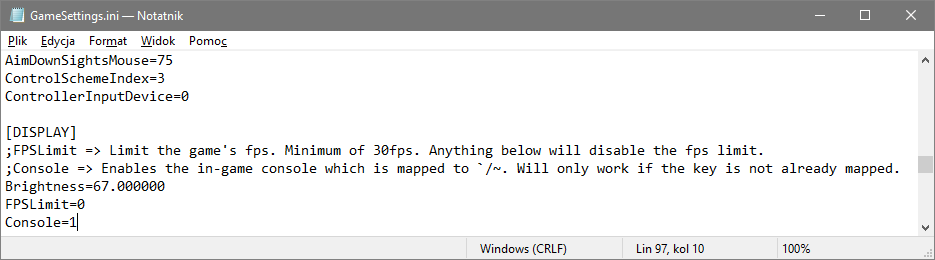
Bonus Tip 1: Disable Frame Limit in Rainbow Six Siege.
The majority of the time, the Rainbow Six Siege GameSettings.ini file has set a frame limit. This can cause serious issues, and the biggest problem is that this tweak is unnoticeable. Players are always making new configurations for solving the FPS and Smoothness issues. However, they never explore this setting.
Secondly, when you upgrade your monitor to a gaming one that features 144HZ/244Hz. You might not notice any difference since the game does not allow FPS to go higher than 60. If you didn’t know, High Refresh Monitors could only provide that exclusive gameplay if the frames are well above 100 or close to the refresh rate.
- Go To Your Rainbow Six Siege Folder > Right Click on GameSettings.ini File and Open it with Notepad.
- Now In the settings, scroll down, and you will find FPSLimited = 60.
- Change the value to something higher than your Refresh Rate. I’ve set it to 0, which means there is no frame limit anymore.

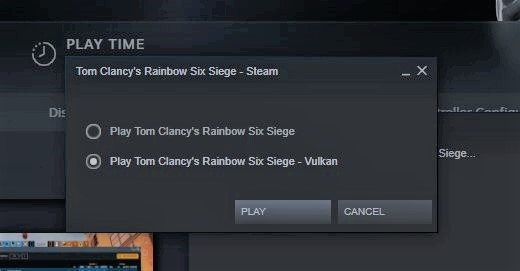
Bonus Tip 2: Use Vulkan To Launch Rainbow Six Siege.
Right Now, Rainbow Six Siege is allowing players to play the game both as DirectX and Vulkan. The difference between these two APIs is quite complex. However, to sum it up for you. Vulkan is more advanced and offers to do two things at once due to its parallel processing unit.
While DirectX, Microsoft’s technology, provides smoother gameplay, as it does things step by step. DirectX is known to run games smoother but provides terrible FPS. Meanwhile, Vulkan is working its way up, and every Pro Rainbow Six Siege player recommends using it. Vulkan provides better FPS while requiring less CPU Usage.
- Open Steam > Launch Rainbow Six Siege.
- In Options, Choose Vulkan. Right now, the default option is DirectX. However, reports indicate that Ubisoft might switch their entire game from DirectX to Vulkan in the future.

Wrapping Up
While you might be thinking that, well, these settings are just for lower-end PCs, and their entire focus is on High FPS. That is not entirely true because these settings are meant to work for all sorts of PCs. They aren’t only circled High FPS. But they also make sure that you are getting the best visuals.
In short, these settings are the most optimized ones for Rainbow Six Siege. If you are a competitive Valorant or Rainbow Six Siege player like me and always want the best visuals and fps. Trust me; these settings will always get the job done and help you become more consistent at the game.
Thanks! Do share your feedback with us. ⚡
How can we make this post better? Your help would be appreciated. ✍
Love It.
very gud
Thanks this helped me a lot!
great detailed article with a step by step instruction on how to do every thing
holy **** thats explicit