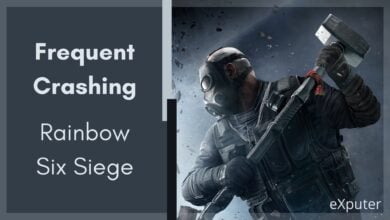
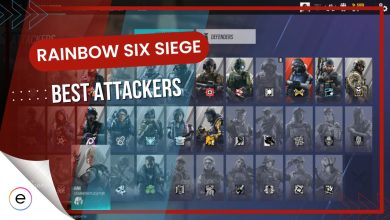
As Rainbow Six Siege enters Year 8 Season 4, Ubisoft’s recent major update has once again caused significant shifts in the ongoing meta. With an extensive pool of 70 operators available, choosing the best one might be perplexing for players. That’s where the Rainbow Six Siege Operator Tier List steps in to assist you.
- There are currently 70 Operators in Rainbow Six Siege.
- Every Operator has a unique ability that complements best when synergized with the team.
- The weapons of the operators were also considered when writing this tier list.
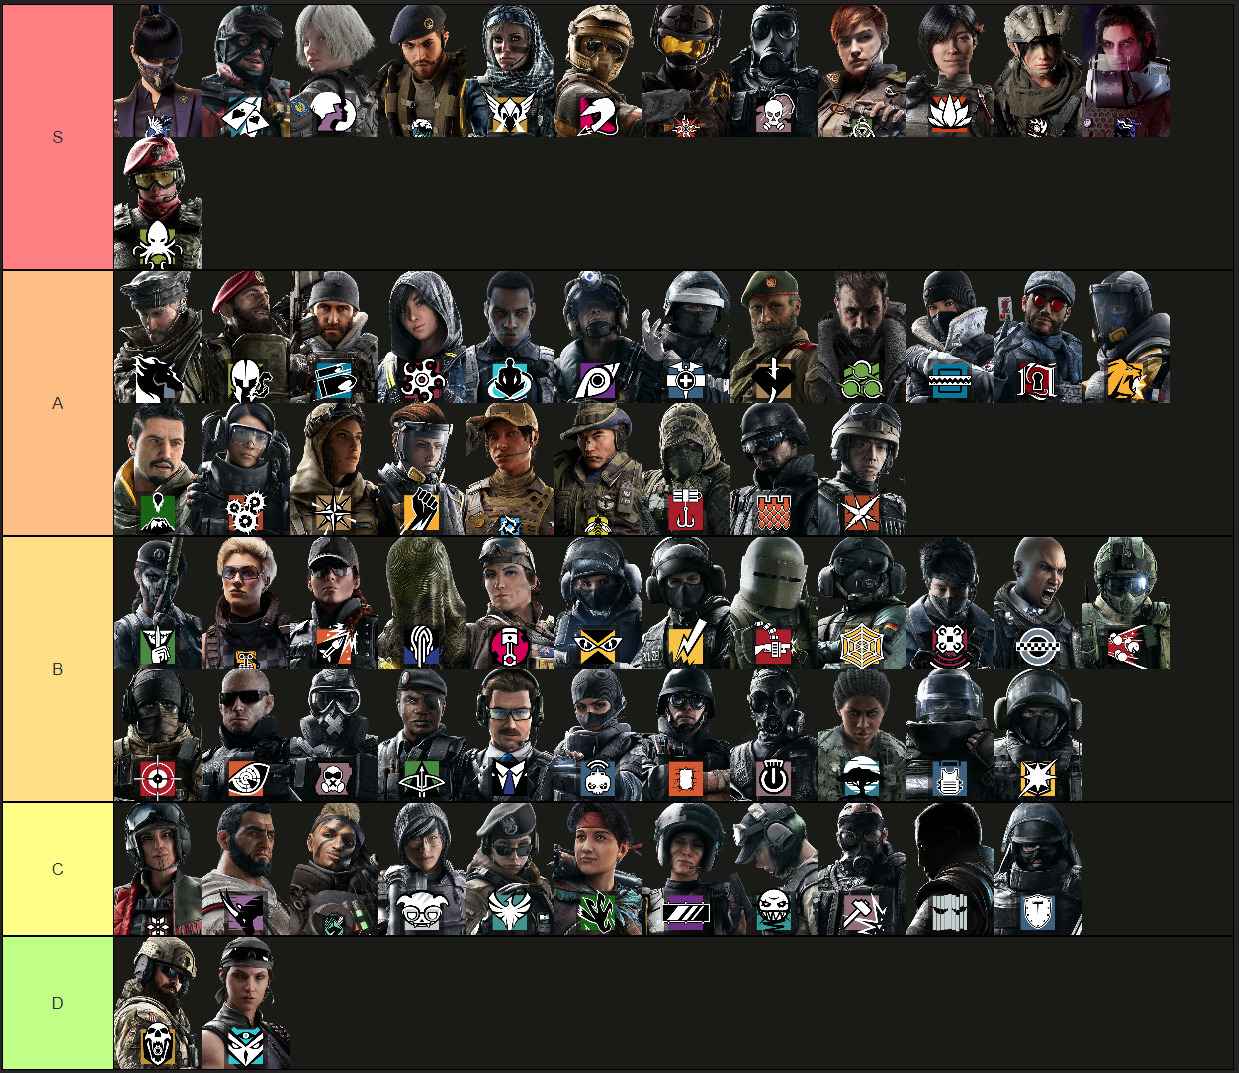
- S-Tier: Operators boast top-tier attacking and defending capabilities.
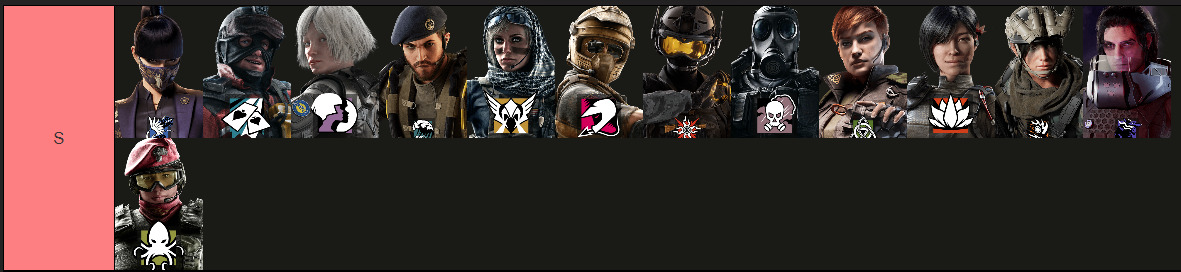
- A-Tier: Operators are slightly below the S-Tier, yet they are robust, essential for ranking up, and highly effective.
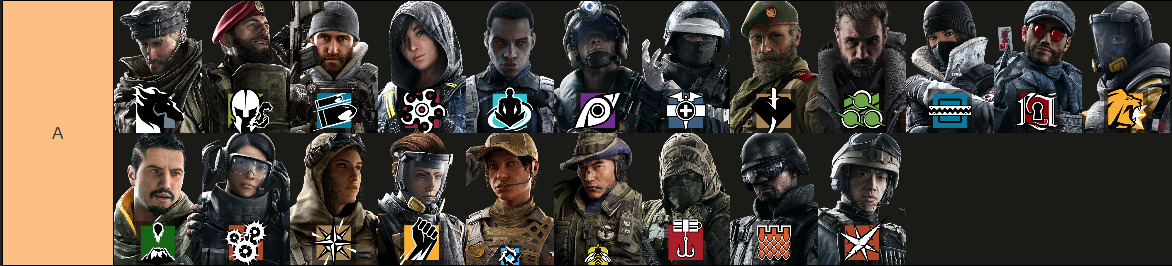
- B-Tier: Operators might not match the strength of S-Tier and A-Tier operators but can be potent when paired with higher-tier operators.
- C-Tier: Operators are weaker compared to average ones and are very situational in high-level games.
- D-Tier: These Operators are the least powerful and are best avoided.
- Author’s Note: I have played Rainbow Six Siege for more than 75+ hours, so you can easily trust me with the Tier List.
All The Operators Compared
Here’s the summary of all the operators in Rainbow Six Siege:
| Tier | Operator | Specialties | Difficulty | Speed | Health | Recommended Loadout |
|---|---|---|---|---|---|---|
| S-Tier | Iana | Front-line Intel | Low | Medium | Medium | Primary: ARX200 (Assault Rifle) Secondary: Mk1 9mm (Handgun) Gadget: Frag Grenade x 2 |
| S-Tier | Azami | Anti-Entry Support | High | Medium | Medium | Primary: 9X19SVN (Submachine Gun) Secondary: D-50 (Handgun) Gadget: Impact Grenade x 2 |
| S-Tier | Ace | Breach Anti-Gadget | Low | Medium | Medium | Primary: AK-12 (Assault Rifle) Secondary: P9 (Handgun) Gadget: Claymore |
| S-Tier | Valkyrie | Intel Support | Medium | Medium | Medium | Primary: MPX (Submachine Gun) Secondary: D-50 (Handgun) Gadget: Nitro Cell |
| S-Tier | Solis | Intel Support | Medium | Medium | High | Primary: P90 (Submachine Gun) Secondary: SMG-11 (Machine Pistol) Gadget: Impact Grenade x 2 |
| S-Tier | Mozzie | Anti-Gadget Intel | Medium | Medium | Medium | Primary: COMMANDO 9 (Submachine Gun) Secondary: SDP 9MM (Handgun) Gadget: Nitro Cell |
| S-Tier | Aruni | Anti-Entry Anti-Gadget | Medium | Low | High | Primary: P10 RONI (Submachine Gun) Secondary: PRB92 (Handgun) Gadget: Barbed Wire |
| S-Tier | Fenrir | Trapper Crowd Control | High | Medium | Medium | Primary: MP7 (Submachine Gun) Secondary: 5.7 USG (Handgun) Gadget: Barbed Wire |
| S-Tier | Smoke | Anti-Entry Trapper | Medium | Medium | Medium | Primary: M590A1 (Shotgun) Secondary: SMG-11 (Submachine Gun) Gadget: Proximity Alarm |
| S-Tier | Tubarao | Anti-Entry Anti-Gadget | Medium | Medium | Medium | Primary: AR-15.50 (Assault Rifle) Secondary: P226 MK 25 (Handgun) Gadget: Nitro Cell |
| S-Tier | Thorn | Anti-Entry Trapper | Low | Medium | Medium | Primary: M870 (Shotgun) Secondary: C75 AUTO (Handgun) Gadget: Barbed Wire |
| S-Tier | Alibi | Intel Trapper | High | High | Low | Primary: MX4 Storm (Submachine Gun) Secondary: Keratos .357 (Handgun) Gadget: Proximity Alarm |
| S-Tier | Ram | Breach | Medium | Low | High | Primary: R4-C (Assault Rifle) Secondary: ITA12S (Shotgun) Gadget: Stun Grenade x2 |
| A-Tier | Maestro | Anti-Gadget Intel | Medium | Low | High | Primary: ALDA 5.56 (Light Machine Gun) Secondary: Bailiff 410 (Handgun) Gadget: Barbed Wire x 2 |
| A-Tier | Maverick | Breach Front-line | Medium | Medium | Low | Primary: M4 (Assault Rifle) Secondary: 1911 TACOPS (Handgun) Gadget: Claymore x 1 |
| A-Tier | Buck | Breach Support | Low | Medium | Medium | Primary: C8-SFW (Assault Rifle) Secondary: MK1 9mm (Handgun) Gadget: Hard Breach Charge |
| A-Tier | Hibana | Breach Front-Line | Low | High | Low | Primary: Type-89 (Assault Rifle) Secondary: P229 (Handgun) Gadget: Stun Grenade x 3 |
| A-Tier | Wamai | Anti-Gadget Trapper | Medium | Medium | Medium | Primary: AUG A2 (Assault Rifle) Secondary: P12 (Handgun) Gadget: Proximity Alarm |
| A-Tier | Jackal | Intel Map Control | High | Medium | Medium | Primary: C7E (Assault Rifle) Secondary: ITA12S (Shotgun) Gadget: Claymore |
| A-Tier | Doc | Support | Low | Low | High | Primary: MP5 (Submachine Gun) Secondary: P9 (Handgun) Gadget: Bulletproof Camera |
| A-Tier | Kaid | Anti-Entry Anti-Gadget | High | Low | Medium | Primary: AUG A3 (Assault Rifle) Secondary: .44 Mag Semi-Auto (Handgun) Gadget: Nitro Cell |
| A-Tier | Zero | Anti-Gadget Intel | Low | High | Low | Primary: SC3000K (Assault Rifle) Secondary: 5.7 USG (Handgun) Gadget: Claymore |
| A-Tier | Frost | Anti-Entry Trapper | Low | Medium | Medium | Primary: 9mm C1 (Submachine Gun) Secondary: MK1 9mm (Handgun) Gadget: Deployable Shield |
| A-Tier | Flores | Anti-Gadget Intel | Medium | Medium | Medium | Primary: AR33 (Assault Rifle) Secondary: GSH-18 (Handgun) Gadget: Claymore |
| A-Tier | Lion | Intel Map Control | Low | Medium | Medium | Primary: V308 (Assault Rifle) Secondary: P9 (Handgun) Gadget: Claymore |
| A-Tier | Goyo | Anti-Entry Trapper | Medium | Medium | Medium | Primary: Vector .45 ACP (Submachine Gun) Secondary: P229 (Handgun) Gadget: Impact Grenade |
| A-Tier | Ying | Front-Line Map Control | Medium | Medium | Medium | Primary: T-95 LSW (Light Machine Gun) Secondary: Q-929 (Handgun) Gadget: Smoke Grenade x 3 |
| A-Tier | Nomad | Front-Line Map Control | High | Medium | Medium | Primary: AK-74M (Assault Rifle) Secondary: .44 Mag Semi-Auto (Handgun) Gadget: Breach Charge |
| A-Tier | Finka | Front-Line Support | Low | Medium | Medium | Primary: Spear .308 (Assault Rifle) Secondary: PMM (Handgun) Gadget: Frag Grenade x 3 |
| A-Tier | Brava | Intel Anti-Gadget | High | High | Low | "Primary: PARA-308 (Assault Rifle) Secondary: USP40 (Handgun) Gadget: Claymore |
| A-Tier | Grim | Front-Line Map Control | Low | High | Low | Primary: 552 Commando (Assualt Rifle) Secondary: P229 (Handgun) Gadget: Claymore |
| A-Tier | Kapkan | Anti-Entry Trapper | Medium | Medium | Low | Primary: 9x19VSN (Submachine Gun) Secondary: PMM (Handgun) Gadget: Nitro Cell |
| A-Tier | Castle | Anti-Entry Support | Medium | Medium | Medium | Primary: UMP45 (Submachine Gun) Secondary: 5.7 USG (Handgun) Gadget: Proximity Alarm |
| A-Tier | Lesion | Anti-Entry Trapper | Medium | Medium | Low | Primary: T-5 SMG (Submachine Gun) Secondary: Q-929 (Handgun) Gadget: Impact Grenade |
| B-Tier | Caveira | Intel Crown Control | High | High | Low | Primary: M12 (Submachine Gun) Secondary: Luison (Handgun) Gadget: Proximity Alarm x 3 |
| B-Tier | Osa | Intel Support | High | Low | Medium | Primary: 556XI (Assualt Rifle) Secondary: PMM (Handgun) Gadget: Impact Grenade |
| B-Tier | Ash | Breach Front-Line | Low | High | Medium | Primary: R4-C (Assault Rifle) Secondary: 5.7 USG (Handgun) Gadget: Breach Charge x 3 |
| B-Tier | Nokk | Front-Line Map Control | Medium | Medium | High | Primary: FMG-9 (Submachine Gun) Secondary: 5.7 USG (Handgun) Gadget: Impact Grenade x 2 |
| B-Tier | Gridlock | Support Map Control | High | Low | Low | Primary: F90 (Assault Rifle) Secondary: Super Shorty (Shotgun) Gadget: Smoke Grenade x 2 |
| B-Tier | IQ | Intel Support | Low | High | High | Primary: AUG A2 (Assault Rifle) Secondary: P12 (Handgun) Gadget: Claymore x 2 |
| B-Tier | Bandit | Anti-Entry Anti-Gadget | Low | High | Low | Primary: MP7 (Submachine Gun) Secondary: P12 (Handgun) Gadget: Barbed Wire x 2 |
| B-Tier | Tachanka | Anti-Entry Crowd Control | High | Low | Low | Primary: DP27 (LMG) Secondary: GSh-18 (Handgun) Gadget: Barbed Wire x 2 |
| B-Tier | Jager | Anti-Gadget Support | Medium | Medium | Medium | Primary: 416-C Carbine (Assault Rifle) Secondary: P12 (Handgun) Gadget: Observation Blocker |
| B-Tier | Echo | Intel Crowd Control | Medium | Medium | High | Primary: MP5SD (Submachine Gun) Secondary: P229 (Handgun) Gadget: Impact Grenade |
| B-Tier | Clash | Intel Crowd Control | High | Low | High | Primary: CCE Shield (Crowd Control Electro Shield) Secondary: P-10C (Handgun) Gadget: Barbed Wire x 3 |
| B-Tier | Fuze | Anti-Gadget | High | Low | Low | Primary: AK-12 (Assault Rifle) Secondary: PMM (Handgun) Gadget: Breach Charge x 3 |
| B-Tier | Glaz | Intel Support | Low | High | Medium | Primary: OTs-03 (Marksman Rifle) Secondary: PMM (Handgun) Gadget: Smoke Grenade x 2 |
| B-Tier | Pulse | Intel Support | Low | High | High | Primary: UMP45 (Submachine Gun) Secondary: 5.7 USG (Handgun) Gadget: Nitro Cell |
| B-Tier | Mute | Anti-Gadget Crowd Control | High | Low | Low | Primary: MP5K (Submachine Gun) Secondary: P226 Mk 25 (Handgun) Gadget: Nitro Cell |
| B-Tier | Capitao | Front-Line Map Control | Low | High | Medium | Primary: PARA-308 (Assault Rifle)) Secondary: PRB92 (Handgun) Gadget: Hard Breach Charge |
| B-Tier | Warden | Anti-Gadget Intel | High | Low | Medium | Primary: MPX (Submachine Gun) Secondary: P-10C (Handgun) Gadget: Nitro Cell |
| B-Tier | Twitch | Anti-Gadget Intel | Medium | Medium | Medium | Primary: F2 (Assault Rifle) Secondary: P9 (Handgun) Gadget: Claymore |
| B-Tier | Thermite | Breach Support | Medium | Medium | Low | Primary: 556xi (Assault Rifle) Secondary: M45 MEUSOC (Handgun) Gadget: Stun Grenade x 3 |
| B-Tier | Thatcher | Anti-Gadget Support | High | Low | Low | Primary: L85A2 (Assault Rifle) Secondary: P226 MK 25 (Handgun) Gadget: Breach Charge |
| B-Tier | Melusi | Intel Crowd Control | High | Low | Low | Primary: MP5 (Submachine Gun) Secondary: RG15 (Handgun) Gadget: Impact Grenade x 2 |
| B-Tier | Rook | Support | High | Low | Low | Primary: MP5 (Submachine Gun) Secondary: P9 (Handgun) Gadget: Proximity Alarm |
| B-Tier | Blitz | Front-Line Map Control | Medium | Medium | High | Primary: G52-Tactical Shield Secondary: P12 (Handgun) Gadget: Breach Charge |
| C-Tier | Thunderbird | Support | Medium | Medium | Low | Primary: Spear .308 (Assault Rifle) Secondary: Bearing 9 (Machine Pistol) Gadget: Bulletproof Camera |
| C-Tier | Onyx | Support | Medium | Medium | Medium | Primary: T-5 SMG (Submachine Gun) Secondary: USP40 (Handgun) Gadget: Proximity Alarm |
| C-Tier | Sens | Support Map Control | Low | High | Medium | Primary: POF9 (Assault Rifle) Secondary: SDP 9MM (Handgun) Gadget: Claymore |
| C-Tier | Dokkaebi | Intel Map Control | Low | High | Medium | Primary: Mk 14 EBR (Marksman Rifle) Secondary: MG-12 (Machine Pistol) Gadget: Smoke Grenade |
| C-Tier | Zofia | Breach Anti-Gadget | High | Low | Low | Primary: LMG-E (Light Machine Gun) Secondary: RG15 (Handgun) Gadget: Breach Charge x 3 |
| C-Tier | Amaru | Front-Line Map Control | Medium | Medium | Medium | Primary: G8A1 (Assault Rifle) Secondary: ITA12S (Shotgun) Gadget: Stun Grenade X3 |
| C-Tier | Mira | Intel Support | High | Low | High | Primary: Vector .45 ACP (Submachine Gun) Secondary: ITA12S (Handgun) Gadget: Nitro Cell |
| C-Tier | Ela | Crowd Control Trapper | High | High | Low | Primary: Scorpion EVO 3 A1 (Submachine Gun) Secondary: RG15 (Handgun) Gadget: Barbed Wire x 3 |
| C-Tier | Sledge | Breach Anti-Gadget | High | Low | Low | Primary: L85A2 (Assault Rifle) Secondary: P226 Mk 25 (Handgun) Gadget: Frag Grenade x 2 |
| C-Tier | Vigil | Anti-Gadget Crowd Control | Low | High | High | Primary: K1A (Submachine Gun) Secondary: SMG-12 (Machine Pistol) Gadget: Impact Grenade x 2 |
| C-Tier | Montagne | Intel Support | High | Low | High | Primary: Le Roc Extendable Shield (Ballistic Shield) Secondary: P9 (Handgun) Gadget: Smoke Grenade x 3 |
| D-Tier | Blackbeard | Support | Medium | Medium | Low | Primary: MK17 CQB (Assault Rifle) Secondary: D-50 (Machine Pistol) Gadget: Stun Grenade |
| D-Tier | Kali | Anti-Gadget Support | Medium | Medium | Medium | Primary: CSRX 300 (Submachine Gun) Secondary: SPSMG9 (Handgun) Gadget: Claymore |
S-Tier
The highest-ranking operators in the Rainbow Six Siege tier list are the top attackers and defenders. Lana is one of my favorite attackers in Rainbow Six Siege. Her equipment, including holograms and two fragmentation grenades, makes the Dutch operator one of the most formidable operators.
Azami has a distinctive concept. As the defenders’ sole counter to vertical plays apart from C4s, her ability is unique. It can hinder attackers from entering the site during the final moments of a round, making her highly valuable for holding positions, particularly when paired with Jäger.
A-Tier
In Rainbow Six Siege, A-tier operators bring unique strengths to the battlefield, catering to various playstyles for both experienced and new players. Hibana, the second hardbreacher introduced, utilizes her X-KAIROS to deploy two, four, or six pellets at once. I play Hardbreacher more, and she excels in breaching reinforced walls and boasts numerous strategies for easily opening complete walls.
Maestro’s cameras prove valuable in defensive setups. They can eliminate various attacking gadgets, such as hard breaching charges and drones. Additionally, his bulletproof cameras and LMG equipped with over 80 bullet magazines further enhance his utility.
B-Tier
The B-Tier operators in Rainbow Six Siege offer a blend of advantages and disadvantages, providing players with various strategic choices. Caveira possesses the ability to significantly impact a single round, yet she tends to operate in a self-centered manner. She can easily be countered by Jackal, which I tend to pick if I spot her during the preparation phase.
Osa excels at deploying shields strategically across crucial positions and windows, effectively covering expansive areas. She proves highly valuable in post-plant scenarios. Additionally, her use of Impact EMPs makes her an excellent ally for operators like Thermite, Hibana, and Ace.
C-Tier

In Rainbow Six Siege, C-tier operators offer a blend of strengths and limitations, presenting players with distinctive challenges and playstyles. Thunderbird’s healing stations are highly advantageous as they remain available for use once placed on the floor. However, you need to crawl or walk towards her stations, which can be difficult in many scenarios.
Dokkaebi’s gadget is not only effective for gathering information but also for disrupting the defenders’ intelligence. While her loadout may not be the strongest, her Impact EMPs make Dokkaebi an excellent choice, especially when paired with Thermite. She excels in a supportive role and clearing roamer, requiring strategic utilization to maximize her potential.
D-Tier

Operators categorized in the D-tier in Rainbow Six Siege are generally best avoided in most situations. For instance, Blackbeard’s ability involves a glass shield on top of his weapon, enabling him to withstand one headshot, which isn’t considered sufficient within the current meta. Additionally, his available loadout is deemed inadequate for effective performance. I would refund these operators if possible.
How Operators Were Ranked?
Having played Rainbow Six Siege for more than 75+ hours, I have encountered all operators. The ranking is based on the weapon, ability, and specialization. However, if you wanna get better at Rainbow Six Siege, you ought to try the Best Settings for optimal performance.
Next:
Thanks! Do share your feedback with us. ⚡
How can we make this post better? Your help would be appreciated. ✍