Helldivers 2 is out with intense action, but finding the best settings for consistent FPS and good graphics can be difficult. This is because Helldivers 2 features several graphic options that can overwhelm some players. Additionally, you might experience a difference in performance depending on the planet you are on.
However, you no longer have to worry, as this best-setting guide I have created will strike the perfect balance between performance and visual fidelity.
I’ve benchmarked Helldivers 2 on the following PC specs:
- CPU: AMD Ryzen 5 2600x
- GPU: Nvidia RTX 3050
- RAM: 16 GB
- Storage: 1TB NVMe SSD
- OS: Windows 11 Pro
You’ll at least need an Intel i7-4790K or AMD Ryzen 5 1500X CPU, Nvidia GTX 1050 Ti or AMD Radeon RX 470 GPU, and 8 GB RAM to run Helldivers 2.
The following graphics settings will impact your in-game FPS the most:
- Object Detail Quality
- Render Distance
- Shadow Quality
- Particle Quality
- Reflection Quality
- Space Quality
- Global Illumination
- Vegetation and Rubble Density
- Lighting Quality
Helldivers 2 is a demanding game as it contains vast battlefields filled with enemies to battle and Strategems with intense particle effects to deploy. With medium to high settings, I was able to maintain 45-50 FPS on my RTX 3050. Apart from experiencing low performance, I didn’t really experience any stability issues.
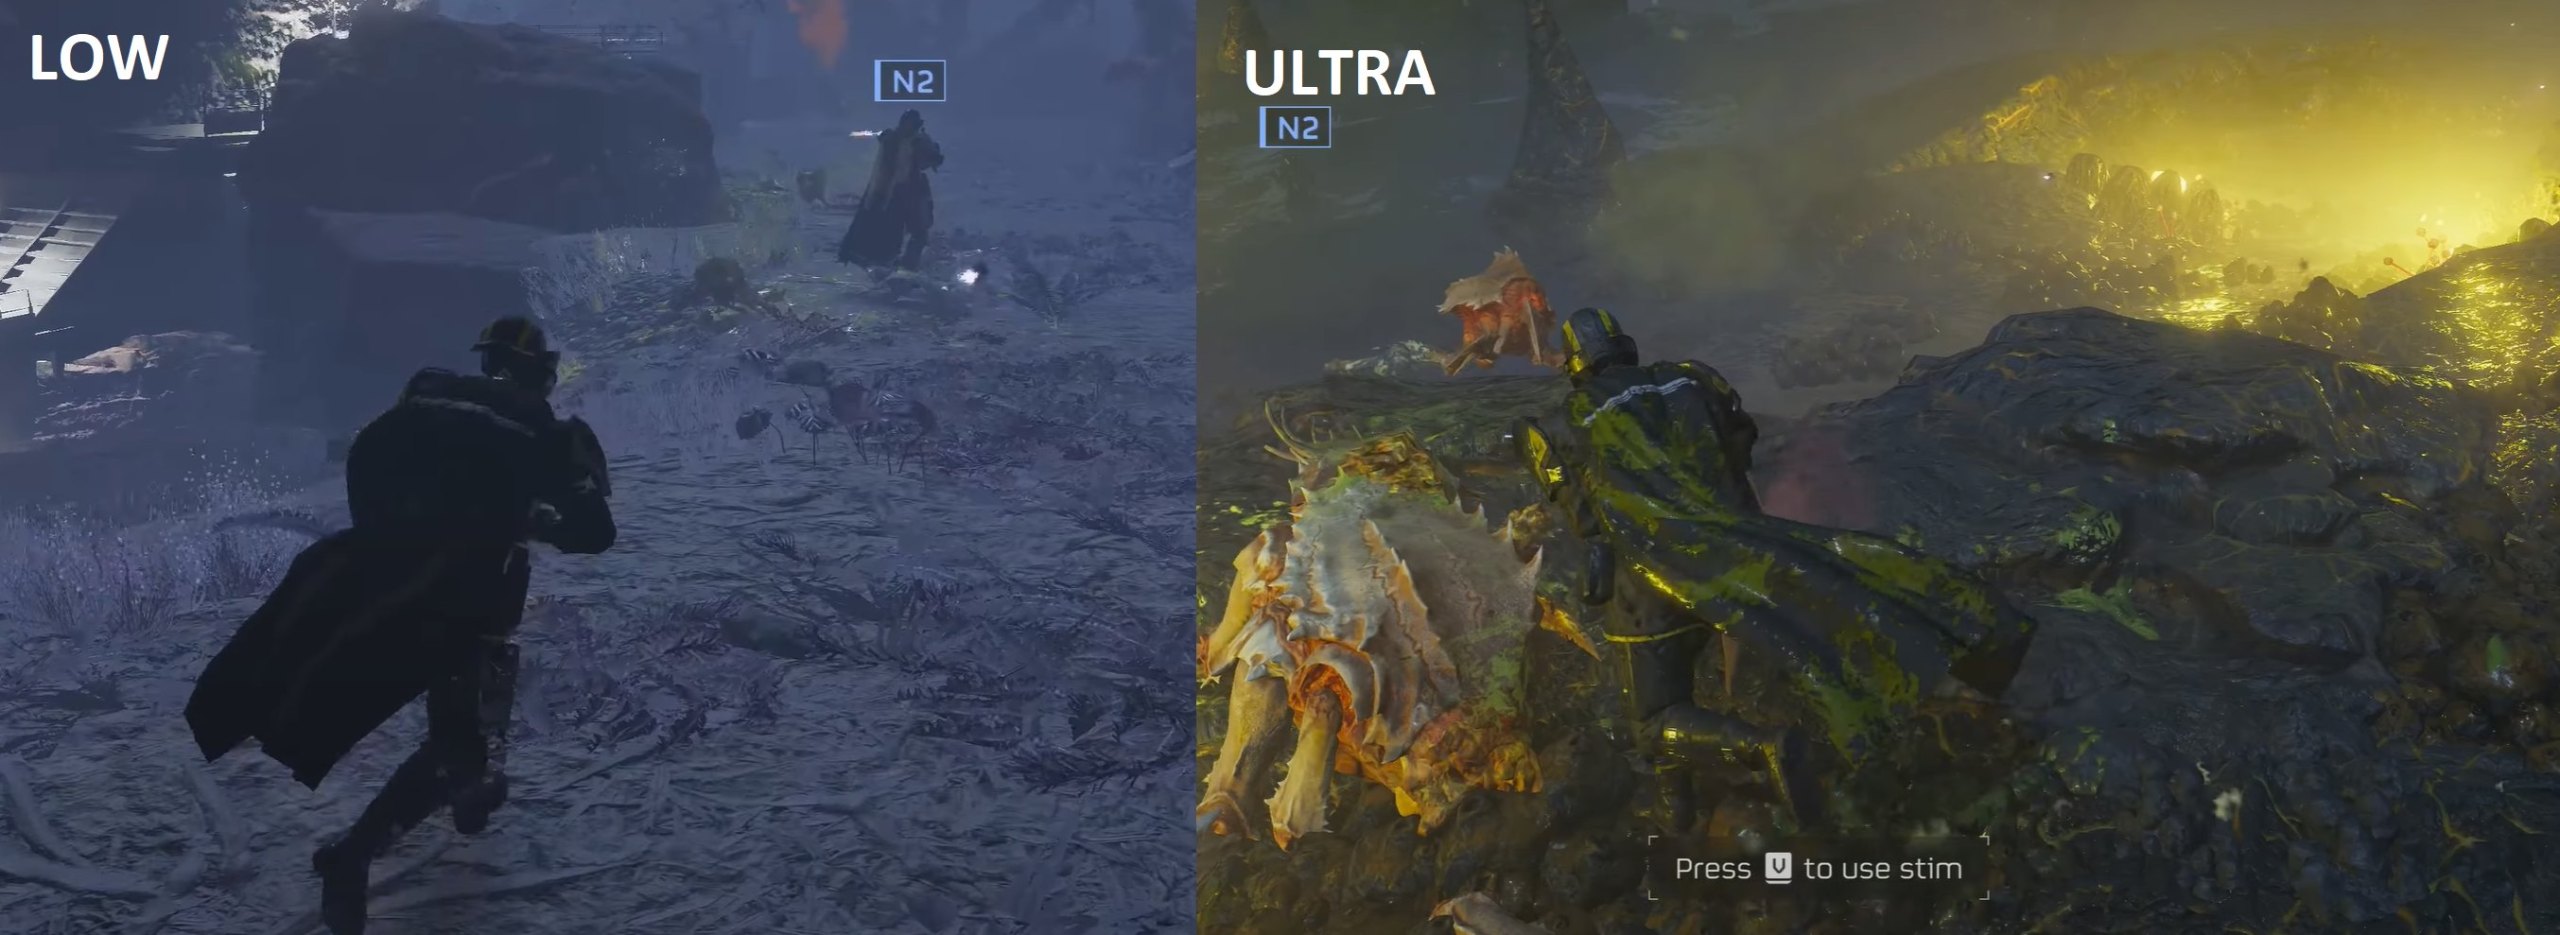
Helldivers 2 Best Settings
Some graphic options here have more impact on the performance, while others don’t have much visual impact but can still take up a few frames. Further, your location is also a critical factor, as some planets have different terrains with unique objects.
Summary Of Best Settings
| Screen Brightness | Personal Preference |
| High Dynamic Range | Off |
| Camera Shake Strength | Off |
| Vertical Field of View | Player’s Choice |
| Graphics Device | Your Primary GPU |
| Screen Device | Your Main Screen |
| Resolution | Monitor’s Native Resolution |
| Render Scale | Ultra Quality |
| Display Mode | Fullscreen |
| V-Sync | Off |
| Graphics Preset | Custom |
| Motion Blur | 0 |
| Depth of Field | Off |
| Bloom | On |
| Sharpness | 0.75 |
| Texture Quality | Depends On VRAM |
| Object Detail Quality | Medium |
| Render Distance | Medium |
| Shadow Quality | High |
| Particle Quality | Lowest |
| Reflection Quality | Lowest |
| Space Quality | Low |
| Ambient Occlusion | Off |
| Screen-Space Global Illumination | Off |
| Vegetation And Rubble Density | Medium |
| Terrain Quality | High |
| Volumetric Fog | Medium |
| Volumetric Cloud Quality | Medium |
| Lighting Quality | Low |
| Anti-Aliasing | Off |
I have provided a more detailed explanation for each setting below for a better in-depth understanding.
Screen Brightness: Personal Preference
The brightness of your screen has no impact on your graphics and FPS. So, you can mess around with this option as you like and choose what looks best to you.
High Dynamic Range: Off
To use HDR, you must enable it from within Windows first. However, the HDR implementation is not that great. It can make the graphics look dull and flat compared to the SDR. So, I suggest you keep it disabled.
Camera Shake Strength: Off
This setting controls the strength of the sudden camera shaking movements. It won’t affect how well the game runs or how it looks, so set it as you like.
I keep it disabled and recommend you do the same, especially if you experience motion sickness.
Vertical Field Of View: Your Choice
Pick whatever option you feel comfortable playing with for the FOV (Field of View). Technically, this will have a slight effect on FPS. But it’s too minuscule to make any massive difference in Helldivers 2.
Graphics Device: Your Primary GPU
This merely decides which graphics card your game will be using. So, pick your Dedicated GPU here, not your Secondary or Integrated ones.
Screen Device: Your Primary Monitor
Similarly, this option decides which monitor Helldivers 2 will be displayed on. So, pick your primary monitor here.
Resolution: Monitor’s Native Resolution
Unlike other games, resolution isn’t one of the crucial settings in Helldivers 2. This is because the game already offers the option to set a render scale. So, I don’t recommend selecting anything other than your monitor’s native resolution here, as it can cause issues with the aspect ratio and various other glitches.
Render Scale: Ultra Quality
Render scale refers to the upscaling option you can use in Helldivers 2. It serves the purpose of artificially enhancing the resolution of an image. Of course, as the enhancement is artificial, it can potentially introduce some imperfections.
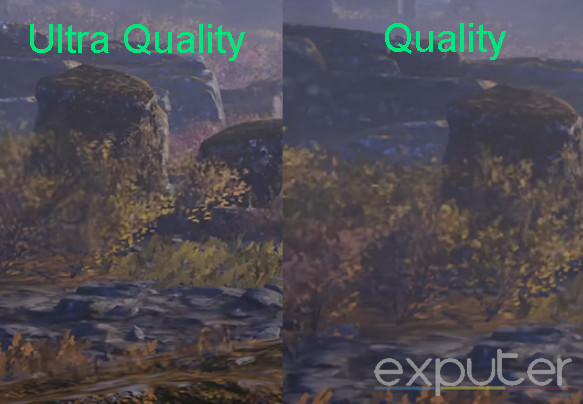
Helldivers 2 adopts TAA Upscaling, which is not the best upscaling option, in my opinion. Firstly, I suggest keeping it disabled to see if you experience frame drops. If so, use Ultra Quality, as going below makes the game pixelated, and going above leads to frame drops.
Display Mode: Fullscreen
Helldivers 2 allows you to run the game in Windowed and Fullscreen modes. While playing in Windowed mode is convenient as it lets you tab out easier, it can also introduce input lag. So, I recommend using Fullscreen mode to improve priority and squeeze as much performance as possible.
V-Sync: Off
V-Sync allows you to sync the frames between your GPU and Monitor. This can be particularly useful when you experience screen tearing. However, it also uses up extra resources to sync these frames. Not to mention that you can experience more input lag with it enabled.
For this, I suggest keeping V-Sync disabled unless you experience a lot of screen tearing.
Graphics Preset: Custom
This setting consists of the presets that change all of the graphic options at once. The presets go from Low to Ultra, allowing you to set your graphic settings all at once.
However, I will be modifying these graphic settings individually depending on their visual impact and effect on FPS. So, keep the Graphic Preset on Custom.
Motion Blur: 0
Motion Blur makes the objects on the screen blurry to emulate realistic movement. However, it can make the screen look strange in most cases. Further, another downside is that it can induce motion sickness in some players. So, I always keep Motion Blur disabled and recommend you do the same.
Depth Of Field: Off
Depth of Field allows you to blur objects at a certain distance from your point of view. This feature exists to try and add more realism to the graphics.
However, similar to motion blur, it can make the visuals suffer because it can’t realistically recreate the effect properly. As such, I suggest keeping it Off.
Bloom: On
Bloom controls the way lighting looks on bright objects. This option makes a decent difference in the visual department and does not tank your FPS too much. So, I recommend keeping the setting enabled in Helldivers 2.
Sharpness: 0.75
You can leave sharpness at 0.75. However, feel free to bump it up if you feel the game is too blurry for you. For me, 0.75 was the sweet spot for the sharpness.
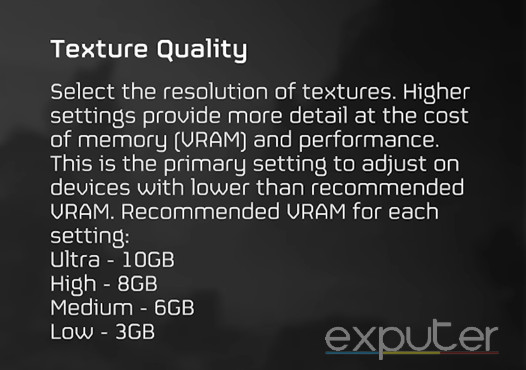
Texture Quality: VRAM Dependant
For the best settings in Helldivers 2, you must set your Texture Quality based on the amount of VRAM you have. If you exceed these limits, the textures will be put into the shared memory, creating a huge performance impact.
So, follow these VRAM to set your Texture Quality:
- 3 GB: Low.
- 6 GB: Medium.
- 8 GB: High.
- 10 GB: Ultra.
Object Detail Quality: Medium
This setting decides the amount of detail for every in-game object. Setting it to High can greatly impact performance whereas Low compromises visual fidelity. So, the best option here is Medium.
Render Distance: Medium
Render distance decides how far away objects can be from you before they stop appearing on the screen. So, if you have a low render distance, things might disappear when they’re far away. But with a high render distance, it can take a lot longer before they disappear.
This mostly tanks your Processor. So, if your processor is strong enough, you can bump it up. However, I feel keeping it at Medium is the sweet spot.
Shadow Quality: High
I noticed a minimal impact on performance when bumping up the Shadow Quality. So, set it to High and see if that works for you. However, the Shadow Quality at Medium looks just as great.
Particle Quality: Lowest
Particle quality has a huge impact on your performance. This setting refers to the quality of the special effects on your screen. I don’t feel too much of a visual difference, even if particle quality is set to lowest. In return, there is a decent buff to performance.
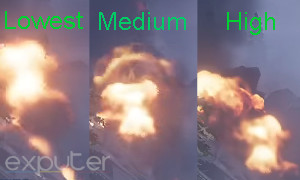
So, keep the particle quality at the Lowest for the best performance.
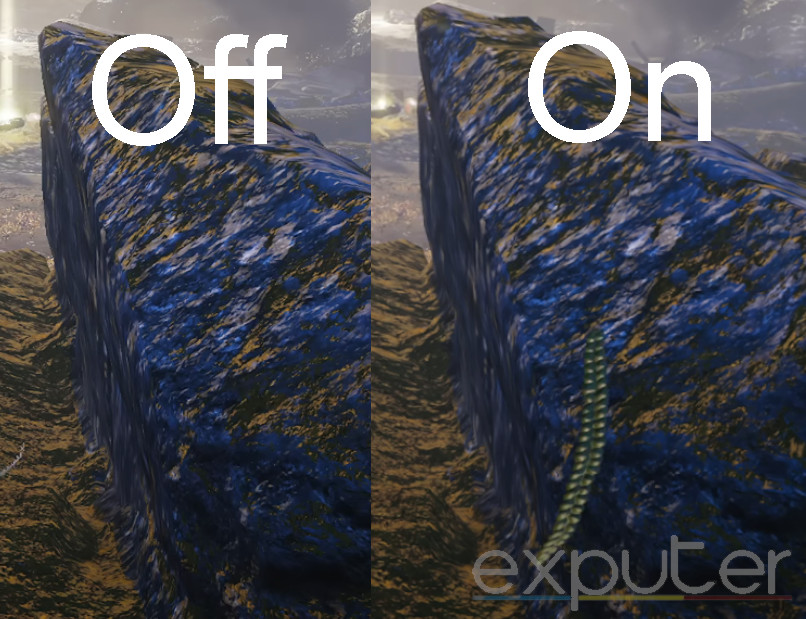
Reflection Quality: Lowest
This is another one of those settings that completely depends on your terrain and planet. I recommend keeping the reflection quality on the Lowest option unless surrounded by reflective terrain.
If you are, bump it up to Medium but not any higher, as reflection quality is one of the most taxing settings in Helldivers 2.
Space Quality: Low
This setting affects how the background space and stars look. I recommend keeping this Low because you won’t notice too much difference by making it High. Further, the impact on your performance on High is decent, which is not worth it.
Ambient Occlusion: Off
This setting makes the overall ambient lighting more realistic. I don’t believe this option is necessary because it offers a tiny visual improvement. Therefore, keep the Ambient Occlusion set to Off.
Screen-Space Global Illumination: Off
This option also aims to create more natural lighting by simulating how light bounces off surfaces and illuminates the environment. I suggest turning it Off to take some load off your GPU, as it doesn’t do much in the visual department.
Vegetation And Ruble Density: Medium
With this option, you can change how much vegetation and other smaller objects are scattered across the environment. This setting can be taxing for systems with low memories.
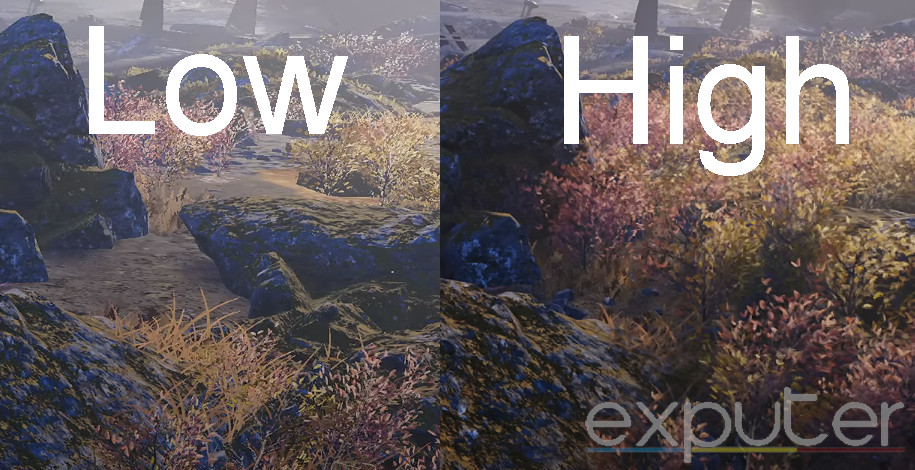
Medium is the best option for vegetation and ruble density. It sets up a decent environment that doesn’t look too empty. While you can turn this to High or Ultra, the performance hit is simply not worth it.
Terrain Quality: High
I didn’t notice much difference in the visuals or the performance when making the terrain quality Low or High. It likely comes into play when moving or flying over the environment.
I recommend keeping it high because it does not affect your performance too much and might make a visual difference in certain areas. However, if you notice frame drops, turn it down to Low or Medium.
Volumetric Fog: Medium
Volumetric Fog refers to the mist-like effect that makes the scenes look more realistic. This option is best at Medium because you still get the realism factor without using too many resources.
Volumetric Cloud Quality: Medium
This option makes the overall sky look much more realistic. Making it high tanked my FPS quite a bit. So, I don’t recommend going above Medium.
Lighting Quality: Low
This setting decides how far light can reach from its source. I noticed little to no difference in how Helldivers 2 looks with this setting set to High or Low. So, the best bet is to keep the Lighting Quality set to Low for the performance bump.
Anti-Aliasing: Off
Anti-aliasing makes the rough edges of objects look smooth to create a more realistic environment. It also has a prominent impact on the performance of your game. So, I suggest keeping it Off, especially if you are using upscaling, as they don’t mix well.
However, if you’re playing on Native Resolution, keep Anti-Aliasing turned on for a sharp look. But if it starts to tank your FPS, try using one of the upscaling options instead.
My Analysis
That covers all the Best Settings you can apply in Helldivers 2 to get the most out of your game. I have seen many players complain on Reddit and the Steam Community about the performance issues. Further, crashing is commonplace in Helldivers 2, as the game is a bit of a mess currently.
https://twitter.com/helldivers2/status/1757688386645524953?s=20
While this is all true, I think the developers have done an excellent job addressing these issues. Additionally, they have maintained open communication with the community and have been very active. Still, however, frequent updates are not stopping some players from encountering FPS and performance issues.
I'm having really bad fps drops on Helldivers 2.
I'm running it on PS5 with performance mode.
The game starts to crawl at like 15 FPS or something.
it's really unplayable until they patch this. pic.twitter.com/ra6i50KXP9— Ascilia (@Ascilia_) February 16, 2024
So, if you’re in the same boat, you can try following my guide to optimize Helldivers 2 until the developers officially solve all performance issues. I am confident it will get you a decent frame boost without making your game look like pixels.
Check out other Optimization Guides for a further boost covered on eXputer:
Thanks! Do share your feedback with us. ⚡
How can we make this post better? Your help would be appreciated. ✍
Man reflections took a 15 FPS bite off my performance