NBA 2K23 comes with many controller settings, including new and old options. If you are new to the franchise, you will obviously be overwhelmed when you open the controller settings screen because of the number of options you will see. In today’s guide, I will help with all the controller settings available in NBA 2K23 and recommend the best options for each setting.
Quick overview of NBA 2K23 settings:
- Adjust Vibration, Shot Meter, Shot Timing, and Shot Timing Release according to personal preference.
- Customize Perfect Release indicators and sound effects for successful shots.
- Opt for Circle player indicators and vibrant colors for better visibility.
- Choose between User Timing and Real Player% for Free Throw Timing.
- Set Pro Stick Function and Orientation to Default and Absolute for enhanced ball control.
- Customize off-ball offense, double-team reactions, and defensive assist settings.
- Adjust passing settings for better accuracy and control.
Summary Of Controller Settings In NBA 2K23
Messing around with the controller settings in NBA 2k23 can have both little and drastic effects on the gameplay. While most of the settings from NBA 2k22 make a return here, there are some brand-new options here as well, which add further depth to the gameplay.
Even though most of the settings we will be discussing and recommending here are mostly dependent on preferences, we will still be explaining every setting to help you better understand the effects of each setting on the gameplay.
| Vibration | Personal Preference |
| Shot Meter | Off |
| Shot Timing | Player’s Choice |
| Shot Timing Release | Early / Late |
| Perfect Release | Personal Preference |
| Perfect Release SFX | Bucket |
| Shot Meter Type | Curved Bar (Mini) |
| Player Indicator | Circle |
| Player Indicator Color | Red |
| Free Throw Timing | User Timing / Real Player |
| Pro Stick Function | Default |
| Pro Stick Orientation | Absolute |
| Off-Ball Offense Mode | Absolute |
| Double Team Reaction | Manual |
| Help Defense Button | Personal Preference |
| Call For Pick And Roll vs Fade | Manual |
| Player Icons | On |
| Skip Pass | Enabled |
| Icon Lead Passing | Enabled |
| Pro Stick Pass Type | Flashy |
| Icon Passing | Default |
| Receiver Control | Receiver Get Open |
| Pro Sick Defense | Absolute |
| Shading Indicator | On |
| Who to Guard | Enabled |
| Defensive Assist Strength | 20 – 25 |
| Boxout Assist Strength | 50 (Default) |
| Pass Target Profile | Openness |
Also, consider reading our guide on the best playmaking badges.
Vibration
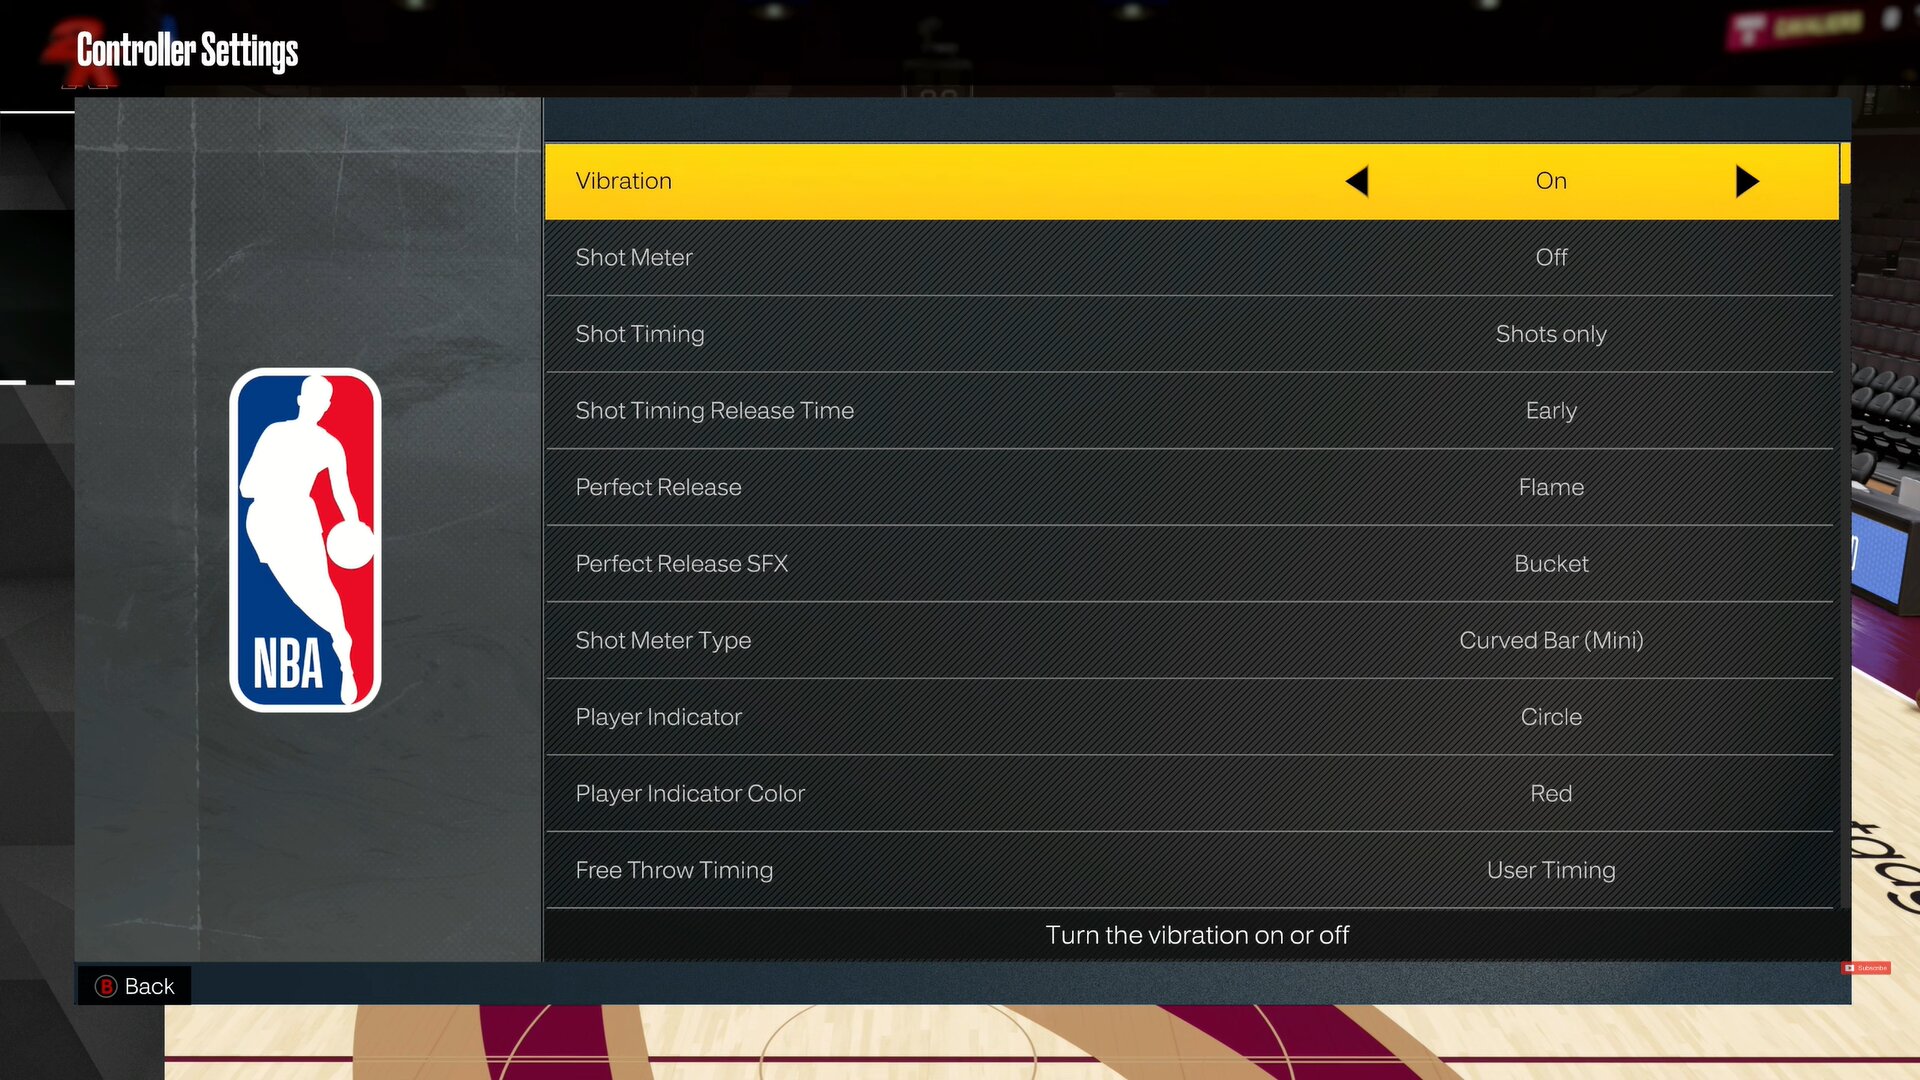
Some players like the vibrations and others find it too distracting. Our recommendation here would be to play a match or two with vibrations and see if it clicks with you; otherwise, turn it off.
Shot Meter
Shot Meter allows you to set your preferred Shot Meter style. Some prefer to keep it turned on to get the jump shot right, but the best way to learn it is by keeping it off. For landing more accurate jump shots, I will advise turning on Shot Feedback instead.
Speaking of jump shots, why not go through our Jumpshot guide?
Shot Timing
Setting Shot Timing to Shots Only is our recommendation for this setting. One of the most satisfying ways of scoring points in the NBA is through dunking because of the way it makes you feel, while we are on this topic, consider reading our guide on best Dunkers.
Shot Timing Release
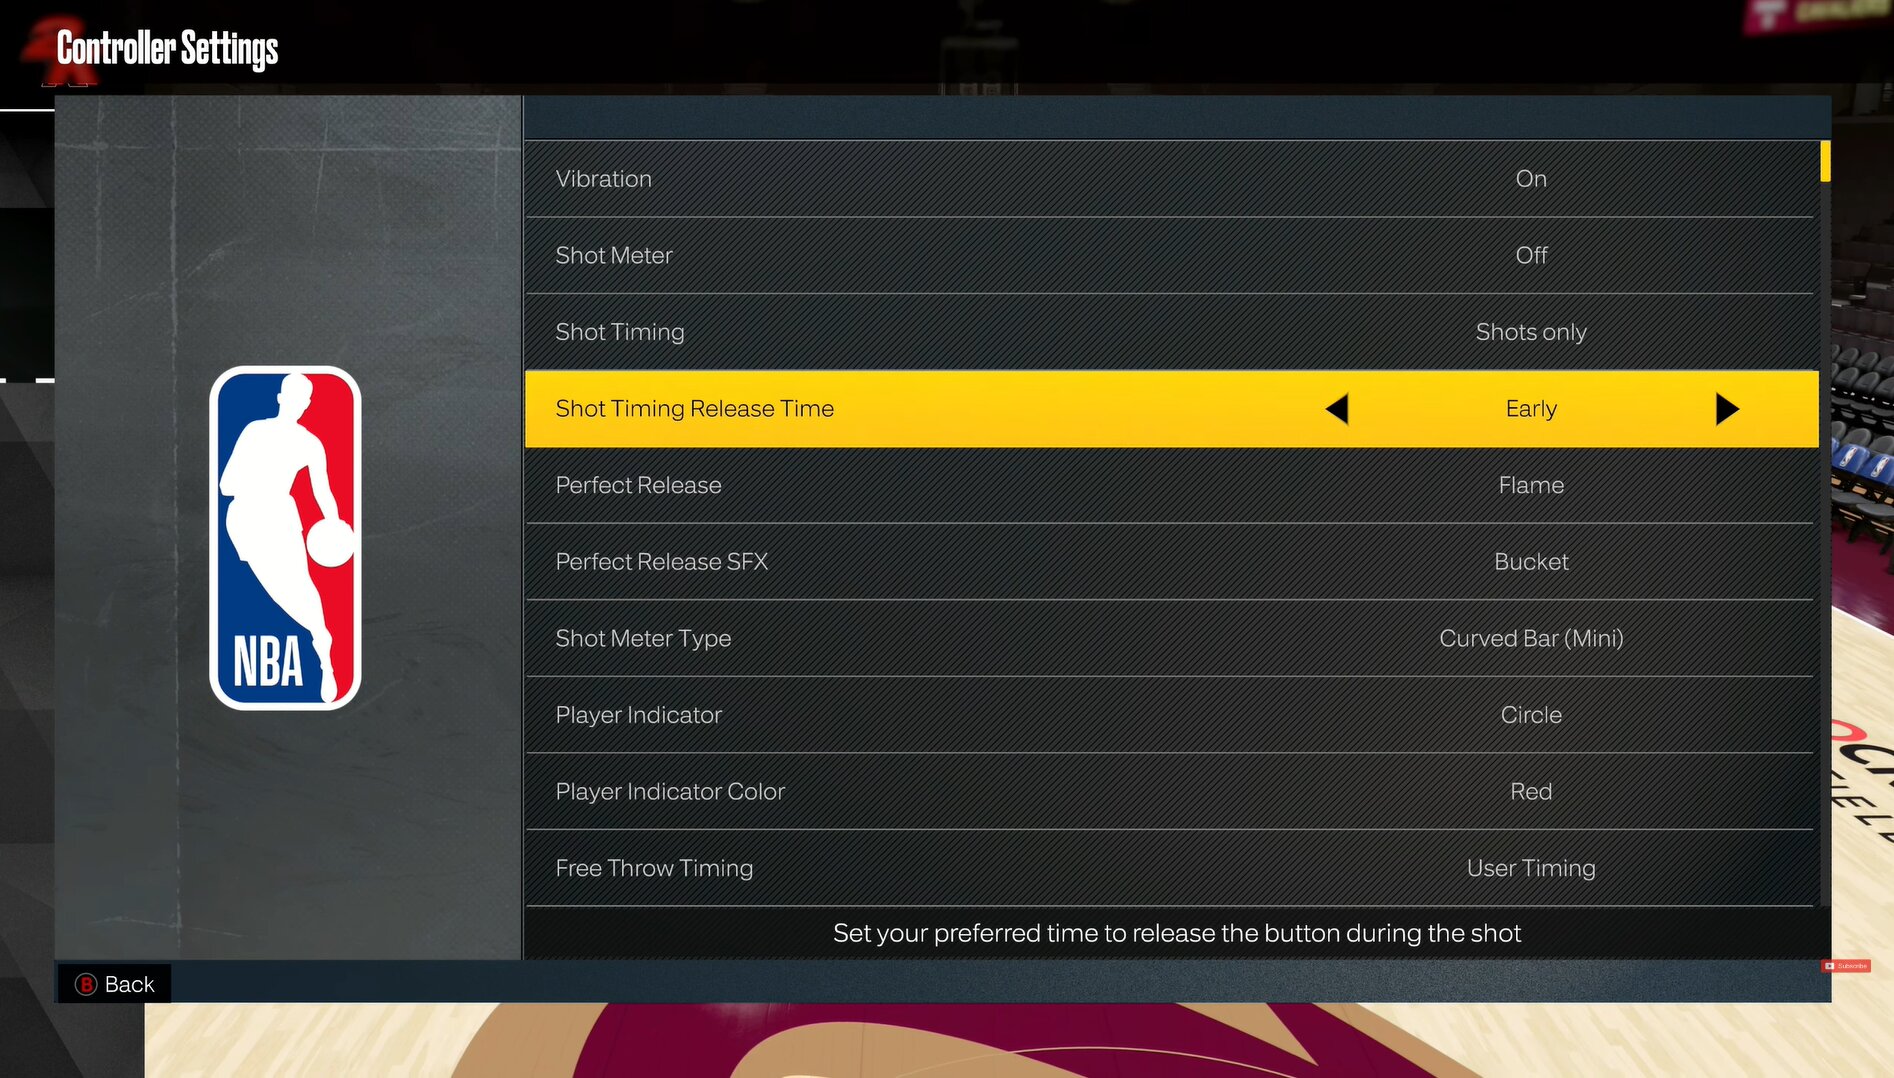
You can set Shot Timing Release Time to Very Early, Early, Late, or Very Late. Now, depending on which option it is set to, you can release your shot button very early or very late. Again, this is another setting that is based on your preference, but Late and Early are the options that will work for most people.
Perfect Release
A little indicator or an animation can be seen on the top of a player’s head after performing a Perfect Release. Again nothing game-changing; you can set it to the ball, flame, or none of these.
Perfect Release SFX
After performing a Perfect Release, you’ll be able to hear a sound effect that will indicate that you have performed a Perfect Release. You can select from various sound effects like Sparkle, Money Machine, and Bucket. Most people go for the Bucket sound effect.
Shot Meter Type
With this option, you can toggle between different options to set a shot meter type that works for you. For us, Curved Bar (Mini) worked the best.
Player Indicator
Player Indicator allows you to see where your player is on the court in case you lose track of him. Circle has the neatest look overall so we will recommend that.
Player Indicator Color
This option allows you to change the color of your Player Indicator. We will recommend setting it to any vibrant color, colors that pop out more, such as Red.
Free Throw Timing
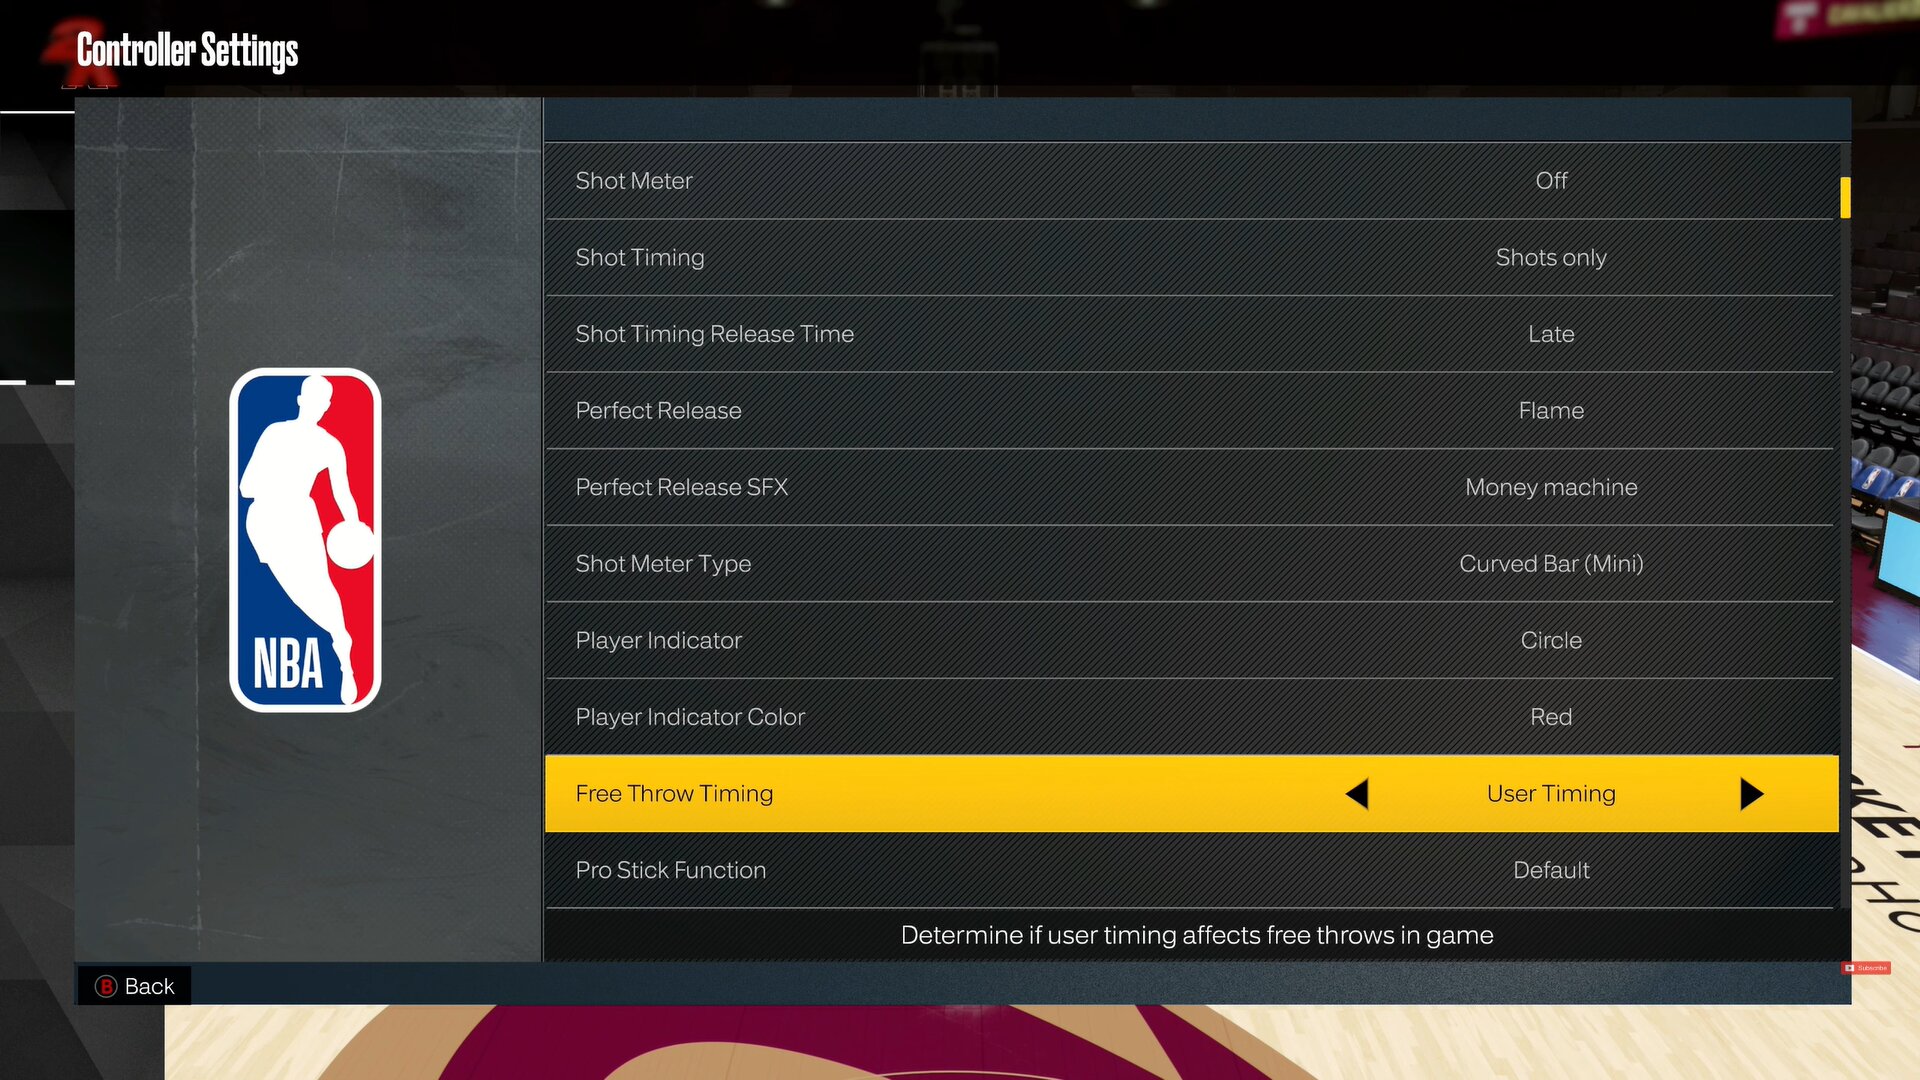
You can set Free Throw Timing to either User Timing or Real Player%. We recommend setting it to User Timing because if you have a terrible throw shooter, you are not going to land any shots with Real Player%.
With User Timing, the control is in your hands. With User Timing on, even if the free throw shooters you have are bad, you will still be able to land some shots and score extra points.
Pro Stick Function & Pro Stick Orientation
NBA 2K23 has further enhanced the Pro Stick functionality, giving the player more control of the ball by allowing gesture combos like double throws and callbacks. Set Pro Stick Function to Default and Pro Stick Orientation to Absolute for the best use of this mechanic.
Off-Ball Offense Mode
This option allows you to determine the orientation of off-ball moves, and we would recommend setting it to Absolute as well.
Double Team Reaction
This setting will help you determine when the offensive team detects and reacts to the double team. Setting it to Manual will give you more control of Double Team, which is what we will recommend. Also, consider going through our guide on best shooting badges in NBA 2k23 as well.
Help Defense Button Function
You can set it to either Call For Help or Double Team, and this function can be activated using the LB button. Set it Call For Help if you don’t want to leave anyone else wide open and just want quick help; otherwise, set it Double-Team for a more offensive approach.
Call For Pick And Roll Vs Fade
This option can be set to either Auto or Manual. We recommend setting it to Manual, obviously, for more control. If you hold LB for a short amount of time, your player will pick and roll, and holding it longer will change the animation to pick and fade. With this option set to Auto, the AI will determine these actions automatically.
Player Icons
With this setting on, after pressing RB, you will be able to see icons appear above the other player’s head, making it easier for you to determine who to pass.
Skip Pass
Enable Skip Pass if you want to pass the ball to the targets far away from your position. This can be done by holding the primary pass button.
Icon Lead Passing
Enabling this option allows you to manually control the receiver you are going to pass, further increasing the chances of a successful pass.
Pro Stick Pass Type
With this setting, you can determine the type of Pro Stick Pass. It’s nothing too game-changing but set it to Flashy if you are unsure of what to choose.
Icon Passing
You can set Icon Passing to Default, Full-Receiver Control, or Pass Type Control. Our recommendation would be the Default control scheme but do check out the other two as well to see which one works with you more.
Receiver Control
As evident from the name, this option gives you control of the receiver whenever you hold the pass button. You can select between Handoff, Receiver Get Open, or Full Receiver Control options. Our recommendation would be to go with the Receiver Get Open option with this setting.
Pro Stick Defense
This setting allows you to play with different orientations for Pro Stick when playing in defense. For this setting as well, we will recommend putting it to Absolute.
Shading Indicator
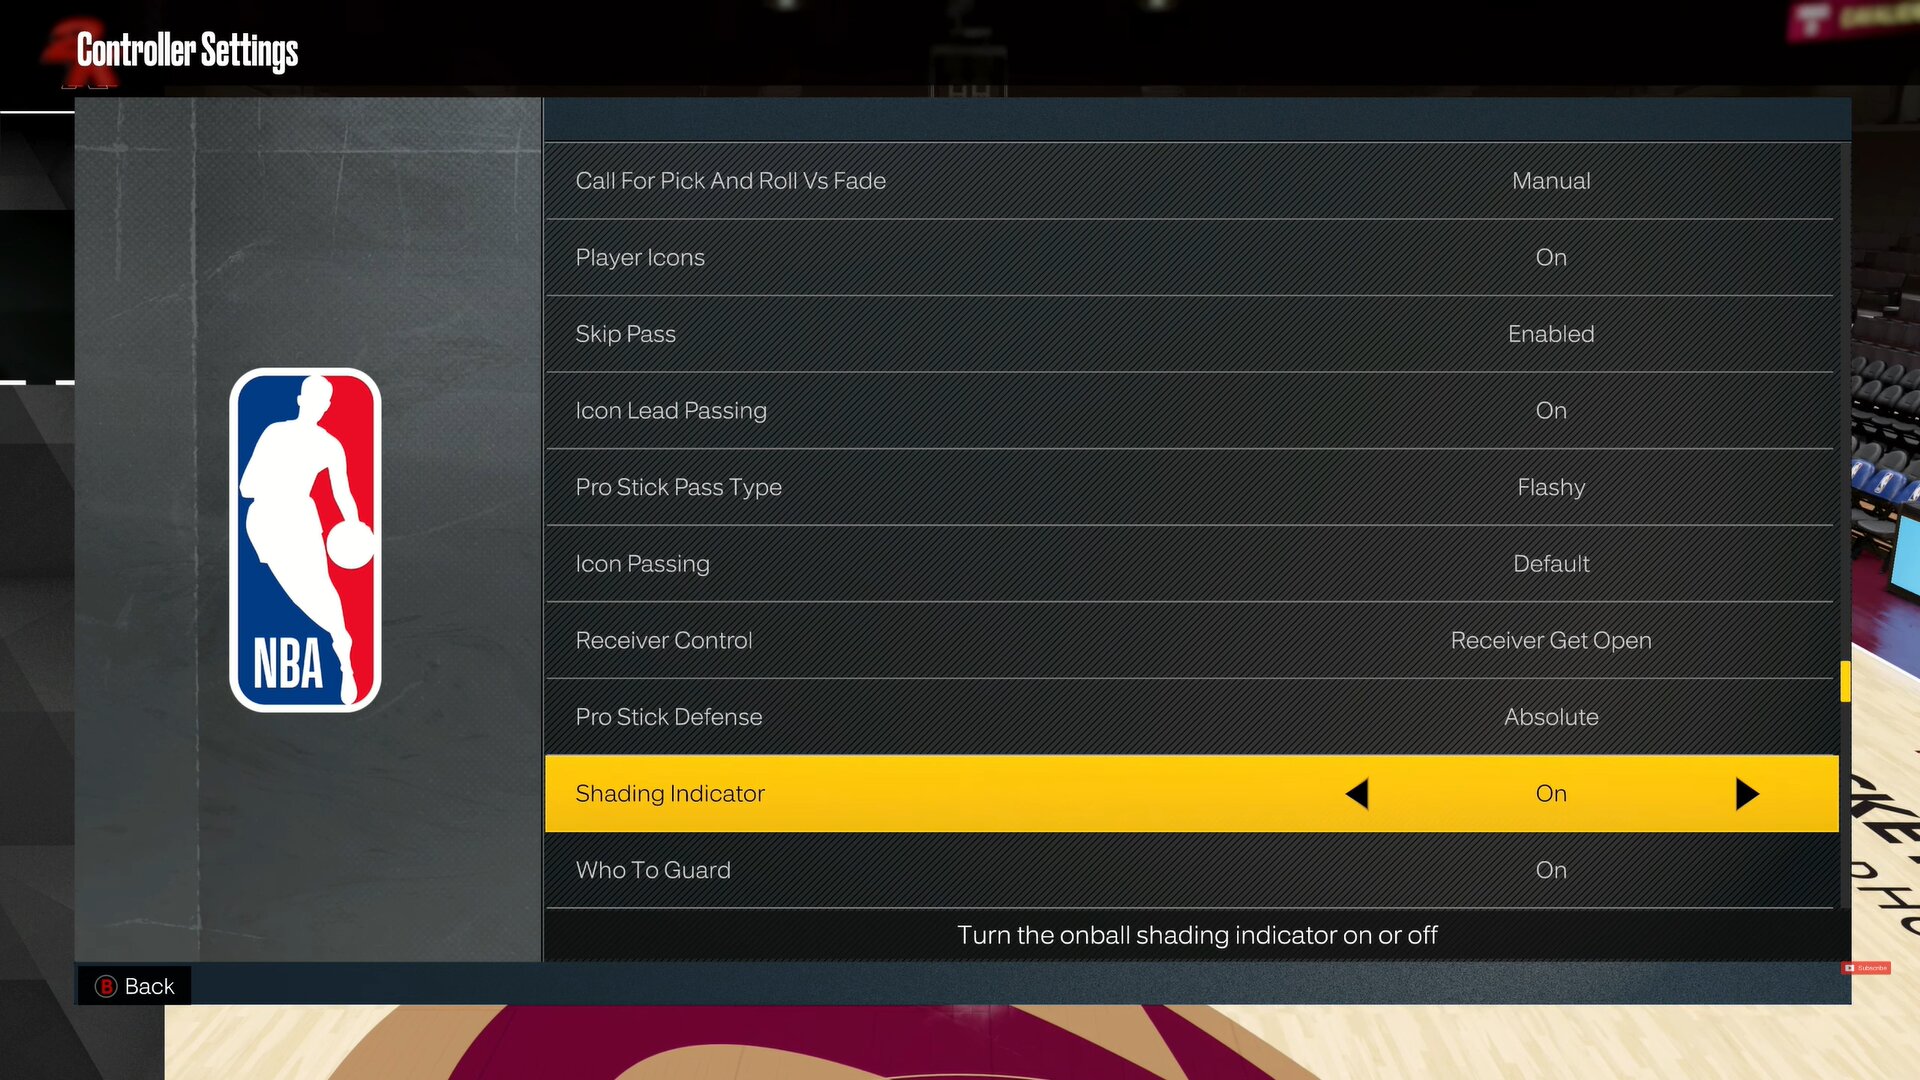
Shading is when you send a ball handler either left or right. Keeping it on helps you determine which side you are shading the player to.
Who To Guard
Enabling Who To Guard will indicate who you are supposed to be defending in defensive situations.
Defensive Assist Strength
This feature basically assists in predicting the movements of the opponents you are guarding. It is at 50 by default, but you can turn it all the way down to 0 if you trust your own skill. Our recommendation would be to set it to 20 or 25 initially and then turn it off later.
Boxout Assist Strength
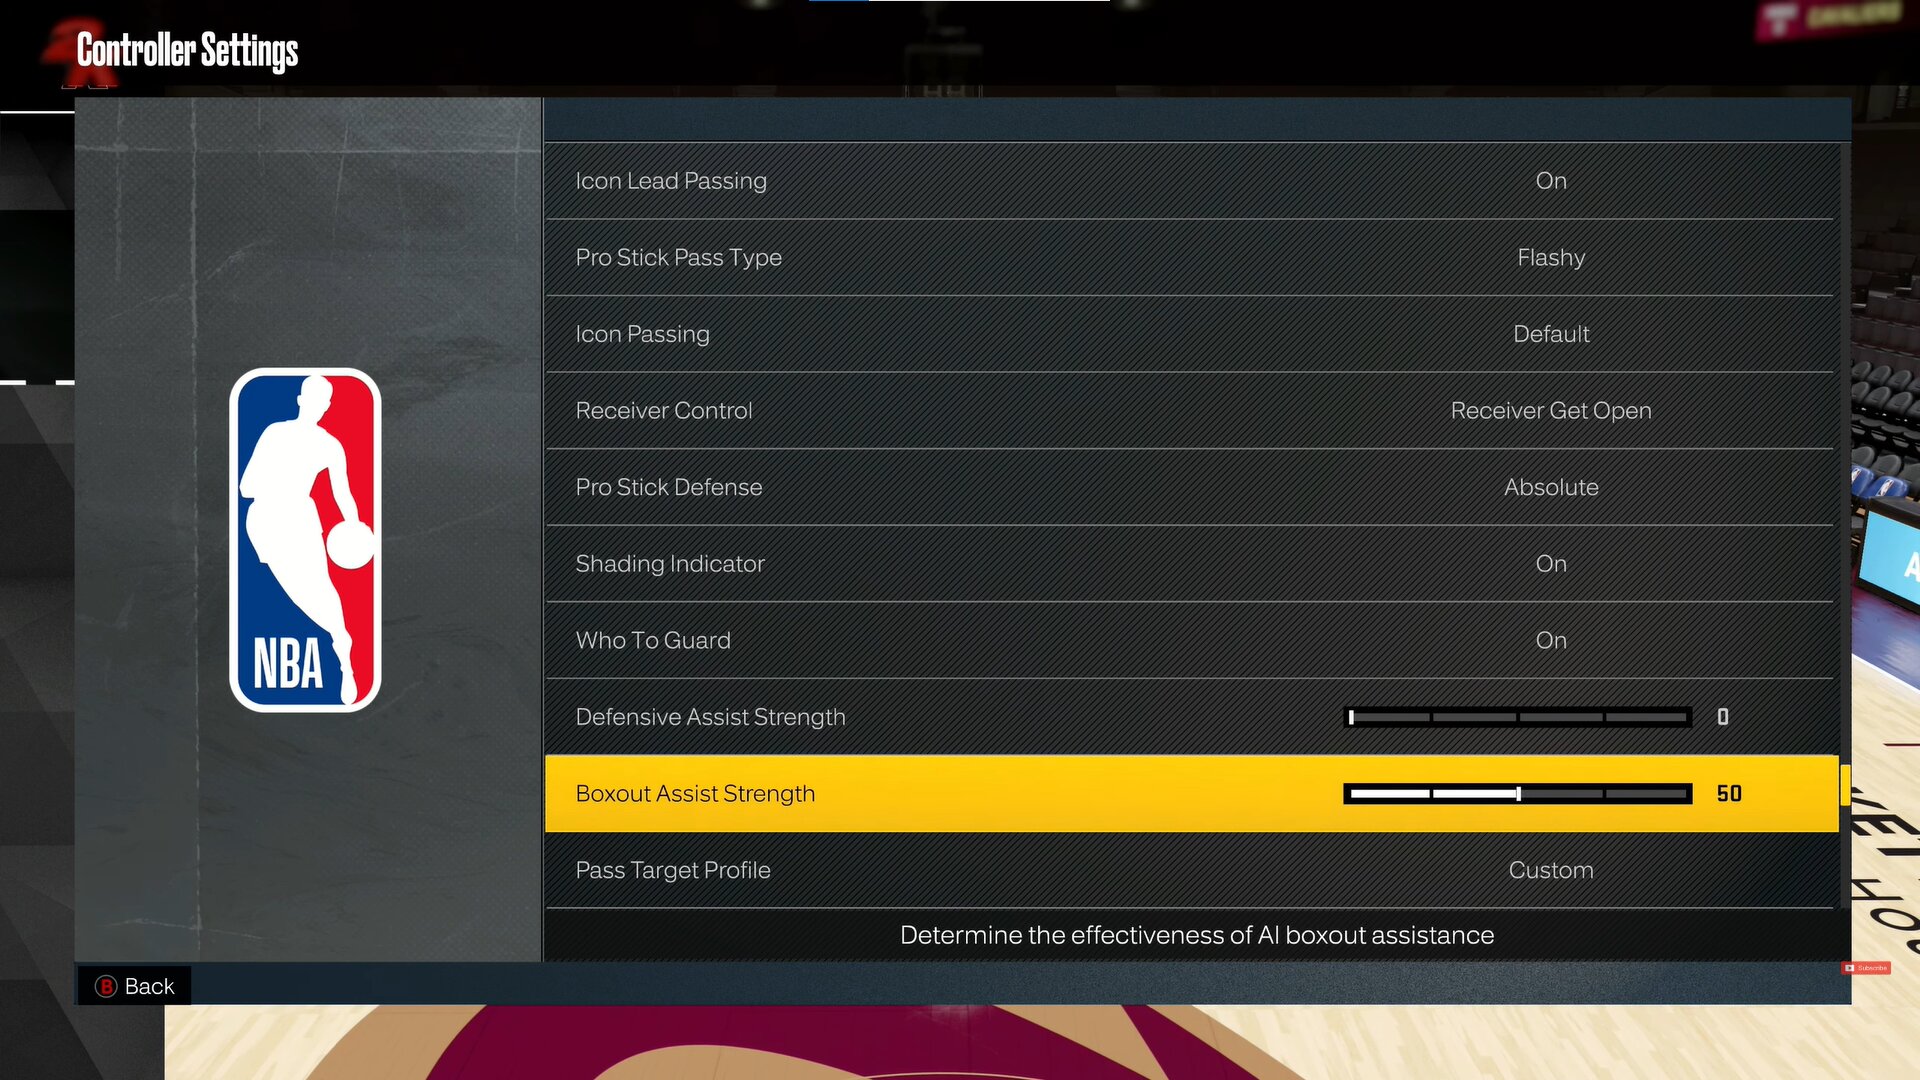
Boxout Assist Strength helps you determine the effectiveness of AI boxout assistance. It is at 50 by default, and we recommend leaving it there.
Pass Target Profile
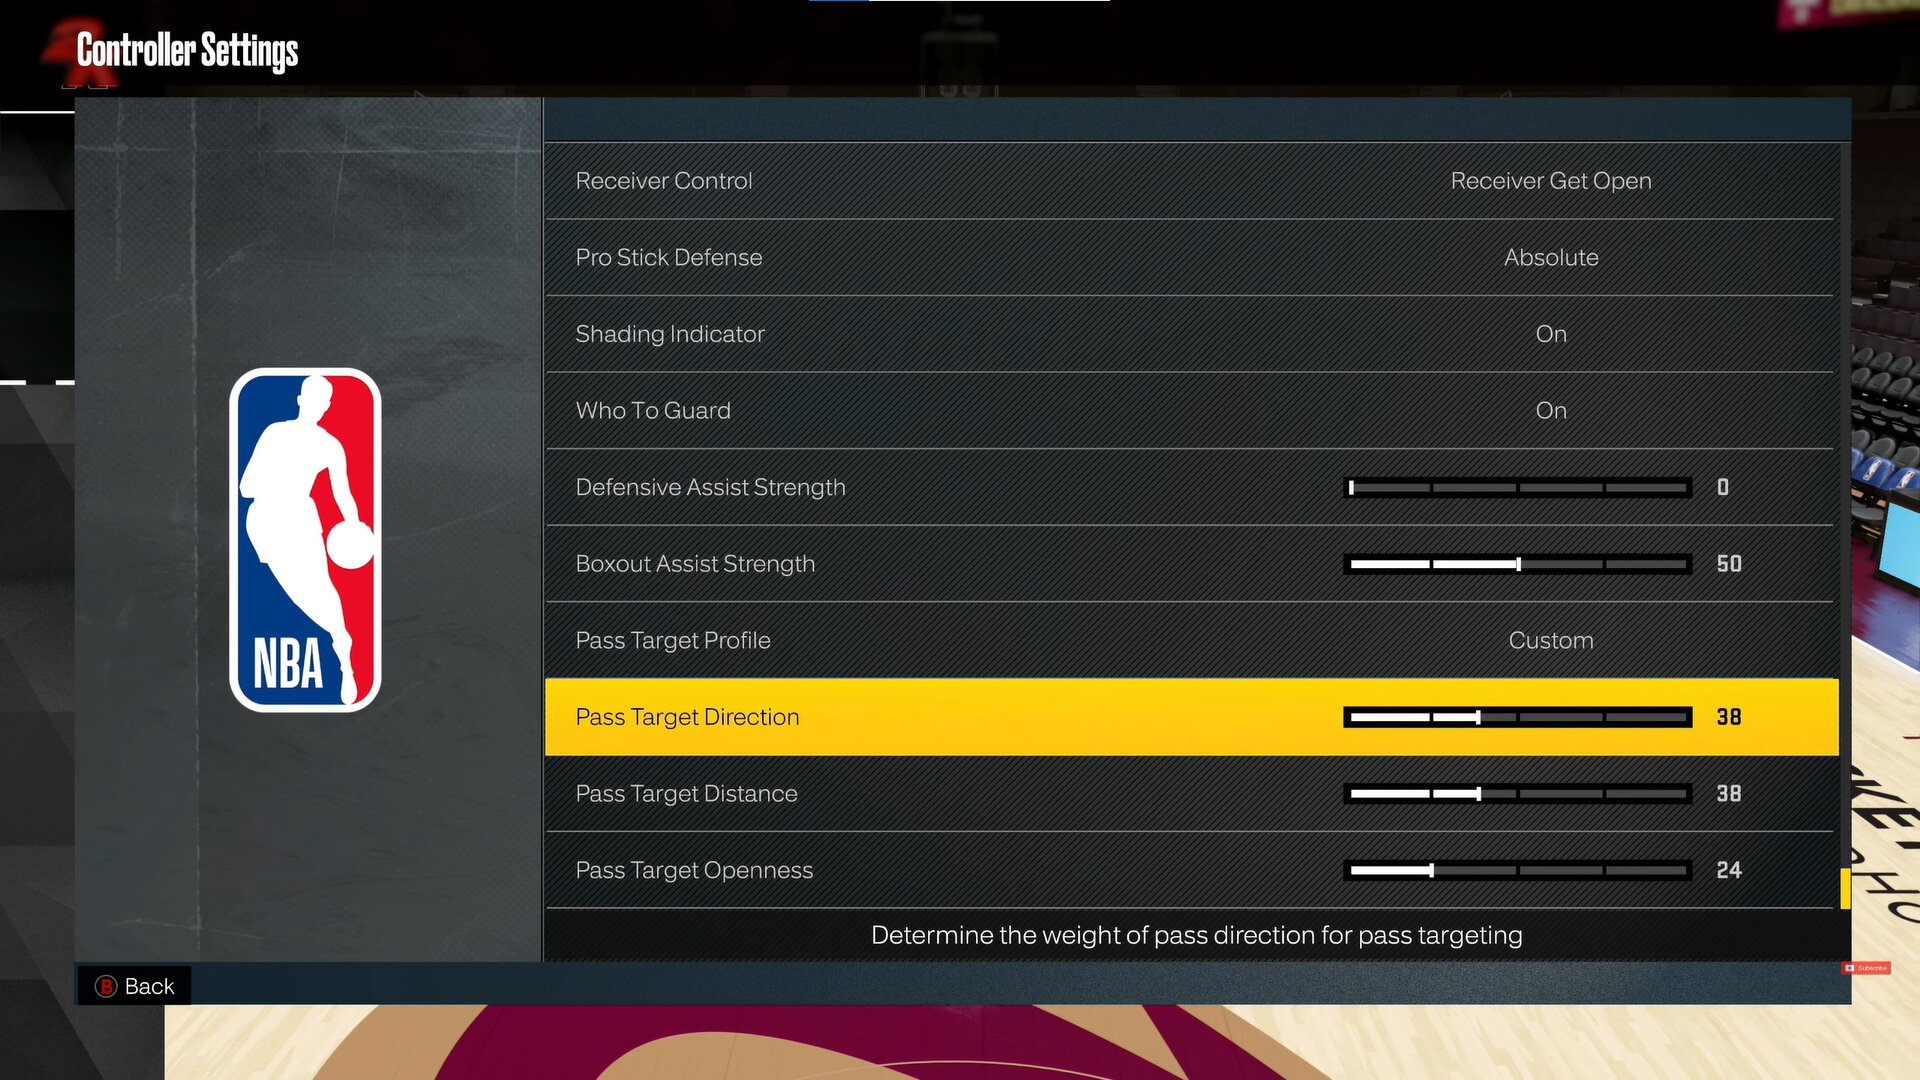
This one is an important setting that really helps with the flow of the game. There are different default presets you can choose from, such as Openness, Distance, and Direction. Toggling between any of the three will change the Pass Target sliders. Furthermore, you can even go with custom settings and set numbers on sliders yourself. If more points in the Openness, the player will pass the ball to the player who is most open.
Similarly, increasing the distance slider allows you to pass the ball to the player closest to you, and lastly, with points invested in the direction setting, your character will pass the ball to the player who is in the same direction as your left stick.
Keep in mind that increasing one slider bar will decrease the points invested in the other, so make sure you pick wisely. Our recommendation would be to go with Openness because that’s the safest option to go with.
This concludes our guide on the best controller settings in NBA 2K23. Let us know what you think about our settings guide in the comments below.
Thanks! Do share your feedback with us. ⚡
How can we make this post better? Your help would be appreciated. ✍
A good guide for beginners
need to explan more maybe have a video about it under the artacle
Nice
Helped out well
Very helpful
I just started this game and the controller settings seemed pretty overwhelming. This article gave me a basic idea of how the settings work and their effects.