Have you ever wondered how you can surf the Internet using simple names? You are even doing this right now, visiting eXputer by the eXputer hostname. This resolution is all possible because behind the covers, a translator is serving your requests against hostnames, called a DNS Server.
These servers act as a phonebook. You dial the hostname, for example, eXputer, and it responds to your browser with its associated IP Address, a unique string of numbers. This translation is required because machines only understand numbers, which people need help remembering or understanding[1].
So, a DNS Server acts as a bridge between the two gaps. However, mapping the entire Internet on a single server is not feasible. Resultantly, your default server, for example, shares and asks for this information from other servers[2]. So, these servers can themselves be clients of different servers at times.
But, this can mean slower load times, precisely where changing your DNS Server comes into play[3].
- A DNS Server is an intermediary between your Network Requests and the underlying IP Addresses.
- They map this information, sharing and fetching it from other servers when it is not natively available.
- Default DNS servers are often limited to their specific zones and resort to asking from other servers.
- Some benefits of swapping your default server include faster browsing speeds, lower latency, improved privacy, and protection from cache poisoning.
- Some demerits associated with a DNS Server change include…
- The method I recommend for switching DNS Servers is through your Router Configuration.
- This recommendation is because the change will apply to all the devices on your network.
- You can, however, swap the default server on individual devices with a little extra effort.
Method Difficulty
DNS Servers can be tricky to change, especially with the associated risks and the number of available options. With this in mind, I have assigned it a difficulty rating of 5 out of 5.
- fill
- fill
- fill
- fill
- fill
While this rating may be off-putting, any changes can be reverted. Further, I will be with you through each step of the process. So, there is no reason to be deterred. But, before jumping into the methods, reading through all the precautions and anything you may need for the task will be a good idea.
Pros of Changing DNS Server
You can get countless benefits by changing your default DNS server to a better one. Here are a few of these benefits:
- Websites across the internet will load faster because Google’s DNS server generally has faster routes to most websites’ IP addresses.
- Your gaming experience will improve, as Google’s DNS server can make your ping much lower compared to your default DNS server.
- Your default DNS server might be the cause behind the many network errors you encounter in games. Changing this DNS can prevent a lot of these errors.
- You will have more privacy compared to your default DNS, as Google’s DNS implements measures to limit data collection and tracking.
Cons of Changing DNS Server
Things Required
Precautions Before Changing DNS Server
You have to be careful and choose the correct DNS server. Although my recommendation for a DNS server is the one provided by Google, you can still use many more DNS servers of your liking.
The location where you are based also plays a massive role, as you should aim for a DNS server with the lowest possible latency.
Again, Google’s DNS has servers across the globe. Just in case your latency with Google’s DNS is not optimal, you should research and then opt for an alternate option.
Additionally, most methods of changing your DNS server require your router or system to reboot. Therefore, make sure to save all of your progress. Furthermore, notify every user within your network about the router rebooting.
Remember to write down and save your original DNS settings so you can return to them if you want to.
I accidentally forgot to save my progress in a game when attempting to change the DNS server. This is why I recommend always double-checking your unsaved material.
How To Change DNS Server
How you approach changing your DNS server depends on the device you want to change it for.
Here are some ways you can use to change your DNS server:
- The fastest way to change the DNS server for all your devices is through your internet router’s configuration.
- You can do it from the Windows network settings if you want to change your Windows PC’s DNS.
- IOS and Android also allow you to manually change the phone’s DNS server from the WiFi settings.
- Similarly, most modern gaming consoles allow you to change the system’s DNS server from the network settings.
- You can assign different DNS servers to individual devices within the same network connection.
However, I suggest that you use Google’s DNS server with all your devices for the optimal internet experience. From personal experience, I can say with certainty that using Google’s public DNS has massively improved my overall internet connection.
Here’s a list of DNS servers that I’ve personally used and also recommend to you:
| DNS Server | Primary DNS | Secondary DNS |
|---|---|---|
| 8.8.8.8 | 8.8.4.4 | |
| Cloudflare | 1.1.1.1 | 1.0.0.1 |
| AdGuard DNS | 94.140.14.14 | 94.140.15.15 |
| OpenDNS Home | 208.67.222.222 | 208.67.220.220 |
| CleanBrowsing | 185.228.168.9 | 185.228.169.9 |
| Alternate DNS | 76.76.19.19 | 76.223.122.150 |
Network Router
Changing your DNS from your router’s configuration will apply that specific DNS server to all the devices connected to that router. This is true as long as you don’t manually change a device’s DNS server.
Here’s how you can alter the DNS server from the router’s configuration:
- To access the configuration, find your router’s login information and IP address on the back of the device.
- Once found, open a browser and enter the router’s IP address in the search bar.
- When the login portal loads, type your username and password to log in.
- Now, you have to find the DNS settings.
- It will generally be called DNS or Domain Name Server, located under a settings category referred to as Setup.
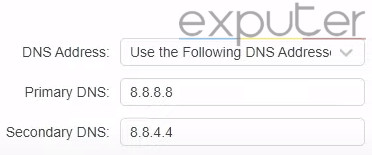
- After finding the settings, enter the primary DNS server as 8.8.8.8 and the secondary DNS as 8.8.4.4.
- Save your settings and reboot your router so the changes take effect.
If you would like to change the DNS server of your device or system individually, follow the methods mentioned below. You can also use these methods to have different DNS servers for individual devices.
Windows PC
If you only want to change the DNS server for your PC without affecting other devices, this method is for you.
Here’s how you can do it:
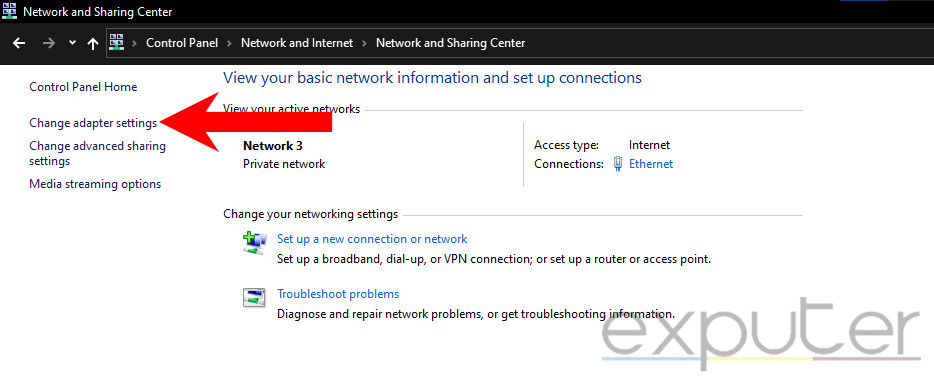
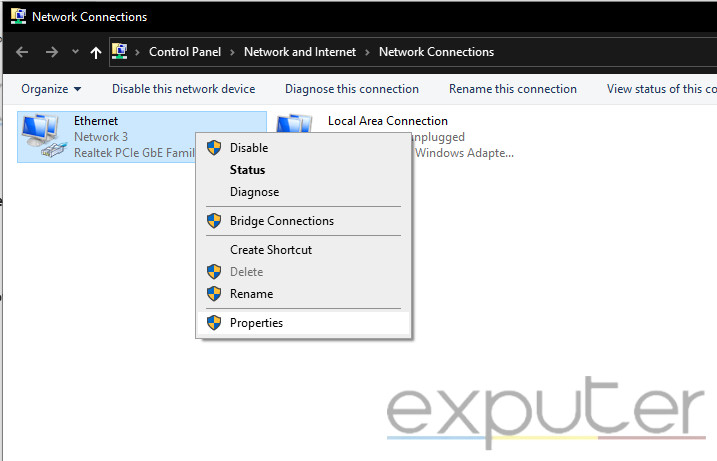
- In the start menu’s search bar, type “control panel” > select the result that appears.
- Once in the control panel, select Network and Internet > Network and Sharing Center > Change Adapter Settings.
- Select the network adapter you’re connected to, either ethernet or WiFi.
- Right-click it and access the adapter’s properties.
- Switch to the Networking tab in the properties.
- Navigate to the section labeled “This connection uses the following items.”
- In this section, find Internet Protocol Version 4 (TCP/IPv4) or Internet Protocol Version 6 (TCP/IPv6).
- The protocol you use will have a tick next to it.
- Select that protocol > Properties.

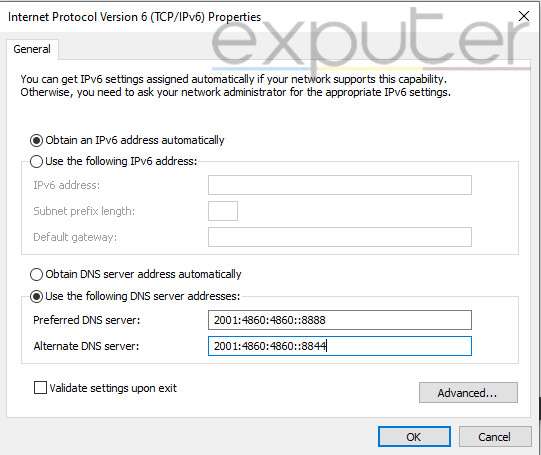
- Move to the advanced section and switch to the DNS tab.
- Remove any DNS servers in this tab and click OK to close it.
- Once you return to your protocol properties, click the circle next to “Use the following DNS server addresses.”
- If you are on the IPV4 protocol, type 8.8.8.8 in the preferred DNS server and 8.8.4.4 in the alternate DNS server.
- For the IPV6 protocol, use 2001:4860:4860:8888 and 2001:4860:4860:8844.
- Once done, click the OK button and proceed to restart your PC.
PlayStation 4 & 5
The process of changing your DNS server is almost identical on both the PS4 & PS5.
Follow these steps to learn how to do it:
- Navigate to your console’s settings > network settings.
- Here, select Set Up Internet Connect.
- Pick the option that applies to you, either WiFi or Ethernet.
- In the next step, select Custom. In the IP address settings, pick Automatic.
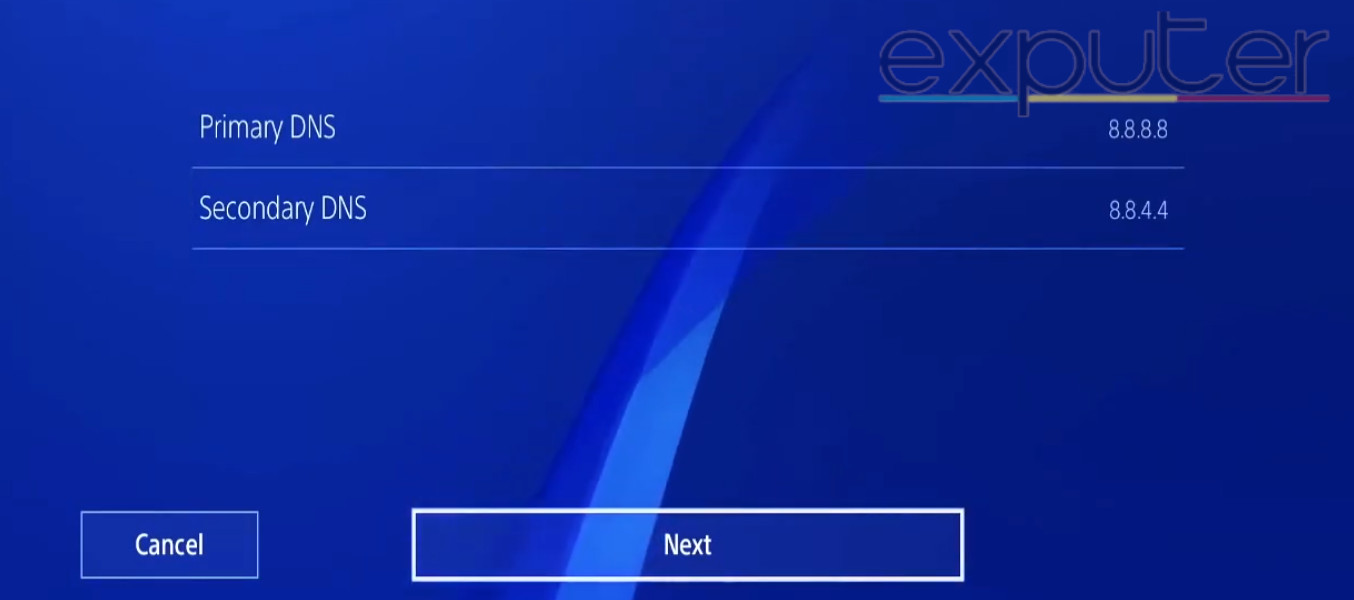
- For DHCP, select Do Not Specify. The next step will take you to the DNS settings.
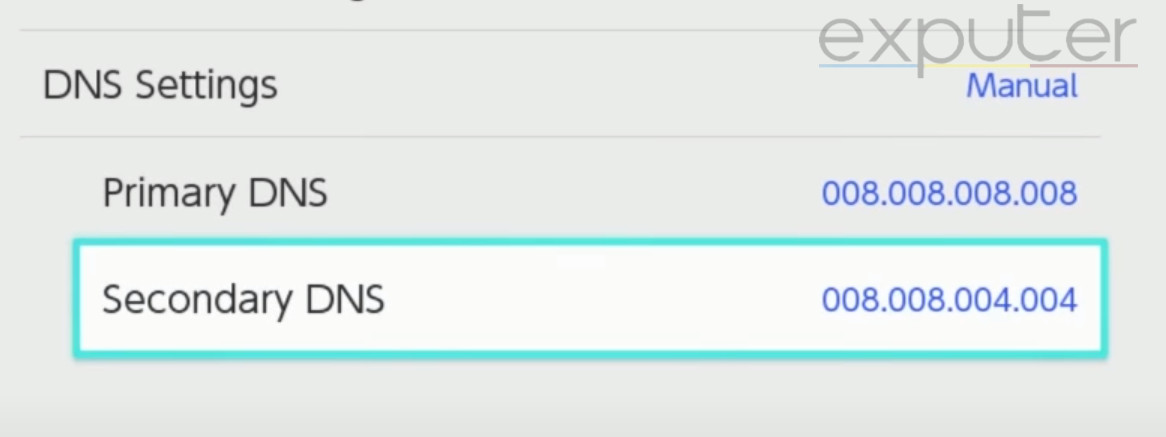
- Here, select manual and enter 8.8.8.8 for the primary DNS and 8.8.4.4 for the secondary DNS.
- Use automatic for the MTU settings > Do Not Use for the proxy settings.
- Now select Test Internet Connection.
- Once the test is done, your DNS will be changed.
Xbox One, Series X, & Series S
Like PlayStation consoles, Xbox consoles also make it incredibly easy to modify your DNS settings.
The settings and method of changing your DNS server are the same across all modern Xbox consoles.
Follow these steps to do it:
- Go to your Xbox settings and ensure you are in the general settings section.
- Here, select Network Settings > Advanced Settings.
- You will now be able to see the DNS settings.
- Select the DNS settings > switch from automatic to manual.
- Once switched, enter 8.8.8.8 for the primary DNS server and 8.8.4.4 for the secondary DNS server.
- Save your settings.
Nintendo Switch
Remarkably, the Nintendo Switch not only presents an impressive number of network features but also includes intuitive options like DNS settings.
Here are the steps to changing your DNS server on the Nintendo Switch:
- Press the home button on your switch controller and enter the settings.
- In settings, select the Internet section > Internet settings.
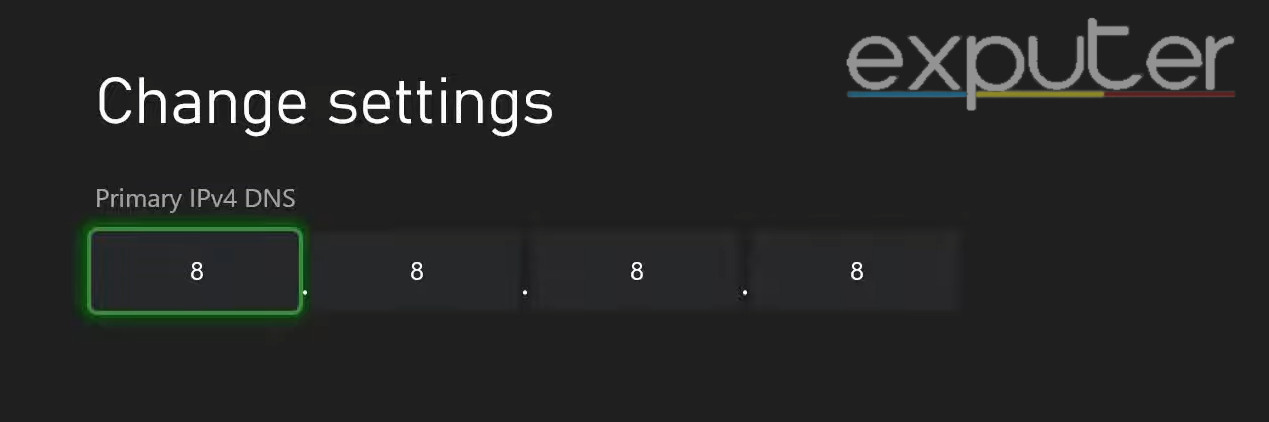
- Here, select the network you are connected to > Change settings.
- Now, click on DNS settings and change it to manual.
- In the primary DNS field, input 8.8.8.8 and use 8.8.4.4 for the secondary DNS.
Android
If you enjoy playing games on your Android device but frequently encounter network issues, rest assured because your phone also allows you to change the DNS server.
Follow this step-by-step guide to learn how to do it:
- Enter your phone’s system settings > WiFi section.
- Touch the gear icon next to the WiFi you are connected to.
- Sometimes, you might have to select the WiFi connection itself or long-press it.
- You might have to select “View More” to reveal all the advanced network settings.
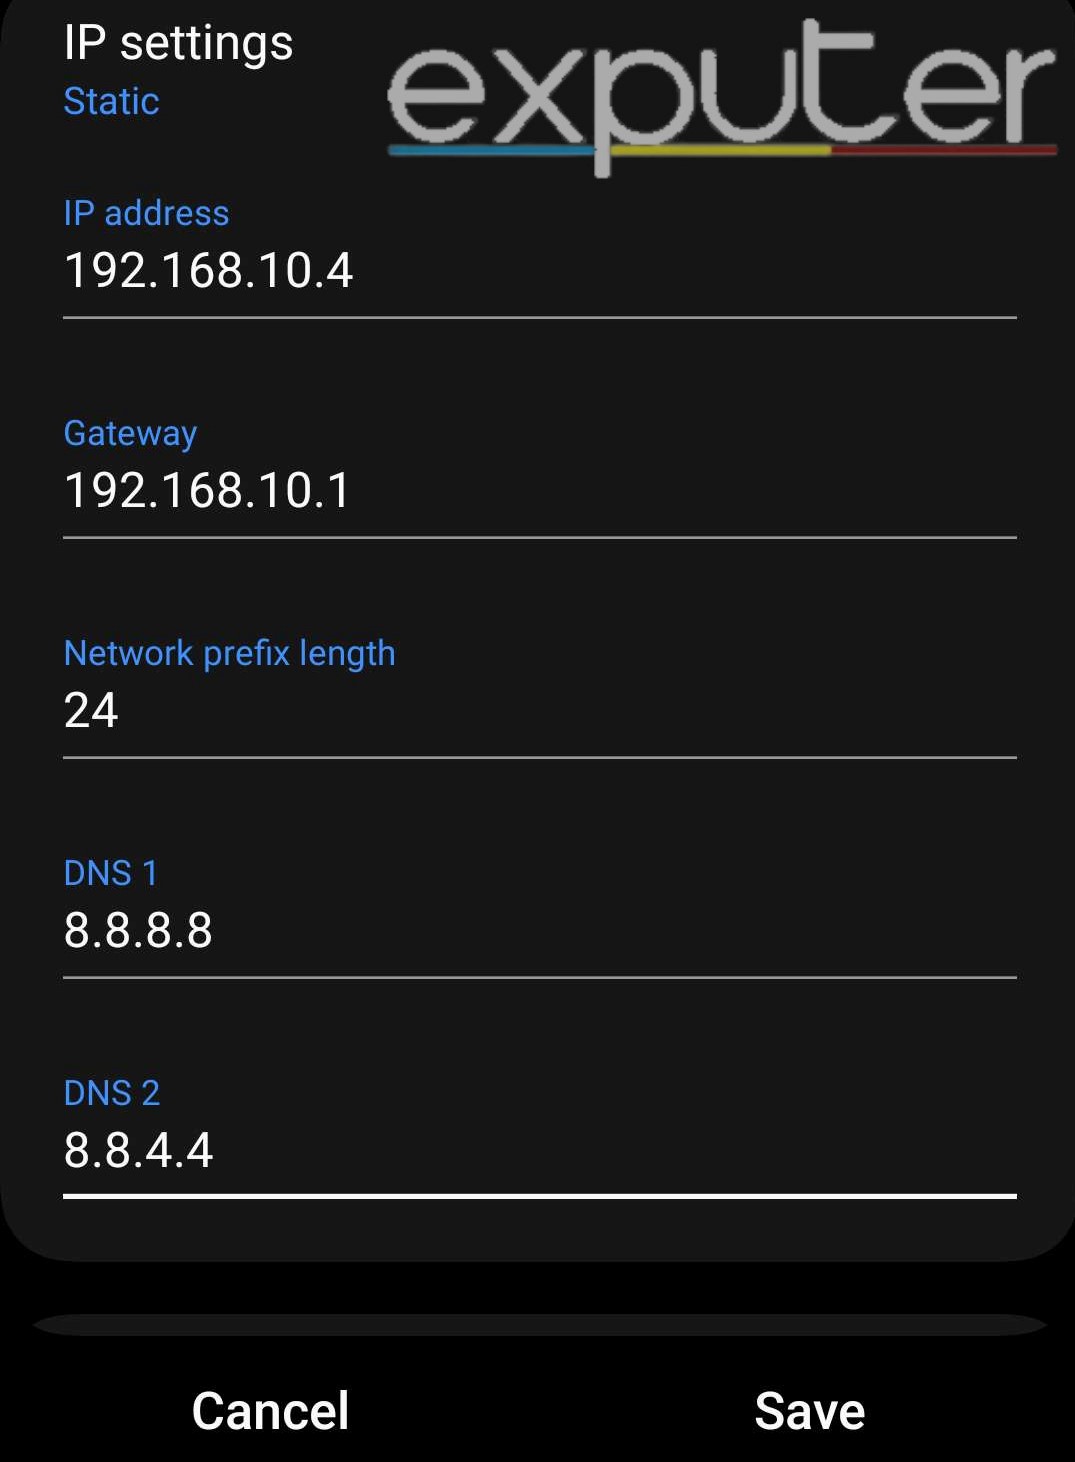
- Here, select the IP address option > change it to static.
- Keep all settings at their default state except the DNS 1 and DNS 2 sections.
- Enter 8.8.8.8 for DNS 1 and 8.8.4.4 for DNS 2.
- Save your settings.
IOS
The DNS changing process for iOS is nearly identical to Android, with just a few changes.
These are the steps to alter your DNS on your IOS device:
- Go to your iPhone’s settings > WiFi.
- Now tap on the information icon next to the WiFi network you are connected to.
- Scroll down until you find the setting called Configure DNS.
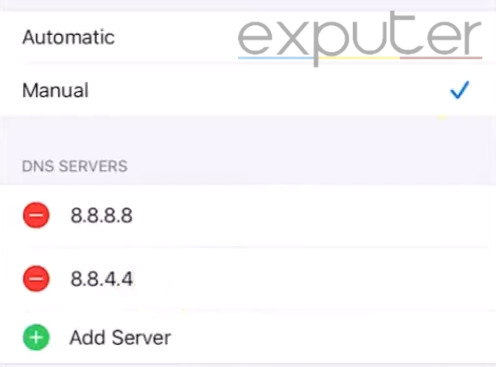
- Tap this setting and select manual.
- If there is an existing DNS server here, swipe right > tap delete to remove it.
- Now tap Add Server > write 8.8.8.8 for Google’s DNS server.
- Tap Add Server again for the secondary DNS, which is 8.8.4.4.
- Make sure to save your settings.
Conclusion
There you have it: a complete and comprehensive guide on all the methods of changing DNS servers on the most commonly used platforms. My default DNS server was not up to par, so I changed it to Google’s public DNS. This allows me to improve my internet experience in various ways.
Changing your DNS server is an optional feat, and while it works amazingly for most, it might not work well for you. It all depends on your use case and your internet connection.
I recommend that you try at least once and see if using an alternative DNS positively impacts your network connection. In some instances, players have reported that changing DNS prevented their apps from connecting to servers or some sites from getting blocked.
So, If altering your DNS doesn’t suit your use case, you can revert the settings as easily as you changed them.
References:
- IBM: “Networking Domain Name System.“
- Clemson University: “DNS Servers.”
- Rutgers University: “Introduction to DNS.”
Thanks! Do share your feedback with us. ⚡
How can we make this post better? Your help would be appreciated. ✍