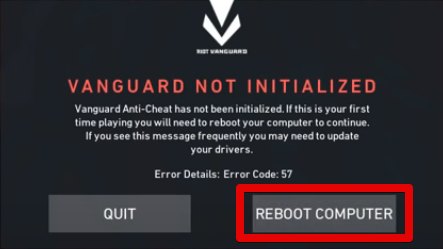
Like most first-person shooters, Valorant has its own set of issues. One such problem that prevents you from even booting up Valorant is Error Code 57. This error has affected a lot of players, surfacing when Vanguard, the anti-cheat system, is not running in the background. If you have also been one of its victims, buckle up as I guide you through all the possible fixes to get you back into the game.
- Basic Fixes: Check Valorant live servers status, try running Riot Launcher and Valorant as administrator, whitelisting the game folder, rebooting your PC and test your network before diving into the fixes below.
Below are some solutions you can try for Error Code 57:
- Terminate Unnecessary Background Programs.
- Flush your DNS Cache.
- Change 3rd-Party DNS Servers.
- Change the VGC Service startup type and Manually Start it.
- Reinstall Vanguard.
Terminate Unnecessary Background Programs
By default, Vanguard has a few services that run automatically on startup to boot the anti-cheat. But, to save up on resources, these services go dormant after a while. The problem arises when your operating system needs even more resources. And when it does, it kills these non-essential services & programs, causing Error Code 57.
While this would generally not be an issue if you have a decent amount of RAM (>8 GBs), I would still recommend taking a peek, just in case.
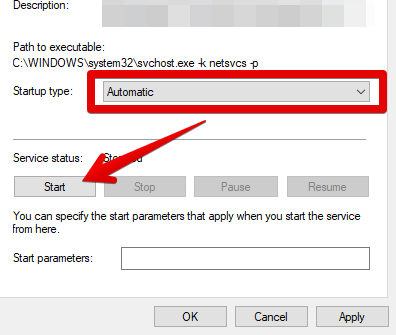
Change The VGC Service’s Startup Type
As I said, Vanguard has a few services that help boot it up on startup. By default, these services should start automatically. Sometimes, however, they can switch to a manual start. This can become a problem as Vanguard needs to boot up on kernel level. Fixing this, however, is not that hard.
To do so, follow the steps as such:
- Press Win + R to open Run > Type “services.msc” > Press Enter.
- Look for “VGC” in the list of services.
- Right-click on it > Click on Properties.
- Set the Startup type to Automatic.

Starting the VGC Service (Image by eXputer) - Click on OK to save the changes.
Change To A Custom DNS
Every network request you make first goes through a series of DNS requests. For easier understanding, you can think of DNS as an address book.
Before you go anywhere, you look for the place’s address. So, while a custom DNS brings many benefits, Vanguard doesn’t like its traffic being redirected. So, a fix that has worked for several players is to switch to a public DNS.
While this won’t give you the same level of control, changing your DNS server is highly likely to fix the Error Code.
Tip: I recommend clearing your DNS cache afterward to prevent domain-resolving issues.
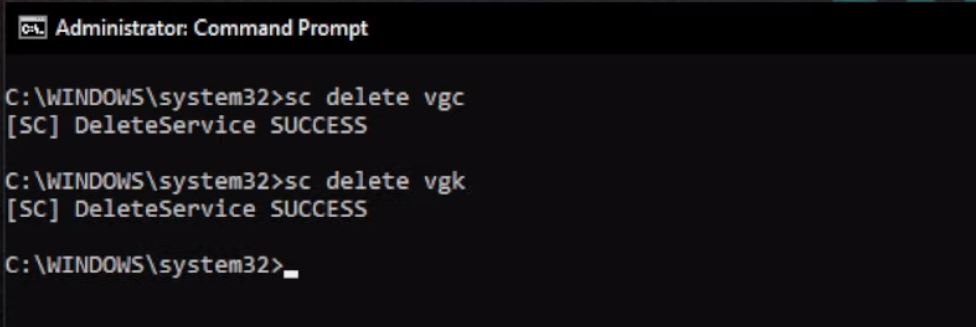
Reinstall Vanguard
If none of the above solutions work for you, the issue likely lies with the corrupted Vanguard itself. Because Vanguard operates at the kernel level, even a tiny problem with its structure can make it fail to load up. So, at this point in the guide, I recommend reinstalling Vanguard and its services as the last resort.
Follow the steps as such to do so:
- Press Start Button > Type ‘Command Prompt’ > Press Enter.
- Type ‘sc delete vgc’ > Press Enter > Type ‘sc delete vgk’ > Press Enter.

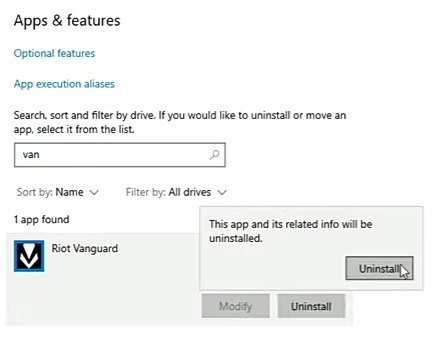
Deleting Vanguard’s Services (Image by eXputer) - Press Start Button > Search ‘Add or Remove Programs’ > Press Enter.
- Type Vanguard in Search this list > Click on Vanguard > Click Uninstall.

Uninstalling Vanguard (Image Captured by eXputer) - Open Valorant > Click on Update to reinstall Vanguard.
Once done, don’t forget to restart your computer so Vanguard can boot up again.
Other Error Codes
Here are some other common Valorant Error Codes, including error code van 6, error code 39, and error code 7, reported by the player base. We have included their solutions in the table below:
| Error Codes | Solutions |
|---|---|
| Error Code Van 6 | 1. Optimize Valorant’s Windows Firewall Settings 2. Change the VGC Service’s Startup Type 3. Enable the VGC service 4. Reinstall Riot Vanguard 5. Changing The DNS Settings |
| Error Code 39 | 1. Optimize Virtual Disk Service. 2. Check Server Status. 3. Enable Vanguard Game Control (VGC). 4. Delete Unnecessary Game Files. |
| Error Code 7 | 1. Check Server Status for Valorant. 2. Verify that your Account’s Region is correct. 3. Change the VCG startup type to Automatic. 4. If you are suspended, contact Customer Support. |
My Thoughts On Error Code 57
I can understand its frustrating errors from playing Valorant for a long time. They pop up out of nowhere and sometimes go away automatically as well. What makes Error Code 57 slightly more frustrating is that Vanguard has no built-in diagnostic tools.
They’ve acknowledged the error 57 on their ultimate list of error codes in their official support article. This was made possible by the several reports players made on forums, including Reddit.
Thankfully, however, the issue is not as widespread among the player base and only periodically pops up. But fear not when it pops up, as this guide will always be here to do the heavy lifting for you. Finally, if nothing works for you, Riot Support will always be your best bet.
Check Other Valorant Error Guides covered on eXputer:
- Fixing Valorant Platform Error
- Valorant Crashing Fix
- Valorant Error Code 39
- Valorant: A Critical Error Has Occurred
- Valorant Error Code Van 68
- Valorant Error Code Van 6
Thanks! Do share your feedback with us. ⚡
How can we make this post better? Your help would be appreciated. ✍