Overwatch 2 has a very competitive player base. Everyone strives to tackle its strategic modes and focus on winning games. All things considered, winning games does require a bit of skill, however, If you really want to take it to the next level. You’ll be needing High FPS and Consistent Performance.
I’ve compiled these methods in a step-by-step process, ensuring the best Overwatch 2 Settings for High FPS.
I’ve benchmarked Overwatch 2 on the following PC specs:
- CPU: AMD Ryzen 5 2600x
- GPU: Nvidia RTX 3050
- RAM: 16 GB
- Storage: 1TB NVMe SSD
- OS: Windows 11 Pro
To run Overwatch 2 on PC, you’ll at least need an Intel Core i3 or AMD Phenom X3 8650 CPU, NVIDIA GTX 600 series or AMD Radeon HD 7000 series GPU, and 6 GB RAM.
The following settings seem to be the most taxing in Overwatch 2:
- Texture Quality
- Local Fog Detail
- Dynamic Reflections
- Shadow Detail
- Model Detail
- Reflections Quality
I’ve played Overwatch 1 a lot and Overwatch 2 wasn’t really that demanding in terms of performance. But sadly, I’ve experienced random drops in FPS more times than I can recount. My frames would go from 100 to 30-40 when several players are in the same area, especially during escort missions. My game has also crashed on some occasions without any warning or error.
Going for these Overwatch 2 settings will not only improve your visuals but also your competitive experience. Do note that for these settings to be effective, your PC’s hardware should be at least as good as Overwatch 2’s minimum hardware requirements.
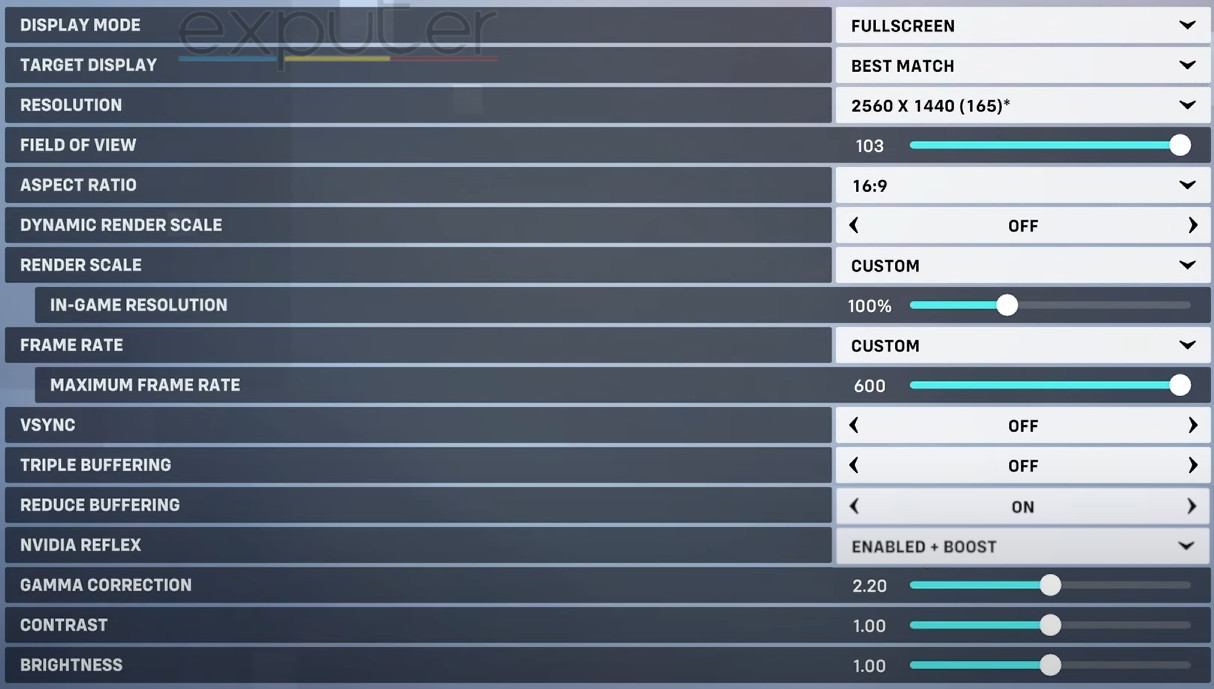
Summary of the Best Graphics Settings
| Setting | Adjustment |
|---|---|
| Display Mode | FULLSCREEN |
| Target Display | BEST MATCH |
| Resolution | Highest Possible |
| Field of View | 103 |
| Aspect Ratio | Your Monitor's Native Aspect Ratio |
| Dynamic Render Scale | Off |
| Render Scale | Custom |
| In-Game Resolution | According to your PC's hardware |
| Frame Rate | Custom |
| Maximum Frame Rate | Highest Possible (600) |
| VSync | Off |
| Triple Buffering | Off |
| Reduce Buffering | On |
| NVIDIA Reflex | Enabled + Boost |
| Gamma Correction | 2.20 |
| Contrast | 1.00 |
| Brightness | 1.00 |
| Graphics Quality | Personal Preference |
| High Quality Upsampling | Your Choice |
| Image Sharpening | 0.30 |
| Texture Quality | Low |
| Texture Filtering Quality | High - 4X |
| Local Fog Detail | Low |
| Dynamic Reflections | Off |
| Shadow Detail | Medium |
| Model Detail | Low |
| Effects Detail | Low |
| Lighting Quality | Ultra |
| Antialiasing Quality | Off |
| Refraction Quality | Low |
| Screenshot Quality | 1X Resolution |
| Ambient Occlusion | Off |
| Local Reflections | On |
| Damage FX | Your Preference |
| Details | All Personal Preference |
Optimized Graphics Settings
Launch Overwatch 2 and press the escape key on your keyboard to open the Overwatch 2 menu. From here, go to options to open the video settings.
- Graphics Quality: You can set this preset to whatever you want. We will be making manual changes so a preset is not necessary.
- High-Quality Upsampling: This setting lowers the overall resolution of Overwatch 2 while increasing the sharpness and details. It will not have a significant effect on your FPS. So, if you like this setting’s look, you can leave it on.
- Texture Quality: This setting caused a slight performance decrease for me. Set this to low.
- Texture Filtering Quality: Put this setting to High – 4X. It will increase the sharpness of objects that are further away.
- Local Fog Detail: Make this setting low because there aren’t too many maps in Overwatch 2 with a lot of foggy effects.
- Dynamic Reflections: This will cause reflections of your enemies and teammates on shiny surfaces. This can be distracting for competitive reasons so turn it off.
- Shadow Detail: You can make this either low or medium, depending on your hardware. This setting can give you a competitive advantage by showing the enemy’s shadow while they are out of sight.
- Model Detail: Put this setting on medium or low. Anything higher can potentially place objects in your sight and block your vision.

- Effect Detail: Keep this on low. The visual clutter obstructed my gameplay and also negatively affected my FPS.
- Lighting Quality: You can max this setting out to Ultra. It does not affect the performance too much and makes Overwatch 2 look much better.
- Antialiasing Quality: Turn this off to get better FPS. Antialiasing makes rough surfaces look smoother but in my experience, it does not have too big of a visual effect.
- Refraction Quality: This setting bends light through reflective objects. It can be a bit distracting so set it to low.
- Ambient Occlusion: This setting gives Overwatch 2 a realistic look but has a decent impact on performance. While it’s suitable for those with strong PCs, most players will benefit from keeping it turned off.
- Local Reflections: This setting will not have any effect on your FPS so you can turn it on.
Sound Settings For Optimal Hearing
Even though the sound settings might seem entirely subjective, there are still some things you should change for a slight competitive advantage.
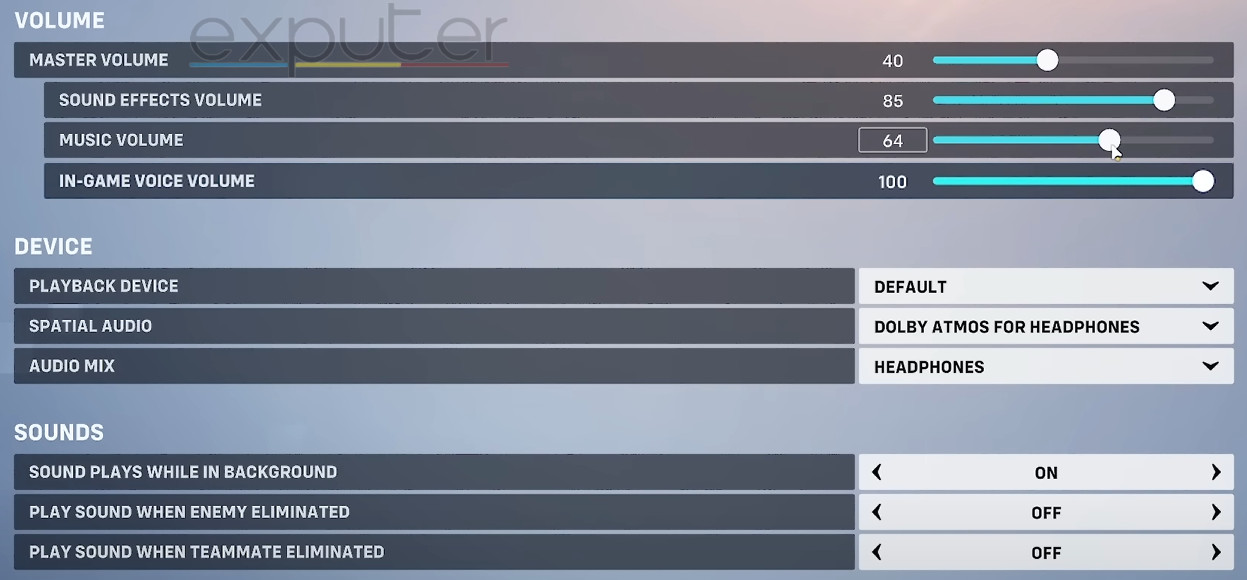
| Master Volume | Your Choice |
| Sound Effects Volume | Personal Preference |
| Music Volume | Your Choice |
| In-Game Voice Volume | Personal Preference |
| Playback Device | Default |
| Spatial Audio | Dolby Atmos For Headphones |
| Audio Mix | Headphones |
| Sound Plays While In Background | On |
| Play Sound When Enemy Eliminated | Off |
| Play Sound When Teammate Eliminated | Off |
Matchmaking Settings & High Precision Mouse Input
The matchmaking section is mostly dependent on your personal preference and how you like to play your online games. But, there are a few settings in the matchmaking section that you must not miss:
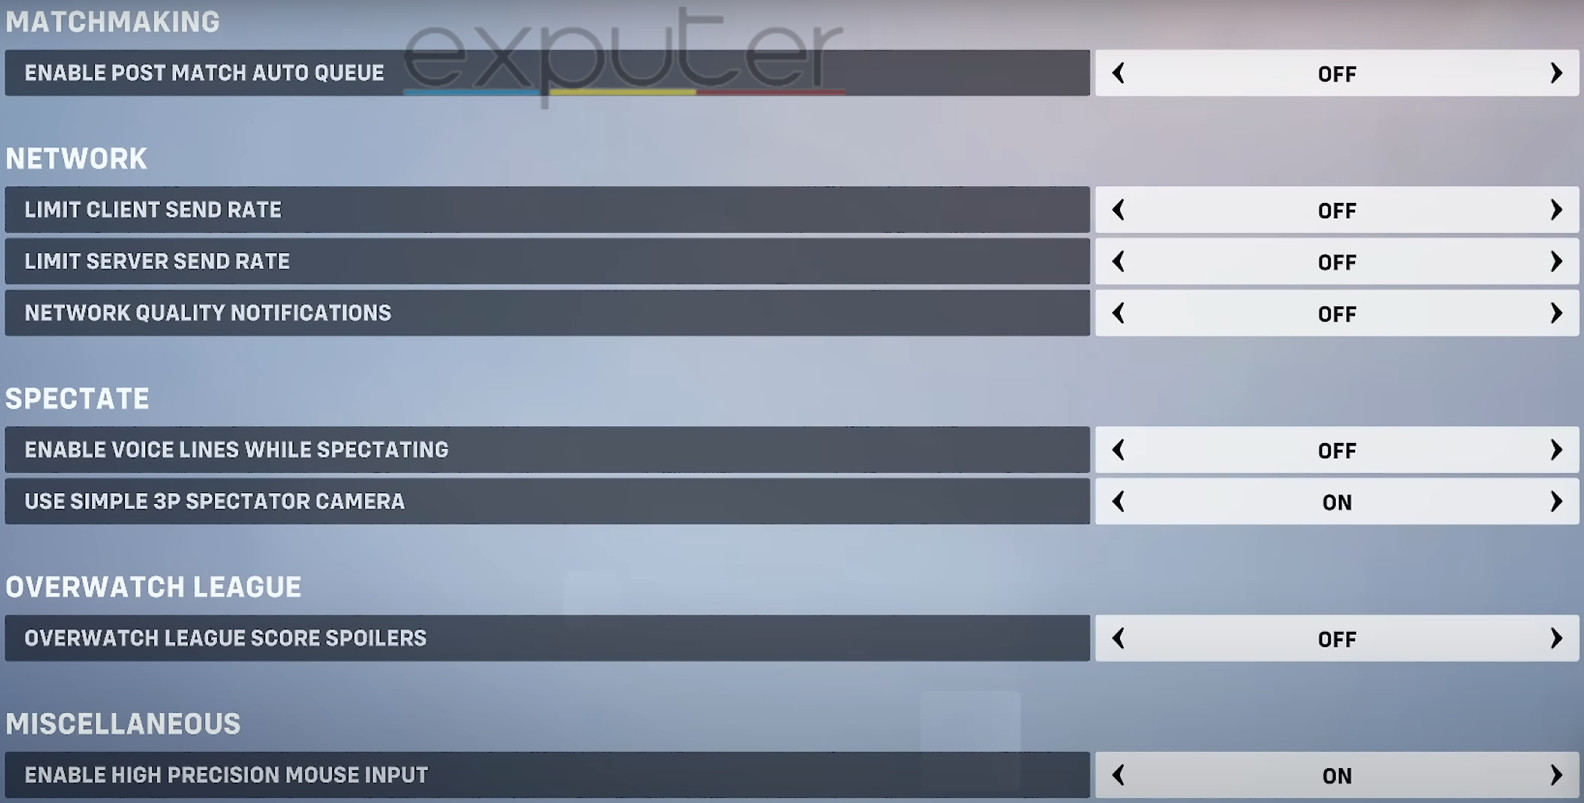
| Enable Post Match Auto Queue | Personal Preference |
| Limit Client Send Rate | Off |
| Limit Server Send Rate | Off |
| Network Quality Notifications | Personal Preference |
| Enable Voice Lines While Spectating | Your Choice |
| Use Simple 3P Spectator Camera | Up to you |
| Overwatch League Score Spoilers | Personal Preference |
| Enable High Precision Mouse Input | On |
Windows Optimization Tweaks
Besides optimizing Overwatch 2’s in-game settings, you can get an additional performance boost by tweaking your Windows as well. Here are some great Windows optimization tips you should try to improve your experience with Overwatch 2:
- Update Your Windows
- Enable Game Mode
- Enable Ultimate Performance Power Plan
- Disable Hardware Acceleration
- Disable Full-Screen Optimization
- Disable Unnecessary Background Services and Applications
- Delete Temp Files
- Increase Overwatch 2’s Application Priority to High In Task Manager
- Force Use Dedicated GPU
Tip: In addition to using the tweaks above, I also recommend that you optimize your Nvidia Control Panel settings or AMD Radeon settings to gain additional performance.
My Thoughts On Overwatch 2 Best Settings
If you haven’t played Overwatch 2 In High FPS, I highly recommend you try it out. The game is very enjoyable when the Frames are consistent and there are no stutters. This guide will also improve your Windows 10 performance. Additionally, you can expect good performance in games other than Overwatch 2.
Keeping various updates as a factor, this Overwatch 2 PC Settings Guide has now been updated.
Thanks! Do share your feedback with us. ⚡
How can we make this post better? Your help would be appreciated. ✍
Thank you for this thorough guide!