Dying Light is famous for its blueprints. These help you with crafting different kinds of stuff. For instance, you can upgrade different weapons, create new throwable items, and even create new weapons from scratch. Today, to help you save a lot of time, we are going to write down an in-depth blueprint locations guide for Dying Light. Through it, you’ll be able to find your favorite blueprints in no time.
- Dying Light is renowned for its blueprints, aiding in crafting a variety of items such as weapon upgrades, throwable items, and even entirely new weapons.
- Blueprints offer the ability to enhance weapons, create novel tools, and construct weapons from scratch.
- Blueprints can be obtained through completing quests, discovering hidden spots, and other sources.
- Similar to other in-game items, blueprints are classified into four distinct rarity categories:
- Green: Uncommon blueprints.
- Blue: Rare blueprints.
- Purple: Exceptional blueprints.
- Orange: Legendary blueprints.
Dying Light Blueprint Locations
At the time of writing, there existed a total of four locations in Dying Light. The first three, Slums, Old Town, and Antenna, can be accessed in the base game. As for the fourth location, The Countryside (only for The Following DLC).
For each location, we are also going to attach a map in which we are going to highlight the location of each blueprint. This way, you’ll be able to get to the location more quickly. For each blueprint, we are also going to mention the crafting requirements for it.
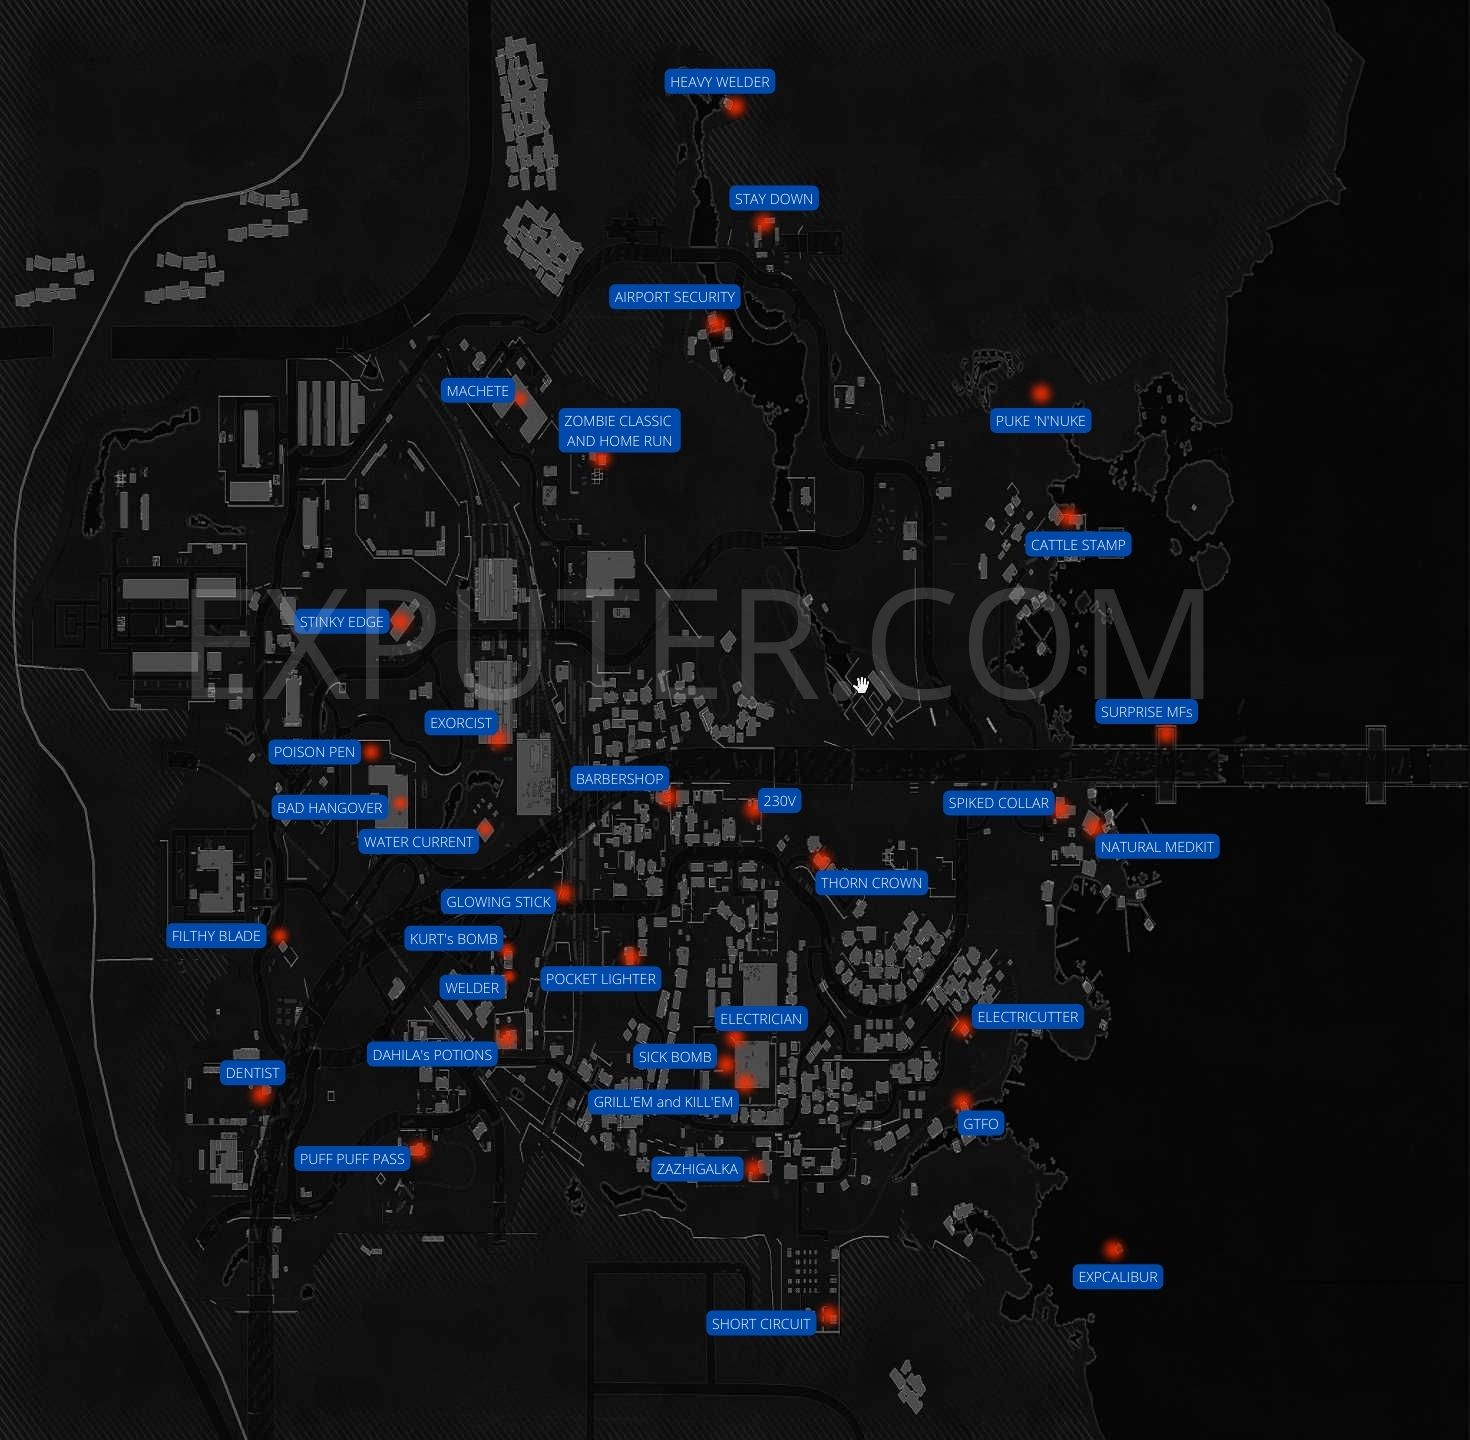
The Slums
The Slums is where you start the game. You will be spending most of your time here. Here are the blueprint locations in The Slums:
| Blueprint Name | Where to Find | Crafting Materials |
| 1- 230V | To get your hands on this blueprint, you will need to go to the safe house that is located on the north side of The Tower. There, you’ll find it next to a candle, on the top of a small wooden box. |
|
| Airport Security | This one can be found inside a shack that is located right next to the Curved Bridge Safe Zone. Inside the shack, you’ll find it on a shelf. |
|
| Bad Hangover | The Bad Hangover blueprint is located inside the Harran Public School. Once inside the school, make your way to the Biology room, and the blueprint will be in the room right across this one. |
|
| Barbershop | You will need to find a three-story house that is located south of the first highway curve of the road that leads straight to the Slums. The blueprint can be found on the second floor of this building inside a small wooden box. |
|
| Cattle Stamp | This blueprint is found in the safe zone that is located on the North of the main bridge. Inside the safe zone, you can find it on a wooden table that is under a shed with a red and white roof. |
|
| Dahlia’s Potions | There are a total of four potions in the game that can be acquired from Dahlia, Shroom Potion, Liver Potion, Kidney Potion, and Cloak Potion, and they can be acquired by completing the Witch Queen quest, Hunting Goon quest, Kidney Punch quest, and Bring me the Brain of Usain Bolter quest respectively. | |
| Dentist | Near the Jealous Runner challenge, there is a large metal depot. There, you can find the blueprint inside a beige-colored tent on a table next to a microscope. |
|
| Electrician | The Electrician blueprint can be acquired by completing the quest called Electronic Parts. This quest is given by Toygar, who can be found inside The Tower. |
|
| Electricutter | This blueprint can be found in a shed that is located in the Eastern Electric Substation. Inside the chest, the blueprint is in an open chest. |
|
| EXPcalibur | This is one of the time-consuming ones in our Dying Light blueprints location guide. To get this blueprint, first, make your way to the Southeast area of the Slums next to the Fisherman’s Village. Then, swim your way to a small rocky island where you’ll be able to find a dead body with a Sword pushed in its chest. You will need to pull this Sword out of the dead body, but make sure to get back right after pulling it out as the body will get covered in flames. After the fire goes out, the blueprint will become available on the ground. You will then be able to transform the Sword you just acquired into the EXPcalibur. |
|
| Exorcist | In the game, you will randomly encounter a character who goes by the name Babar Kizil. Upon meeting him, he will ask you to protect him while he searches for some ingredients. After the search is complete, you will take him to The Tower, where he will thank you for helping him and will reward you with the Exorcist blueprint. |
|
| Filthy Blade | The Filthy Blade blueprint is located inside a storage room of a Gas Station that can be found in the slums. However, keep in mind that you will first need to unlock the door of the storage room with a lockpick before you can get inside it. |
|
| Fire Launcher | Right outside The Tower, you will encounter a man named Faruk Korkmaz. He will ask you to escort him on his mission of delivering some stuff, and at the end of it, he will reward you with the Fire Launcher blueprint. |
|
| Glowing Stick | Make your way to the Western Central Slums and visit the Railroad Overpass. Search the area until you find a Brown Buss. You will find this blueprint at the driver’s seat of the mentioned bus. |
|
| Grill’em and Kill’em | This is yet another blueprint that will be given to you by Toygar, the man who can be found inside The Tower. It is acquired as a reward for completing the Lighter Gas quest. |
|
| GTFO | Omar Boz is yet another character that you will randomly encounter right outside of The Tower. Upon meeting him, he will ask you to escort him to his favorite fishing spot. After you help him out, he will reward you with the GTFO blueprint. |
|
| Heavy Welder | Make your way to the Northeastern Slums by following the river. There, you will need to search for a shack that will be located right next to a palm tree. You will be able to find the blueprint inside a box behind this shack. |
|
| Home Run | You will need to start The Prodigal Son quest to get this blueprint. During the quest, find a shed that will be located below the Singal Tower where Alexei was staying. Inside the shed, you will find the blueprint at the top of a crate. |
|
| Korek Machete | Another time-consuming blueprint on our blueprint locations guide is the Korek Machete blueprint. First, make your way to the rooftop of the Underground Parking that is located northwest of the Stuffed Turtle Safe Zone. There, you will need to find a wooden box that will have a pink bunny drawn on it. You will need to jump on this box to drop into a hole where you’ll find a blue box. Then, get near the box and start kicking it. After successfully kicking the box 76 times, it will open and will provide you with the Korek Machete blueprint. |
|
| Kurt’s Bombs | The Kurt’s Bombs blueprint can be acquired by completing a quest called The Big Bang Thesis, at the end of which Kurt will reward you with this blueprint. |
|
| Natural Medkit | To get this blueprint, you will need to complete a side quest called Incense Herbs. In this sidequest, you will need to find and collect Lavender Plants and bring them back to Toygar. |
|
| Pocket Lighter | In the game, you will unlock a safe zone after completing a sidequest Goodnight Mr. Bahir. Inside this safe zone, you can find the blueprint on a shelf. |
|
| Poison Pen | To get the blueprint, you will first need to visit the Harran Public School. You will then need to search the surrounding area for a beige-colored tent. The blueprint is inside this tent placed next to a whiteboard. |
|
| Puff Puff Pass | You will need to visit the street that is across the Black Serpent Bazaar. There, you will meet a man named Ahmet, a former member of Rais’ Gang. He will beg you to protect him and take him to The Tower. At the end of the quest, Ahmet will reward you with the Puff Puff Pass blueprint. |
|
| Puke ‘N’ Nuke | You will first need to find a small Canyon in the Northeastern area of the Slums. From there, you will need to make your way to a high area where you’ll find a tree that will be right next to a burning barrel. The blueprint will be inside the chest right next to the tree. |
|
| Short Circuit | Make your way to the Central Electric Network Station and search the area for a yellow box. The blueprint will be inside this box. |
|
| Sick Bomb | Along with the Korek Machete 2.0 blueprint, which we’ll talk about later, the Sick Bomb blueprint is also one of the most time-consuming ones. To get this blueprint, make your way to the 19th floor of The Tower by using the elevator. Then, make your way to the roof and search the area for a Checkers board. After you find it, interact with it to make a move. Now, go back to the bottom of The Tower and keep going out of it until the message “Leaving Safe Zone” appears on your screen.
Then, get back to the roof to interact with the Checkers board again. You will need to do this entire process five times until the Whiteside wins, after which you will need to repeat the process one more time. However, this time, you will find the Sick Bomb blueprint waiting for you to pick it up on the Checkers board. |
|
| Spiked Collar | In the Harbor Safe Zone, you will need to search around for a workshop called Golden Hammer. Inside this workshop, you’ll find the blueprint on a workbench. |
|
| Stay Down | In the Northeastern Area, there is a safe zone or a construction site. Right next to them, you’ll find a couple of blue containers. The blueprint can be found inside one of these blue containers. |
|
| Stinky Edge | Make your way to the Bites Motel and head up to the second floor. There, you will come across a locked door. Use a lockpick to unlock it, and you’ll then see the blueprint on a desk inside this room. |
|
| Surprise MFs | To get your hands on this blueprint, you will need to climb the largest main bridge pillar. You can use the support cable to climb all the way to the top, where you’ll find the blueprint inside a yellow box. |
|
| Thorn Crown | You will need to search for a two-story building in The Slums. The blueprint can be found inside the large garage of this building. However, keep in mind that you will first need to raise one of its doors to enter it. |
|
| Water Current | During the mission First Assignment, you’ll come across a safe zone that is located north of the long highway turn. Inside this safe zone, you’ll find the blueprint on the desk. |
|
| Welder | Make your way to the Jaffar Wheelstation Garage. Right next to where Zaid is working, you’ll see a blue locker. The blueprint will be on the table at the front of the blue locker. |
|
| Zappo | In the parking of the Stuffed Turtle supermarket, you will come across a man named Nick Pesto who will be trapped inside a van. He will ask you to protect him and take him back to The Tower. Upon successfully assisting him, he will reward you with the Zappo blueprint. |
|
| Zazhigalka | You will need to search around The Tower for Zere’s bus. The blueprint can be found on the top of the bus inside a yellow box. |
|
| Zombie Classic | The Zombie Classic blueprint can be acquired by completing The Prodigal Son quest, at the end of which Alexei will reward you with this blueprint. |
|
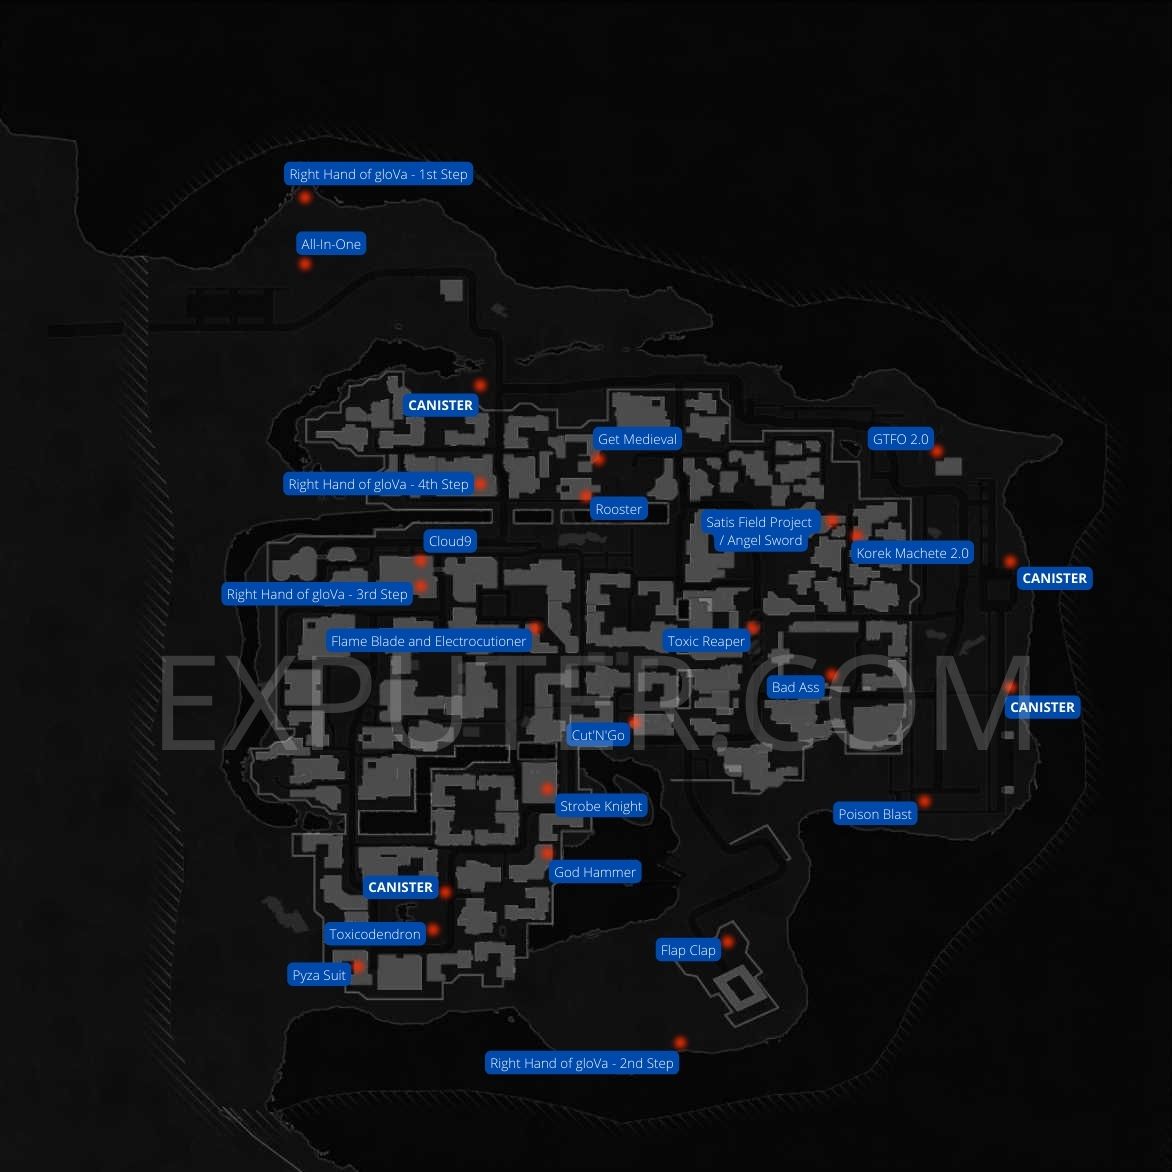
Old Town
Next up, we have Old Town, an area that you’ll visit later in the game. Here are the Dying Light blueprints locations for this area:
| Blueprint Name | Where To Find | Crafting Materials |
| All-In-One | To get this blueprint, you will need to head to a stone tower that is located before the stone bridge in the Northwestern Area. Once there, make your way inside the stone tower, and you’ll find the blueprint there. |
|
| Angel Sword | The Angel Sword blueprint can be acquired by completing the last quest given by Rupert called “Troll.” |
|
| BadAss | First, make your way to the large town square area that is located on the Eastern side of the map. Then, search around for a large blue-ish billboard. The blueprint is on the top of this billboard. |
|
| Cloud9 |
To get this, make your way inside Harran University. Then, search for a small room near there area where Spike sits. Inside this small room, the blueprint is on a desk right next to a lamp. |
|
| Cut’N’Go |
First, make your way inside the first Safe Zone in Old Town. Then, head west and look for a building that has a roof with a structure on it. Make your way to the top of this building, and you’ll be able to find the blueprint placed on the mattress inside the structure. |
|
| Electrocutioner | To get this blueprint, you will need to make your way to Ember’s Tower and then all the way up to the last floor. |
|
| Flame Blade | By following the location provided on the map, make your way to a building that will have a metal roof. On the top of this building, you’ll find the blueprint in a small yellow box inside a small dome. |
|
| Flap Clap | This blueprint can be acquired by completing the quest called “Chasing Past”, in which you need to assist a man named Tariq. |
|
| Get Medieval | The Get Medieval blueprint can be found inside the Garden-Roof safe zone. Once inside, make your way to a small room where you’ll be able to find the blueprint placed on a chair. |
|
| God Hammer | The God Hammer blueprint can only be acquired while completing the Chasing Past quest, the same quest that rewards you with the Flap Clap blueprint. During the quest, you will enter a workshop that is owned by the Cannibal. This is where you’ll be able to find the blueprint on a workbench. |
|
| GTFO 2.0 | In the Northeastern area of the map, there is a supply drop of Rais. In its surrounding area, there is a yellow van. The blueprint can be found inside this yellow van. |
|
| Korek Machete 2.0 | The Korek Machete 2.0 blueprint requirement involves completing a side activity. First, head north of the tower Safe Zone where you’ll be able to find an empty plant pot on a small roof. Right next to the pot, on the ground, you’ll find the words “Korek Was Here.”
From this point onwards, you will need to bring white gasoline canisters to this location from a total of four places. After you successfully do this, a hand will pop out from the pot and will reward you with the Korek Machete 2.0 blueprint. As you can judge for yourself, the Korkek Machete 2.0 blueprint is the most time-consuming one. |
|
| Poison Blast | By following the location mentioned on the map, make your way to the area and search for a white van. The blueprint is inside the compartment of this truck. |
|
| Toxicodendron | Near one of the safe zones, there are buildings that are surrounded by a metal fence. At one of the corners of this area, there is a dead body on a couch. This is where you’ll be able to find the blueprint. |
|
| Pyza Suit | The Pyza Suit is a part of a Super Mario’s Worlds easter egg. Head to the Southwestern part of the map and look for a rooftop with a chimney on it. There will be a green pipe inside this chimney. From here, you’ll be able to enter the easter egg area. After you’ll make your first jump, head a little backward until you see a pink cube. You will then need to jump on this pink cube to acquire the blueprint. |
|
| Right Hand of gloVA | To get the Right Hand of gloVa blueprint, you will need to go through some trouble. First, make sure you have completed the main quest called “Higher Education” so that you can unlock a side quest called “Do you Believe.” This side quest will allow you to access a safe zone which we’ll talk about later.
Getting the blueprint requires collecting two stones from two different places. The first one can be found in the Northwest area of the map, right next to a stone tower, while the second one can be found in the Southeast corner at a beach. Look for it around the Museum compound near the water. After you have collected both stones, take them over the safe zone that you got access to while completing the “Do you Believe” side quest. And for those wondering, this is the very Safe Zone from where you’ll hear loud music coming from. Once inside this safe zone, place the stones on a skull that will be on the top of a rock. You will then be able to get the blueprint. |
|
| Rooster | In Old Town, there is a large red brick building. You will be able to find the blueprint at the bottom of the Southeastern Tower. You’ll find an open window there, and the blueprint will be inside this room. |
|
| Stasis Field Projector | The Status Field Projector blueprint in our Dying Light blueprint guide can be acquired by going through any of the two quests.
The first one is a side quest called “Rupert the Gunsmith” and during this quest, you’ll come across a pink Teddy Bear. You will need to activate this Teddy Bear until it explodes and grants you the blueprint. The second one is the main quest called “The Clinic.” During the quest, when Dr. Camden opens the office doors, there is a room to the left. Make your way to this room, and you’ll be able to find the blueprint there. |
|
| Strobe Knight | To get this blueprint, you will first need to complete a side quest called Office Outpost, which is given to you by Savvy. After this side quest, make your way to the ground floor of the Eurynomos Bank. There, you’ll be able to find the blueprint on the top of a barrel that is right next to the generator. For those wondering, the side quest must be completed before going to this area as, during the quest, you will be able to turn off the defenses around this area. |
|
| Toxic Reaper | In Old Town, there exists a tunnel under which you’ll be able to find a yellow van right next to a police van. The blueprint is located inside this yellow van. |
|
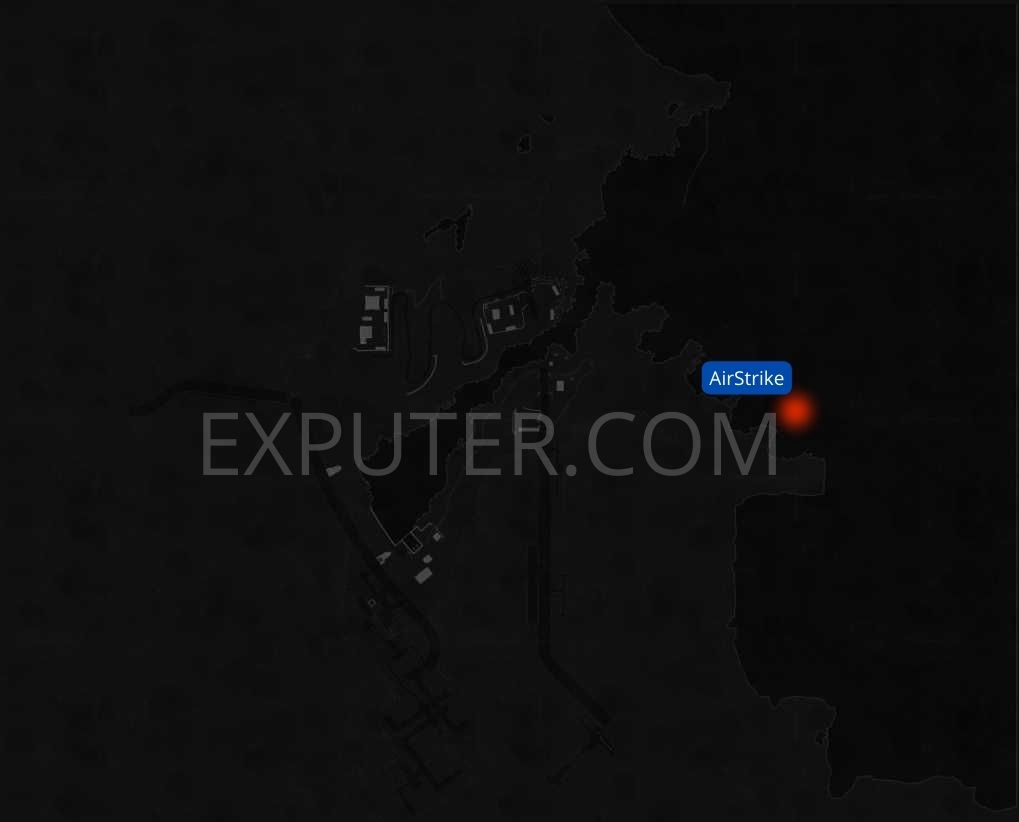
Antenna
The antenna isn’t a big area, and you’ll only find a single blueprint there. Here is the Dying Light Airstrike blueprint location:
| Blueprint Name | Where to Find | Crafting Materials |
| Air Strike | To get the blueprint, you will need to make your way to the location mentioned on the map and search for a crate underwater near the airplane wreck. The blueprint will be inside this crate. |
|
The Countryside
As mentioned earlier, The Countryside is accessible to only those who have The Following DLC unlocked. Here are the Dying Light The Following blueprint locations:
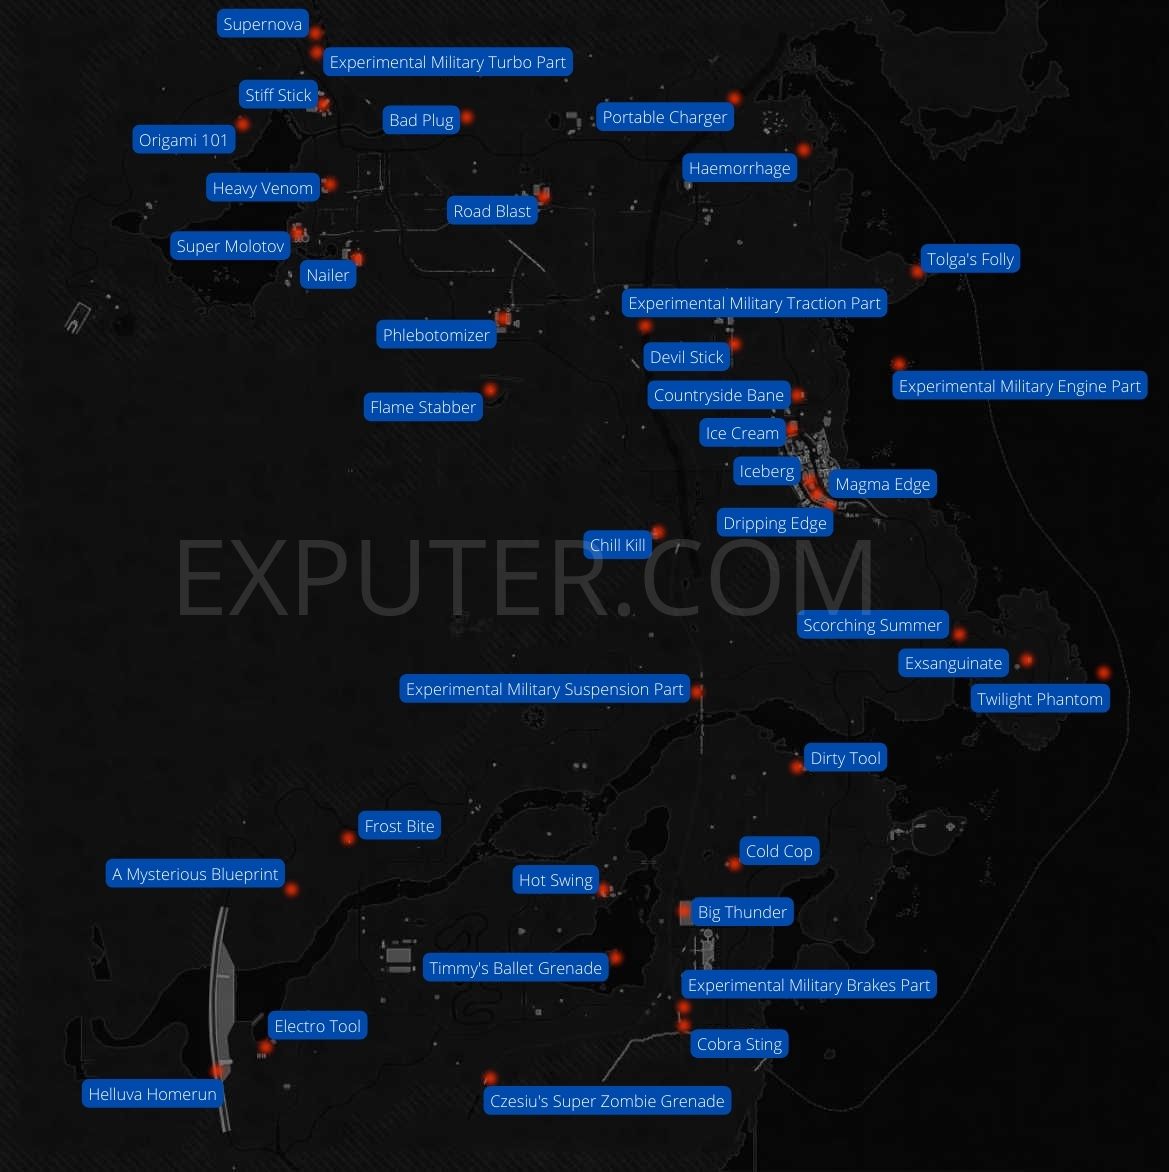
| Blueprint Name | Where To Find | Crafting Materials |
| A Mysterious Blueprint | This blueprint can be found by going to the location on the map and finding an area with two holes. Inside these two holes, you’ll find a lot of DVDs. You will need to dig out the blueprint from these holes, something that you can do by pressing the kick button multiple times. | -NA- |
| Bad Plug | This blueprint can be found inside a building that has an electric fence around it. Keep in mind that you will encounter some enemies inside the building. After making the area clear, look around for a shelf on which you’ll be able to find the blueprint. |
|
| Big Thunder | The Big Thunder can be acquired by eliminating one of the Freaks of Nature, Behemoth. after you take the mentioned target down, you’ll be able to find the blueprint in its dead body. |
|
| Chill Kill | In The Countryside, you’ll unlock a safe zone that will happen to be a Transmission Tower. You’ll be able to find the blueprint inside a chest on the top of this tower. |
|
| Cobra Sting |
The Cobra Sting can be found by going to the military train in Countryside and searching underneath it. |
|
| Cold Cop | To get the Cold Cop blueprint, you will need to climb a transmission tower. Head over to the one mentioned in the map and climb all the way to the top, where you’ll be able to find the blueprint on a map. |
|
| Countryside Bane | This blueprint can be acquired by completing a side quest called Venom. In this side quest, all you will need to do is talk to Bilal, and he will reward you with the blueprint at the end of the conversation. |
|
| Czesiu’s Super Zombie Grenade | To get this blueprint, you will first need to complete a side quest called Rocket Waggoon. This is because the quest will help you acquire a hacking tool, through which you’ll be able to open the locked box that contains the blueprint. The location of the box can be seen on the map. | -NA- |
| Depleter |
To get this blueprint, you will need to kill David and Goliath, who also happens to be one of the Freaks of Nature, just like Behemoth. As you’ll need to kill David first, you’ll be able to find the blueprint in the dead body of Goliath. |
|
| Devil Stick | The Devil Stick blueprint is located on a water tower right next to a water tent. You’ll be able to find the blueprint placed on a cardboard mat. |
|
| Dirty Tool | This blueprint is located in a field. Its location can be seen on the map, and you’ll be able to find the blueprint near a bunch of haystacks. |
|
| Dripping Edge |
To get this blueprint, you will need first to complete a side quest called “The Thrill of the Chase.” During this quest, you will need to make your way to the third floor, where you’ll be able to find the blueprint inside an office located in Adam’s Apartment. You can either get the blueprint during the quest or after. |
|
| Electro Tool | Make your way to the area outside the Hydro Dam, where you’ll be able to find a bunch of shipping containers. The blueprint is inside one of these containers. Remember that you will need to complete the side quest “Power to the people” before getting the blueprint. |
|
| Experimental Military Brakes Part |
To get this, make your way to a military container inside a military outpost that can be found on the South East side of the map. Make sure to pick up a military keycard from Jasir before going there, as you’ll need it to unlock the container. |
|
| Experimental Military Engine Part | This one can be found inside a military container. Before going there, make sure to take the keycard from Jasir with you. The container is located southwest of Bilal’s gas station, on a small island. |
|
| Experimental Military Suspension Part |
To get this blueprint, you will need to make your way to the military container located at the center of the map. A keycard from Jasir is required to unlock the container. |
|
| Experimental Military Traction Part | There is a military outpost located on the Northside of the map. It exists somewhere between Jasir’s farm and Bilal’s gas station. In this outpost, there is a military container that has the blueprint inside it. You will need to get the keycard from Jasir to unlock this container. |
|
| Experimental Military Turbo Part |
This blueprint is inside a military container that can be found in an outpost that is located in the North West section of the map. Make sure to pick up the keycard from Jasir before going there. |
|
| Exsanguinate |
In The Countryside, there exists a safe zone that has a lighthouse near it. The blueprint can be found inside a white crate near this lighthouse. |
|
| Flame Stabber |
Make your way inside the Hunting Tower, and you’ll be able to find a yellow chest. Unlock this chest by using a lockpick to acquire the blueprint. |
|
| Frost Bite | This one can also be found inside a Hunting Tower. The blueprint will be inside a metal chest. |
|
| Hemorrhage | You will need to visit the Dirt Road located in The Countryside. There, you will be able to find the blueprint out in the open on a wooden table. |
|
| Heavy Venom | You can get this blueprint by killing one of the Freaks of Nature called Holler. |
|
| Helluva Homerun | This blueprint can only be acquired after or during the side quest called “Power to the People.” During the side quest, you will need to make your way inside a room within the Hydro Dam building, where you’ll be able to find the blueprint inside a metal chest. |
|
| Hot Swing | This is yet another blueprint that can be acquired by taking down one of the Freaks of Nature. For this one, you’ll need to kill Beelzebufo. |
|
| Ice Cream | You will need to make your way to a building that is right next to a red bus. Inside the building, you’ll be able to find the blueprint in a newspaper stand. |
|
| Iceberg | The blueprint can be acquired only during or after the side quest called “Going Portal.” During it, you will go through a post office. The blueprint can be found inside this office in a file cabinet. |
|
| Magma Edge | To get this one, you will need to go to a tower that has a wooden interior. Inside this tower, you’ll find the blueprint. |
|
| Nailer | The Nailer blueprint is located inside the main building of the farm. You will need to make your way to the attic, where you’ll find the blueprint inside a drawer. |
|
| Origami 101 |
This can be acquired if you have the hacking tool, something that you get after completing the Rocket Waggoon side quest. After you have acquired the tool, make your way to the top of the large white tower, where you’ll be able to find the blueprint inside a mysterious chest. | -NA- |
| Phlebotomizer | To get this blueprint, you will need to go to the Barn where Jasir is sitting. The blueprint is right next to him, on a stack of cans. |
|
| Portable Charger |
The Portable Charger blueprint can be acquired by killing Thor, who belongs to the Freaks of Nature group. |
|
| Roast Blast | Right next to one of the safe zones, there exists a warehouse. Inside this warehouse, you can find the Roast Blast blueprint on a bunch of orange crates. |
|
| Scorching Summer |
There exists a rocky area on the map at the side of the road, and you can find a blueprint behind the rocks inside a yellow box. |
|
| Stiff Stick | The Stiff Stick can be found in a workshop, which you can locate by following the location mentioned on the map. The blueprint will be on a desk. |
|
| Super Molotov |
At some point, you will have a story quest called “Gaining Credence.” During this quest, you will unlock the Pumping Station safe zone. Inside this safe zone, you will need to locate a bloody water tank and dive into it. You’ll be able to find the blueprint inside a yellow box at the bottom of the tank. |
|
| Supernova | You will need to make your way to the Volatile Hive for this blueprint. After clearing the area, look around for a green wagon. The blueprint will be inside the wagon within a wooden chest. |
|
| Timmy’s Ballet Grenade | Another blueprint for which you need is the hacking tool that is acquired through the Rocket Waggoon side quest. After that, make your way to a small island on the lake, where you’ll find the mystery box containing the blueprint. | -NA- |
| Tolga’s Folly | There is a small rocky island on the Northeastern side of the map. You’ll find a mystery box with the blueprint inside it on this island. You’ll need the hacking tool you get from the Rocket Waggoon side quest to unlock it. | -NA- |
| Twilight Phantom | To get this blueprint, you will need to visit the lighthouse and dive into the sea east of it. Then, make your way to the bottom of the sea, where you’ll find the mystery box containing the Twilight Phantom blueprint. You will need to use the hacking tool you got from the Rocket Waggoon side quest to unlock it. | -NA- |
Rarity Levels Of Blueprints
Just like most of the other items in the game, the blueprints can also be divided into four categories:
- Green – Uncommon blueprints.
- Blue – Rare blueprints.
- Purple – Exceptional blueprints.
- Orange – Legendary blueprints.
The higher the rarity level of a blueprint, the better it will be. We have mentioned Dying Light legendary blueprint locations as well in our guide, so you’ll be able to find them easily as well.
This was all regarding our Dying Light blueprint locations guide. We hope that it will help you acquire all the blueprints in the game within a short period of time. As you can see for yourself, some of these blueprints are easy to get, while others will make you go through a lot of trouble. Before you leave, make sure to check out the Best Bows in Dying Light and the best weapons in Dying Light as well.
FAQs
Depending on your speed, it can take you somewhere between 4 to 8 hours to collect all the blueprints in Dying Light.
The Angel Sword blueprint is considered the most powerful blueprint in Dying Light.
The orange blueprints, known as legendary blueprints, are the best ones in the game.
Thanks! Do share your feedback with us. ⚡
How can we make this post better? Your help would be appreciated. ✍