Epic Games Launcher is one of the most popular game clients, but even then, it still faces some errors to this day. One such error is the Epic Games Connection Error. There can be multiple reasons for this issue to pop up, ranging from a bad network connection to a downed server.

Here are some fixes that’ll help in fixing Epic Games’ connection error:
- Check your Internet Connection.
- Access through Windows Defender.
- Turn off any VPN connection.
- Clear Epic Games Launcher’s Cache.
- Change your DNS server.
- Flush your DNS server.
- Renew your IP.
- Restart the connection between your device and the network.
- Enable Port Forwarding/Virtual servers in your Router settings.
- Restart your system.
Allowing Access Through Windows Defender
Windows Defender firewall may cause issues with some programs, such as Epic Games. It can identify Epic Games as a threat and block its connection on your PC.
This is a common problem, and you can resolve it by simply allowing Epic Games from the Windows Defender firewall. Here’s our guide to help you allow Epic Games from the firewall.
Turn Off VPN Or Proxy Connections
VPN or Proxy connections might be great for online gaming and browsing, but they can sometimes cause conflict with some applications. Your Epic Games launcher may be one of these apps.
Hence, I recommend disabling or simply closing down any VPN applications that may be running on your PC. This will resolve any connection conflict that Epic Games is having while establishing a connection with the servers. Disabling VPN has also helped other players resolve this issue for Epic Games.
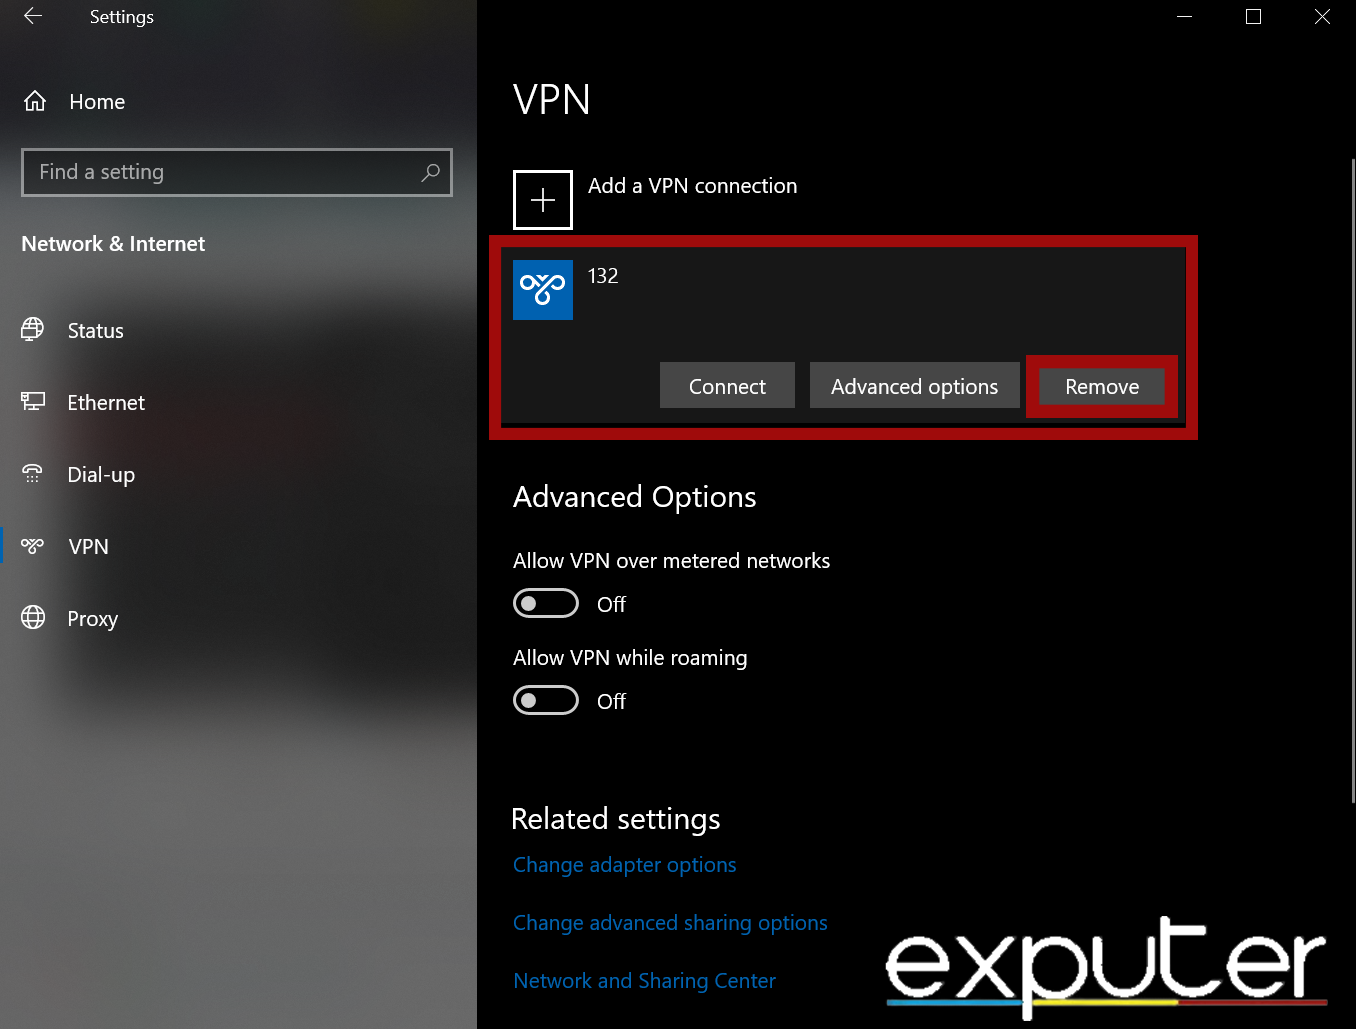
However, If you have a VPN configured within Windows, here’s how to disable it:
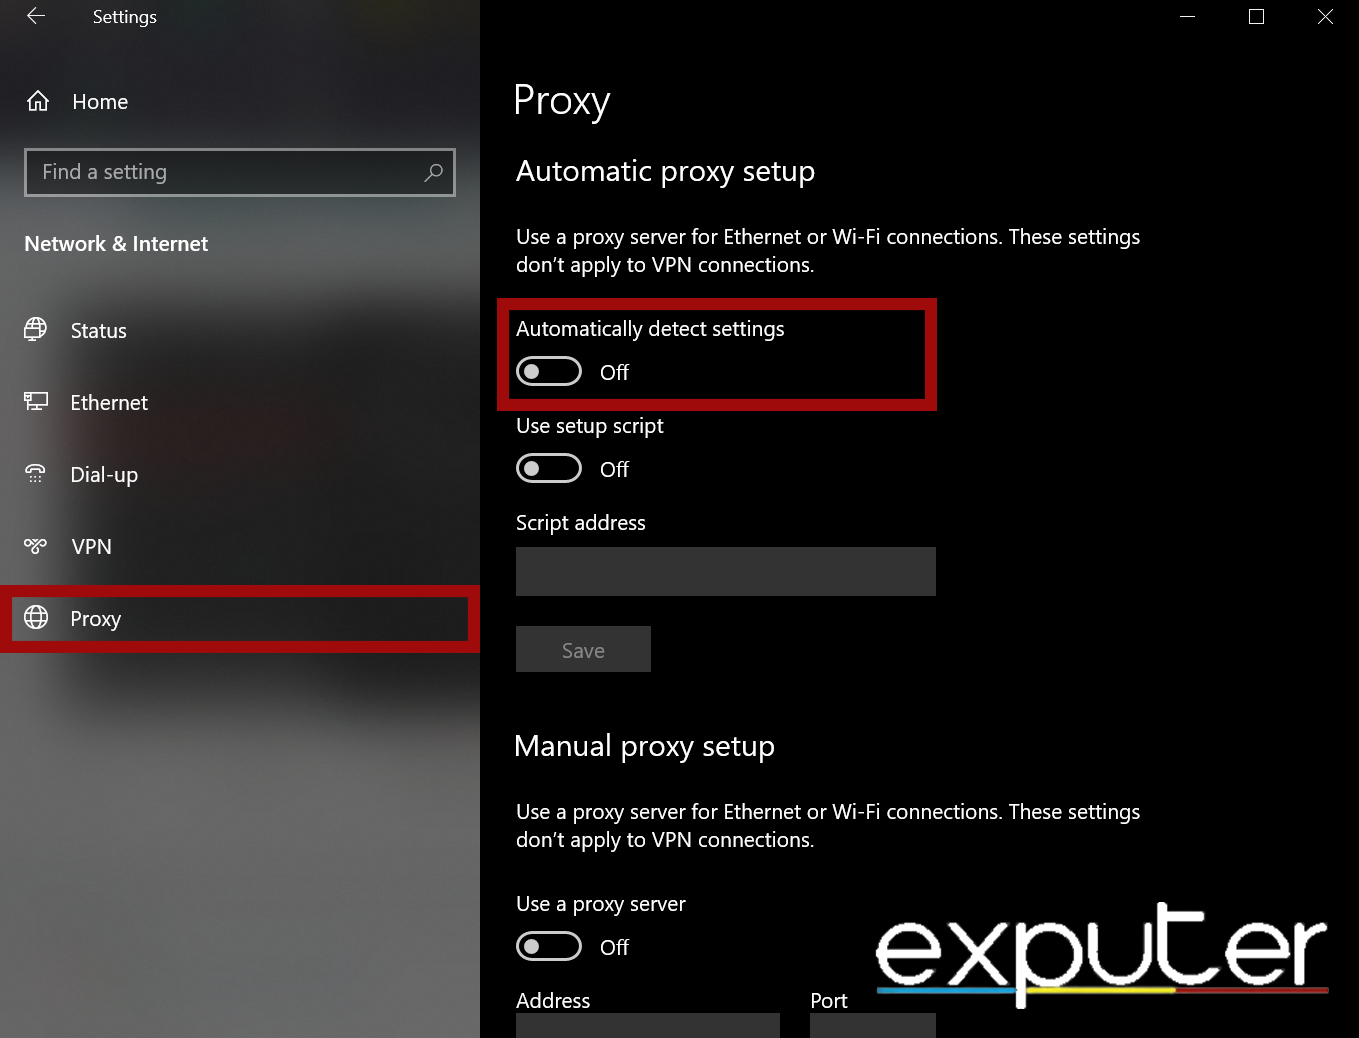
- Open the Windows Settings app by clicking the start button and then clicking the Settings icon>Update and Security>VPN section from the left and remove any active VPN profiles.

Removing VPN Profiles in Network and Internet Settings in the Settings app. - Now select the proxy section from the left and turn off Automatically Detect Settings.

Turning off Automatic Proxy setting Detection in Network and Internet Settings in the Settings app. (image captured by eXputer)
Clear Epic Games Launcher’s Cache
Epic Games Launcher can also give such errors because of the cache being full. If you don’t clear out your cache, then it can lead to unexpected behaviours and increased loading times. So clearing the cache freshens up your Epic Games Launcher, allowing it to perform faster function more responsively and fix potential glitches.
Change Your DNS Server
Domain Name System, otherwise known as DNS server, is very important for the overall performance of both the downloading and uploading. Sometimes, your default DNS server can create a connection conflict with the Epic Games launcher, similar to the IP address situation.
In this case, you can try changing your DNS server to a better one, such as Google or Cloudflare DNS. These will not only improve the responsiveness of your internet connection but also remove any hurdles in the way of Epic Launcher.
Flush Your DNS Server
Flushing your DNS server is a swift process that is very useful at the same time. Flushing your DNS server can help resolve connectivity issues such as slow loading times and connection errors.
It basically clears out the cached data of the DNS server and allows the DNS server to fetch fresh data, resulting in faster loading times and better connectivity.
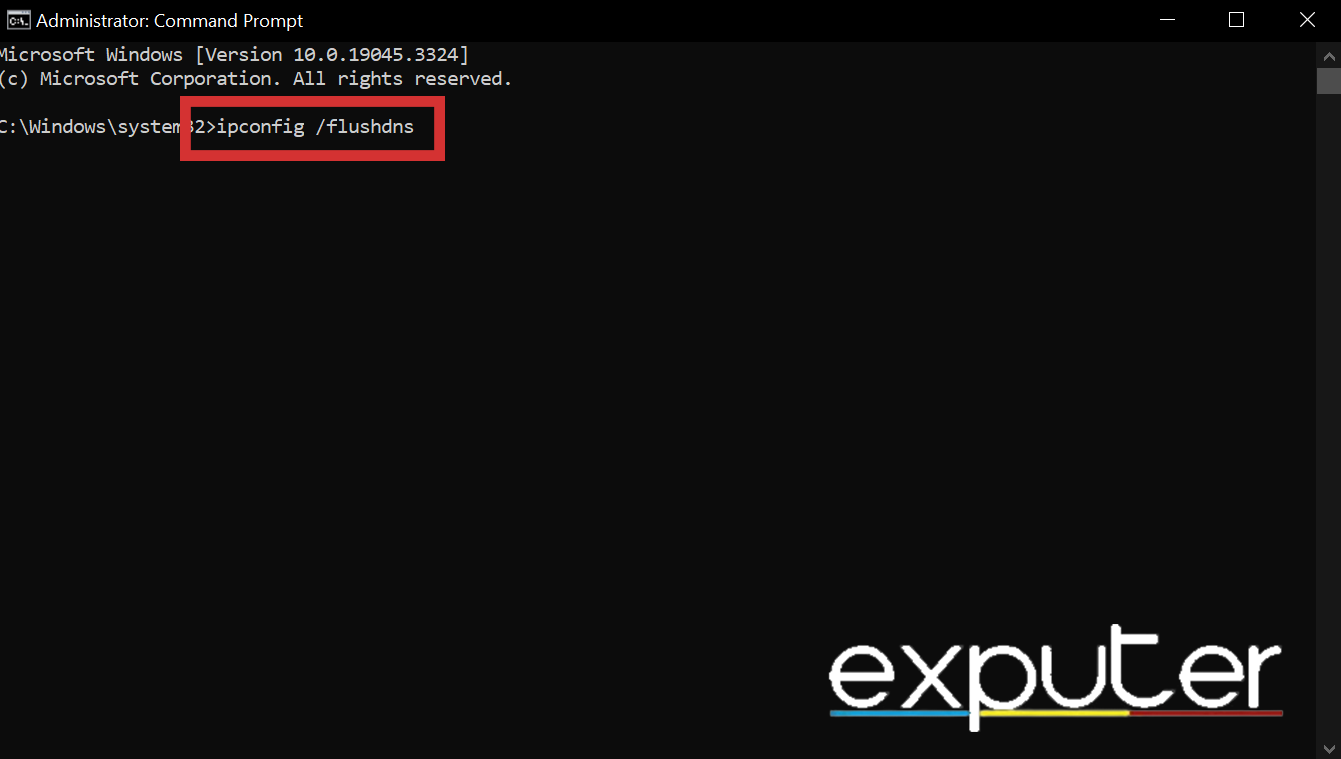
To flush your DNS, all you need to do is run CMD as Administrator > Type the command: ” ipconfig /flushdns ” without quotation marks and press Enter.
Renew Your IP
This is also a pretty handy command that can help solve many connectivity issues and network hiccups and increase responsiveness. The ” ipconfig /renew ” command basically renews your IP address by helping your device to get a new IP address from your router and helps in cases where the user is having issues online or having trouble connecting to the Internet.
Enable Port Forwarding/Virtual Servers
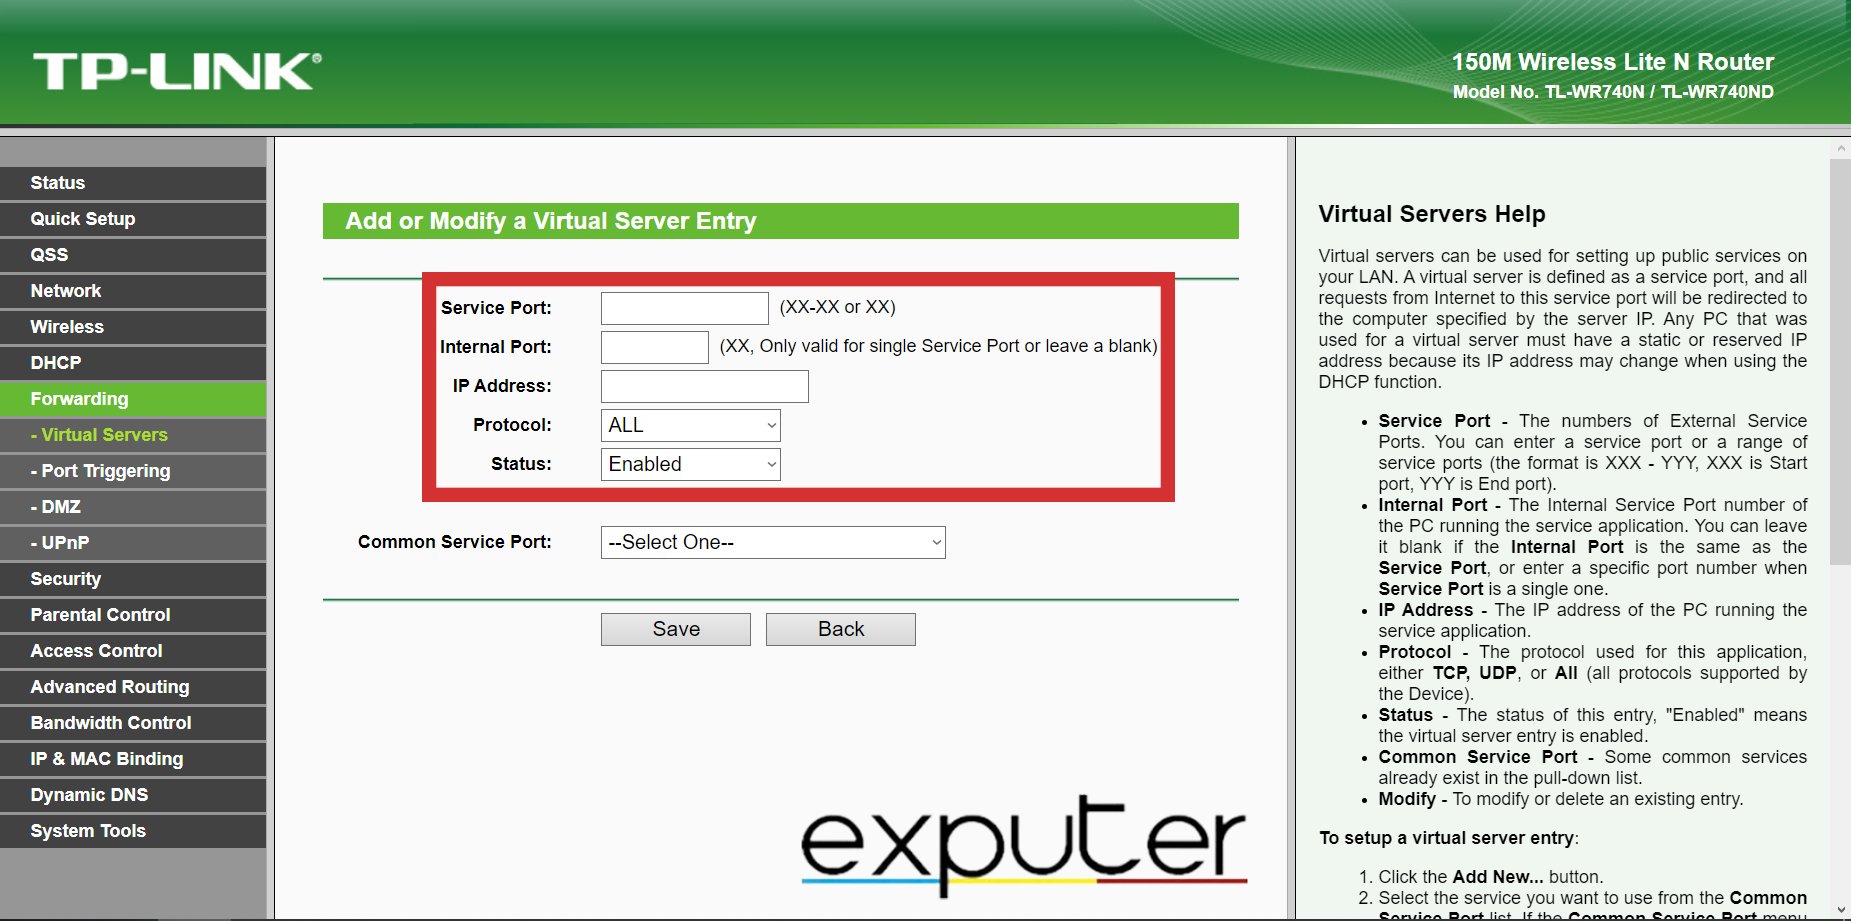
Port Forwarding can be very useful in online gaming, hosting server-based events, using applications that require open ports to work properly, and optimizing NAT type. Enabling the Port Forwarding/Virtual Servers list below in your router settings can be very helpful in fixing the connection error, as Epic Games Launcher’s network ports might be blocked in your router.
Anyhow, you can follow the steps below to enable Port Forwarding/Virtual Servers on TP-LINK (TL-WR740N / TL-WR740ND):
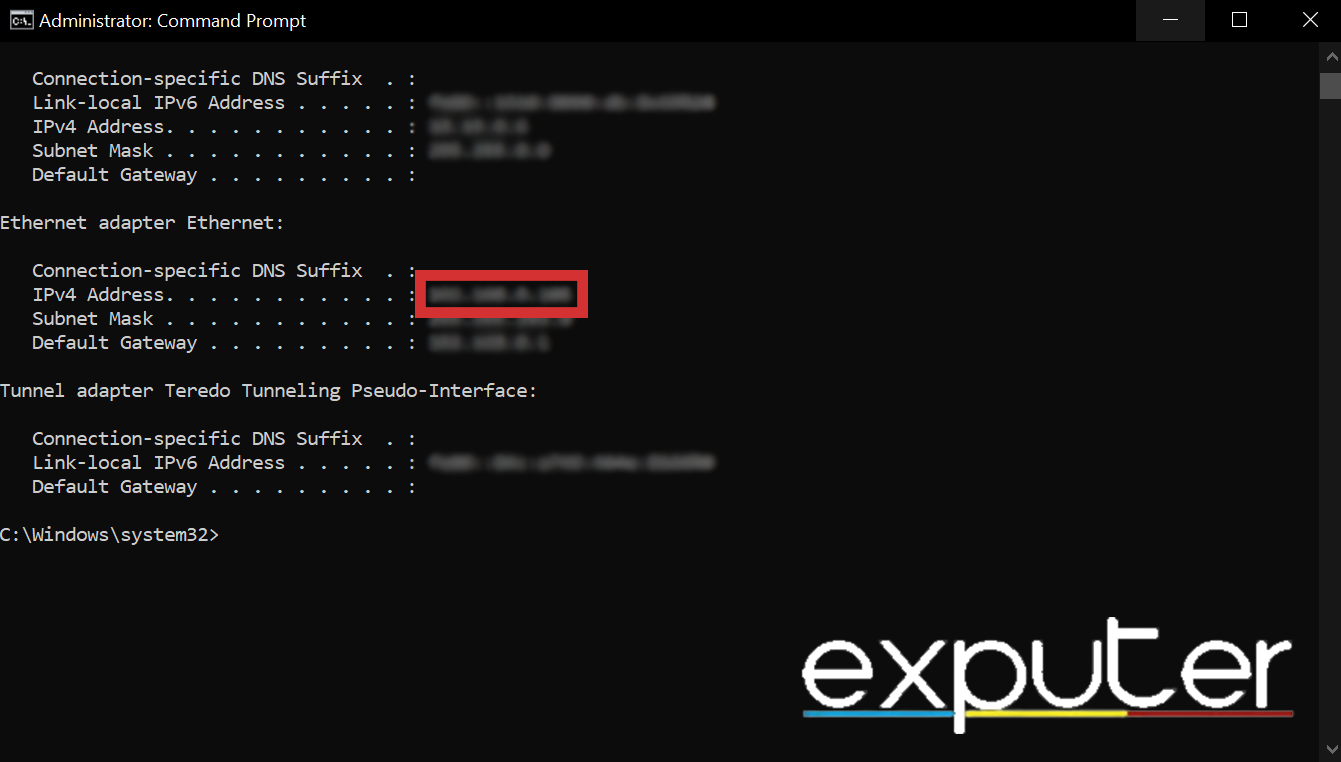
- First off, check your IP address by running cmd as an Administrator, typing the Command ” ipconfig “, and hitting Enter.
- This shows all the info about your IP. Under your Internet Adapter’s name, the IPv4 Address will be your system’s IP.

Checking the System’s IP in cmd. (image copyrighted by eXputer) - Open your router setting by typing the IP address (192.168.0.1, 192.168.1.1) of your router in your browser’s address bar and enter your router credentials to log in.
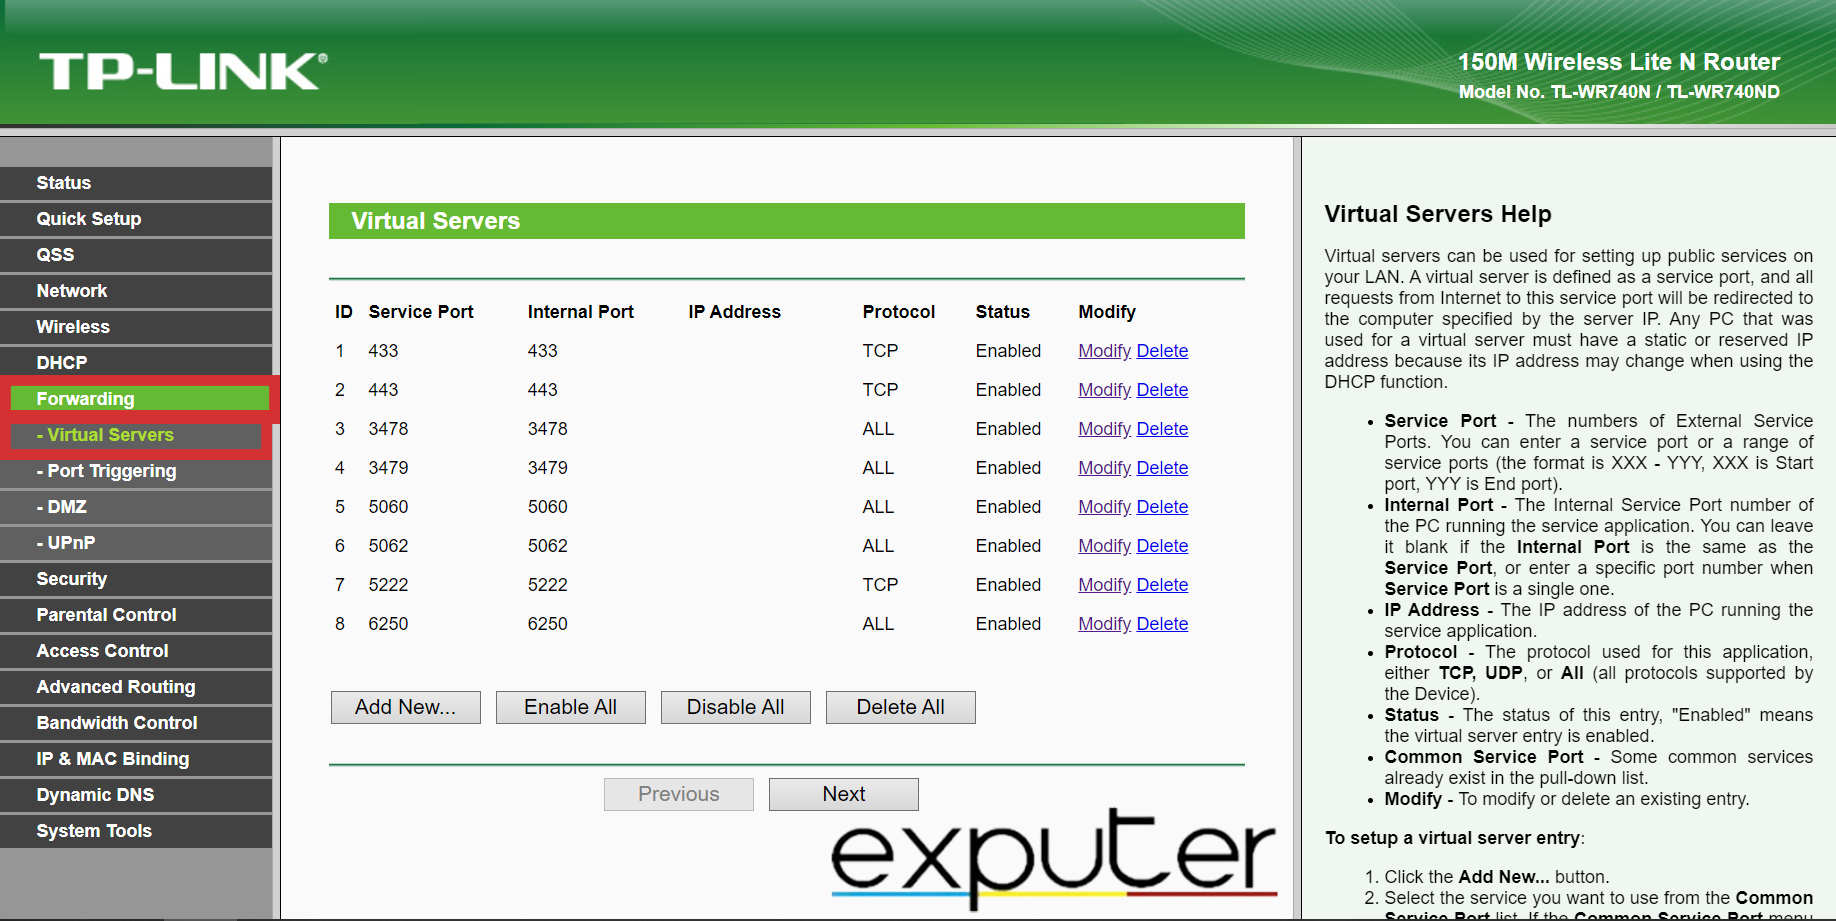
- After opening the router settings, click Forwarding > Virtual Servers.

Opening Port Forwarding/Virtual Servers Settings in TP-LINK Router Settings. (image captured by eXputer) - After opening the Virtual Servers settings, click the Add New… button.
- Now, add all the ports from the following ports list to the Port Forwarding/Virtual Servers list individually.

Adding a Port in the Port Forwarding/Virtual Servers options in the Router Settings. (image taken by eXputer)
Here is the list of ports that help improve the network connection and quality in applications and games such as Epic Games Launcher, Fortnite, etc., and also help reduce connection errors in applications.
- 80 (TCP/UDP)
- 433 (TCP)
- 443 (TCP)
- 3478 (TCP/UDP)
- 3479 (TCP/UDP)
- 5060 (TCP/UDP)
- 5062 (TCP/UDP)
- 5222 (TCP)
- 6250 (TCP/UDP)
- 12000-65000 (TCP/UDP)
After adding all these ports, restart your router to apply them. For restarting your Router/Modem, you can follow our complete guide on Restarting your Modem.
Final Words
After applying all these solutions, it is crucial to reboot your system so that all these fixes work. If you don’t restart your system after applying all these fixes, the problem will still persist.
This problem can occur from time to time, and it’s mostly related to the server-end connection. However, if the Epic Games launcher is working great for your other friends, then you can get yours fixed easily with the fixes mentioned above.
In addition to applying the above fixes, you can always check the official Epic Games Status page to see if the cause of the error is from the server side, and you can also visit the Epic Games Support page.
Here are some of the error guides that we have covered in the past.
Thanks! Do share your feedback with us. ⚡
How can we make this post better? Your help would be appreciated. ✍
