 Fact Checked By
 Ah, Valorant! The famous love-child of Overwatch and CSGO. I’ve been playing Valorant since the beta days, and I’ve tried several tweaks that took its performance to the next level. Hence, I wrote this guide for players who want the absolute best in-game performance. This guide features the best Valorant settings to fix FPS drops, get better graphics, and achieve better performance.
I’ve benchmarked Valorant on a PC with the following specs:
- OS: Windows 11 Pro 23H2
- System: Lenovo Legion 7i Laptop
- CPU: Intel i7-11800H
- GPU: NVIDIA RTX 3070 8GB
- RAM: 32GB DDR4
- Storage: Samsung 1TB SSD Gen 4
Make sure that your PC at least has an Intel Core 2 Duo E8400 or AMD Athlon 200GE CPU, Intel HD 4000 or Radeon R5 200 for a GPU, and 4 GB RAM to run Valorant.
The following settings can reduce your in-game FPS in Valorant the most:
- Material Quality
- Detail Quality
- Texture Quality
- Antialiasing
- Cast Shadows
Valorant isn’t a demanding game on your PC. It’s almost in the same league as CS2 when it comes to requirements. With my setup, I was able to easily attain 150 FPS on average with medium-high settings. I also didn’t encounter any stability issues either. However, network-related errors are quite frequent and did make me disconnect from an active match a lot.
- Author’s Note: After going through Valorant for several weeks on Riot Client, I feel confident going into the topic with thorough experience.
Valorant best setting guide will help you squeeze every bit of performance from your system. So, without any further delay, let’s begin with the best Valorant graphics settings for PC.
Best Graphics Settings
Quick Preview Of The Graphics Settings
| OPTION | SETTING |
| Resolution | Native |
| Display Mode | Fullscreen |
| Monitor | Primary |
| Aspect Ratio Method | 4:3 / Letterbox |
| Limit FPS on the Battery | Off |
| Max FPS on Battery | 60 FPS or higher |
| Limited FPS in Menus | Player’s Choice |
| Max FPS in Menu | 30 FPS |
| Max FPS in Background | 30 FPS |
| Limit FPS Always | Off |
| Max FPS Always | 60 FPS |
| NVIDIA Relex Low Latency | On |
| Multi-Threaded Rendering | On |
| Material Quality | Low or Medium |
| Texture Quality | Medium or High |
| Detail Quality | Low |
| UI Quality | Medium |
| Vignette | Off |
| VSync | Off |
| Anti-Aliasing | MSAA X2 |
| Anisotropic Filtering | 2x or 4x |
| Improve Clarity | Player’s Choice |
| Bloom | Off |
| Distortion | Off |
| Cast Shadows | Off |
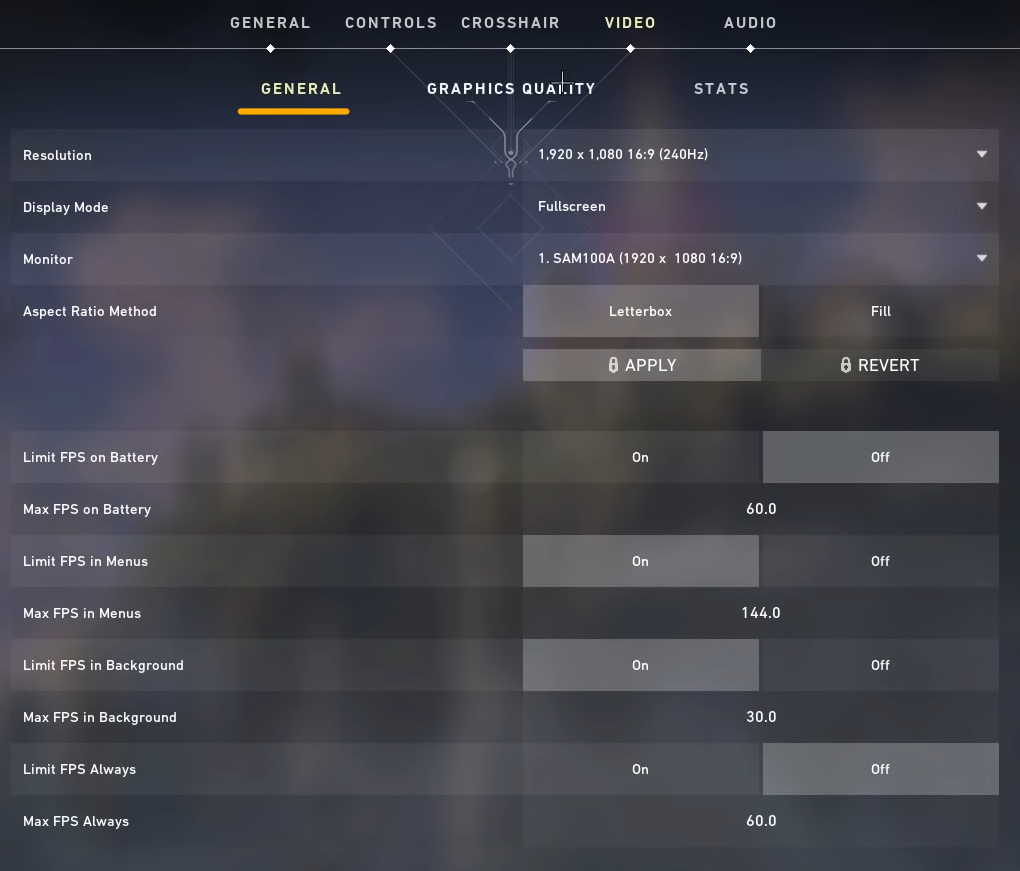
Resolution: Set to Native
Resolution is the most important setting in the whole game. It’s best to play Valorant at the native resolution of your screen. However, if you’re experiencing low frames, try lowering the resolution a bit.
Sure, you’ll gain a drastic improvement in performance, but it’ll be at the cost of visual clarity. So, it’s best to try other methods to get better performance and save this one as a contingency.
Display Mode: Fullscreen
Display mode should be set to “Full Screen” at all times to get the best FPS in Valorant. Fullscreen helps your PC prioritize the game’s performance over background processes.
Monitor: Primary
Select your primary monitor here.
Aspect Ratio Method: 4:3 or Letterbox
Letterbox is lauded as the best aspect ratio to play, especially by the Valorant Pros. The 4:3 aspect ratio stretches your display, making textures weirdly elongate horizontally. But this means the textures of opponents will be wider as well; hence, they’ll be easier to shoot.
Limit FPS on Battery: OFF
It’s nice to see games giving some love to the laptop gamers out there. But this option isn’t helping much, so best to turn it off to avoid any FPS dips.
Max FPS on Battery: Above 60 FPS
It’s another setting dedicated to laptop gamers but doesn’t have much use either. Since laptops automatically reduce performance on battery power, your FPS will automatically reduce. But you can still set it to 60 or above just to be sure your in-game setting isn’t capping FPS.
Limited FPS in Menus: Personal Preference
Do you Alt+Tab often in and out of Valorant? Maybe you’re a streamer or record gameplay and need to minimize the game for a quick chat with your audience. To make minimizing Valorant easy, turn this setting On; otherwise, Off.
Max FPS in Menu: 30 FPS
If you don’t want your GPU to push unnecessary frames while idling in the main menu, turn this setting to 30 FPS.
Max FPS in Background: 30 FPS
Set this to 30 FPS to prevent your PC from pushing unnecessary frames when not required. Plus it also helps minimize the game quickly.
Limited FPS Always: Off
Turn this setting Off to uncap FPS in-game.
Max FPS Always: 60 FPS
This helps make the animations in the main menu smoother.
Nvidia Relex Low Latency: Turn it On
If you’re playing Valorant on an Nvidia GPU, this is the best to have. It helps reduce input lag significantly, allowing actions in-game to be responsive and accurate. Unfortunately, AMD users can’t use this feature as it’s exclusive to Nvidia.
After the General Tab, it’s time to find the best graphics quality settings. These settings offer high FPS and maximum performance in the game. However, we’ll also let you choose to keep some visual quality where possible.
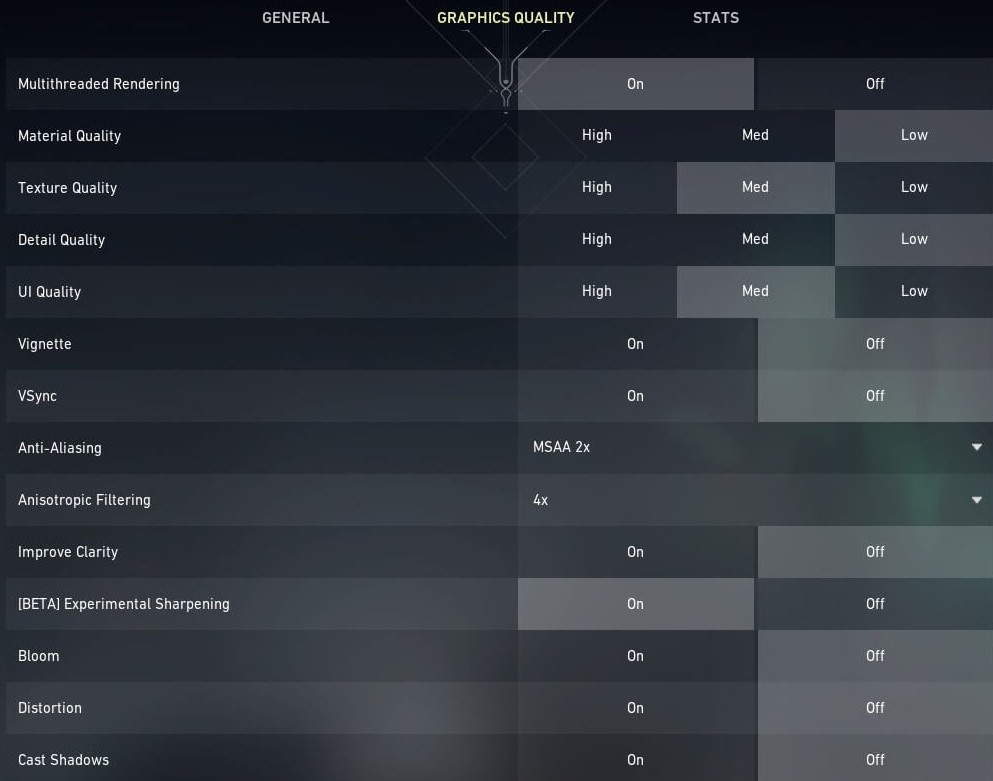
Multi-Threaded Rendering: On
If you’re playing Valorant on a high-end PC, turn Multi-Threaded Rendering to On. This setting will significantly improve your CPU performance and graphics quality.
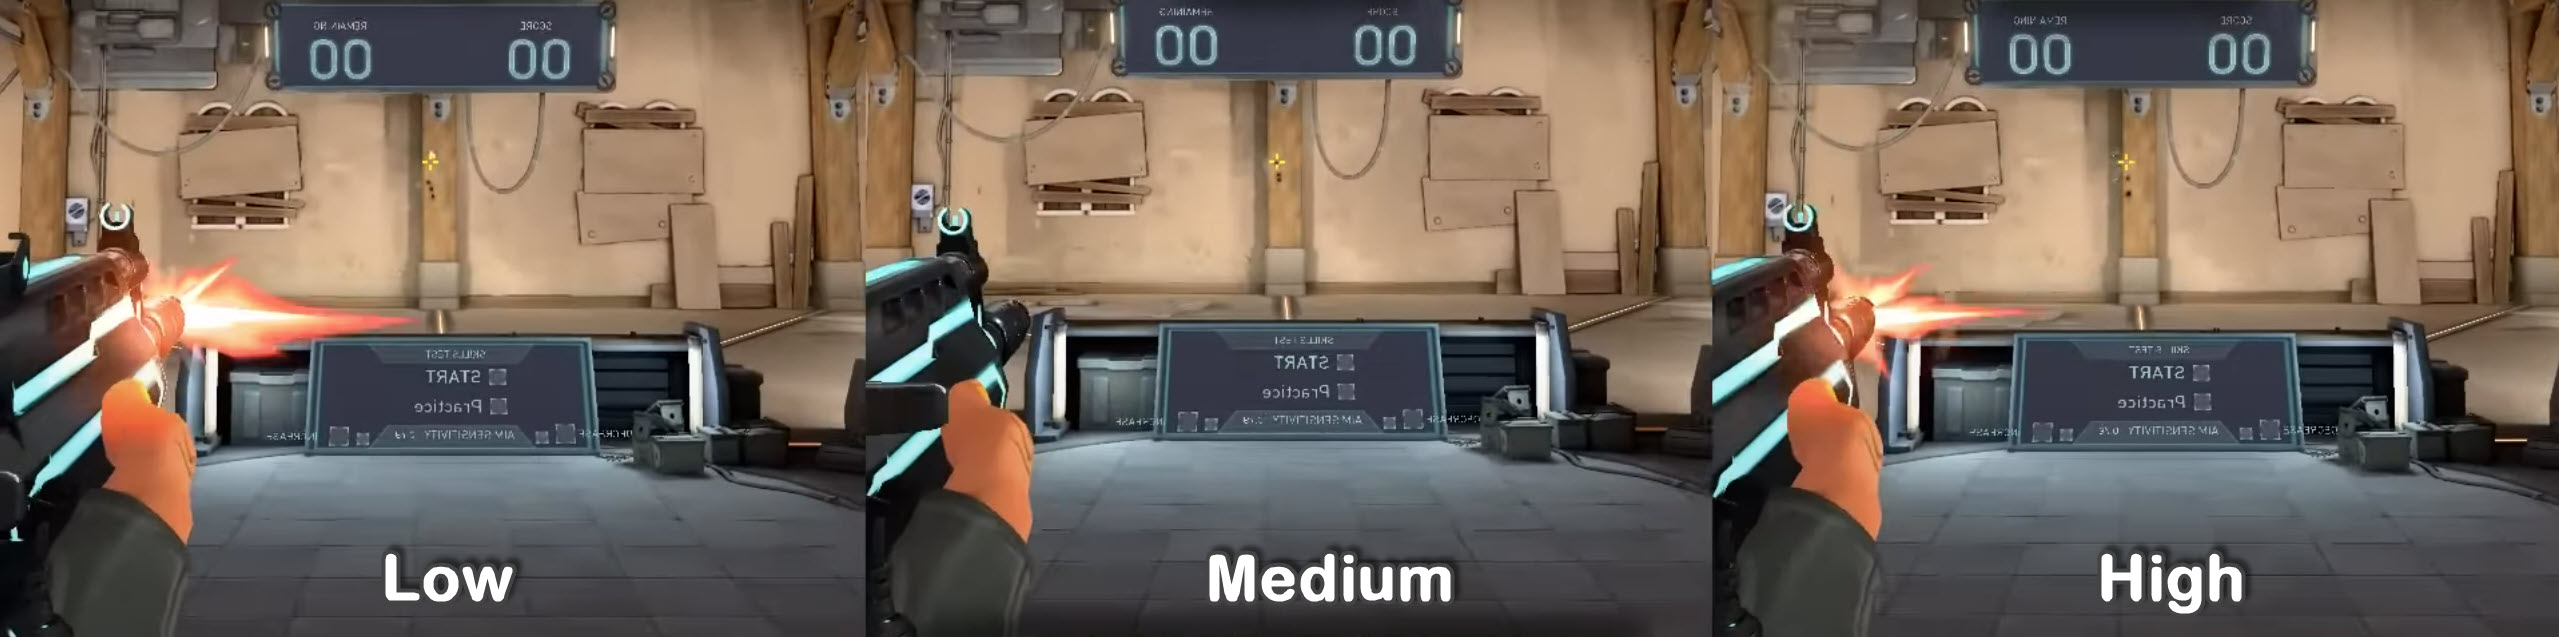
Material Quality: Low to Medium
This setting has a major impact on Valorant’s performance. If you have a budget PC, then turning it to low will help you get the most FPS. However, if you have some GPU power to spare, at least use the medium settings.
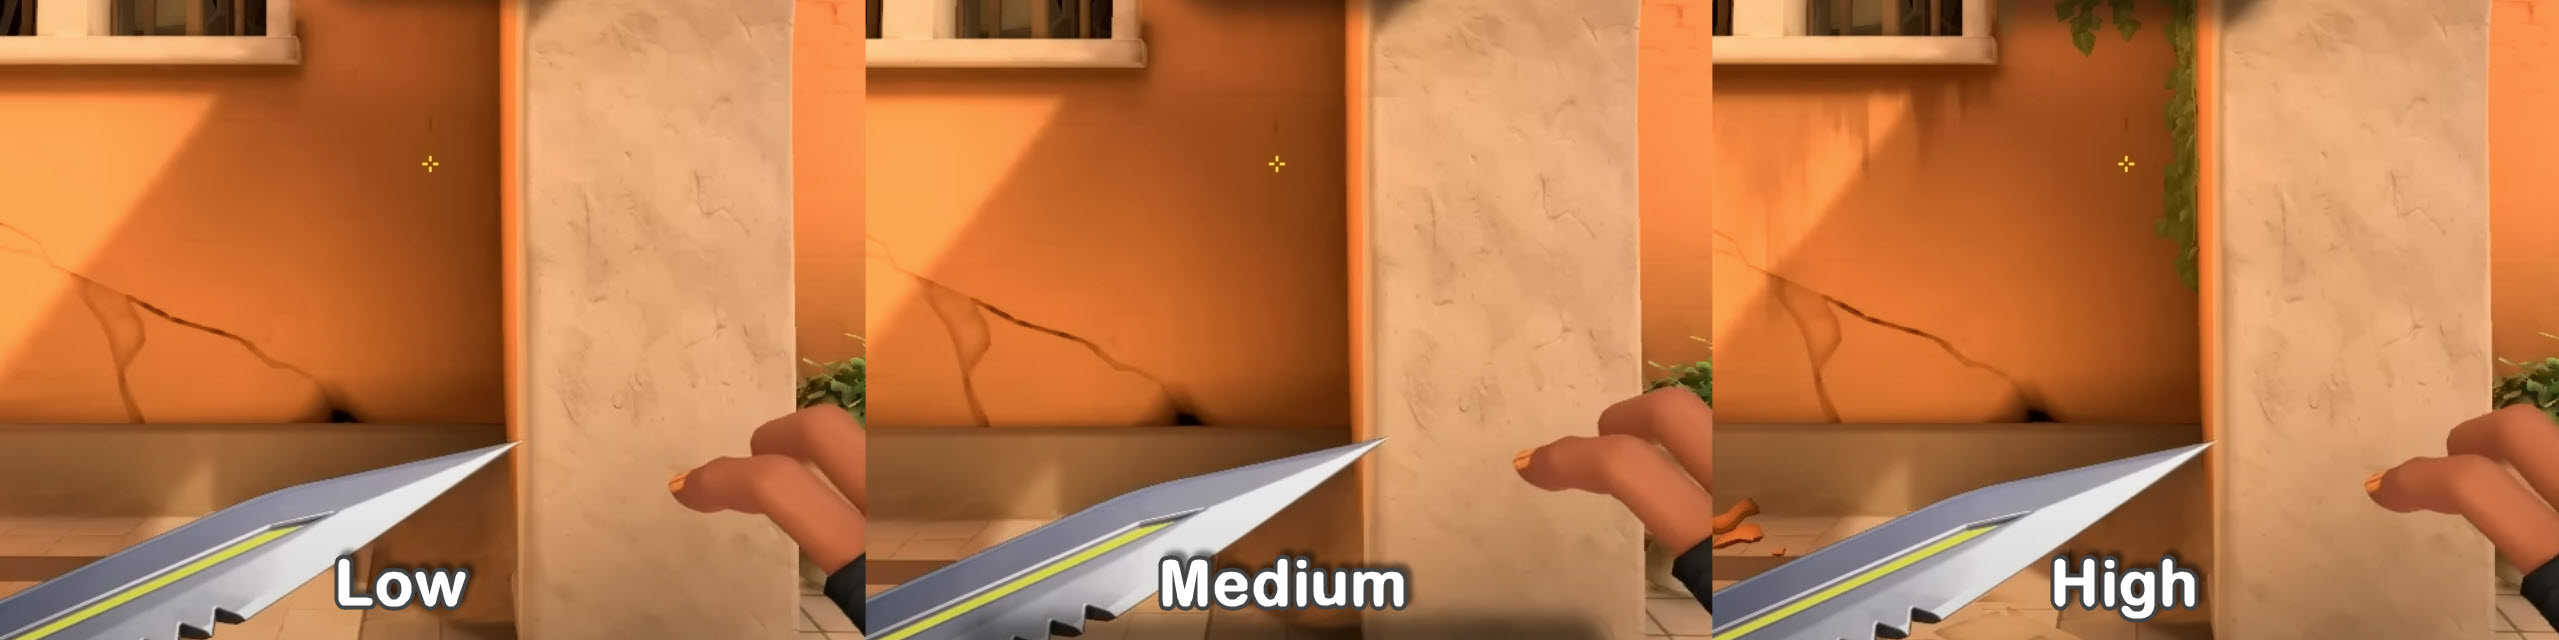
Texture Quality: Medium to High
Textures in the game don’t affect performance that much. So, turning the texture quality to medium is a great option for low-end PCs. If you’re rocking a high-end PC, then crank it to High.
Detail Quality: Low
If you want fewer distractions and clutter on your screen, turn the detail quality setting to Low. This helps boost FPS in Valorant and also helps reduce unnecessary textures on your screen, like vines on walls and foliage, etc.
UI Quality: Medium
Set the UI Quality to Medium, as it doesn’t have much effect on performance. This will affect the UI elements in Valorant, like player portrait, setting menu, etc.
Vignette: Off
A vignette is an aesthetic setting that does not have an effect on performance. However, it darkens the corners of your screen to add a cinematic feel to your matches. Yeah, it doesn’t work. We’ve tried it. If you take your matches seriously, then it’s just going to get in the way. Leave it at Off.
VSync: Off
Do yourself a favor; don’t use V-sync in any game. Period! In many games, V-sync is known to add micro-stutters, input lags, and even cap FPS according to your monitor’s refresh rate. Turn it off to uncap your FPS. You might face screen tearing every now and then, but it’ll be worth it when you’re gaining better FPS than other players.
Anti-Aliasing: MSAA X2
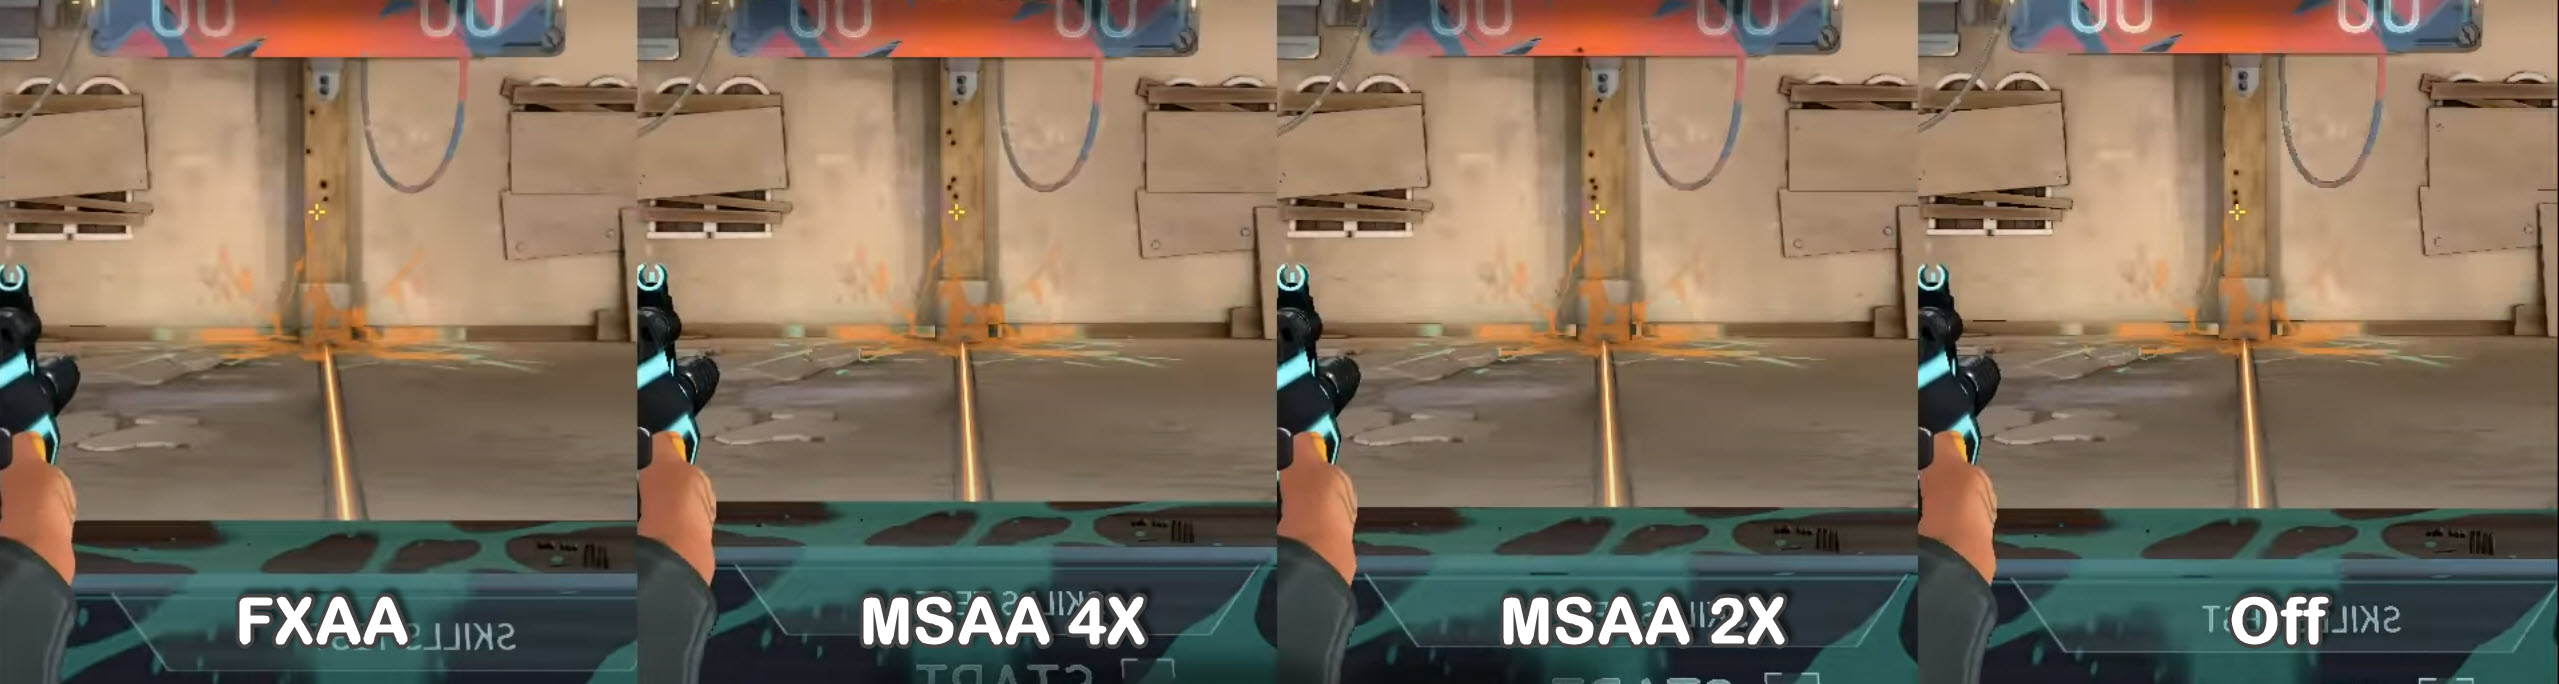
To get the most FPS, people prefer turning Antiailiasing off, but that’s not true. You could set it to MSAA X2 to get amazingly clear visual quality while still maintaining decent FPS. Plus, it’s not even that taxing, so it’s all good.
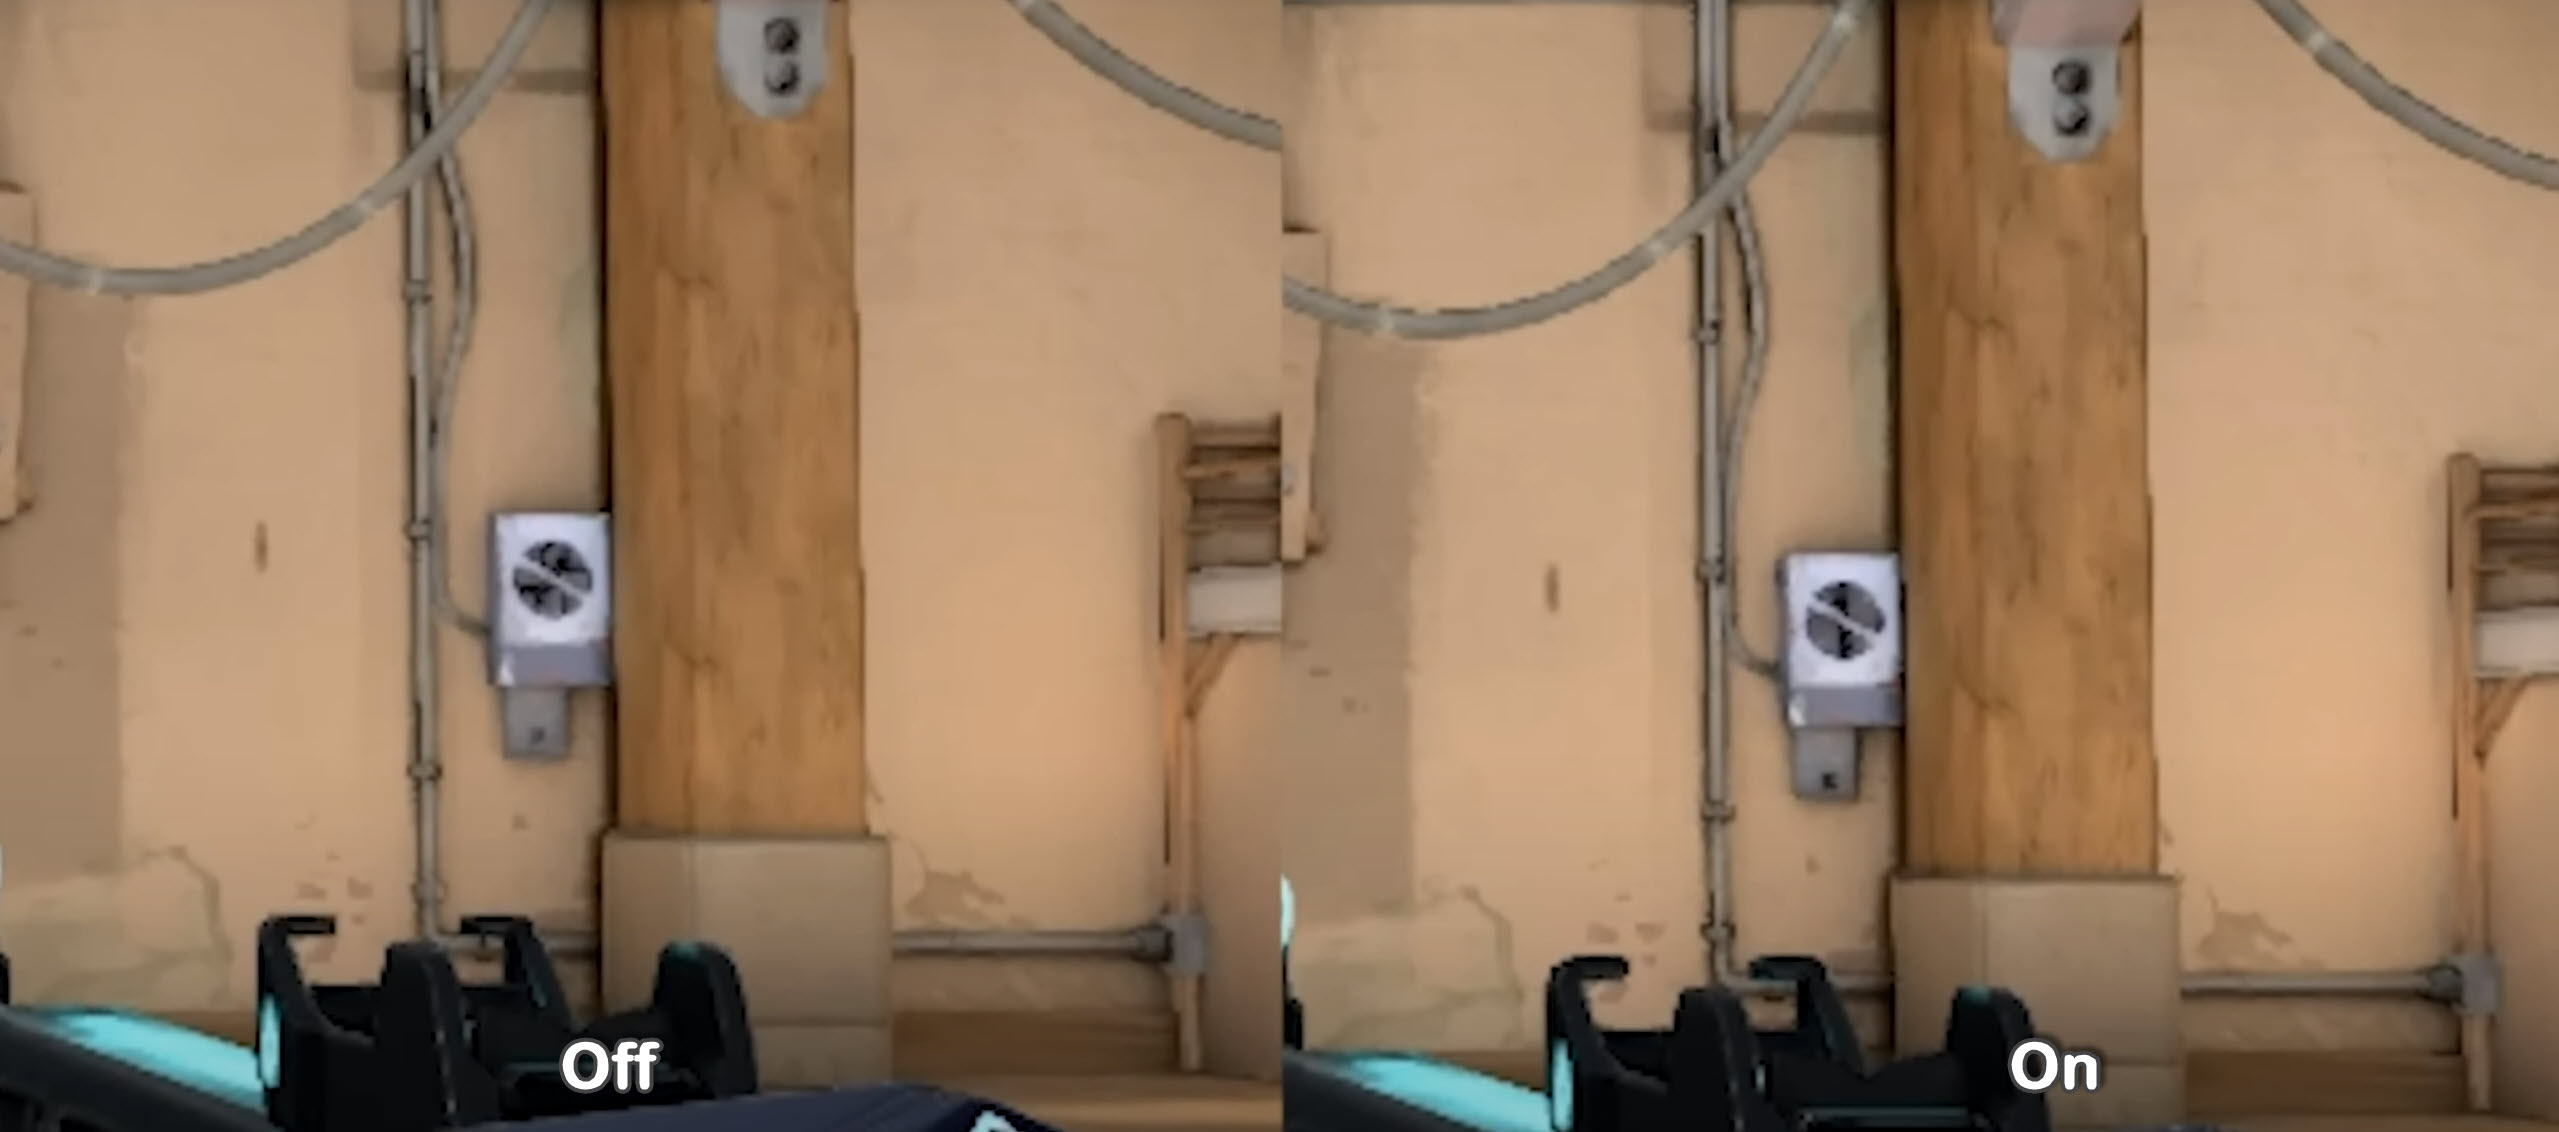
Anisotropic Filtering: 2x – 4x
Using 2x or 4x isn’t really that taxing on your PC and really improves the texture sharpness of objects at oblique angles in Valorant. If you’re on a beefy PC, you could go with 16x.
Improve Clarity: Personal Preference
To some, this setting has improved visual quality a lot for no performance sacrifice. However, for some, it has dipped frames for no viable quality improvement. I’d recommend trying On and Off and seeing what works for you.
Bloom: Off
Turn Bloom Off if you want zero distractions in the game. It’s only a visual effect with no hit on performance.
Distortion: Off
Another meaningless visual effect that adds a “distortion” effect on your screen. Best to disable it.
Cast Shadows: Off
This setting shows or hides your player’s shadow and does not affect the other team. Turning it off is the best action here.
Applying changes to the General and Graphics Quality Tab will significantly improve your framerates. You can also expect better responsiveness, visuals, and overall performance with these best settings.
Once you are done with these two tabs, make sure you also apply some changes in the Stats section.
Best Stats Settings
This section won’t really affect your game’s performance. These are more quality-of-life changes that affect your HUD in-game.

- Client FPS: Text Only
- Server Tick Rate: Hide
- Total Frame Time: Hide
- CPU Frame Time: Hide
- GPU Frame Time: Hide
- Network Round Trip Time: Text Only
- Packet Loss: Hide
This concludes our in-game tweaking for Valorant. Let’s move on to the next part.
Nvidia Settings
Summary Of Nvidia Settings
| OPTION | SETTING |
| Image Sharpening | On |
| Anisotropic Filtering | Off |
| FXAA -Antialiasing – FXAA | Off |
| Gamma Correction – Antialiasing | Off |
| Mode – Antialiasing | Off |
| Background Max Frame Rate | 20 |
| Low Latency Mode | Ultra |
| Max Frame Rate | Off |
| Power Management Mode | Prefer Max Performance |
| Monitor Technology | Up to the Monitor |
| Multi-Frame Sampled AA (MFAA) | Off |
| Anisotropic Sample Optimization | Off |
| Negative LOD Bias – Texture Filtering | On |
| Quality – Texture Filtering | High Performance |
| Trilinear Optimization – Texture Filtering | On |
| Threaded Optimization | Auto |
AMD Radeon Settings
Quick Overview Of AMD Settings
| OPTION | SETTING |
| Radeon Anti-Lag | Enabled |
| Radeon Chill | Disabled |
| Radeon Boost | Disabled |
| Radeon Image Sharpening | Enabled |
| Sharpness | Player’s Choice |
| Wait for Vertical Refresh | Always Off |
| Anti-Aliasing | Use Application’s Settings |
| Anti-Aliasing Method | Multisampling |
| Morphological Anti-Aliasing | Disabled |
| Anisotropic Filtering | Disabled |
| Texture Filtering Quality | Performance |
| Surface Format Optimization | Enabled |
| Tessellation Mode | Override Application Settings |
| Maximum Tessellation Level | Off |
| OpenGL Triple Buffering | Disabled |
| Reset Shader Cache | Perform Reset |
However, before you apply the best AMD Crimson Settings for Valorant, make sure you have the latest AMD Radeon Graphic Drivers Installed. You can update the latest drivers by visiting the AMD Website, Downloading the Auto-Detect, and Installing Radeon Graphics Drivers for Windows.
Here’s a detailed guide to a complete set of AMD best settings for you to use on your PC.
Best High FPS Optimization Settings
- Updating Your Windows Version
- Using The Maximum Performance Plan Of Windows
- Disabling Unnecessary Background Applications
- Enabling Game Mode on Windows
- Disable Hardware Acceleration In Third-Party Apps
Valorant Optimization Thoughts
Now, we’ve reached the summit of this best settings guide for Valorant. I’m pretty confident that you’ll now have a great experience with Valorant with higher FPS and even higher kill count.
Ending the guide, I’d like to mention that all of these tweaks are meant to get you the highest possible frames. Some might complain that their overall graphics and visual quality have dropped slightly. But this is how it is; graphics and visuals are always compromised for better Frame Rates. well, unless you have a high-end PC that is.
Secondly, there is no point in having good graphics in competitive FPS games. Apart from Valorant, some steps in this guide can also transform your overall Windows. You will notice much better speed, responsiveness, and overall experience. If you are having trouble with Valorant Crashes, make sure you read this guide as well. Happy Gaming Folks!
Update: The article has now been updated in 2024 with additional methods and changes.
Thanks! Do share your feedback with us. ⚡
How can we make this post better? Your help would be appreciated. ✍
perfect
pog
very well explain
good
perfect
Ok
thanks you moiz, grettings from spain
Thanks It was really effective and helped me boost my fps, I haven\'t Tried to open Valorant yet but whoever is reading this can get ensured that this is extremely effective
it hepls
Best!
very nice
thank u all
made my fps go down
tysm that was very helpful
TOP notch
![Valorant Error Code Van 1067 [FIX]](https://exputer.com/wp-content/uploads/2023/05/Valorant-Error-Code-Van-1067-390x220.jpg)