In COD Warzone 2.0, it is essential to prioritize setting up your controller or Mouse and Keyboard with the best settings. Keep in mind that at the end of the day, tweaking each setting here will come down to your own personal preference. I strongly advise experimenting and testing out each setting. Nonetheless, without further delay let’s get started with our layout of the best controller settings in COD Warzone 2.0
Here are some quick facts about COD Warzone 2’s controller settings:
- Call Of Duty Warzone 2.0 controller settings consist of adjusting the sensitivity, enabling some QoL features as well, and disabling some annoyances.
- Setting such as the detailed Deadzone options can help players deal with stick drift issues.
- Players can also increase their capability during gameplay by disabling the Auto-parachute in order to open it manually during matches.
- Most importantly, these settings all come down to personal preference and players should test out and see which is the perfect balance for them.
- Why Trust Us: Sameer has spent multiple hours playing Modern Warfare 2 and Warzone on Battle Net and PS, during which he has managed to test out the best Controller Settings.
Controller Settings For Warzone 2.0
Whether it’s the Xbox or Playstation controller, it ultimately comes down to your preference on which one feels the best in your hands. I used the PS5 Dualsense controller which also has some Haptic Feedback support along with its adaptive triggers which we will mention briefly too.
Here’s a breakdown of each setting and how it can impact your gameplay.
Inputs
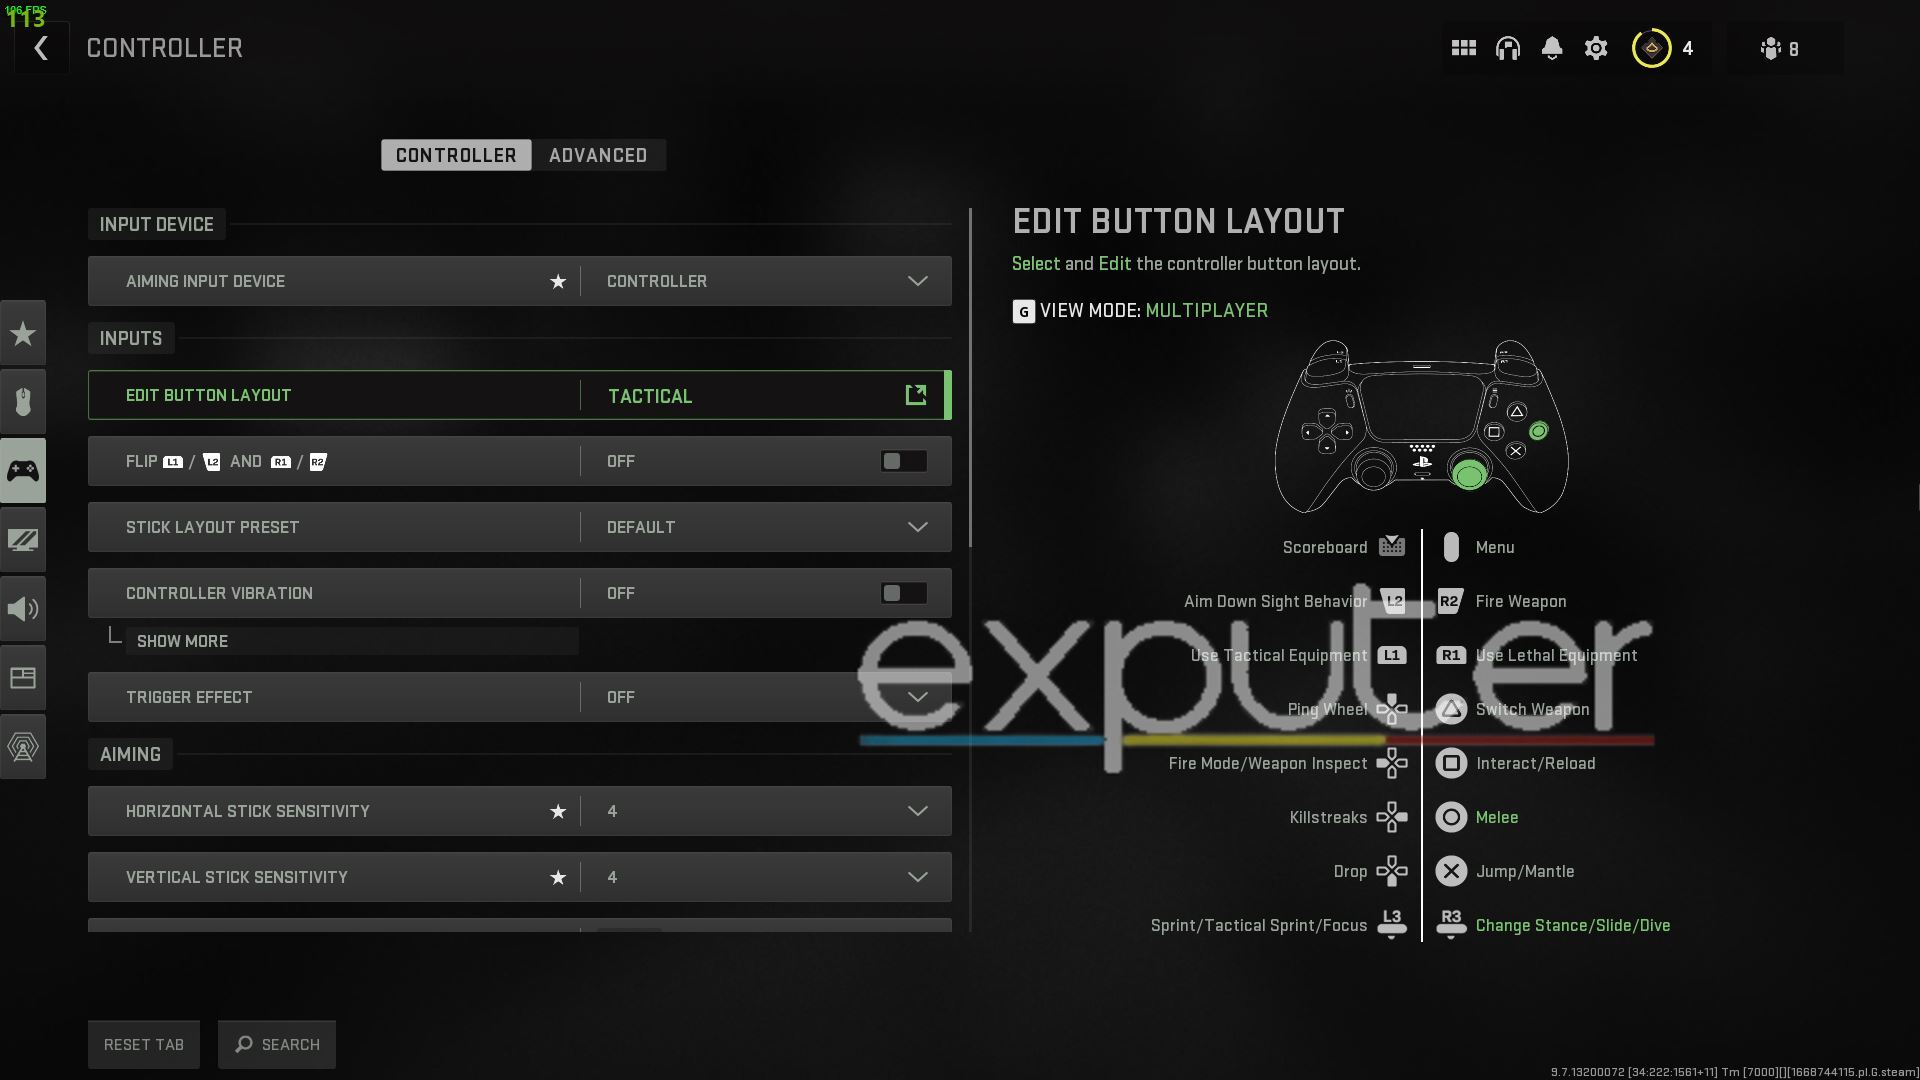
In this section, you can adjust the button layout of the controller, among a few other things such as the Dualsense features in case you’re using which we will mention briefly, so let’s get started.
- Edit Button Layout – Default: Stick with the default button layout; it works well for most players.
- Flip L1/L2 and R1/R2 – Off: This swaps trigger and bumper buttons and is useful if you hold your controller in a ‘CLAW’ style. If you don’t use this style, keep it turned off.
- Stick Layout Preset – Default: Leave this at the default setting; changing it usually isn’t necessary.
- Controller Vibration – Off: In a fast-paced game like Warzone 2.0, it’s best to turn off controller vibration for better focus.
- Trigger Effect: While the Dualsense controller offers great feedback, it’s better to turn it off in multiplayer FPS games like Warzone 2.0 to avoid distractions and improve aiming.
Aiming
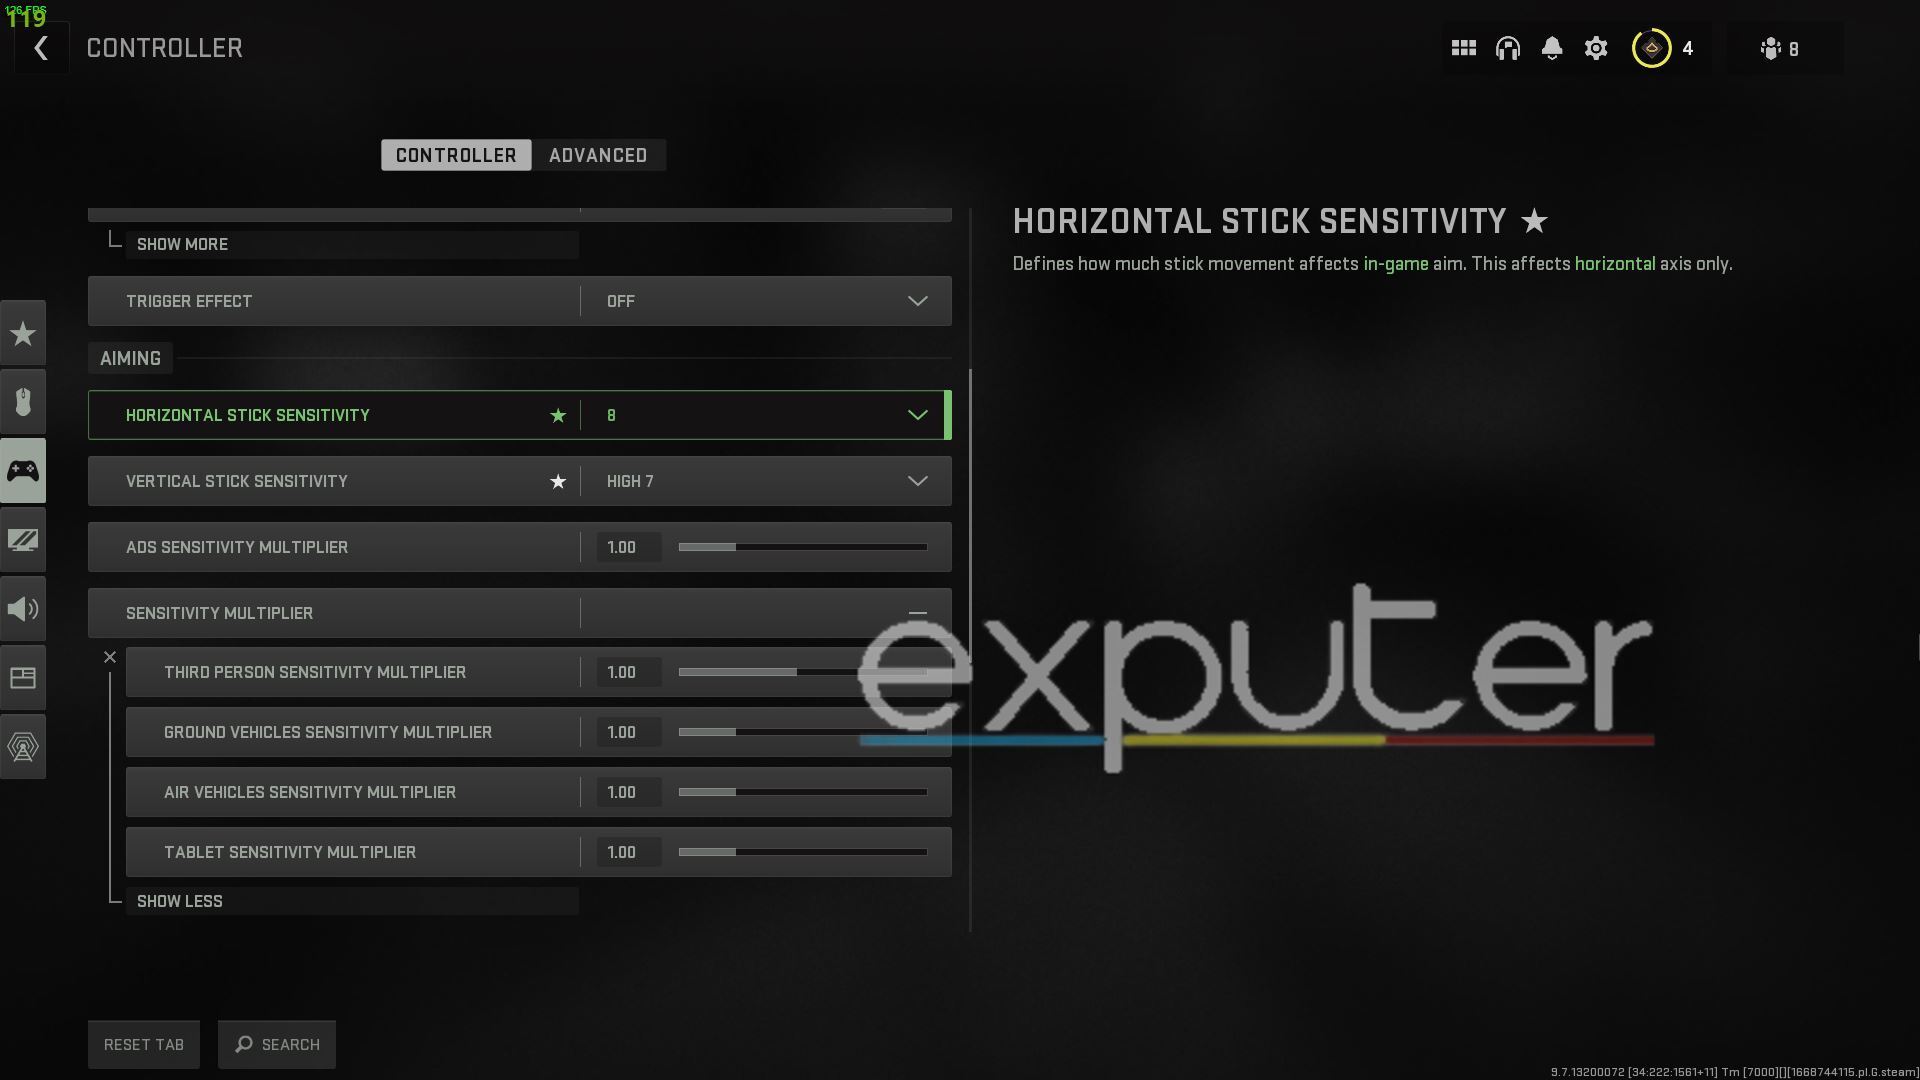
In the Aiming section, you can adjust the sensitivity of the in-game camera and also the aim-down sights sensitivity while aiming with your guns. There isn’t much to explain here so we will entail our settings so you can find a perfect balance.
- Horizontal Stick Sensitivity: 8
- Vertical Stick Sensitivity: High 7
- ADS Sensitivity Multiplier: 1.00
- Sensitivity Multiplier: 1.00 (Default)
- Verticle Aim Axis: 1.00 (Default)
Most importantly, try to set up a high Horizontal and Vertical sensitivity as the default one is pretty slow and cumbersome. You will want to keep it between 7-10 to get a perfect view while playing a match since in a game like Warzone 2.0, it is all about having quick reflexes to take down your foes with ease.
You can hop into a match real quick to test out your sensitivity and tweak it as time goes on to find the right adjustment for your play style. It is worth noting that you can adjust the ADS sensitivity however you wish though many may not know, it is one of the few important and best settings to adjust for your controller in COD Warzone 2.0 since having total control while aiming your weapon will be key to winning encounters.
Gameplay
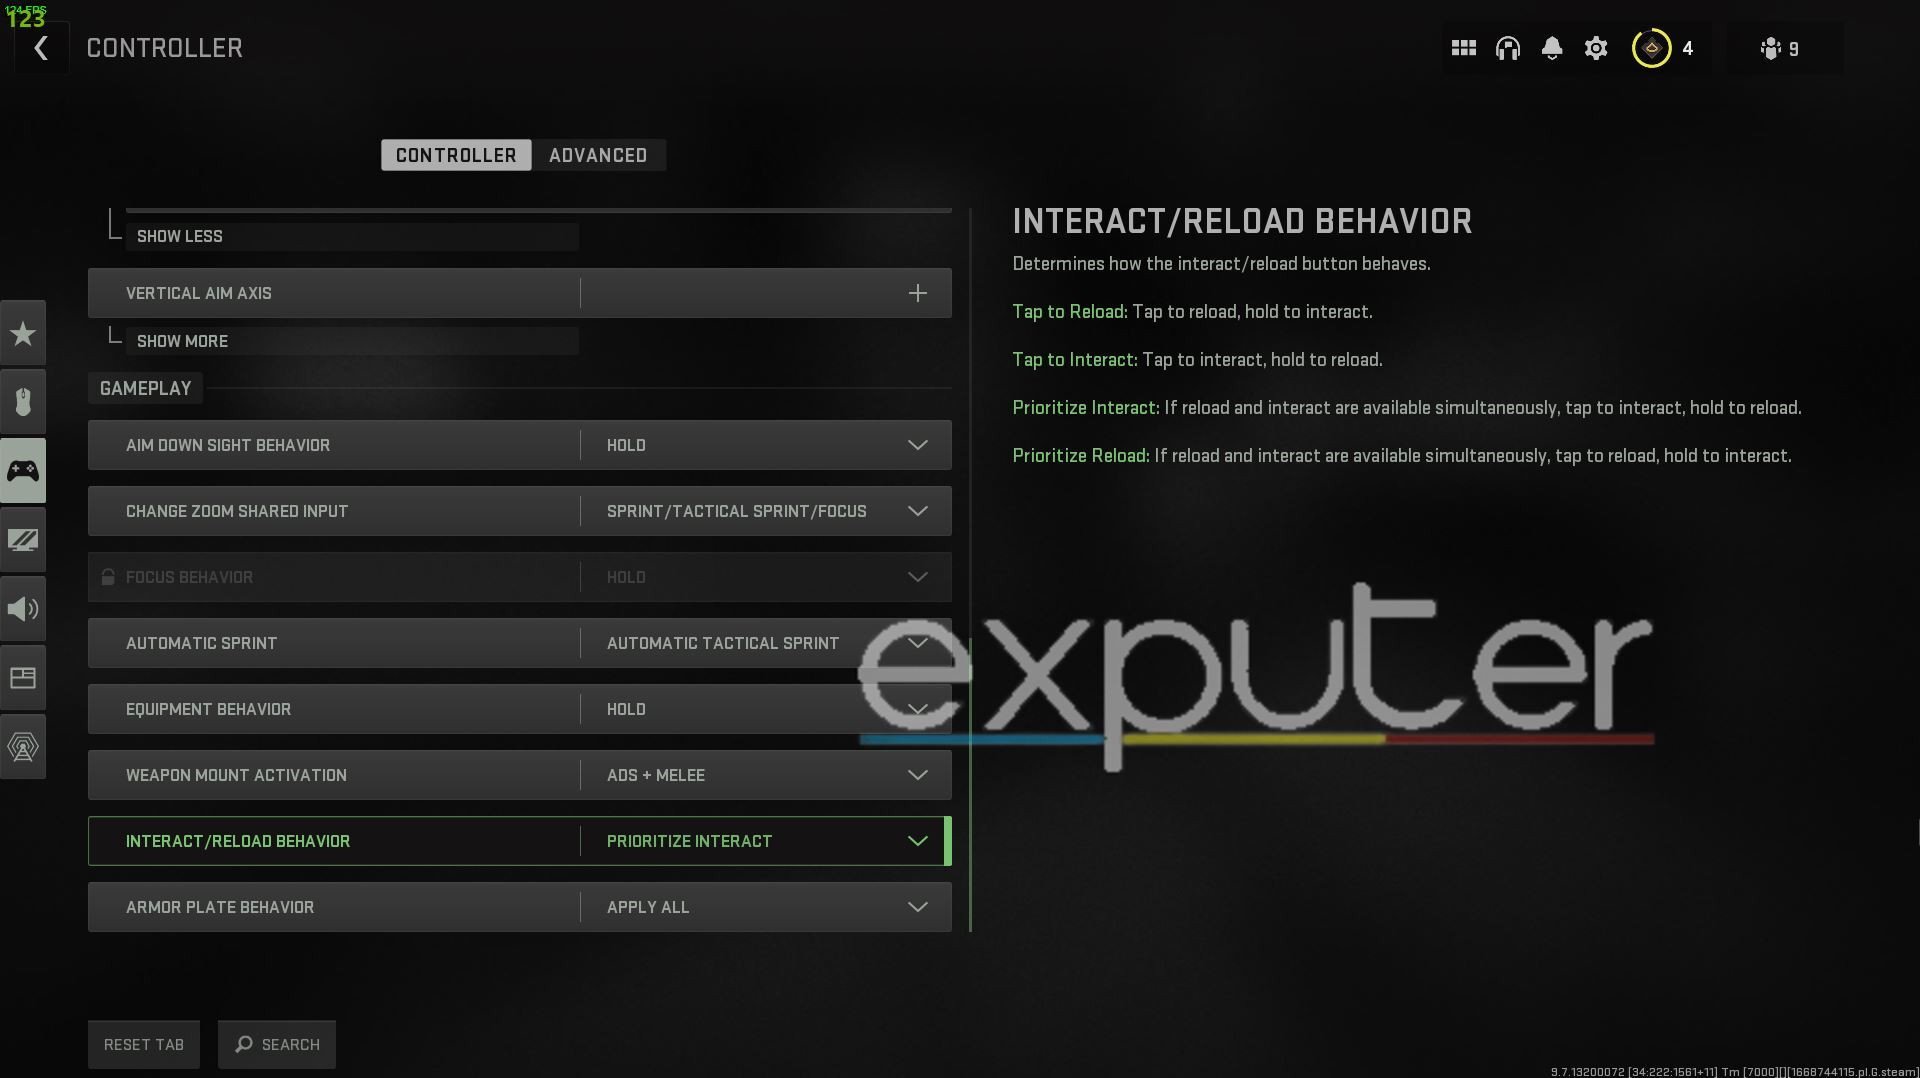
The settings in this section will mostly cover features such as enabling sprint when moving by default as well as other helpful quality-of-life options such as allowing you to fully equip armor plates when needed instead of the default single plate per button press. These settings are pretty self-explanatory and we recommend following our custom options below to get an idea of what you need to enable and tweak:
- Aim Down Sight Behaviour: Hold
- Change Zoom Shared Input: Sprint/ Tactical Sprint/ Focus
- Focus Behavior: Hold
- Automatic Sprint: Automatic Tactical Sprint
- Equipment Behavior: Hold
- Weapon Mount Activation: ADS+Melee
- Interact/Reload Behavior: Prioritize Interact
- Armor Plate Behavior: Apply All
Advanced Settings
These settings can be adjusted for Both controller and Mouse keyboard but it is hard to get lost when adjusting these, but thankfully we have already laid out the groundwork in order for you to understand most of the important settings listed here.
So without further delay let’s discuss these advanced settings and how they can impact your experience in Call of Duty Warzone 2.0.
Aim Assist & Gyro Aiming
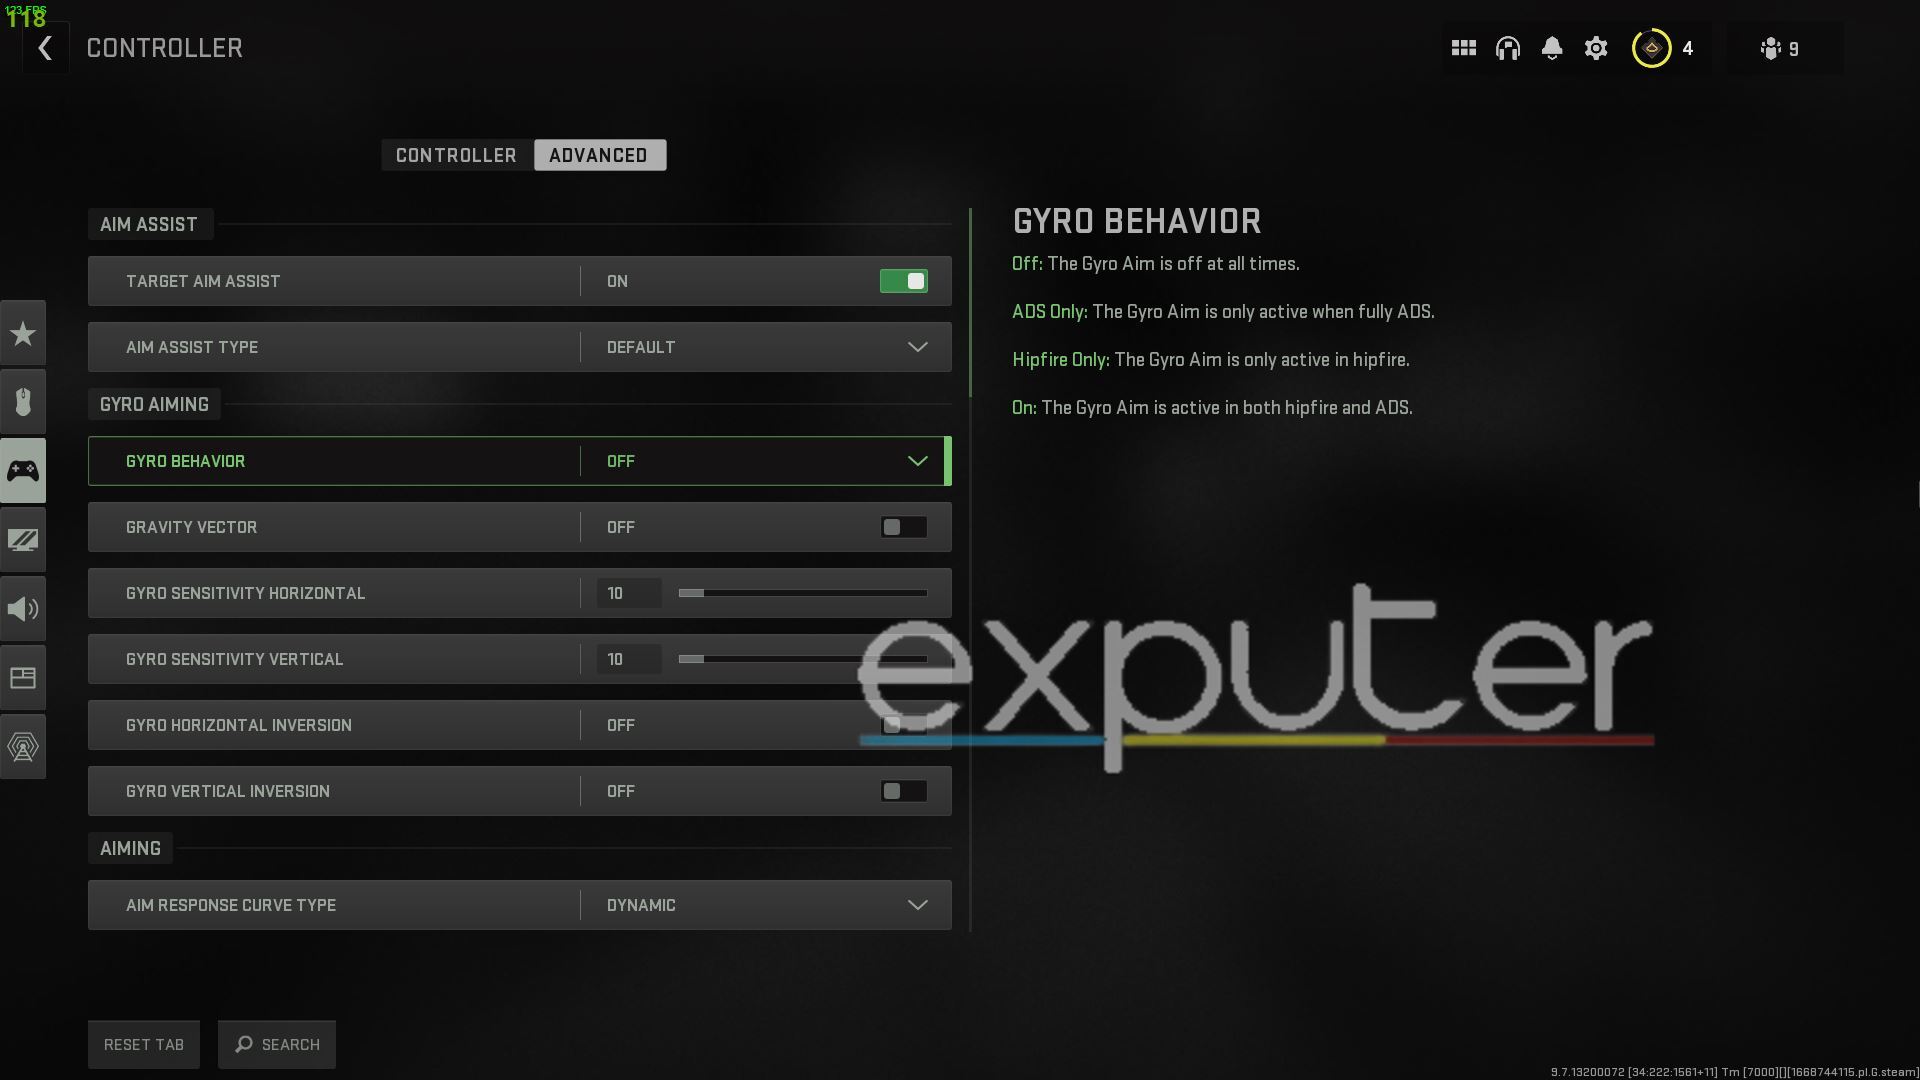
- Target Aim Assist: On
- Aim Assist Type: Black Ops
- Gyro Behavior: Off
- Gravity Vector: Off
- Gyro Sensitivity Horizontal: 10 (Default)
- Gyro Sensitivity Vertical: 10 (Default)
- Gyro Horizontal Inversion: Off
- Gyro Vertical Inversion: Off
Aim Assist has been around since the dawn of FPS games in console hardware as it allows you to quickly snap your aim onto targets easily and assist you in taking them.
The feature itself has become a controversial topic as of late in this era of Video Games as PC players flock over it, calling it an unfair advantage. But that is a matter that we won’t delve too much into right now.
Aiming
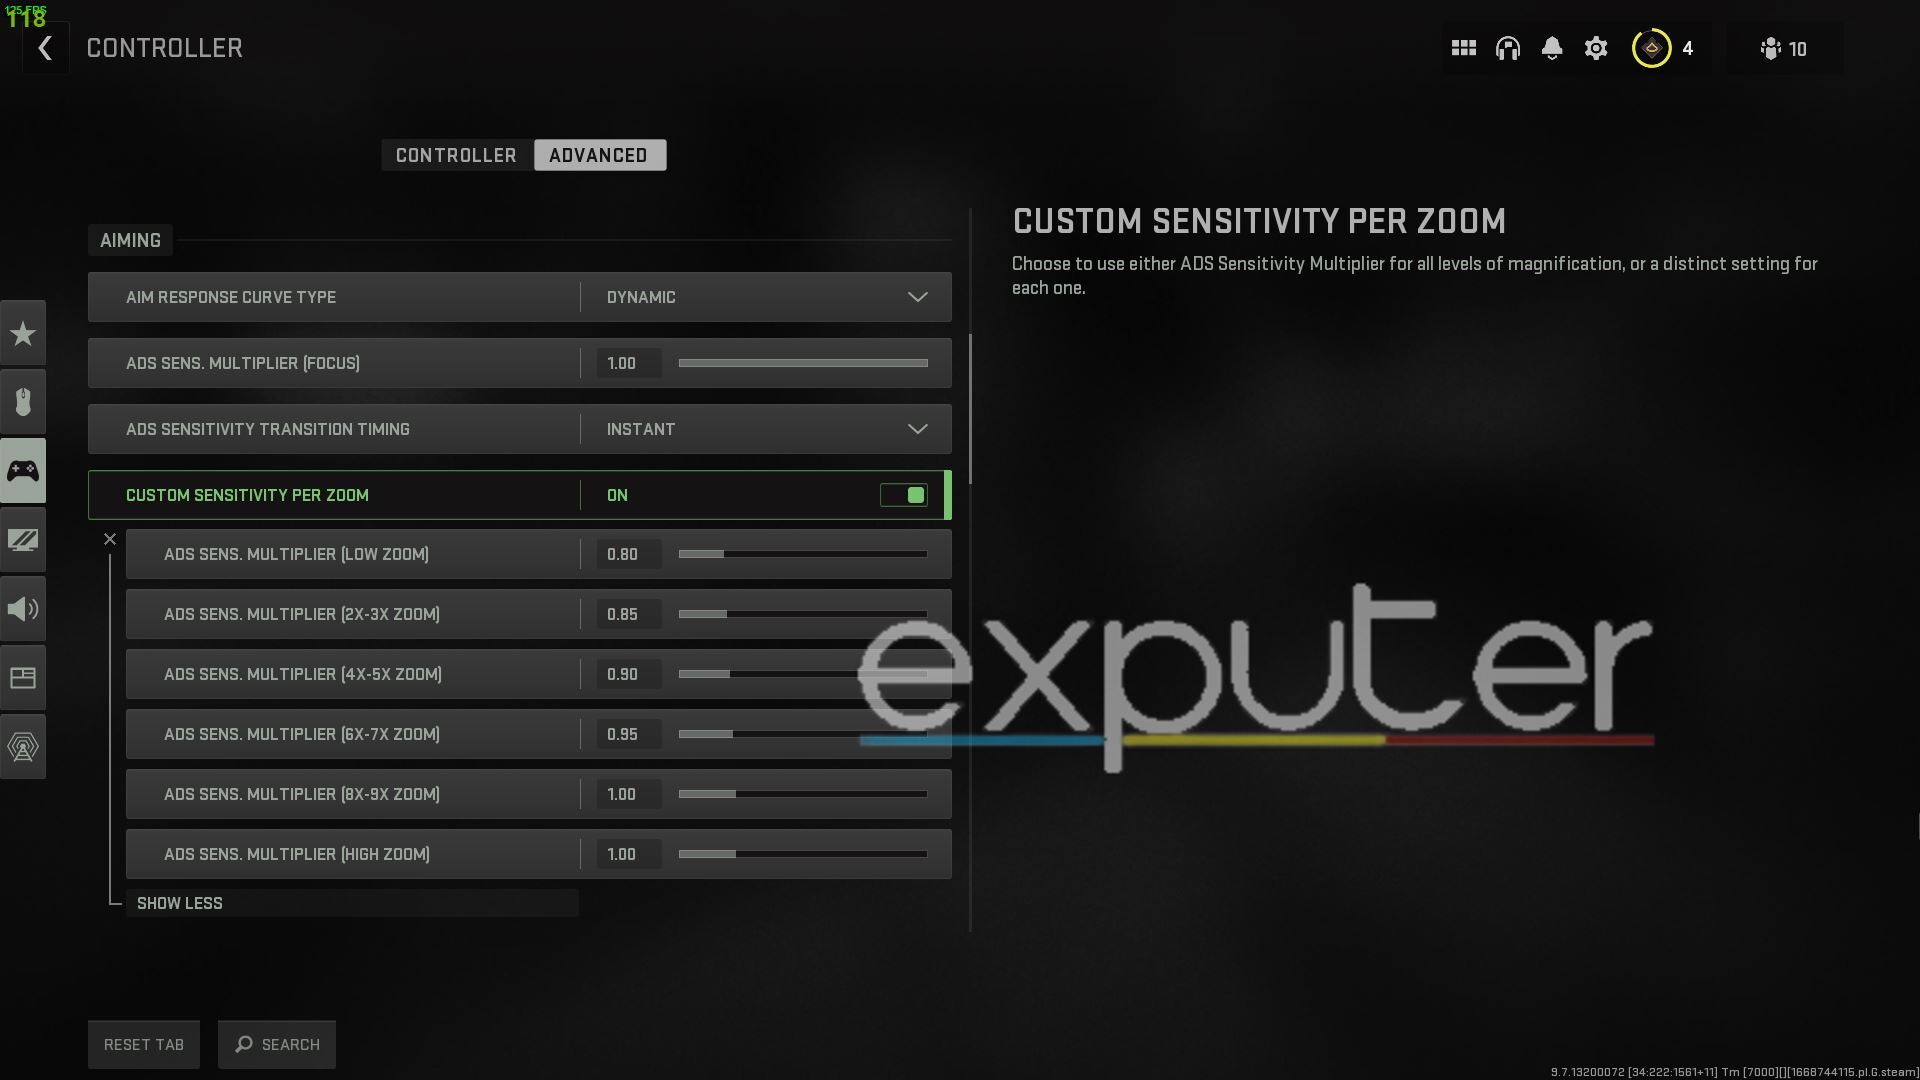
- Aim Response Curve Time: Dynamic
- ADS Sensitivity Multiplier [Focus]: 1.00
- ADS Sensitivity Transition Timing: Instant
- Custom Sensitivity Per Zoom: On
- [Low Zoom]: 0.80
- [2-3x Zoom]: 0.85
- [4-5x Zoom]: 0.90
- [6-7x Zoom]: 0.95
- [8-9x Zoom]: 1.00
- [High Zoom]: 1.00
Adjusting the values of the ADS is yet another crucial feature before you even think of jumping into the game. While the standard setting is the safest option, I recommend experimenting with each of the three curve time options as they are heavily based on your choice.
I recommend starting with the lowest value such as 0.80 and gradually raising it with each zoom type.
Deadzone
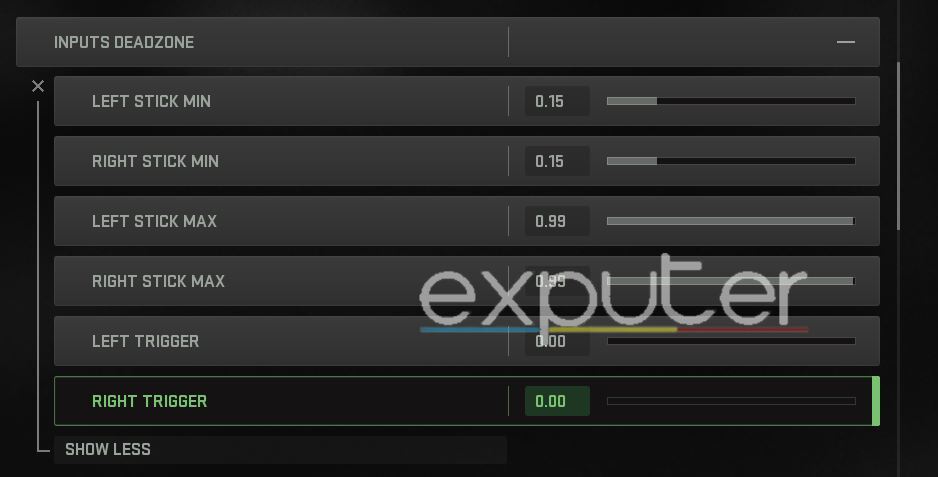
Before we go into the details, adjusting your Deadzone features allows you to counteract an irritable occurrence known as Stick Drifting. It occurs in the analog sticks of controllers where once you put down your controller and either the camera or character is moving on their own, it will mainly be the cause due to Stick Drifting.
If you have this sort of problem, you can adjust the value of the dead zone for the game to detect how far you need to move the stick for it to input its action in-game. So again, as stated numerous times already, you should adjust the values to your preference and see how it can resolve the stick drifting on your end.
- Left Stick Min: 0.15
- Right Stick Min: 0.15
- Left Stick Max: 0.99
- Right Stick Max: 0.99
- Left Trigger: 0.00
- Right Trigger: 0.00
The setting that can be modified here to help you the best when it comes to the gameplay is your Trigger Inputs, which we prefer at zero so you can have the bare minimum firing delay when attacking foes in COD Warzone 2.0.
Movement Behavior
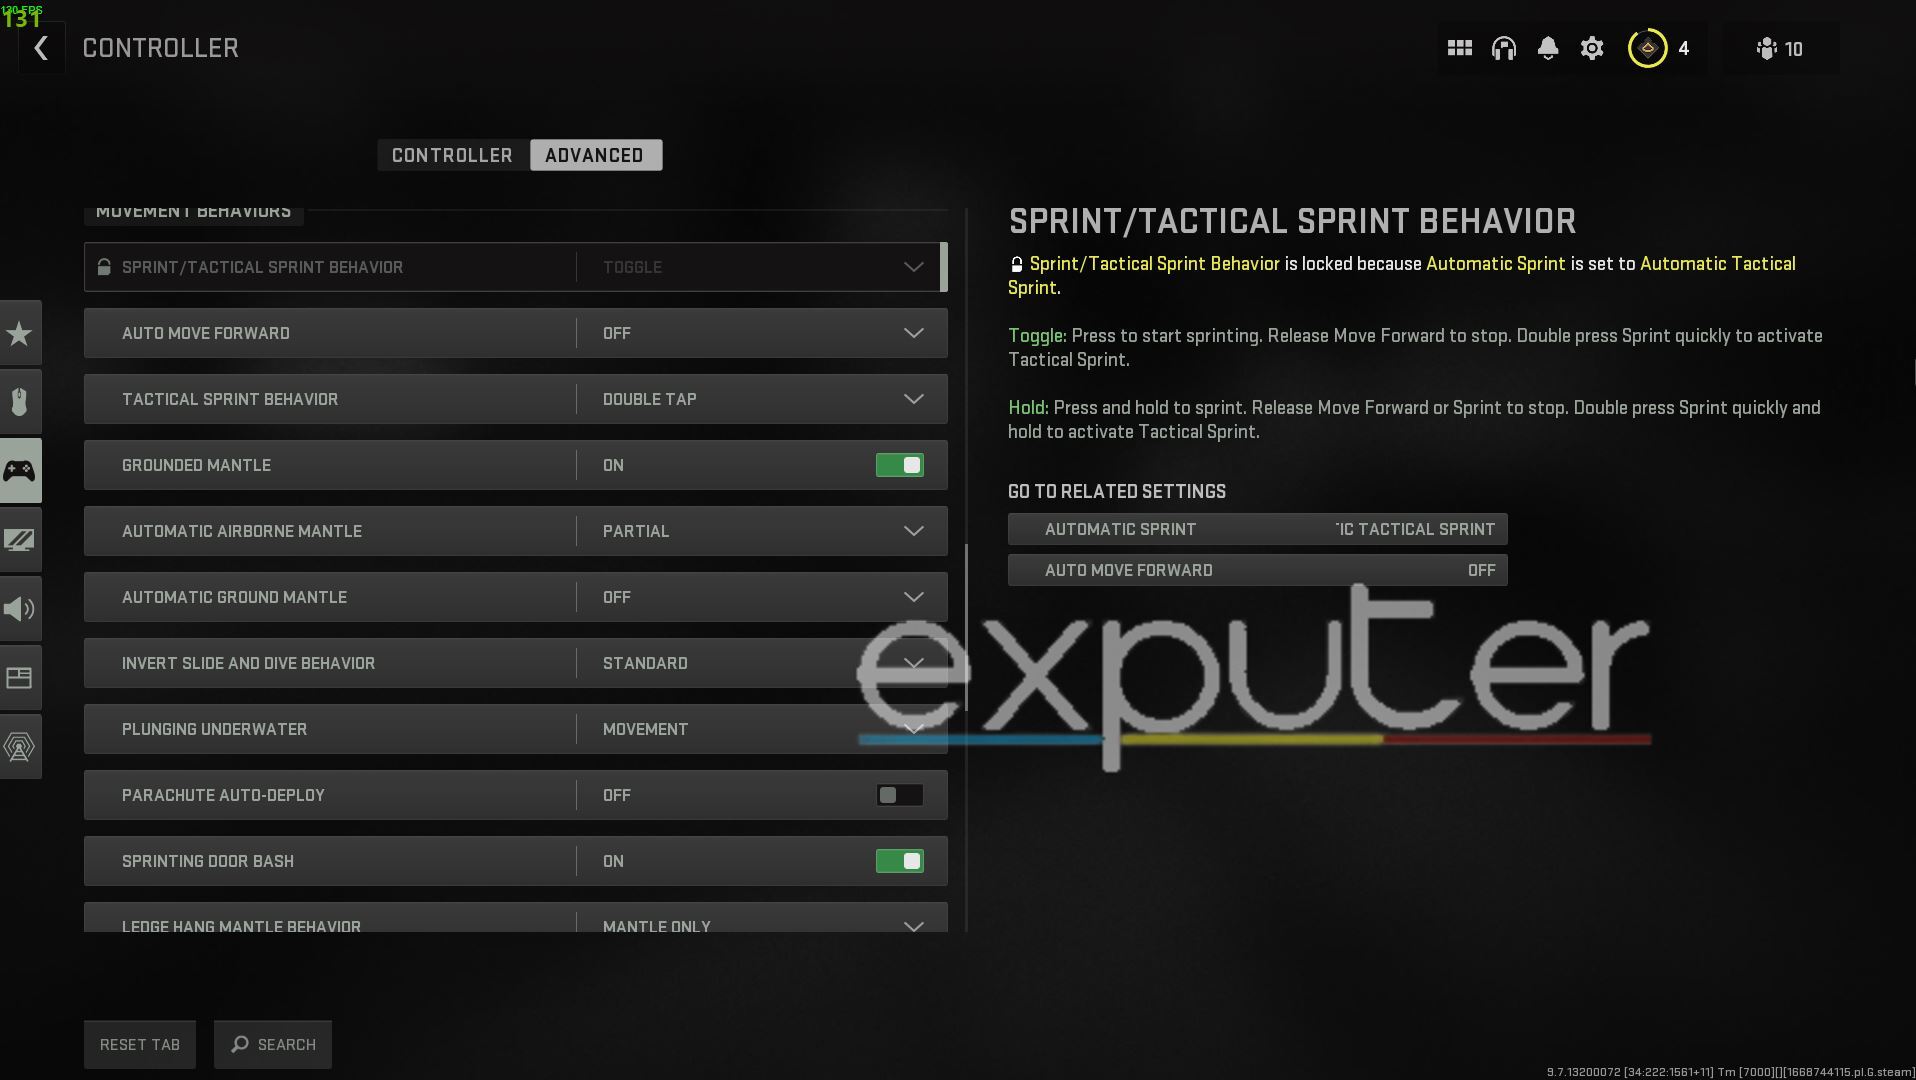
- Auto Move Forward: Off
- Tactical Sprint Behavior: Double Tap
- Grounded Mantle: Off
- Automatic Airborne Mantle: Partial
- Automatic Ground Mantle: Off
- Invert Slide And Dive Behavior: Standard
- Plunging Underwater: Movement
- Parachute Autodeploy: Off
- Sprinting Door Dash: On
- Ledge Mantle Behavior: Mantle Only
Having the Tactical Sprint on Double Tap will essentially make it so that you do not accidentally enter that sprint mode to alert your enemies. It can be extremely crucial during intense situations where you need to only use it in a pinch so double tapping to trigger it will be the safest solution.
Combat Behavior
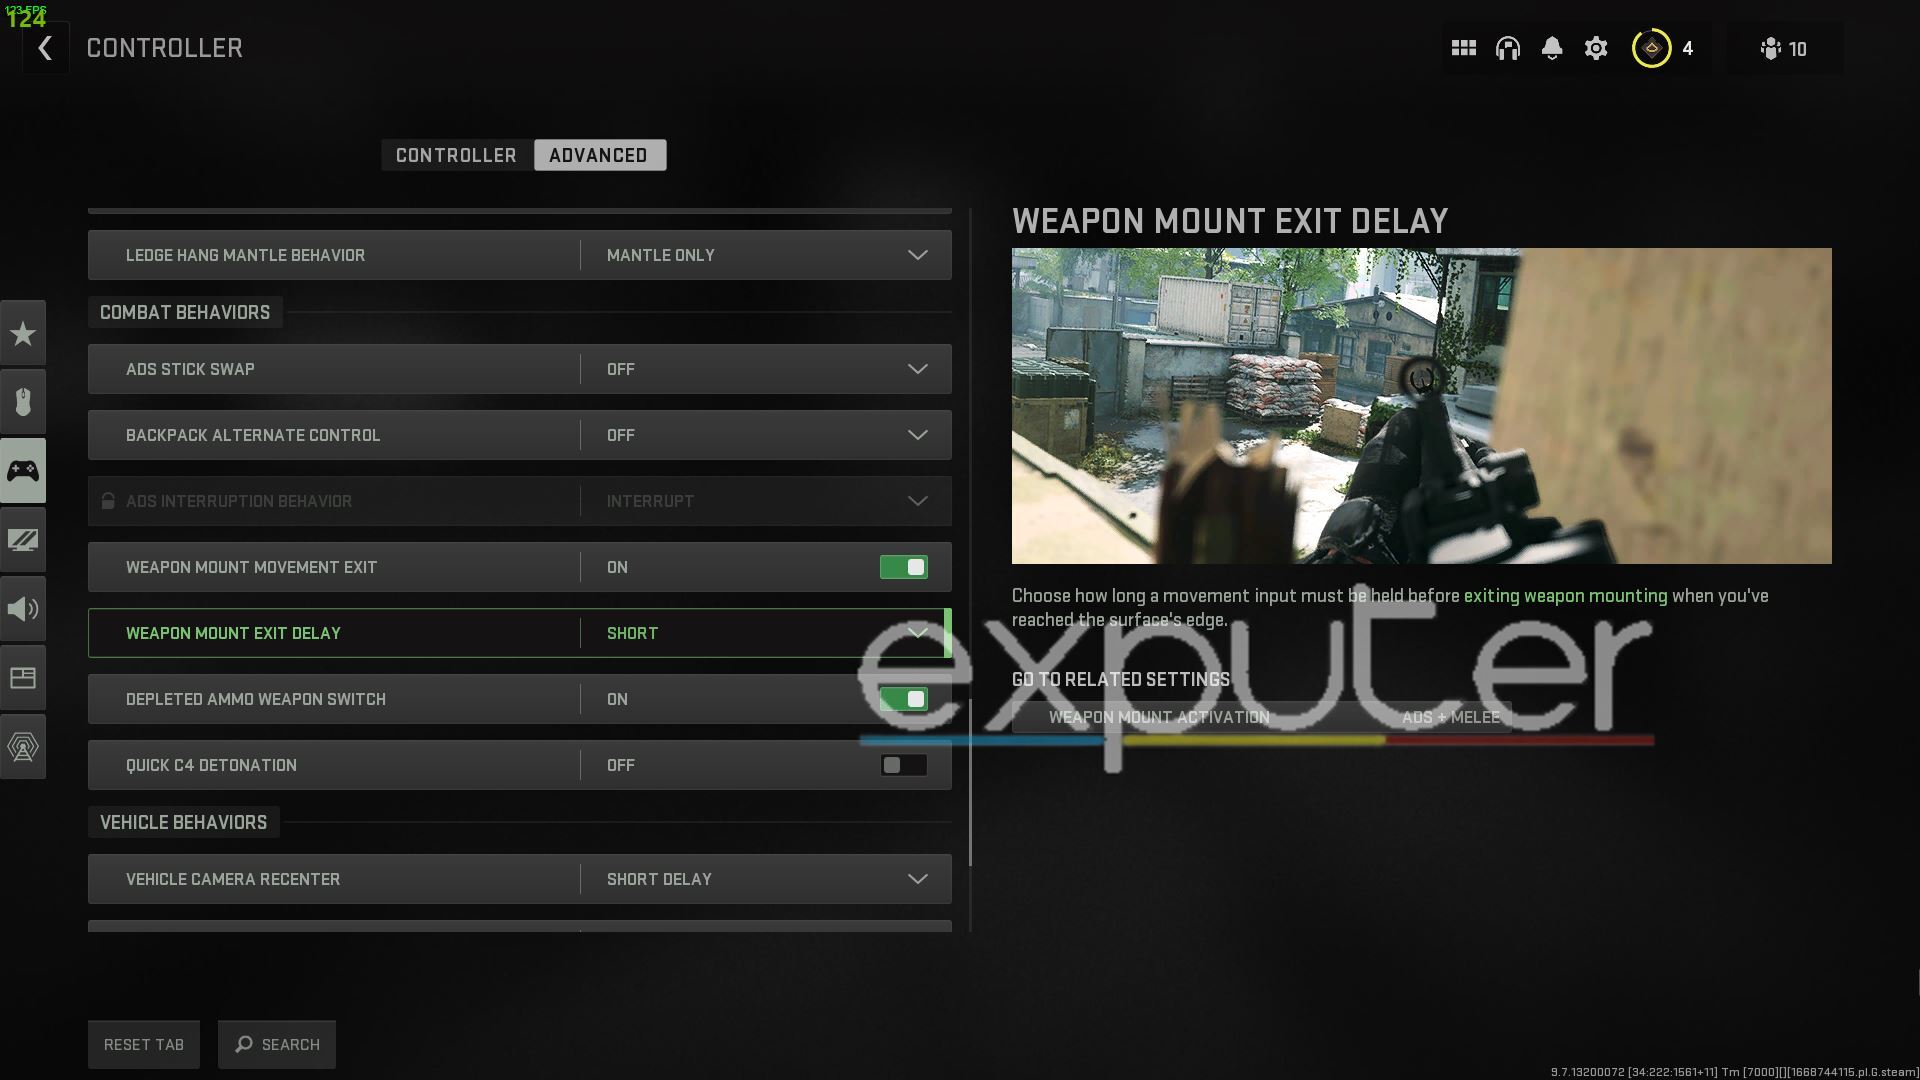
- ADS Stick Swap: Off
- Backpack Alternate Control: Off
- ADS Interruption Behavior: Interrupt
- Weapon Mount Movement Exit: On
- Weapon Mount Exit Delay: Short
- Depleted Ammo Weapon Switch: On
- Quick C4 Detonation: Off
Navigating your backpack via the Directional Button is advised so rather than enabling the alternate controls for it, we recommend sticking with the off switch on it rather than adding the movement stick to it as its input.
Weapon mounting is rarely used and is pretty situational in Warzone 2.0 so having its movement Exit enabled alongside the delay for the exit to be on Short will make things fly by much easier when using the mechanic.
Switching weapons while their ammo is depleted mostly comes down to personal preference but we have it turned to On so we could quickly swap to our secondary weapons during firefights.
Lastly, turning off quick C4 Detonation will allow you to launch all of your explosives before you can choose to blow them up.
Vehicle & Overlay Behavior
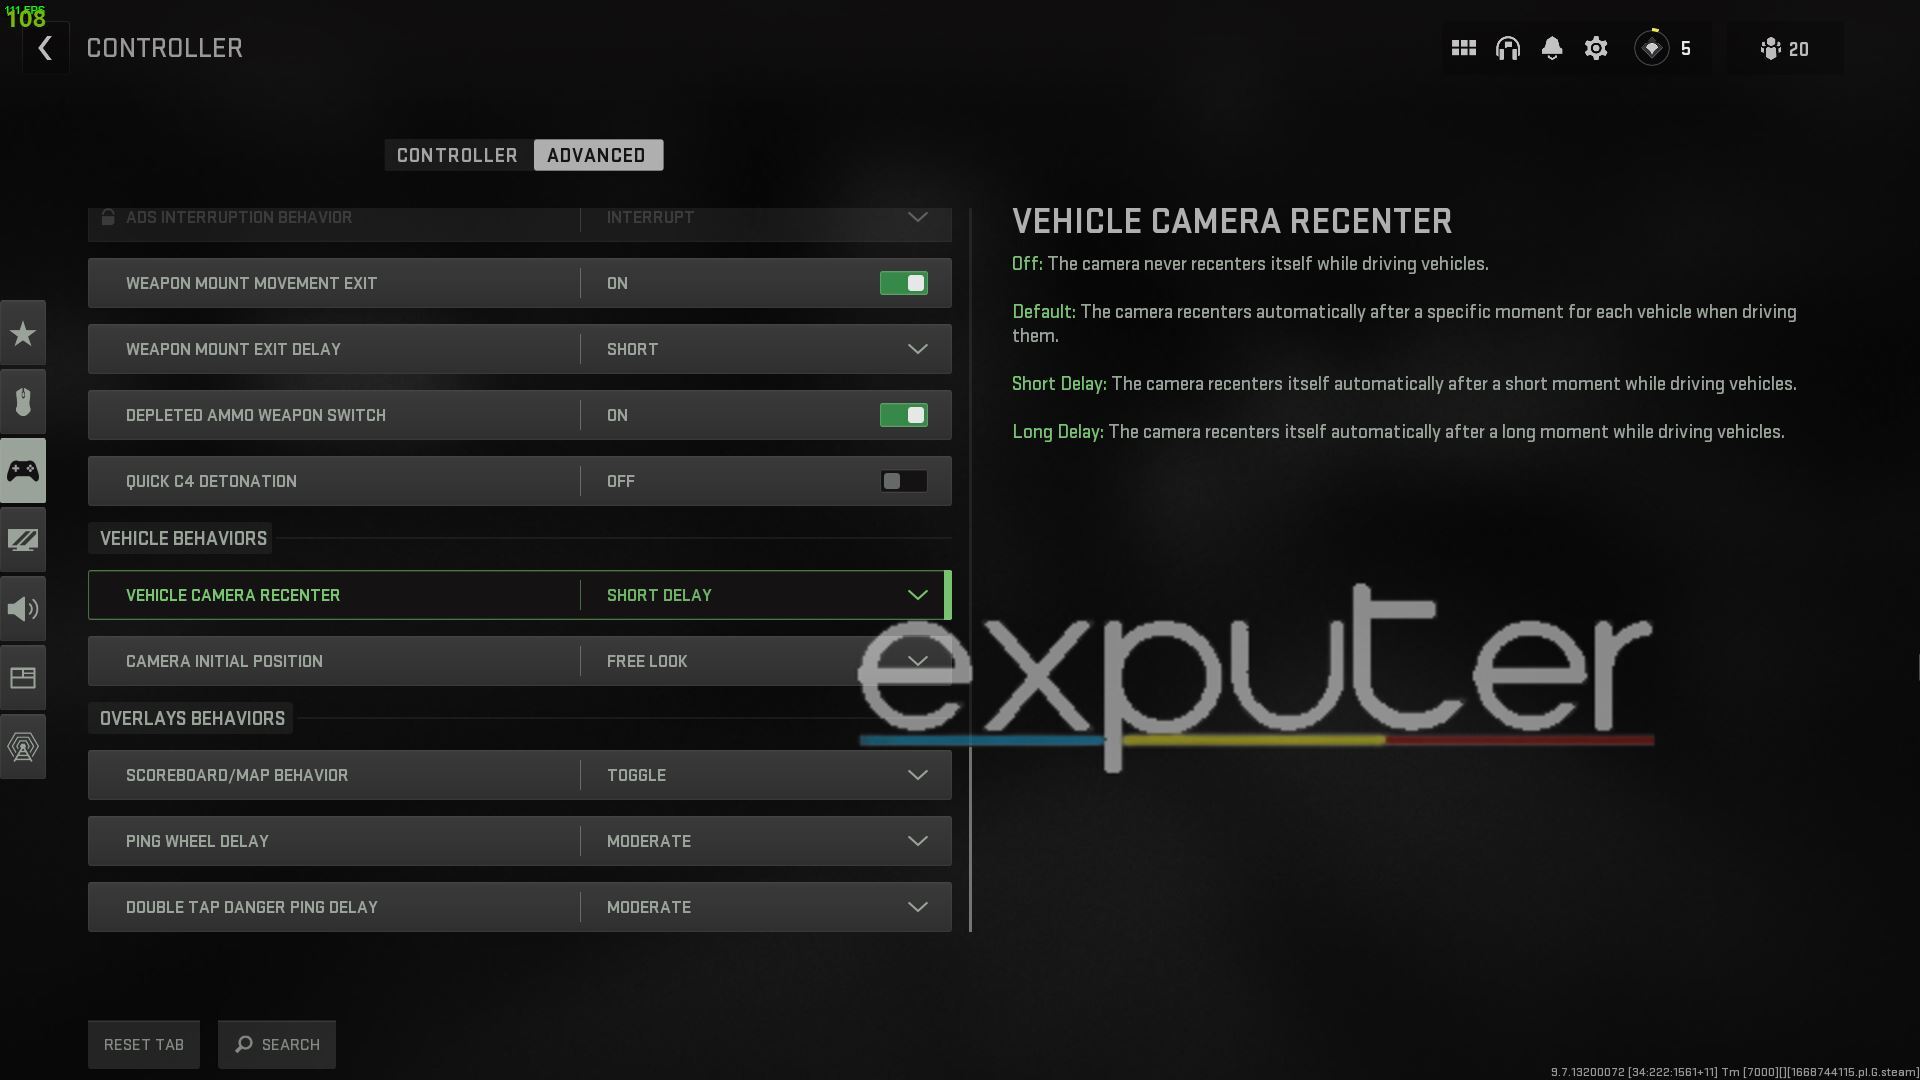
- The Vehicle Recenter: Short Delay
- Camera Initial Position: Free Look
- Ping Wheel Delay: Moderate
- Double Tap Danger Ping Delay: Moderate
Allowing the Short Delay on Vehicle Recenter will make it so that the camera snaps back to the center of the gameplay rather than having it fixated on one side for long periods.
Free Look on the initial camera position setting will allow players to maintain the camera angle they had when they enter a vehicle in Warzone 2.0. It is great when you are trying to keep your eyes on the enemy as you make your escape or are trying to focus on a view other than the central position.
The Wrap-Up
Warzone 2.0 is an extension of Call Of Duty Modern Warfare 2 and although the game has slight optimization issues for players, the game is off to a solid start across all platforms. While the campaign and multiplayer of the game have certainly charmed a plentiful of the player base, thankfully now that the free-to-play battle royale expansion has launched, even more players are flocking over to download and try the brand-new experience.
Furthermore, it is worth stating that the game has a variety of weapon loadouts that you can use such as the classic but deadly Best Assault Rifle loadout which is ideal for every beginner player of the game. Not to mention you can also try using the Best Snipers in the game which can destroy enemies with the right skill at long range. Not a fan of ranged artillery? Then why not try using some of the Best LMGs to gain an upper hand on your foes?
We hope you enjoyed reading this guide to the best controller settings for COD Warzone 2.0, let us know if these settings help you out in getting a basic idea of what you may need to tweak for yourself. If you have any other questions or want to share your experience with the game so far, let us know all about it in the comments section below! As always, eXputer wishes you luck!
Up Next:
- God Of War Ragnarok Best Controller Settings
- Best Controller Settings For Grounded
- Overwatch 2 Best FOV Settings
Thanks! Do share your feedback with us. ⚡
How can we make this post better? Your help would be appreciated. ✍