Starfield was inarguably one of the biggest game releases of 2023 that’s been touted as Bethesda Studio’s magnum-opus in the works since 2018. But considering the sheer scale of the game, there are bound to be bugs and issues with it. Thankfully, there aren’t many bugs compared to other prominent AAA releases. However, Sudden crashes are one of the worst issues that’s been bothering players on PC. We’ll investigate this issue and find the best solutions for Starfield’s crashing issue (and error 0xc0000005) for both Xbox and PC.
Sometimes, PC players also encounter the crashing issue with the following message:
- Outdated GPU drivers, lack of permissions, unstable servers due to a high volume of players, problems with game clients, missing/corrupted game files, and bad overclocking profiles are what’s causing Starfield to crash.
Here are all the effective fixes for you to try in order to solve the game’s crashing issue:
- Verify Whether The Game Servers Are Normal
- Diagnose Your Internet Connection
- Check Your Steam/Xbox App
- Update Microsoft Gaming Services & Xbox App
- Run Starfield With Administrator Privileges
- Repair Starfield Game Files
- Turn Off FSR And Turn VSync On
- Lower In-Game Settings
- Clear DirectX Shader Cache
- Update Your GPU Drivers
- Whitelist Starfield From Your Antivirus
- Remove Overclocking Profile From Your PC
Verify Whether The Game Servers Are Normal
The problem with a game like Starfield is that there are tons of players just waiting to get into it and start playing. The same thing happened with Diablo 4, and the same is happening with Starfield as well.
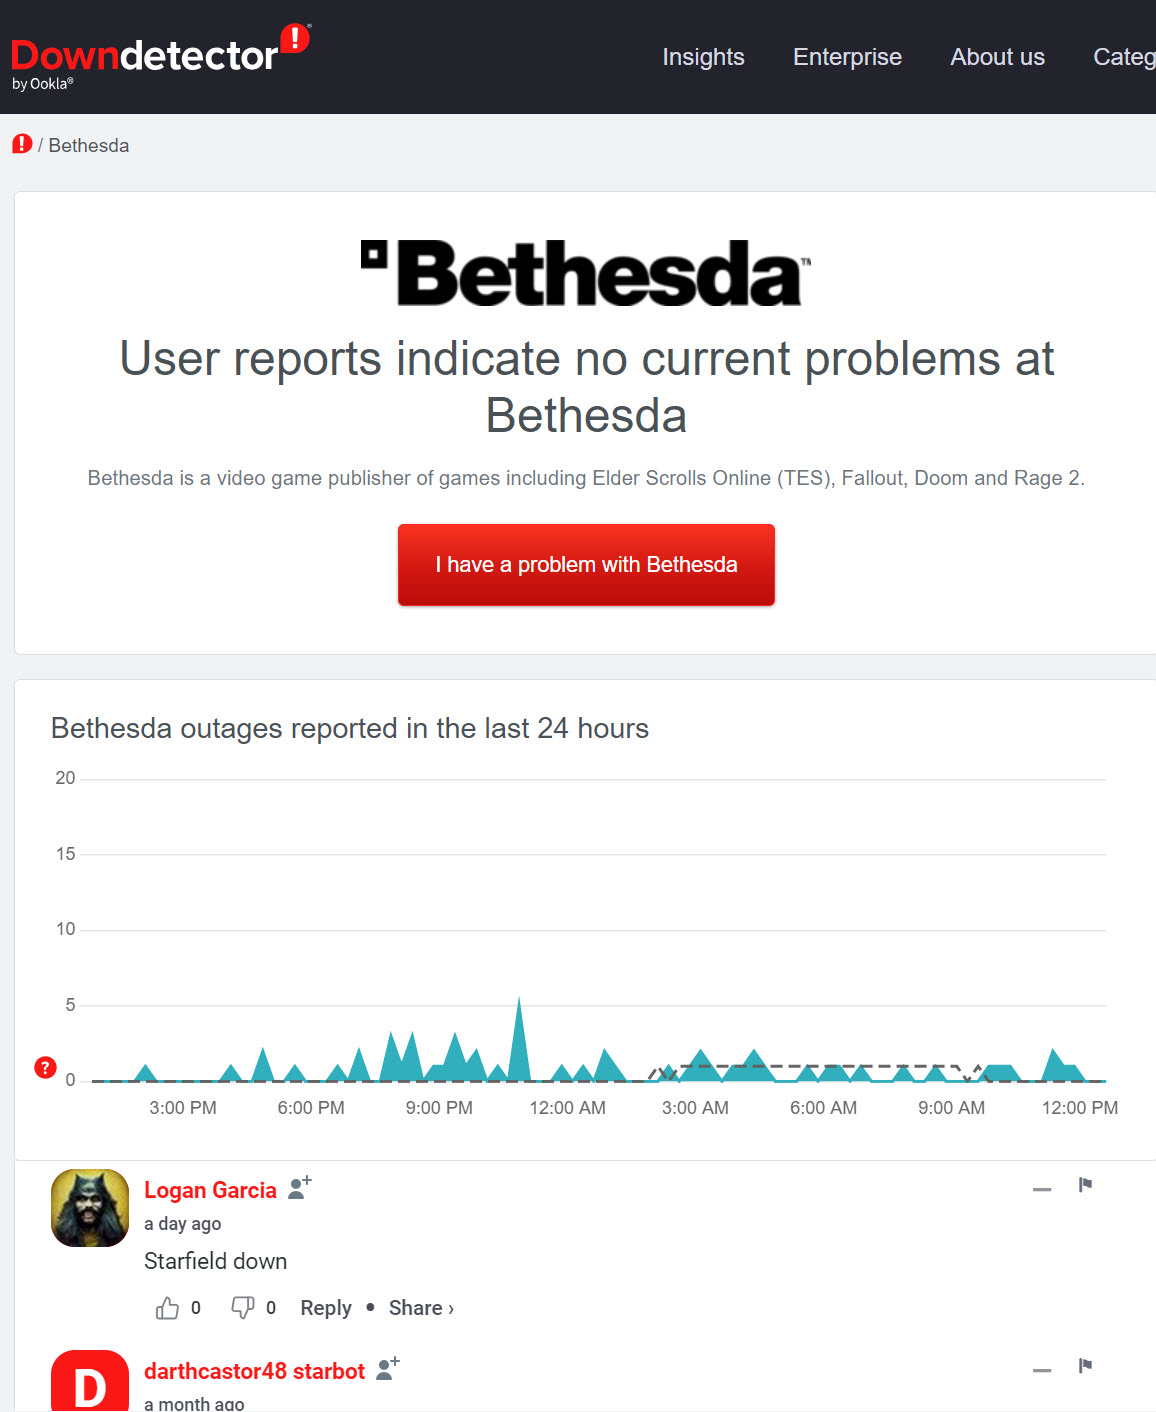
So, before you start bashing your system for crashing every time you launch Starfield, I recommend that you first check whether the servers are operational and not overloaded with traffic. To do that, you can simply visit either the official Starfield Twitter/X page or check out Bethesda server status from third-party sites like downdetector.
If you don’t find any server indicators on the above platforms, you can also join Starfield’s official discord server and ask the community here directly.
Check Your Steam/Xbox App
Sometimes, there can be problems with the game clients themselves that you’re trying to launch the game on. You can play Starfield right now on both Steam and Xbox App. So, you should try the following to see if the issue is resolved.
Clear Cache Of Steam Or Xbox App
If restarting the Steam or Xbox App didn’t work for you, then you can try clearing the cache for them. These game clients build up cache over time as you play different games through them. This cache can become corrupted, causing problems for the game client.
So, you can simply clear the cache for both Steam and Xbox App. Here are some detailed steps in this guide by our expert on clearing your application cache.
Repair/Reinstall Game Client
As a last resort, you can try uninstalling Steam or Xbox App and do a fresh install to get Starfield working again. This has proven highly effective in my testing when games are simply not launching or crashing a lot. The process is also quite straightforward.
You can simply uninstall either by looking up Add or Remove Programs in the Windows Search and clicking on the first link. After the Window opens up, simply search for either Steam or Xbox App and choose to uninstall it. After you’re done, you can install them back up and check whether Starfield is working or not.
Update Microsoft Gaming Services & Xbox App
Since most players are excited to get their hands on Starfield through Xbox Game Pass on Day 1, they’re having problems playing it without the game crashing all of a sudden. The problem might originate from the Microsoft Gaming Services and Xbox application being outdated or corrupted on your PC.
Here’s how you can update Microsoft Gaming Services & Xbox App:
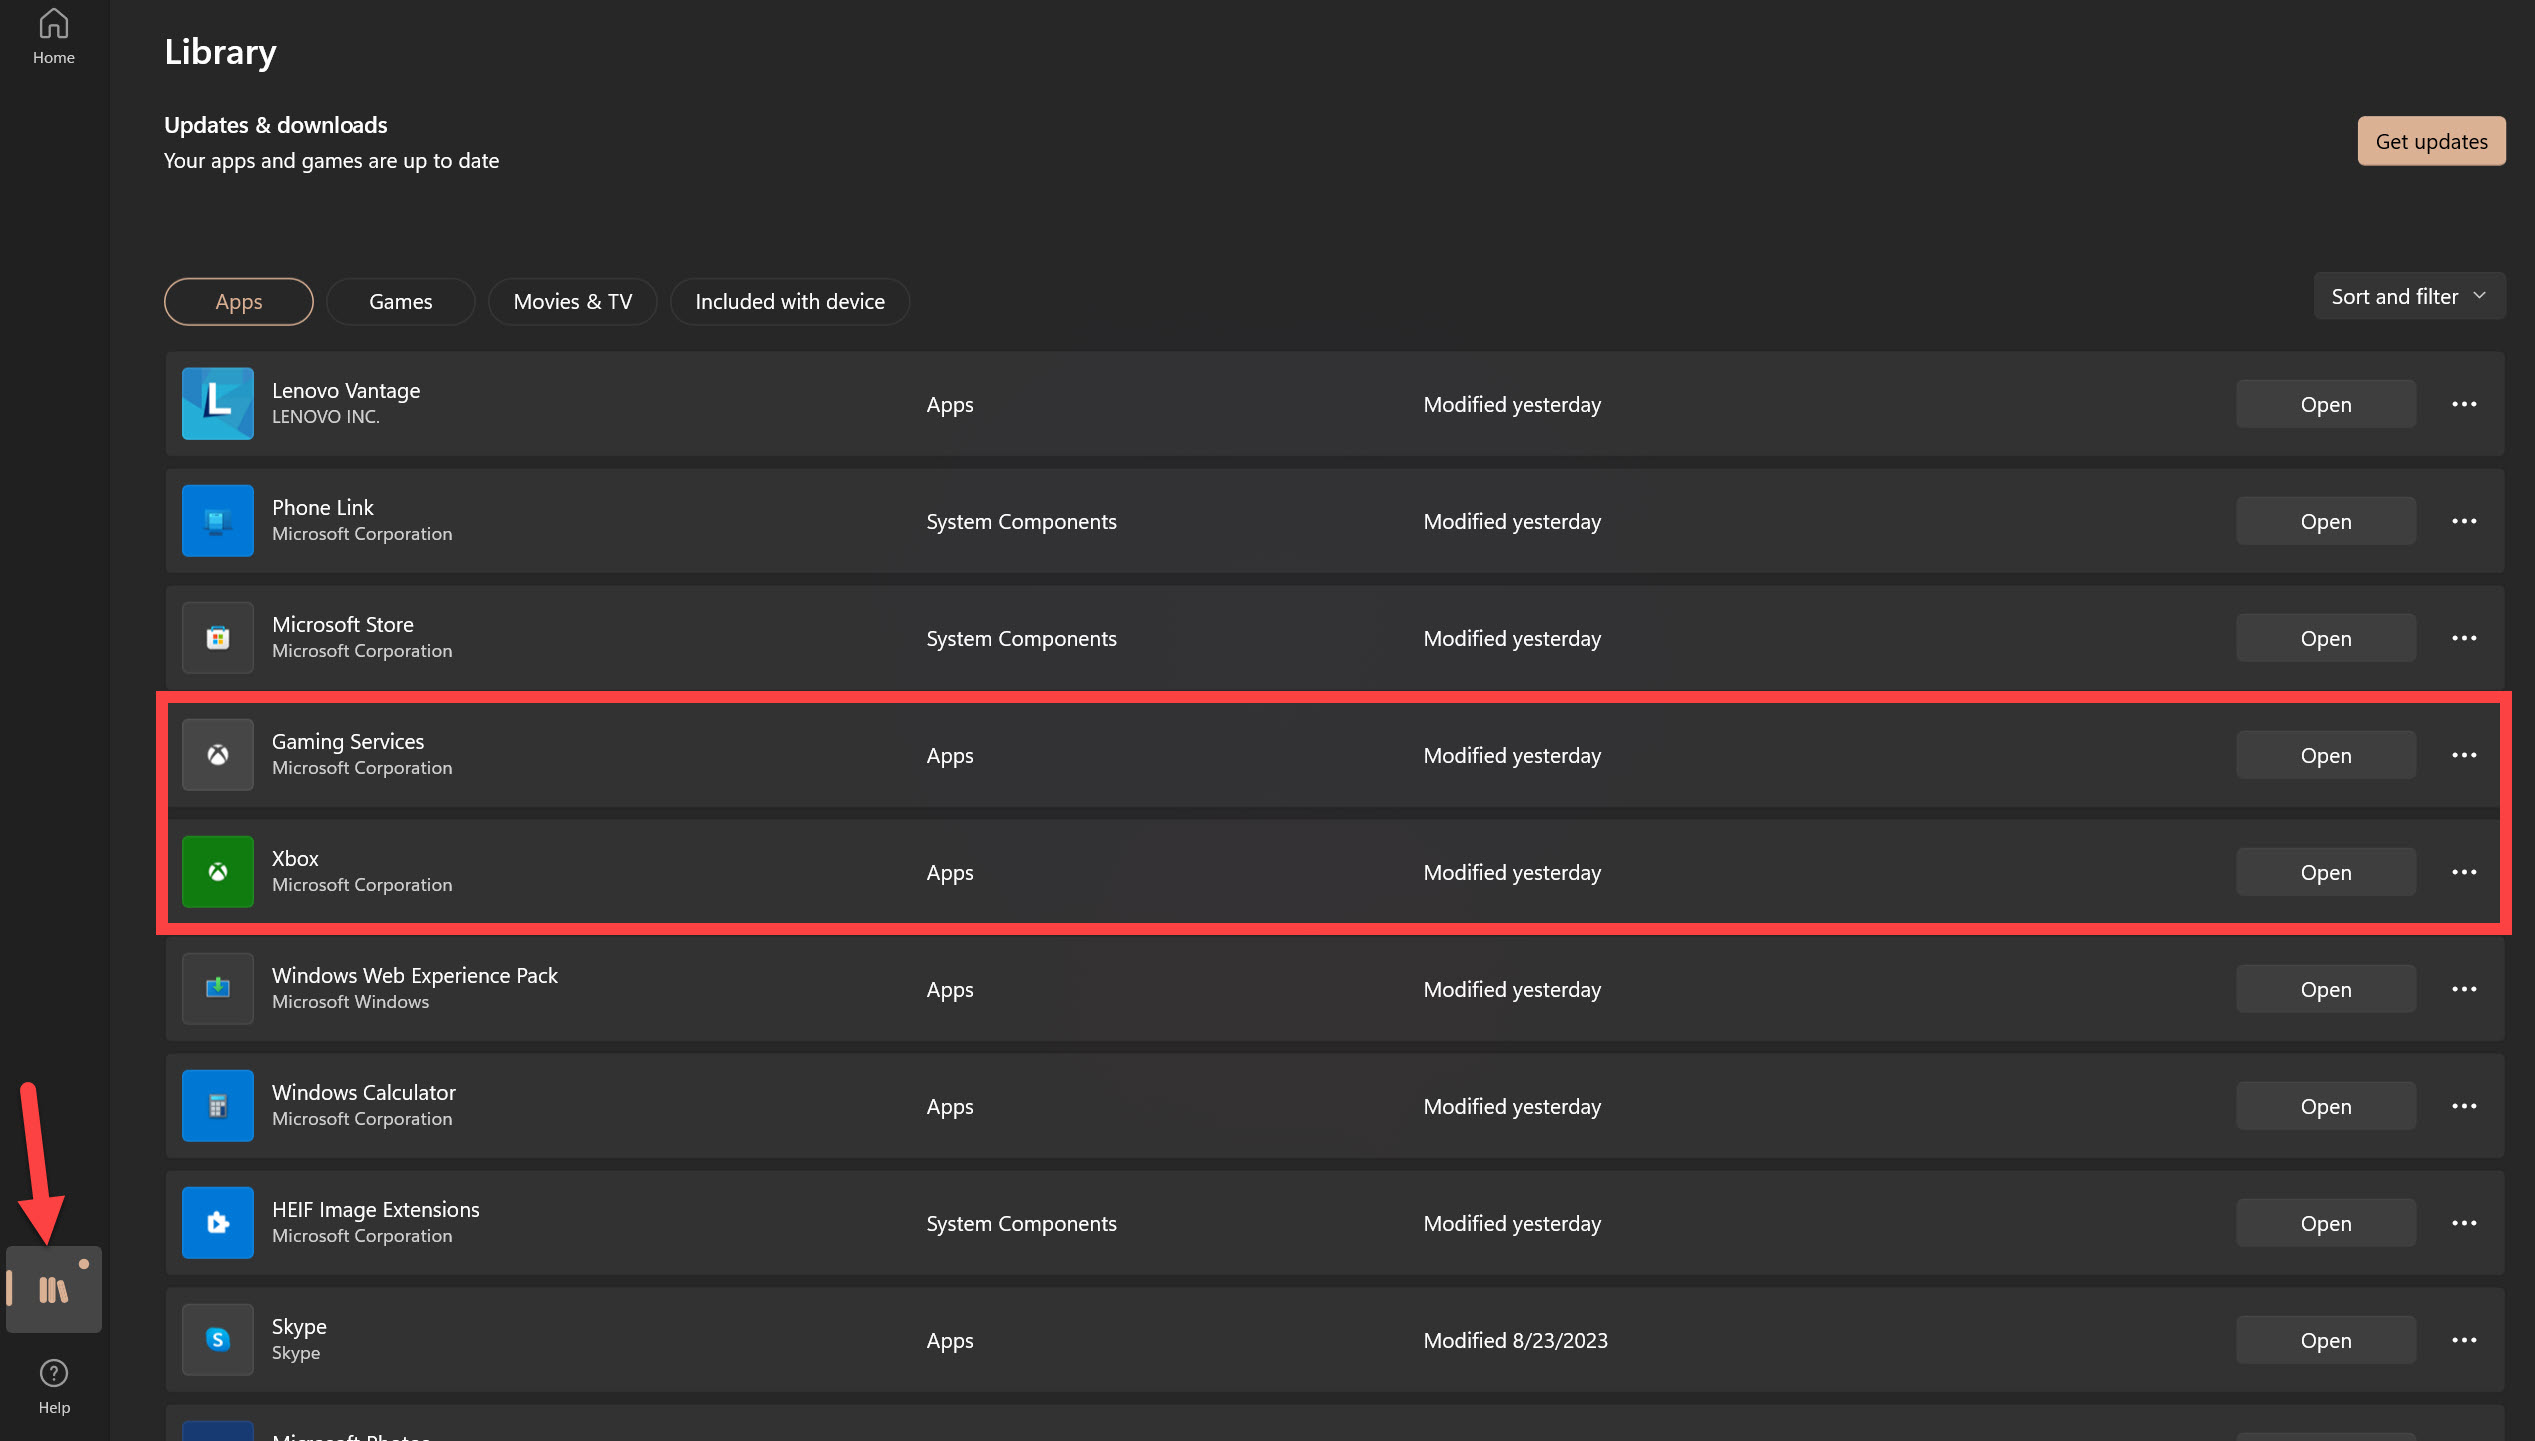
- You’ll have to open Microsoft Store by searching for it in the Windows Search. Simply Type “Microsoft Store” in the search and click the first result.
- After accessing the store, you must go to your app library on the second-last icon in the bottom-left.
- Here, the first thing you need to do is click on the “Get Updates” button on the top right.
- After the Store completes its scan, it’ll start updating the apps that have pending updates. This will also get your Xbox Application and Microsoft Gaming Services updated.
After you’re done, simply close down the Microsoft Store and try launching Starfield through the Xbox App. Your game would work normally if the problem originated from an outdated app or framework.
Run Starfield With Administrator Privileges
Most of the time, when games like Starfield are having trouble running normally on your PC, it’s probably because of a lack of permissions. By default, Microsoft Windows doesn’t give applications or games complete access to your PC as a security measure.
However, you can bypass this security measure by simply running Starfield as an administrator. Bethesda officially recommends doing so on their official forums in order to run Starfield without any hitches. Here’s our guide on how to run Starfield as an administrator.
After this, you can launch Starfield and play for a while. If the crashing issue was occurring due to a lack of proper permissions, this will resolve it. You’ll be able to play the game without any issues moving forward.
Repair Starfield Game Files
Another major reason why you’re facing Starfield’s crashing problem is that game files might have gone missing or corrupted. This will cause the game to crash, even if you’re just in the main menu or don’t launch at all. This can also lead to your save game being corrupted, according to Bethesda.
So, to fix this, you’ll have to verify the game files for Starfield whether you’re playing it through Steam or Xbox App. Here’s a detailed guide by us to help you through the process.
Now you can start the game and rest easy knowing that verifying game files has fixed the crashing issue.
Turn Off FSR And Turn VSync On
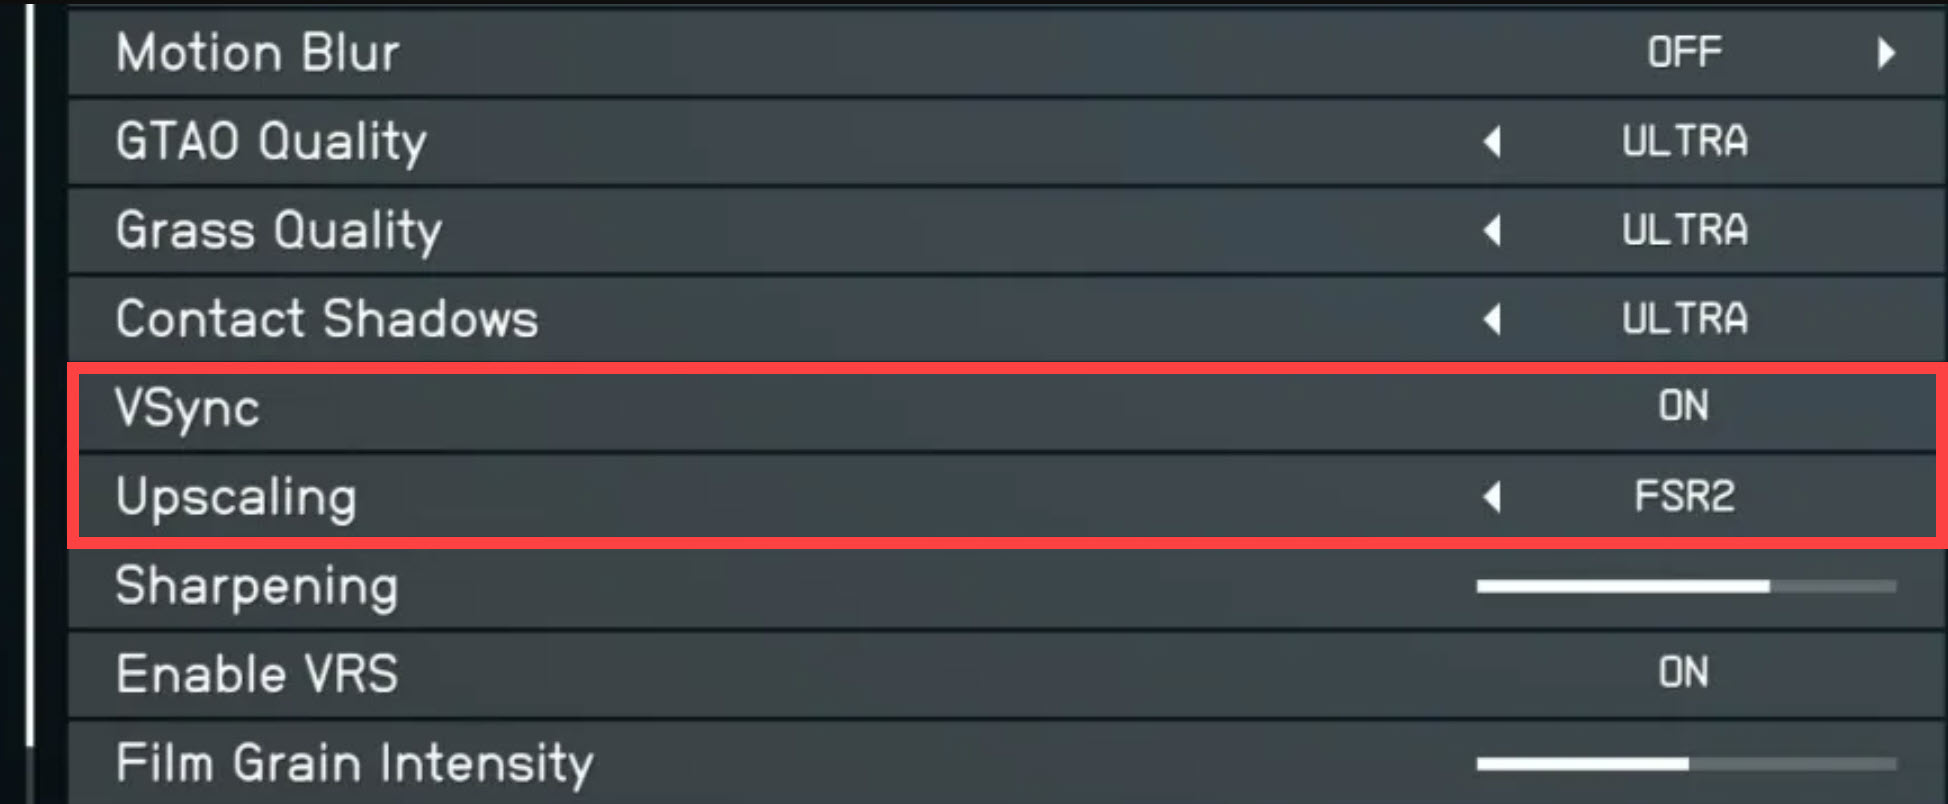
Players in the forums are reporting that FSR 2.0 implementation in the Starfield is actually making the performance worse. In some cases, it’s even causing the crashing issue for them. Until FSR is fixed, or you opt to install the popular DLSS mod, I recommend turning it off and capping your frames to 60. Here’s how to do it:
- Launch Starfield, and from the main menu, head towards the Settings menu.
- Inside Settings, you’ll need to access the Display settings.
- Inside the Display settings, go ahead and disable turn the Upscaling option to Off and Vsync to On.
After you’re done, simply restart Starfield and start playing the game. You’ll notice the game is quite stable this time around, and you won’t be facing any crashing issues at this point.
Whitelist Starfield From Your Antivirus
The antivirus software is the number one reason behind several problems in games, and this can also be the reason behind the Starfield crashing issue. To verify whether this is really the case, we’ll need to disable the antivirus on your PC temporarily.
Learn all about disabling your antivirus temporarily and adding Starfield to its whitelist through our guide right here.
Remove Overclocking Profile From Your PC
If you had been waiting for Starfield for a long time, you might have prepared your PC to run the game at its maximum performance capabilities. This means you might have applied overclocks to your hardware to squeeze every bit of performance when you finally have access to the game.
However, this isn’t working well for players as the overclocking profile can conflict with the game, causing it to crash and even not launch at all. This might be a letdown for a few PC players, but you can do two things in this scenario.
- You can either completely restore the clock speed of your hardware, essentially disabling overclocking profiles of any sort.
- Or you can fine-tune the overclocking limits and keep testing Starfiled to see what overclocks the game runs stable at. Once you find that limit, go nuts.
Why Is Starfield Crashing On Your PC?
Starfield just fully launched today, and players have been facing crashing issues in it ever since the early access days. This is quite problematic for players who’ve been waiting for the game’s release and counting down every second until they can get their hands on it.
Now, the game’s crashing problem might be happening due to several reasons, including:
- Issues with Xbox Game Pass subscription on PC.
- Servers are overloaded with players.
- PC lacks components with the power to run the game.
- Starfield lacks proper permissions to run.
- Missing/Corrupted game files.
- Problems with your internet connection.
- Outdated GPU drivers.
- Issues with the Xbox App.
- Your system antivirus restricts Starfield.
These are just some of the factors that can cause crashing and prevent you from playing the game for a longer period of time without any hitches. Now that we’ve identified a handful of issues, let’s work towards resolving them.
System Requirements For Starfield
Just before we start applying different fixes to help you solve the crashing issue, we first need to make sure your PC can run the game at all.
The game will run just on your PC as long as it matches or exceeds the official minimum Starfield system requirements below:
Minimum System Requirements For Starfield
- Operating System: Windows 10 version 21H1 (10.0.19043)
- CPU: AMD Ryzen 5 2600X, Intel Core i7-6800K
- System RAM: 16 GB RAM
- Graphics Card: AMD Radeon RX 5700, NVIDIA GeForce 1070 Ti
- DirectX Version: 12
- Network Type: Broadband Internet connection
- Storage Space Requirement: 125 GB of available space
- Further Notes: SSD Required
Did You Fix The Crashing Issue?
And there you have it. I’ve listed every possible solution to help you solve Starfield’s crashing and Error 0xc0000005 issue. Starfield just got released today, so expect this kind of issue to surface, considering the sheer scale of the game. However, the developers are actively listening to player feedback and devising hotfixes and patch notes as you’re reading this.
If your problem is severe and you need an expert opinion, I suggest you contact official support. They’ll surely analyze your particular issue and provide the best solution that’ll work.
Here’s what you can read next on Starfield from eXputer:
- Starfield How to Install DLSS Mod
- Starfield Best Graphics Settings
- Starfield Into The Unknown Bug [FIXED]
- How To Fix Starfield Not Downloading
- Best Starfield Settings For Maximum Performance On PC
- Starfield Unable To Log In Error [SOLVED]
Thanks! Do share your feedback with us. ⚡
How can we make this post better? Your help would be appreciated. ✍