Farthest Frontier features one of the most intricate farming systems players can come across, with increased map types, town hall placements, fertility details, early-game food production, maintenance of crops and lands, and much more. Our Farthest Frontier Farming Guide will give an overview of how to start and maintain a crop farm.
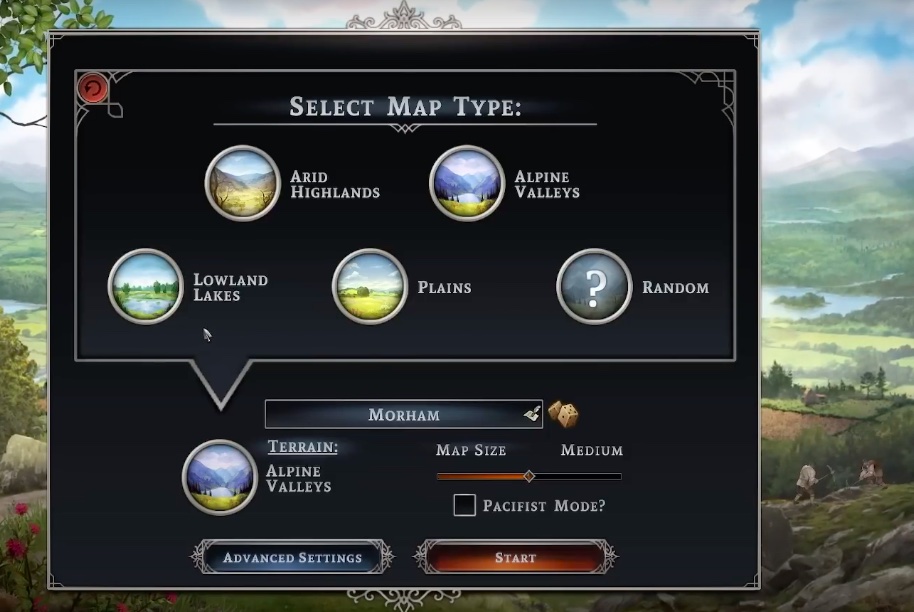
- Farthest Frontier offers 4 map types: Lowland Lakes, Plains, Alpine Valleys, and Arid Highlands.
- Lowland Lakes is beginner-friendly, with high fertility and easy crop growth.
- Plains have a solid amount of fertile valleys, making it easy for crop growth.
- Alpine Valleys have lower fertility and require more effort from the player for maintenance.
- Arid Highlands is one of the most difficult map types with extremely difficult maintenance, crop growth, and yield prediction.
- Players can also select a random option to let the game choose the best option for them.
- Town hall placement should be considered carefully, and players should examine the land available using the F key to get an overview of fertility.
Map Types
Let’s start by discussing the map types offered by Farthest Frontier. There are a total of 4 types of map details and map types, so let’s see what they are.
Lowland Lakes
The first type of map you will be offered will be the lowland lakes, which is pretty much one of the best selections for players who are completely new to the game. The map type is insanely beginner-friendly, with mechanics that are pretty easy to understand.
The fertility on the lowland lakes is pretty high, allowing for easy crop growth and low maintenance needed by the player. For players that want the highest amount of fertility, they should look into selecting the lowland lakes map type.
Plains
Another map type is the “Plains”, which is self-explanatory, as it is simply a plain area. When directly compared with the Lowland Lakes, it does not compare since lowland lakes have the highest fertility.
However, plains will have a solid amount of fertile valleys, allowing the player to plant down their crops easily without worrying too much about their crops going bad. If you’ve wanted to know more about quarries in-game, you might find our Farthest Frontier Quarry guide helpful!
Alpine Valleys
Moving on, the next map type that players can choose will be known as Alpine Valleys. Essentially, Alpine Valley has an even lower fertility rate than lowland lakes, the highest, and plains, the second highest.
That being said, the Alpine Valleys is best for players who dare test their farming and maintenance skills since the map type will require a bit more effort from the player’s end. Still, Alpine Valley is pretty lush compared to more barren areas.
Arid Highlands
In essence, the Arid Highlands has one of the most difficult map types, and maintenance is also extremely difficult. The crop growth and yield prediction are also difficult; therefore, it requires insane amounts of maintenance from your end.
Random
If you are someone who would rather let the game choose the best option for you, then you can click on the “random” button, which will shuffle through one of the four already available options, that being lowland lakes, plains, alpine valleys, and arid highlands. From there, it is up to the player to maintain their selected land.
Town Hall Placement and Fertility
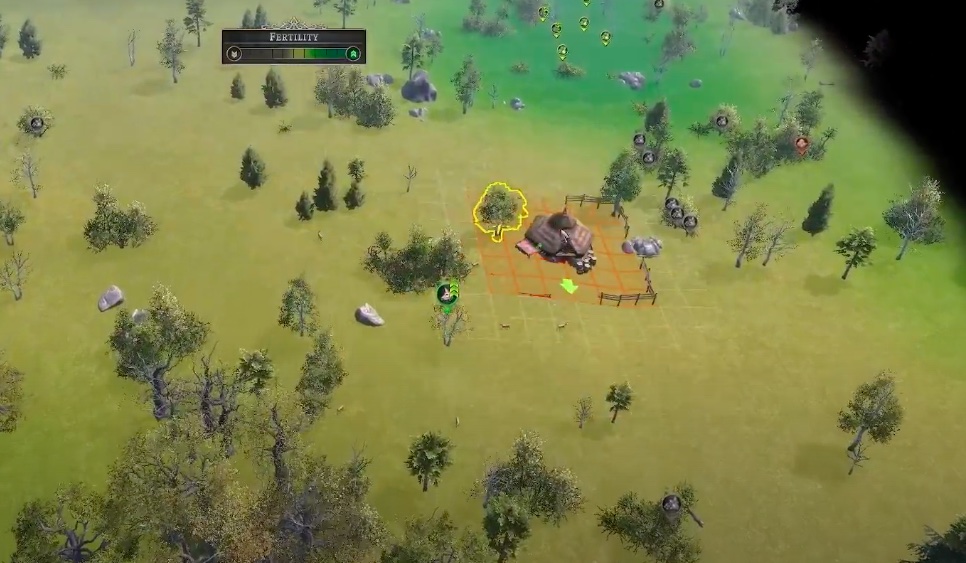
Now, apart from selecting the map type, the next thing that players will typically want to consider is the main town hall, considering that it will be one of the biggest landmarks of the player’s settlement in the Farthest Frontier. If you’ve wanted to get your hands on bricks in-game, then you might want to read our Farthest Frontier Bricks How To Get It guide since it goes into full detail!
Fertility Overview
When placing the town hall, consider fertility. Press ‘F’ to view green, yellow, or barren land types. The map offers an overview with no limitations. Look for lush green areas, ideal for settlement.
Dark Blue/Green Patch
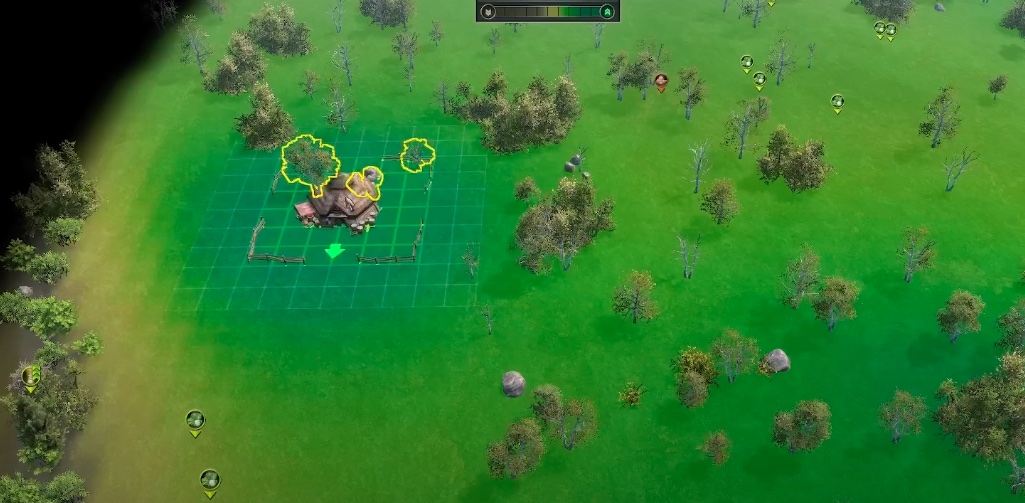
If you scroll over even more to the left area, Farthest Frontier farmers will be able to encounter a patch that will be colored blue/ green, and the color will be pretty deep. The patch of land being colored that particular color indicates its extremely high fertility. That being said, the lighter the color, the more it will prove to be suitable for your settlement.
Players will want to keep their settlement somewhere pretty close to that blue/green colored patch.
Mineral Resources
When choosing a settlement location, prioritize mineral resources. Settle near a consistent source of minerals to avoid shortages. Read our Farthest Frontier Best Food Sources guide for more.
Key considerations for settlement location:
- Water: Place near a water source, but avoid flooding risks.
- Dark patch: Opt for fertile land to ease crop farming and increase yields.
- Trees: Ensure sufficient trees for shelter from harsh weather.
Early-Game Production of Food
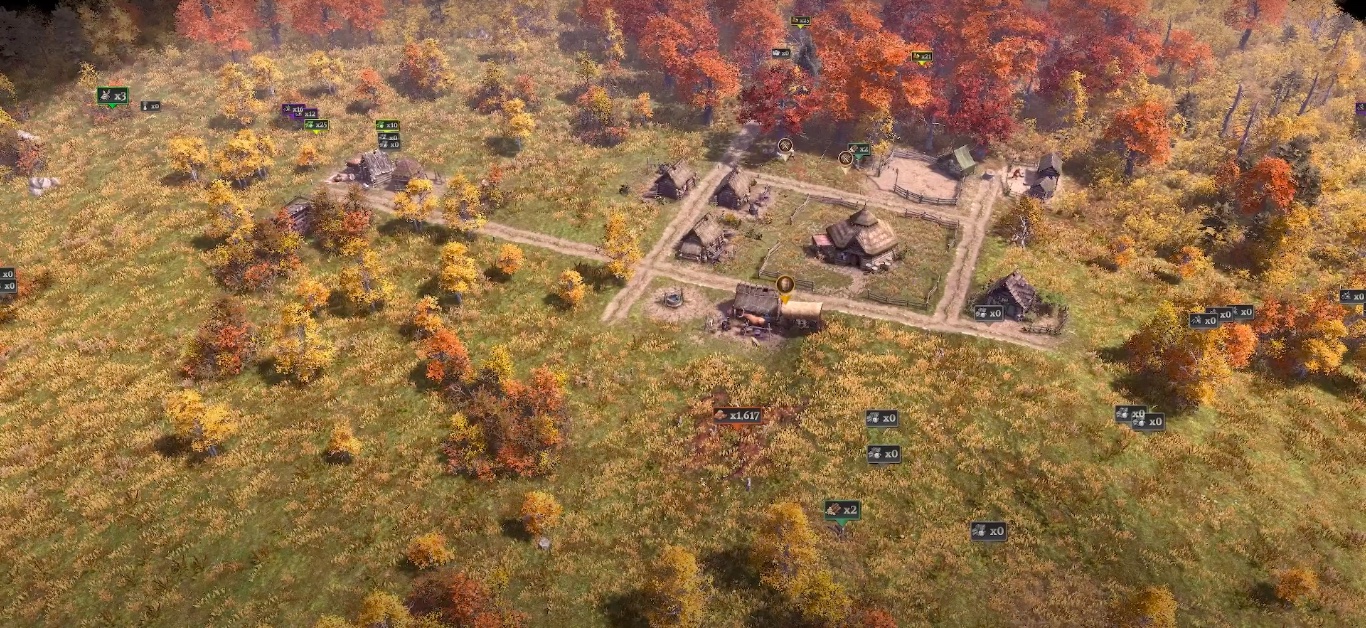
Now that you’ve finally got your settlement going, the settlement will include your main town hall, and apart from that, it should include a few basic houses so that however many people you have been able to be housed.
Alongside that, players will also have main food resources, such as hunting cabins providing a certain amount of food for their main settlement. While your settlement is still in its early stages, payers should note that they should focus on keeping their town as maintained as possible, meaning keeping up to the standards of living for the people in your area.
Should You Build Farms
In the early game, players often question the necessity of building a farm. The simple answer: no, you don’t need one. Initially, food resources are abundant, and investing in farmland is unnecessary, especially with a smaller population under 50.
For small settlements, focus on alternative food sources:
- Fishing: Fishing is a major food source. Dedicate some in-game time to catch fish, providing sustainable food for growth.
- Smoke Houses: Besides fishing, smokehouses offer various food options, making them a suitable choice, especially if you’re new to farming.
- Hunting: Hunting can provide meat, a versatile ingredient for various dishes.
Bear in mind that early on, some manual labor is required to relocate foraging huts with changing seasons and requirements. If you decide to build a farm early in Farthest Frontier, reserve 1-3 workers who are not already assigned to your settlements but can be hired as farmers.
Farm Placements And Sizes
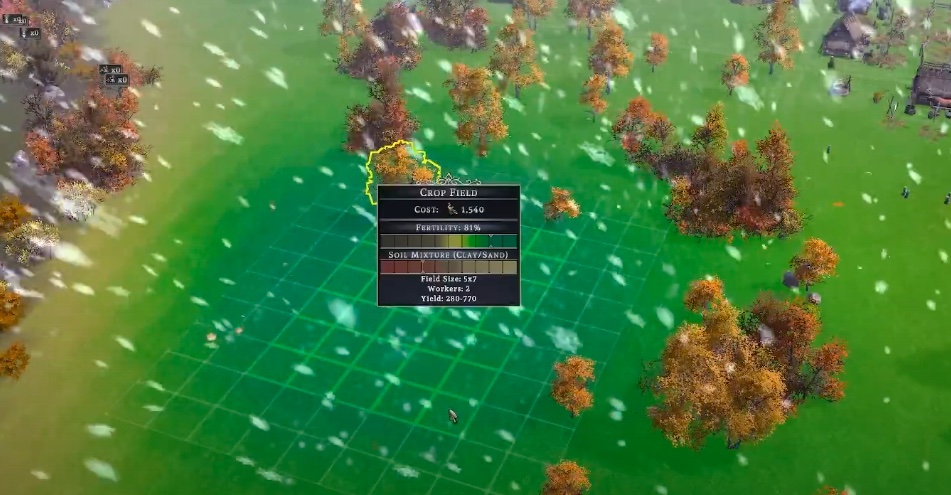
Now that you have started your settlement, starting with your farm is the next important and obvious step. One of the most important things that players will need to consider will be the overall size of their farm and how big it should be. Read up on our Farthest Frontier Desirability Best Ways To Increase guide!
Sizes
Starting with the standard size, it is a 5×5 sized land. Players are not allowed to create land smaller than a 5×5, such as a 4×4, 3×3, or 2×2, considering it will be practically useless, it will not have any kind of proper yield of crops, and it will take the same amount of effort that it would take to maintain a 5×5 piece of land.
When you are just starting with your first 5×5 piece of farm, players will need to invest in one main worker who will be continuously working on the farm. If one worker is simultaneously working on the farm day and night, then players can expect a yield of 200-550, which is pretty impressive for first-timers.
5×6
Players can also go for a 5×6 yield if they feel a 5×5 is too low. A 5×6 field will still require only one worker, but it will be able to provide you with 10% more yield when it is directly placed in comparison with a 5×5 piece of land. The total yield for a 5×6 land will be 240 minimum and 660 maximum.
5×7
If you want a slightly bigger piece of land to start with, you can go for a slightly more elongated version of the same 5×5 land and instead convert it to a starting dimension of 5×7.
5×8
Want to go even higher in dimensions? Why not go for a 5×8 piece of land, which will typically require the same amount of workers as that of a 5×7 piece of land, which is 2? So, if you’re going for a 5×7 land with two workers, why not use the same amount of labor for a higher yield?
If you use a 5×8 piece of farming land, then at a minimum, you will gain a total yield outcome of 320 and a maximum yield of 880.
5×10
A few players will want to max out their two workforce outcomes, and for that, they can try out a 5×10 land, which will give an outcome of 400 minimum and 1100 maximum yield.
Crop Rotation UI Interface
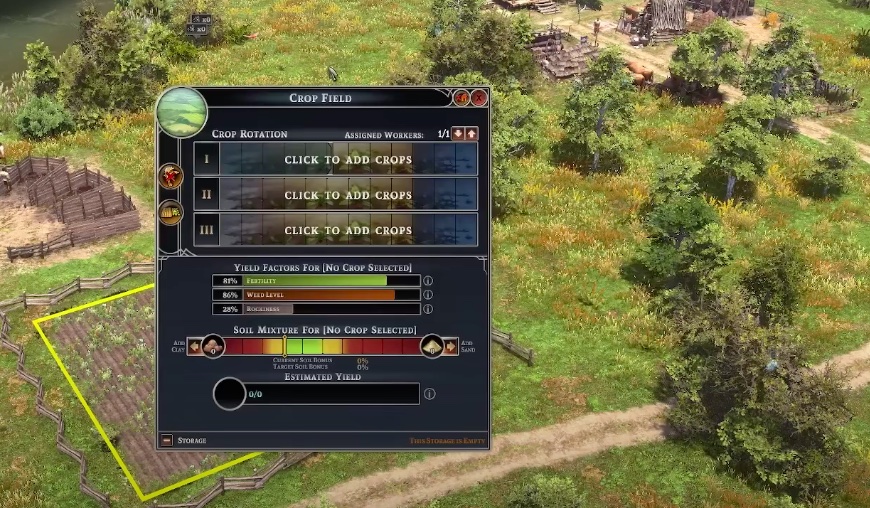
Okay, now that you’ve selected an overall size for your farm, it is time to figure out just what is going on with the entire Crop Field interface because of how complicated it may seem. Want to know how to get your hands on iron? Read our Farthest Frontier How To Get Iron and Craft Iron Bars guide!
Though it might seem like that, if it is broken down, it becomes pretty easy to digest, as can be seen below:
- Crop Rotation I, II, III: These bars show first, second, and third-year crop placement. “I” represents your first year, “II” your second, and “III” your third.
- Block Separation: In each “one-year crop placement,” you have 12 blocks, each representing a month (January to December).
- Shaded Blocks: Shaded blocks indicate time passed since your first crop placement in the first, second, or third year.
- Assigned Workers: Family size determines the workers needed; 5×5 requires one worker, and 5×7 requires two. The tab shows active workers maintaining your farm.
- Yield Factor: This includes fertility, weed level, and soil rockiness. Higher fertility yields better crops, as indicated by the Estimated Yield bar.
- Estimated Yield: Reflects the expected crop outcome based on soil conditions.
- Add Crop: Click to select and plant crops from your inventory.
- Crop Sliding Placement: Move crops within 12 monthly boxes, considering winter growth limitations.
- Removing Crops: Easily remove crops if needed. This summarizes the entire UI interface.
Crop Information
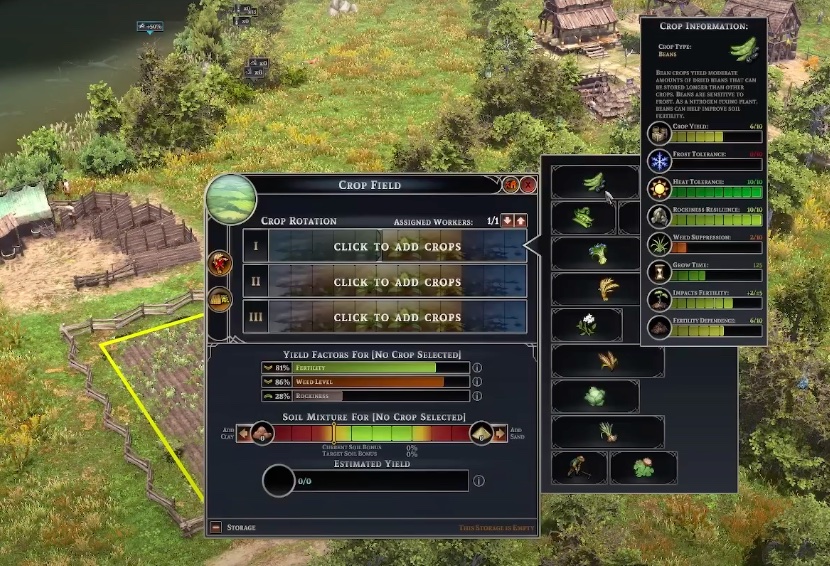
Next, let’s dive deeper into the Farthest Frontier Farming Guide regarding crops for players:
- Crop Yield: This indicates the food players will harvest from their crops. Lower crop yield means less food.
- Frost Tolerance: It reveals how well crops withstand extreme cold, like winter nights in December or January.
- Heat Tolerance: Similar to frost tolerance, it shows how much heat crops can endure without extra watering. Some crops thrive in hot months like June or July.
- Rockiness Resilience: It’s essential for good crop outcomes. It measures how well crops handle rocky soil. Low resilience leads to lower yields.
- Weed Suppression: This shows a crop’s ability to tolerate weeds without affecting yield. Better weed suppression ensures more stable crop yields.
- Grow Time: It represents the time required for crops to be ready for harvest. A shorter grow time yields a faster output.
With that, we will wrap up our Farthest Frontier Farming Guide! Our Farthest Frontier Clay guide is a must-read!
Guide and Photo Credits: Taka on Youtube
Thanks! Do share your feedback with us. ⚡
How can we make this post better? Your help would be appreciated. ✍