One of the most important features of the game is to be able to mine minerals. Iron ore was the earliest mineral added to the game. You can smelt the Iron ore into Iron ingots and craft many new items in the game. You need to learn about the Best and Optimal Levels of Iron Veins in Minecraft version 1.18 because that changed the game.
Key Takeaways
- Iron in Minecraft is found at two distinct levels: on Stony Peaks at Y=232 and underground at Y=16.
- It’s abundant and easily spotted with bronze spots on the rock.
- Preparation involves acquiring the best pickaxe.
- With a pickaxes in hand, head to your preferred location and mine the iron.
- Iron is versatile, allowing for crafting of better swords, axes, and armor pieces like helmets.
- Author’s Note: With more than dozens of hours of experience in Minecraft, I feel more than obliged to provide you with hands-on experience on the topic below.
Best Iron Mining Levels
The Minecraft 1.18 update, released in November 2021, brought forth some major updates. It is named ‘Caves & Cliffs: Part II’. Although the previous update brought several new ores to the caves, v1.18 completely changed the game. It introduced bigger caves, taller mountains, a new cave system, mountain biomes, and even the concept of flooded caves. The new heights and depths of the game’s world with the previous version were fully utilized with the 1.18.
In the versions before the ‘Caves & Cliffs,’ you would only find huge quantities of Iron underground, below sea level. But the update changed everything in the game. After update 1.18, it is more common to find Iron in the mountains rather than underground.
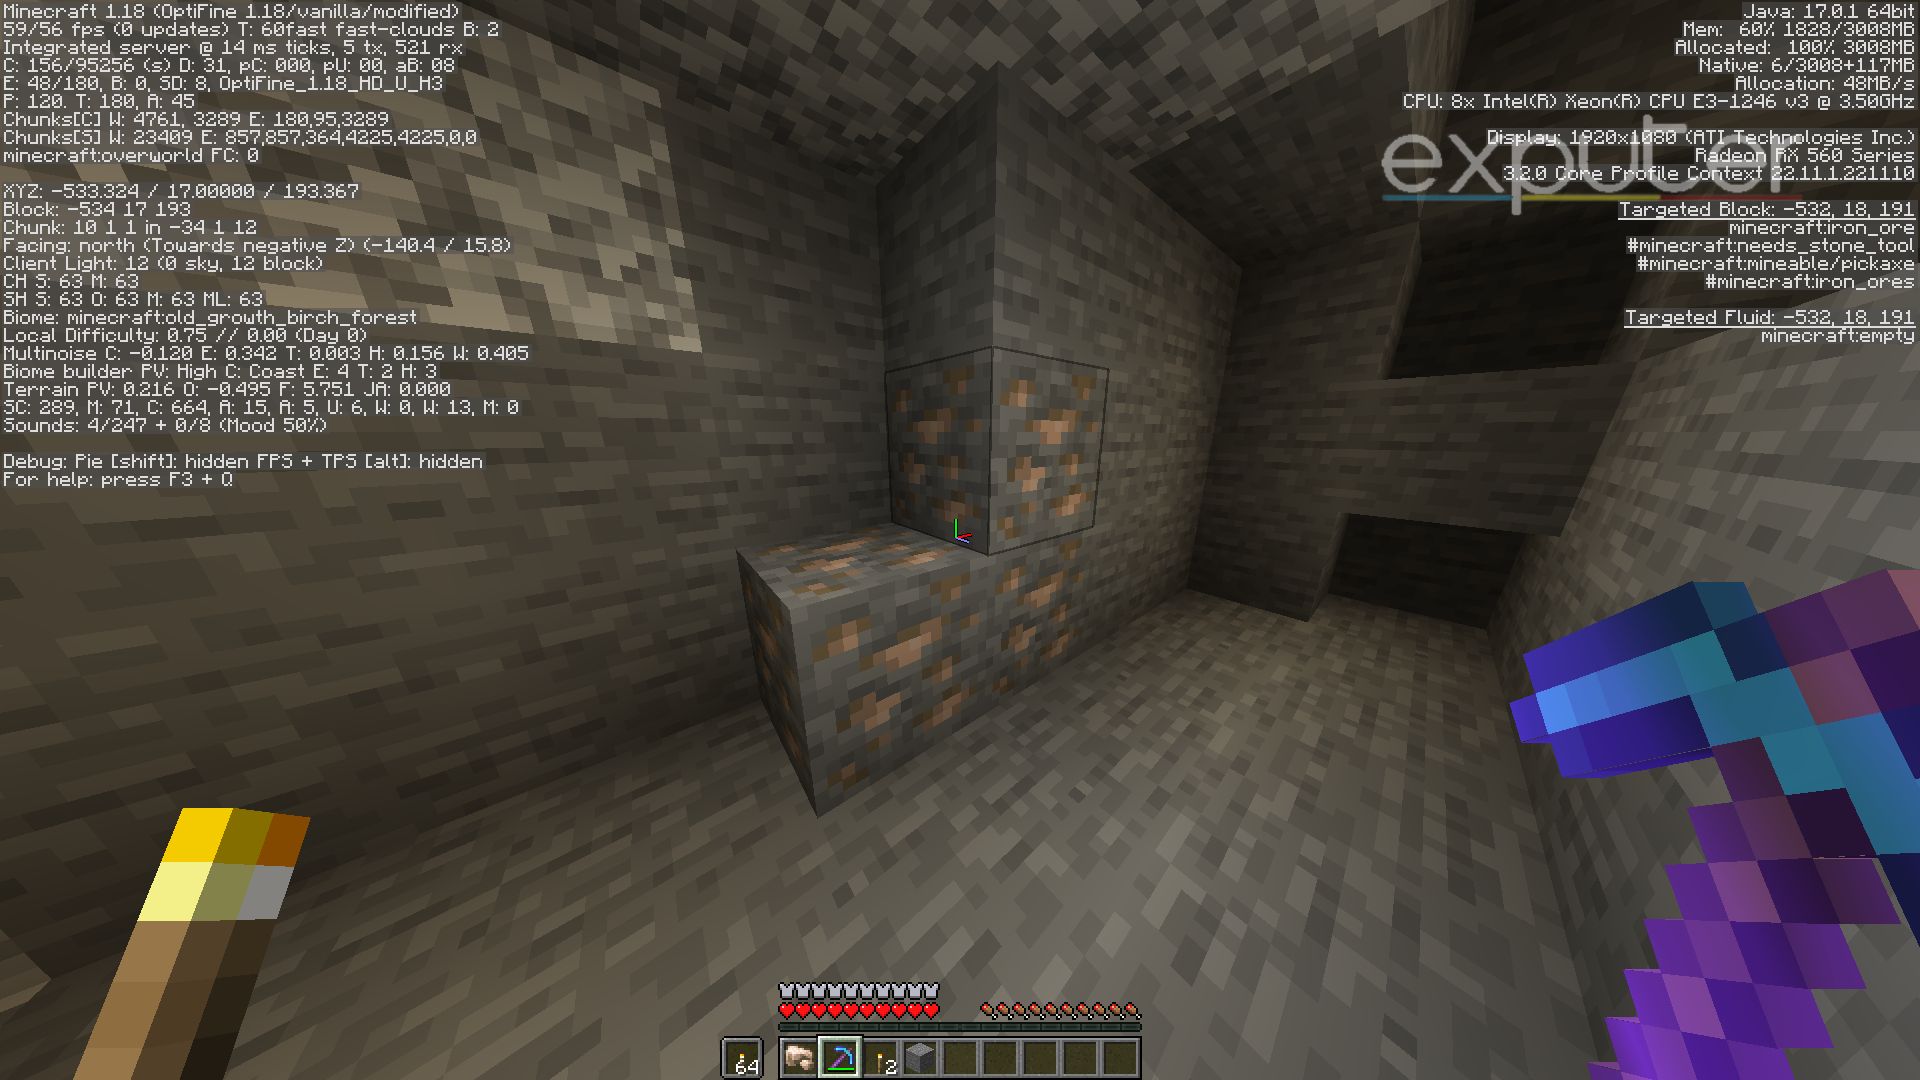
If you have the goal to mine Iron in Minecraft, then it is best and optimal to look for Iron or Iron Veins on the Y=232 Level or Y=16 level in 1.18. According to a post shared on Twitter by one of the developers, these are the best levels to find Iron in Minecraft version 1.18. While looking at the picture, you come to understand how the Ore distribution work, and you can utilize it to your benefit too.
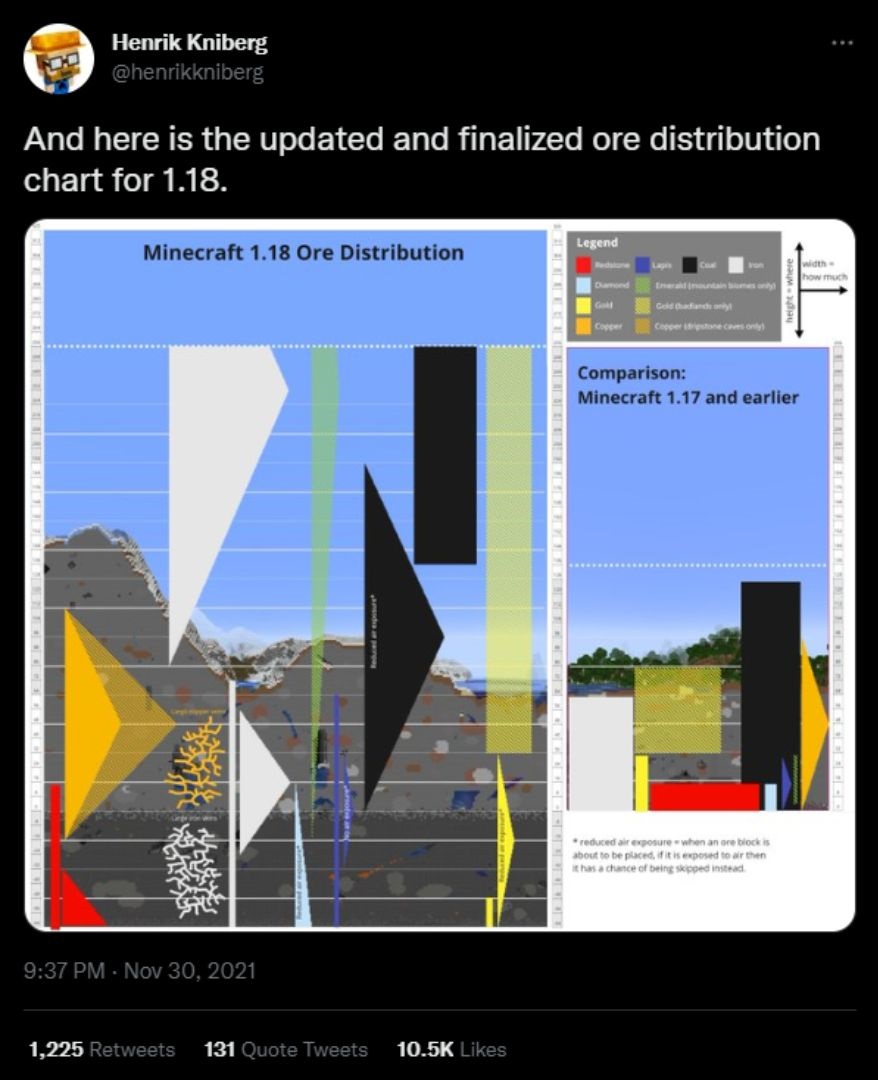
The Vertical distance tells the range where you’ll find Iron or any other mineral in the game. Whereas the Horizontal length tells the density or how much you’ll find there. It shows that mining in the Mountains is the best option to go for.
Best Level To Find Iron
To efficiently gather iron in Minecraft version 1.18, you have two main options: mining in mountains at Y=232 or delving underground to Y=16. Iron is available at other levels as well, but these locations offer the highest concentration.
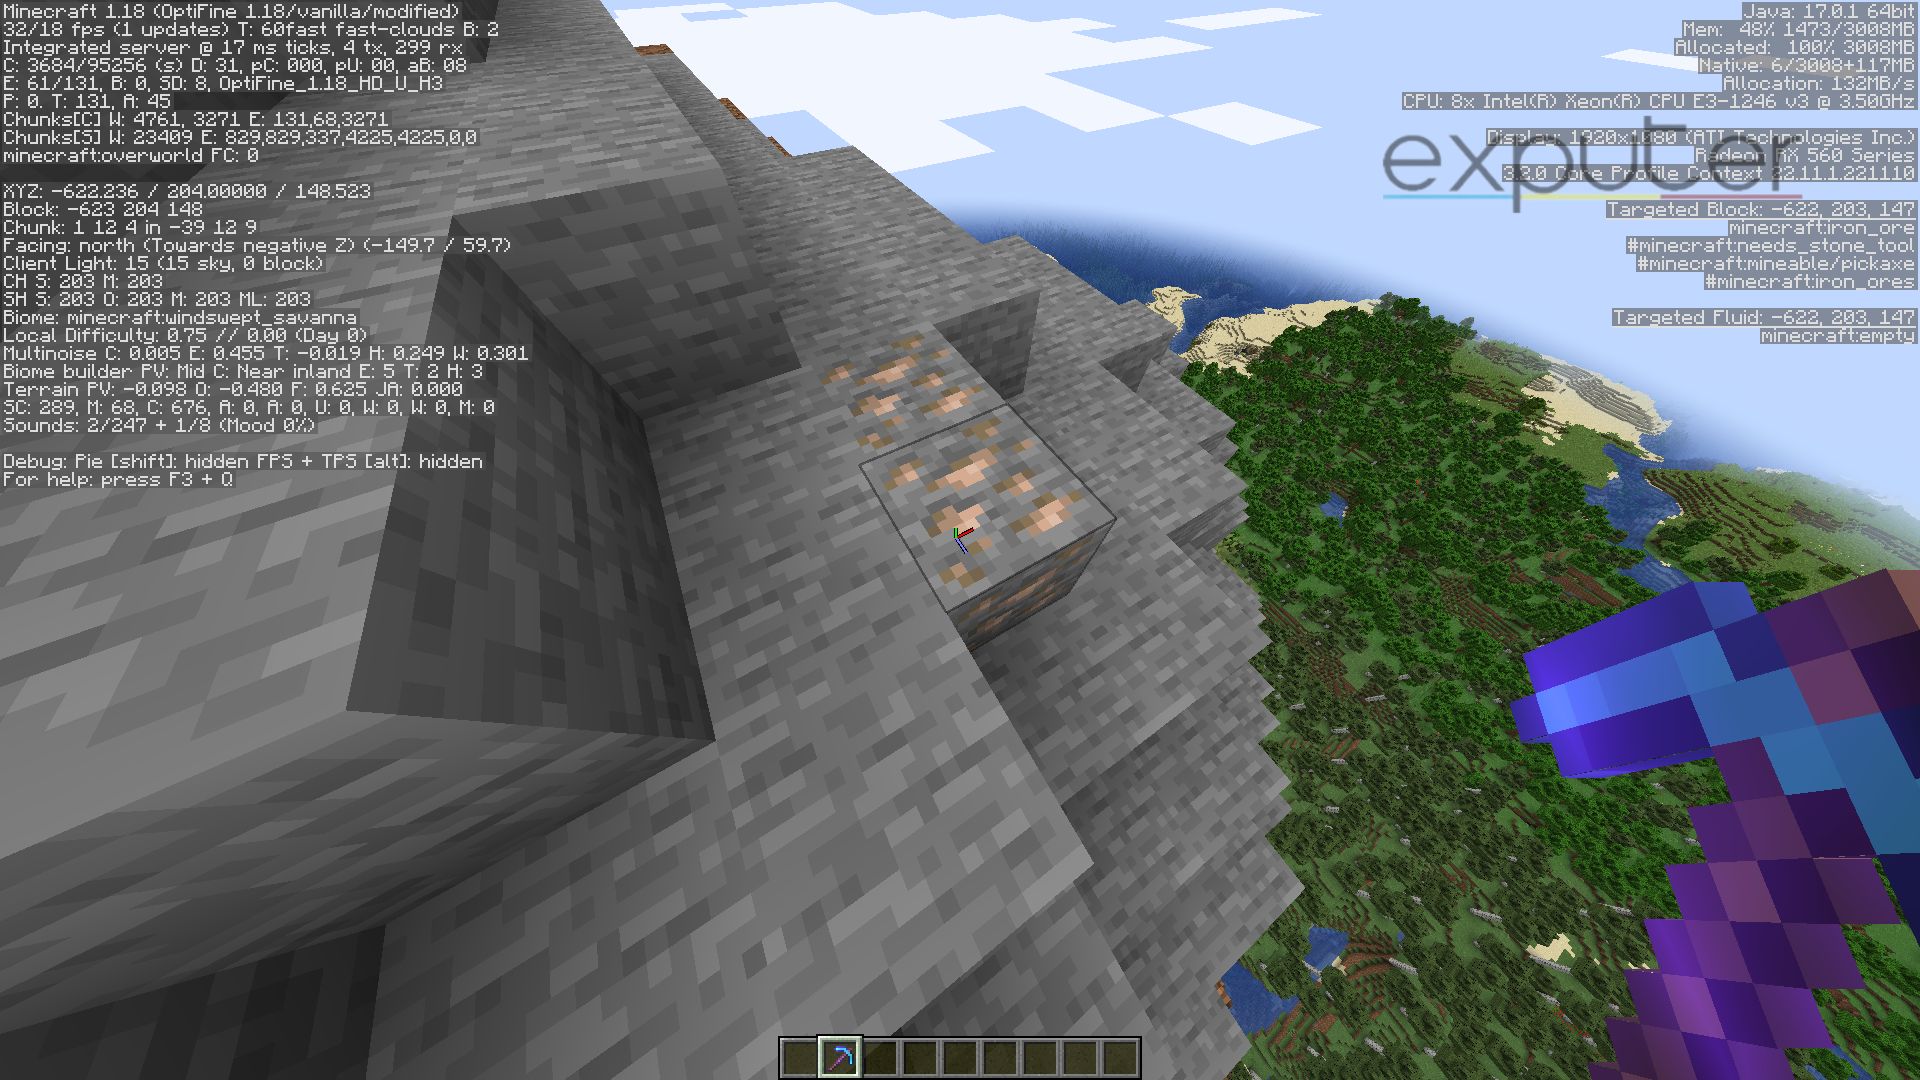
In mountains, particularly the ‘Stony Peaks’ biome, you’ll find abundant iron. Mining at Y=232 ensures optimal iron yield. Create a cave system for efficient mining once you reach this level.
How To Check Level
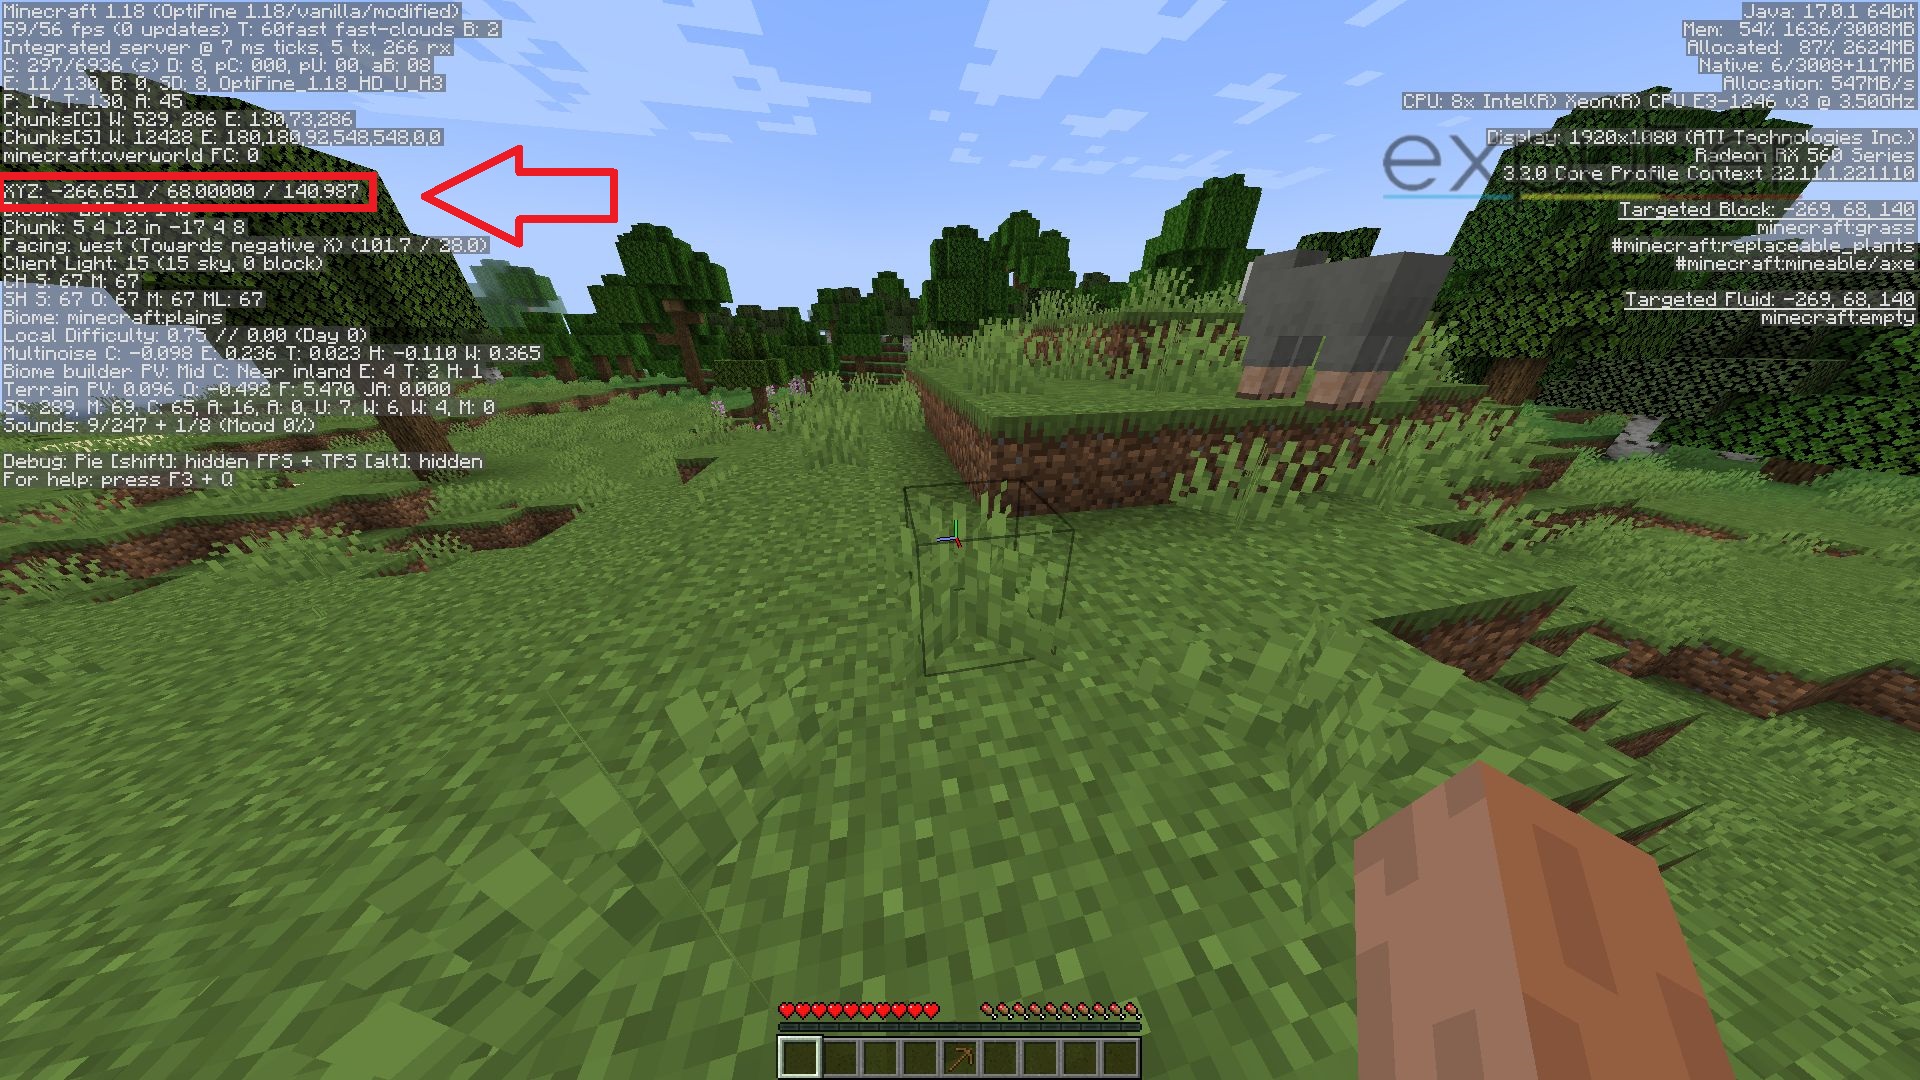
Now, before you can head down towards the mines or up to the mountains, you need to understand how Coordinates work. In addition, you must know how to check your level in Minecraft so you don’t waste your time at a place where you won’t find the most Iron. For that, you’ll have to learn how to properly know what level you are on.
- Press the F3 key on your keyboard to display the debug screen in the top left corner of your screen.
- Look for the line labeled “XYZ,” which is divided into three segments: X, Y, and Z.
- The Y-coordinate indicates your current vertical position. This is the value you’ll want to pay attention to when mining for specific resources like iron.
By monitoring your Y-coordinate, you can navigate to the desired depths to maximize your resource collection. Additionally, the X and Z coordinates are helpful for determining your horizontal location and marking specific locations on the map.
Preparation To Mine Iron
Once you have found an Iron ore, you must be prepared with the necessary tools to mine. You can only use very specific tools to mine for Iron and not every tool mines with the same efficiency. In Minecraft, you can make different tools and equipment to help make it easier to mine Iron in the game. We’ll explain what you’ll need to mine with efficiency.
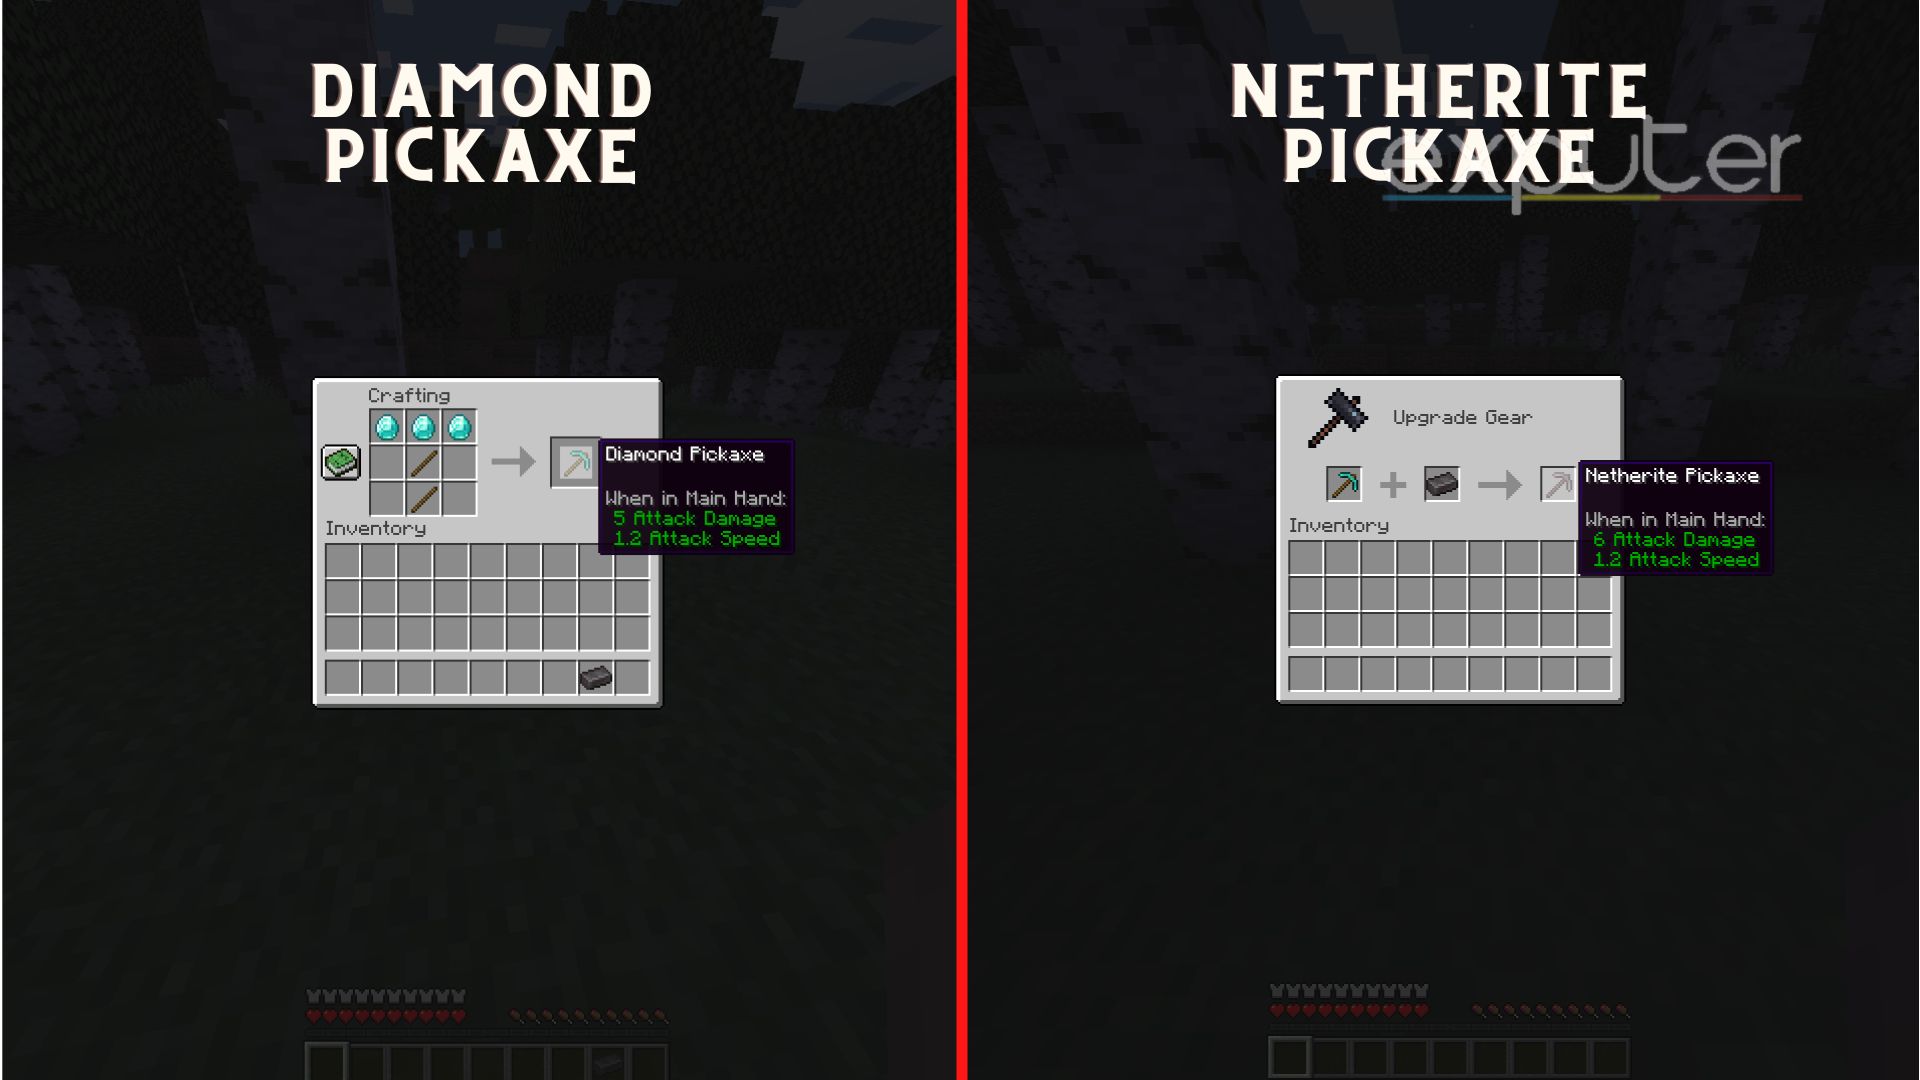
Pickaxe: The pickaxe is essential for mining iron ore. You can only mine iron with a Stone, Iron, Diamond, or Netherite pickaxe. Here’s how to craft one:
- Open your crafting menu, displaying a 3×3 grid.

To craft a pickaxe, you need to make a T-shape. [Image Credit: eXputer] - Place three of the desired material (stone, iron ingot, diamond, or netherite ingot) across the top row horizontally.
- Place two sticks vertically in the middle column, leaving the bottom row empty. This creates a ‘T’ shape.
- Once the items are correctly placed, the pickaxe will appear on the right side of the grid. Craft it and add it to your inventory.
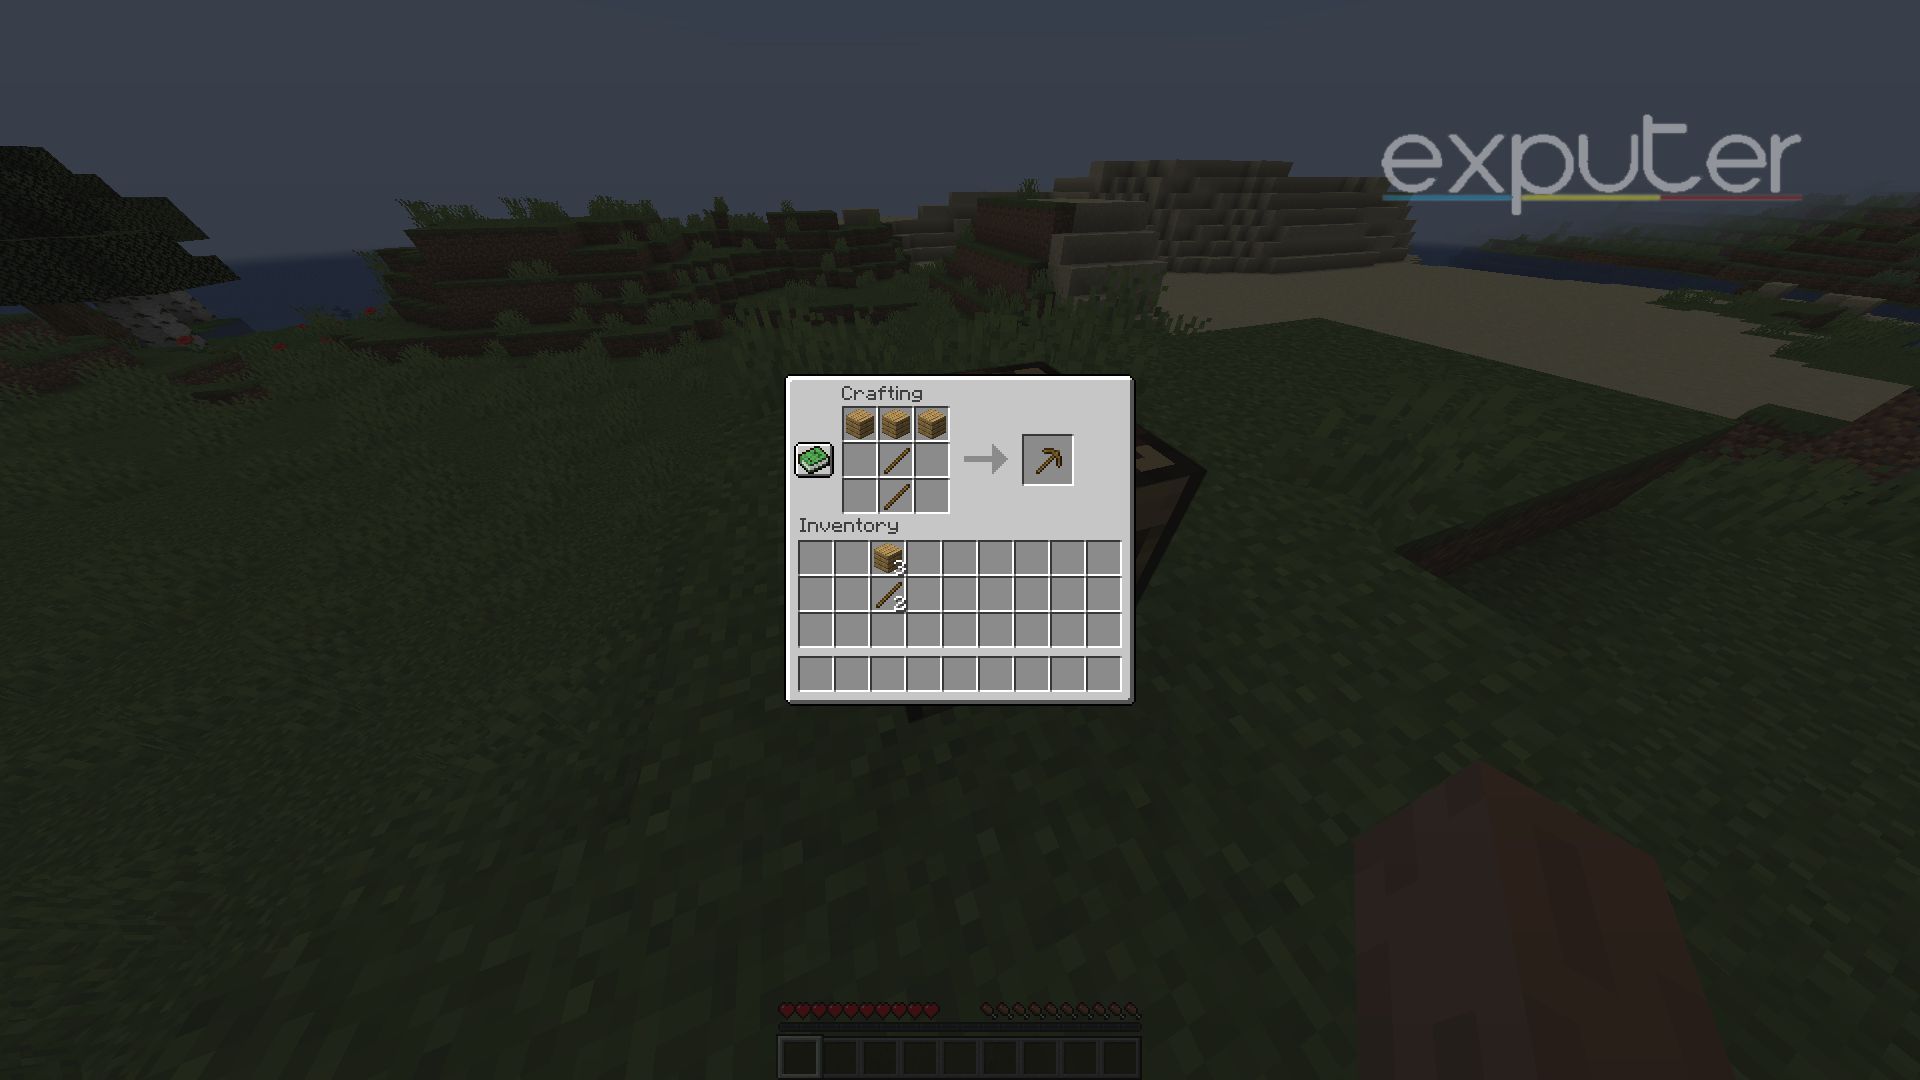
Starting out, craft a Stone Pickaxe as the Wood Pickaxe won’t be strong enough to mine iron. Upgrade to an Iron, Diamond, or Netherite pickaxe as you acquire the necessary materials for increased efficiency.
Throwing in a bunch of Enchantments such as Efficiency and Unbreaking will make your Pickaxe much more efficient. One of the best enchantments when mining would be the Fortune Enchantment. It will completely change how you mine Minerals in the game.
Mining Iron
- Locate Iron: Head to the mountains for a high concentration of Iron veins. If you’re open to mining other minerals, venture underground where various minerals, including Iron, can be found.
- Equip Yourself: For your first mining venture, obtain a Wooden Pickaxe to gather cobblestones. Then, craft a Stone Pickaxe for mining Iron.
- Mining Process: With the Stone Pickaxe equipped, click and hold the left mouse button to strike the Iron ore until it breaks into smaller blocks. Collect the mined Iron ore before it disappears.
- Smelting Iron: Place the Iron ore and fuel (coal or charcoal) in a furnace to smelt the ore into Iron ingots. Use these ingots to craft useful items.
- Advanced Mining: As you progress, venture deeper into mines for more resources. Bring extra Pickaxes, food, and torches to sustain longer mining sessions. Enchant your Pickaxe with Efficiency and Unbreaking enchantments for improved efficiency and durability.
By following these steps, you can efficiently mine Iron.
Why Should You Mine Iron?
Okay, so you have collected a bunch of Iron, or you are about to mine Iron but don’t have any idea what to use it for. Then you have come to the right spot. Mining iron in Minecraft is essential for several reasons:
- Crafting Tools and Armor: Iron is used to craft a wide range of essential items, including armor, tools, weapons, compasses, anvils, and buckets. Iron tools are particularly important for mining other valuable resources like diamonds and gold.
- Defense and Protection: Iron golems can be crafted to protect your base from various threats in the game, providing an additional layer of defense.
- Transportation Networks: Iron is crucial for creating transportation networks using rails and minecarts. By automating these systems with iron and redstone, you can greatly improve efficiency and convenience in your world.
Conclusion
In conclusion, mining iron is a fundamental aspect of Minecraft gameplay. Knowing where to find it and how to utilize it effectively can greatly enhance your gaming experience, enabling you to craft powerful tools, protect your base, and create intricate transportation systems.
More From Exputer:
- Best Minecraft House Ideas
- Best Minecraft Backgrounds & Wallpapers
- Best Bow Enchantments In Minecraft
- BEST Minecraft Launchers
Thanks! Do share your feedback with us. ⚡
How can we make this post better? Your help would be appreciated. ✍