FIXED: Valorant Error Code 39 [Updated 2023]

Is the Valorant error code 39 not letting you play the game anymore? Find out how to solve this issue with the fixes that this guide entails.

Have you been enjoying the free-to-play FPS to the full but have lately had your experience ruined by the irksome Valorant error code 39? You’ve definitely come to the right place looking for working solutions to the issue at hand. We’re going to talk about everything that can fix this problem and get you back to playing at full tilt in no time.

Key Highlights
  • Error Code 39 typically occurs when the servers are down. This may be because of a new patch, ongoing maintenance, or something else. 
  • This error reportedly occurs mainly on North America servers, but some Europe players have also reported it.
  • This error is usually temporary and resolved by the developers intentionally taking servers down to update the game. So, simply waiting may be the way to fix it.
  • Rebooting your PC is a simple and effective solution when encountering this error code.
  • Running the game as administrator may fix the error, if it’s caused by lacking special privileges. 
  • Changing the Startup Type of the Virtual Disk service in your PC’s “Services” program can sometimes fix the issue.
  • A Clean Boot can help you assess whether a specific program or application is causing the error and can resolve other peripheral issues without deleting any progress. 
  • VGC is an essential service that allows Valorant to run smoothly and connect to multiplayer servers. It is important to ensure it runs correctly to avoid errors.
  • Unnecessary files may accumulate in the game folder over time and cause errors. It is worth checking and removing them to ensure an optimal experience.
  • If nothing else works, uninstalling and re-downloading/installing Valorant or the Riot Games client may fix the error code 39 issue.

8 Ways To Fix Valorant Error Code 39  

Reports circulating around the internet all seem to describe that error code 39 mostly affects North American servers. However, some Valorant players from Europe have also been included in the expansive list of influenced users. Therefore, server connectivity is one of the major reasons you’re going to be stopped from playing. This is why the error code states, “There was an error connecting to the platform. Please restart your game client.” 

Error Code Val 39
Error Code VAL 39

The error code should ideally acknowledge this information already and advise aspiring players not to bother making any efforts on their end, but since that’s not the case, it’s our duty to create due awareness and entail multiple fixes for the issue if required as well.

Moreover, it’s worth knowing that there’s a strong likelihood of a player running into the VAL 39 error code in the wake of a major game update. The developer—Riot Games—tends to drop Episodes and Acts for the game which implement a ranking-based time frame. Whenever an Act or a new Episode comes out, the servers experience downtime and hence cause the error code 39.

Now that you’re aware of the reason why this issue happens, let’s jump right into the fixes.  

Play the Wait Game 

Don’t take that subtitle too literally. In most cases, the code 39 will go away on its very own. This is simply because of the nature of its origin. The developers intentionally make the servers go down to properly incorporate whatever new they have brought to Valorant. The fix, therefore, is quite obvious in this scenario. All that you have to do is wait until the addition has been made and normalcy has been restored.  

A few important places to keep getting your updates from is the official Twitter handle of Valorant that will definitely post anything major heading toward the game. In addition, you can also keep track of the official Riot Games Server Status to get more up-to-speed information on anything related to server connectivity. Lastly, a specialized website called DownDetector is also important to have pinned in your browser somewhere. 

That said, all of the above is for regular cases where the issue does not pertain to your PC or the game client you’re using. If considerable time has passed and no reports are coming in regarding the downtime of Valorant, then it’s safe to assume that the problem is on your end. 

Now that the wait game is over, let’s look into the matter more in-depth and talk about what you can do in order to solve it. 

Restart the PC

We’re going to start off with something quite undemanding here. The effectiveness of a mere reboot is something that needs to be admired more. The first thing that you should do after encountering the Valorant error code is to let your PC cool off some steam by shutting it down.

Turn it back on, load up the game client or the launcher, and try playing Valorant now to see if it lets you connect to the servers now. 6 times out of 10, restarting your PC gets some good work done. However, if you’re still not able to play, it appears that the issue you are facing is rooted deeper than we anticipated. 

Try Running the Game as An Administrator

Running the game as an administrator means that you get to launch it uninterruptedly without the constraints of special admin privileges. This seemingly trivial process could be hindering the game from properly connecting to the servers and, in turn, popping up with the VAL 39 error code. We can rule this out quite painlessly by running the game as an administrator and that should give us the answers we need to progress. 

To do this, look for the game using the Window Search bar by typing in “Valorant.” The application should appear at the top of the search results and present you with different options on the right-hand side of the page. Click on “Run as administrator” and move forward with anything that entails from here on out. 

val error code 39 valorant
Running Valorant as An Administrator

The game should launch on your Windows 10 PC now. Go ahead with the log-in screen and see if Valorant now connects to the relevant servers. If running the title as an administrator hasn’t solved the issue, you need to try more complicated fixes—all of which we’ll be getting to from here on out.  

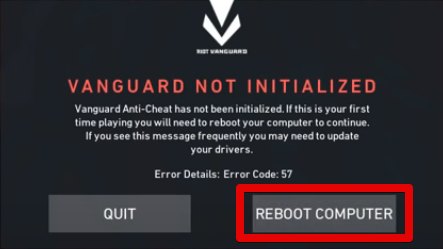
  • The Valorant Error Code 57 “Vanguard Not Initialized” can be fairly bothersome as well if you happen to run into it. Find out how to fix the issue here.  

Optimize the Virtual Disk Service on Your PC

One of the first things that you can do to start playing Valorant again is to change the “Startup Type” of a particular application in your Windows 10 PC’s “Services” program. 

Doing so boasts a sizable chance of resolving the Valorant error code 39 issue to get you back to playing without breaking a sweat. The application we’re talking about is called Virtual Disk and it is responsible for managing the services related to storage arrays, file systems, volumes, and disks too. 

The following steps are going to walk you through the full process. 

  1. The first step is to go to your Windows Start menu and type in “Services.” That should change the contents of the screen on your PC and bring up the search results. Click on “Run as administrator” when you see the options beside the application to continue while avoiding any potential problems. 
Launching the Services app as an administrator
Launching the “Services” app as an administrator

2. Once the application launches and you see its main interface, scroll down a little to find the “Virtual Disk” service. Right-click on it to expand the options and then select “Properties” to get to the next step. 

val error code 39 valorant
Accessing the Properties of the Virtual Disk Service

3. As soon as the properties of the service appear on your screen in a separate window, the next step is to head over to the “Startup Type” section and click on the bar beside it. That should give you multiple options to select, however, you will be choosing just one. We have to choose “Automatic” to possibly fix the Valorant code 39. Complete doing that to get to the next step. 

Optimizing the Startup Type to Be Automatic

4. Finalize the process by clicking on “OK.” This should do the trick for you as you’ve now successfully optimized the Virtual Disk service as it was required.

valorant error code 39
Finalizing the Process

5. There’s one final step that you have to complete now and it’s as easy as ABC. Simply restart your PC to apply the effects that you’ve just incorporated on your device. Doing so should solve the issue for us. 

Restarting the Windows 10 PC

That’s all about the first solution we have for fixing the Valorant error code 39. Try launching the game again to see if it works now. Congratulations if it does, but if the problem still persists, continue reading on for more high-quality fixes. 

Perform a Clean Boot 

A “Clean Boot” is a niche Windows feature that is performed deliberately to assess whether a specific program, application, or software is hindering another program from operating in full flight. The Valorant code 39 could be surfacing because of your antivirus software, perhaps, that has negated essential components that the game needs to run and has blocked it from connecting to servers. 

Before proceeding with removing your dedicated antivirus software from the PC, it’s advised to perform a Clean Boot. Doing so will make it possible to launch Valorant with a fewer number of resources, startup programs, and services and even resolve other peripheral issues that you might be unknowingly facing.

It’s worth putting it out here before getting started with the illustrative measures that clean booting your PC does not delete anything. Therefore, rest fully assured knowing that all of your progress will remain safe during the procedure. We just need to make sure that a minimal number of drivers is what that’s needed to get the job done, and a Clean Boot will help us confirm that. 

How to Perform a Clean Boot on a Windows 10 PC

The following steps are going to talk about the process of clean booting your PC effectively.

  1. Click on the Windows Start menu and search for an application called “System Configuration.” Click on “Run as administrator” when the application appears just to be mindful of preventing any potential issues. 
Opening System Configuration

2. The next step is to click on the “Services” tab within the “System Configuration” application. Once done, click on the box beside “Hide all Microsoft services.” That should leave you with those processes within the main window that aren’t necessarily required to run crucial Windows applications. We’ll now be getting to disabling them but just in a jiffy. 

Hiding All Microsoft Services

3. Completing the previous step should make it all right to proceed. Click on “Disable all” as specified in the screenshot below and then click on “OK” to apply the changes. 

Disabling All Non-Microsoft Services

4. Good job on making it this far, but you’re only halfway there yet. You now have to click on the “Startup” tab that’s located at the top of the “System Configuration” window to continue. The gist of it is that we’re now trying to open the Windows Task Manager. Once you’re at the Startup section of the application, click on “Open Task Manager” and you should be good to go. You can alternatively press the “CTRL,” “Shift,” and “Esc” keys together to open up the Task Manager just the same, but be sure to hover to the “Startup” area yourself if you choose to opt for this route. 

Opening the Task Manager

5. You now have to disable each application that has “Enabled” written under their Status. The following image is just for reference, so you’ll have quite a few applications remaining to be disabled. Tick off everything that you see not fitting the description and then close the Task Manager to complete this step.

valorant error code 39
Disabling the Remaining Applications From the Task Manager to Clean Boot PC

That’s about it for setting up all the prerequisites for performing a Clean Boot on a Windows 10 PC. All that’s left now is to restart your PC and see if the VAL 39 error code still doesn’t cease to go away. We got a bunch of more solutions lined up for you if even a Clean Boot didn’t help resolve the issue. 

Enable VGC for Valorant

VGC is a dedicated service that will become pretty prevalent on those PCs that have Valorant installed. This crucial program makes it possible for the game to run smoothly and undergo a number of processes. Out of everything that VGC does for the free-to-play shooter, it also lets it connect to multiplayer servers and establish a stable connection.

We are going to double-check whether VGC is up and running on your system or it’s simply out of order. More often times than not, many players have had this service stopped or disabled, and that’s basically asking for the Valorant error code 39.

Let’s dive into the tutorial for enabling VGC without any further ado. The process is quite similar to optimizing the Virtual Disk service that we covered above.

How to Enable the VGC Service

Follow the steps listed below verbatim for the best results.

  1. The first step is to fire up the Services application on your Windows PC. You can do that by searching for it through the Windows Start menu. The following screenshot depicts what to do. Don’t forget to run it as an administrator though. 
Launching the Services app as an administrator
Launching the “Services” app as an administrator

2. You will now be shown to a screen where tons of services will be listed. You will have to look for VGC here so don’t hesitate in scrolling down. The services are arranged in alphabetical order so scrolling down to the services whose names are starting with the letter “V” will be helpful. Once you’ve found it, right-click the service and select “Properties” to get to the next step.

Accessing the Properties of the VGC Service

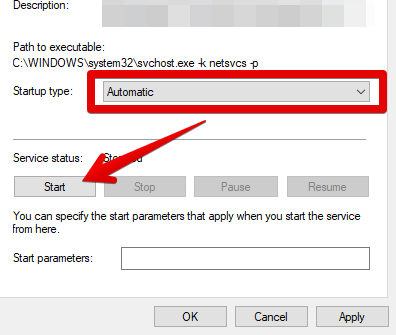
3. The rest of the work is pretty much clockwork. You now have to click on the bar beside “Startup” and that should open up a drop-down menu. Select “Automatic” from there and click on “Start.” This should kickstart the service if it had been stopped earlier.  

valorant error code 39
Starting the VGC Service

4. You now have to simply click on “OK” to finalize the process. Close the window afterward to complete this solution attempt. 

valorant error code 39
Finalizing the Process

That’s about it for this fix. By making sure that VGC is running on your Windows PC, you’re genuinely increasing your chances of solving the VAL 39 error code. Restart your device before trying to launch the game again. If you’ve managed to solve the problem now, cheers! But if the issue still hasn’t bitten the dust, time to look into more solutions. There’s always light at the end of the tunnel. 

Delete Unwanted Valorarant Game Files

A slew of unnecessary game files can accumulate in the Valorant folder and it’s worth ruling out the possibility that those are causing the VAL 39 error code. Anything that can obstruct a user from having an optimal experience should be shown the door from the Windows PC. However, it’s no guarantee that the files we’re about to remove from our system are going to be present on your device too. Follow along with the tutorial below and check on your end side by side to get to the bottom of it all. 

The following steps are going to take it from here. Be sure to follow each step as instructed for nothing but the most favorable results. 

  1. The first step is to open up the Run program on your Windows PC. You can do that by searching for it specifically in the Windows Start menu or by inputting a simple keyboard shortcut key, which is “Windows” and “R” together. Once you have the application all fired up, type in “AppData” and press the “Enter” key to get to the next step. 
val 39 error code valorant
Opening the Relevant Folder

2. The “File Explorer” application on your Windows PC should pop up now following the last step. Since we used the “AppData” name in the Run application, the system is going to take us directly to the folder in question. You will have to scroll down and search for “Valorant” once you’re there though. The files will typically be in alphabetical order, so searching from where all of the entries’ name begins to start from the letter “V” sounds like a good idea. Click on the folder once you’ve found it to continue. 

Clicking on Valorant's Game File Folder
Clicking on Valorant’s Game File Folder

3. Doing so will take you to another area where you’ll have to click on “Saved” to continue. Do that and get to the next step. 

valorant error code 39
Clicking on the “Saved” Folder of Valorant

4. You’ll now have to make another click as the content of the screen is changed. Select the “Config” folder next and move forward. 

Clicking on the "Config" Folder
Clicking on the “Config” Folder

5. You’ve now finally arrived at the area where you need to do some cleaning. Select all of the files as shown in the screenshot below and delete them pronto. Don’t forget to empty your Recycle Bin afterward to completely rid your system of these unwanted files. 

Deleting the Unwanted Valorant Game FIles

That’s about it for another possible fix of the VAL 39 error code. High hopes for this solution fixing the issue for you. If the problem still refuses to go away, we’re afraid that you have one final potential working measure to approach yet. Let’s get into it straight away then. 

Uninstall Valorant and the Riot Games Client

An uninstall oftentimes works like a charm for fixing various game-related issues. It did the job for the Destiny 2 Crashing PC error Last but surely not least, uninstalling the game even helps resolve the Valorant Error Code Van 68 issue, which pertains to Valorant indeed but has a different rooted source. 

Therefore, if you have Valorant as a standalone executable application, delete it from your Windows PC. In addition, the same practice goes for the relatively recent Riot Games desktop client that houses all the games coming from the American developer. It features one of the nicer UI elements we’ve seen as compared to well-grounded entities like Steam and the Epic Games Launcher

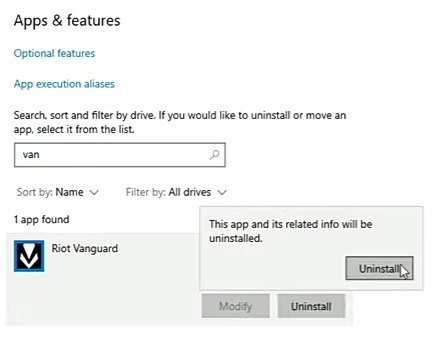
You can easily uninstall applications by heading over to “Add or remove programs” from the Windows Search bar. As soon as you have all thing Valorant uninstalled from your device, get the title back on your PC by re-downloading it. We acknowledge that this can get boring and tiresome, but it’s your only shot left at fixing the game for once and for all.  

Therefore, wait until Valorant or the Riot Games desktop client has been fully installed. Fire up the game again and go through all the updates that you have to download. Lastly, check if you’re still getting the error code 39 issue. It’s time to celebrate if you’ve finally found the fix to this otherwise long-standing problem. 

Frequently Asked Questions

What Does Error Code 39 Mean in Valorant?

The Error Code 39 popping up on the main game screen, it means that there is a server connectivity disorder that is preventing Valorant from connecting online. You mostly need to restart your game client to resolve this issue, but the scenario can get more deep-rooted than that.

How Do I Fix Valorant Error?

The Valorant error can be fixed by enabling the VGC and the Virtual Disk services on your Windows PC. Clean booting, restarting the game client, and running it as an administrator can also help resolve the issue in some cases.

Can’t connect to Valorant servers?

It can genuinely be frustrating for players that cannot connect to Valorant servers. An update is set to be scheduled or the developers have pulled the service themselves. Either way, you can either wait for the server connectivity to improve or try out a couple of fixes to see if it can fix itself.

Was this article helpful?

Thanks! Do share your feedback with us. ⚡

How could we improve this post? Please Help us. ✍

Haider Khan


PC gaming geek with three years of content writing experience - covering Video Game Settings, and errors across all devices.

Related Articles