Our guide to the Horizon Forbidden West Dreadwing Location entails everything that you will need to know firsthand when tackling this machine for the first time in your playthrough. It is a challenging heavyweight machine that can easily kill Aloy if you’re not careful enough. You will need its parts in order to upgrade your weapons and armor, which can easily be missed if you don’t tear them down first in the fight. Despite that, if you are looking to farm the Dreadwing with efficiency, then you will need to follow a detailed strategy.
- Horizon Forbidden West’s Dreadwing is a formidable heavyweight machine resembling bats in appearance.
- Two locations to find Dreadwing: near LATOPOLIS old world site in the Desert region and on the west side of the Arena.
- Caution is advised at the Arena location, as players also face a Stormbird.
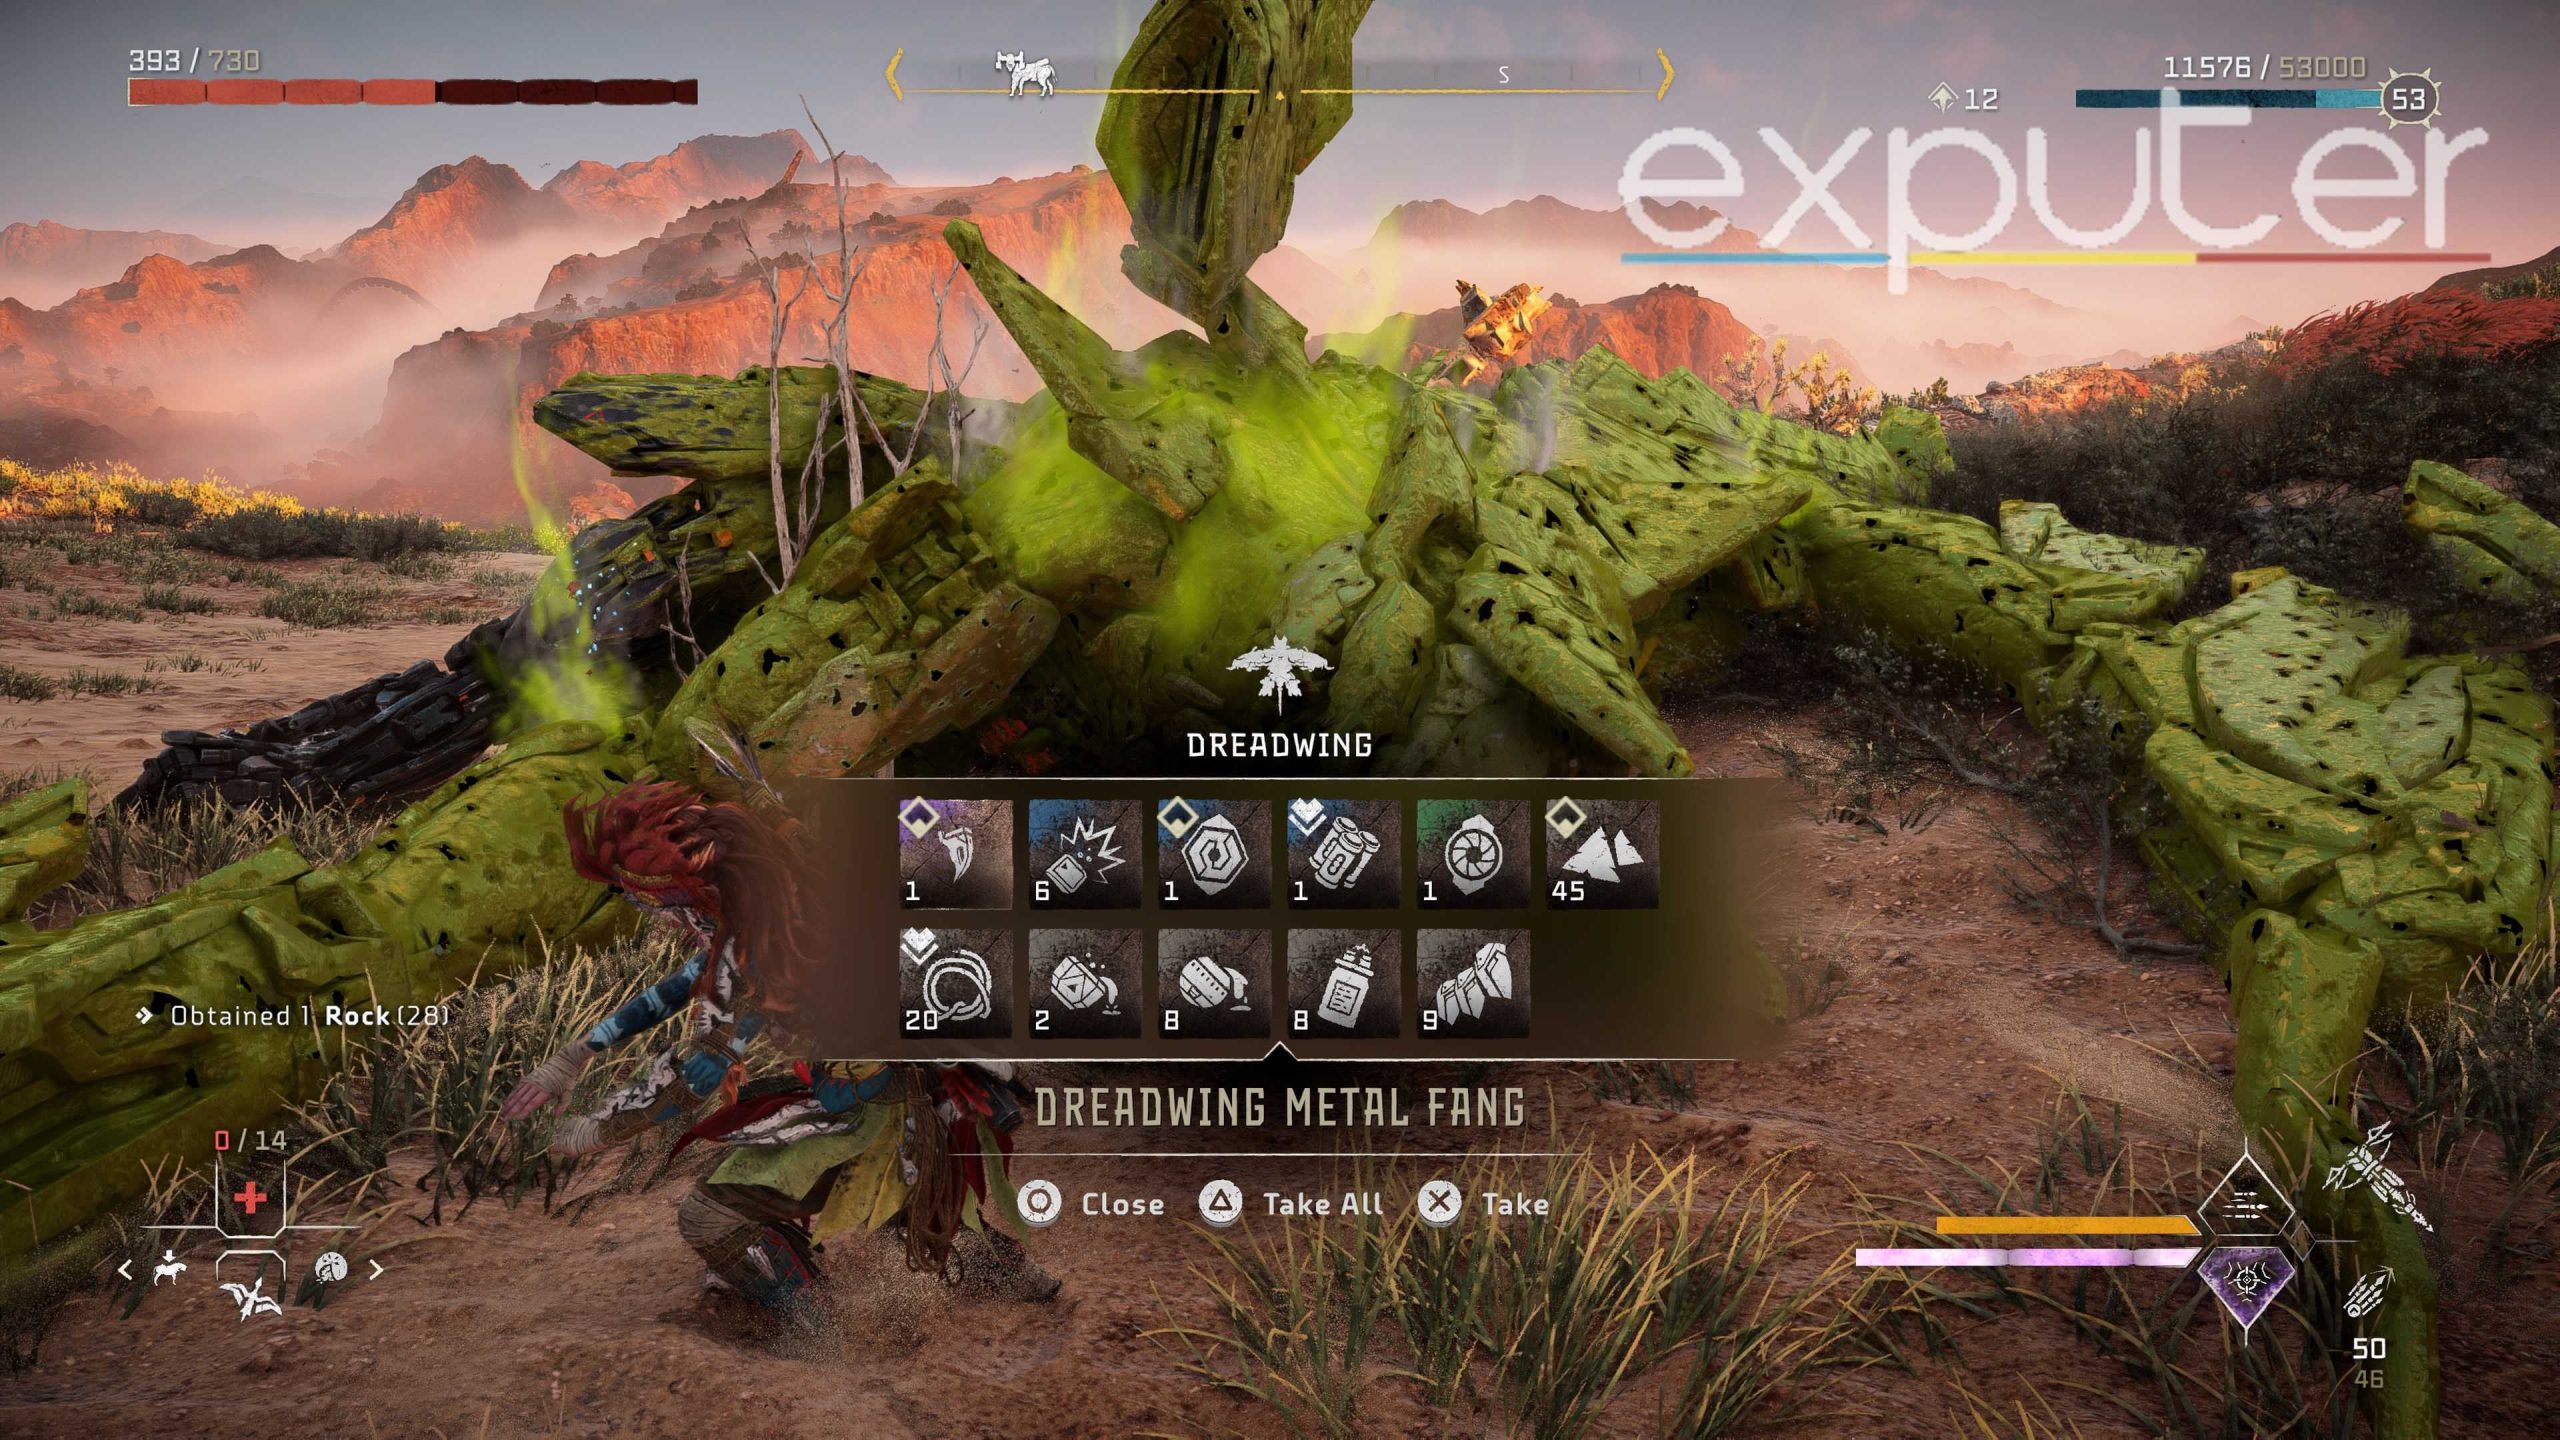
- Detachable parts of Dreadwing provide various resources, with Metal Fangs crucial for high-level gear upgrades.
- Dreadwing’s attacks include deadly wing swipes, acid spit, and shockwave-inducing tremor stomps
Dreadwing Locations In Horizon Forbidden West
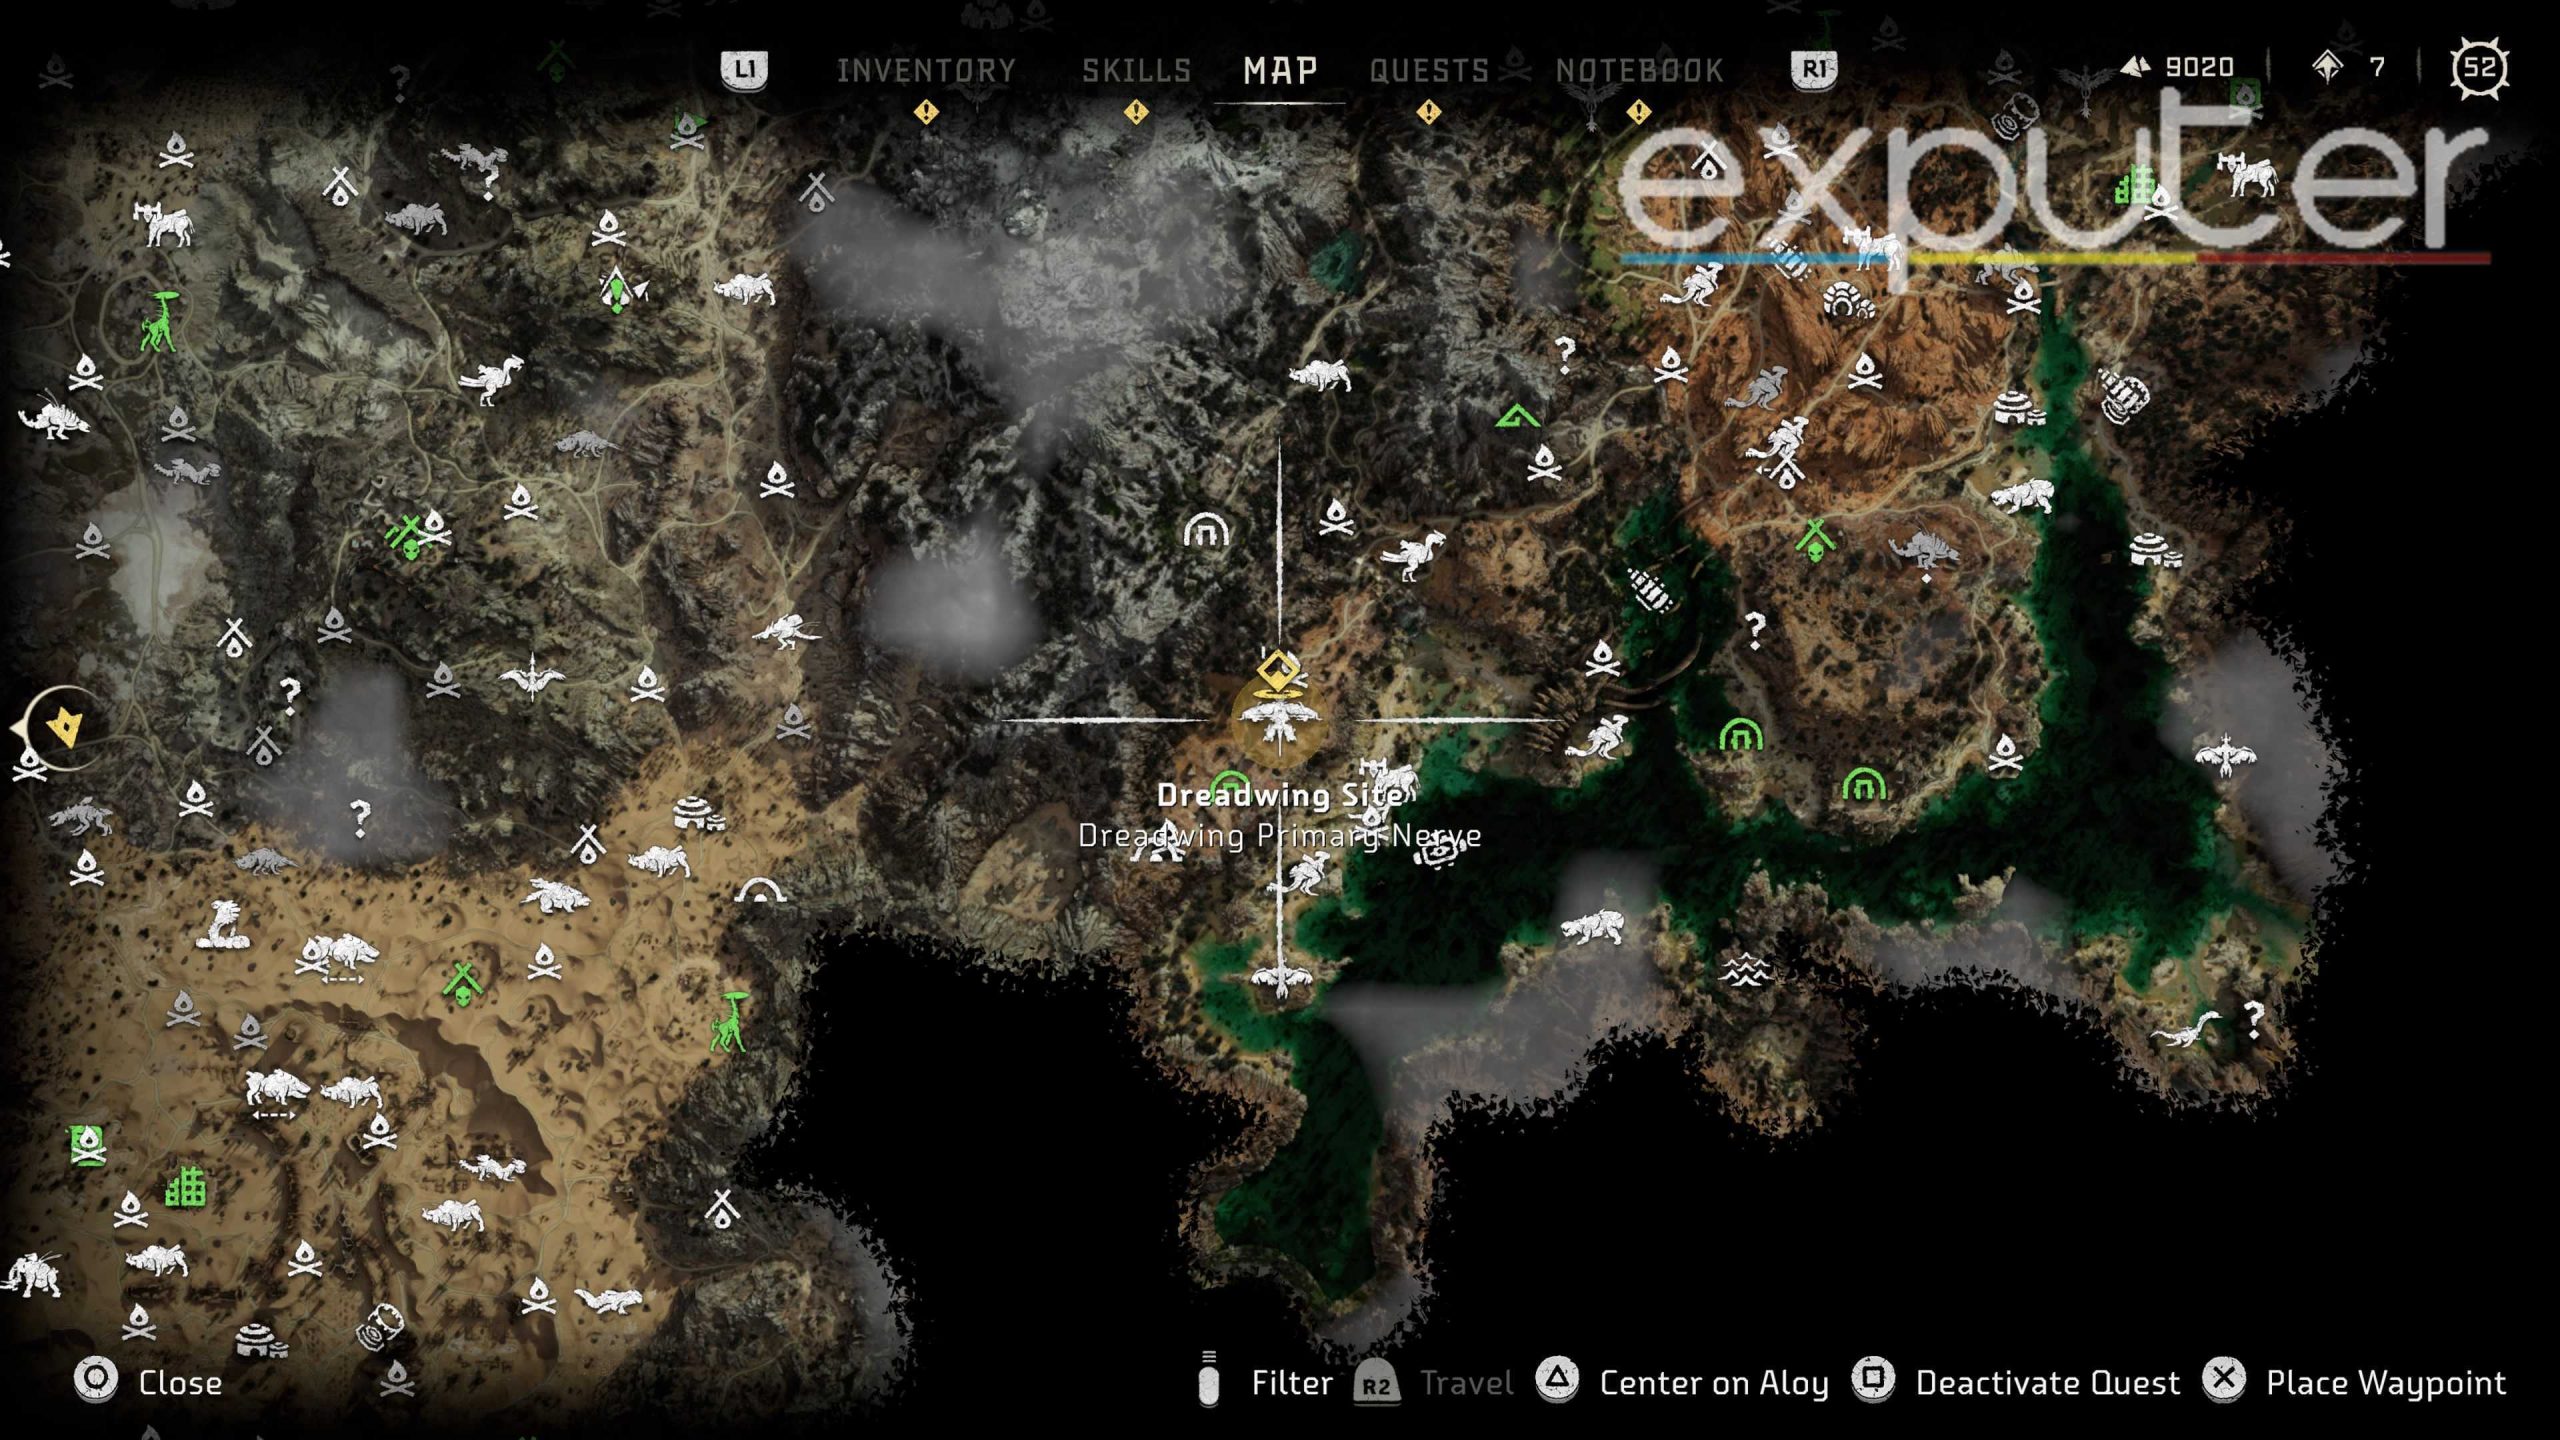
As stated previously, you will first need to complete the Seeds of the Past mission to access the Dreadwing machine, but once you do, you should be able to make it spawn on the map. As shown in the image above, this is the only officially known site of the Dreadwing on the map, which is towards the South in the desert region. It will usually spawn the normal variant.

However, if you feel like you handle an extra bit of challenge and want to fight against the Apex variant during nighttime, then you can venture to the location we have marked above. The only problem is that you will not only have to deal with a Dreadwing but also a Stormbird. Fighting against both can be chaotic. The location is a little towards the West side of the Maw of the Arena, where you engage in gladiator battles against machines.
But again, we strongly advise just using the first and only marked site by the game to farm its loot; unless you feel confident in taking both machines down with ease, then you’re welcome to head to this location.
Loot Table And Parts
We have organized a descriptive table for you down below, which details every part of the Dreadwing as well as which part has a chance to drop what kind of items:
| PARTS | LOOT | ATTRIBUTES |
| Body | Metal Bite, Metal Shards, Braided wire, Deadwing Circulator, Large Machine core, Dreadwing Primary nerve, Volatile Sludge, Machine muscle, Crystal Braiding, Metal bone, Luminous Brainstem, Sturdy Hardplate | None |
| Flash Blinders | Braided wire, Crystal Braiding, Sturdy Hardplate | Detachable: The component can be detached with tear damage |
| Metal Fang | Dreadwing Metal fang | Detachable |
| Metalbite sac | Metalbite | Explosive: The component explodes when destroyed |
| Stamina Drain Container | Volatile Sludge | Detachable |
| Sparker | Sparker | Chain Reaction: Triggers an elemental explosion if shot with shock damage |
| Resource Container | Blastpaste, Braided wire, Sturdy Hardplate, Large Machine Core, Dreadwing Primary nerve, Luminous Brainstem | Detachable |
| Bomb Launcher | Usable Weapon | Detachable |
| Stealth Generator | Braided wire, Sturdy Hardplate, Luminous Brainstem | Detachable |
| Antenna | Braided wire, Sturdy Hardplate, Dreadwing Primary nerve | Detachable |
| Damage Dampener Container | Volatile sludge, Purgewater | Detachable |
| Noxious Container | Volatile Sludge | Detachable |
| Radar | Braided wire, Sturdy Hardplate, Deadwing Circulator | Detachable |
| Purgewater Canister | Purgewater | Chain Reaction |
How To Defeat The Dreadwing
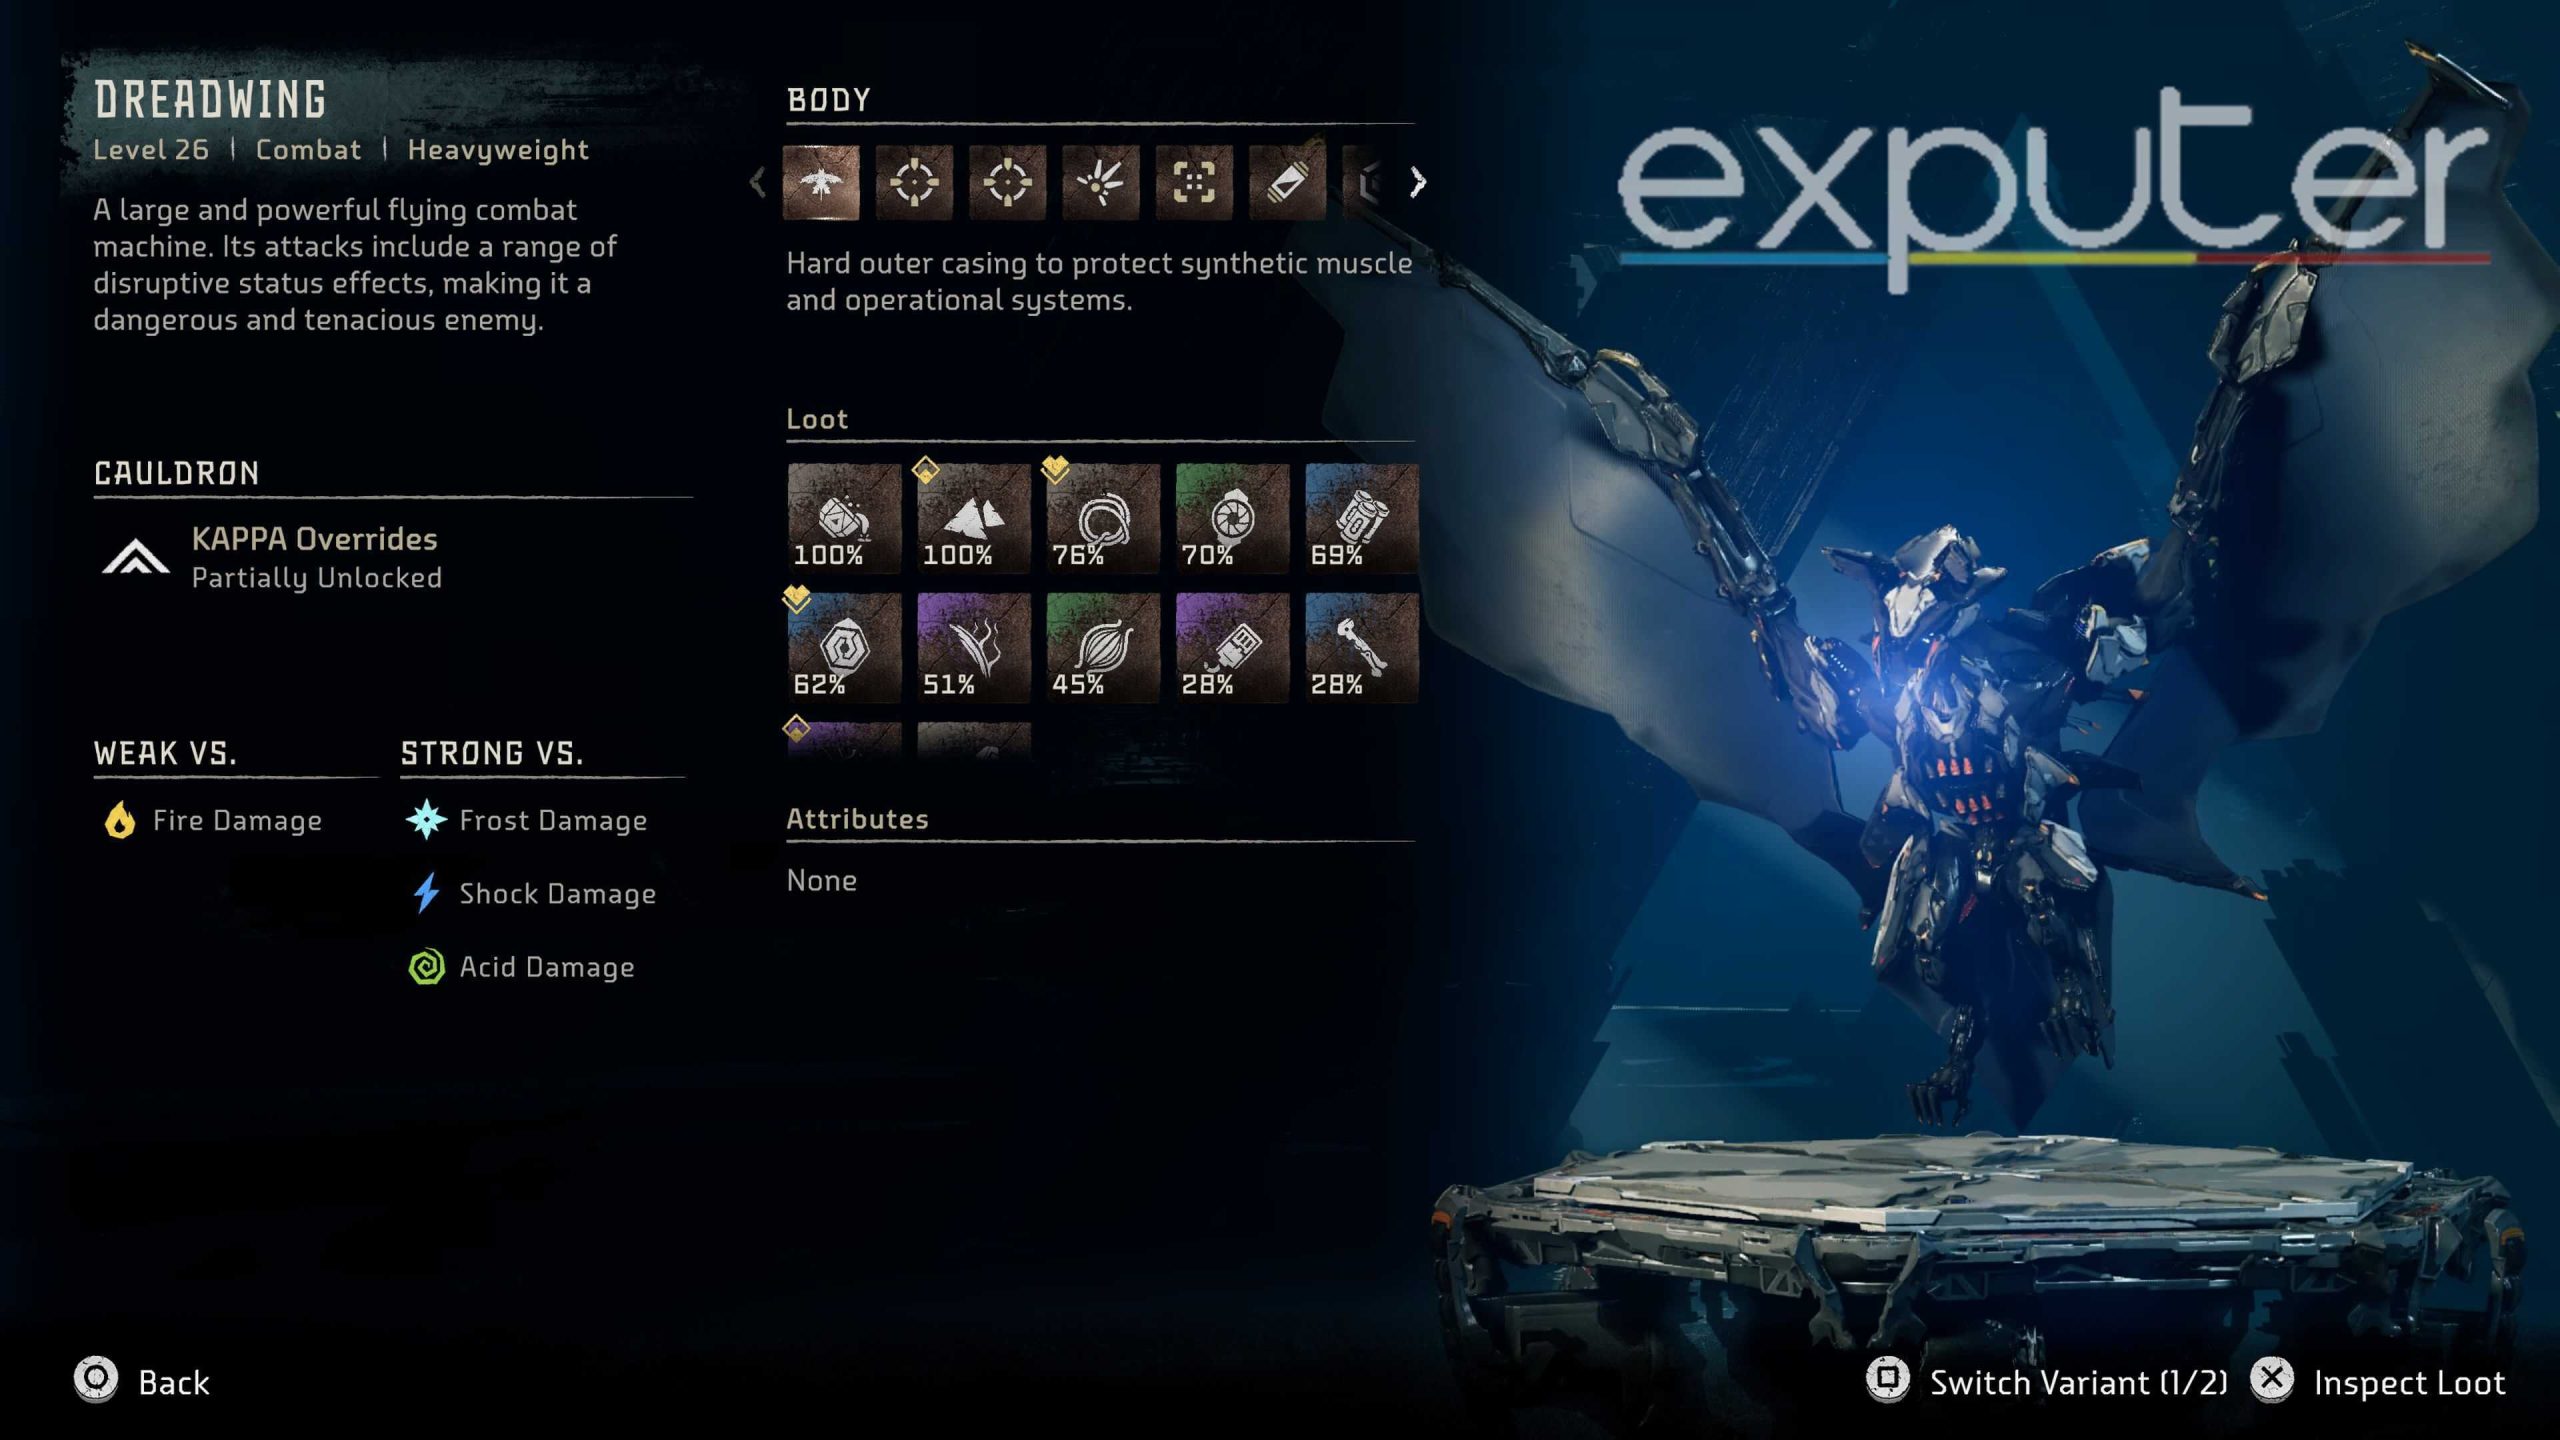
- Weaknesses: Fire damage
- Resistances: Frost, Shock, and Acid damage
- Override Cauldron: KAPPA Overrides
Unlike most battles in the game, the Dreadwing may seem intimidating at first sight, but if you’re an experienced player like me who’ll battle it for the first time via a main story quest, then you should have little to no trouble.
Now that we have covered the location of the Dreadwing in Horizon Forbidden West let’s dive deeper and discuss the best loadout for Aloy and the optimal strategy to take it down with ease, starting with the Machine’s main move list of attacks.
Attack Movelist
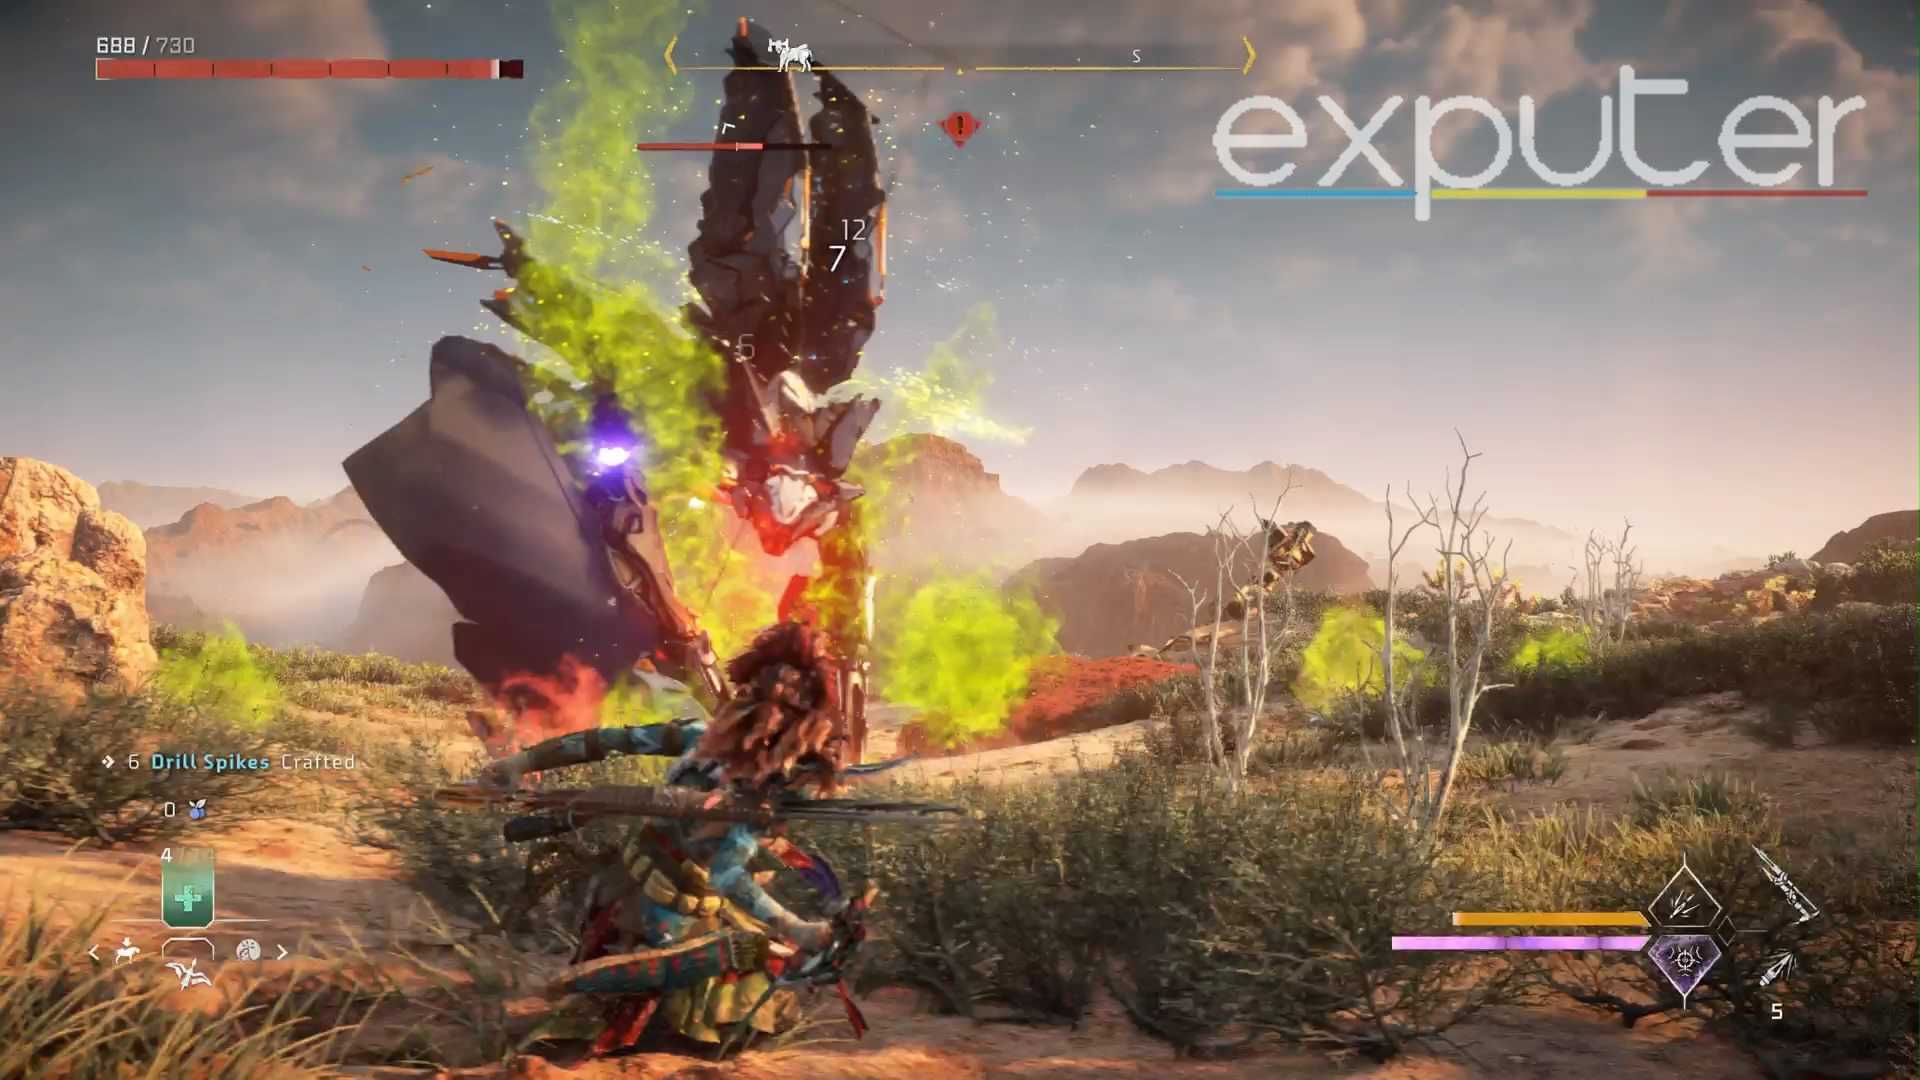
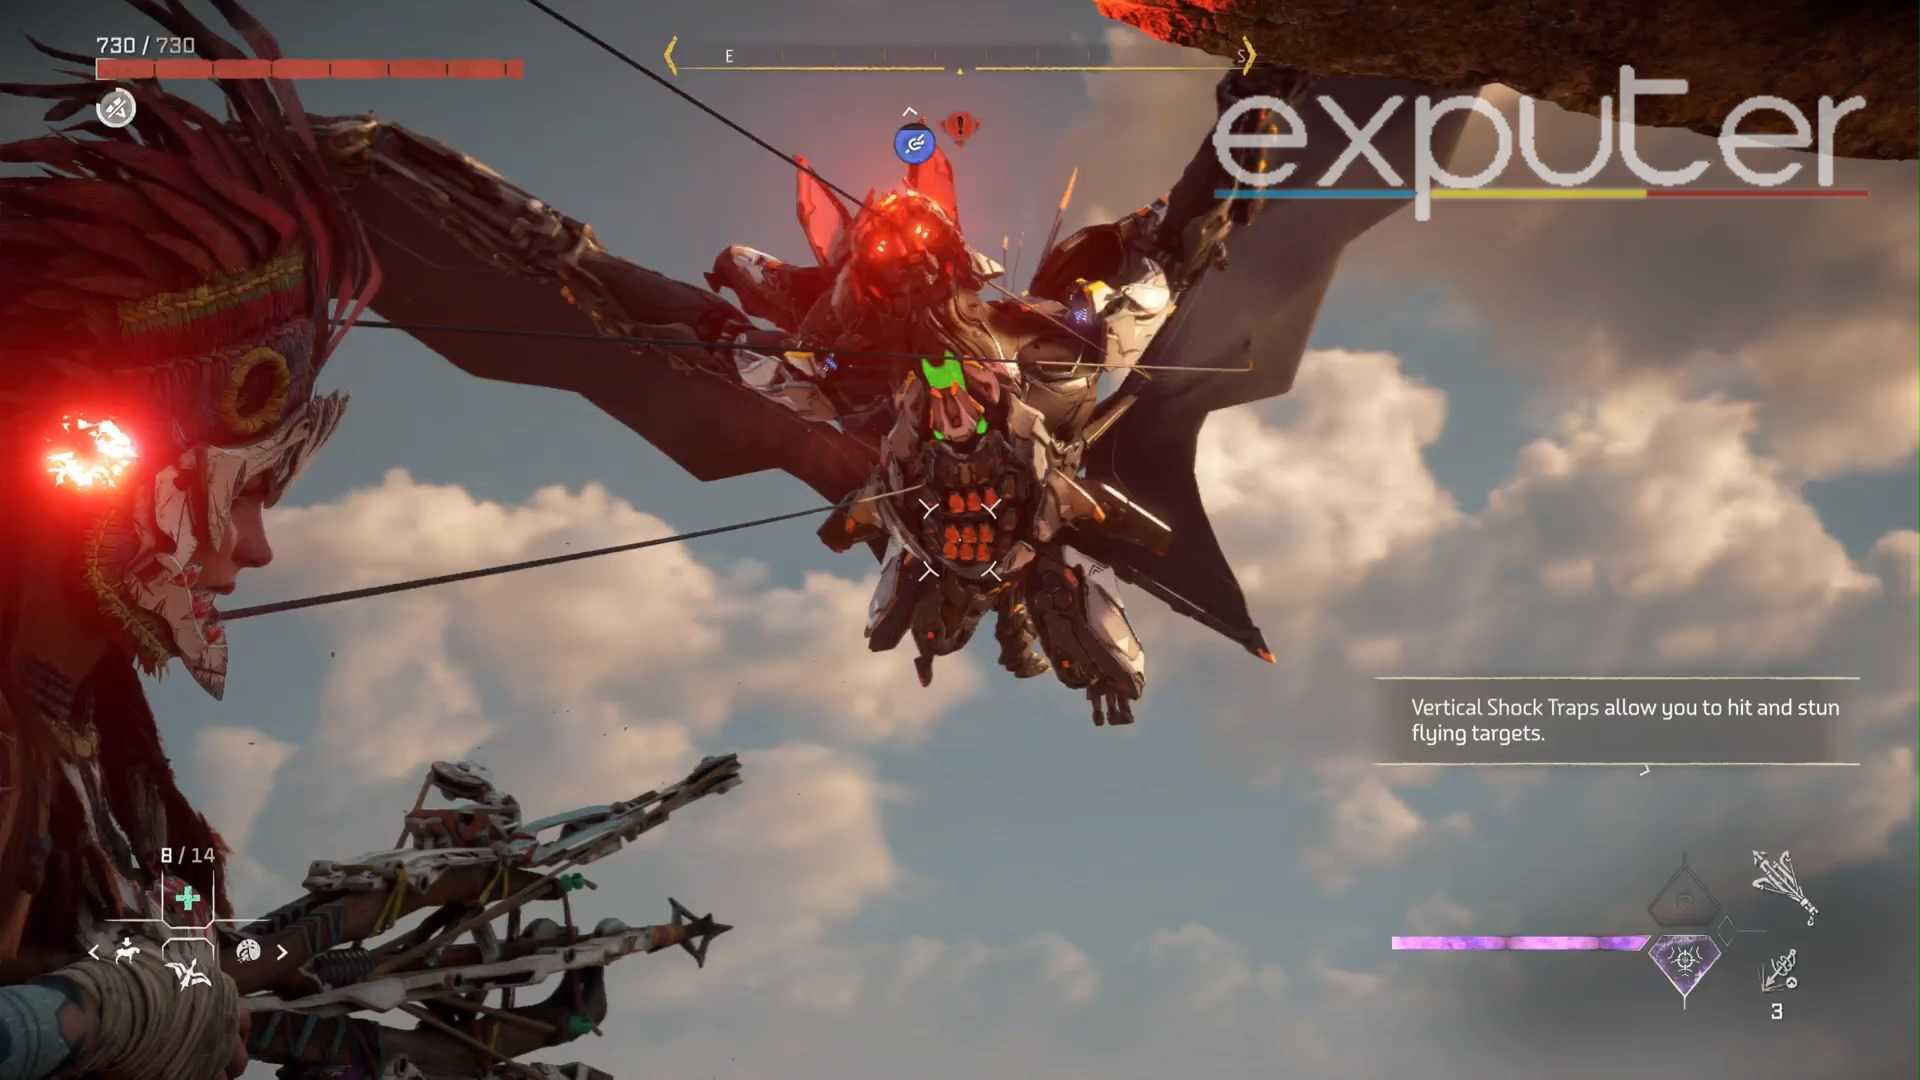
While the Dreadwing primarily focuses attacks that revolve around using its wings to slash you from the air or on the ground, there are a few attacks that you need to focus on avoiding, which are as follows:
- Wing Slash: Whilst on the ground, the Dreadwing will charge forward at you and try to slash you with one of its wings.
- Spin Strike: The Dreadwing will spin in a 360 motion while charging up into the air, causing a large wind-like AoE attack that can damage you if caught within its radius.
- Pulse Stomps: The Dreadwing will charge at you whilst relentlessly stomping on the ground and unleashing concussive shockwaves, which can stun you if you don’t dodge out of it.
- Acid Spit: The Machine will unleash this attack from the air as it will shoot Acid 2-3 times, so we strongly advise dodging it timely to avoid it.
While we have covered most of the important attacks, during some cases, the Dreadwing will tend to fly overhead and launch acids from his front, so dodging to the side during that is preferred. It is also worth stating that this machine will more than likely use its camouflage ability to go invisible for a brief period, which you can easily interrupt. You can also use cleansing potions to recover from its AoE screeches or blind attacks.
Loadout
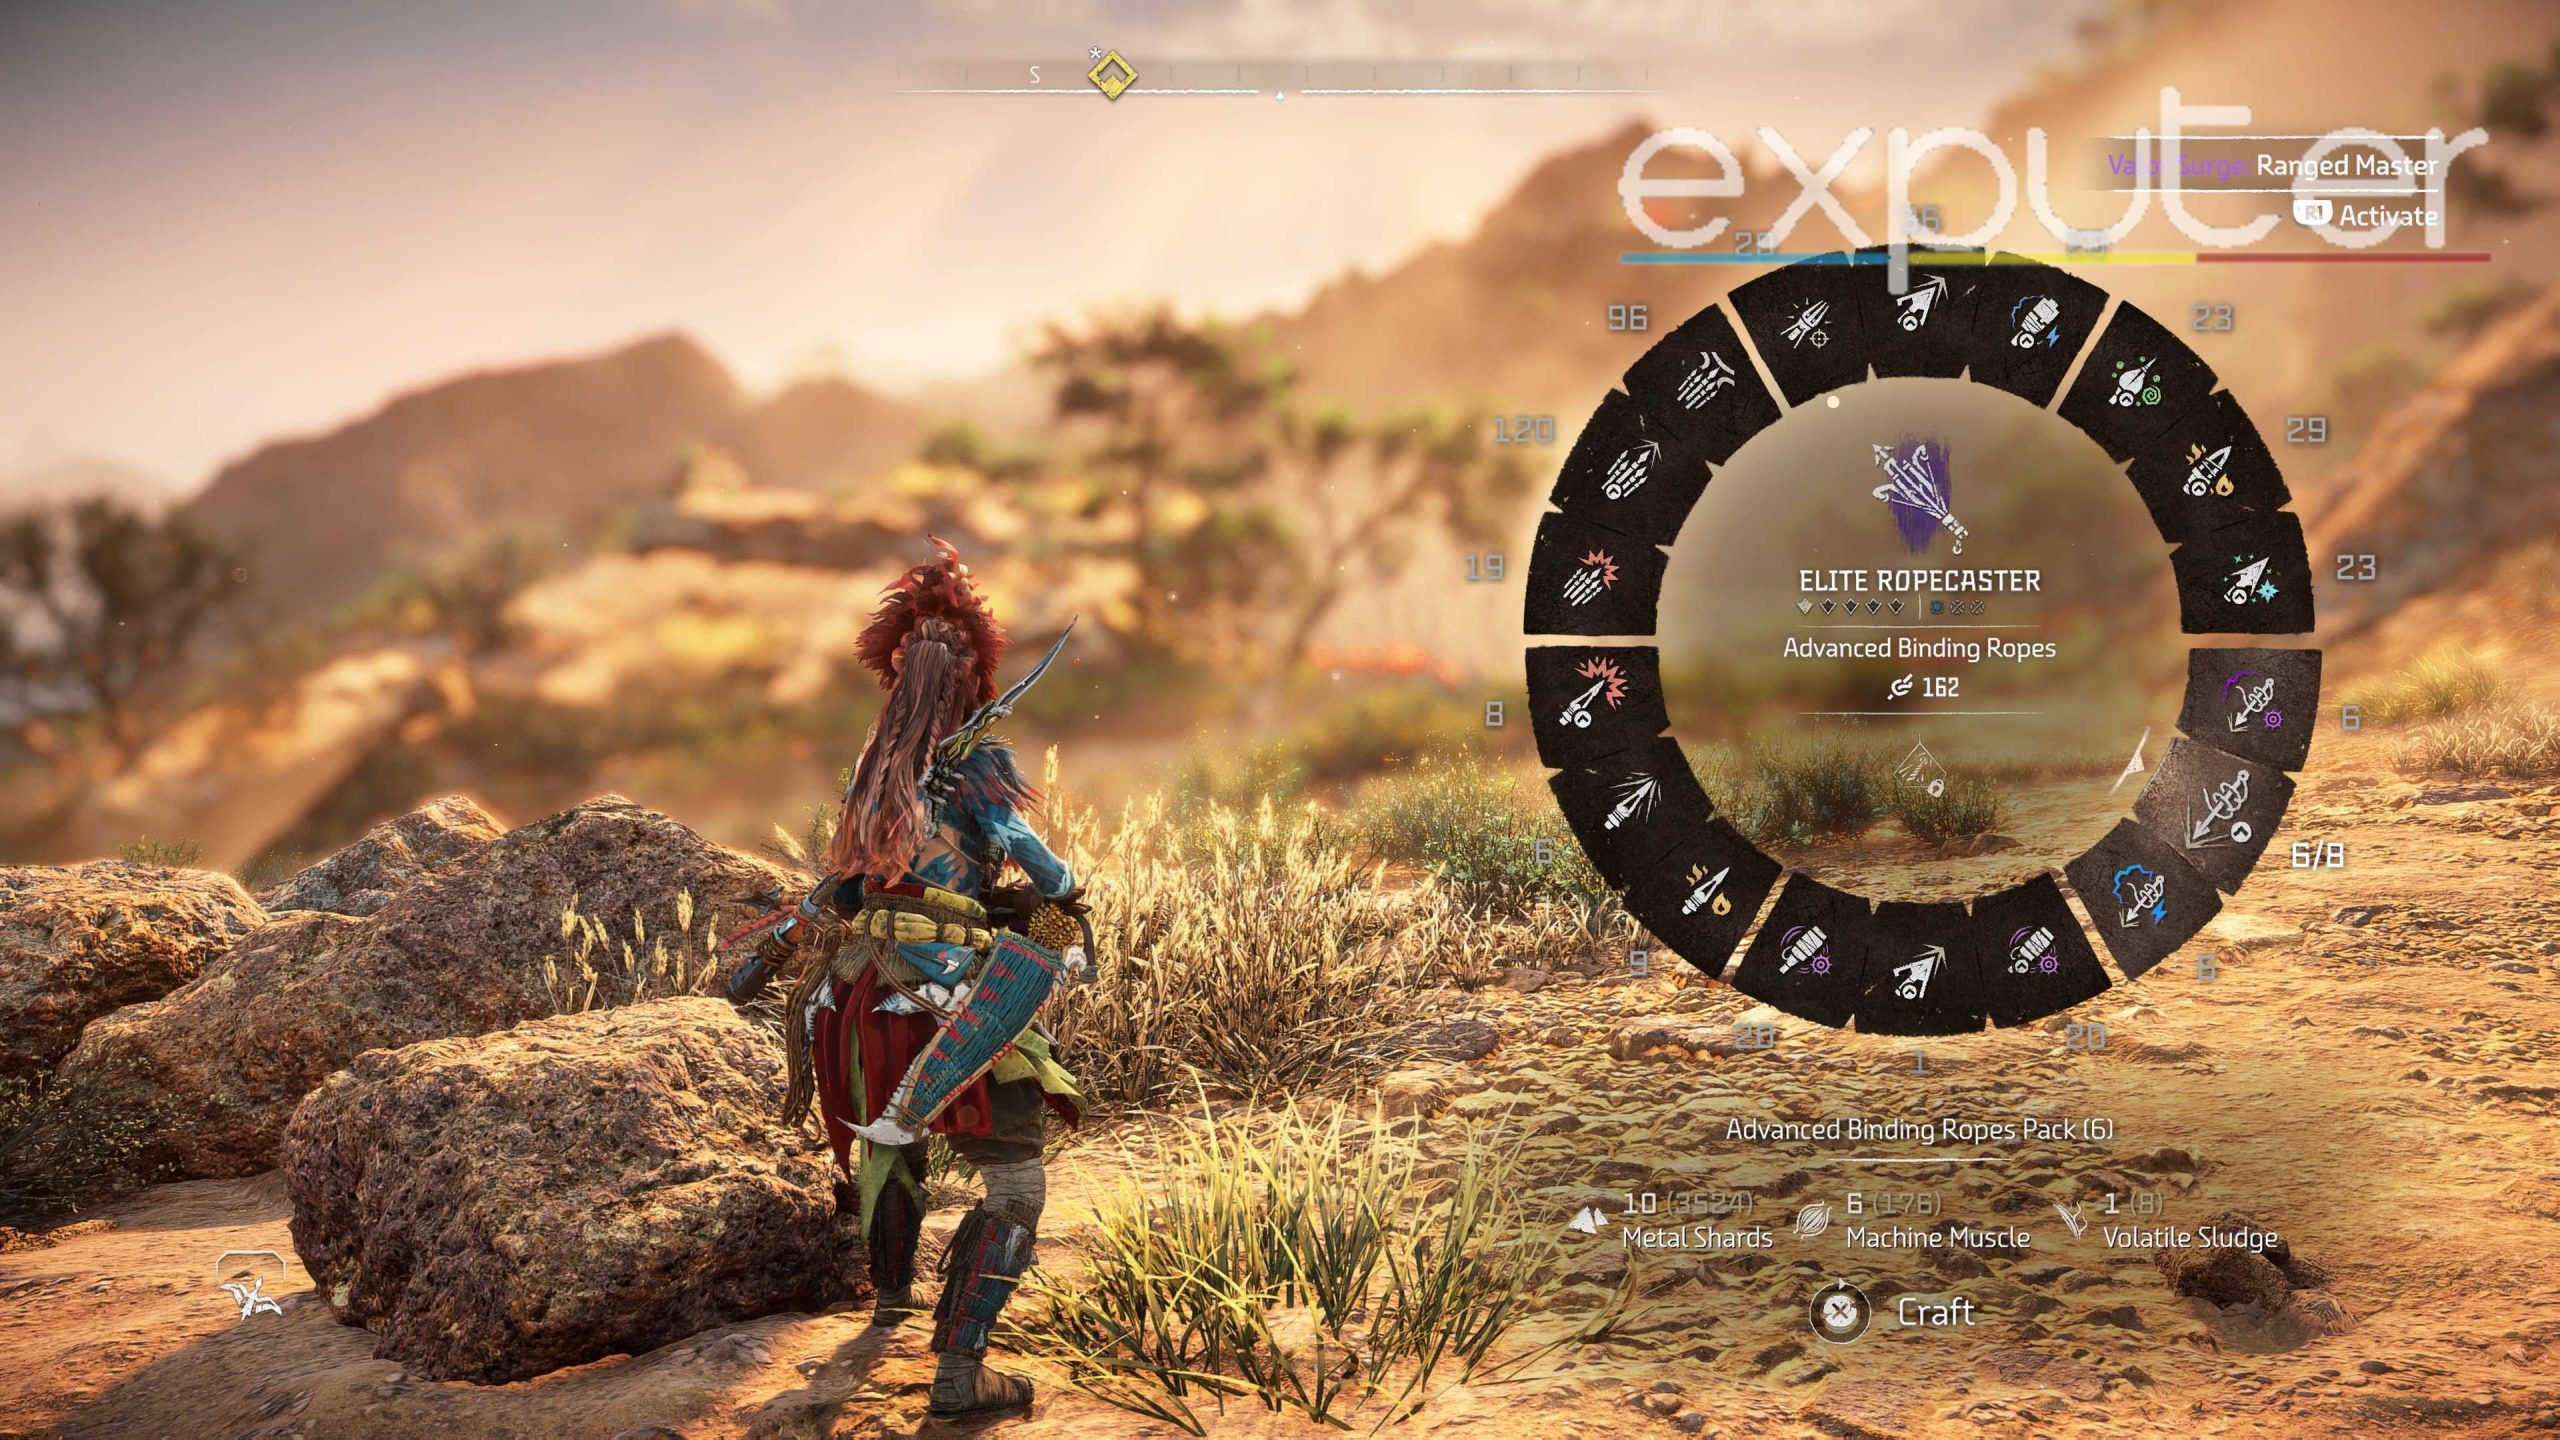
The recommended loadout that we personally used against the Dreadwing is listed below and shown in the image we have provided above:
- Bolt Blaster: The Blast Forge
- Hunter Bow: The Sun Scourge
- Ropecaster: Elite Ropecaster
- Armor: Nora Thunder Warrior
- Valor Surge: Ranged Master
Aside from the Elite Ropecaster (which you can purchase from the merchant at Thornmarsh), each of these weapons can be traded for medals, which are earned via completing battles in The Arena.
You can still use any weapon you want, provided that they are somewhat upgraded to combat the Dreadwing, but we went with these to efficiently kill it for farming purposes. Activating the Ranged master valor surge will boost our DPS using the Boltcaster to easily take down the machine.
Strategy
As you approach the Dreadwing, it is worth keeping in mind that he will use his scanner to instantly track your location and begin the encounter. The radius of the scan covers roughly 15-20 meters and has a cooldown of around 20 seconds before it pings the scanner again. During that time, you can quickly sneak up on the Dreadwing while it’s perched upside down in its bat-like state to take out its front metal fangs.
Regardless of whether you had the first strike at the machine in stealth or not, let’s begin with how you need to strategically use your loadout effectively.
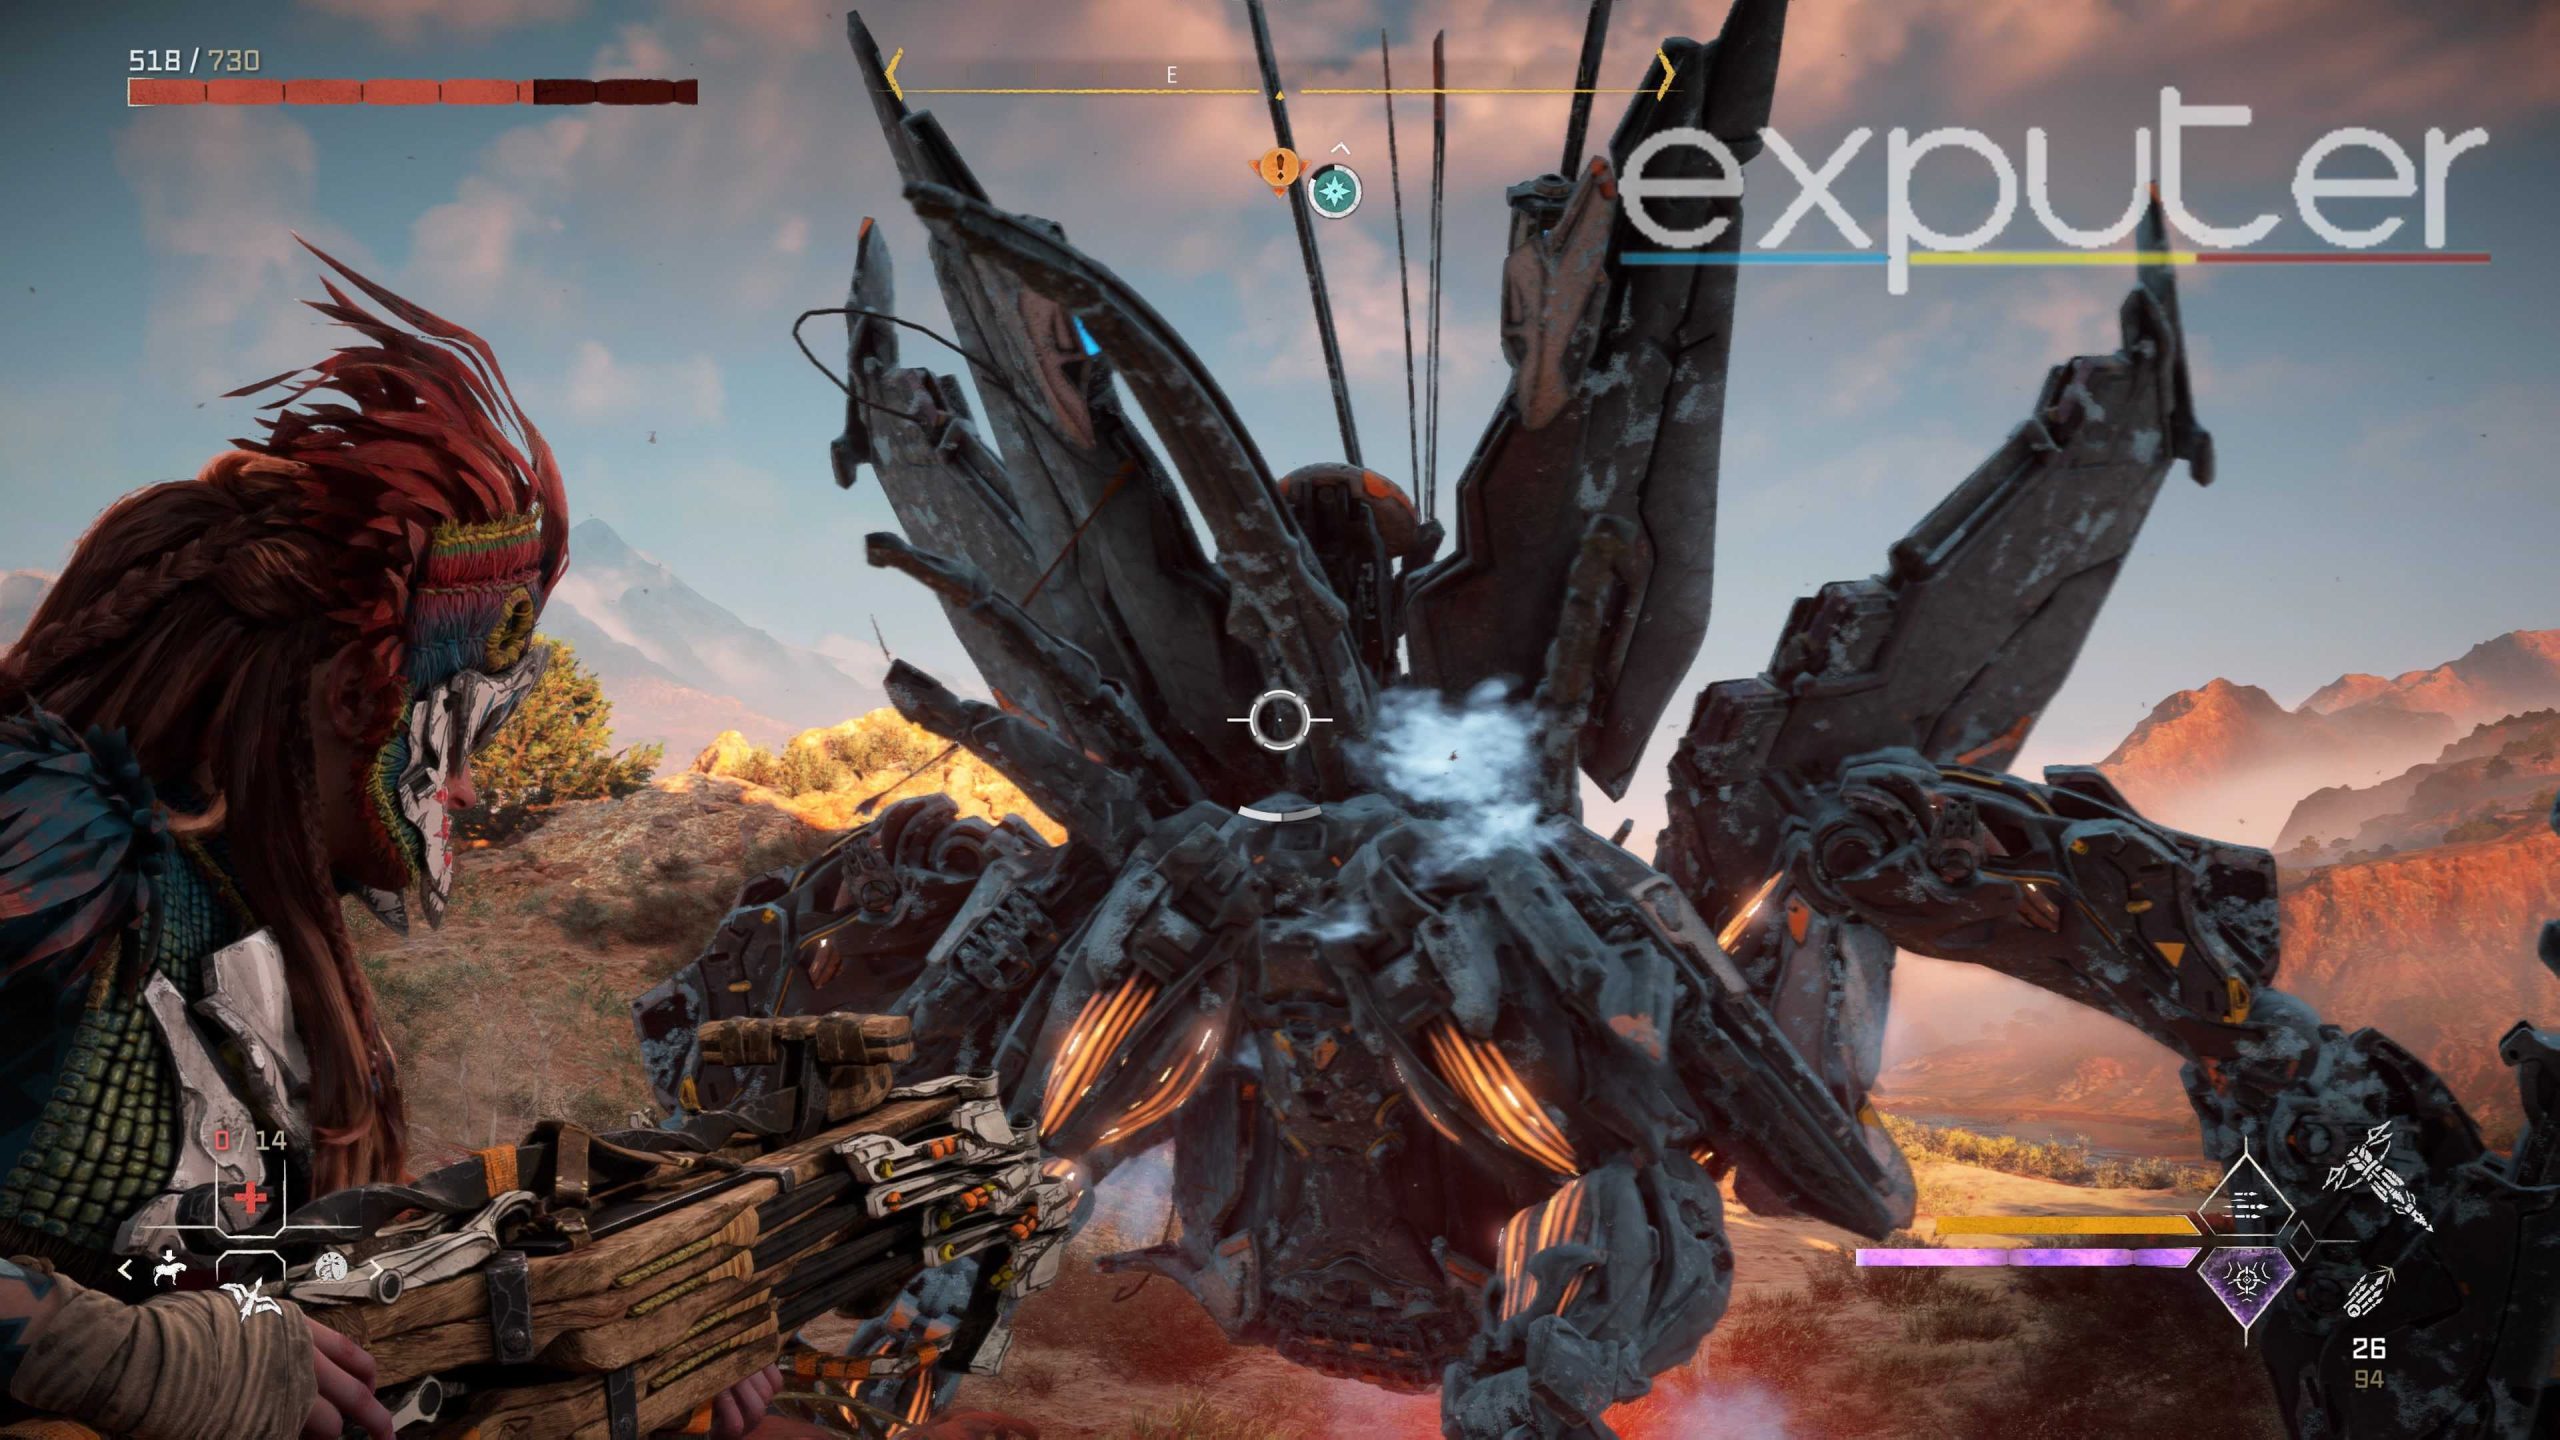
- Tying It Up: Begin the fight immediately by shooting the Ropecaster at the Dreadwing, which will immobilize it to the ground since it’s difficult to fight whilst it’s in the air.
- The number of ropes needed to fire at it in order to take it down will depend on how far you’ve upgraded the Ropecaster, but you should have enough time to do the next step easily.

- Metalfangs: You will need the Dreadwing’s Metal fangs in order to upgrade most of your weapons and armor. Hence, as the Dreadwing drops on the ground via the Ropecaster, you should quickly aim and shoot down its metal fangs located on the mouth, as we have depicted in the image above.
- Immobilizing it again: The next course of action is how the Dreadwing will take flight again since we will be taking out its metal fangs as a priority, so prepare to dodge any of its attacks carefully and use your Ropecaster at the same time to take it down once more.
- Freezing: Once it’s tied down again for a brief period, equip your Sun Scourge bow or any of the best bows with the frost elemental arrows and begin firing at the machine to build up frost on it, which in turn will help increase our damage to finally take it down in the next step.
- We know the frost element is one of the Dreadwing’s resistance, but trust us when we suggest how freezing it will greatly help with the damage we inflict using the Boltcaster.
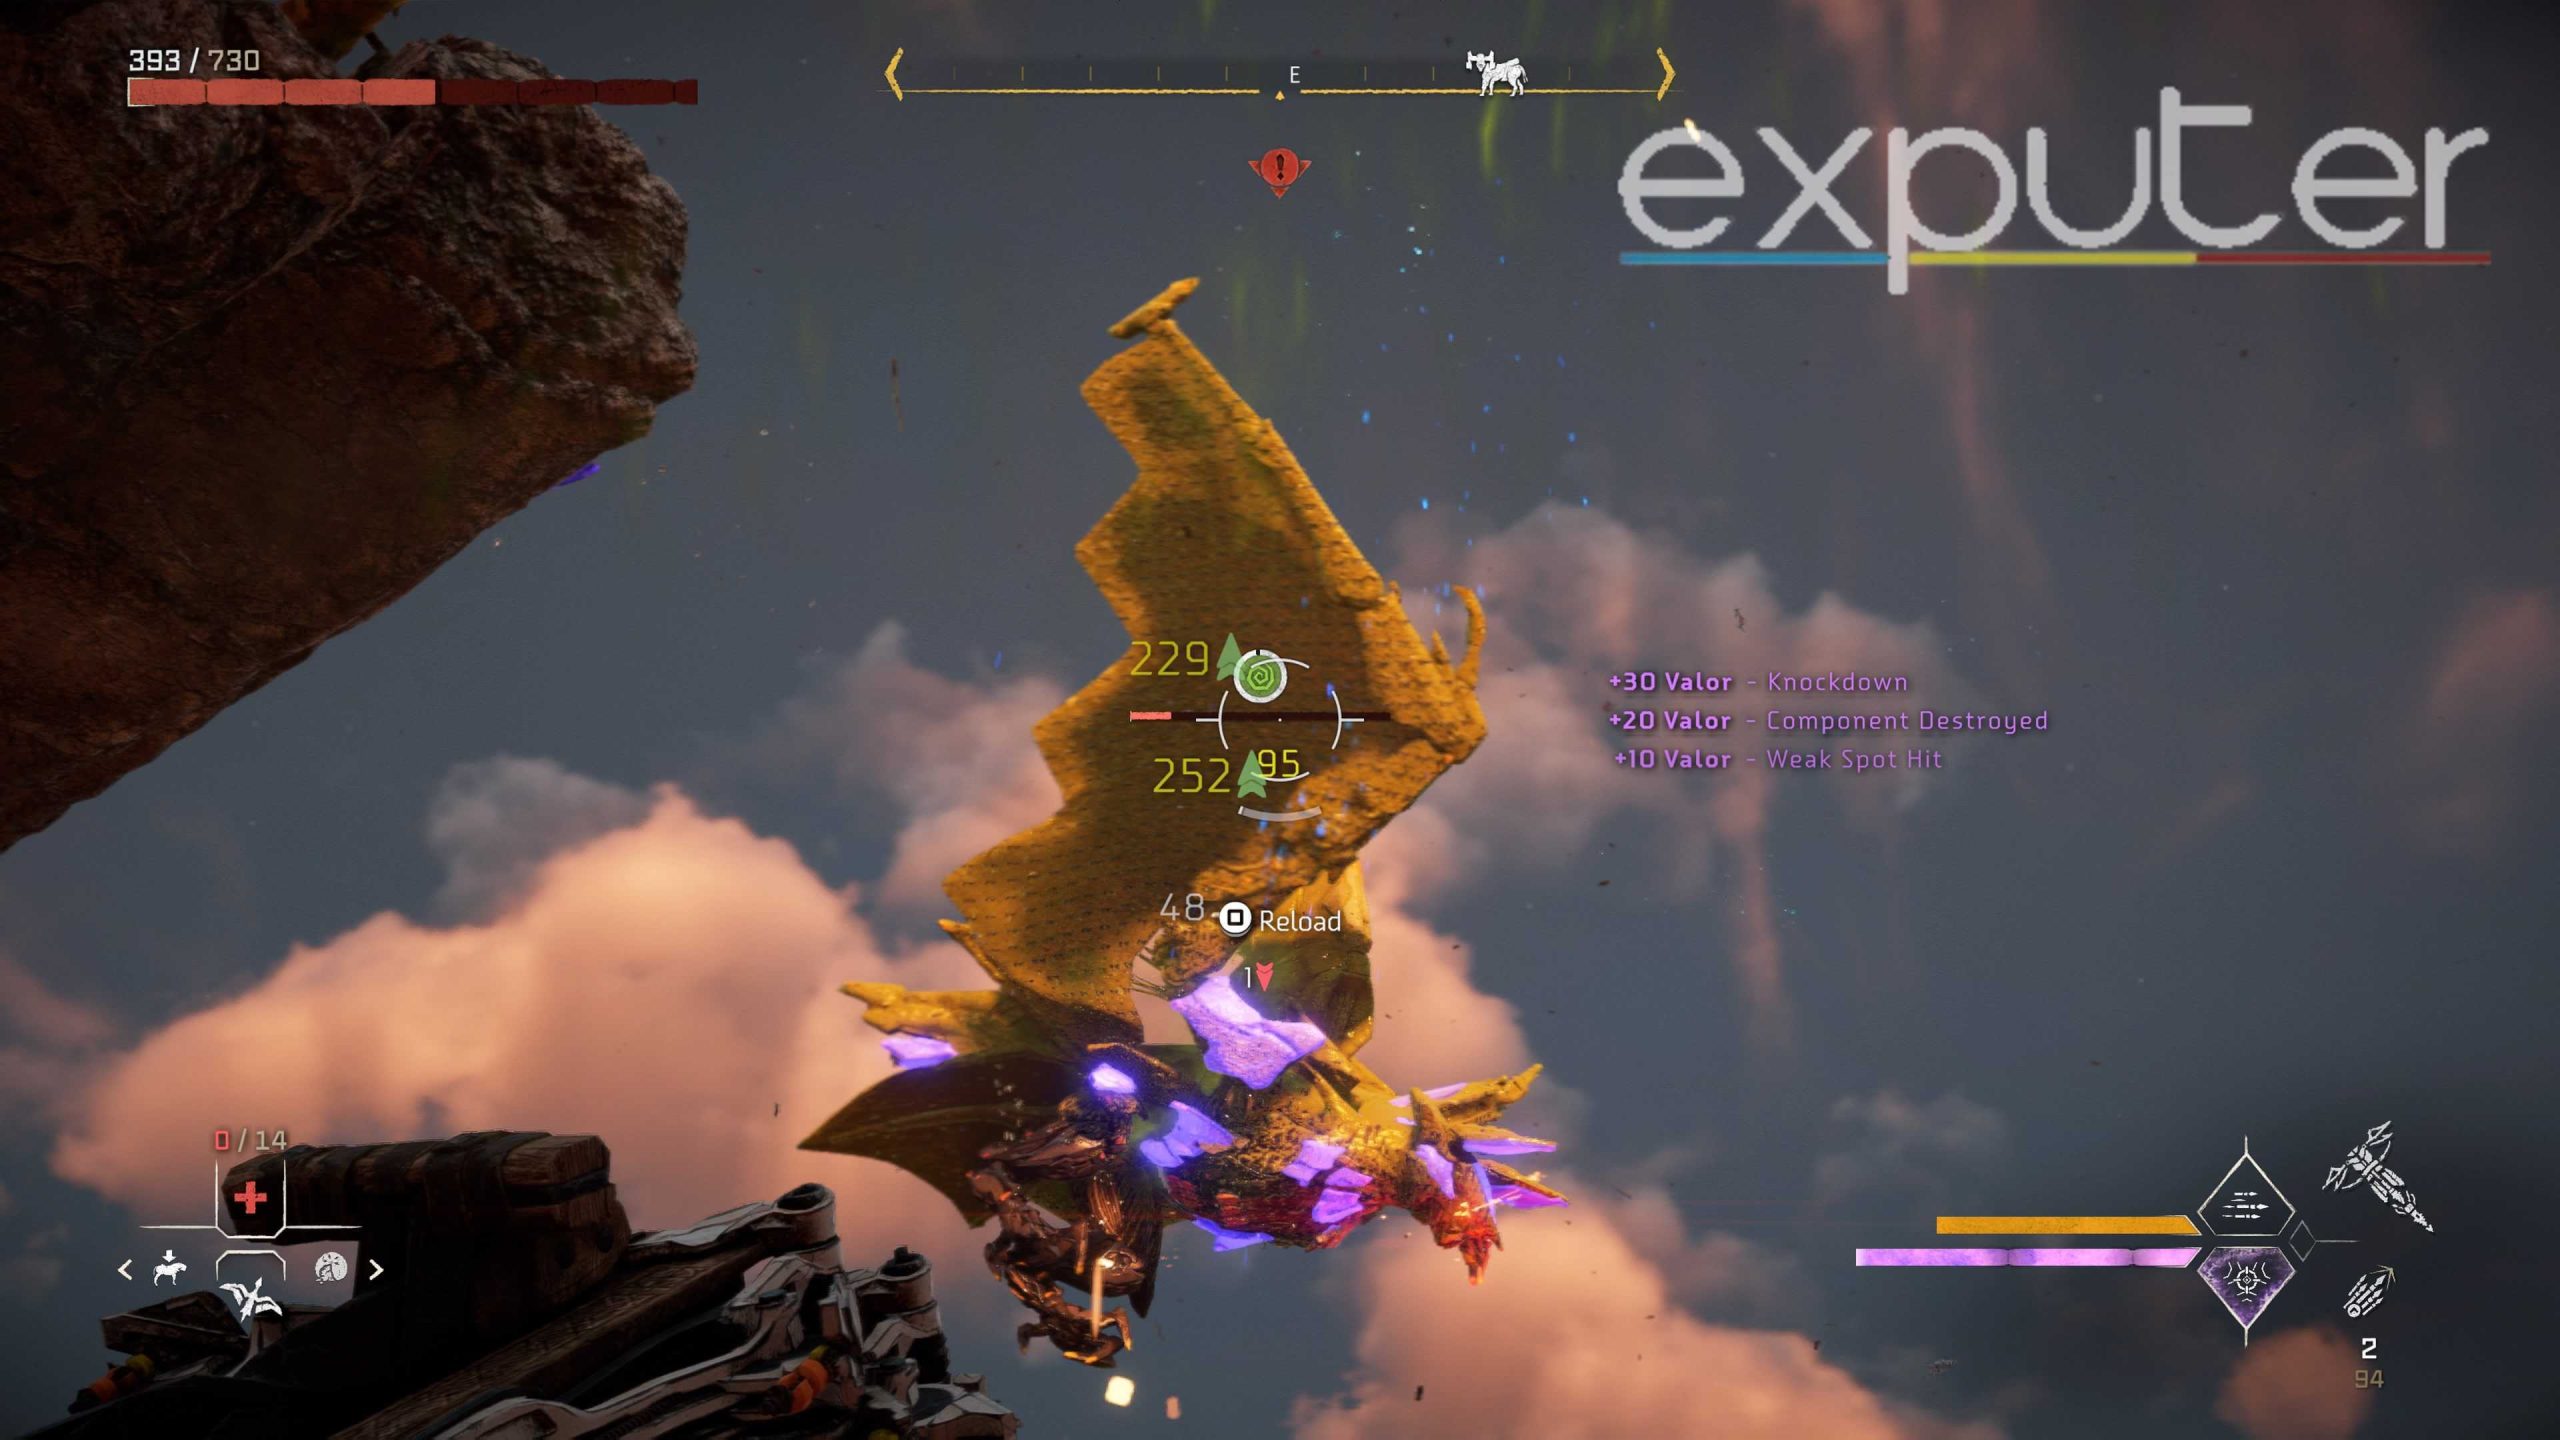
- Unleashing The Boltcaster: The Boltcaster is easily one of the best weapons in Horizon Forbidden West, especially if you’re using the Blast Forge, which is a must-have since it has impact bolt ammo.
- Essentially, you need to fire the Boltcaster immediately after freezing the Dreadwing, and we recommend doing it on its back, where you can find a number of detachable parts that can deal huge damage when broken.
- We highly recommend activating the Valor Surge at this point to further boost your damage which will easily melt the health of the Dreadwing in a matter of seconds.
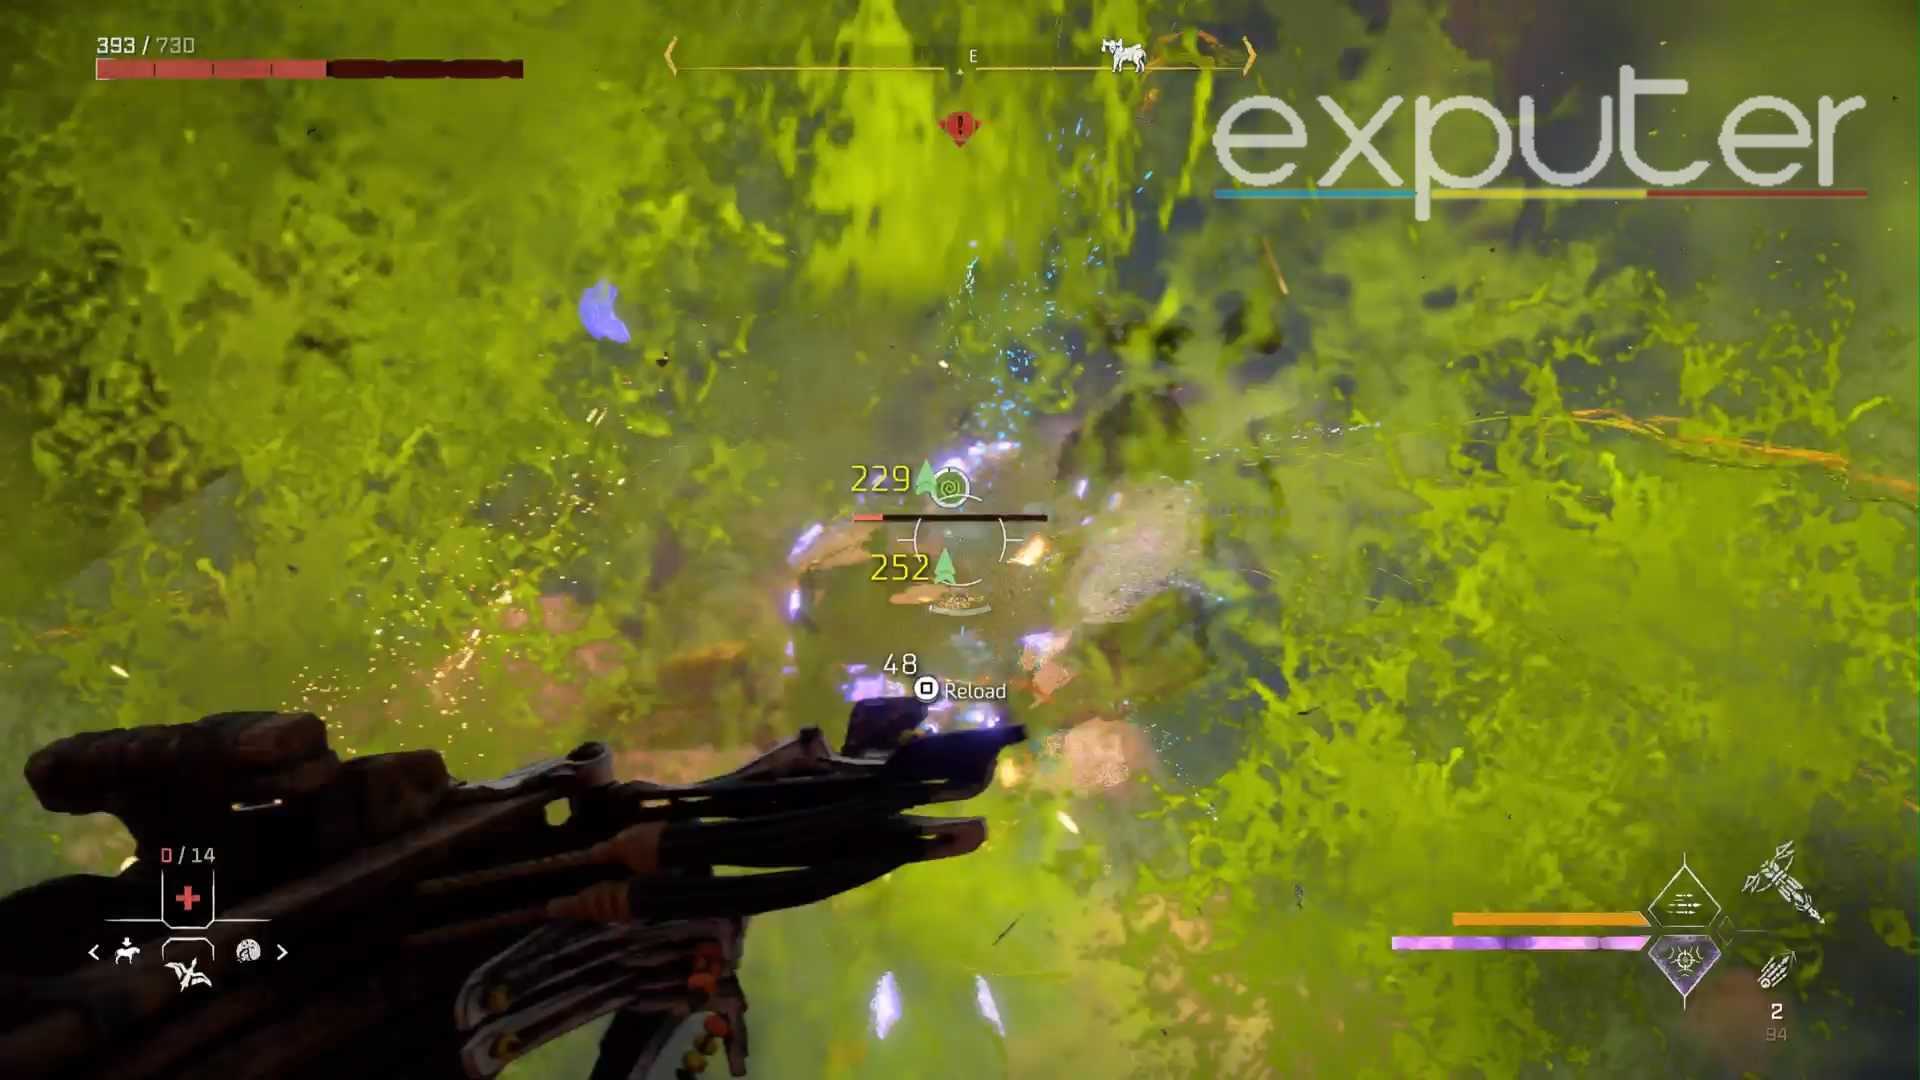
- A few other combat tips we can suggest are to use the ‘slide-into-dodge roll’ technique to grant more immunity frames to Aloy, which will allow her to easily evade almost any attack, as well as use the smoke bombs to get breathing room from the fight to heal up or reload the Boltcaster.
- Lastly, it is worth mentioning that players can also target the Acid pouch on its front chest which will explode when dealt enough damage, making the Dreadwing suspectible to the Acid element.
Summing It Up
Horizon Forbidden West is easily one of the best open world games with a rich combat and stunning photorealistic graphics that can encapsulate any gamer on their first playthrough. As you can see in the following Subreddit Post, the Dreadwings can be a tenacious machine to fight for quite a few players.
If you think you have what it takes to overcome it then you might easily be able to take down the new machines in the Burning Shores expansion of the game too. Our Review of Horizon Forbidden West Burning Shores discussed many of the ups and downs of the game, as well as the latest changes and new content introduced with the DLC which can easily impress fans.
But for now, this concludes our guide to the Horizon Forbidden West Dreadwing Locations as well as the detailed strategy to defeat it. If you have any further questions related to the guide or the game in general then be sure to let us know in the comments below! As always, eXputer wishes you luck!
Up Next:
- Horizon Forbidden West: How To Start Burning Shores
- Horizon Forbidden West: All Black Box Locations
- Horizon Forbidden West: All Survey Drones Locations
- How to Fast Travel in Horizon Forbidden West
Thanks! Do share your feedback with us. ⚡
How can we make this post better? Your help would be appreciated. ✍