Horizon Forbidden West contains 43 base game machines and 4 Burning Shores new machines. To get information about machines, such as strengths, weaknesses, loot drops, & more, I scanned each & every single machine in the game & you are expected to do the same. Overriding all Cauldrons in Horizon Forbidden West is equally important if you want to speed up the process of killing these machines or making a few of them your allies.
Of these 47 machines, 43 are available in the base game, and 4 new machines were introduced in the Burning Shores DLC.
22 out of these 47 machines are new additions in Forbidden West; the rest were carried from the first game into the sequel.
Aloy can mount 4 machines from the base game and one from the Burning Shores DLC, making a total of 5 mountable machines.
Strengths, weaknesses, loot drops, Horizon Forbidden West machine parts list & other useful information about the machines can be acquired after Aloy scans them.
The best ways to defeat machines are to attack the weak parts, override them, and bring other machines as allies after overriding them.
Here’s a complete summarized comparison of all the Machines in Horizon Forbidden West:
Machine
Size
Class
Challenge Level
HP
Grazer
Small
Acquisition
8.0
150.0
Burrower
Medium
Reconnaissance
16.0
550.0
Scrounger
Small
Reconnaissance
16.0
500.0
Leaplasher
Medium
Combat
18.0
1300.0
Scrapper
Small
Acquisition
8.0
220.0
Spikesnout
Medium
Acquisition
16.0
700.0
Skydrifter
Large
Transport
20.0
1700.0
Plowhorn
Large
Combat
18.0
2000.0
Charger
Small
Acquisition
8.0
220.0
Lancehorn
Small
Combat
12.0
400.0
Longleg
Medium
Acquisition
13.0
350.0
Bristleback
Midweight
Acquisition
13.0
320.0
Fanghorn
Large
Combat
21.0
2500.0
Redeye Watcher
Small
Reconnaissance
10.0
200.0
Widemaw
Midweight
Combat
18.0
2000.0
Clawstrider
Midweight
Combat
16.0
700.0
Corruptor
Medium
Combat
18.0
1900.0
Bellowback
Medium
Transport
18.0
1600.0
Glinthawk
Small
Acquisition
18.0
240.0
Shell-Walker
Medium
Transport
18.0
800.0
Stalker
Medium
Acquisition
18.0
240.0
Grimhorn
Medium
Combat
21.0
2800.0
Ravager
Large
Combat
26.0
4500.0
Snapmaw
Large
Combat
20.0
3500.0
Sunwing
Large
Combat
25.0
6000.0
Clamberjaw
Large
Combat
24.0
5000.0
Rollerback
Large
Combat
25.0
6000.0
Rockbreaker
Large
Combat
28.0
7000.0
Behemoth
Large
Transport
25.0
2700.0
Dreadwing
Large
Combat
28.0
7500.0
Tideripper
Large
Combat
27.0
8000.0
Shellsnapper
Large
Combat
32.0
10000.0
Stormbird
Large
Combat
27.0
3500.0
Thunderjaw
Large
Combat
27.0
8000.0
Frostclaw
Large
Combat
30.0
11000.0
Scorcher
Large
Combat
30.0
11000.0
Slitherfang
Large
Combat
32.0
12000.0
Tremortusk
Large
Combat
36.0
14000.0
Fireclaw
Large
Combat
38.0
16000.0
Slaughterspine
Large
Combat
42.0
18000.0
Tallneck
Large
Reconnaissance
12.0
2000.0
Specter
Large
Reconnaissance
14.0
4000.0
Specter Prime
Large
Reconnaissance
20.0
8000.0
Waterwing
Large
Combat
32.0
16000.0
Bilegut
Large
Combat
36.0
18000.0
Stingspawn
Large
Combat
42.0
20000.0
Horus
Large
Combat
48.0
24000.0
Grazer
Grazer
Size
Class
Weight
Challenge LV.
HP
Override
Small
Acquisition
Light
8
Corrupted: 15
190
Corrupted: 225
Cauldron MU
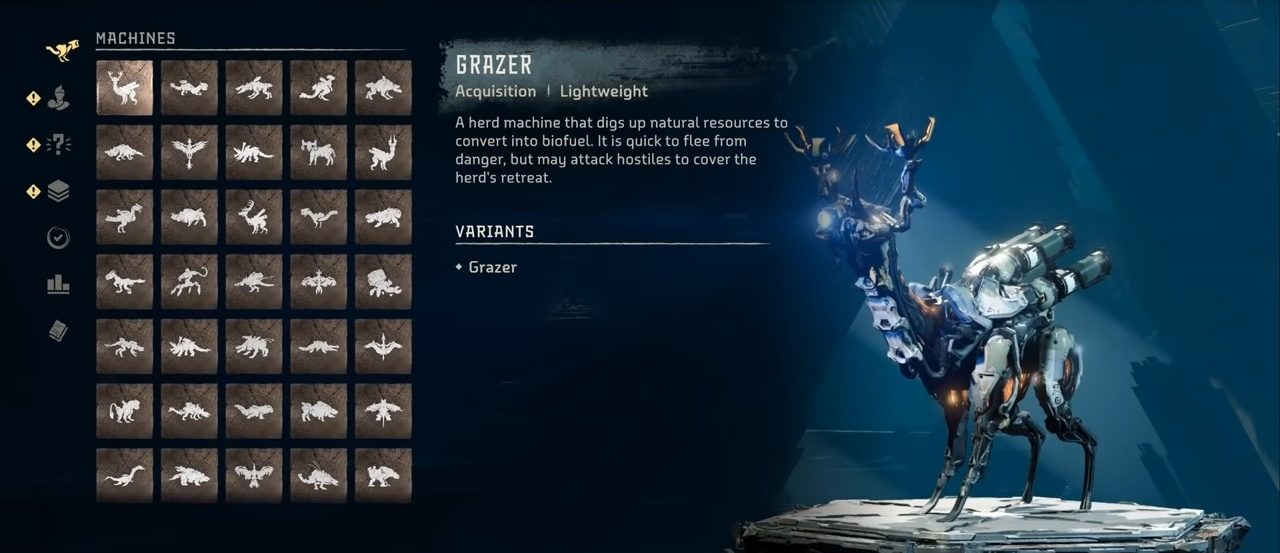
The Grazer is a lightweight, acquisition-type machine designed for digging up natural resources and converting them into biofuel. As a herd machine, it relies on speed and evasiveness to escape danger but will not hesitate to engage hostiles if it means ensuring the herd’s safe retreat.
Attack Name
Description
Front Leg Strike
Rears up, delivering a powerful kick at the target
Leap and Kick
Jumps forward, extending a kick toward the target
Rear Leg Thrust
Kicks back at a target using their hind legs
Antler Skewer
Executes a swift upward stab with antlers
Antler Charge
Charges at target with lowered head and antlers
Show Full Text
Loot Drop
Metal shards
Blaze
Grazer circulator
Machine muscle
Grazer primary nerve
Small machine core
Braided wire
Metal bone
Sturdy hardplate
Grazer rotor horn
Strengths
Resistant to acid damage
Weaknesses
Vulnerable to shock damage
Body Parts
Main body
Rotor horns
Blaze canister
Burrower
Burrower
Size
Class
Weight
Challenge LV.
HP
Override
Medium
Reconnaissance
Light
5
10 Canister & Apex
12 Tracker
18 Apex Canister
19 Apex Tracker
95
175 Canister
280 Tracker
289 Apex
310 Apex Canister
420 Apex Tracker
Cauldron MU
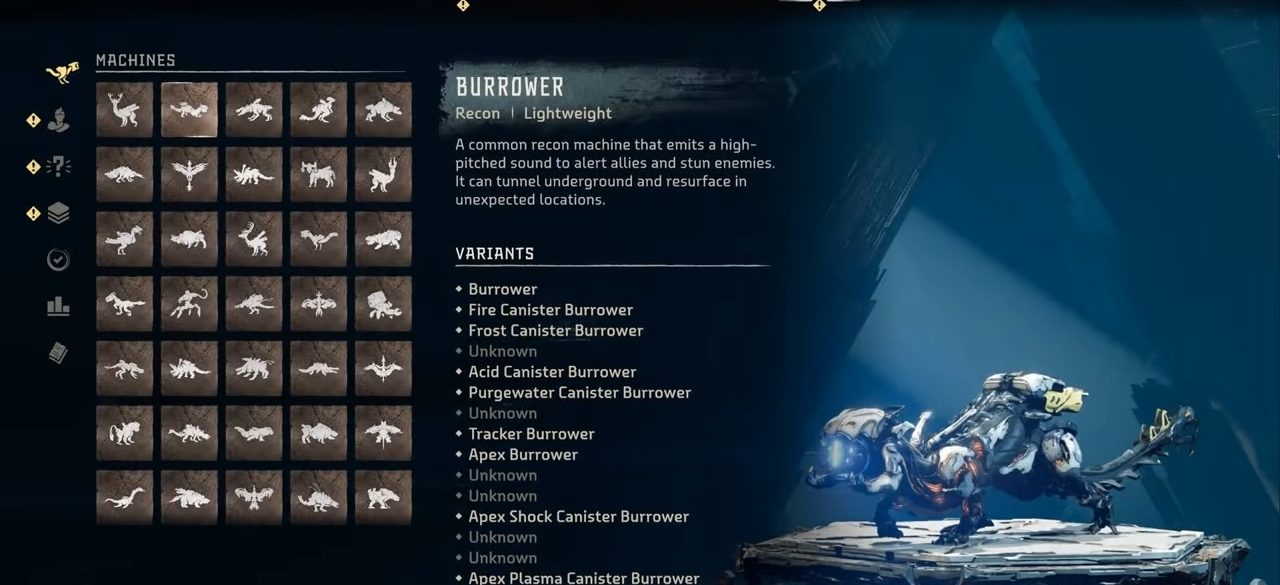
Under the small-sized Horizon Forbidden West machine names is the Burrower, which is a lightweight, recon-type machine known for its ability to emit high-pitched sounds, alerting allies and stunning enemies. It can also tunnel underground and resurface in unpredictable locations.
Attack Name
Description
Sonic Blast
Unleashes rapid, deafening sound waves at the target
Boulder Fling
Hurls a rock at the target with a claw
Plasma Burst
Fires a high-speed plasma projectile from its eye
Arcing Bite Assault
Leaps and bites at target, followed with a rising bite
Tail Spin Strike
Jumps and strikes the target with tail in mid-air
Ground Slam Pounce
Lunges and slams ground with tail near the target
Whirling Tail Smack
Jumps and spins, whipping tail in a full circle
Spiral Swim Bite
Bites while swimming in a corkscrew pattern
Show Full Text
Burrower Variants
Regular Burrower
Fire Canister, Frost Canister, Shock Canister, Acid Canister, Purgewater Canister, and Plasma Canister Burrowers
Tracker Burrower
Apex versions of all listed variants
Loot Drops
Metal shards
Machine muscle
Burrower circulator
Burrower primary nerve
Small machine core
Braided wire
Metal bone
Sturdy hardplate
Burrower soundshell
Echo shell
Blaze
Weakness
Susceptible to fire damage
Body Parts
Main body
Eye
Soundshell
Resource container
Scrounger
Scrounger
Size
Class
Weight
Challenge LV.
HP
Override
Small
Acquisition
Light
8
14 Apex
150
380 Apex
Cauldron MU
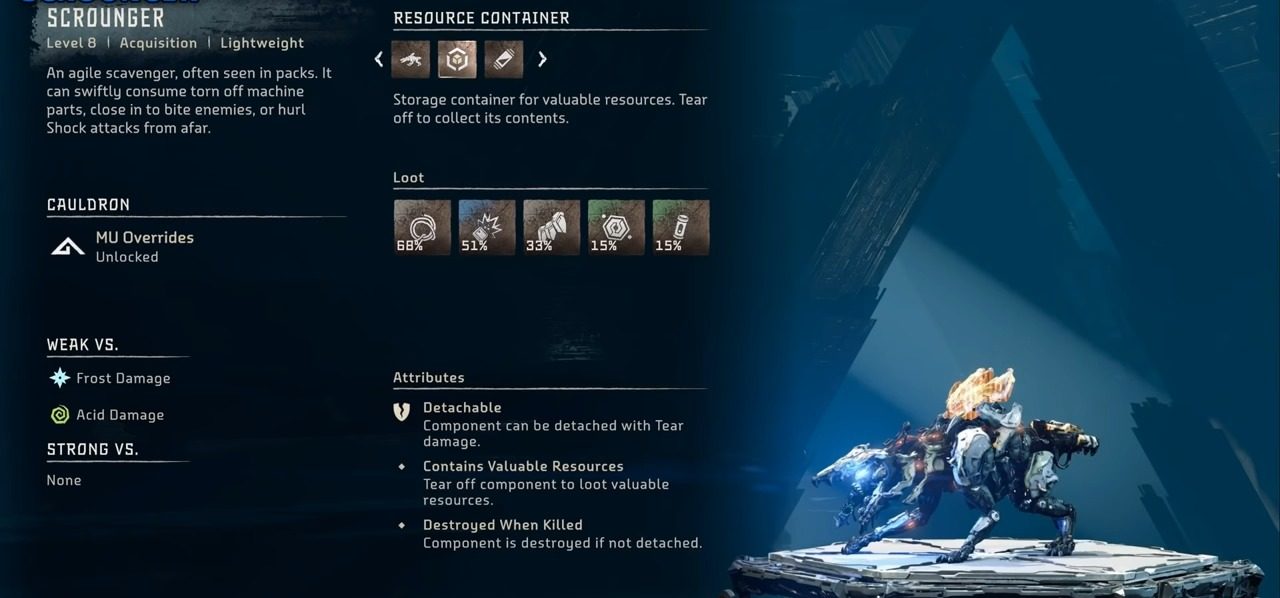
The Scrounger machine is an acquisition-based, lightweight creature in our machine list of Horizon Forbidden West known for its agility and scavenging prowess. Often found in packs, it quickly consumes machine parts and can either bite enemies or launch Shock attacks from a distance. The Scrounger can be overridden using the MU Cauldron override.
Attack Name
Description
Omni Bite
Swift bite with spherical shockwave at close range
Snap Lunge Bite
Biting lunge with shockwave around jaws
Leaping Jaw Crush
Leaps and bites with shockwave turns upon landing
Ascending Chomp
Rising uppercut jump with multiple shockwave bites
Shock Barrage
Fires rapid bursts of shock projectiles at a target
Arcing Shock Bomb
Launches a tracking shock projectile with the explosion
Show Full Text
Scrounger Variants
Scrounger
Sentry Scrounger
Apex Scrounger
Apex Sentry Scrounger
Loot Drops
Sparker
Metal Shards
Machine Muscle
Scrounger Circulator
Small Machine Core
Scrounger Primary Nerve
Metal Bone
Braided Wire
Sturdy Hardplate
Blastpaste
Scrounger Spark Coil
Strengths
Agile and swift, making it difficult to target.
Performs various shock-based attacks, keeping enemies at bay.
Often found in packs, increasing the overall threat.
Weaknesses
Vulnerable to Frost and Acid Damage.
Attack delays provide opportunities for counterattacks.
Lacks strong defenses against particular damage types.
Leaplasher
Leaplasher
Size
Class
Weight
Challenge LV.
HP
Override
Small
Transport
Light
8
14 Apex
150
380 Apex
Cauldron MU
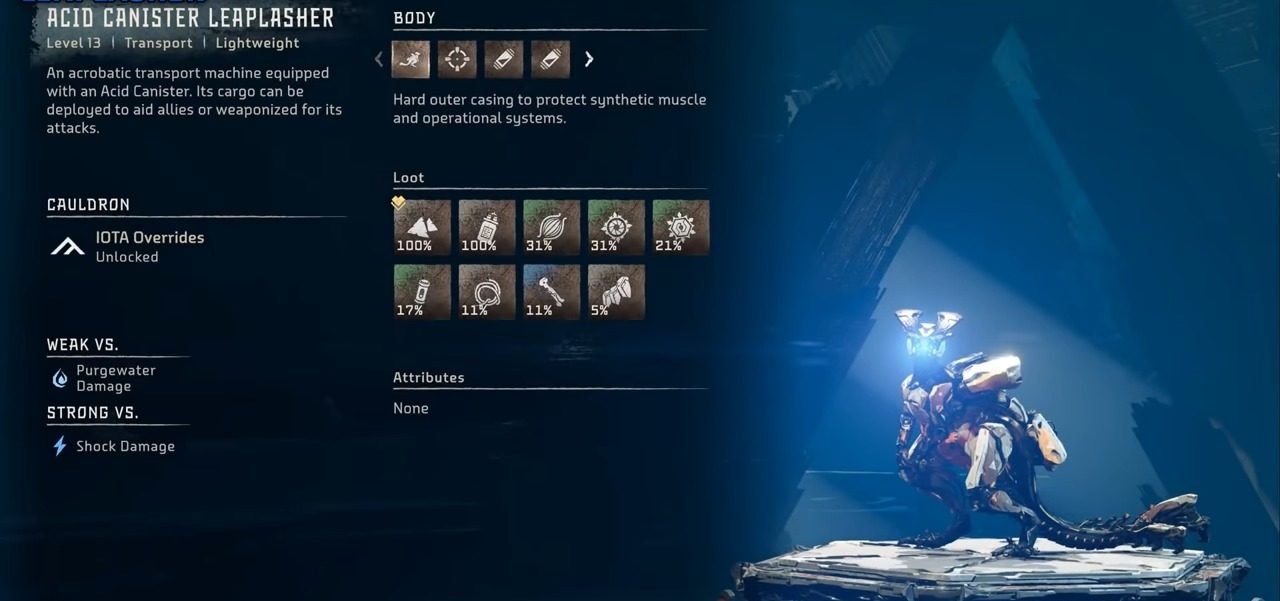
The Leaplasher machine, a lightweight transport type, is known for its acrobatic abilities and comes equipped with an Acid Canister. This versatile machine can deploy its cargo to support allies or utilize it as a weapon. It can be overridden using the IOTA Cauldron override. Leaplasher’s body includes a body, cargo claw, acid canister, and power cell.
Attack Name
Description
Shock Rock Fling
Scrapes tail, launching 3 shock-infused rocks
Electric Pod Launch
Fires pod from the claw, causing shock explosion
Electrified Axe Kick
Leaps and delivers a horizontal flying kick
Shockwave Stomp
Jumps and creates shock explosion on landing
Shock Tail Slam
Leaps back, slamming their tail to create a shock explosion
Jolt Claw Slam
Leaps with spinning claw, causing shock on impact
Charged Spin Attack
Spins vertically with cargo claw, adding shock damage
Electrified Reel-Kick
Grabs the target with claw, reeling in an electric kick
Show Full Text
Leaplasher Variants
Acid Canister Leaplasher
Fire Canister Leaplasher
Frost Canister Leaplasher
Apex Leaplasher
Loot Drops
Metal Shards
Sparker
Machine Muscle
Leaplasher Circulator
Leaplasher Primary Nerve
Small Machine Core
Braided Wire
Metal Bone
Sturdy Hardplate
Metalbite
Leaplasher Spark Coil
Strengths
Resistant to Shock Damage.
Weaknesses
Vulnerable to Purgewater Damage.
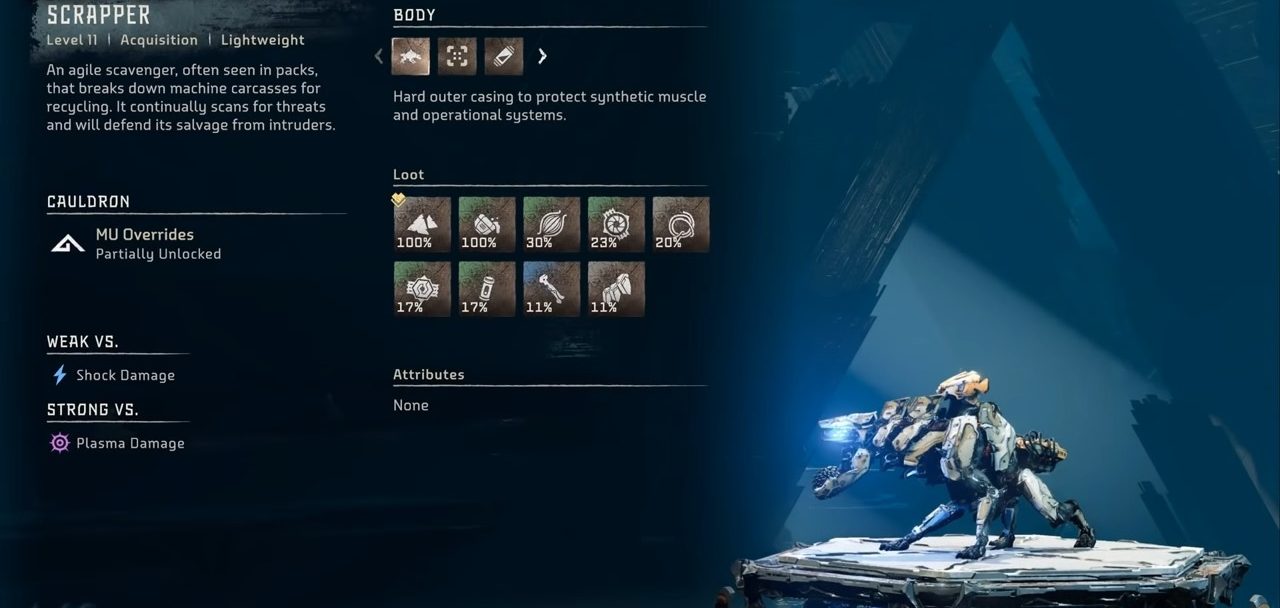
Scrapper
Scrapper
Size
Class
Weight
Challenge LV.
HP
Override
Small
Acquisition
Light
11
15 Corrupted
17 Daemonic
18 Apex
235
330 Corrupted
385 Daemonic
353 Apex
Cauldron MU
The Scrapper machine is a nimble, acquisition-based lightweight robot known for dismantling fallen machines to recycle their parts. It frequently roams in groups, constantly scanning for threats and safeguarding its gathered resources from interlopers. The Scrapper can be overridden using an MU Cauldron. Its body consists of several key components, including the main body, radar, and plasma cell.
Attack Name
Description
Swift Bite
Fast bite at close range for self-defense
Lunge and Chomp
Biting lunge aimed at the target
Claw Slash
Swipes at the target with a claw during a lunge
Plasma Sweep
Fires a side-to-side sweeping plasma beam
Ground-to-Target
Fires plasma beam, sweeping from ground to target
Plasma Barrage
Rapid-fire burst of six plasma projectiles
Show Full Text
Variants
Scrapper
Apex Scrapper
Loot Drops
Metal Shards
Glowblast
Machine Muscle
Scrapper Circulator
Braided Wire
Scrapper Primary Nerve
Small Machine Core
Metal Bone
Sturdy Hardplate
Scrapper Radar
Scrapper Spark Coil
Strengths
Resistant to Plasma Damage
Weaknesses
Vulnerable to Shock Damage
Spikesnout
Spikesnout
Size
Class
Weight
Challenge LV.
HP
Override
Small
Acquisition
Light
14
24 Apex
430
840 Apex
Cauldron MU
Next in this machine list of Horizon Forbidden West is the Spikesnout, which is an acquisition-focused lightweight robot designed to extract ground resources by liquefying them. When threatened, it withdraws, releasing clouds of vapor that can either empower allies or debilitate enemies. The Spikesnout can be overridden using a CHI Cauldron. Its body is composed of several parts, including the main body, acid canister, amplifying sac, damage dampener sac, stamina drain sac, and resource container.
Attack Name
Description
Debuffing Mist Spray
Sprays mist that dampens damage and drains stamina
Acidic Rock Burst
Launches corrosive projectiles at target
Snout Energy Shot
Fires energy shot that drains stamina and dampens damage
Slashing Attack
Close-range melee slashing attack
Overhead Slash & Spray
Combines overhead slash with debuffing mist
Mist Ground Slam
Ground slam that releases debuffing mist shockwave
Mist-Infused Perimeter
Creates a close-range misty barrier with debuffs
Defensive Tail Sweep
Tail sweep attack that releases debuffing mist
Show Full Text
Variants
Spikesnout
Apex Spikesnout
Loot Drops
Metalbite
Metal Shards
Machine Muscle
Spikesnout Circulator
Small Machine Core
Spikesnout Primary Nerve
Metal Bone
Braided Wire
Sturdy Hardplate
Volatile Sludge
Puregewater
Spikesnout Sac Webbing
Blastpaste
Strengths
Resistant to Shock Damage
Weaknesses
Susceptible to Fire Damage
Vulnerable to Purewater Damage
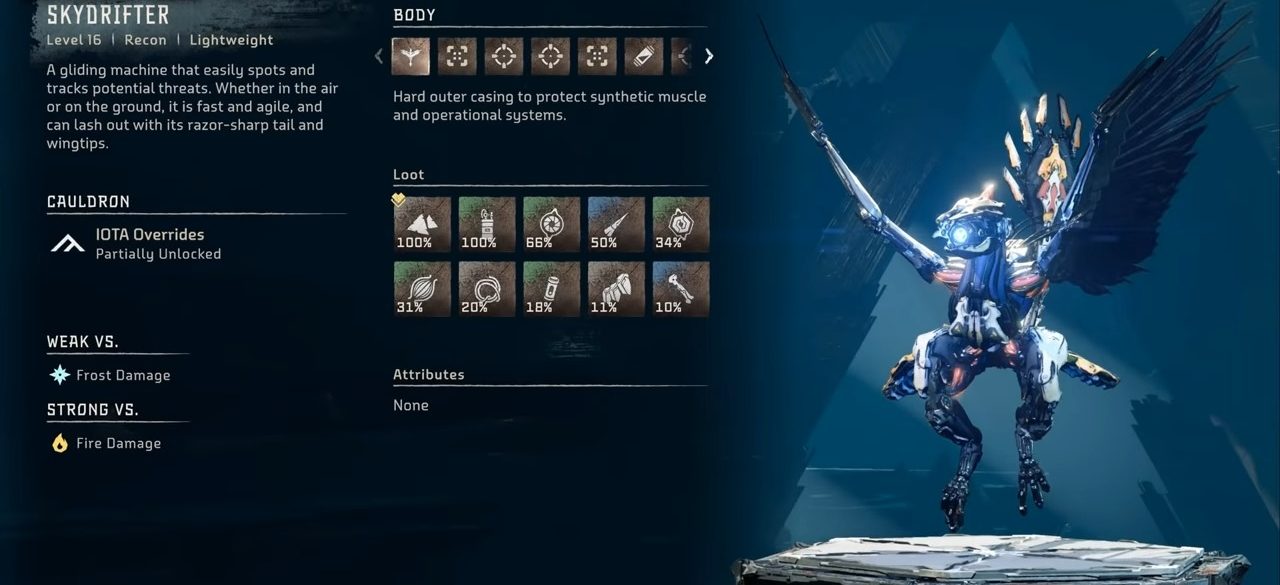
Skydrifter
Skydrifter
Size
Class
Weight
Challenge LV.
HP
Override
Small
Recon
Light
16
26 Apex
450
675 Apex
Cauldron IOTA
Among the Horizon Forbidden West machine names, the Skydrifter machine falls under the lightweight recon robot known for its agility and keen tracking abilities. The Skydrifter can be overridden using an IOTA Cauldron. Its body comprises several parts, including the main body, scanning unit, tracking container, booster, antenna, sparker, and razor tail.
Attack Name
Description
Tracking Dart
Fires a dart that tracks the target and deals damage over time
Razor Quills
Shoots 8 quills in a tight horizontal spread
Claw Dive
Dives and slashes with claws, leaving a trail of fire
Wing Slasher
Glides and slashes with wings may follow up if missed
Spin Blast
Spins and slashes with wings create fire on takeoff/landing
Razor Swipe
Hops and spins, striking with razor tail
Blast Launch
Uses boosters to blast into the air
Razor Swoop
Swoops in a corkscrew pattern, leaving a fire trail
Landing Air Burst
Creates wind blast before landing, deals damage
Show Full Text
Variants
Skydrifter
Apex Skydrifter
Loot Drops
Metal Shards
Echo Shell
Skydrifter Circulator
Piercing Spike
Skydrifter Primary Nerve
Machine Muscle
Braided Wire
Small Machine Core
Sturdy Hardplate
Metal Bone
Skydrifter Razor Tail
Strengths
Resistant to Fire Damage
Weaknesses
Vulnerable to Frost Damage
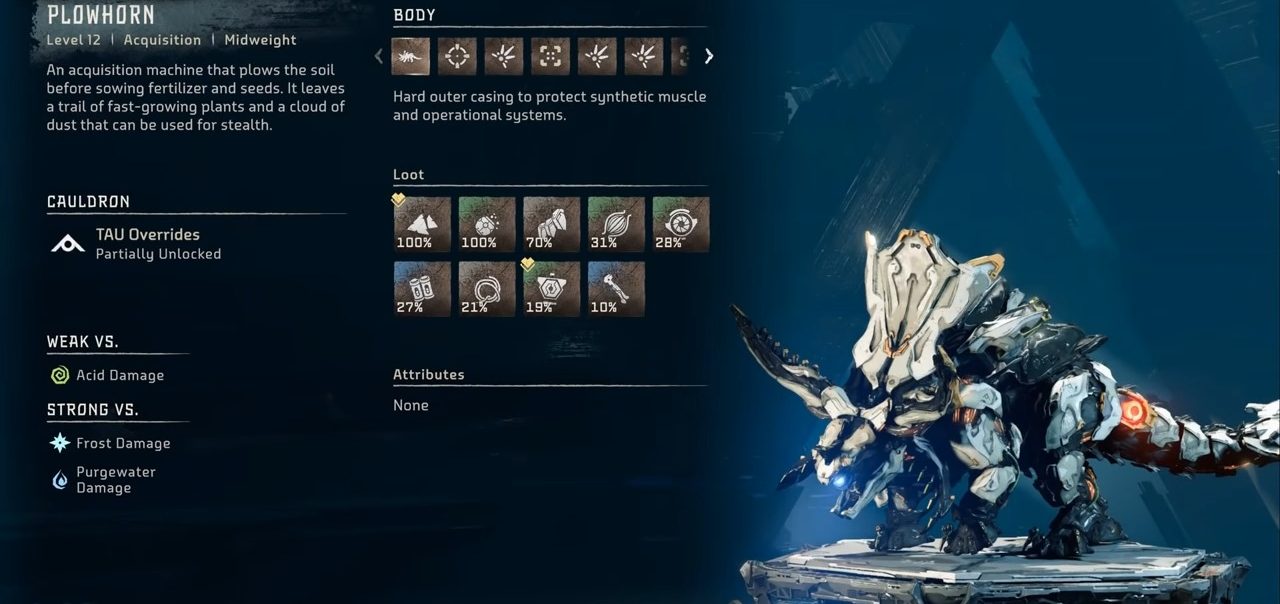
Plowhorn
Plowhorn
Size
Class
Weight
Challenge LV.
HP
Override
Small
Acquisition
Light
12
22 Apex
800
1200 Apex
Repair-Bay TAU
The Plowhorn machine is a midweight acquisition robot specialising in tilling the earth and dispersing seeds and fertilizer. The Plowhorn can be overridden using a TAU Cauldron. Its body comprises several parts: the main body, horns, adhesive sac, seed dispenser, purgewater sac, fertilizer sac, tail clamp, and tail capsule.
Attack Name
Description
Adhesive Volley
Launches adhesive glob from horns, tracking target
Gravel Barrage
Fires adhesive-covered rocks, tracking target
Viscous Slam
Slams ground with adhesive-coated horns
Piercing Charge
Charges, leaving an adhesive trail, create a wave of adhesive
Impaling Slash
Whips tail, lunging forward and rotating to face the target
Impaling Dredger
Dives and slams horns into the ground, skids on landing
Show Full Text
Variants
Plowhorn
Apex Plowhorn
Loot Drops
Metal Shards
Stickpaste
Sturdy Hardplate
Machine Muscle
Plowhorn Circulator
Medium Machine Core
Braided Wire
Plowhorn Primary Nerve
Metal Bone
Plowhorn Horn
Medicinal Berry
Vigorstem
Volatile Sludge
Fiberzest
Purgewater
Blastpaste
Strengths
Resistant to Frost Damage
Resistant to Purgewater Damage
Weaknesses
Vulnerable to Acid Damage
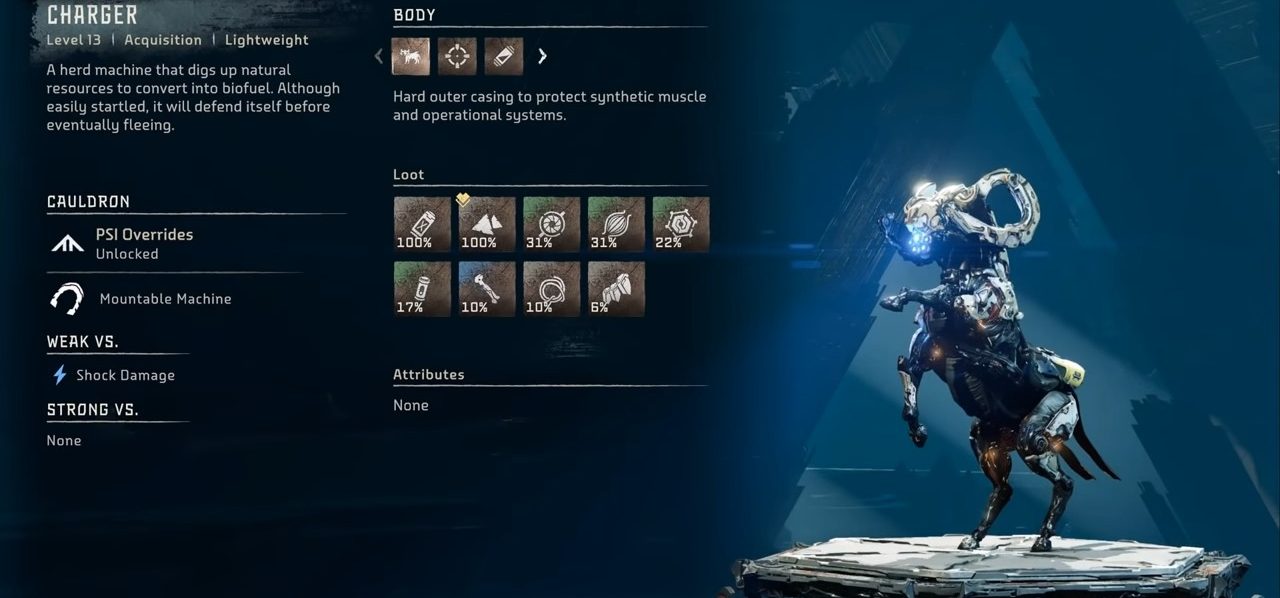
Charger
Charger
The Charger machine is a lightweight acquisition robot that functions as a herd machine in this machine list, excavating natural resources to transform them into biofuel. Notably, the Charger can be mounted for transportation. It can be overridden using a PSI Override, which is automatically unlocked. Its body comprises several parts, including the main body, horns, and blaze canister.
Attack Name
Description
Front Kick
Rears up and lunges forward with a double front kick
Back Kick
Delivers a quick, powerful backward kick
Spin Kick
Spins 180° and performs a roundhouse kick
Rodeo Kick
Rotates 360° while kicking with hind legs
Charge
Assumes aggressive posture and charges at the target
Show Full Text
Loot Drops
Blaze
Metal Shards
Charger Circulator
Machine Muscle
Charger Primary Nerve
Small Machine Core
Metal Bone
Braided Wire
Sturdy Hardplate
Charger Horn
Weaknesses
Vulnerable to Shock Damage
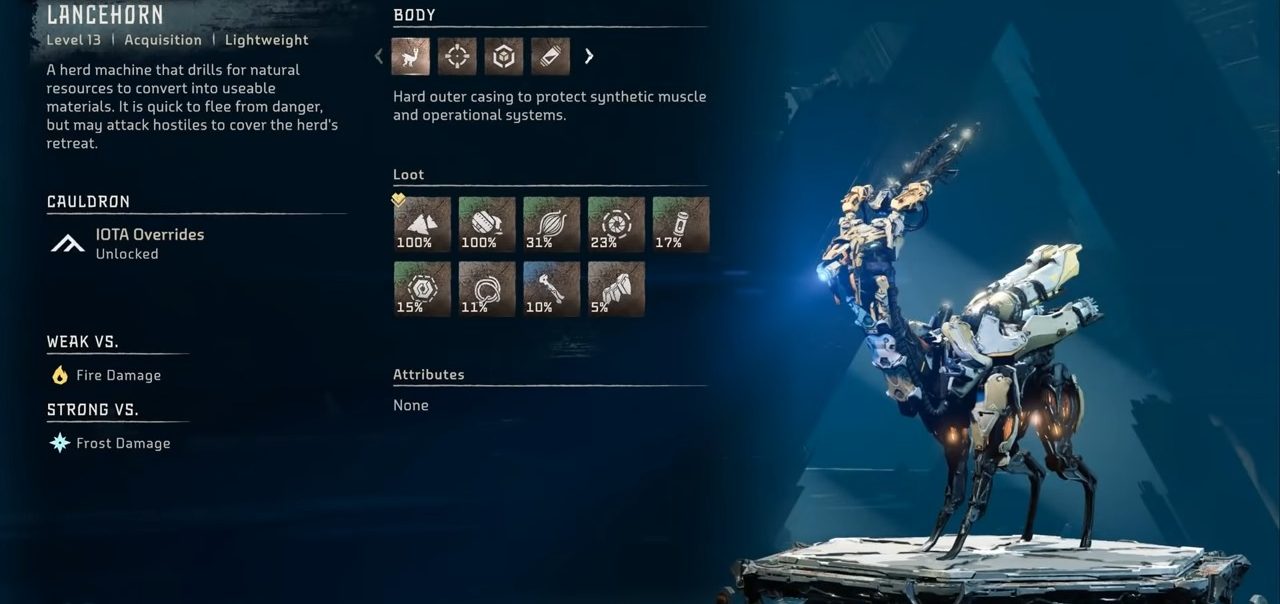
Lancehorn
Lancehorn
The Lancehorn machine is a lightweight acquisition robot that operates as a herd machine, drilling for natural resources to convert into usable materials. Though it typically flees from danger, it may engage hostiles to ensure the herd’s safe retreat. The Lancehorn can be overridden using an IOTA Cauldron. Its body comprises several parts: the main body, drill horns, resource canister, and chillwater canister.
Attack Name
Description
Front Leg Kick
Rears up and delivers a front kick
Leaping Front Kick
Jumps and kicks at the target
Hind Leg Kick
Kicks backward at the target
Skyward Stab
Stabs upward with antlers
Charge
Charges at target with lowered antlers
Leaping Horn Stab
Leaps and stabs with antlers
Gore and Flip
Gores and flips target with antlers
Show Full Text
Loot Drops
Metal Shards
Chillwater
Machine Muscle
Lancehorn Circulator
Small Machine Core
Lancehorn Primary Nerve
Braided Wire
Metal Bone
Sturdy Hardplate
Lancehorn Drill Horn
Blastpaste
Strengths
Resistant to Frost Damage
Weaknesses
Vulnerable to Fire Damage
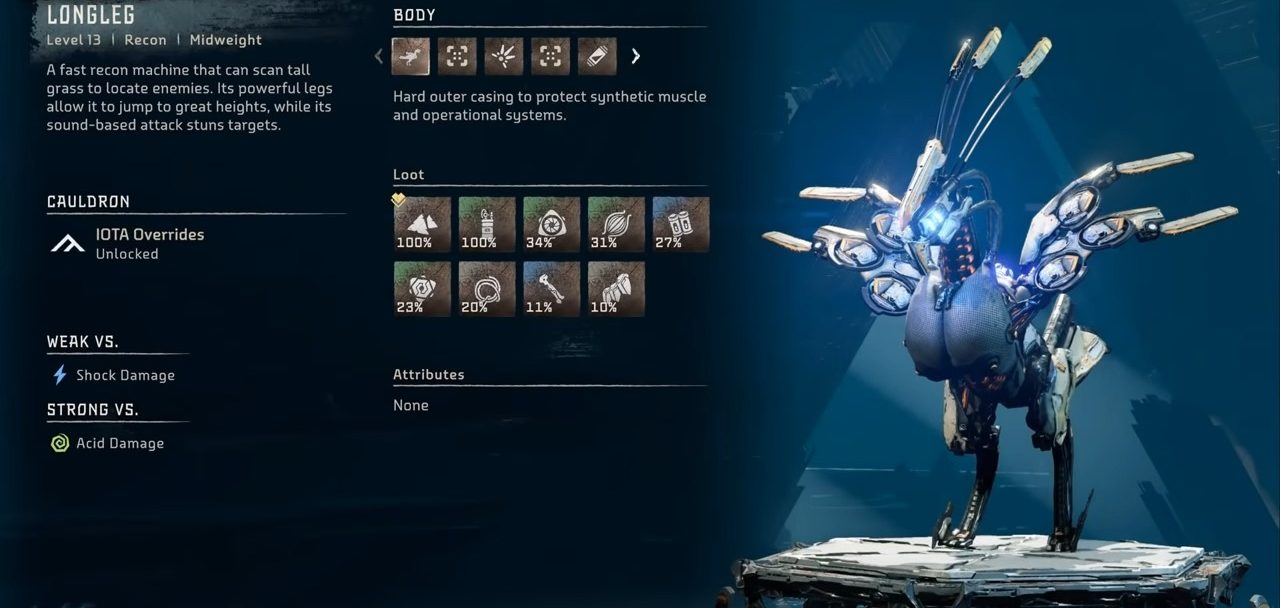
Longleg
Longleg
The Longleg machine is a midweight recon robot that excels in speed and scanning capabilities. It can detect enemies hiding in tall grass, and its robust legs enable it to leap to impressive heights. The Longleg also possesses a sound-based attack that stuns its targets. It can be overridden using an IOTA Cauldron. Its body is composed of several parts, including the main body, antenna, concussion sac, wing burner, and sparker.
Attack Name
Description
Sonic Stun
Emits a sonic projectile causing Deafened
Ranged Heat Blast
Launches fireball from heated Wing Burners
Beak Thrust
Jumps and slams ground with beak
Dashing Claw Jump
Hops and slashes with claws; creates shockwave
Hovering Chicken Scratch
Leaps and scratches in mid-air
360° Burning Wing Flap
Creates Fire explosion with Wing Burners
Jumping Wing Blast
Jumps and creates a large shockwave on impact
Show Full Text
Variants
Longleg
Apex Longleg
Loot Drops
Metal Shards
Echo Shell
Longleg Circulator
Machine Muscle
Medium Machine Core
Longleg Primary Nerve
Braided Wire
Metal Bone
Sturdy Hardplate
Longleg Wing Burner
Strengths
Resistant to Acid Damage
Weaknesses
Vulnerable to Shock Damage
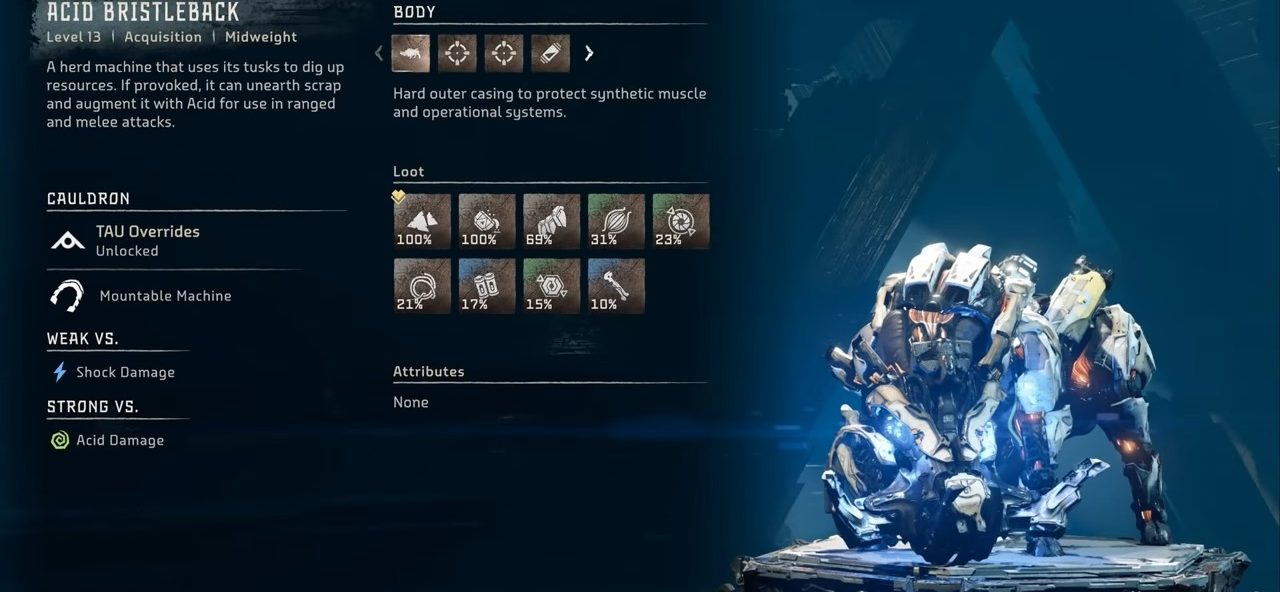
Bristleback
Bristleback
The Bristleback machine is a midweight acquisition robot that operates in herds and employs its tusks to dig up resources. This is one of the five mountable machines in our machine list that can be overridden with a TAU Cauldron. The Bristleback’s body comprises the main body, tusks, grinder discs, and an acid canister.
Attack Name
Description
Tusk Smash
Leaps and smashes snout; may follow up with infused rocks
Hoof Thrust
Hops backward and delivers a swift kick
Reverse Snout Swing
Swings snout in 180º motion, often followed by Snout Swing
Snout Swing
Swings snout while lunging diagonally
Snout Bash Combo
Lunges and bashes with snout
Spewing Twist Kick
Spins and kicks while spewing Acid/Fire
Wreckage Rush
Charges with Acid/Fire infused scrap
Charge
Weaker charge when both Tusks are removed
Show Full Text
Variants
Acid Bristleback
Fire Bristleback
Apex Acid Bristleback
Apex Fire Bristleback
Loot Drops
Metal Shards
Metalbite
Sturdy Hardbone
Machine Muscle
Bristleback Circulator
Braided Wire
Medium Machine Core
Bristleback Primary Nerve
Metal Bone
Bristleback Tusk
Piercing Spike
Strengths
Resistant to Acid Damage
Weaknesses
Vulnerable to Shock Damage
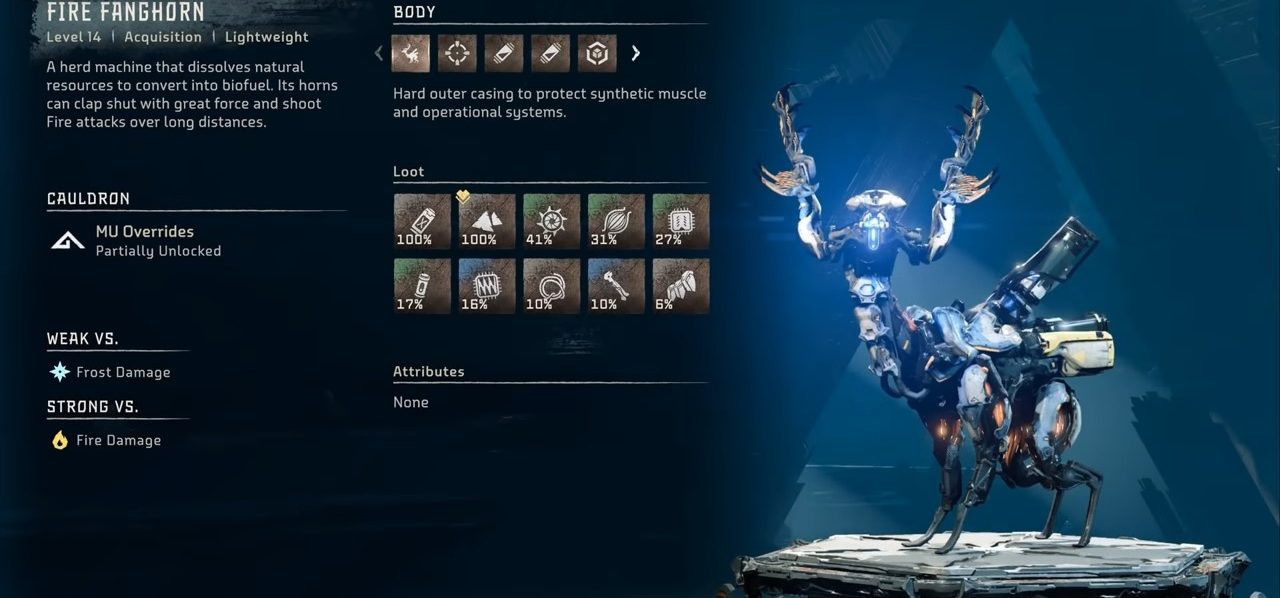
Fanghorn
Fanghorn
The Fanghorn machine is a lightweight acquisition robot that roams in herds, dissolving natural resources for biofuel conversion. Its horns can snap together powerfully, enabling it to launch long-range fire attacks. The Fanghorn can be overridden using an MU Cauldron. Its body is composed of the main body, antlers, a blaze canister, a purgewater canister, and a resource container.
Attack Name
Description
Front Leg Kick
Leans on hind legs and kicks at the target
Leaping Front Kick
Leans on hind legs, steps forward, and kicks at the target
Hind Leg Kick
Kicks backward at the target
Skyward Stab
Stabs upward with antlers
Charge
Lowers head and charges at the target with antlers
Flame Burst
Shoots a series of 3 fireballs at the target, which explode on contact and leave residual fire damage areas
Antler Strike
Coats antlers in flames leap at the target, clap them shut, and create a small fire explosion in front of its head when landing
Show Full Text
Variants
Fanghorn
Apex Fanghorn
Loot Drops
Blaze
Metal Shards
Fanghorn Circulator
Machine Muscle
Fanghorn Primary Nerve
Small Machine Core
Apex Fanghorn Heart
Braided Wire
Metal Bone
Sturdy Hardplate
Fanghorn Antler
Purgewater
Blastpaste
Strengths
Resistant to Fire Damage
Weaknesses
Susceptible to Frost Damage
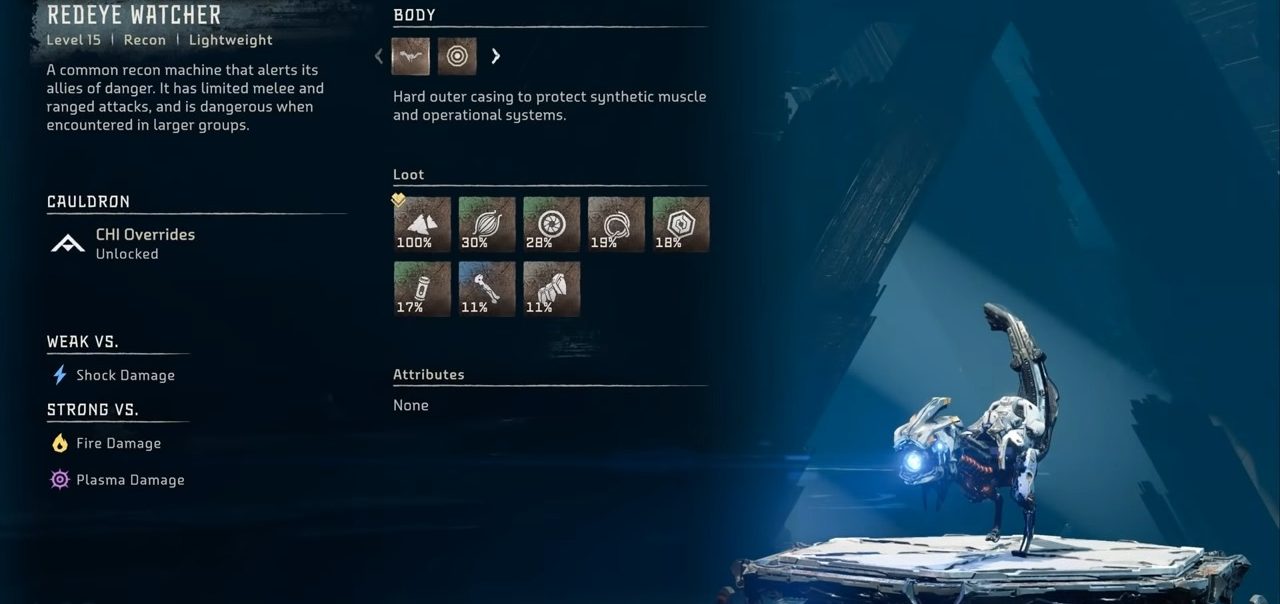
Redeye Watcher
Redeye Watcher
The Redeye Watcher is a lightweight recon machine that detects threats and alerts its allies. This machine can be overridden with CHI Cauldron access. Although it has limited melee and ranged attacks, it becomes dangerous when encountered in larger groups.
Attack Name
Description
Blinding Flash
Emits a bright flash of light to blind and disorient human enemies, ineffective against machines.
Plasma Blast
Fires a plasma projectile at the enemy, tracking the target during windup; disabled when drenched
Spinning Tail Strike
Performs a short-range spinning bludgeon attack with its tail
Rising Head Bash
Jumps at the enemy, using its head as a bludgeon, may lead to an immediate counter-attack if missed
Jumping Smash
Jumps at the enemy, using its body as a bludgeon; may lead to immediate counter-attack if missed; disabled when slowed
Show Full Text
Variants
Redeye Watcher
Apex Redeye Watcher
Loot Drops
Metal Shards
Machine Muscle
Redeye Watcher Circulator
Braided Wire
Redeye Watcher Primary Nerve
Small Machine Core
Metal Bone
Sturdy Hardplate
Strengths And Weaknesses
Weak Against: Shock Damage
Strong Against: Fire Damage, Plasma Damage
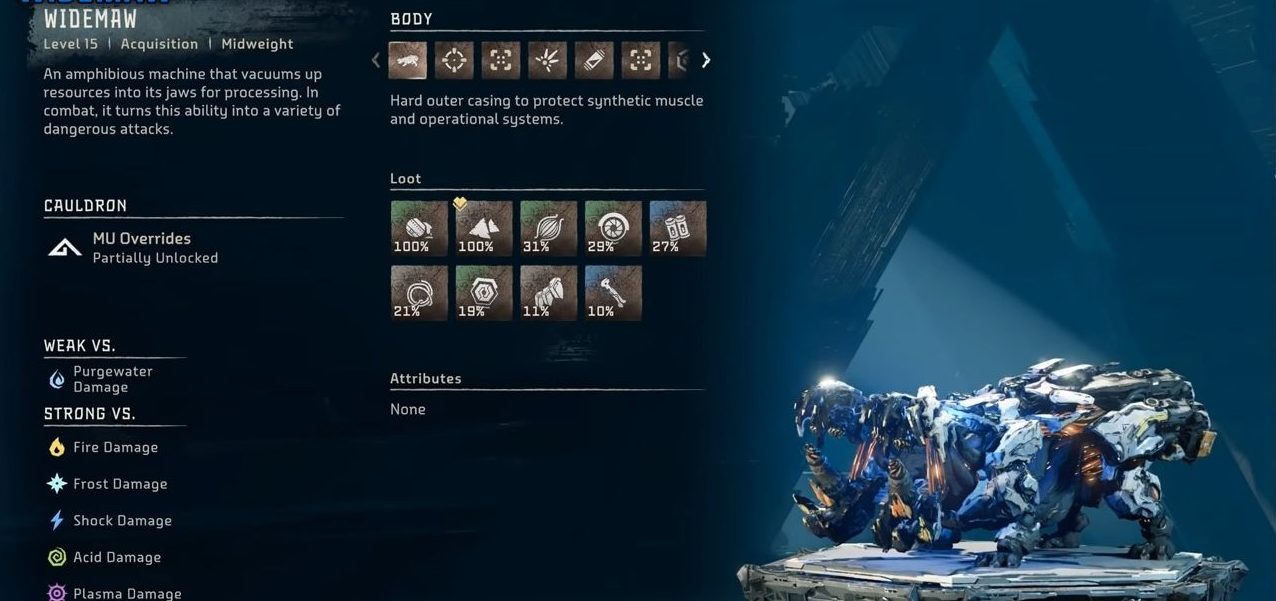
Widemaw
Widemaw
The Widemaw is an amphibious acquisition machine that vacuums resources into its jaws for processing. In Horizon Forbidden West, this midweight machine becomes a formidable opponent in combat, utilizing its vacuum ability in various dangerous attacks. It can be overridden with access to the MU Cauldron.
Attack Name
Description
Cyclone Drag
Sucks the target into melee range, followed by a Slosh Chomp; vacuums nearby Metal Fertilizer Pods to enter an Overcharged state
Slosh Chomp
Bites while sweeping left to right, releasing a blast of Purgewater; disabled when drenched
Hurricane Haul
Pulls the target within melee range with vacuum turbines
Sludge Spew
Spits a series of mud projectiles coated in Purgewater, creating residual damage areas; disabled when drenched.
Sludge Bomb
Forms a large mud ball coated in Purgewater and spits it at the target; disabled when drenched.
Splatter Blaster
Releases a wide blast of Purgewater, creating residual damage areas; disabled when drenched
Turbine Leap
Pulls the target in before leaping backward and stomping, disabled when slowed.
Tusk Charge
Charges at full speed to ram the target; disabled when slowed
Turbine Sludge Charge
Boosts towards the target while scooping up mud, creating residual Purgewater damage areas; disabled when drenched.
Sludge Vacuum
Inhales and releases compressed air and Purgewater, leaving lingering pools; disabled when drenched
Emergency Roll
Performs an evasive barrel roll to reposition
Pod Cluster
Ejects a cluster of Metal Fertilizer Pods around the Widemaw
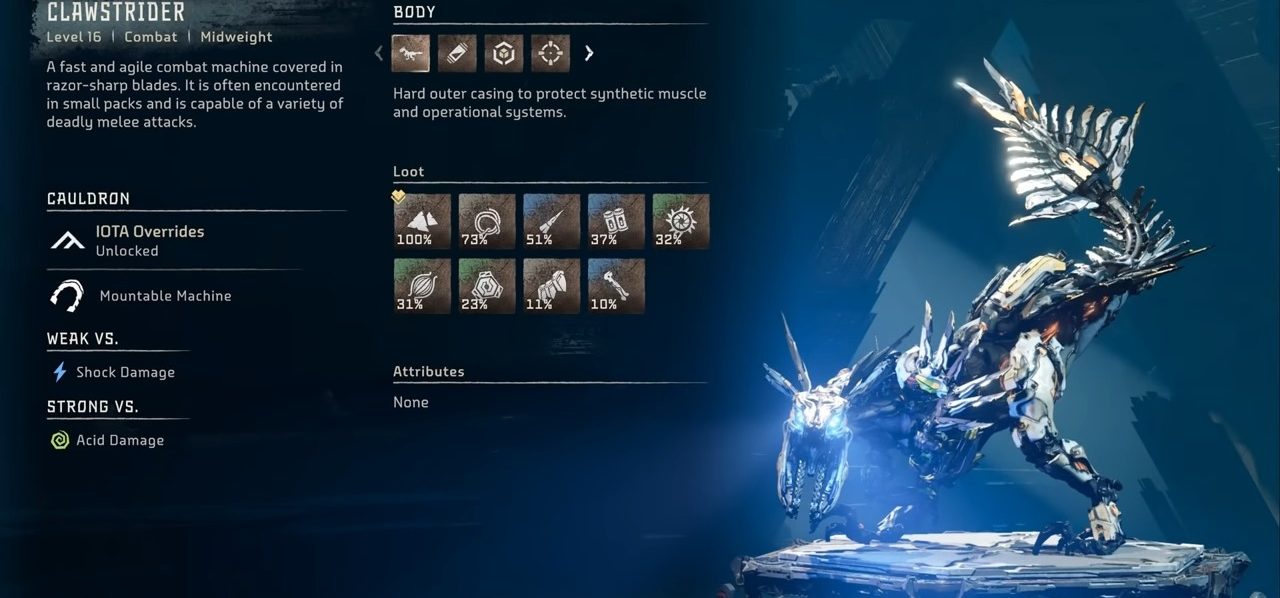
If we have to rank Clawstrider in a machine tier list, then this one will come at the top for being a ruthless machine in the game. The Clawstrider is a swift and agile midweight combat machine, often found in small packs. Covered in razor-sharp blades, this mountable machine is capable of various deadly melee attacks. It can be overridden with access to the IOTA Cauldron.
Attack Name
Description
Deafening Shriek
Emits a loud shriek that can deafen enemies
Winding Slash
Performs a quick, powerful slashing attack
Leaping Claw Slash
Leaps and slashes with claws, with added elemental damage for elemental variants
Relentless Maul
Continuously mauls the target, with added elemental damage for elemental variants
Twisting Bite
Bites the target while twisting, with added elemental damage for elemental variants
Reverse Tail Thrash
Delivers a powerful tail attack to the rear
Leaping Tail Swipe
Leaps and swipes with its tail
Twisting Tail Swipe
Performs a swift tail swipe at close range
Show Full Text
Body Parts
Body
Sparker
Resource Container
Razor Tail
Variants
Clawstrider
Fire Clawstrider
Acid Clawstrider
Apex Clawstrider
Apex Fire Clawstrider
Apex Acid Clawstrider
Loot Drops
Metal Shards
Braided Wire
Piercing Spike
Medium Machine Core
Clawstrider Circulator
Machine Muscle
Clawstrider Primary Nerve
Sturdy Hardplate
Metal Bone
Sparker
Blastpaste
Clawstrider Razor Tail (detach tail)
Strengths And Weaknesses
Weak Against: Shock Damage
Strong Against: Acid Damage
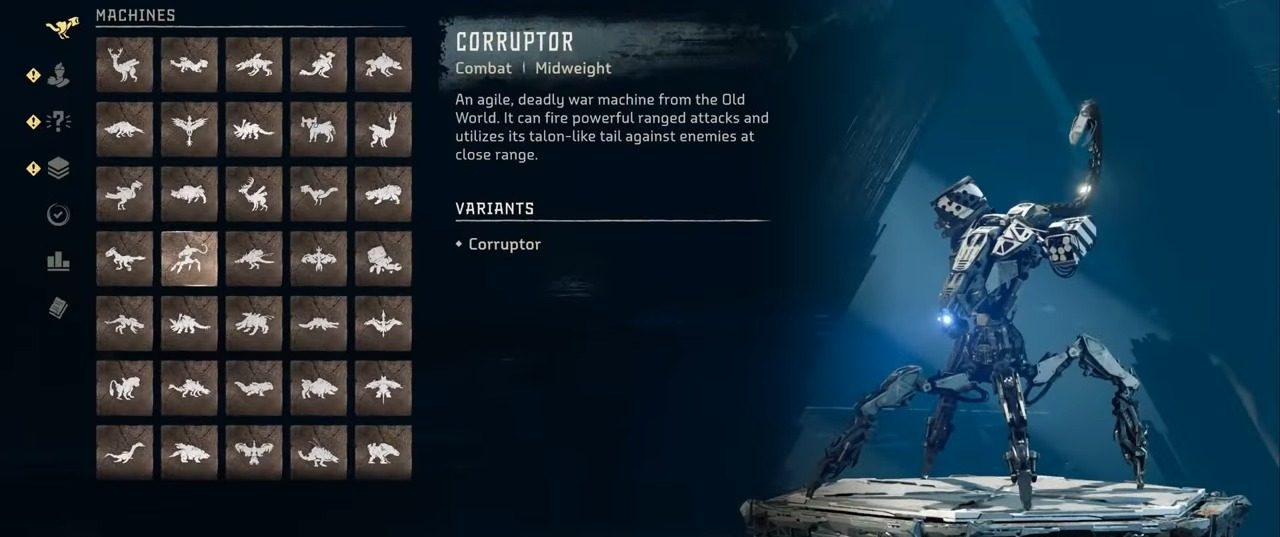
Corruptor
Corruptor
The Corruptor is an agile midweight combat machine from the Old World, known for its powerful ranged attacks and lethal tail. Corruptor is one of the few robots in Horizon Forbidden West that cannot be overridden.
Attack Name
Description
Explosive Spikes
Launches three explosive spikes at the target, avoiding friendly fire
Grenade Launcher
Fires a grenade that scatters before impact, leaving a wide area of fire
Rock Throw
Grabs and hurls a boulder at the target, predicting their movement
Tail Swipe 180
Lunges and rotates its torso 180°, whipping its tail around
Tail Swipe 360
Spins in place while whipping its tail, targeting enemies at its sides or behind
Tail Strike
Strikes overhead with its tail, stabbing the ground in front
Dirt Blast
Whips its tail diagonally into the ground
Jump Attack
Leaps high and lands on top of the target; disabled when slowed
Show Full Text
Body Parts
Body
Spike Launcher
Heat Core
Grenade Launcher
Loot Drops
Metal Shards
Piercing Spike
Medium Machine Core
Volatile Sludge
Corruptor Circulator
Machine Muscle
Corruptor Primary Nerve
Braided Wire
Crystal Braiding
Sturdy Hardplate
Metal Bone
Blastpaste
Strengths and Weaknesses
Weak Against: Fire Damage
Strong Against: Berserk Damage
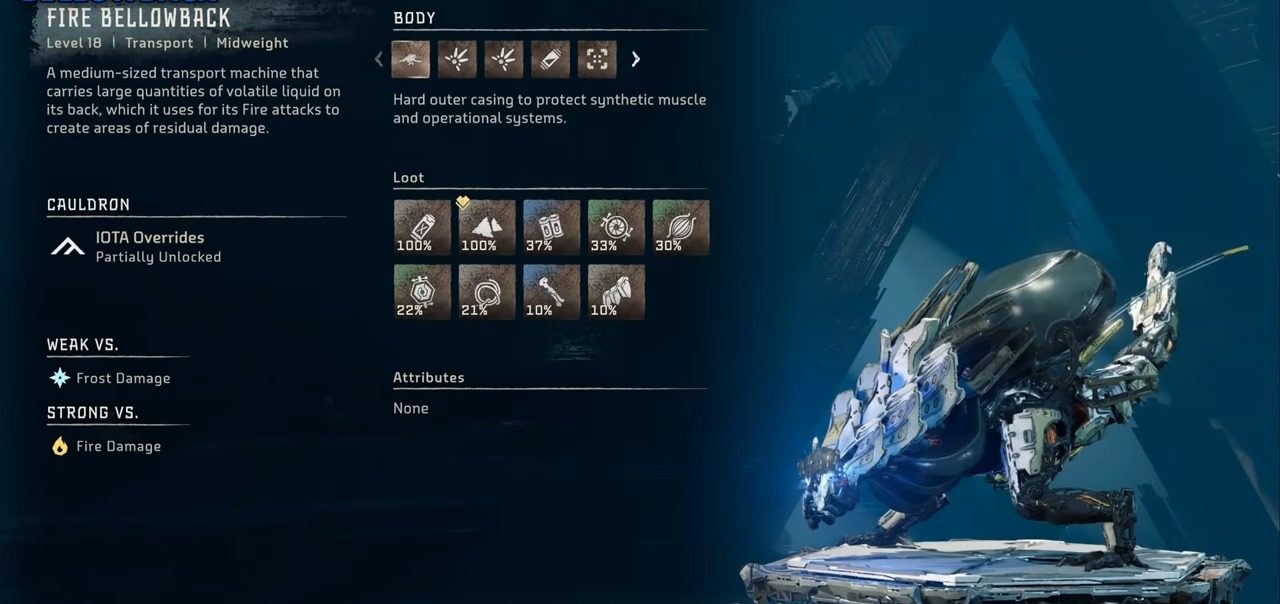
Bellowback
Bellowback
The Bellowback is a medium-sized transport machine that carries large quantities of volatile liquid on its back, which it uses for powerful elemental attacks. It can be overridden after unlocking the IOTA Cauldron.
Attack Name
Description
Elemental Projectiles
Launches explosive projectiles that create residual elemental damage areas
Elemental Spray
Sprays a continuous stream of elemental liquid at the target
Elemental Circular Spray
Rotates while spraying elemental fluid, leaving residual elemental damage areas
Shoulder Barge
Charges and barges into the target, skidding a short distance
Tail Swipe
Rotates 180° while swiping with its tail
Leaping Smash
Hops and leaps at the target, smashing its head into the ground
Show Full Text
Body Parts
Body
Gullet
Cargo Refining Sac
Sparker
Antenna
Variants
Fire Bellowback
Acid Bellowback
Frost Bellowback
Apex Bellowback
Loot Drops
Blaze
Metal Shards
Medium Machine Core
Bellowback Circulator
Machine Muscle
Bellowback Primary Nerve
Braided Wire
Metal Bone
Sturdy Hardplate
Volatile Sludge (refining sac)
Bellowback Sac Webbing (refining sac)
Strengths And Weaknesses
Weak Against: Frost Damage
Strong Against: Fire Damage
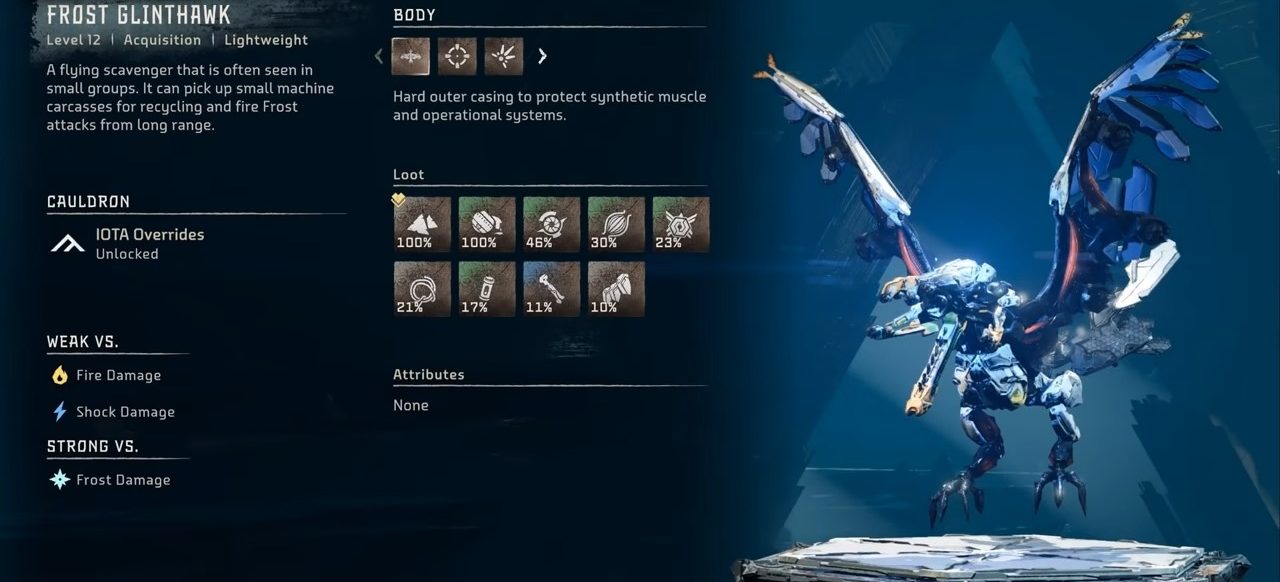
Glinthawk
Glinthawk
The Glinthawk is a lightweight flying scavenger machine often seen in small groups, known for recycling small machine carcasses and launching long-range frost attacks. It can be overridden once the IOTA Cauldron is unlocked.
Attack Name
Description
Elemental Spit
Fires exploding elemental projectiles, leaving damaging residual pools of the same element.
Bombing Run
Flies in a straight trajectory, dropping elemental bombs that create residual damage areas
Claw Slash
Swoops down to slash multiple times with its talons
Show Full Text
Body Parts
Body
Beak
Chillwater Sac
Variants
Frost Glinthawk
Fire Glinthawk
Apex Glinthawk
Loot Drops
Metal Shards
Chillwater
Glinthawk Circulator
Machine Muscle
Glinthawk Primary Nerve
Braided Wire
Small Machine Core
Metal Bone
Sturdy Hardplate
Glinthawk Beak (beak only)
Strengths And Weaknesses
Weak Against: Fire Damage, Shock Damage
Strong Against: Frost Damage
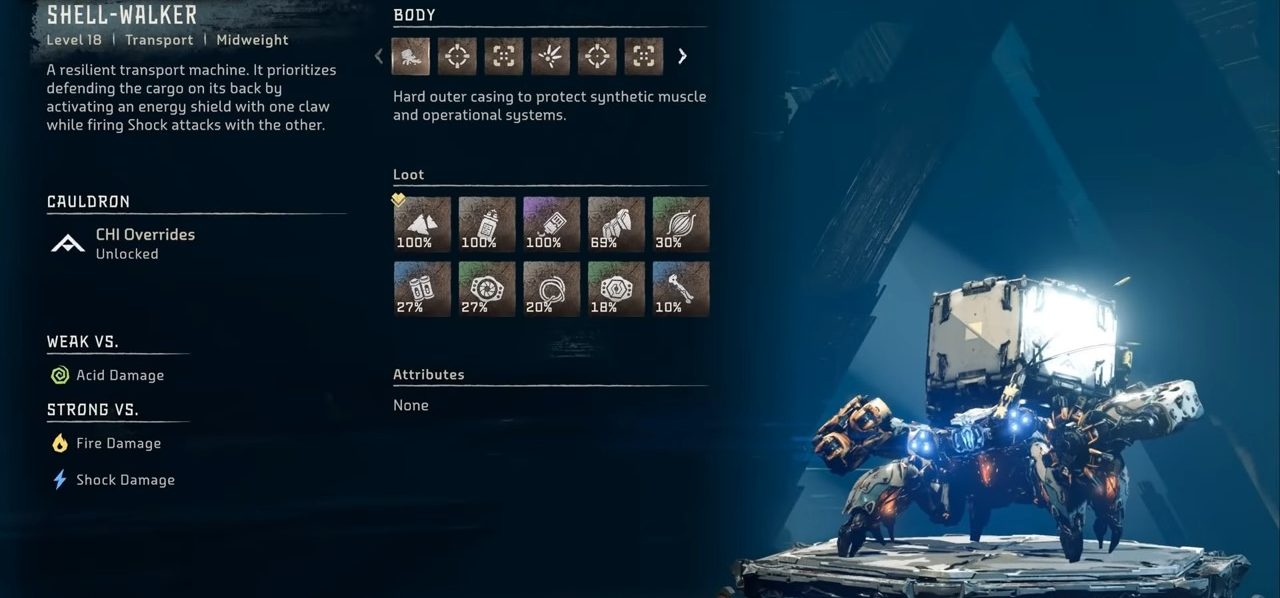
Shell-Walker
Shell-Walker
The Shell-Walker is a resilient, midweight transport machine that defends its cargo with a combination of energy shields and shock attacks. It can be overridden after unlocking the CHI Cauldron.
Attack Name
Description
Shield Claw Swipe
Leaps forward and swipes with its Shield Claw
Multi Clap Snap
Jumps 3 times in quick succession, snapping with its Lightning Gun claw
Claw Combo
Performs a three-hit lunging combo with both claws, stopping if a hit lands
Advancing Electric Shot
Fires a shock orb while advancing, creating a residual shock damage area on impact
Electric Shot Homing
Launches a homing shock orb that tracks the target and generates a residual shock damage area upon impact
Electric Shot Volley
Shoots 3 arcing shock orbs, each creating a residual shock damage area upon impact
360 Electric Discharge
Unleashes a 360° shock blast in a large area surrounding its body
Show Full Text
Variants
Shell-Walker
Apex Shell-Walker
Loot Drops
Metal Shards
Sparker
Crystal Braiding
Sturdy Hardplate
Machine Muscle
Medium Machine Core
Shell-Walker Circulator
Braided Wire
Shell-Walker Primary Nerve
Metal Bone
Shell-Walker Lightning Gun (lightning gun only)
Strengths and Weaknesses
Weak Against: Acid Damage
Strong Against: Fire Damage, Shock Damage
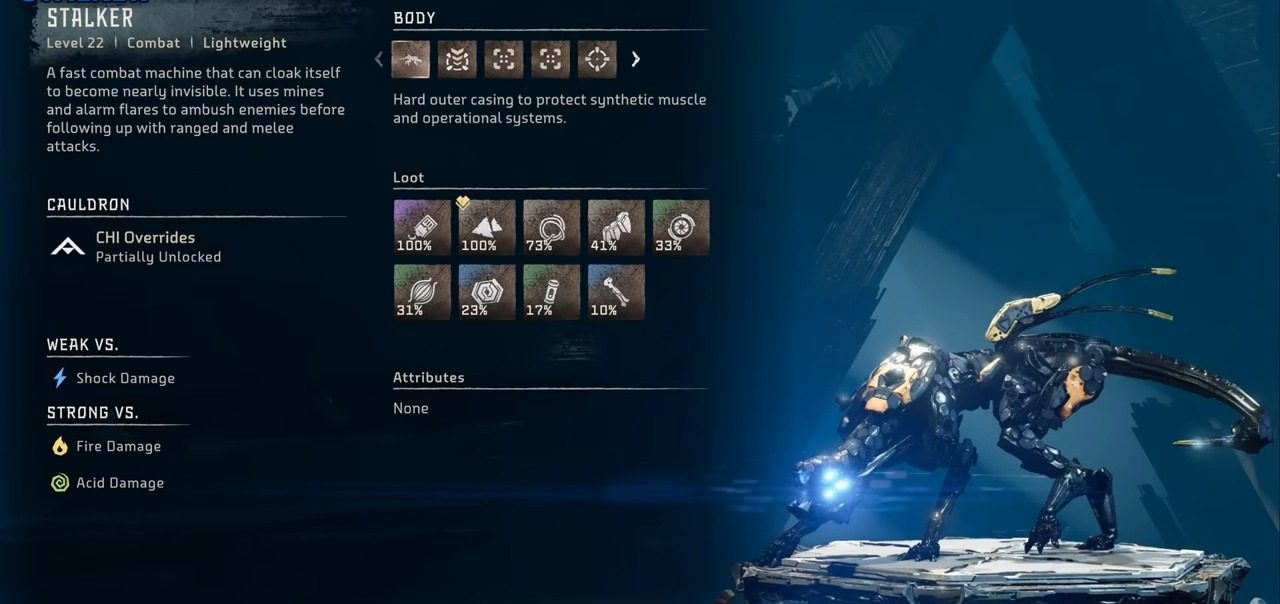
Stalker
Stalker
The Stalker is a lightweight combat machine that excels in stealth, using its cloaking abilities to ambush enemies with mines and alarm flares before launching into ranged and melee attacks. Override access is granted after unlocking the CHI Cauldron.
Attack Name
Description
Dart Gun Shot
Fires up to 3 shots at the enemy with its dart gun
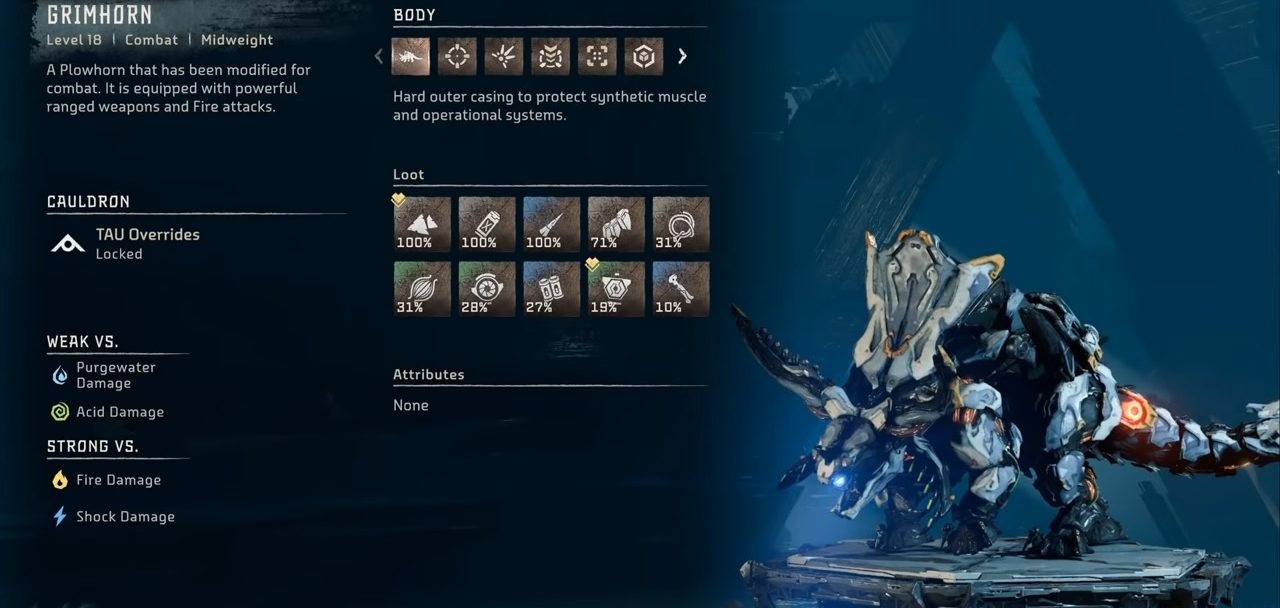
The Grimhorn is a midweight combat machine modified from a Plowhorn for battle. It is equipped with potent ranged weapons and fire attacks and shouldn’t be taken lightly in our machine list. The machine can be overridden after unlocking the TAU Cauldron.
Attack Name
Description
Piercing Charge
Charges at high speed to ram target or transition into Impaling Slash (disabled when slowed)
Impaling Slash
Whips tail in a 270° spinning motion, lunging forward and rotating to face the target
Impaling Dredger
Dives at the target, slamming both horns into the ground, causing damage to its body
Scorching Meteor Shower
Launches two flaming projectiles from horns, tracking target’s movements (disabled when drenched)
Scorching Stream
Sprays a continuous stream of flames while advancing (disabled when drenched)
Scorching Slam
Coats horns in flames, then rises and slams the ground, creating a fire explosion (disabled when drenched)
Cluster Strike
Fires two discs that hover and split into multiple explosives, detonating on impact
Show Full Text
Body Parts
Body
Horns
Blaze Sac
Cluster Launcher
Tail Clamp
Tail Capsule
Variants
Grimhorn
Apex Grimhorn
Loot Drops
Metal Shards
Blaze
Piercing Spike
Sturdy Hardplate
Braided Wire
Machine Muscle
Plowhorn Circulator
Medium Machine Core
Plowhorn Primary Nerve
Metal Bone
Plowhorn Horn (detach horns)
Useable Weapon (detach Cluster Launcher)
Blastpaste (detach Tail Capsule)
Strengths And Weaknesses
Weak Against: Purgewater Damage, Acid Damage
Strong Against: Fire Damage, Shock Damage
Ravager
Ravager
Size
Class
Weight
Challenge LV.
HP
Override
Medium
Combat
Midweight
20
27 Corrupted
32 Apex
1300
1950 Apex & Corrupted
Cauldron IOTA
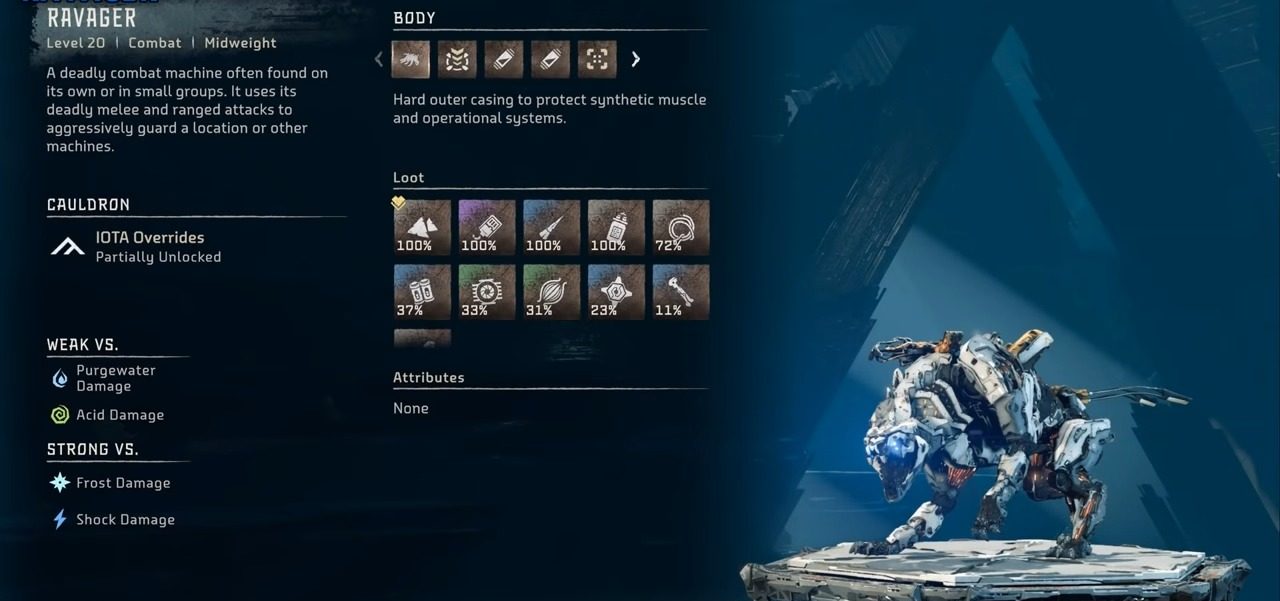
The Ravager is a midweight combat machine known for its lethal melee and ranged attacks. Often found alone or in small groups, it aggressively guards locations or other machines. Ravager contains some interesting machine parts list that could be acquired after destroying this machine type. The Ravager can be overridden after unlocking the IOTA Cauldron.
Attack Name
Description
Claw Swipe
Performs a single lunging claw swipe
Berserker Fury
Executes multiple lunging claw slashes
Jaw Smash
Delivers a lunging bite
Shock Jaw Smash
Performs an electrically charged lunging bite (disabled when drenched)
Leaping Jaw Smash
Swipes with jaw after pouncing (disabled when slowed)
Cannon Burst
Fires rapid shots from cannon
Shock Cocoon
Creates a defensive radial electric cocoon (disabled when drenched)
Shock Wave
Electrifies jaws, smashing them into the ground, unleashing a shockwave
Show Full Text
Body Parts
Body
Ravager Cannon
Sparker
Glowblast Canister
Antenna
Variants
Ravager
Apex Ravager
Loot Drops
Metal Shards
Crystal Braiding
Piercing Spike
Sparker
Braided Wire
Medium Machine Core
Ravager Circulator
Machine Muscle
Ravager Primary Nerve
Metal Bone
Sturdy Hardplate
Useable Weapon (detach Ravager Cannon)
Glowblast (detach Glowblast Canister)
Strengths And Weaknesses
Weak Against: Purgewater Damage, Acid Damage
Strong Against: Frost Damage, Shock Damage
Snapmaw
Snapmaw
Size
Class
Weight
Challenge LV.
HP
Override
Medium
Acquisition
Midweight
20
27 Corrupted
31 Daemonic
32 Apex
1450
2175 Corrupted & Apex
2538 Daemonic
Cauldron IOTA
Another fast-moving robot in this Horizon Forbidden West complete machine list is the Snapmaw. This machine is a midweight acquisition machine that processes resources from bodies of water and deposits them on land. This amphibious machine is fast and territorial, employing its jaws, tail, and elemental materials to attack. The Snapmaw can be overridden after unlocking the IOTA Cauldron.
Attack Name
Description
Spin Attack
Lunges forward, spinning 180° with tail in a sweeping motion
Spin on Spot
Quickly spins in place, swinging its tail
Frost Mortar
Spits 5 Frost projectiles in an arc (disabled when drenched)
Jump Attack
Winds up at a distance before leaping at the target
Jump Bite
Performs a short-range jump and bites once
Snap Bite
Quickly snaps at the target with its jaws
Lunging Jaw Snap
Dives underwater emerge biting twice or surges forward, snapping jaw
Show Full Text
Body Parts
Body
Chillwater Sac
Purgewater Canister
Dispersal Tank
Resource Container
Variants
Snapmaw
Apex Snapmaw
Loot Drops
Purgewater
Piercing Spike
Metal Shards
Machine Muscle
Snapmaw Circulator
Medium Machine Core
Braided Wire
Snapmaw Primary Nerve
Sturdy Hardplate
Metal Bone
Snapmaw Sac Webbing (detach Snapmaw Sac)
Chillwater (detach Snapmaw Sac)
Blastpaste (detach Dispersal Tank)
Strengths And Weaknesses
Weak Against: Fire Damage, Shock Damage
Strong Against: Frost Damage, Purgewater Damage
Sunwing
Sunwing
Size
Class
Weight
Challenge LV.
HP
Override
Medium
Acquisition
Midweight
20
1100
Cauldron IOTA
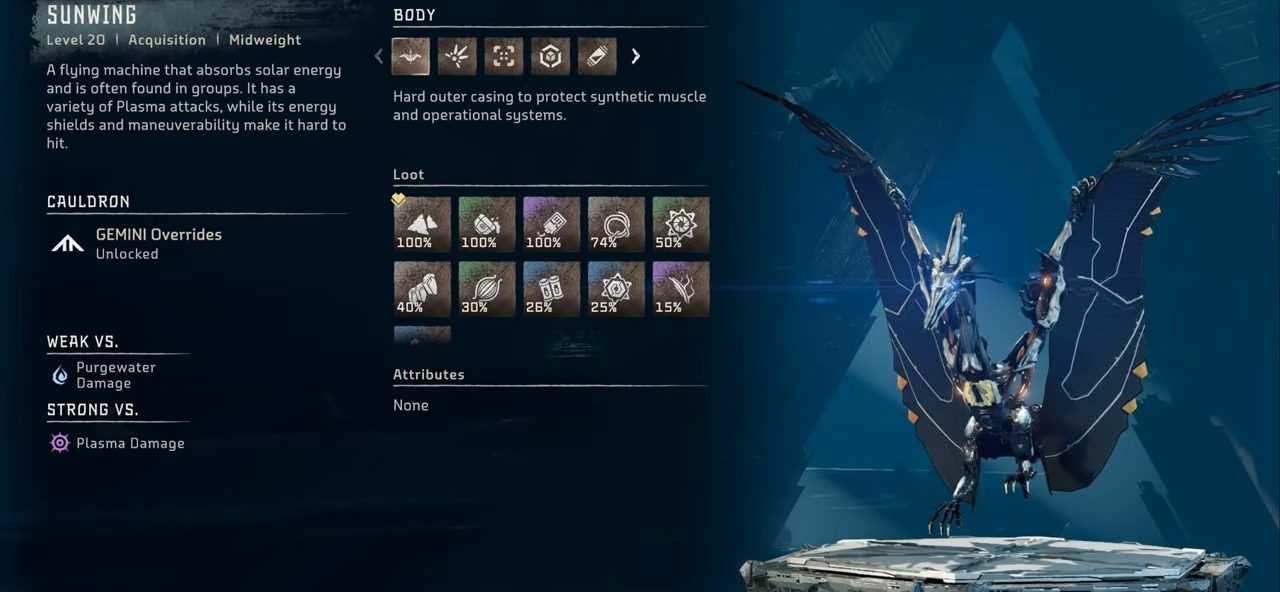
The Sunwing is a midweight acquisition flying mount machine that soars through the skies, absorbing solar energy and is often found in groups. Equipped with various plasma attacks, energy shields, and excellent maneuverability, the Sunwing is difficult to hit. It can be overridden after unlocking the GEMINI Cauldron.
Attack Name
Description
Burst Defender
Fortifies with wings outstretched and fires plasma bursts (disabled when drenched)
Air Burst
Hovers and strafes while firing plasma bursts (disabled when drenched)
Power Fling
Throws plasma-infused boulder at target (plasma damage disabled when drenched)
Aerial Plasma Sweep
Cleaves the ground with a plasma beam (disabled when drenched)
Ground Breaker
Plows beak into the ground, generating a plasma trail (plasma damage disabled when drenched)
Crashing Tear
Swoops down and slams beak into the ground (plasma damage disabled when drenched)
Wing Swipe
Hops and swipes with a wing, followed by another swipe if the first misses
Ascending Burster
Takes off vertically, generating a wind blast and firing a plasma beam (disabled when drenched)
Show Full Text
Body Parts
Body
Plasma Fin
Shield Caster
Resource Container
Sparker
Variants
Sunwing
Apex Sunwing
Loot Drops
Metal Shards
Glowblast
Crystal Braiding
Braided Wire
Sunwing Circulator
Sturdy Hardplate
Machine Muscle
Medium Machine Core
Sunwing Primary Nerve
Volatile Sludge
Metal Bone
Sunwing Shield Caster (detach Shield Caster)
Blastpaste (detach Resource Container)
Sparker (detach Sparker)
Strengths And Weaknesses
Weak Against: Purgewater Damage
Strong Against: Plasma Damage
Clamberjaw
Clamberjaw
Size
Class
Weight
Challenge LV.
HP
Override
Medium
Acquisition
Midweight
21
34 Apex
1050
1575 Apex
Cauldron IOTA
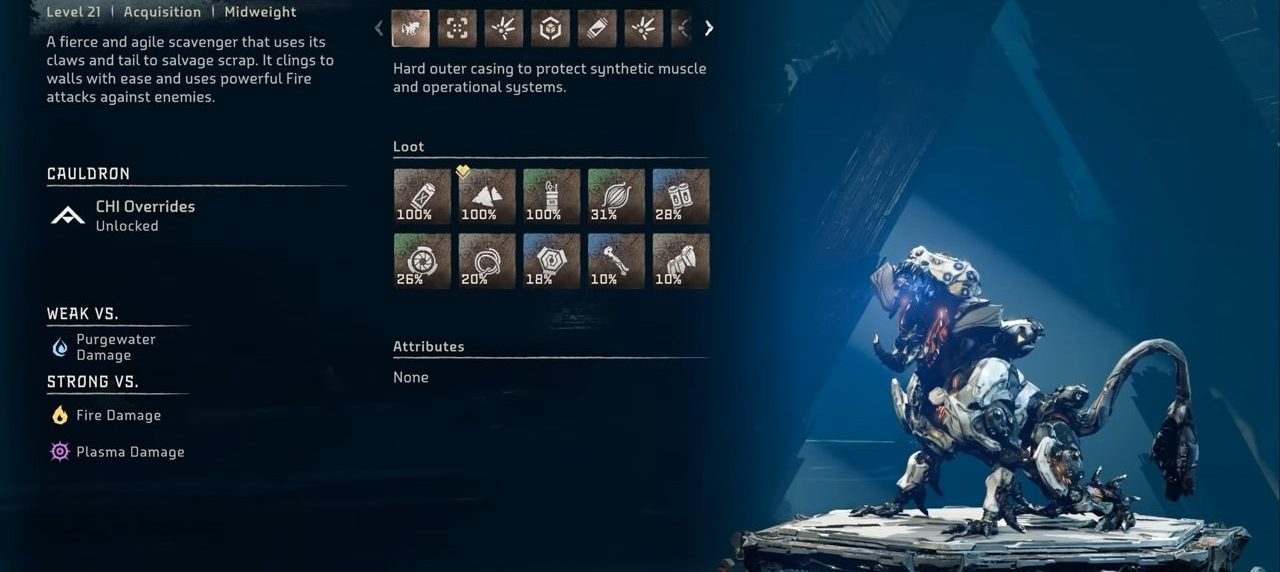
The Clamberjaw is a midweight acquisition machine known for its agility and fierce scavenging abilities. Utilizing its claws and tail to salvage scrap, this is a unique enemy type in Horizon Forbidden West that can cling to walls with ease and employs powerful Fire attacks against enemies. Override is possible after unlocking the CHI Cauldron.
Attack Name
Description
Fist Slam Frenzy
Three-hit claw combo follows up only if the target is in range
Tearing Tackle
Leaps and bites with powerful jaws (disabled when slowed)
Noxious Tail Slash
Whips Tail Duster, releasing a cloud of noxious fumes
Seismic Slam
Leaps and slams the ground, causing a Tremor effect (disabled when slowed)
Table Flip Grab
Grabs target with claws and tosses them
Sacred Lunge
Dismounts the wall in a leaping smash
Elemental Shrapnel Spit
Spits Fire-infused shrapnel (fire damage disabled when drenched)
Snatch and Hurl
Launches scrap held by Tail Duster (consumables blocked disabled when drenched)
Flash Burst
Releases a dazzling flash of light
Terror Screech
Inflates Concussion Sacs and emits a deafening scream
Show Full Text
Body Parts
Body
Resource Scanner
Concussion Sac
Resource Container
Sparker
Blaze Sac
Tail Duster
Variants
Clamberjaw
Apex Clamberjaw
Loot Drops
Blaze
Metal Shards
Echo Shell
Machine Muscle
Medium Machine Core
Clamberjaw Circulator
Braided Wire
Clamberjaw Primary Nerve
Metal Bone
Sturdy Hardplate
Blastpaste (detach Resource Container)
Sparker (detach Sparker)
Clamberjaw Tail Duster (detach Tail Duster)
Strengths And Weaknesses
Weak Against: Purgewater Damage
Strong Against: Fire Damage, Plasma Damage
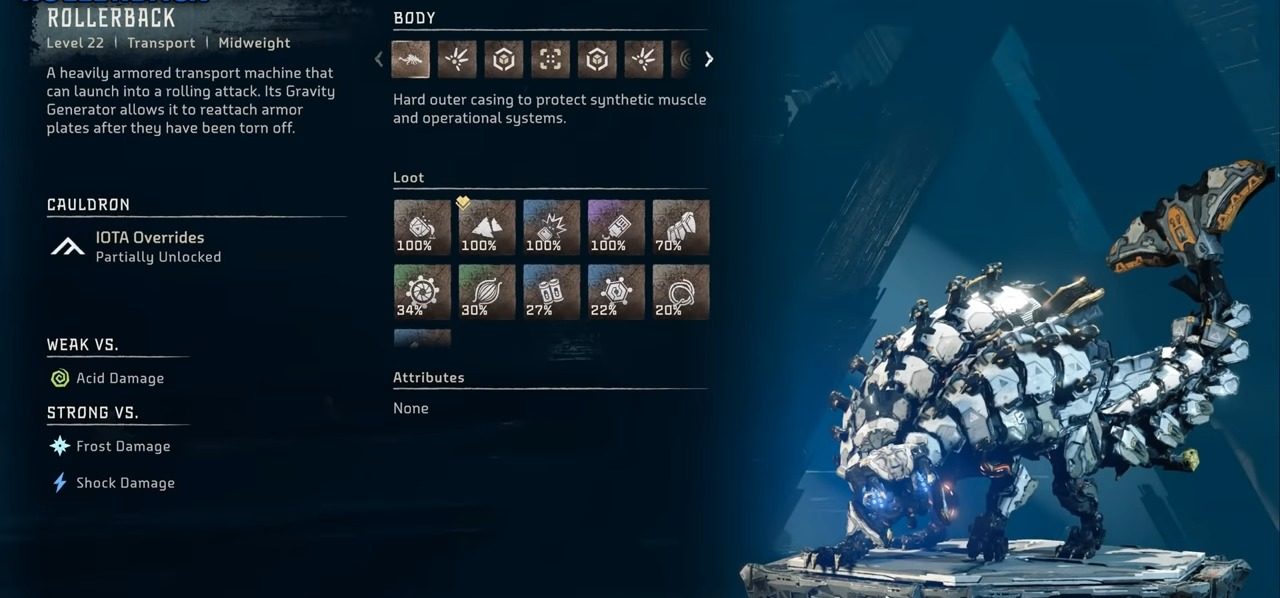
Rollerback
Rollerback
Size
Class
Weight
Challenge LV.
HP
Override
Medium
Transport
Midweight
22
35 Apex
2200
3300 Apex
Cauldron IOTA
The Rollerback is a midweight transport machine known for its heavy armor and ability to launch into rolling attacks. Equipped with a Gravity Generator, it can reattach armor plates after being torn off. Override can be performed once the IOTA Cauldron is unlocked.
Attack Name
Description
Burndozer
Rolls at high speed, generating a trail of residual Fire damage areas
Mega-Crush Hammer
Raises and slams tail, creating a shockwave and Tremor effect
Sweep and Launch
Tumbles and swipes with tail
Hammer Swing
Spins while swinging Hammer Tail
Blast Off
Blasts upwards and slams down, generating massive blasts and shockwaves
Adhesive Shot
Spits globs of adhesive
Gravel Spray
Spins in place, kicking up debris toward the target
Thruster Burst
Ignites thrusters, unleashing a flaming blast
Show Full Text
Body Parts
Body
Adhesive Sac
Resource Core
Cargo Holders
Cooling Block
Gravity Generator
Thruster
Acid Canister
Hammer Tail
Variants
Rollerback
Apex Rollerback
Loot Drops
Metalbite
Metal Shards
Blastpaste
Crystal Braiding
Sturdy Hardplate
Rollerback Circulator
Machine Muscle
Medium Machine Core
Rollerback Primary Nerve
Braided Wire
Metal Bone
Stickpaste (detach Adhesive Sac)
Rollerback Hammer Tail (detach tail)
Strengths And Weaknesses
Weak Against: Acid Damage
Strong Against: Frost Damage, Shock Damage
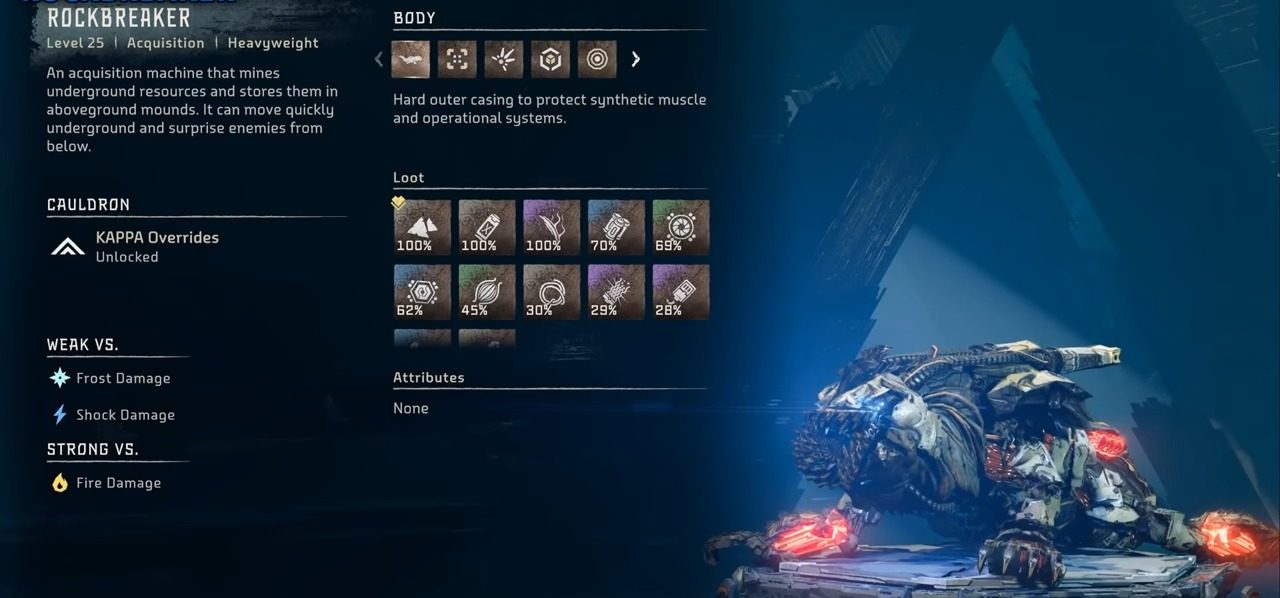
Rockbreaker
Rockbreaker
Size
Class
Weight
Challenge LV.
HP
Override
Large
Transport
Heavy
25
34 Corrupted
40 Daemonic & Apex
2600
5250 Corrupted
5400 Apex
6125 Daemonic
Cauldron KAPPA
The Rockbreaker is a heavyweight acquisition machine that specializes in mining underground resources and storing them in aboveground mounds. Known for its swift underground movement, it can ambush enemies from below. Override is possible once the KAPPA Cauldron is unlocked.
Attack Name
Description
Dirt Jet
Shoots rocks and debris in an arc
Dirt Volcano
Erupts and spits out burning rocks, creating Fire explosions and damaging areas
Snap Bite
Performs a fast lunging bite
Lunge Bite
Lunges towards the target while biting along the surface
Spin Attack
Spins while swiping with its tail
Jump Attack
Dives at the target when emerging from the ground
Shark Bite
Emerges below target while biting, repeating up to three times
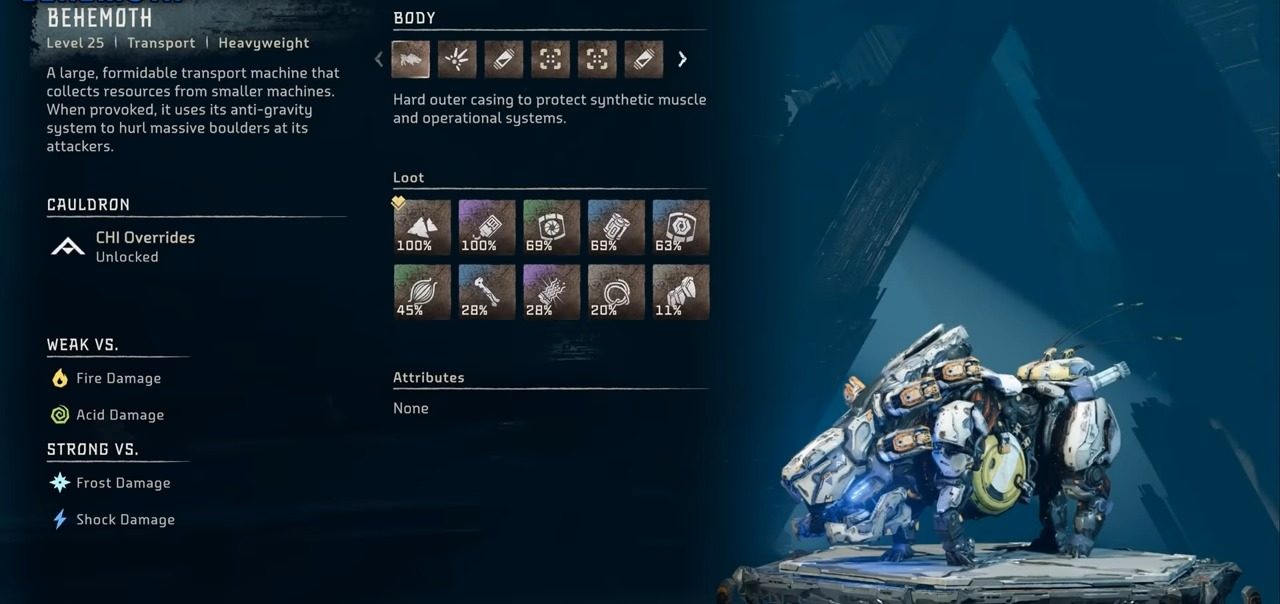
The Behemoth is a heavyweight transport machine that gathers resources from smaller robots of Horizon Forbidden West. Equipped with an anti-gravity system, it hurls massive boulders at attackers when threatened. Override is possible after accessing the CHI Cauldron.
Attack Name
Description
Grinding Shrapnel Blast
Fires rock shrapnel by spinning grinder jaws in the ground
Gravity Boulder Throw
Forms and hurls a boulder at the target using Force Loaders
Gravity Purge
Surrounds itself with rocks and blasts them in all directions
Charge
Charges towards the target, swinging head side to side
Quake Smash
Rises and smashes down with ram, creating a Tremor effect
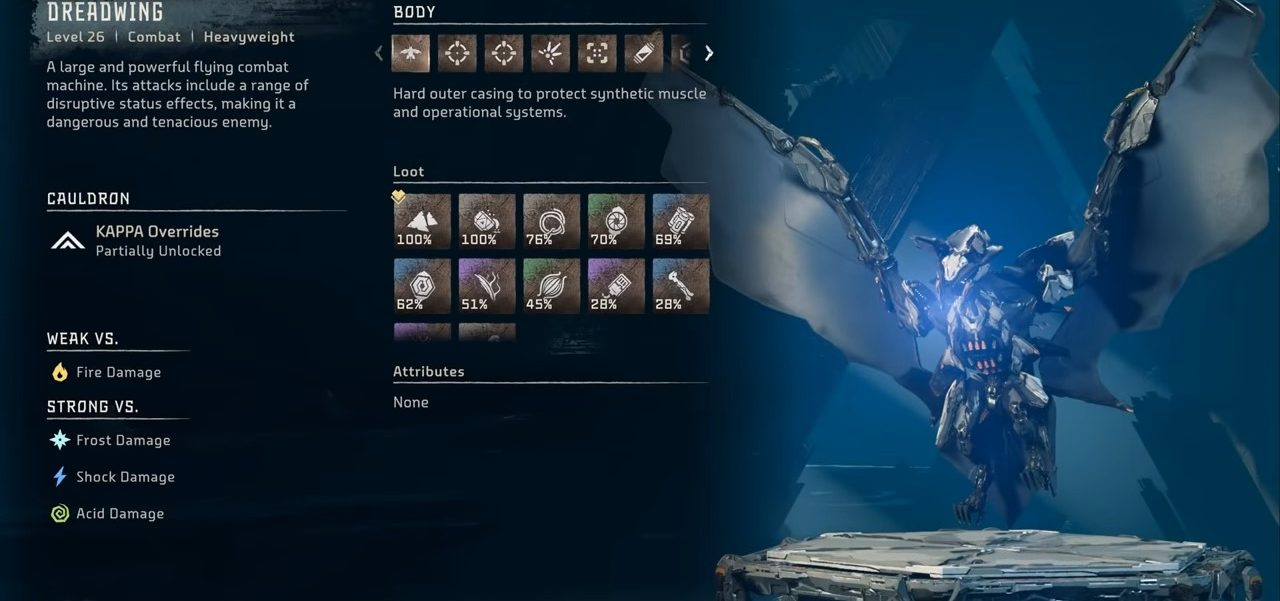
The Dreadwing comes under the Horizon Forbidden West machine names that are formidable, heavyweight, and flying combat machines known for their disruptive status effect attacks. It can be overridden after accessing the KAPPA Cauldron.
Corrosive Onslaught
Grounded attack with corrosive effects
Corrosive Burst
Flying attack with corrosive effects
Retreating Barrage
Grounded and flying attack with bombs and wing flap
Leaping Bombardment
Grounded attack with bombs
Flash Blast
Grounded and flying attack that blinds
Wing Striker
Grounded attack with wing and plague state effects
Fang Strike
Grounded attack with bite, shockwave, and plague state effects
Rampaging Bite
Grounded attack with bite and plague state effects
Spin Strike
Grounded attack with wings, wind blast, and plague state effects
Hook Crusher
Grounded attack with stomp, shockwave, and plague state effects
Swooping Slash
Flying attack with melee and plague state effects
Rampaging Smash
Flying attack with body crush, shockwave, and plague state effects
Comet Barrage
Flying attack with body and bombs, and plague state effects
Rising Strike
Grounded attack with melee and plague state effects
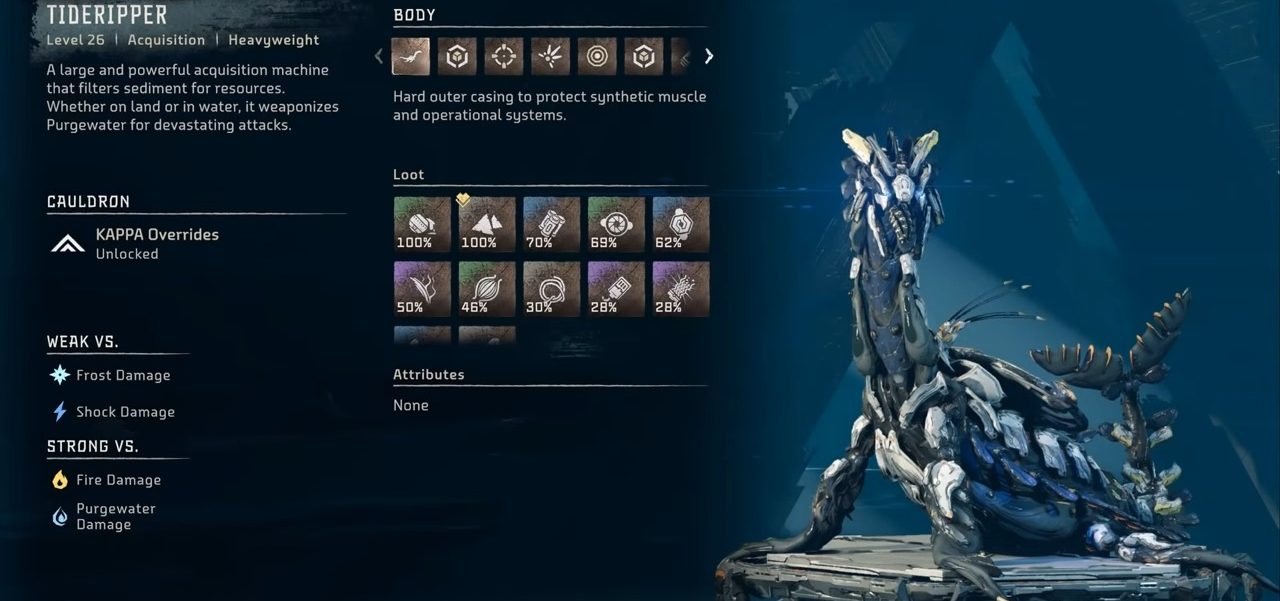
The Tideripper is a massive heavyweight acquisition machine that filters sediment for resources, employing Purgewater for lethal attacks on land and in water. Among the Horizon Forbidden West machine override list, this one can be overridden by accessing the KAPPA Cauldron.
Attack Name
Description
Drill Stab
Grounded melee attack
Neck Sweep
Grounded melee attack
Purging Smash
Grounded melee attack with Purgewater
Shore Slam
Melee attack with Purgewater for all terrains
Hydro Crush
Grounded melee attack with Purgewater and crushing effect
Mud Wrecker
Grounded melee attack with crushing effect
Sliding Hydro Crash
Grounded melee attack with Purgewater and crushing effect
Twist Ripper
Short-range melee attack
Torpedo Rush
Medium-range melee attack over and underwater
Jet Stream
Grounded Purgewater attack
Jet Stream Sweep
Grounded and overwater Purgewater attack
Tidal Wave
Grounded Purgewater projectile attack
Mud Spit
Grounded Purgewater projectile attack
Show Full Text
Body Parts
Body
Processing Capsule
Purgewater Cannon
Purgewater Pouch
Heart
Tail Canister
Chillwater Canister
Tail
Antenna
Tidal Disc
Exhaust Port
Sparker
Glowblast Canister
Purgewater Sac
Variants
Tideripper
Apex Tideripper
Loot Drops
Purgewater
Metal Shards
Large Machine Core
Tideripper Circulator
Tideripper Primary Nerve
Volatile Sludge
Machine Muscle
Braided Wire
Crystal Braiding
Luminous Brainstem
Metal Bone
Sturdy Hardplate
Blastpaste (detach Processing Capsule)
Chillwater (detach Chillwater Canister)
Tideripper Tail Fin (detach fin)
Glowblast (detach Glowblast Canister)
Strengths And Weaknesses
Weak Against: Frost Damage, Shock Damage
Strong Against: Fire Damage, Purgewater Damage
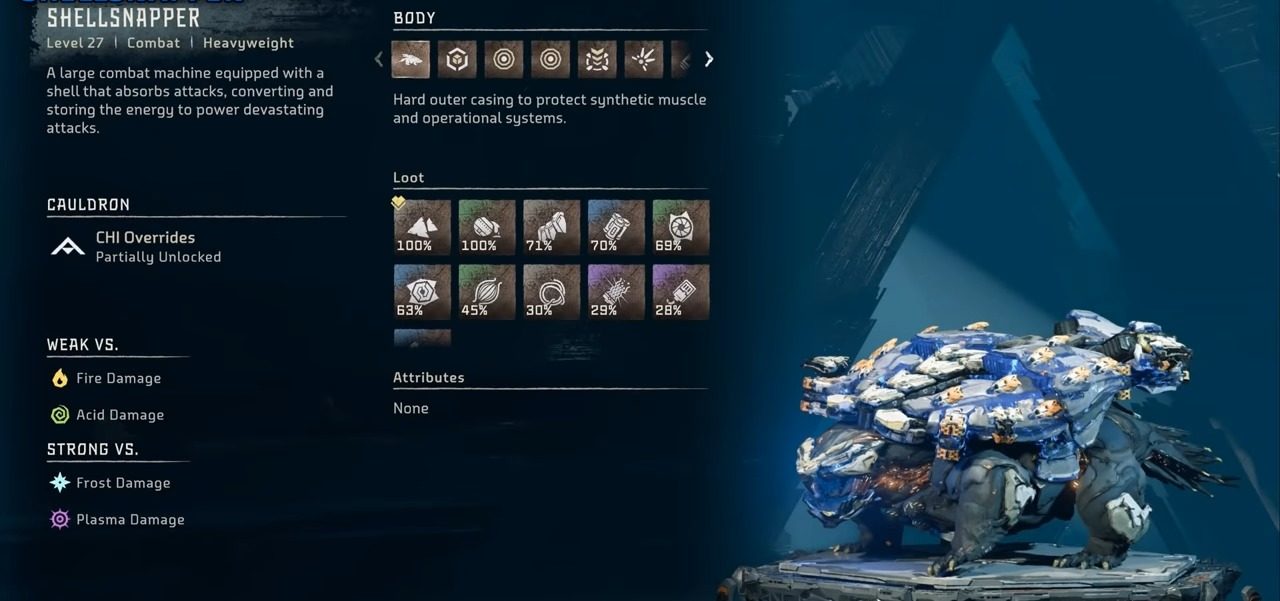
Shellsnapper
Shell-Snapper
Size
Class
Weight
Challenge LV.
HP
Override
Large
Combat
Heavy
27
42 Apex
4000
6000 Apex
Cauldron KAPPA
The Tideripper is a massive heavyweight acquisition machine that filters sediment for resources, employing Purgewater for lethal attacks on land and in water. It can be overridden by accessing the KAPPA Cauldron.
Attack Name
Description
Snap Bite
Grounded melee attack with Frost damage
Forward Slash
Grounded melee attack with icicles, Frost damage
Backward Slash
Grounded melee attack with icicles, Frost damage
Tail Crack
Grounded melee attack with Frost explosion
Springing Belly Flop
Grounded/Burrowed melee attack with Tremor effect
Freeze Blaster
Grounded/Burrowed ranged Frost attack with icicles
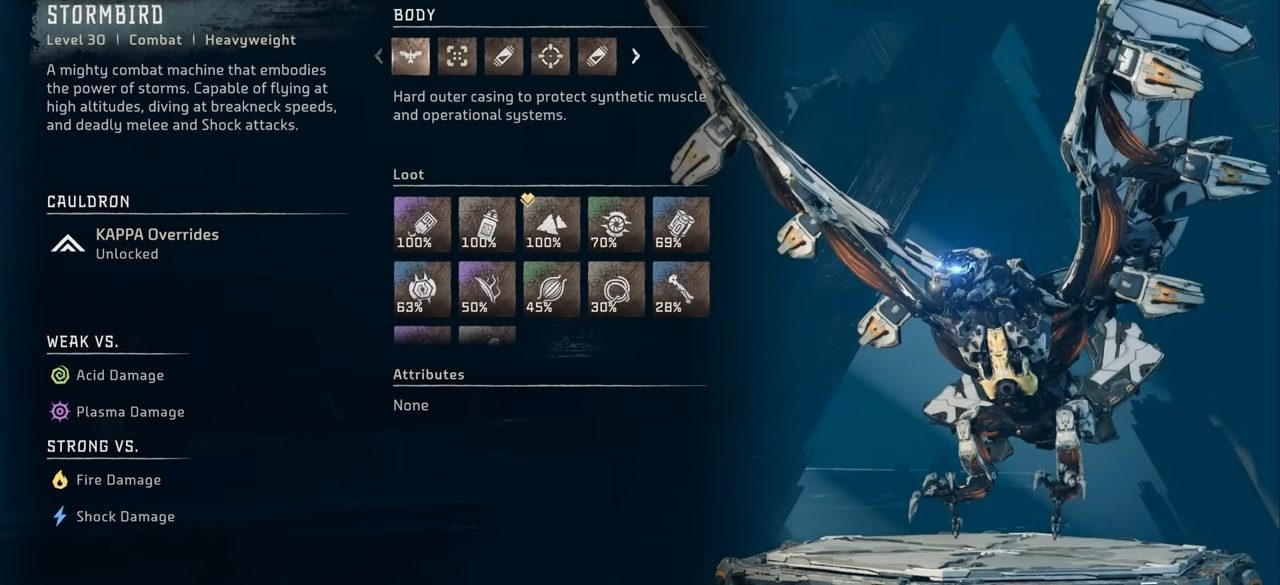
The Stormbird is a powerful heavyweight combat machine, soaring high and diving with incredible speed to deliver devastating melee and Shock attacks in the Horizon Forbidden West. It can be overridden using the KAPPA Cauldron.
Attack Name
Description
Storm Cannon Blaster
Flying Shock attack with large explosion and residual damage
Storm Cannon Shots
Flying Shock attack with a series of orbs
Carpet Bomb
Flying Shock attacks with dropped bombs
Wing Flap
Grounded/Flying wind blast attack
Beak Bite
Grounded Shock attack with a pecking motion
Claw Slash
Grounded melee attack with talons
Thunder Walk
Grounded Shock attack with electrical energy bubble
Quick Land
Flying Shock attack with ground smash
Tail Swipe
Grounded Shock attack with a tail whip
Thunder Dive
Flying Shock attack with dive bomb
Show Full Text
Body Parts
Body
Wing Thrusters
Chillwater Canister
Storm Cannon
Purgewater Canister
Variants
Stormbird
Apex Stormbird
Loot Drops
Crystal Braiding
Sparker
Metal Shards
Stormbird Circulator
Large Machine Core
Stormbird Primary Nerve
Volatile Sludge
Machine Muscle
Braided Wire
Metal Bone
Luminous Brainstem
Sturdy Hardplate
Chillwater (detach Chillwater Canister)
Stormbird Storm Cannon (detach Storm Cannon under its belly)
Purgewater (detach Purgewater Canister on its tail)
Strengths And Weaknesses
Weak Against: Acid Damage
Strong Against: Plasma Damage
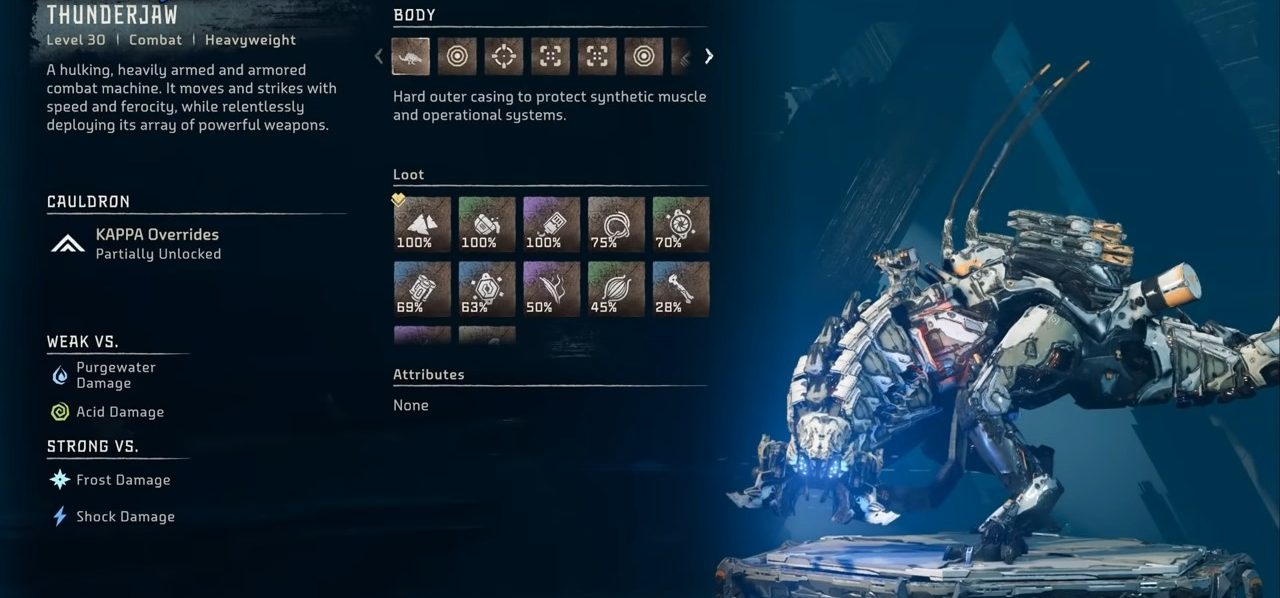
Thunderjaw
Size
Class
Weight
Challenge LV.
HP
Override
Large
Combat
Heavy
30
36 Corrupted
40 Daemonic
48 Apex
6500
9750 Corrupted & Apex
11375 Daemonic
Cauldron KAPPA
The Thunderjaw is a massive, heavily armed, and armored combat machine that moves with agility and strikes ferociously, deploying an array of powerful weapons. It can be overridden using the KAPPA Cauldron.
Attack Name
Description
Cannon Burst (Lead Up)
Rapidfire Cannons firing projectiles starting at the ground
Cannon Burst (Side)
Rapidfire Cannons sweeping horizontally
Disc Launcher Homing
Homing disc projectiles launched from Disc Launchers
Disc Launcher Barrage
A sequential barrage of discs from Disc Launchers
Disc Launcher 360
Defensive 360-degree formation of discs
Laser Sweep
Fan-shaped spread of laser beams (below 40% HP)
Laser Blast
Firing an orb-shaped laser blast
Charge
Charging at full speed toward the target
Bite Attack
Biting attack with head thrust
Rushing Bite Attack
Lunging bite attack at a 45-degree angle
Foot Stomp
Series of stomps with alternating legs, causing Tremor effect
Tail Swipe
180-degree tail swipe
Tail Slam
The tail slams on the ground, causing a Tremor effect
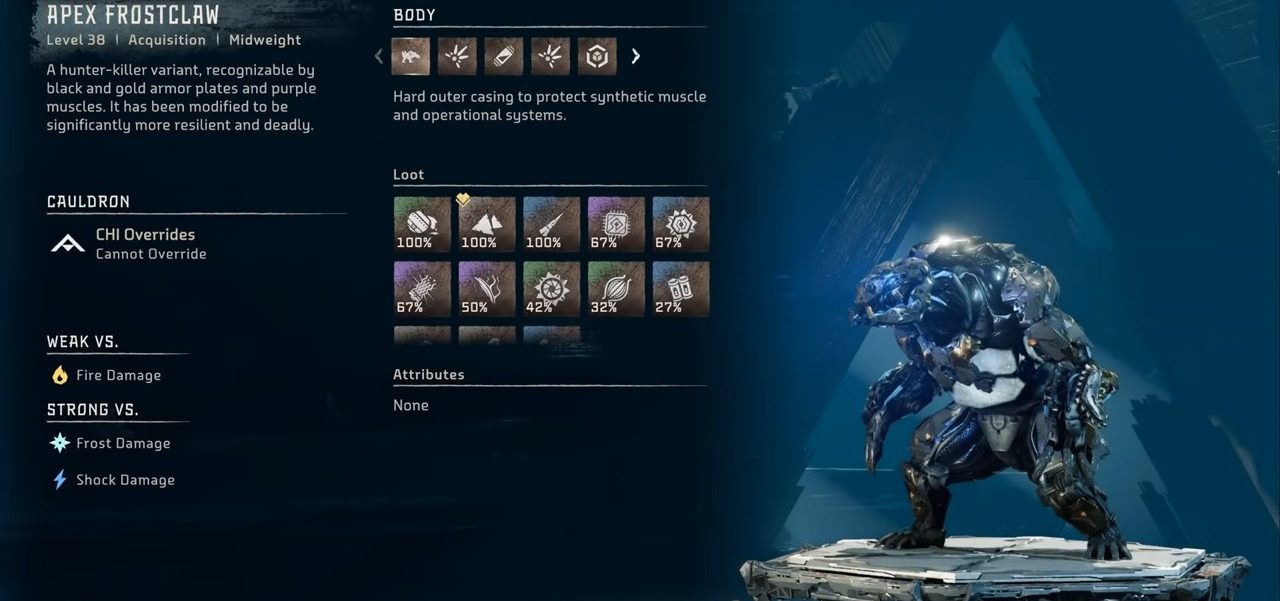
The Frostclaw is an agile and fierce midweight acquisition machine known for its astonishing speed and potent Chillwater-fueled Frost attacks. This robot deserves special attention in this Horizon Forbidden West complete machine list, and it can be overridden using the CHI Cauldron.
Attack Name
Description
Ice Spikes
Launches ice spikes at the target
Backhand Slash
Swipes with its claws
Fury Slash
Delivers a swift claw attack
Back Crush
Crushes the target with its back
Lunging Dive
Dives at the target
Lunging Uppercut
Strikes with an uppercut
Hail Storm
Hurls a storm of ice at the target
Frost Blast
Unleashes a close-range frosty explosion
Grinder Scrape
Scrapes the ground, flinging ice
Claw Slash
Slashes target with its claws
Frost Dive
Dives and causes an icy explosion
Frost Grab
Grabs and crushes the target
Frost Slam
Slams the ground, causing an icy explosion
Show Full Text
Body Parts
Body
Chillwater Sac
Glowblast Canister
Chillwater Unit
Resource Container
Variants
Frostclaw
Apex Frostclaw
Loot Drops
Chillwater
Metal Shards
Piercing Spike
Apex Frostclaw Heart (Apex Variant Body)
Frostclaw Primary Nerve
Luminous Brainstem
Volatile Sludge
Frostclaw Circulator
Machine Muscle
Medium Machine Core
Braided Wire
Sturdy Hardplate
Metal Bone
Glowblast (detach Glowblast Canister)
Frostclaw Sac Webbing (detach Chillwater Unit)
Blastpaste (detach Resource Container)
Strengths And Weaknesses
Weak Against: Fire Damage
Strong Against: Frost Damage, Shock Damage
Scorcher
Scorcher
Size
Class
Weight
Challenge LV.
HP
Override
Medium
Combat
Midweight
30
35 Daemonic
48 Apex
2000
2800 Daemonic
3000 Apex
Cauldron CHI
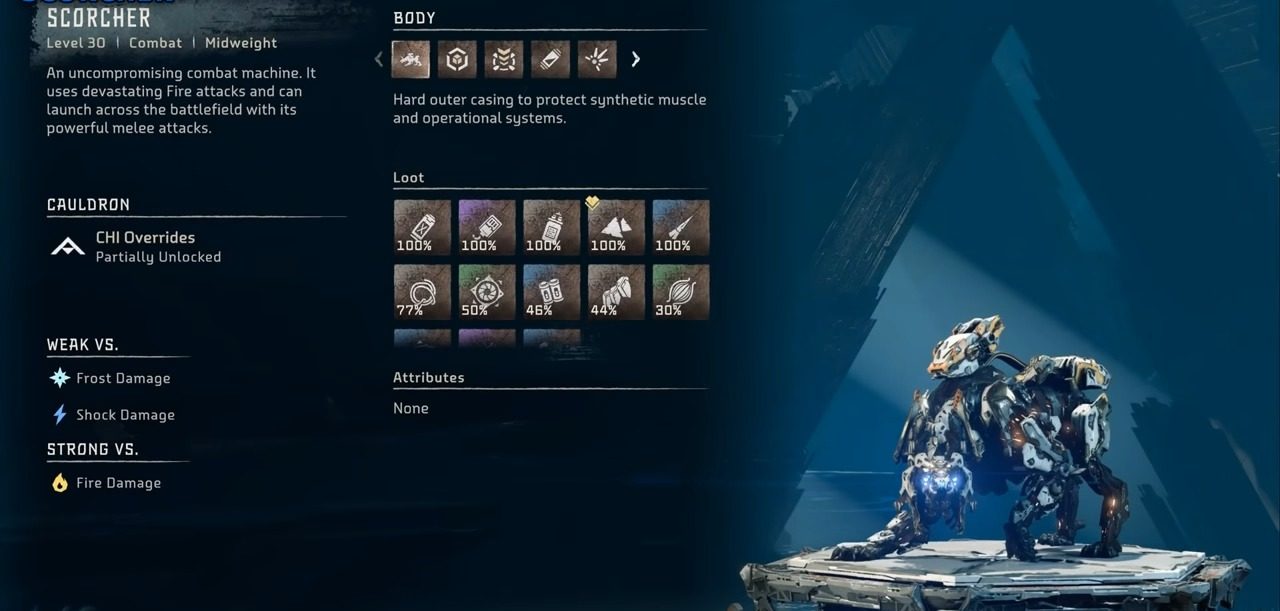
The Scorcher is a relentless midweight combat machine, notorious for its fierce Fire attacks and impressive agility during melee assaults. It can be overridden using the CHI Cauldron.
Attack Name
Description
Scorching Fang
Bites while spewing flames from its mouth
Quick Scorching Fang
Faster variant of Scorching Fang
Cinder Claws
Lunges and slashes with fire-augmented claws
Ignition Boost
Charges with ignited leg thrusters, leaving fire trails
Furnace Blast
Defensive 360° heat blast
Heat Wave
Slams jaws, releasing a wave of flames along the surface
Mine Launcher (Row)
Launches three rows of mines
Mine Launcher (Area)
Blankets an area with multiple mines
Show Full Text
Body Parts
Body
Scanning Ear
Mine Launcher
Purgewater Canister
Power Generator
Variants
Scorcher
Apex Scorcher
Loot Drops
Blaze
Crystal Braiding
Sparker
Metal Shards
Piercing Spike
Braided Wire
Scorcher Circulator
Medium Machine Core
Sturdy Hardplate
Machine Muscle
Scorcher Primary Nerve
Luminous Brainstem
Metal Bone
Scorcher Scanning Ear (detach Scanning Ear on its head)
Useable Weapon (detach Mine Launcher on its back)
Purgewater (detach Purgewater Canister on its back)
Strengths And Weaknesses
Weak Against: Frost Damage, Shock Damage
Strong Against: Fire Damage
Slitherfang
Slitherfang
Size
Class
Weight
Challenge LV.
HP
Override
Large
Combat
Heavy
28
48 Apex
685 Reach For The Stars
1180 – 2507 The Kulrut
5500 Overworld
8250 Apex
Cauldron KAPPA
The Slitherfang is a massive, swift heavyweight combat machine known for its long-range attacks and versatile arsenal when in a coiled stance. This formidable robot of Horizon Forbidden West can be overridden using the KAPPA Cauldron.
Attack Name
Description
Fang Strike
Lunges forward for a vicious bite attack
Slither Charge
Charges at target with great speed
Fang Dozer
Burrows and rams target
Toxic Stream
Spews a stream of poisonous liquid
Fang Ripper
Grapples and tears at target
Excavator
Unleashes a powerful ground-based attack
Loop Dives
Dives in and out of the ground to strike from range
Hood Vibrations
Generates deafening sound waves
Tail-Bolt
Launches an electrified projectile
Thunderbolt Smash
Slams tail with electrified trail
Thunderbolt Swipe
Swipes with electrified tail
Shock Constrictor
Constricts target with electrified coils
Show Full Text
Body Parts
Body
Sonic Hood
Earthgrinder
Glowblaster Canister
Metalbite Sac
Sparker
Purgewater Canister
Acid Canister
Resource Container
Data Nexus
Purgewater Sac
Shock Orb
Variants
Slitherfang
Apex Slitherfang
Loot Drops
Metalbite
Crystal Braiding
Metal Shards
Braided Wire
Slitherfang Circulator
Large Machine Core
Slitherfang Primary Nerve
Volatile Sludge
Machine Muscle
Luminous Brainstem
Metal Bone
Sturdy Hardplate
Slitherfang Earthgrinder (detach Earthgrinder on its front)
Glowblast (detach Glowblast Canister on its front)
Sparker (detach Sparker)
Purgewater Canister (detach Purgewater Canister on its lower body)
Useable Weapon (detach Shock Orb on the end of its tail)
Strengths And Weaknesses
Weak Against: Fire Damage, Frost Damage, Plasma Damage
The Tremortusk is a colossal heavyweight combat machine that compensates for its slow pace with its heavily armored exterior and various ranged weapons. The machine can be overridden using the KAPPA Cauldron.
Attack Name
Description
Tusk Multi-Stab
Rapid stabbing motion with tusks
Tusk Pincer
Clamping attack using tusks
Shatter Swing
Wide arcing swing with tusks
Terror Reaper
Charging attack with tusks
Raging Terror Reaper
Frenzied charging attack with tusks
Thunder Stomper
Stomps with shockwave and shock ring
Seismic Thunder Slam
Powerful slam with concussion explosion and shock
Homing Shock Swarm
Launches homing shock projectiles
Plasma Splinter-Blitz
Fires a barrage of plasma projectiles
Plasma Splinter-Barrage
Long-range plasma projectile attack
Incinerator
Spews fire in a wide arc
Blazing Barrier
Creates a barrier of fire
Blazing Rock Throw
Hurls fiery rocks at target
Cannon Blitz
Rapid-fire cannon attack
Cannon Barrage
Unleashes a barrage of cannon fire
Terror Trumpet
Emits a deafening sound
Show Full Text
Body Parts
Body
Tusks
Plasma Cannon
Processing Capsule
Sparker
Blaze Sac
Shock Cannon
Antenna
Amplifying Sac
Salvo Cannon
Heat Sink
Ammo Drum
Variants
Tremortusk
Apex Tremortusk
Loot Drops
Metal Shards
Sparker
Crystal Braiding
Piercing Spike
Sturdy Hardplate
Large Machine Core
Tremortusk Circulator
Tremortusk Primary Nerve
Volatile Sludge
Machine Muscle
Braided Wire
Metal Bone
Luminous Brainstem
Tremortusk Tusk (detach tusk on its front)
Useable Weapon (detach Plasma Cannon on its side)
Useable Weapon (detach Shock Cannon on its back)
Blastpaste (detach Ammo Drum)
Chill water (detach Ammo Drum)
Glowblast (detach Ammo Drum)
Purgewater (detach Ammo Drum)
Strengths And Weaknesses
Weak Against: Frost Damage
Strong Against: Fire Damage
Fireclaw
Fireclaw
Size
Class
Weight
Challenge LV.
HP
Override
Large
Acquisition
Heavy
42
55 Daemonic
60 Apex
7500
9375 Daemonic
11250 Apex
Cauldron CHI
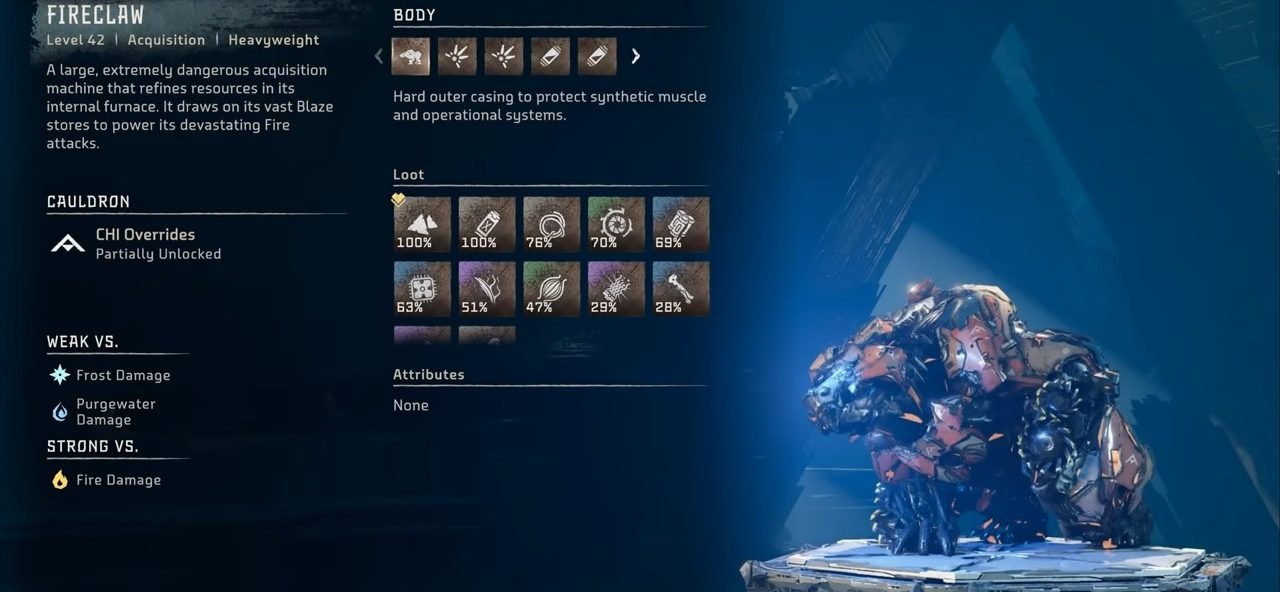
The Fireclaw is a formidable heavyweight acquisition machine known for refining resources with its internal furnace. Its immense Blaze reserves fuel its lethal fire attacks. The machine can be overridden with the CHI Cauldron.
Attack Name
Description
Lava Burst
Erupts with lava, affecting a medium range
Volcanic Meteor Shower
Showers area with molten rocks
Backhand Slash
Swipes with claws at close range
Lunging Dive
Leaps forward, claws extended
Back Crush
Slams body backward onto opponents
Fury Slash
Swift, aggressive claw swipe
Fire Spray
Sprays fire in a cone shape
Flame Blast
Releases a powerful blast of flames
Grinder Scrape
Drags claws across the ground, producing sparks
Claw Slash
Quick claw swipe at close range
Inferno Dive
Leaps forward with a fiery explosion
Inferno Slam
Slams the ground, causing a fiery shockwave
Rock Shield Charge
Charges with a rock shield in front
Rock Shield Throw
Hurls rock shield at target
Rock Shield Smash
Smashes rock shield into the ground
Show Full Text
Body Parts
Body
Blaze Sac
Blaze Unit
Purgewater Canister
Sparker
Variants
Fireclaw
Apex Fireclaw
Loot Drops
Metal Shards
Blaze
Braided Wire
Fireclaw Circulator
Large Machine Core
Fireclaw Primary Nerve
Volatile Sludge
Machine Muscle
Luminous Brainstem
Metal Bone
Crystal Braiding
Sturdy Hardplate
Fireclaw Sac Webbing (detach Blaze Unit in the middle of its body)
Purgewater (detach Purgewater Canister on its back)
Sparker (detach Sparker on its back)
Strengths And Weaknesses
Weak Against: Frost Damage, Purgewater Damage
Strong Against: Fire Damage
Slaughterspine
Slaughterspine
Size
Class
Weight
Challenge LV.
HP
Override
Large
Combat
Heavy
45
64 Apex
1419 Gemini
7500 Overworld
11250 Apex
Cauldron KAPPA
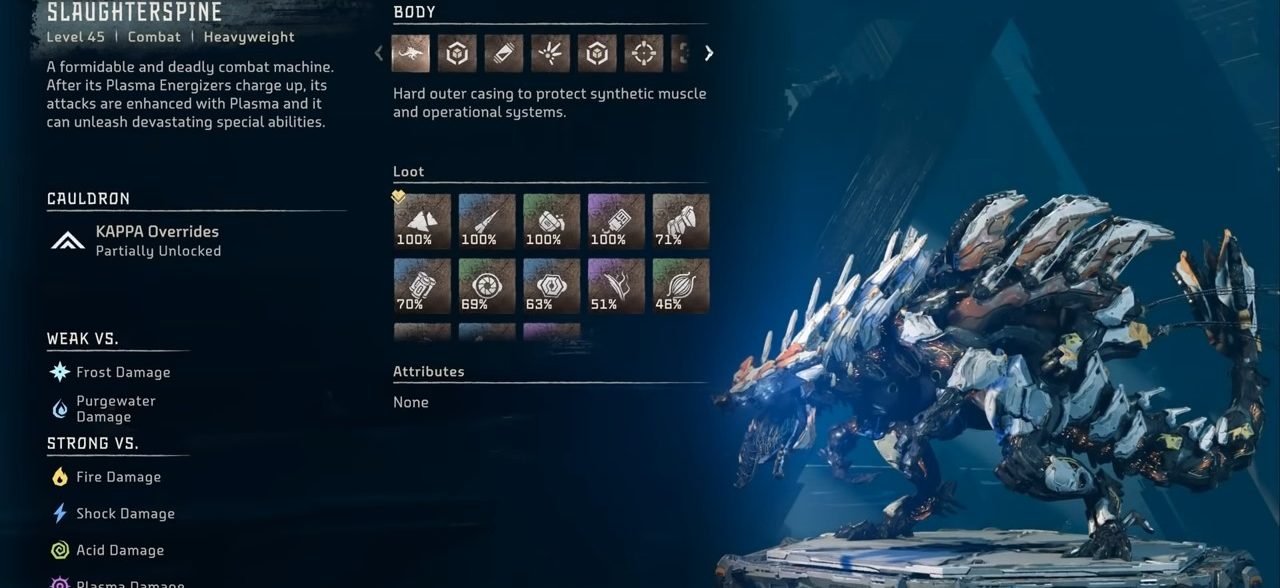
The Slaughterspine is a fearsome heavyweight combat machine that becomes even more dangerous when its Plasma Energizers are charged, enabling it to perform powerful plasma-enhanced attacks. If we’re to rank all machines in a Horizon Forbidden West machine tier list, then I’d place Slaughterspine at the highest position for being the most dangerous machine. This machine can be overridden using the KAPPA Cauldron.
Attack Name
Description
Enraged Plasma Blast
Short-range plasma explosion
Raging Breath (Lead Up)
Prepares for a powerful breath attack
Raging Breath (Wave)
Releases a wave of destructive breath
Enraged Atomic Breath
Unleashes a long-range plasma beam
Spine Barrage
Fires multiple spines at medium range
Precision Spine Strike
Targets a single enemy with a spine at long range
Lancer Wave
Sweeps the Spinetail Lancer horizontally
Lancer Eruption
Thrusts the Spinetail Lancer upward
Core Earthblaster
Releases a shockwave from the Plasma Core
Thundering Roar
Emits a deafening roar at very close range
Raging Plasma Discharge
Sends a short-range plasma burst
Slaughter Bite
Bites at enemies in close range
Rampage Rush
Charges forward, attacking with force
Dragging Plasma Sweep
Sweeps the ground with plasma energy
Slaughter Sweep 180
Performs a 180-degree sweep attack
Slaughter Sweep 360
Executes a 360-degree sweep attack
Double Maul
Attacks with two powerful swipes
Rampage Stomp
Stomps the ground, causing damage nearby
Slaughter Crush
Crushes enemies beneath its massive body
Show Full Text
Body Parts
Body
Processing Capsule
Purgewater Canister
Metalbite Sac
Plasma Core
Plasma Earthblaster
Plasma Energizer
Plasma Spine Launcher
Capacitor Capsule
Antenna
Chillwater Canister
Tail Canister
Spinetail Lancer
Variants
Slaughterspine
Apex Slaughterspine
Loot Drops
Metal Shards
Piercing Spike
Glowblast
Crystal Braiding
Sturdy Hardplate
Large Machine Core
Slaughterspine Circulator
Slaughterspine Primary Nerve
Volatile Sludge
Machine Muscle
Braided Wire
Metal Bone
Luminous Brainstem
Blastpaste (detach Processing Capsule or Capacitor Capsule)
Purgewater (detach Purgewater Canister)
Useable Weapon (detach Plasma Spine Launcher on its back)
Useable Weapon (detach Spinetail Lancer on its tail)
Strengths And Weaknesses
Weak Against: Frost Damage, Purgewater Damage
Strong Against: Fire Damage, Shock Damage, Acid Damage, Plasma Damage
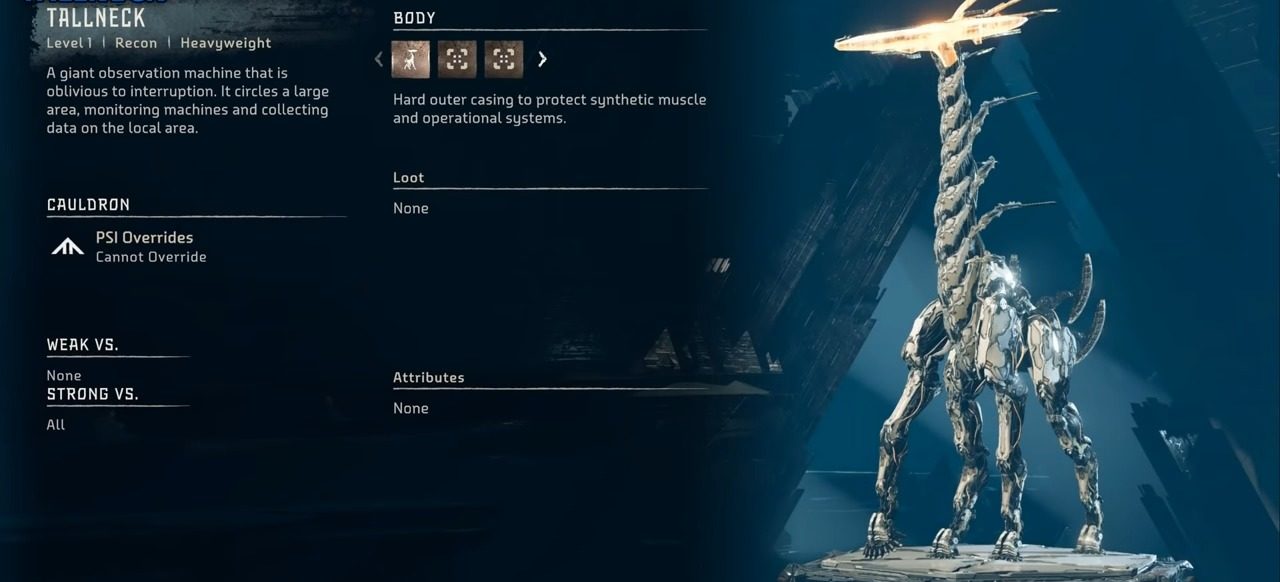
Tallneck
Tallneck
Size
Class
Weight
Challenge LV.
Large
Recon
Heavy
1
The Tallneck is a heavyweight recon machine that diligently surveys a vast region, gathering data and monitoring other machines without being disturbed. It can be overridden using the PSI Override, but you do need All Tallneck locations first.
Important: Tallneck in Horizon Forbidden West are non-hostile machines. They serve only one purpose to show you every point of interest in a certain area of the map after you climb on top of them and Override.
Show Full Text
Body Parts
Body
Radar
Climb Holds
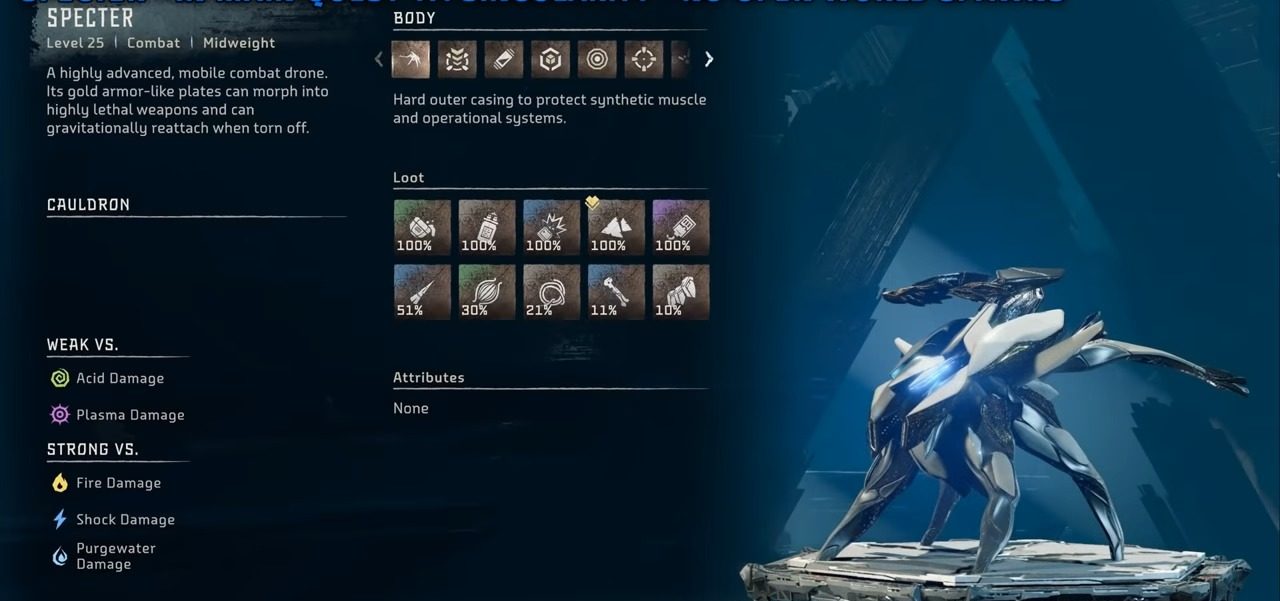
Specter
Specter
Size
Class
Weight
Challenge LV.
HP
Override
Medium
Combat
Midweight
25
2400
None
The Specter machine is an advanced mobile combat drone featuring gold armor-like plates that transform into deadly weapons and can reattach using gravitational forces if detached. If you’re looking for a Horizon Forbidden West machine override list for Specter, then you’d be disappointed becasue this one is not available for an override.
Attack Name
Description
Phalanx Turret
Deploys Nano Plates to form a shield while firing Pulse Cannons
Pulse Cannon Burst
Fires a continuous stream of projectiles while tracking target
Phalanx Barrage
Fires a sweeping horizontal stream of shots from Pulse Cannons
Serrated Flail
Spins in place with outstretched tentacle
Sweeping Banishment
Lunges and spins, attacking with tentacles and spikes
Sacred Onslaught
Lunges and swipes horizontally with tentacles
Longinus Lance Thrust
Dives and slams horn into the ground, lifting them in an uppercut motion
Burning Longinus Dive
Ignites thrusters and jumps, leaving a trail of fire and explosive spikes
Sacred Lunge
Dismounts the wall and leaps, slashing with tentacles
Show Full Text
Body Parts
Body
Pulse Cannon
Shock Unit
Resource Depository
Regeneration Unit
Vector Thrusters
Plasma Unit
Nano Plate
Control Nexus
Loot Drops
Glowblast
Sparker
Blastpaste
Metal Shards
Crystal Braiding
Piercing Spike
Machine Muscle
Braided Wire
Metal Bone
Sturdy Hardplate
Usable Weapon (detach Pulse Cannon)
Volatile Sludge (detach Resource Depository)
Luminous Brainstem (detach Resource Depository)
Strengths And Weaknesses
Weak Against: Acid Damage, Plasma Damage
Strong Against: Fire Damage, Shock Damage, Purgewater Damage
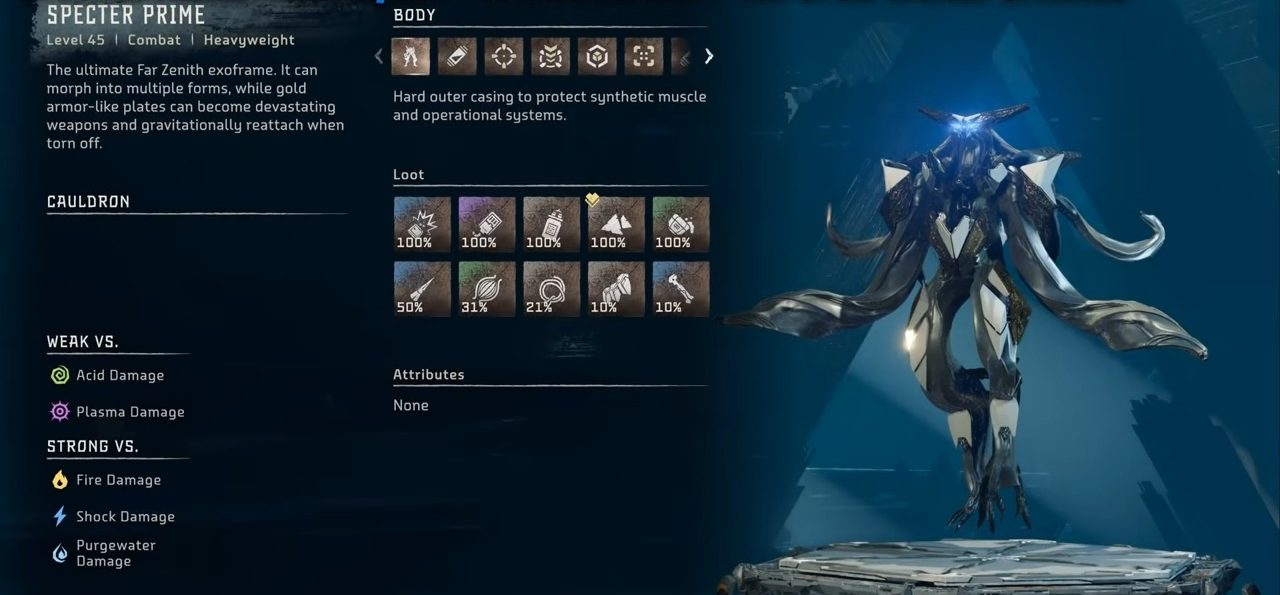
Specter Prime
Specter Prime
Size
Class
Weight
Challenge LV.
HP
Large
Combat
Heavy
1
8500
The Specter Prime machine is the ultimate Far Zenith exoframe that is capable of morphing into various forms. Its gold armor-like plates can transform into devastating weapons and reattach gravitationally if removed. Overrides are not available for this machine.
Attack Name
Description
Pulse Cannon Burst (Lead Up)
Fires an initial barrage of projectiles
Pulse Cannon Burst (Sweep)
Sweeps the area with a stream of projectiles
Hellfire Strike
Launches a powerful projectile attack
Pulsar Strike
Unleashes a mid-to-long-range energy blast
Progenitor Wrath
Engages a medium-range area-of-effect attack
Vengeful Fury
Executes a long-range precision strike
Divine Wrath
Unleashes a very long-range, powerful attack
Cross Strike
Performs a short-range melee attack
Divine Thrust
Thrusts forward with immense force
Vengeful Impaler (Triple)
Launches three short-to-medium-range impaling attacks
Vengeful Impaler (Single)
Performs a single impaling attack at short-to-medium range
Siege Slam
Delivers a medium-range ground slam
Sludge Strike
Hurls sludge at a short-range target
Annihilating Ascent
Launches upward in a short-range aerial assault
Total Recall
Fires a long-range projectile salvo
Show Full Text
Body Parts
Body
Plasma Unit
Siege Mortar
Pulse Cannon
Resource Repository
Nano Plate
Shock Unit
Regeneration Unit
Control Nexus
Lancer Prime
Vector Thruster
Loot Drops
Blasterpaste
Crystal Braiding
Sparker
Metal Shards
Glowblast
Piercing Spike
Machine Muscle
Braided Wire
Sturdy Hardplate
Metal Bone
Luminous Brainsteam (detach Siege Mortar)
Usable Weapon (detach Pulse Cannon)
Volatile Sludge (detach Resource Repository)
Strengths And Weaknesses
Weak Against: Acid Damage, Plasma Damage
Strong Against: Fire Damage, Shock Damage, Purgewater Damage
All Burning Shores Machines
The above-mentioned 43 Horizon Forbidden West all machine names are part of the base game. However, the Burning Shores DLC adds 3 new standard machines & 1 boss-type machine.
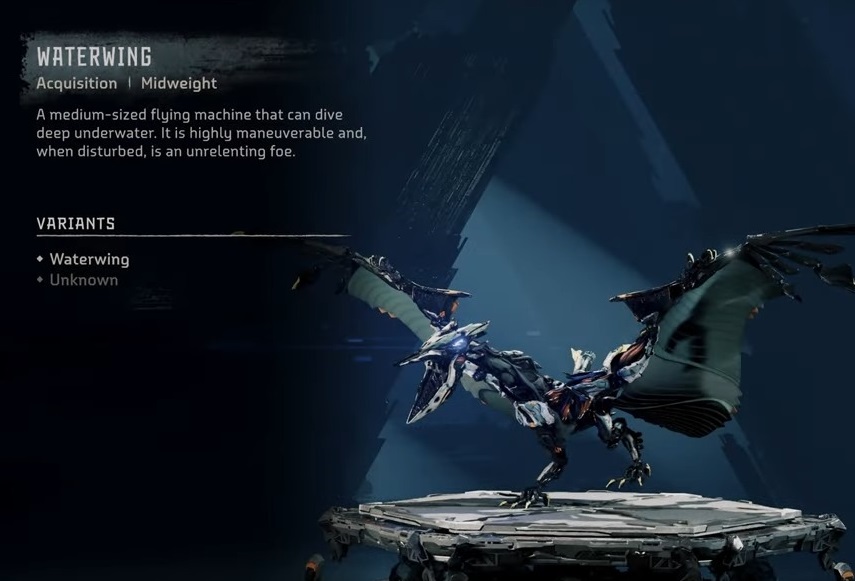
Waterwing
waterwing machine information
Size
Class
Weight
Challenge LV.
Override
Medium
Acquisition
Midweight
35
52 Apex
Cauldron GEMINI
The Waterwing machine is a medium-sized, highly maneuverable flying machine with the ability to dive deep underwater. As an acquisition-class machine, it becomes a tenacious adversary when disturbed. Its override feature is unlocked during the main story progression.
Show Full Text
Strengths & Weaknesses
Strong against: Shock, Purgewater
Weak against: Fire
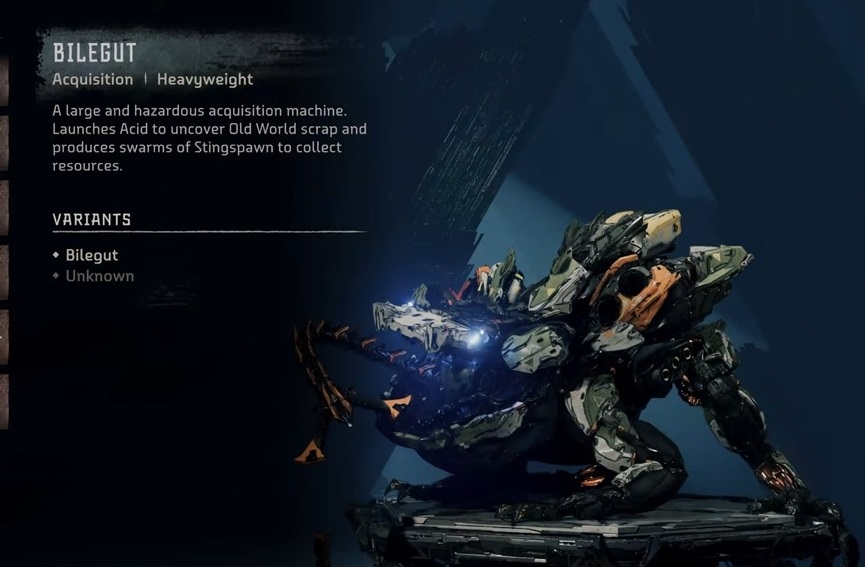
Bilegut
Bilegut Machine information
Size
Class
Weight
Challenge LV.
Override
Large
Acquisition
Heavy
42
Cauldron THETA
The Bilegut machine is a large, hazardous acquisition machine adept at launching acid to uncover Old World scrap and producing Stingspawn swarms for resource collection. Overriding this machine becomes possible after completing Cauldron THETA. Its body parts include the main body, acid launcher, and Stingspawn hives.
Show Full Text
Strengths & Weaknesses
Strong against: Purgewater, Acid
Weak against: Fire, Frost
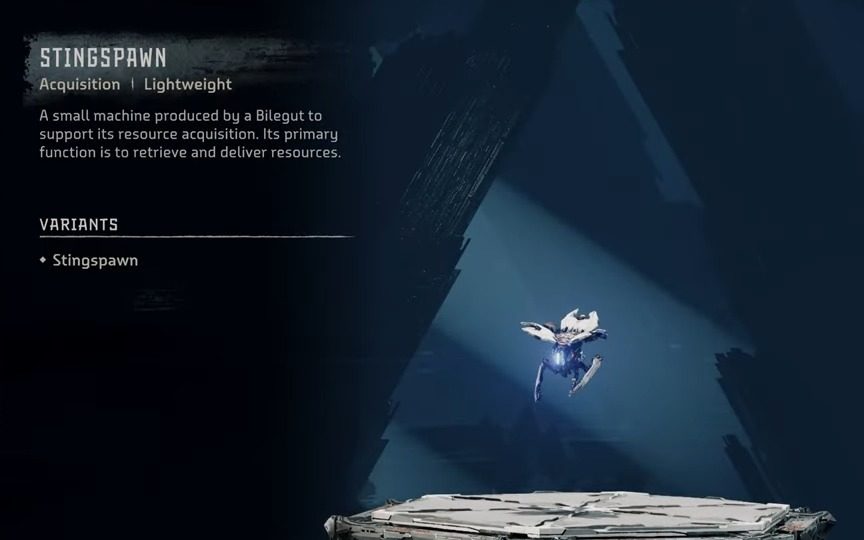
Stingspawn
Stingspawn information – Horizon Forbidden West Burning Shores DLC
Size
Class
Weight
Challenge LV.
Override
Small
Acquisition
Light
5
None
The Stingspawn machine is a small acquisition-class machine created by the Bilegut to assist in resource gathering. Its main purpose is to collect and transport resources. This machine is not eligible for an override.
Show Full Text
Strengths & Weaknesses
Strong against: Acid
Weak against: Shock
Horus
Horus Machine
Size
Class
Challenge LV.
Titan
Chariot
60
The Horus machine is the ultimate destructive force from the Old World, a Chariot-class machine capable of delivering devastating attacks and producing other machines. However, its ancient systems are susceptible to overheating. This machine cannot be overridden.
Show Full Text
Strengths & Weaknesses
Strong against: All elemental attacks
Weak against: None
This brings us to the end of the Machine list guide, where I have entailed all 43 base game machines and four new machines of the recently launched Burning Shores DLC. To defeat the machines in the list above, I used the best bows and new Burning Shores weapons and equipped Aloy with the best armor in Horizon Forbidden West. Otherwise, most machines like Fireclaw and Dreadwing will kill you very quickly.
Irfan Ansari is a Senior Editor and Guides Writer on eXputer. He has seven years of Video Game Journalism experience and has been gaming for more than 22 years. Over his editorial career, he has gained experience at multiple sites, including TheGamer and VeryAli Gaming. Irfan has also earned a degree in Writing and Editing from the University of Michigan. Learn some more about Irfan's gaming journey on his Steam, PSN, and Xboxprofiles.
Experience: 7+ Years || Worked for TheGamer and VeryAli Gaming
Enjoyed this article? Discuss the latest gaming news, get expert help with guides and errors, and chat about all things gaming on eXputer Forums and Discord Server. Connect with fellow gamers who share your passion by becoming a part of eXputer's community.