Winterbite Destiny 2 is a completely new exotic glaive that came with the Lightfall expansion. It is a heavy-slot, stasis energy glaive that is able to dish out decent damage and is extremely fun to use. Its combination of unique perks makes Winterbite very useful in dealing huge amounts of boss damage and clearing out majors in a matter of few seconds.
- Winterbite is a brand new exotic glaive that comes with the Lightfall DLC.
- Talk to Nimbus and the City Archivist in the Watchtower at Nueomuna.
- The City Archivist will provide you with a series of quests that you need to complete to obtain Winterbite, which are divided into; Stargazer, Maelstrom, Bluejay, and Strider.
- Winterbite has some exciting perks that make it a very powerful heavy weapon in its current state.
- The exotic perk Big Frigid Glaive allows you to fire a large ball of energy toward nearby targets.
- Tilting at Windmills allows you to block damage with the glaive shield.
- Weighted Edge will deal increased damage and freeze targets when you melee enemies with the glaive.
How To Get Winterbite In Destiny 2
At this point, you should also make sure that you have unlocked the new sub-class Strand because parts of the quest require you to have the Strand sub-class equipped and bond with Strand sources around Nueomuna.
The City Archivist, Quinn Laghari, has a series of quests you need to complete, leading to unlocking this exotic glaive. Essentially, by completing each of these quests, you will be learning an aspect of activities on Neuomuna and helping Quinn repair the damaged monuments of Cloudstriders in the past who are no longer alive.
Welcome to the Hall of Heroes – Step One
- This part of the Winterbite quest is introductory and requires you to run around the Hall of Heroes, interacting with monuments and listening to a few audio logs.
- Once this step is completed, head over to Quinn Laghari, The City Archivist.
- Quinn will be offering three sub-quests, which are; Stargazer, Maelstrom, and Bluejay.
Stargazer
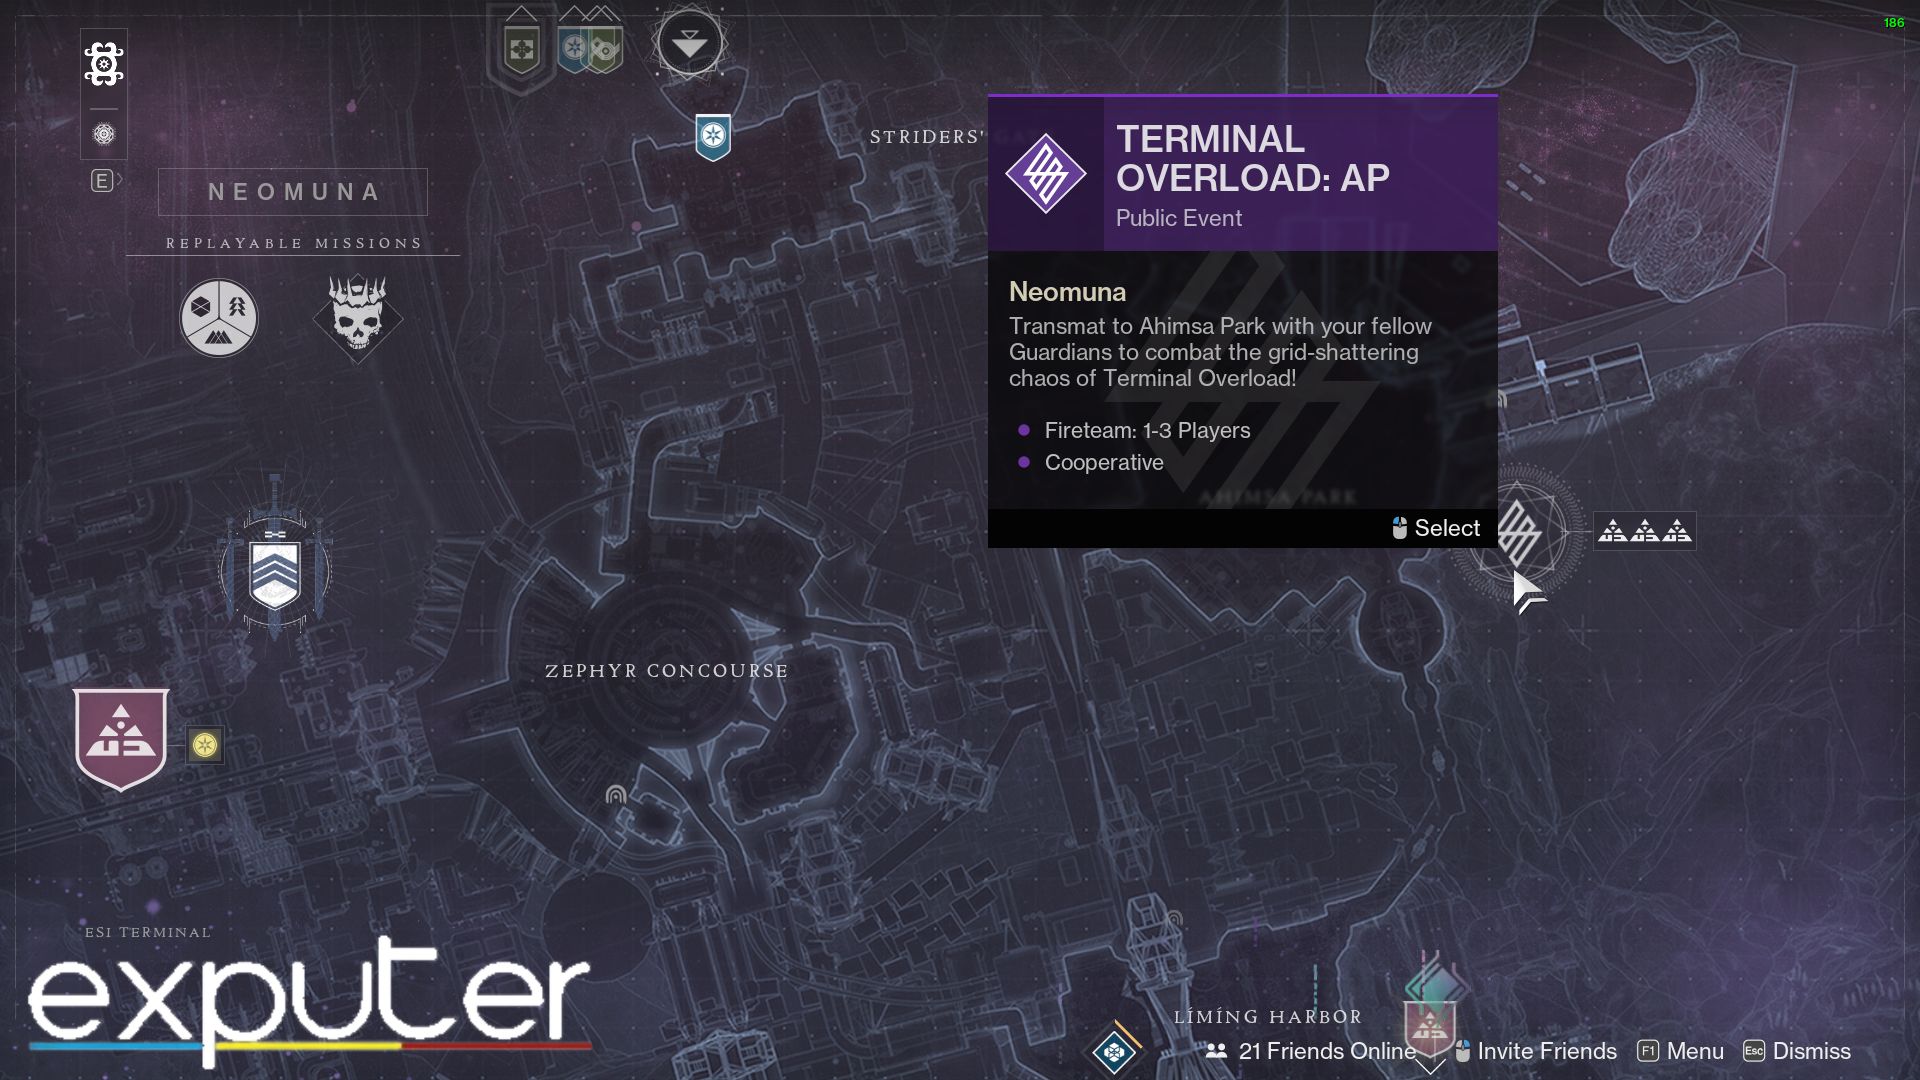
- The first step requires you to complete the Terminal Overload activity and open the chest at the end.
- Terminal Overload is a public event that can be easily located using a map.
- Once you have completed the activity, open the reward chest that doesn’t require a key.
- Next, locate Esi Terminal on Neuomuna using your map. It should be marked with a blue icon.
- Track the location, and head over there. Once you reach there, destroy the Vex Hydra.
- Now, go back to the location of the Terminal Overload activity and complete it again.
- Once you have completed this activity, open the reward chest that requires the Terminal Overload Key.
- Finally, you need to return to the Hall of Heroes and talk to Quinn to progress to the next part.
- Quinn will ask you to repair Stargazer’s monument. Once repaired, this will end the Stargazers’ quest.
Maelstrom
- The first step of the Maelstrom quest will require you to bond with two strand sources in Vex Incursion Zones.
- Strand sources can be located throughout Nueomuna and can be identified as green Auras.
- You also need to complete activities like Patrols and Public Events and loot planetary resources.
- Once in the Vex Incursion Zone, activate the ghost with the detector, and start a patrol.
- You should be able to complete a public event and patrol simultaneously while collecting materials.
- This will allow quick progression through this step.
- Next, you need to complete a Lost Sector that is inside the Vex Incursion zone for the day.
- Finally, return back to Quinn Laghari, and repair the Maelstrom monument.
Bluejay
- First, head to Nimbus and talk to him. Once you are done talking with Nimbus, equip the Strand sub-class.
- Nimbus will require you to collect eight Shellcode Fragments and a Polymorphic Engine.
- Shellcode Fragments can be acquired by killing enemies with the Strand sub-class.
- For the Polymorphic Engine, you will need to open a chest that requires a Terminal Overload.
- Now, you need to open your map, mark the Vex Incursion Zone and fast travel to that area.
- You can start a patrol and start killing enemies. Eventually, you will start getting Shellcode Fragments.
- While completing this objective, you can also open location and regional chests for a Terminal Overload Key.
- Once you have the key, use it to open the activity chest to obtain the Polymorphic Engine.
- The third step requires you to complete the Partition Activity, which is located in the Liming Harbor region.
- Finally, return to the Hall of Heroes and repair the Bluejays memorial. Afterward, talk to Quinn.
Strider – Step Two
Now that you have completed the Welcome to the Hall of Heroes quest, head over to Quinn. She will provide you with the next step of the quest to obtain Winterbite. This next quest is called Strider.
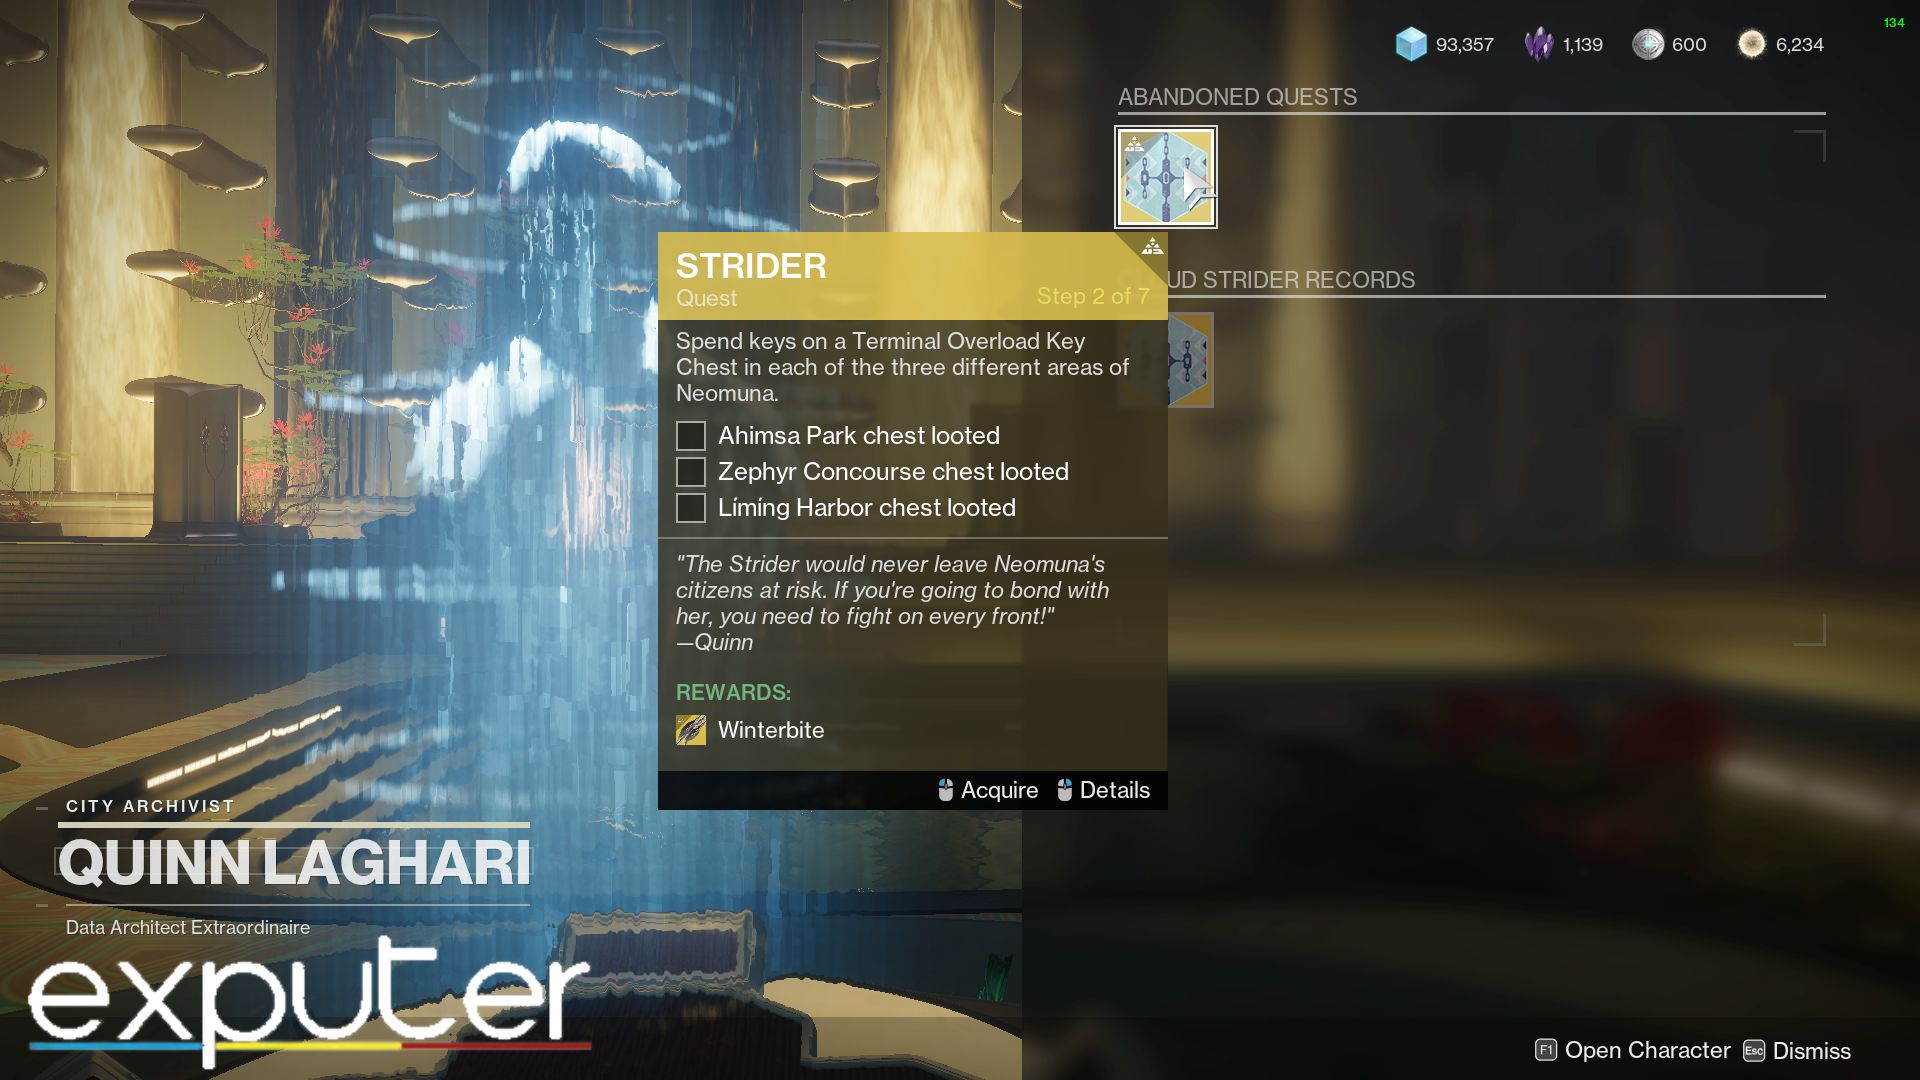
- The Strider quest will require you to visit the Archivist Quinn Laghari and talk to her. Afterward, she will require you to spend three Terminal Overload Key Chests.
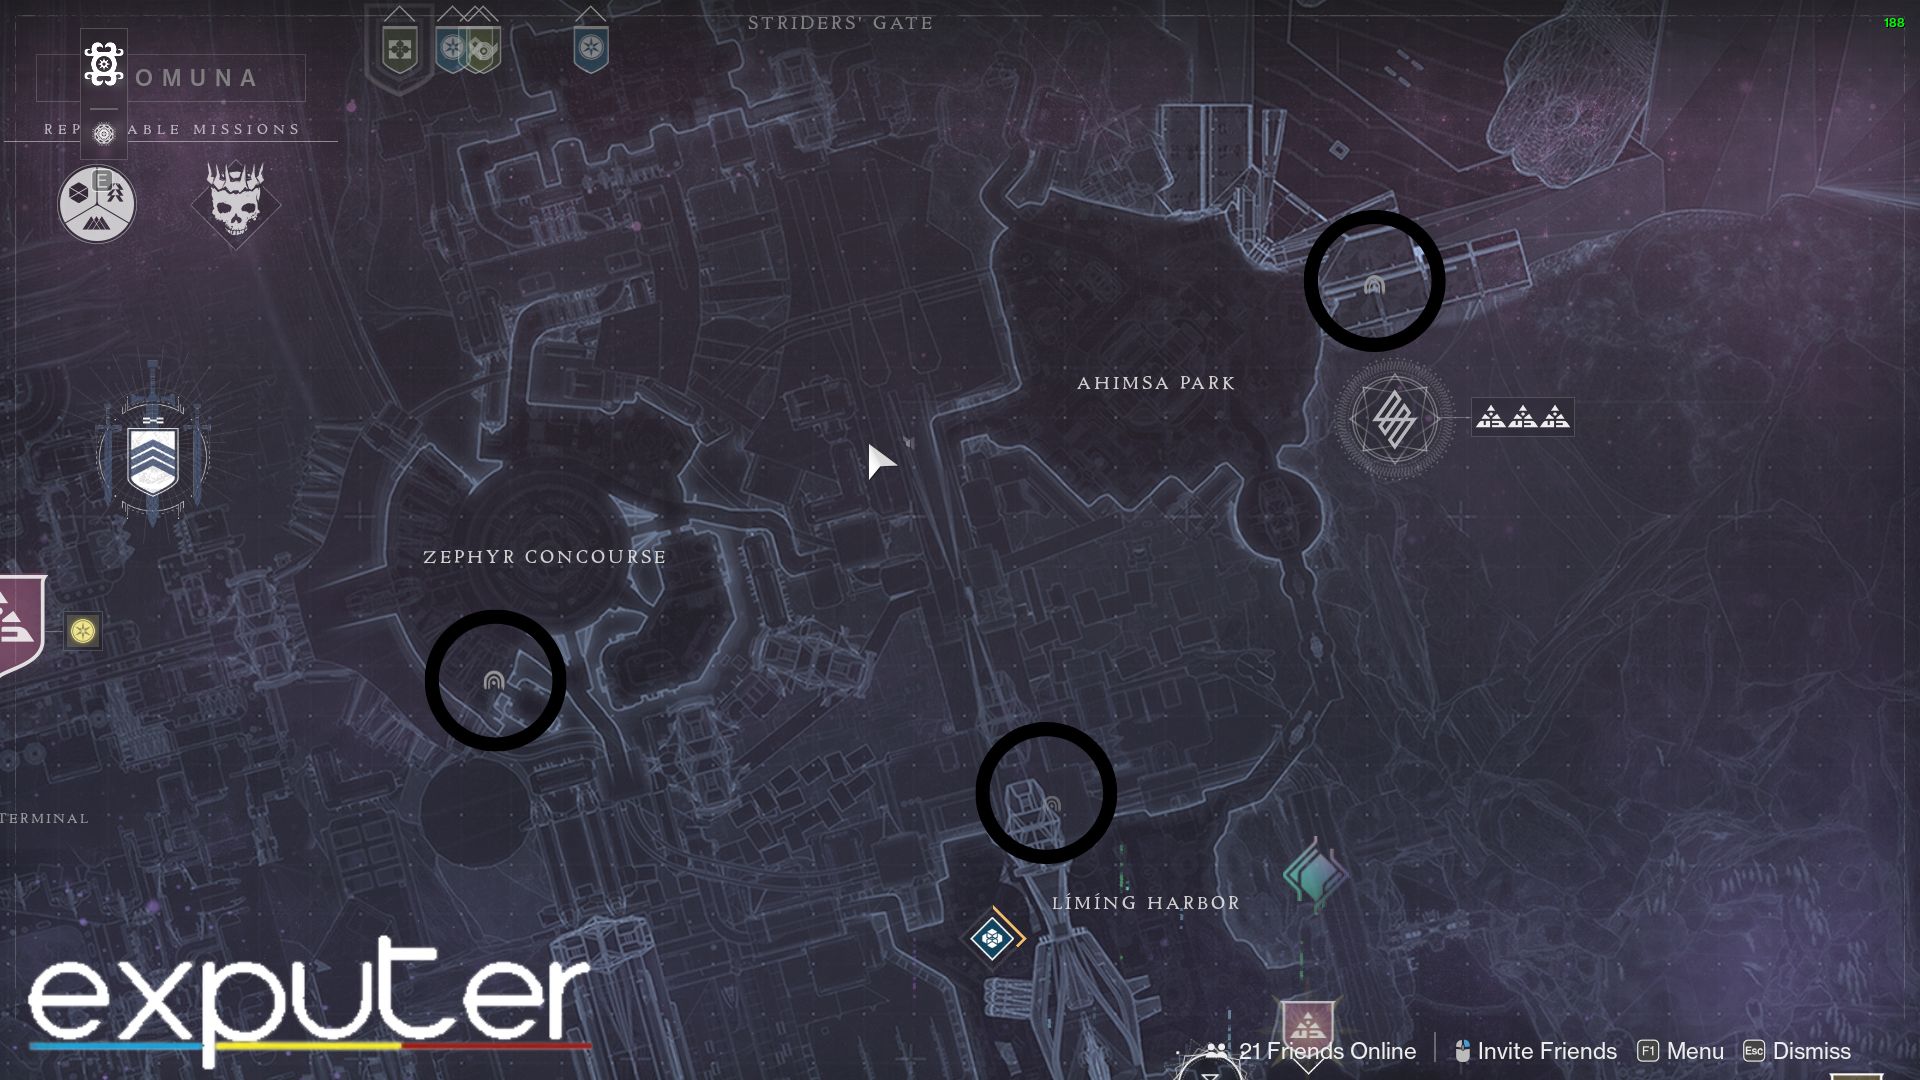
- You need to open these Terminal Overload Key Chests in three different locations around Neuomuna. These three locations are Ahimsa Park, Zephyr Concourse, and Liming Harbor.
- The Terminal Overload public event is on a daily rotation. Therefore, you will have to complete one Terminal Overload event every day for three days to complete this step.
- The next step will require you to collect Location Data. This can be easily done by killing Shadow Legion enemies on Nueomuna. Then you can head over to the Ahimsa Park lost sector to collect the Data Cipher.
- The Data Cipher is located in a side room along a narrow walkway in the lost sector.
- Once the Data Cipher is collected, complete the lost sector as you normally would and open the lost sector chest to finally complete this step.
- Now you need to head back to the City Archivist, Quinn Laghari, and talk to her.
- She will ask you to repair the Strider Memorial by interacting with it.
- The next step will require you to head over to Maya’s Retreat in Liming Harbor, where you will fight through Vex enemies and a Hydra Major. Once all the Vex enemies are dead, interact with the Conflux.
- Finally, you return to the Archivist and talk to her, and she will reward you with Winterbite Exotic Glaive.
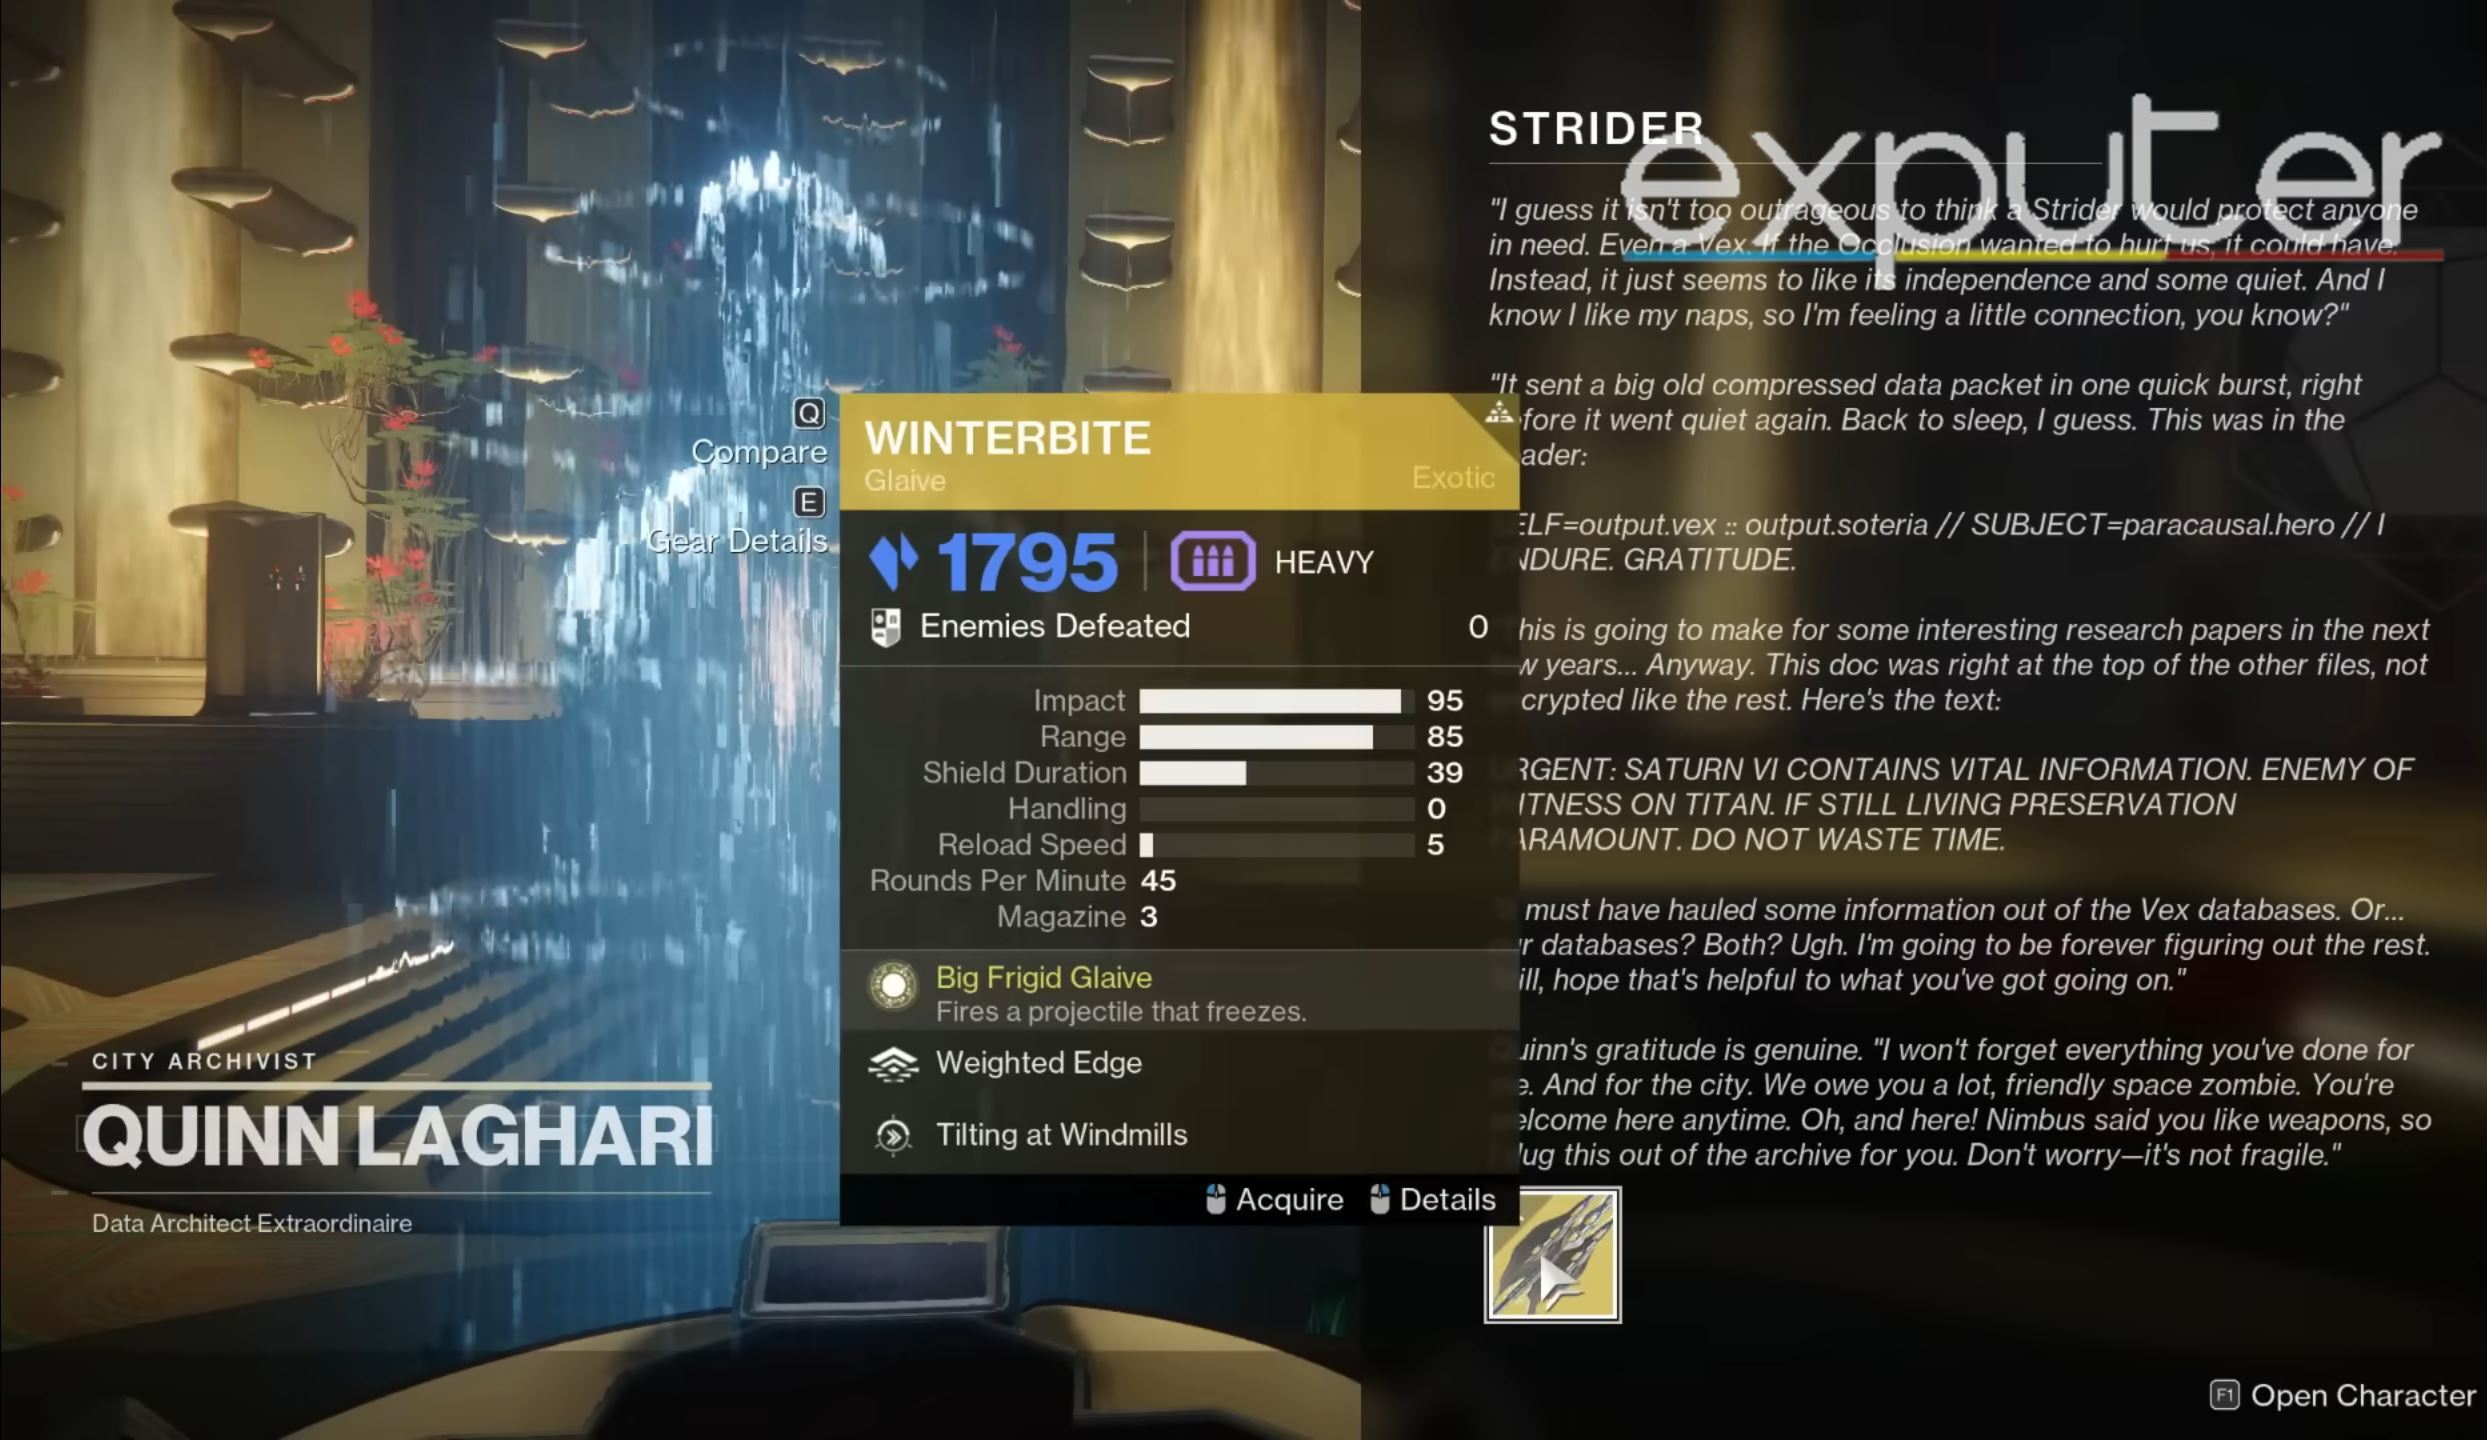
Winterbite Stats And Perks
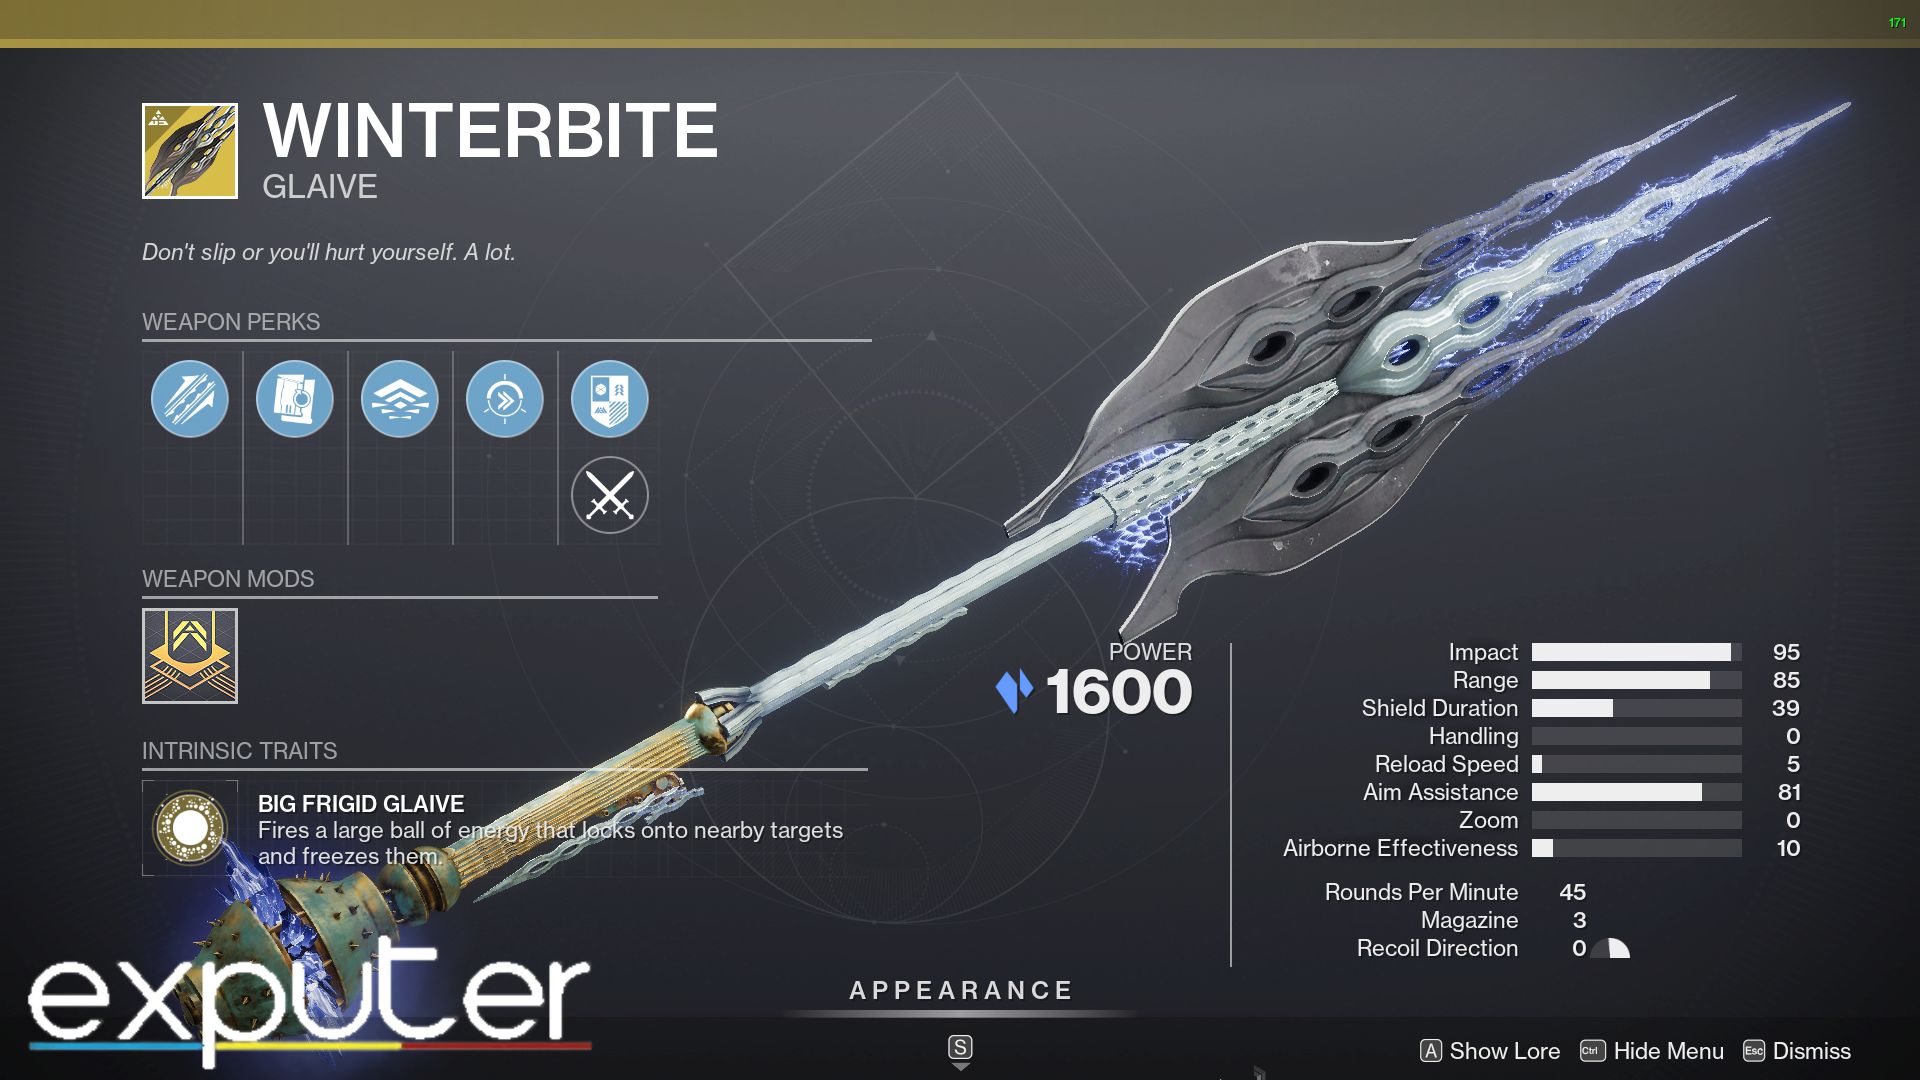
| WEAPONS | STATS |
|---|---|
| Impact | 95 |
| Range | 75 |
| Shield Duration | 39 |
| Handling | 05 |
| Reload Speed | 10 |
| Aim Assistance | 81 |
| Inventory Size | 0 |
| Airborne Effectiveness | 10 |
| Rounds Per Minute | 45 |
| Charge Time | 39 |
| Magazine Size | 03 |
- Bid Frigid Glaive: Fires a large projectile of energy that will lock on to nearby enemies and freeze them.
- Weighted Edge: This glaive does an increased amount of melee damage and slows down the target
- Tilting at Windmills: Using the shielding ability on the glaive to block damage will increase movement speed.
- Supercooled Accelerator: Increases range and reduces reload speed and handling.
- Alloy Magazine: This glaive has an increased reload speed when the magazine is empty.
Overall, Winterbite is a great exotic glaive. The long quest to obtain Winterbite may be off-putting, but it is definitely worth the patience.
Winterbite can be paired up with several builds, such as with Warlock using Devour ability. This will allow you to shred enemies with easy and melt majors and mini-bosses. If you want to learn more details about the weapon, you can visit Light.gg. You can also find players and teammates on r/DestinyLFG to complete the exotic quest faster.
Up Next:
Conditional Finality Destiny 2
Salvage Keys Destiny 2
Centrifuse Auto Rifle Destiny 2
Deep Dive Destiny 2
Thanks! Do share your feedback with us. ⚡
How can we make this post better? Your help would be appreciated. ✍