Final Fantasy 16 has tons of items that players can get their hands on, most of which are used in crafting items that can come in handy while progressing in Final Fantasy 16. One of the items is the Whitewyrm Bone in Final Fantasy 16, which can be used to make an excellent sword and acquired through a boss fight. Players might want to know how to obtain the white wyrm bone.
- The Whitewyrm bone is a crafting item that can be used to craft items that can help players in FF16.
- The Whitewyrm Bone can be used to craft the Diamond Armlet by spending 1 Whitewyrm Bone and can be used to enhance it too.
- The Diamond Sword weapon can be crafted using Whitewyrm Bone, too.
- Players must face and defeat the White Dragon, which has a few attack patterns to obtain it.
- The dragon focuses on launching shards, jumping up and down, slamming its wings, and releasing spherical orbs, ice crystals, and more.
- Assassinating the white dragon will grant you 3 Whitewyrm Bones, 20 Bloody Hide, and 20 Sharp Fang.
What Is The Whitewyrm Bone In Final Fantasy 16?
Kicking things off, let’s take a look at what the Whitewyrm Bone is:

- The Whitewyrm Bone is a crafting item that players can obtain and can be used to make useful items.
- Crafting materials can be used to craft any item the player could use for further progression or to improve their gameplay.
- The Whitewyrm Bone can not be farmed or acquired from any place other than to fight the White Dragon.
How To Get Whitewyrm Bone
One of the main ways players can obtain the Whitewyrm Bone in Final Fantasy 16 is by defeating the White Dragon.
- The white dragon is a pretty tough boss fight that players will not be able to skip. Therefore, you will have to face it no matter what, eventually.
- Players must fight the white dragon, and the boss fights will prove extremely difficult, even tougher than the Akashic Dragon or the Bahamut.
What Can Be Crafted With Whitewyrm Bones?
Moving on, the next thing that you might want to consider is that once you get the Whitewyrm Bones, there are a few items that you might be able to craft from it.
Diamond Armlets
One of the first things you can craft from the Whitewyrm Bone in Final Fantasy 16 is the Diamond Armlets. The armlets are essentially Vambraces that can be sold for 1350 Gil and will be available after you visit Tabor for the first time. To craft it, you will need the following items.
| Crafting Materials | Amount Of Material Needed |
| Whitewyrm Bone | 1 |
| Sharp Fang | 81 |
| Wyrrite | 243 |
The diamond armlets can also be reinforced, and this process can be done by bringing the items mentioned below to the Blackthorne. Other than that, you can also craft the Diamond Sword from the Whitewyrm Bone. You can also get the Armlets at Charon’s Toll for 2700 Gil.
| Reinforcement Level | Materials And Amount Required |
| +1 |
|
| +2 |
|
White Dragon Boss Fight Strategies
To get the Whitewyrm Bone, you should know that facing the White Dragon without any precautions might kill your character faster than you could ever imagine. Therefore, let’s look at how you might be able to fight the dragon and take it down.
- The dragon will feature a few similarities that players can note with the Akashic Dragon, including a few attack patterns.
- Encountering the white dragon, Clive takes out his sword before stating that it must be one of the dragoons’ pets, and the dragon simply howls at him, and the boss fight starts.
Start Of Fight
The white dragon will start the boss fight quite aggressively, launching projectiles that look like shards toward you.

- It will launch out one shard toward the far left side of the battle area, and then it will be followed by a second projectile that he will shoot out towards the right of the first projectile.
- The White Dragon follows up the shard attacks by shooting out a projectile that will be placed right behind the second projectile launched.
- Remember that these shards will resemble crystals sticking to the ground, and you want to steer clear of them and evade them.

Releasing Five Projectiles (Image Credits Exputer) - The dragon will then follow up with five projectiles from the left and five from the right, which fly and arch toward the player.

After that, the dragon follows up an attack by getting a bit closer to the player, spinning around from where it is standing, and unleashing a giant circle of ice crystals; if they end up hitting the player, it can severely drain your HP.

- After releasing the circular crystals, it remains stagnant for a few seconds, giving you the perfect time to get closer to it to launch a few attacks.
- There will also be an attack where the White Dragon gets on its hind legs and stays there for a split second before slamming down the forelegs, causing two parallel lines of ice crystals to get unleashed.

Hind Legs (Image Credits Exputer) - The White dragon may also pick up its wings and rotate them towards you, slamming them down in front of you, and when it does that, you should stay on the inside of it.

As the white dragon slams its wings toward you vertically, it will cast more ice crystals. Therefore, it is crucial to remain on the inside of the wings.

Fight Continuation
Occasionally, the dragon will also fly up and stay a bit of distance; it will stay afloat with its wings flapped out, cast out one ice projectile at a time, and launch out 5-6 projectiles.

- The best way to stay protected from the projectiles is to know they will travel in a line.
- The dragon also casts out an attack called the Heavenly Host, which allows it to release 5 spectral projectiles toward the player, but they travel incredibly slowly, so avoiding them should be easy.

Heavenly Host (Image Credits Exputer) - The heavenly host attack will also be followed by the same 9-10 projectiles that arch toward the player and then target you.
- The dragon keeps following through with its attacks, including where it lifts its wings and launches it down, causing a shockwave of ice crystals to get released in your general direction.

Releasing 9-10 Projectiles (Image Credits Exputer)


After that, the dragon becomes vulnerable for a little bit. It roars and then lies down with its head exposed, giving you the perfect opportunity to head in and unleash as many attacks as possible, draining its HP more and more. The white dragon will remain vulnerable for quite a bit.
Phase Two
After being vulnerable for a while, the dragon that grants you the Whitewyrm Bone will stop being staggered and get up, which marks the beginning of phase two.
One of the main attacks that it will carry out is to get on its hind legs, and it will release crystals that will slowly descend to the floor, after which they will stretch out and then become ice beams that will continue to rotate and will be targeting you.

- After that, the dragon slams back onto the ground, which causes it to release yet another shockwave of ice crystals all in a second, which can severely hurt you if you are not careful enough.

Ice Beams (Image Credits Exputer) - Another attack will be to jump up and then slam down its body against the ground, causing a heavier attack.
- It returns to its hind legs to carry out the same attack pattern, unleashing the same ice crystals.

Another interesting pattern that won’t be seen in phase one is the white dragon firing down icy breaths onto the ground, which covers the ground with a circular radius where there are tiny crystals of ice, and the best way to avoid that is to simply head away from the radius as it continues to expand. The shards then expand and then blow outwards before disappearing.

- Heavenly Host is cast out again, but this time, 7-8 spherical orbs will be launched toward you instead of the five seen in phase one.
- The ice projectiles are also cast out from both left and right as they reach you and target you.

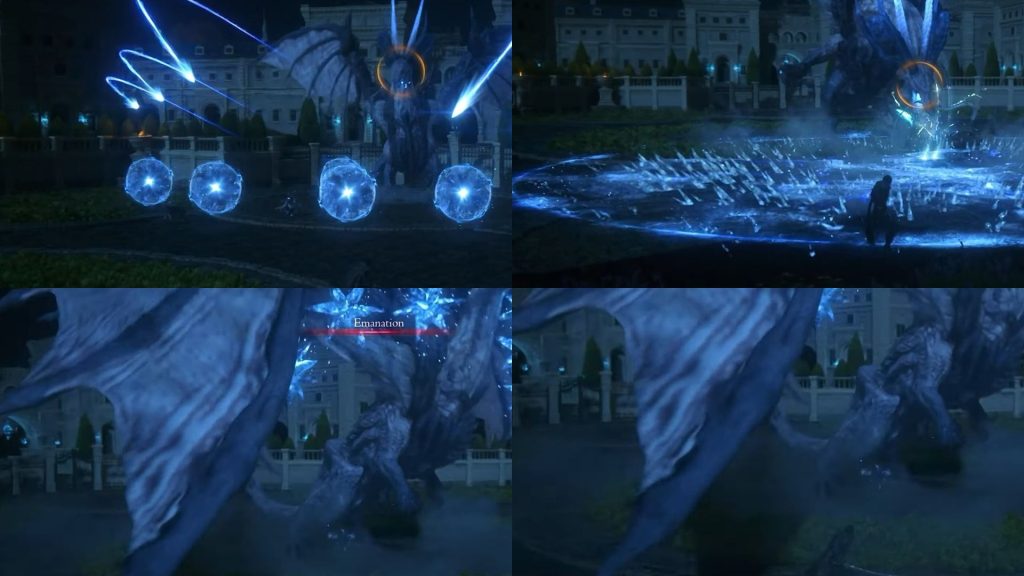
Heavenly Host Phase Two (Image Credits Exputer) - It will also target you and launch a crystal in a crisscross position.

Towards the end of the fight, the dragon will practically go insane, launching projectiles and orbs and targeting your left, right, and center, and it’s all about timing, strategy, and prioritizing your attacks. The dragon also casts out its Dragon Dance attack.
- The dragon dance attack typically consists of everything at once, from Heavenly Host to projectiles from Emanation.
- As the boss fight ends, you should be able to get 3 Whitewyrm Bones, 20 Bloody Hide as well as 20 Sharp Fang.
While here, why not read up on the Final Fantasy 16 Eikonic Challenge Mode guide, which details the demo challenge mode? Alongside that, you might also like the Final Fantasy 16 All Eikons guide, which tells you all that you need to know about all Eikons!
With that, the Final Fantasy 16 Beat Benedikta Bossfight guide will detail how to defeat Benedikta! Lastly, the Final Fantasy 16 Trophy List guide will showcase all trophies!
Up Next:
- Final Fantasy 16 Limit Break
- Final Fantasy 16 Voice Actors
- Final Fantasy 16 How To Save
- Final Fantasy 16 Ability Points
Thanks! Do share your feedback with us. ⚡
How can we make this post better? Your help would be appreciated. ✍