Horizon Forbidden West offers many interesting locations, collectibles, and optional side quests. One of the notable side quests with collectibles is the Relic Ruins. There are nine of these Relic Ruins scattered across the map, waiting to be discovered.
All the Relic Ruins offers an Ornament, which is a collectible in Horizon Forbidden West. The Relic Ruins have many puzzles that require you to be extremely creative to get to the end of the Ruins and collect the Ornament. This guide has all the codes, locations, and walkthroughs to get you all 9 Ornaments from the Relic Ruins in Horizon Forbidden West.
Show Full Text
Key Takeaways
The Daunt Relic Ruins:
Location: Eastern part of the map, just above the southern edge.
Puzzle and Code: Climb, pull boxes, solve courtyard puzzles, get code 1705.
Retrieve Ornament: Climb, solve more puzzles, use the key and code, and collect the Ornament.
No Man's Land Relic Ruins:
Location: Southwestern part of the map, near a crossroad.
Puzzle and Code: Navigate platforms, ignite path, charge energy canister, use Pull Caster to solve puzzles, and get code 2204.
Retrieve Ornament: Climb, solve more puzzles, use the key and code, and collect the Ornament.
Restless Weald Relic Ruins:
Location: Northeastern part of the map, near a deer hunting spot.
Puzzle and Code: Find code 1923, manipulate the train cart, and solve platform puzzles.
Retrieve Ornament: Climb, manipulate boxes, open the door, and collect the Ornament.
Dry Yearn Relic Ruins:
Location: Eastern part of the map, northeast from the middle.
Puzzle and Code: Break vines, pull switches, manipulate train cart, charge energy canister.
Retrieve Ornament: Solve puzzles, climb, and retrieve Ornament.
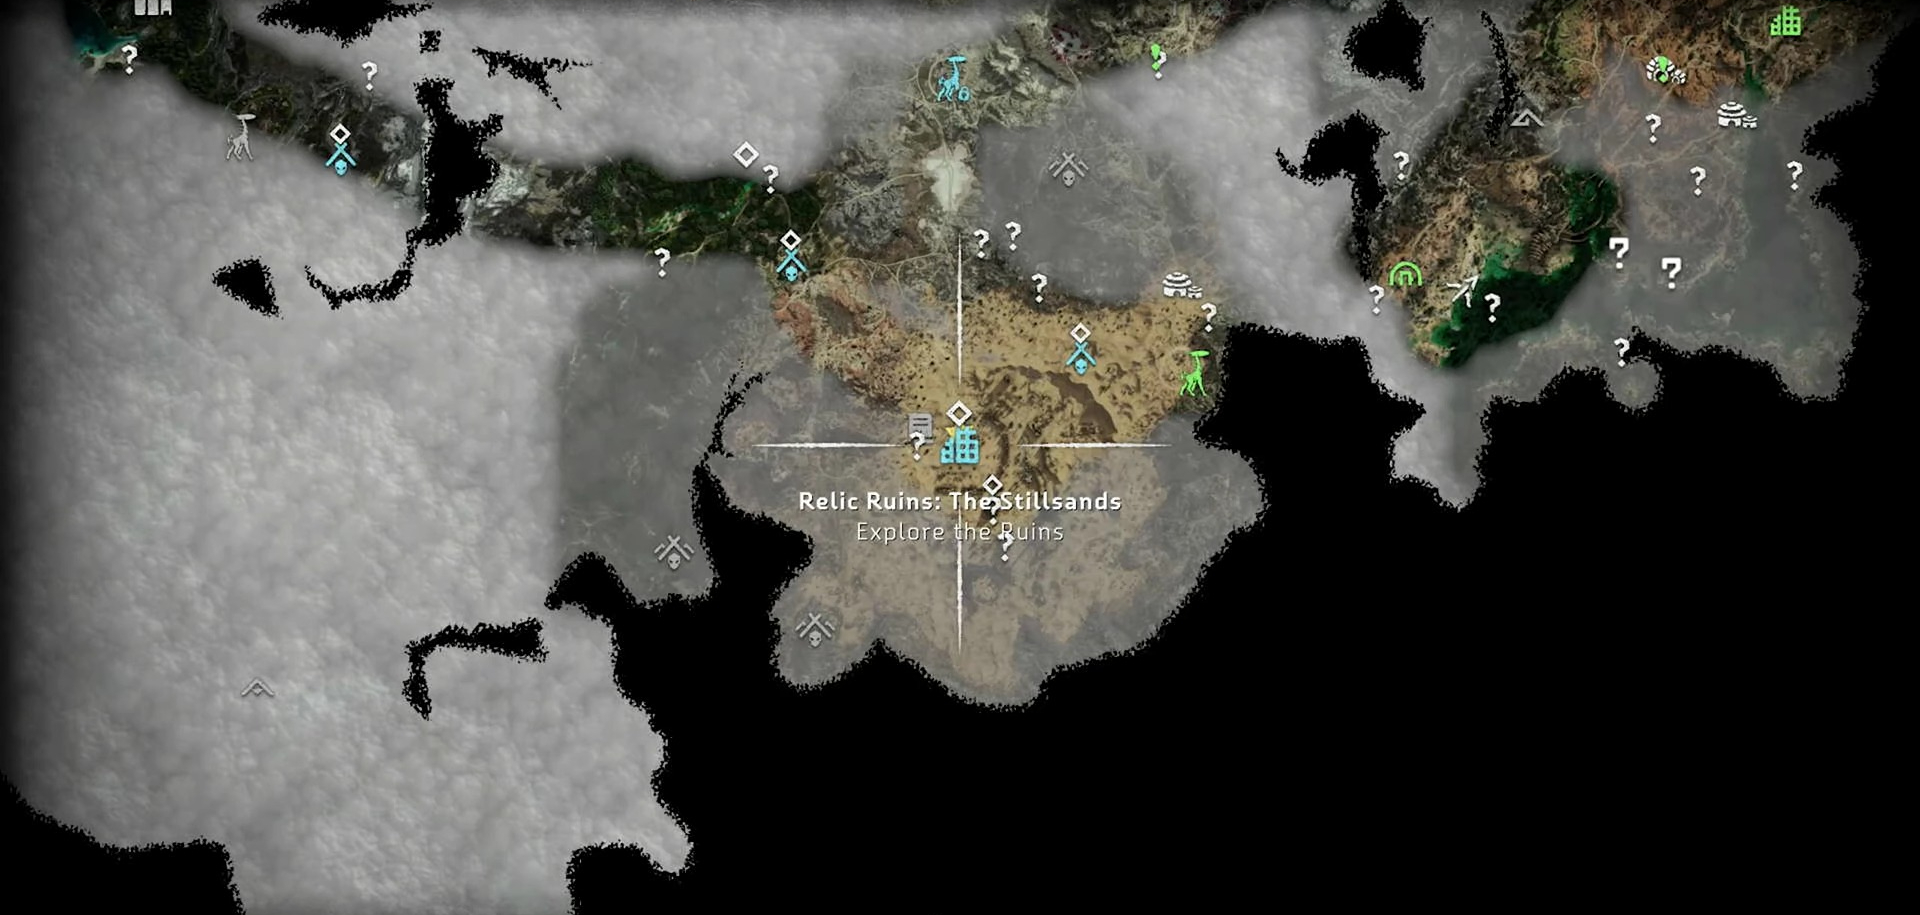
The Stillsands Relic Ruins:
Location: Southwestern part of the map, in a desert.
Puzzle and Code: Ignite path, pull switches, use grapple, retrieve key, climb.
Retrieve Ornament: Solve puzzles, climb, and retrieve Ornament.
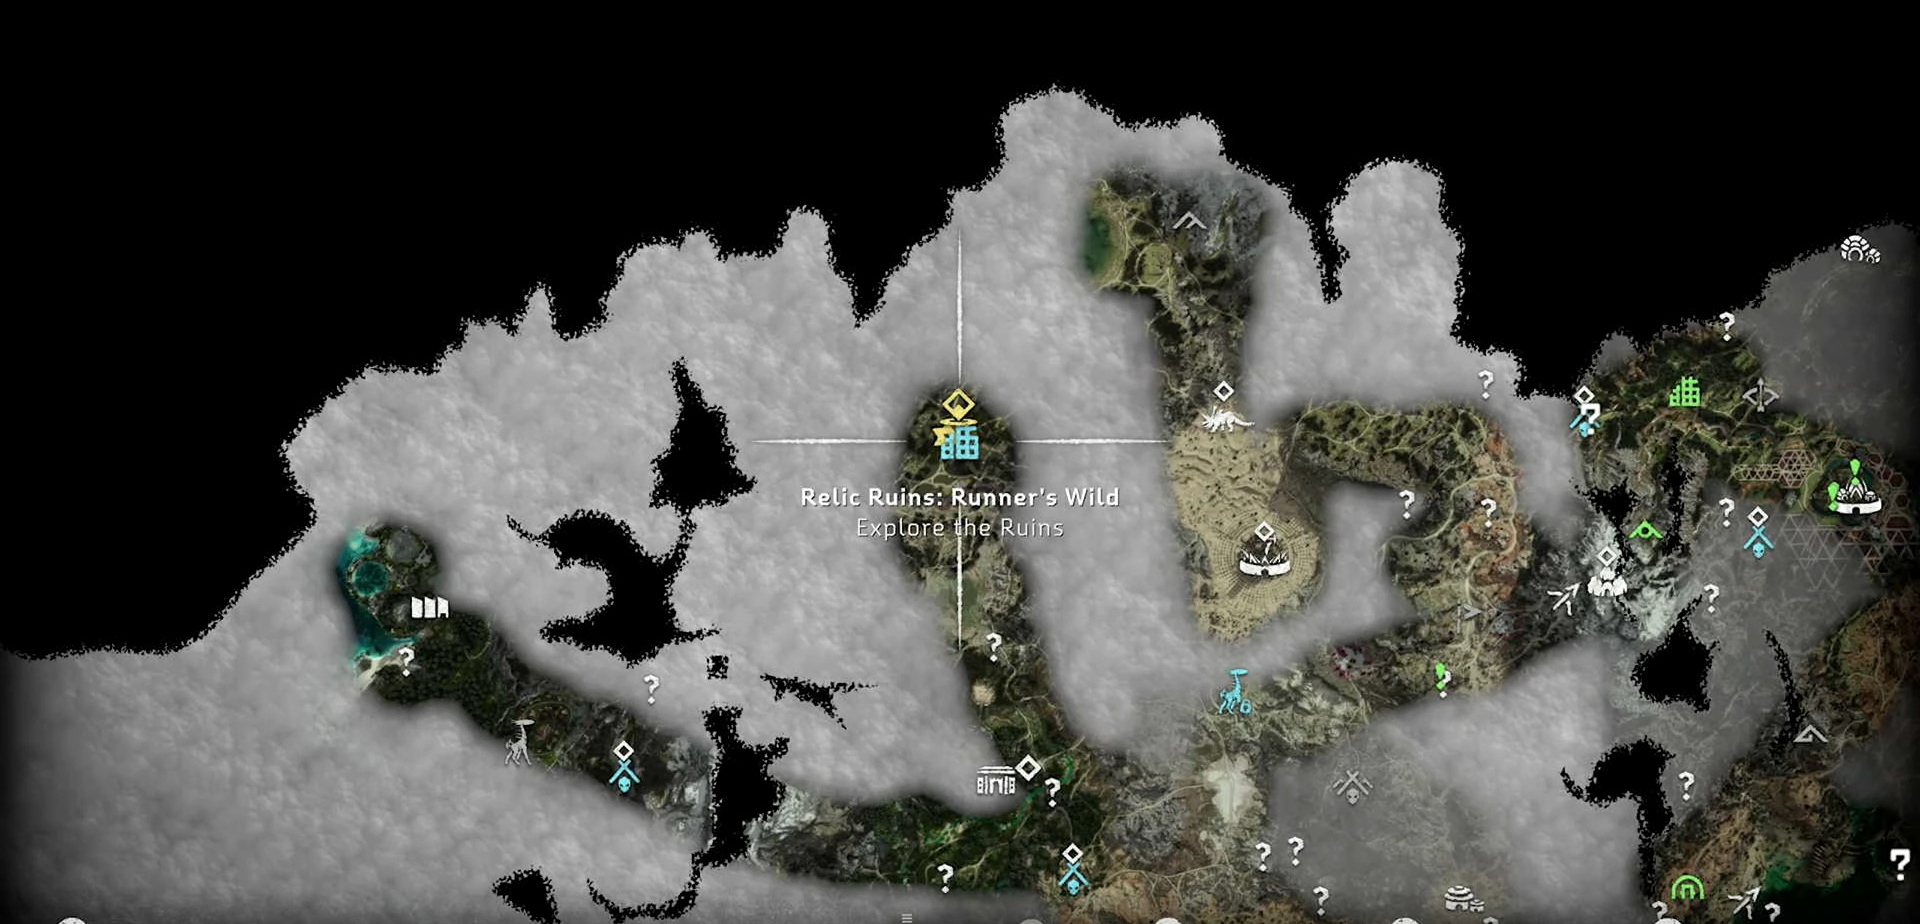
Runner's Wild Relic Ruins:
Location: North part of the map, near icy areas.
Puzzle and Code: Climb, ignite path, use Pull Caster, retrieve key.
Retrieve Ornament: Solve puzzles, climb, and retrieve Ornament.
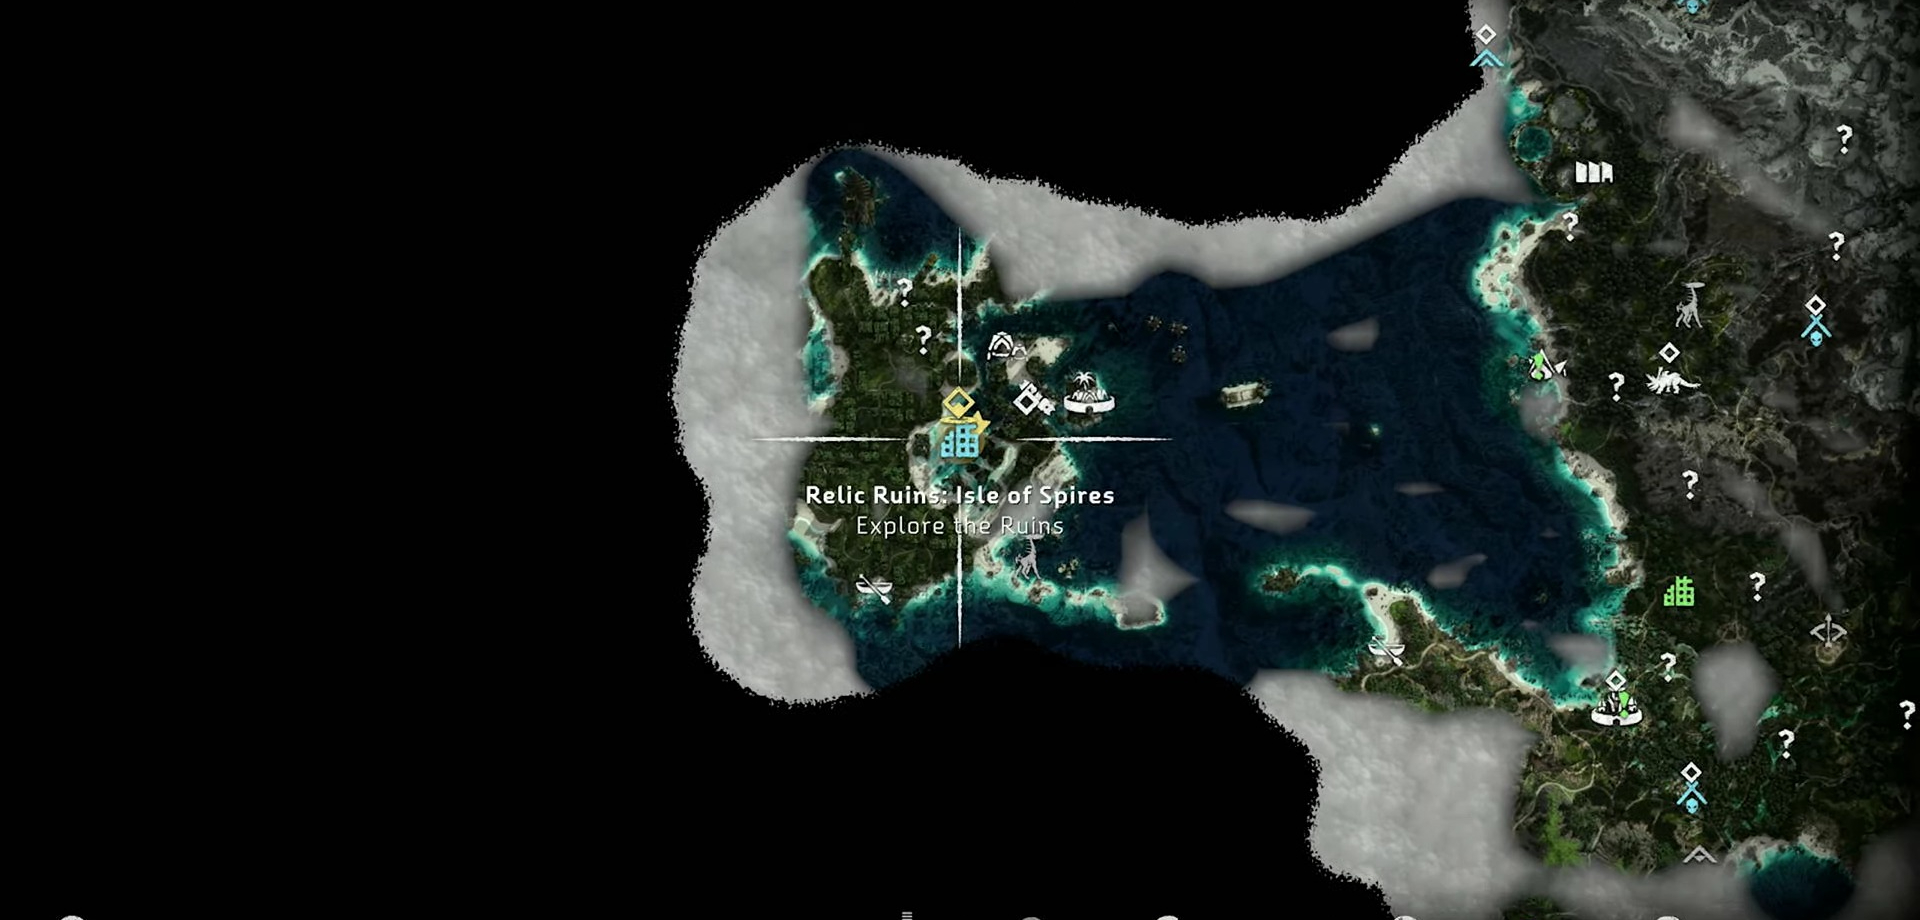
Isle of Spire Relic Ruins:
Location: Western island of the map, eastern side.
Puzzle and Code: Navigate vents, use the Energy Canister, climb, and use the key and code.
Retrieve Ornament: Solve puzzles, climb, and retrieve Ornament.
Nights of Lights Relic Ruins:
Location: Southern desert, part of an Errand Quest.
Retrieve Ornament: Complete quest objectives to find the Relic.
Quick Tip: If you are after the trophy rewarded for completing the Relic Ruins, you only need to complete three Relic Ruins.
Horizon Forbidden West All Relic Ruins Codes
Getting the door codes requires you to do extra puzzles, and getting them can be a pain If you have already reached the location for a Relic Ruin. If you don't know the code for the doors, then down below are all the codes required for the doors in each of the ruins.
Here's a summarized form of Relic Ruins information:
Relic Ruins Name
Location
Door Code
The Daunt
Eastern part of the map
1705
No Man’s Land
Southwestern part of the map
2204
Restless Weald
Northeast side of the map
1923
Isle of Spires
Western part of the map (Island)
2109109
Leo’s Floor 9
N/A (part of a floor code)
2109
Astrid’s Floor 7
N/A (part of a floor code)
109
Nights of Lights
Southern part of the map (Errand Quest)
N/A
The Stillsands
Southwestern part of the map
N/A
Runner’s Wild
North side of the map
N/A
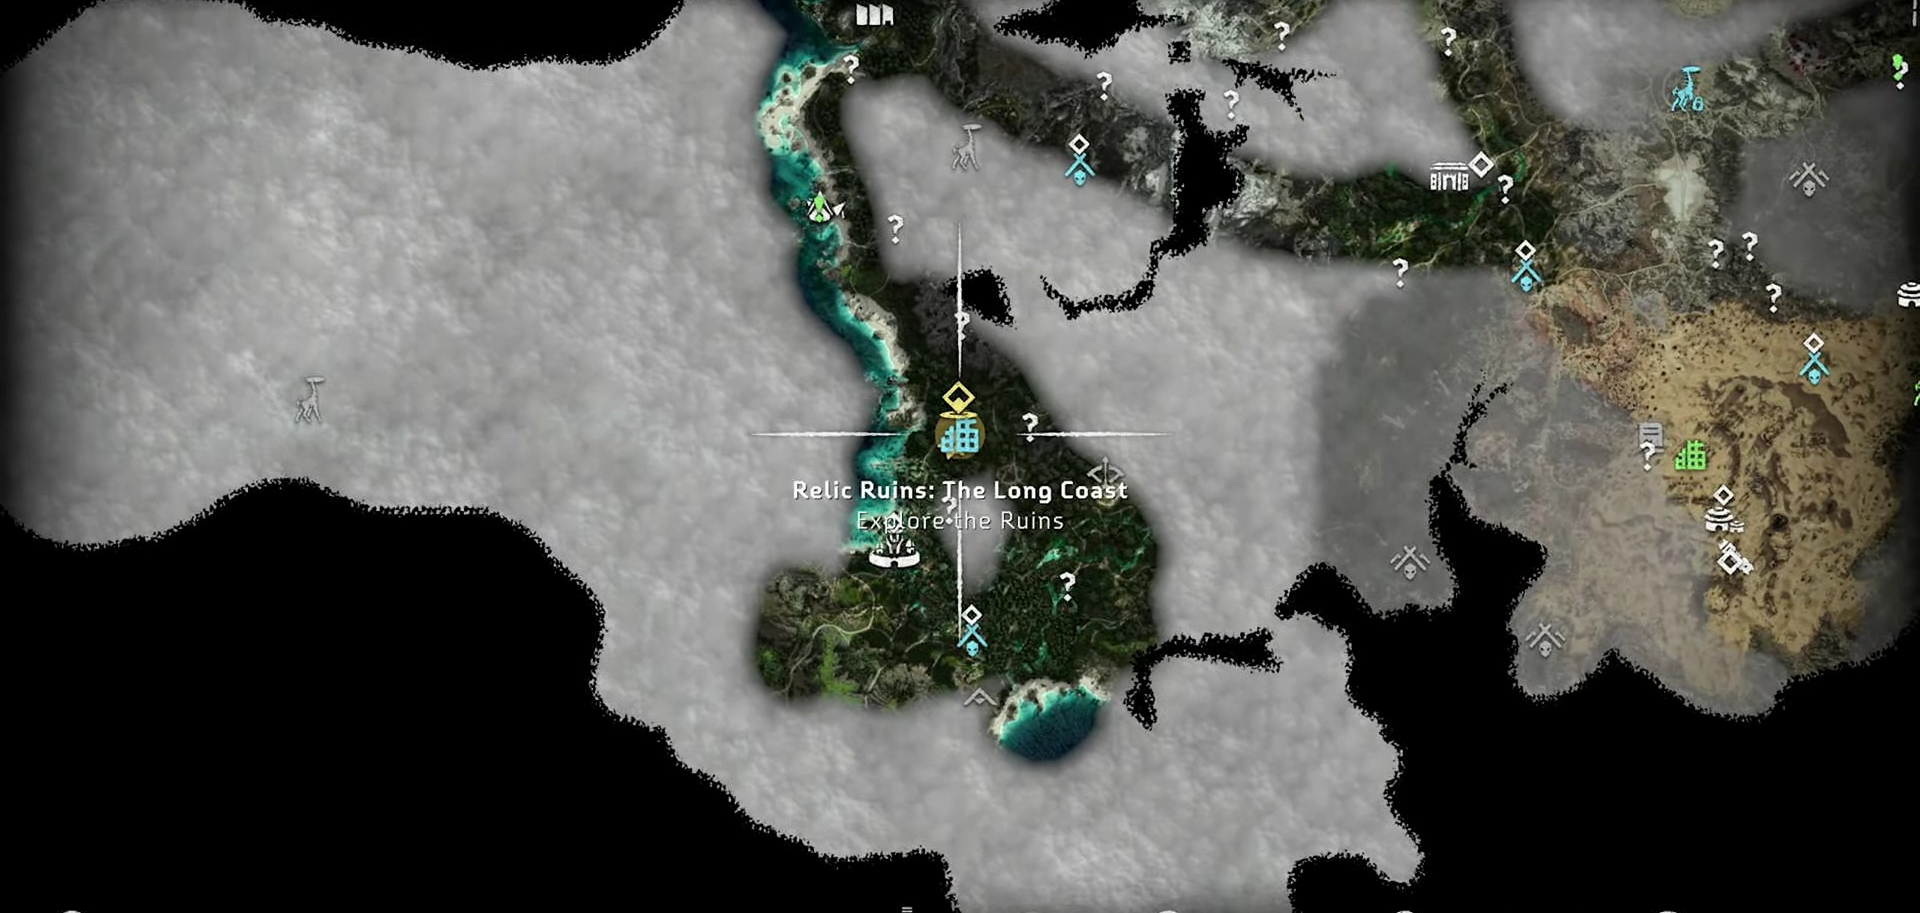
The Long Coast
Southwest part of the map
N/A
The Daunt Relic Ruins Location
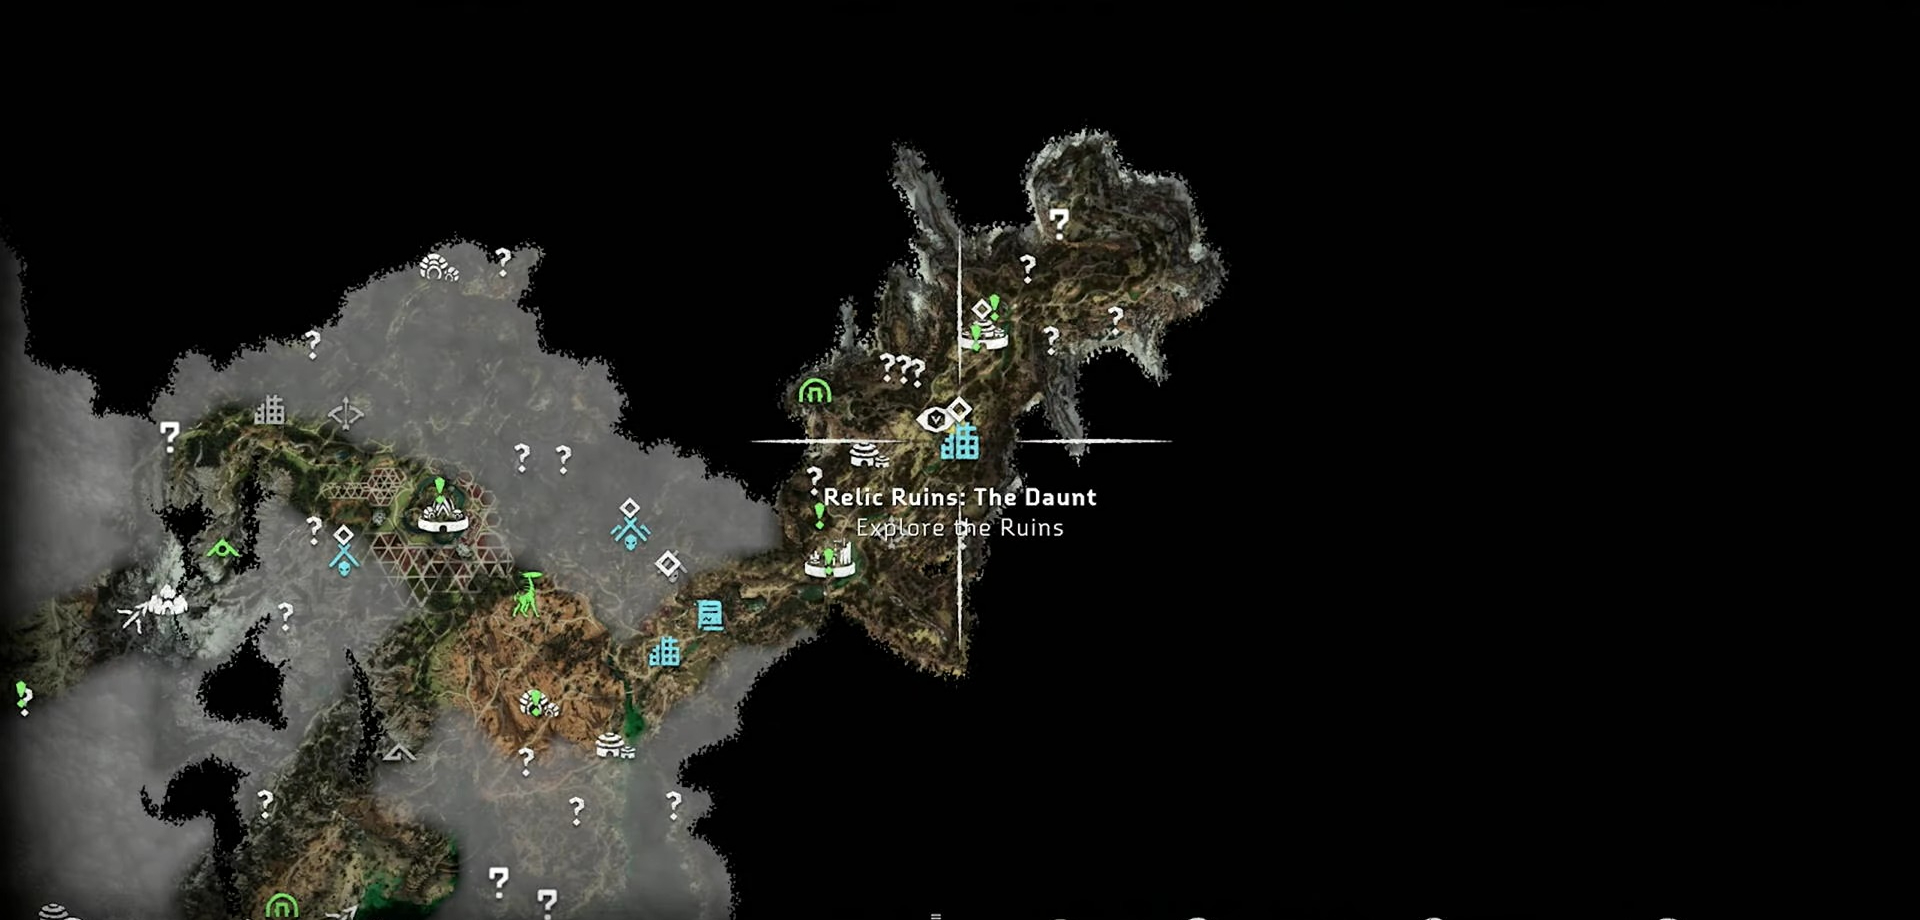
The location of the Daunt Relic Ruins in Horizon Forbidden West is all the way on the eastern part of the map. The exact location is just above the southern edge of the map on the east.
Relic Ruins The Daunt Location in Horizon Forbidden West
When you reach the area near the Ruin Relic, you will see the building of the Daunt Relic clearly. It is made up of many hut-like rooftops, and there will be a lot of trees surrounding the area of Relic. Once you enter the buildings of the Relic Ruin, it will show a message saying, “New Relic Ruins: The Daunt.” But if you have already been there. It won’t show such a message since it’s already been discovered.
Climb the box, reach the platform, and jump to the left balcony.
Collect the key and unlock the door.
Input the code, collect the Relic to complete The Daunt Relic Ruins in Horizon Forbidden West.
No Man’s Land Relic Ruins Location
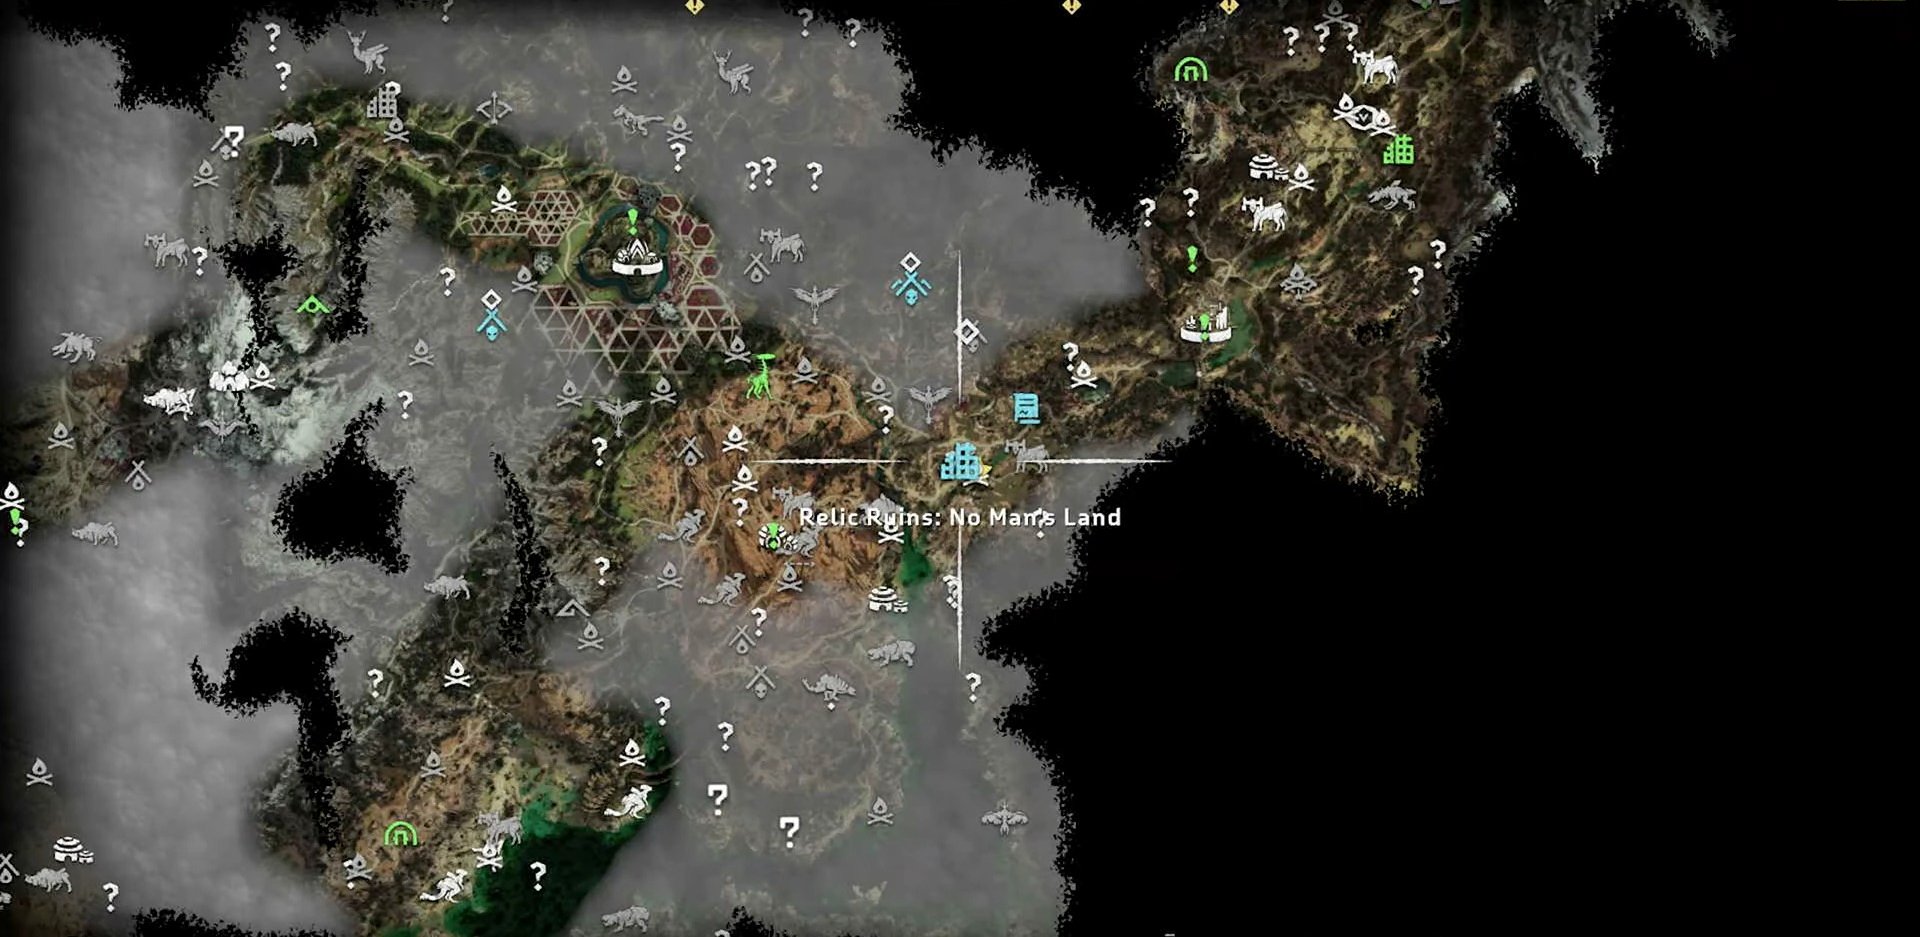
In Horizon Forbidden West, the location for the No Man’s Land Relic Ruins is in the southwestern part of the map. If you are not able to locate the exact location, go east from the middle of the map, and you will see a narrow part in the map leading to the eastern side. The location is there in that narrow area of the map.
Relic Ruins No Man’s Land Location in Horizon Forbidden West
After arriving at the location or nearby area, look for a crossroad section, and just in the middle, you will find the Relic Ruins’ building. The building will be completely rundown, with most of its walls broken and showing their insides. If you see such buildings, get inside there, and it will show the message “Relic Ruins: No Man’s Land.” There you go, that is the location of the No Man’s Land Relic Ruins.
Place the battery on top of a box, move it across the water without Pull Caster.
Climb the ramp, retrieve the battery.
Insert the battery into the slot, revealing the code (2 2 0 4).
Use the code to unlock the door and complete the No Man’s Land Relic Ruins in Horizon Forbidden West.
Restless Weald Relic Ruins Location
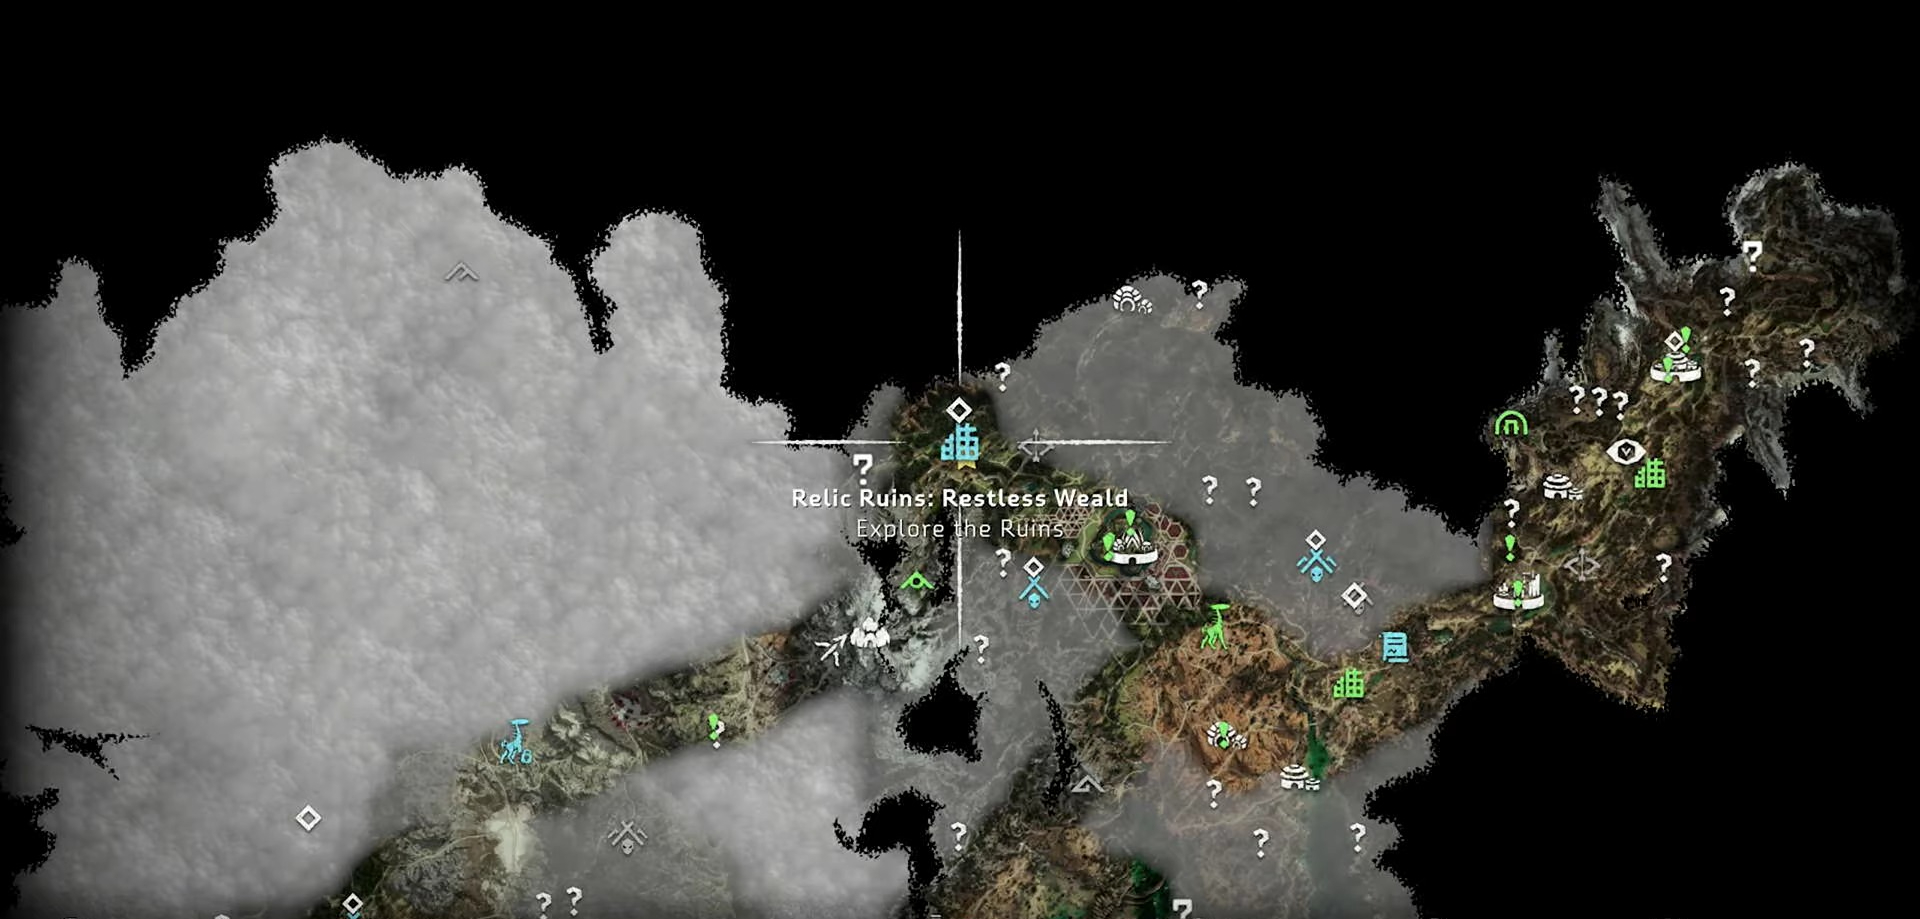
To find the location of the Restless Weald Relic Ruins in Horizon Forbidden West, look at the northeast side of the map. To locate it even further, go to the northern edge of the map and keep going east till you get to the part of the map which is below the other edges. Here you will see a deer hunting spot, and just below it is the location of the Restless Weald Relic Ruins.
Relic Ruins Restless Weald Location in Horizon Forbidden West
When you get here, you will see a lot of green grass and trees in a big field. There will be two rundown buildings next to each other. The one on the left will not have any grass in front, but the one on the right will be surrounded by grass. Once you go in there, it will show “Relic Ruins: Restless Weald.”
The Restless Weald Relic Ruins can be easily completed by following the detailed walkthrough provided below.
Show Full Text
Step 1
Find the code, “1 9 2 3,” on the left building’s wall.
Move a train cart to the right building using a lever.
Obtain a rooftop key.
Unlock the right door using the key and code.
Step 2
Use the train cart to climb the left building.
Cross a rope to the other section.
Find a ladder with red locks, unlock or glide to it.
Collect a scannable object.
Open the door and slide through a rope.
Step 3
After opening the door, slide from the rope to reach the other side. Perform a delayed jump after running to safely reach the next room.
Find a Firegleam in front of you, go below the hole created by the Firegleam, and exit outside.
Step 4
Push the train cart back to the lever.
Move it into the Firegleam hole.
Climb on top, jump to a pillar’s ledge.
Reach the top to complete the Restless Weald Relic Ruins in Horizon Forbidden West.
Dry Yearn Relic Ruins Location
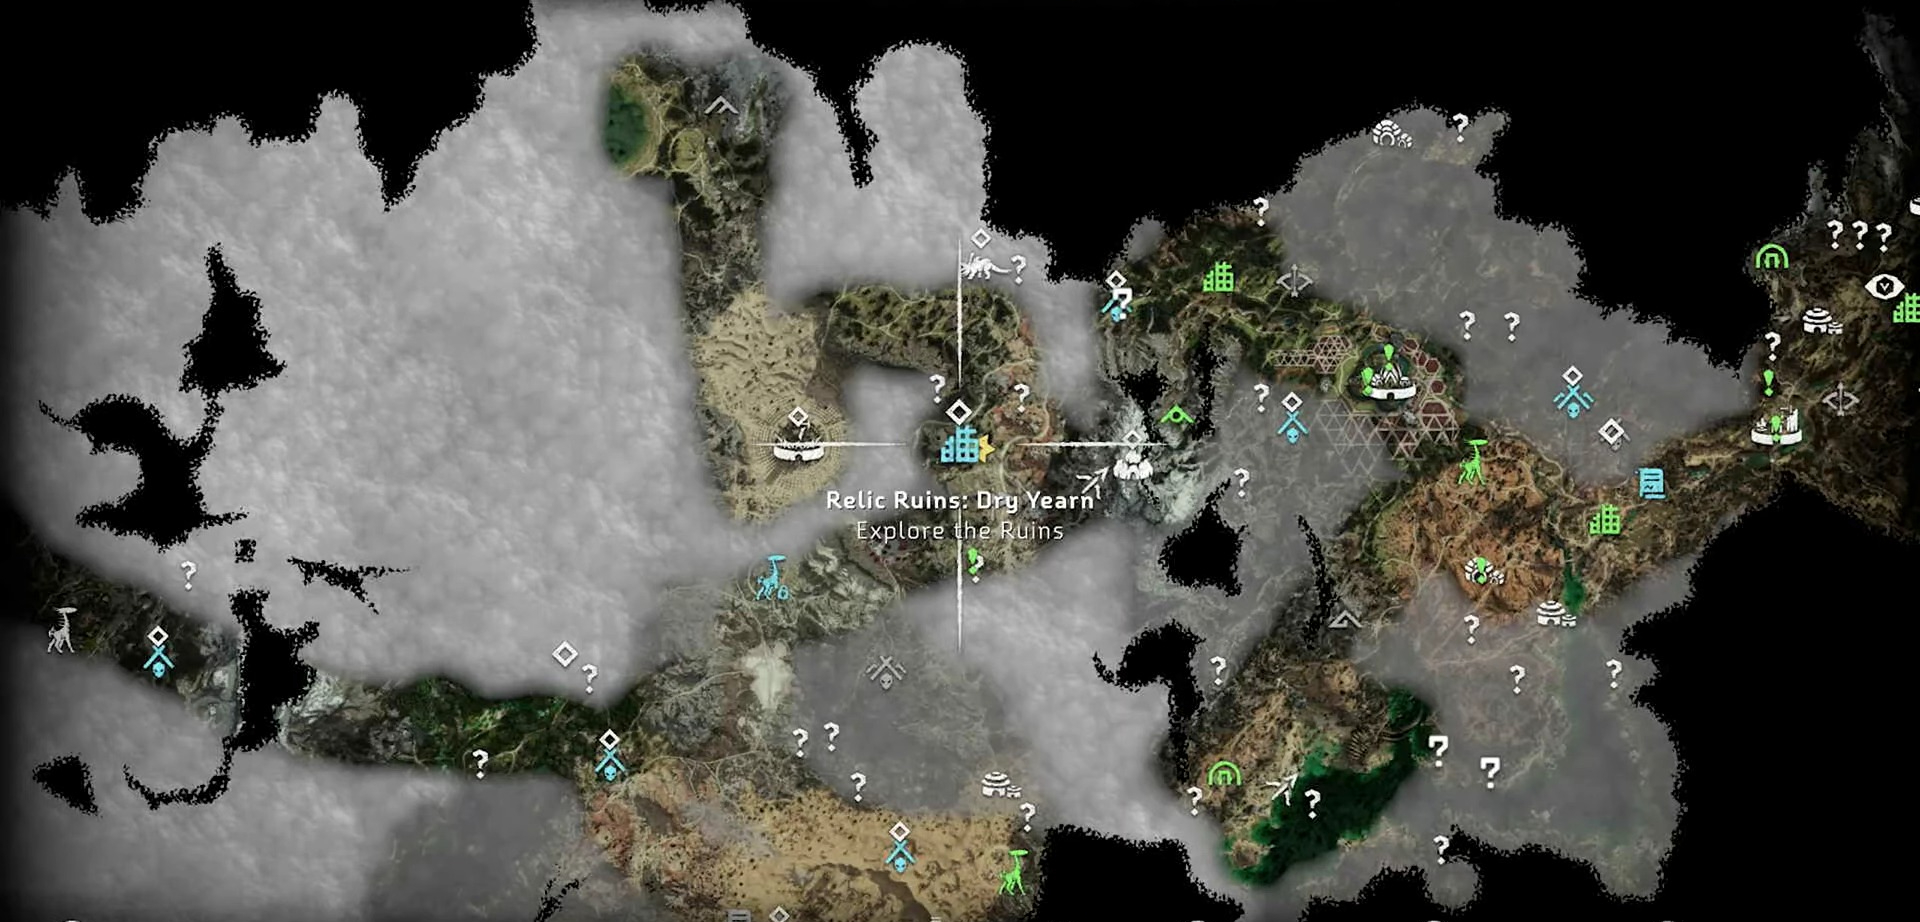
The location of the Dry Yearn Relic Ruins in Horizon Forbidden West is on the east, but it’s a bit tricky to get. It’s not exactly east but a bit northeast from the middle of the map. If you look on the southwest part of the map from the Restless Weald Relic Ruins’ location, you will easily spot it.
Relic Ruins Dry Yearn Location in Horizon Forbidden West
Go to the left side from the big circular area on the right side to get to the location. Here you will see a big road and past that is the Dry yearn Relic Ruin location. It will be inside a cliff, and when you are near it, Aloy will say, “An Old World ruin built into the cliff, I wonder what’s inside.”
To complete the Dry Yearn Relic Ruins in Horizon Forbidden West, follow the walkthrough below.
Note: You will need the Vine Cutter to complete the Dry Yearn Relic Ruins. You get the Vine Cutter from Main Story Quest “Seeds Of The Past.”
Show Full Text
Step 1
Locate Dry Yearn Relic Ruins in Horizon Forbidden West inside a large cliff.
Use Vine Cutter to break a glowing stone on the left, clearing vines.
Move a box, climb it, and open a door with a yellow valve.
Step 2
Follow a train track to the end.
Use Pull Caster to break a cracked wall, revealing a train cart.
Pull the cart near the door.
Use Pull Caster to pull out three ledges.
Climb the cart and ledges to get a door key.
Step 3
Open the door with the key.
Inside, open a vent with Pull Caster.
Crawl through, find a Firegleam, and detonate it.
Step 4
Use the yellow valve to open the huge door again.
Place the train cart underneath it.
Climb the cart, ledges, and break a wall with Pull Caster.
Find the Dry Yearn Relic to complete this Ruins Relic in Horizon Forbidden West.
The Stillsands Relic Ruins Location
In Horizon Forbidden West, you will find The Stillsands Relic Ruins’ location all the way to the south. In that area, look for a big desert, and in the middle of that desert is The Stillsands Relic Ruins.
Relic Ruins The Stillsands Location in Horizon Forbidden West
Once you are inside the area, you will easily be able to recognize the ruins. There will be a lot of sand all over the area and a big circular ruin in the middle. Once you are near the ruins, it will show “Relic Ruins: The Stillsands.”
You can complete The Stillsands Relic Ruins in Horizon Forbidden West by following the detailed walkthrough steps below.
Show Full Text
Step 1
Find The Stillsands Relic Ruins in Horizon Forbidden West.
Reach it by circling left from the nearest camp, climbing stones, and repelling into the ruins.
Use Pull Caster to bring down a box.
Ignite a Firegleam to clear your path.
Step 2
Drag the box inside and climb on it.
Ascend to a platform using the box.
Operate a valve to raise the water level.
Block water flow by placing the box in the drainage.
Swim to the top right corner, get the key from the stairs.
Step 3
Swim to the door, open it.
Find another box, push it into the water.
Use Pull Caster on pillars and platforms to move the box to the other side.
Attach the box to the wall.
Climb up on the box to locate The Stillsands Relic in Horizon Forbidden West.
Runner’s Wild Relic Ruins Location
The location of the Runner’s Wild Relic Ruins in Horizon Forbidden West is on the north side of the map. It is on the top side from the middle of some crossroads going everywhere on the east of the icy areas.
Relic Ruins Runner’s Wild Location in Horizon Forbidden West
After reaching the location of the relic ruins, it will not be much difficult to find it. There will be many green areas surrounding the Runner’s Wild Relic, and the building for the relics is very church-like and run down. You can enter there through the way near the campfire on the road.
The Runner's Wild Relic Ruins in Horizon Forbidden West are easily done by following the walkthrough below.
Show Full Text
Step 1
Enter Horizon Forbidden West ruins.
Break a cracked wall with Pull Caster.
Lower a box with Pull Caster from a ledge.
Climb the box, then tower’s ledges on the left.
Descend, ignite a Firegleam on the right to create a path.
Break another cracked wall on the right with Pull Caster.
Step 2
Move the box to where you broke the wall.
Climb it onto the roof, then lower it below the floor.
Place it beneath the floor, climb up, and bring the other box on top.
Step 3
Push both boxes through the Firegleam hole.
Climb them to reach the top.
Get the key for the door.
Drag both boxes back to their original spot.
Open the door with the key, break a cracked wall inside with Pull Caster.
Step 4
Push the top box through the path.
Place it outside near the vines at the end.
Jump on it, climb the vines, find the Ornament.
Completing Runner’s Wild Relic Ruins in Horizon Forbidden West.
The location of The Long Coast Relic Ruins in Horizon Forbidden West is on the southwest part of the map. You will spot the location on the map by looking to parts closer to the coast on the west, just above where the coast forms a V shape.
Location in Horizon Forbidden West Location in Horizon Forbidden West
At the location, you will find a whole jungle-like place with a lot of trees and grass surrounding the area for the ruins. Vines will completely cover the Long Coast Relic Ruins building, so look carefully, and you will recognize it easily.
In Horizon Forbidden West, The Long Coast Relic Ruins can be completed by following the steps below.
Show Full Text
Step 1
Find The Long Coast Relic Ruins left of a campfire.
Enter, climb a platform, and ignite a Firegleam.
Pull a switch, get a grapple for the top back platform.
Step 2
Look for a railing above the path outside.
Inside, pull a switch past rubble, then quickly grapple back to the platform.
Pull a box through a hole in the platform.
Step 3
Drag the box into the water, use Pull Caster to move it.
Place the box in an elevator inside a door.
Retrieve an Energy Canister, insert it on the elevator’s left wall.
Use the elevator to go up with the box.
Step 4
Glide past a wall after igniting a Firegleam.
Drag the box through the path created, then descend.
Step 5
Drag the other box inside the elevator door above.
Go up in the elevator with the box.
Open a vent with Pull Caster, climb through with the box.
Use the other box to reach the top and find The Long Coast Relic Ruins in Horizon Forbidden West.
You can find the location of the Isle Of Spire Relic Ruins in Horizon Forbidden West all the way on the Island found in the very western part of the map. The location is on the eastern part of that Island.
Relic Ruins Isle of Spires Location in Horizon Forbidden West
Upon reaching that small part of the Island where the Isle Of Spire Relic Ruins is, you will see a big building of ruins surrounded by the shores. The ruins are so massive that you will not miss them no matter what.
The walkthrough for the Isle of Spire Relic Ruins in Horizon Forbidden West is below.
Note: Just like the Dry Yearn Relic, you will need the Vine Cutter to complete the Isle Of Spire Relic Ruins. The Story Quest “Seeds Of The Past” grant you the Vine Cutter.
Show Full Text
Step 1
Find Isle Of Spire Relic Ruins to the right of the nearest campfire.
Enter using yellow circular ledges.
In the ruins, locate a small room with a vent on the roof.
Use the Pull Caster to open the vent and create a path with a Firegleam.
Step 2
Collect an Energy Canister and charge it in a nearby station.
Return to the entrance and power up an elevator with the charged Canister.
Be quick as the Canister loses its charge.
Step 3
Descend with the elevator and head left.
Retrieve a box from the water using the Pull Caster.
Push the box into the water, then drag it and use it to reach a broken see-through wall.
Shoot down ladders, climb up, and find the key
Step 4
Remove metal obstacle on the vines with the Vine Cutter.
Swim to the ladders, climb up, and get the key.
Use the key and enter code “2 1 0 9 1 0 9” to open a door.
Find the Ornament behind the door, completing the ruins in Horizon Forbidden West.
Nights of Lights Relic Ruins Location
The Night Of Lights Relic Ruins is not a separate Relic Ruins Quest but part of an Errand Quest. The location for the Errand Quest to get the Nights Of The Light Relic Ruins in Horizon Forbidden West is all the way on the southern part of the map. It is in the same desert as The Stillsands Relic, but this one is more in the south.
Relic Ruins Nights of Lights Location in Horizon Forbidden West
After reaching the location, locate and talk to Stemmur. It will begin your quest to find the Relic. From this point on, you can go inside the ruin and look for the Relic by yourself. But we recommend keeping the quest’s objectives on, as they will guide you to complete the quest and get your Relic. This Relic has no walkthrough since it is easy and is completely guided by the quest.
Final Verdict
These were all the Relic Ruins in Horizon Forbidden West with locations and walkthroughs. Completing the Relic Ruins Side Quests is no easy job, but it is part of the fun that comes with this game. If you were able to get the Ornament you wanted from the Relic Ruins with the help of this guide, let us know by commenting below. You can read our next guide to get even more out of Horizon Forbidden West.
Saqib is a Senior Guides writer at eXputer with multiple years of writing experience. His love for RPGs, Roblox, and mobile games knows no bounds. In his free time, Saqib is on yet another adventure with Roblox or free roaming in RPG. Saqib has completed a Journalism degree and worked for notable gaming sites including DualShockers and Gamepur. You can follow Saqib's gaming activity on his Steamprofile.
Experience: 3+ Years || Education: Bachelor's in Accounting || Previously Worked for DualShockers & Gamepur || Published 200+ Guides
Enjoyed this article? Discuss the latest gaming news, get expert help with guides and errors, and chat about all things gaming on eXputer Forums and Discord Server. Connect with fellow gamers who share your passion by becoming a part of eXputer's community.