The Season 20 of Apex Legends is here, and there is definitely a lot of competition in the Battle Royale. It would be best to have your skills honed and your instincts sharpened. Besides that, you must have your Apex Legends settings up to date.
There will be a lot of Patchwork in the game, so it’s best to have your Settings figured out, especially if you are playing Apex Legends on PC. Remember that these settings won’t make you invincible, but they will give you that extra nudge toward victory.
I’ve benchmarked Apex Legends on the following PC specs:
- CPU: AMD Ryzen 5 2600x
- GPU: Nvidia RTX 3050
- RAM: 16 GB
- Storage: 1TB NVMe SSD
- OS: Windows 11 Pro
Your PC should at least have an Intel i5 3570K or AMD equivalent CPU, Nvidia GTX 970 or AMD Radeon R9 290 GPU, and 8 GB RAM to run Apex Legends.
The following settings are the most demanding in Apex Legends:
- Adaptive Supersampling
- Ambient Occlusion
- Sun Shadow Coverage & Detail
- Spot Shadow Detail
- Volumetric Lighting
Apex Legends isn’t a demanding game to run on your PC and neither it has any performance issues even on entry-level hardware. I was able to easily pull over 100 FPS on medium to high settings at 1080p. The random crashes and FPS drops do happen, but more frequent are the network-related issues while matchmaking. Our Apex Legends reviewer Fahad also had similar positive things to say about the game’s performance.
Video
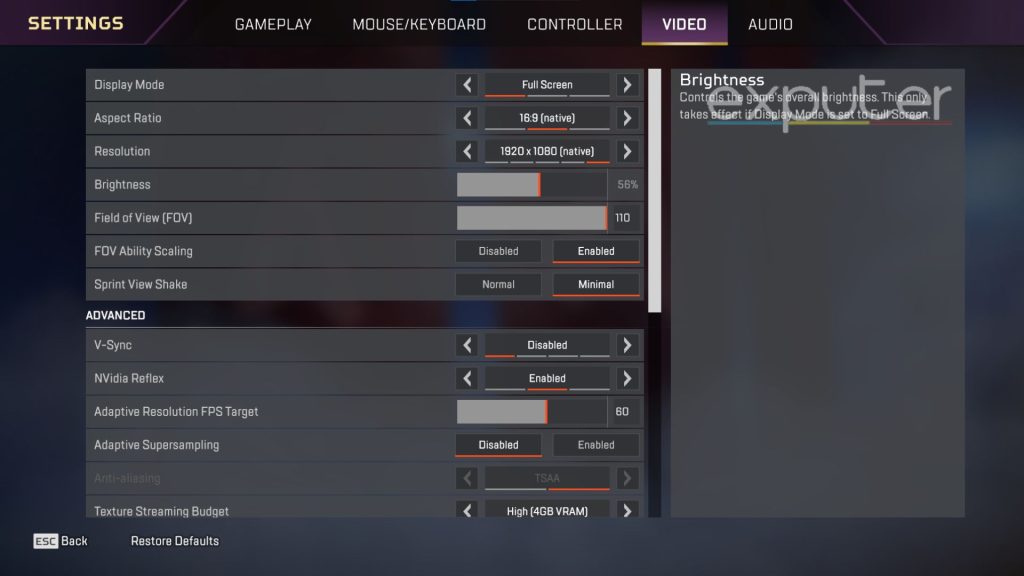
These settings majorly affect your FPS because some players wash out the gameplay by increasing brightness or stretching the pixels by increasing the aspect ratio.
In order to peak your gaming ability in season 20 of Apex Legends, you have to adjust the ratio to the native of your Console or PC. Also, if you adjust it to 16:9, the gameplay looks smooth, and mid to long-range battles are easily doable in retrospect.
Summary of Basic Video Settings
| Settings | toggle |
|---|---|
| Display Mode | Full Screen |
| Aspect Ratio | 16:9 [native] |
| Resolution | 1920×1080 [native] |
| Brightness | 56% |
| Field Of View | 110 |
| FOV Ability Scaling | Enabled |
| Sprint View Shake | Minimal |
Advanced
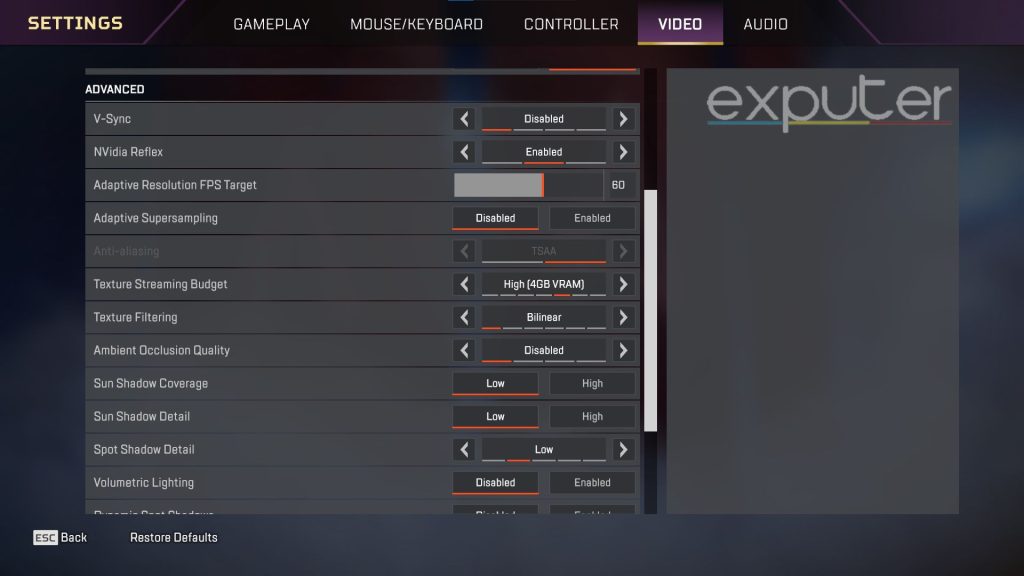
The texture of a game is extremely important since visually seeing stuff can help you be more present in the game. However, if you tend to go beyond the High Texture Steaming Budget, the game will look muddy, and every object will distract you. In Season 20 of Apex Legends, you cannot afford to get distracted, so stick to the suggested settings, and you will be good to go.
Overview of Advanced Video Settings
| Settings | toggle |
|---|---|
| V-Sync | Disabled |
| NVidia Reflex | Enabled |
| Adaptive Resolution FPS Target | 60 |
| Adaptive Supersampling | Disabled |
| Texture Steaming Budget | High [4GB VRAM] |
| Texture Filtering | Bilinear |
| Ambient Occlusion Quality | Disabled |
| Sun Shadow Coverage | Low |
| Sun Shadow Detail | Low |
| Spot Shadow Detail | Disabled |
| Volumetric Lighting | Disabled |
Quick visual comparison of most impactful graphics settings in Apex:
 Ambient Occlusion


Gameplay
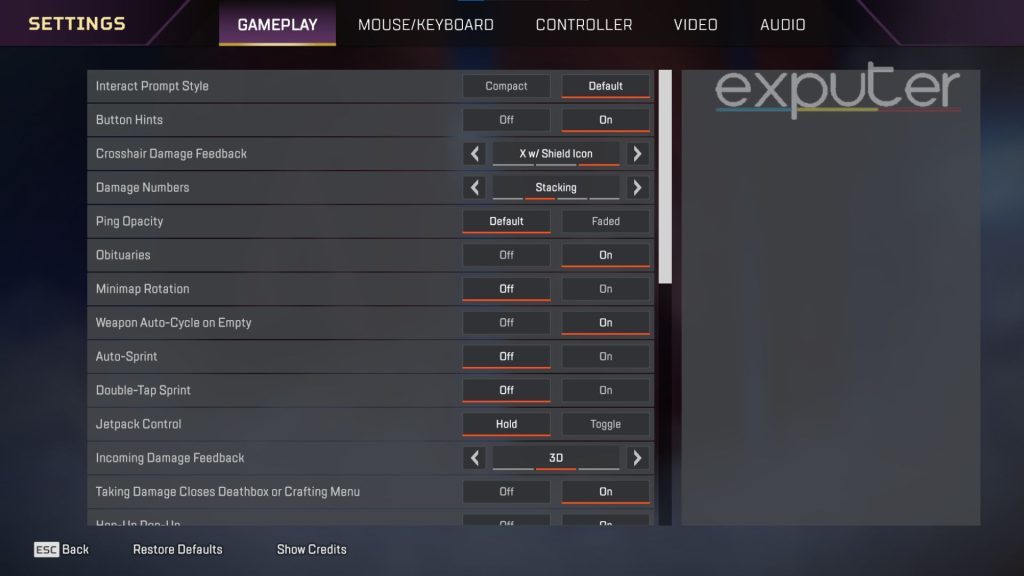
This is for those players who already don’t know stuff like this, but they, too, eventually get it. The unnecessary movement of the map confuses and distracts you, so it is better if you turn it off.
Most people just Toggle Auto Sprint on just because it is easier, but it takes away your element of surprise in the game. Always keep in mind the enemy can hear your footsteps, so every time you move forward, they will hear you moving. The Stealthier you are in Apex Legends, the better.
It is best if you toggle the “Taking Damage Closes Deathbox or Menu” to On because some of the players forget that this option even exists. If it’s off and you are busy grave digging, you can easily get drilled.
Gameplay Settings Summarized
| sETTINGS | TOGGLE |
|---|---|
| Interact Prompt Style | Compact |
| Button Hints | Off |
| Crosshair Damage Feedback | Off |
| Damage Numbers | Stacking, Duh |
| Ping Opacity | Default |
| Obituaries | On |
| Minimap Rotation | Off |
| Weapon Auto-Cycle on Empty | On |
| Auto Sprint | Off |
| Double Tap Sprint | Off |
| Jetpack Control | Hold |
| Incoming Damage Feedback | 3D |
| Taking Damage Closes Deathbox or Menu | On |
| Hop Up Pop Up | On |
| Streamer Mode | Off |
| Anonymous Mode | Disabled |
| Usage Sharing | Enabled |
| Performance Display | Off |
| Club Invites | Enabled |
| Communication Filter | Everybody |
| Reticle | Default |
| Laser Sight | Default |
Accessibility
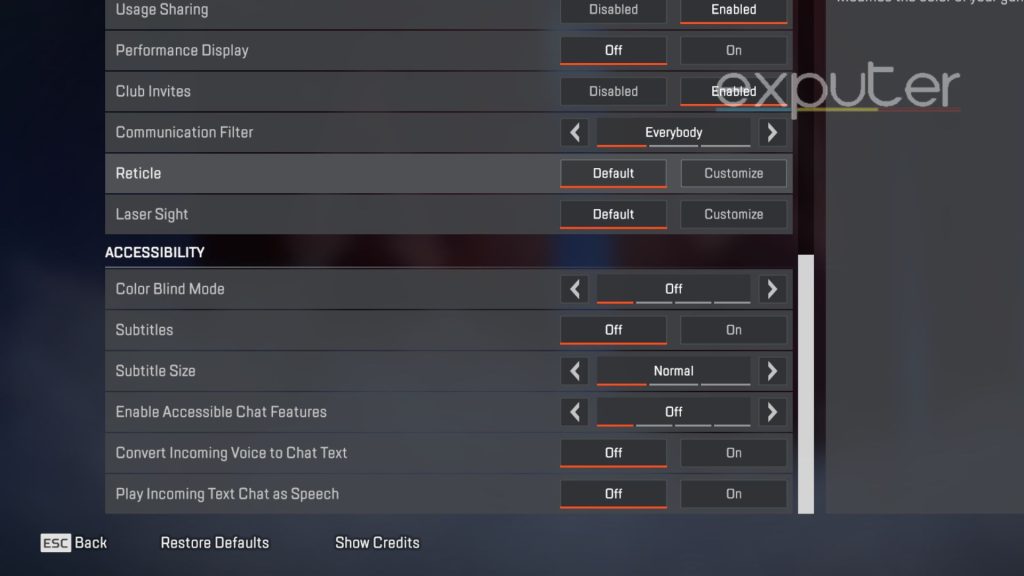
These settings are specific for visually impaired or deaf gamers so that even they have a fair advantage over people. It is true that most streamers use this option to their advantage and make the colors bolder and more vibrant for them. This is so that they identify loot and pings better.
It is mostly up to preference, but if you were to take my opinion, it’s a bit extra. The speech-to-text features are a nice settings feature to be added to Apex Legends Settings for the deaf community. Well, they should be happy they can’t hear the Warzone lobbies!
Summary Table For All Accessibility Settings
| Settings | TOGGLE |
|---|---|
| Color Blind Mode | Off |
| Subtitles | Off |
| Subtitle Size | Normal Size |
| Enable Accessible Chat Features | Off |
| Convert Incoming Voice To Chat Text | Off |
| Play Incoming Text Chat As Speech | Off |
Mouse/Keyboard

Now the mouse settings are really up to your own preference and playstyle. Not only that, most of the players have Mouses with different rates of DPI, so it is best if you choose your own. You can do that by playing Apex Legends for a while and figuring out what best suits you.
Although there will be some players who may need the starting sensitivity number for the Apex Legends settings, for gamers, 4.5 Mouse Sensitivity is more than enough, it is not too fast or too slow to control.
ADS speed is really comfortable when it’s set at 1.0 Sensitivity. You will be able to track your targets with your scope or reticle turned on when you want to drill opponents farther away; sensitivity matters. If it is at a sensitivity that you cannot really control, you’ll lose the target.
Therefore, you must also set it to something you yourself are comfortable with. Shroud and Aceu are great examples of these types of settings since they do not overcomplicate them and keep them simple.
Quick Summary For Mouse/Keyboard Settings
| Settings | toggle |
|---|---|
| Mouse Sensitivity | 4.5 |
| ADS Mouse Sensitivity | 1.0 |
| Mouse Acceleration | Off |
| Mouse Invert | Off |
| Lighting Effects | On |
Movement
These settings are primarily for the Keyboard and the Keybinds you create for yourself. If you have a different type of keyboard, like a single-handed keyboard, only then a different type of set of key binds is required. If that is not the case, then leave these be. Also, if you have any key that is damaged or broken, somehow you can definitely change the address of those key controls.
If you have one of those tactical gaming Mouses with an extra set of buttons, then you can definitely have an advantage in Apex. If those buttons are located on the left of the mouse, then set Key 4 to the Tactical Ability and Key 5 to the Ultimate Ability. After this, you will have those nifty abilities at your fingertips. Well, the tip of the thumb is more accurate.
Controller
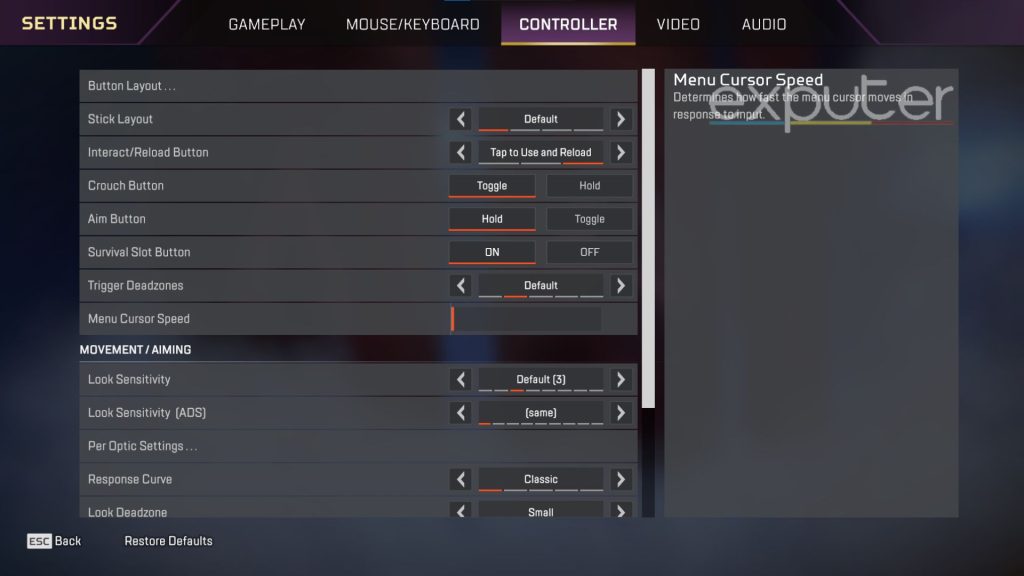
These settings specifically come for the Controller players who want to get those nifty Aim Assist going for them. Each of these settings will help you fight with the mightiest of PC players out there. Most of these settings are pretty standard, like the crouch and aim buttons. Now, what comes to preference again is the button layout. Similarly to the keyboard binds earlier, you can choose your own button layouts for your respective gaming style. The extra edition would be the Tap To Use and Hold To Reload Button, which is extremely important.
The Deadzone, again, is really up to your preference since its sole purpose is to reduce Stick Drift in the game. It happened quite a lot, even before Apex Legends Season 20 arrived. So, according to your respective “stick drift,” increase the number until the stick drifting stops. If it hinders your gameplay, you should try to get a new controller for yourself now. Sorry.
Quick Overview of Controller Settings
| Settings | toggle |
|---|---|
| Button Layout | Default |
| Stick Layout | Default |
| Interact/Reload Button | Tap To Use/Hold To Reload |
| Crouch Button | Toggle |
| Aim Button | Hold |
| Survival Slot Button | On |
| Trigger Deadzones | Default |
| Menu Curso Speed | Low |
Movement/Aiming
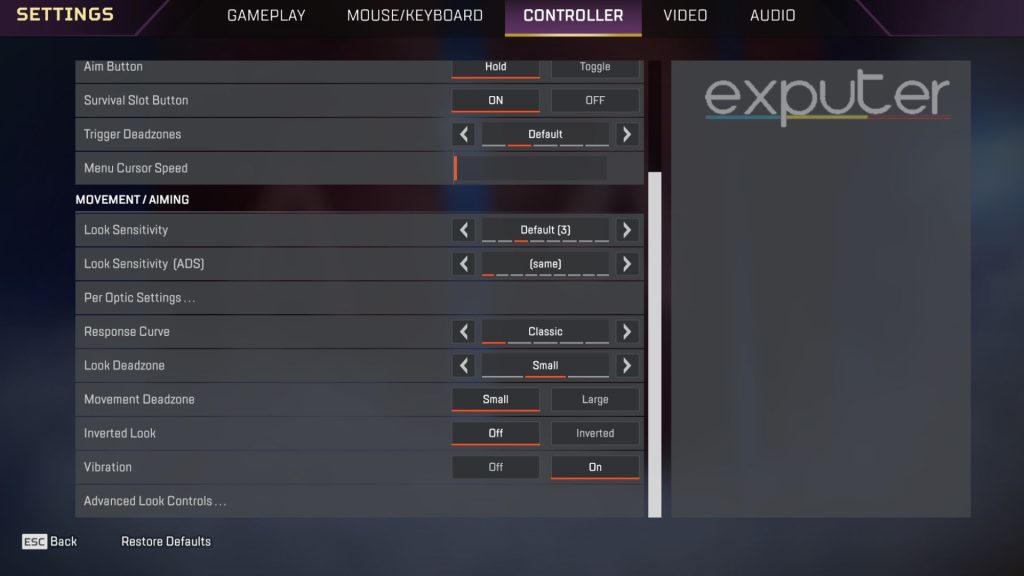
To fully optimize your Apex Legends settings, you must understand Look Sensitivity’s importance. When you are on PC, there is the freedom to increase the Look sensitivity so you can look at every angle as quickly as you can. But for console players, this can be difficult for obvious reasons. For that particular reason, bump the sensitivity to “Default 3” so you are in that gray area of controlling your aim and covering your blind spots too.
The same goes for the optic settings. If you are looking to grind season 20 of Apex Legends, make sure to keep these ALC settings up to date or to your utmost capability. In the above movement settings, the most dodged tip is the turning off of vibration. It cannot be stressed enough how Controller Vibration affects your gameplay! Although it has the realistic shooting gameplay advantage, it is not worth losing your aim for at all.
Summary Of Movement/Aiming Settings
| Settings | toggle |
|---|---|
| Look Sensitivity | Default |
| Look Sensitivity (ADS) | [same as Look Sensitivity] |
| Per Optic Settings | Default |
| Responsive Curve | Classic |
| Look Deadzone | Small |
| Movement Deadzone | Small |
| Inverted Look | Off |
| Vibration | Off |
| Advanced Look Controls | Up to Preference |
Audio
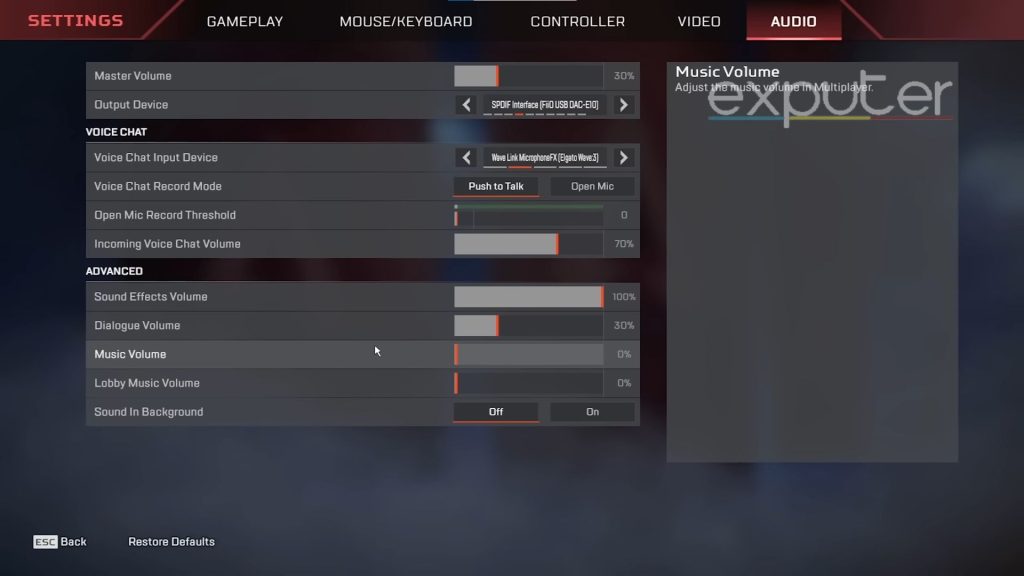
If you want the extremely loud lobby noises from your friends, lobby music, game music, and other music in Apex Legends, then I suggest you keep it down a bit.
Quick Audio Settings
| Settings | toggle |
|---|---|
| Master Volume | 60% |
| Output Device | Whatever Device You Use |
Voice Chat
Apex Legends is now on its 20th Season; after all the loud lobby noises you hear, it’s better just to toggle your mic to push to talk. It is only sensible. Keep it to 70 so that your ears stay safe as well.
All The Voice Chat Settings
| Settings | toggle |
|---|---|
| Voice Chat Input Device | Whatever Device You Use |
| Voice Chat Record Mode | Push To Talk (AKA. Grow Up) |
| Open Mic Record Threshold | 0 (Because Duh) |
| Incoming Voice Chat Volume | 70% |
Advanced
There’s a difference between in-game sounds and lobby music. Lobby Music serves no purpose other than just basic lobby music. It is up to preference if you want to keep it on or not. Sound Effects Volume is a different case, so you must keep it full. Doing so will make sure you hear every single step out of place made by the enemy. You can even hear shots coming like rata-tata! from afar and determine the positioning of the enemy.
Music Volume is a huge distraction in Apex Legends. It is all for the show of the game, but it is extremely loud and unnecessary, especially in season 20 of Apex Legends. If you turn it off, you will, in return, get a much clearer sound of the enemy in your surroundings while you are landing.
Overview of Advanced Settings
| Settings | toggle |
|---|---|
| Sound Effects Volume | 100% |
| Dialogue Volume | 30% |
| Music Volume | 0% |
| Lobby Music Volume | 0% |
| Background Sound | Off |
Wrap Up
These are the best possible settings you can find for the 20th Season of Apex Legends Revelry. It is not certain that you will see all of your matches with these settings, but it will sure as hell keep you ahead of the curve. If you want to look for similar settings for a game, make sure to check out our guide on the Warzone 2 Aim Assist Settings. If you want to get the maximum FPS, check our Valorant settings guide over it.
Next
- Best Nvidia Control Panel Settings
- Best Fortnite Settings
- Best Resolution Settings For Valorant
- BEST Rocket League Settings
Thanks! Do share your feedback with us. ⚡
How can we make this post better? Your help would be appreciated. ✍