Armored Core 6: All Hidden Parts [Stats, Descriptions, & Locations]
Learn about all the locations from where you can get the hidden parts in Armored Core 6, ranging from weapons to complete armor sets.
![Armored Core 6 All Hidden Parts [Stats, Descriptions, & Locations] featured image](https://cdn.exputer.com/wp-content/uploads/2023/09/Armored-Core-6-All-Hidden-Parts-Stats-Descriptions-Locations.jpg)
The Armored Core 6 hidden parts are an excellent way to fill your inventory with meaningful and effective mech parts without using any COAM. These units generally require you to stray from the mission objectives and focus on exploring areas to find some hidden chests. Inside these chests, you’ll find different weapons as well as Frame and Inner Components for your mech, which you can customize to craft a new build and further dominate the battlefield with your preferred playstyle.
- Players can discover the Armored Core 6 hidden parts, which can be found in chests scattered across different missions and do not cost any COAM currency.
- Once the secret parts are obtained, players must complete the whole mission for those parts to enter their inventory.
- There are 19 in-game hidden parts, most of which are hidden in Chapters 2, 3, and 4 of Armored Core 6, mainly ranging from weapons to armor sets, with some additional components like boosters.
- The final two secret parts are in the “Regain Control of the Xylem” mission, which is only accessible in NG++.
- Besides their stats, one of their significant benefits is that players can reserve their COAM for superior but much more expensive AC parts.
All Armored Core 6 Hidden Parts Locations
Here’s an extensive list of all 19 hidden parts that you can grab in Armored Core 6, detailing the mission locations where you can find them in your playthrough:
| HIDDEN PART | COMPONENT | MISSION |
|---|---|---|
| HC-3000 | Head | Infiltrate Grid 086 (Chapter 2) |
| CC-3000 | Core | Infiltrate Grid 086 (Chapter 2) |
| AC-3000 | Arms | Infiltrate Grid 086 (Chapter 2) |
| 2C-3000 | Legs | Infiltrate Grid 086 (Chapter 2) |
| IA-C01W1: NEBULA | Plasma Rifle (Right-Hand) | Tunnel Sabotage (Chapter 3) |
| IA-C01G: AORTA | Generator | Survey The Uninhabited Floating City (Chapter 3) |
| WB-0010 DOUBLE TROUBLE | Chainsaw (Left-Hand) | Eliminate "Honest" Brute (Chapter 3) |
| BC-0600 12345 | Booster | Eliminate "Honest" Brute (Chapter 3) |
| WB-0000 BAD COOK | Flamethrower (Right-Hand) | Eliminate "Honest" Brute (Chapter 3) |
| IA-C01L Ephemera | Legs | Underground Exploration – Depth 1 (Chapter 4) |
| IA-C01B Gills | Booster | Underground Exploration – Depth 2 (Chapter 4) |
| IA-C01A Ephemera | Arms | Underground Exploration – Depth 2 (Chapter 4) |
| IA-C01F OCELLUS | FCS | Underground Exploration – Depth 3 (Chapter 4) |
| IA-C01C Ephemera | Core | Underground Exploration – Depth 3 (Chapter 4) |
| IA-C01H Ephemera | Head | Unknown Territory Survey (Chapter 4) |
| IA-C01W3: AURORA | Light-wave Canon (Right-Shoulder) | Reach The Coral Convergence (Chapter 4) |
| IA-C01W2: MOONLIGHT | Melee (Left-hand) | Reach The Coral Convergence (Chapter 4) |
| IB-C0W3: NGI 006 | Coral Missile Launcher (Left-Shoulder) | Regain Control Of The Xylem (Chapter 5) |
| IB-C03W4: NGI 28 | Coral Shield (Left-Shoulder) | Regain Control Of The Xylem (Chapter 5 NG++) |
Infiltrate Grid 086
Your first list of Armored Core 6 hidden parts, the WRECKER collection, is obtainable in Chapter 2’s first story mission after beating Balteus. As you’ll see, this armor set is incredibly versatile, favoring several different builds and playstyles.
HC-3000 WRECKER
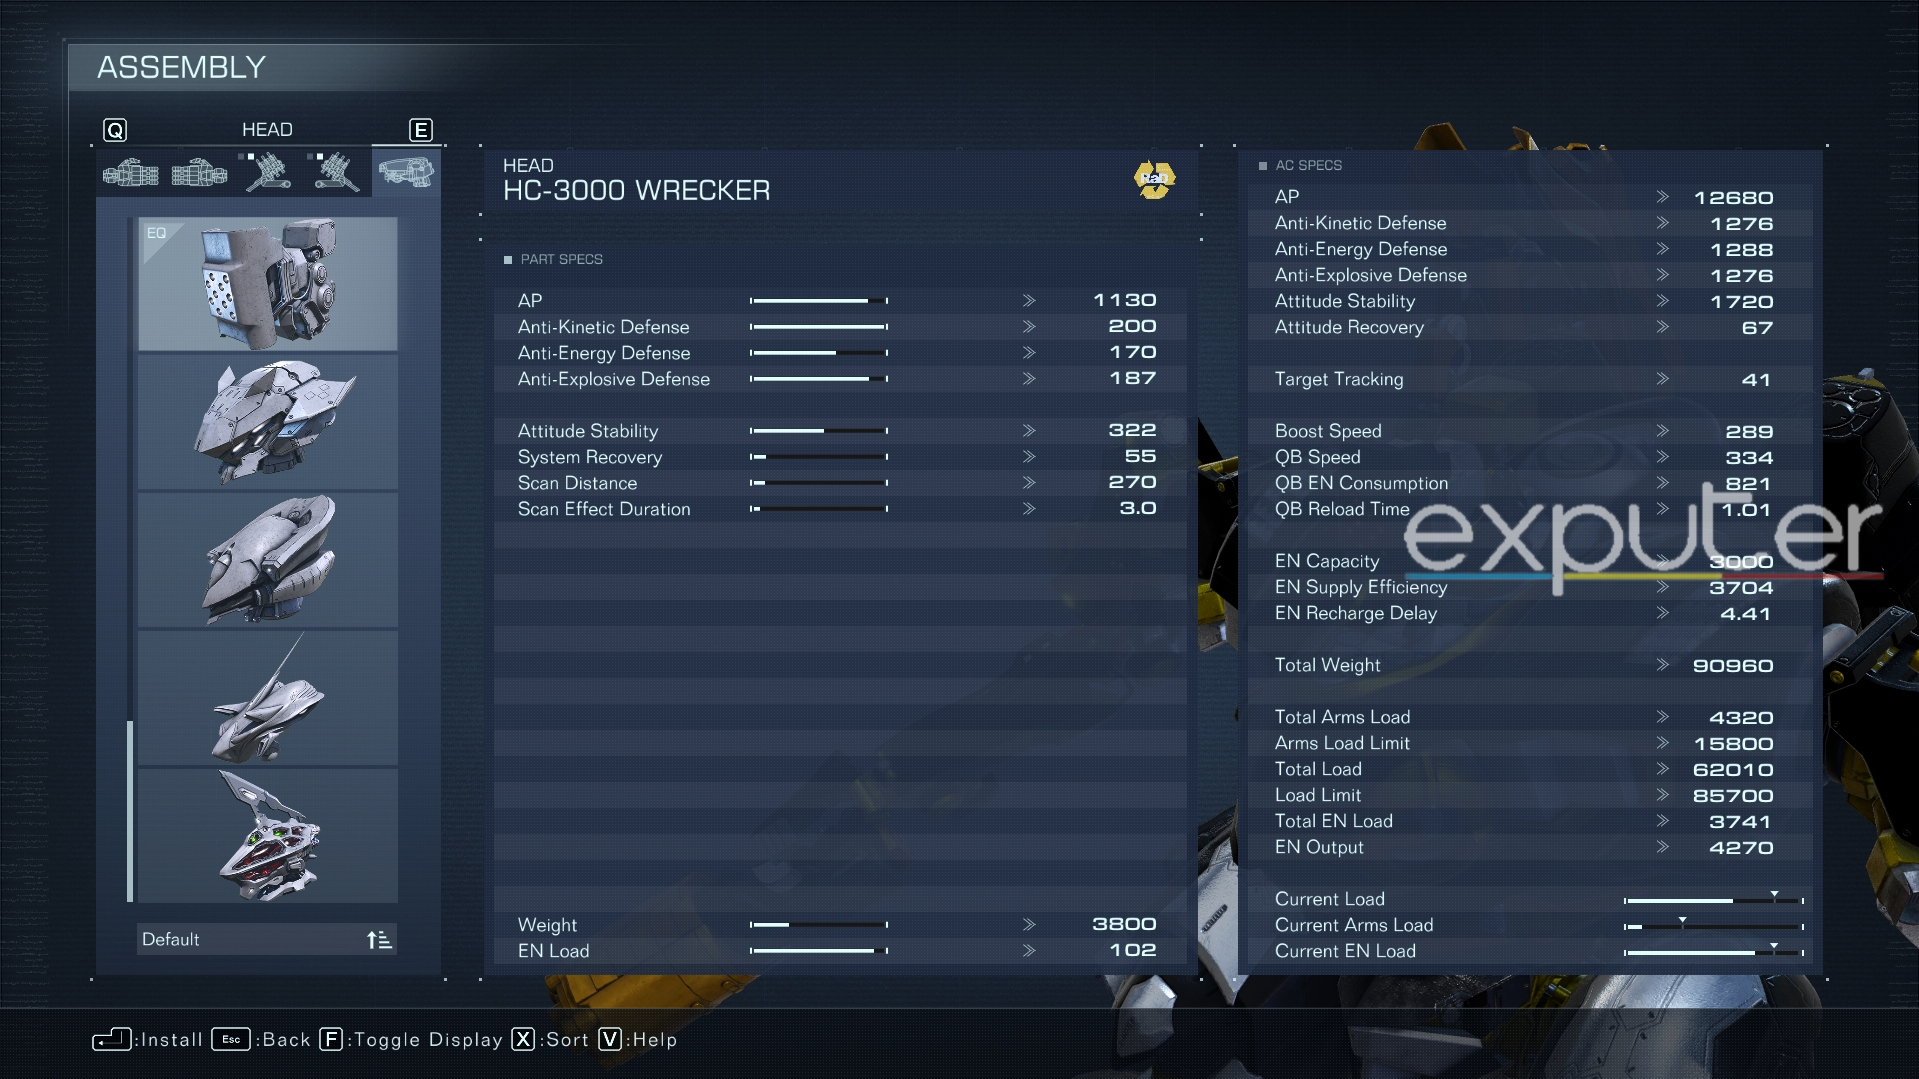
| AP | 1130 |
| Anti-Kinetic Defense | 200 |
| Anti-Energy Defense | 170 |
| Anti-Explosive Defense | 187 |
| Attitude Stability | 322 |
| System Recovery | 55 |
| Scan Distance | 270 |
| Scan Effect Duration | 3.0 |
The HC-3000 is a promising head component to the WRECKER set on the list, given that it’s arguably one of the more favorable hidden early parts in Armored Core 6. It comes equipped with the best Anti-Kinetic and second-best Anti-Explosive Defense, a noticeable AP increment, and decent Attitude Stability. However, it lags in Scan abilities, making it a discouraging choice for players to constantly use their Scan to learn about enemy positionings.
Upon entering Chapter 2, you can follow these steps to obtain one of the first WRECKER parts in Armored Core 6:
- From the mission’s starting point, proceed towards your first objective marker beyond the two bridges, where you’ll fight “Invincible” Rummy.
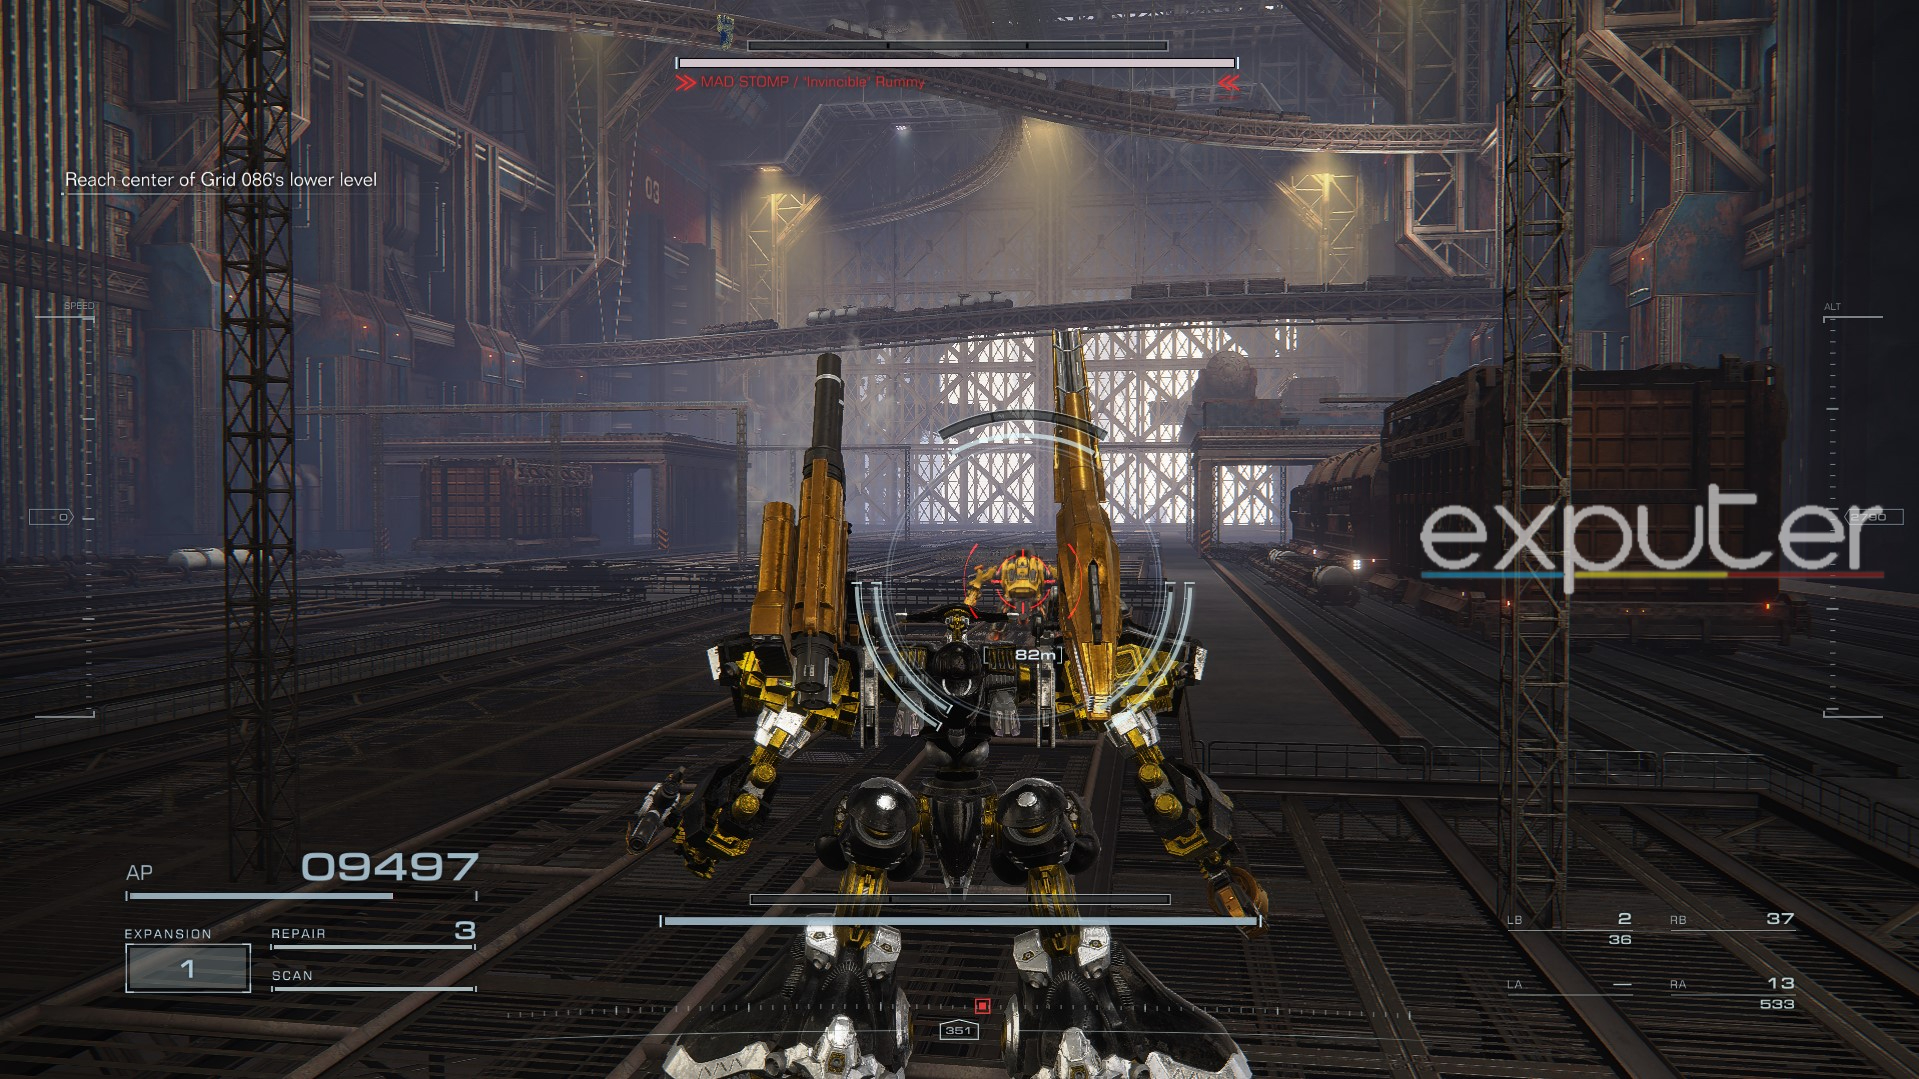
- After taking down Rummy, continue following your objectives until you access a door and reach the vents beyond it.
- At the end of the uppermost level, drop down to take out the enemy MT and head to the back of the room opposite the exit to find the chest with the HC-3000 inside.
CC-3000 WRECKER
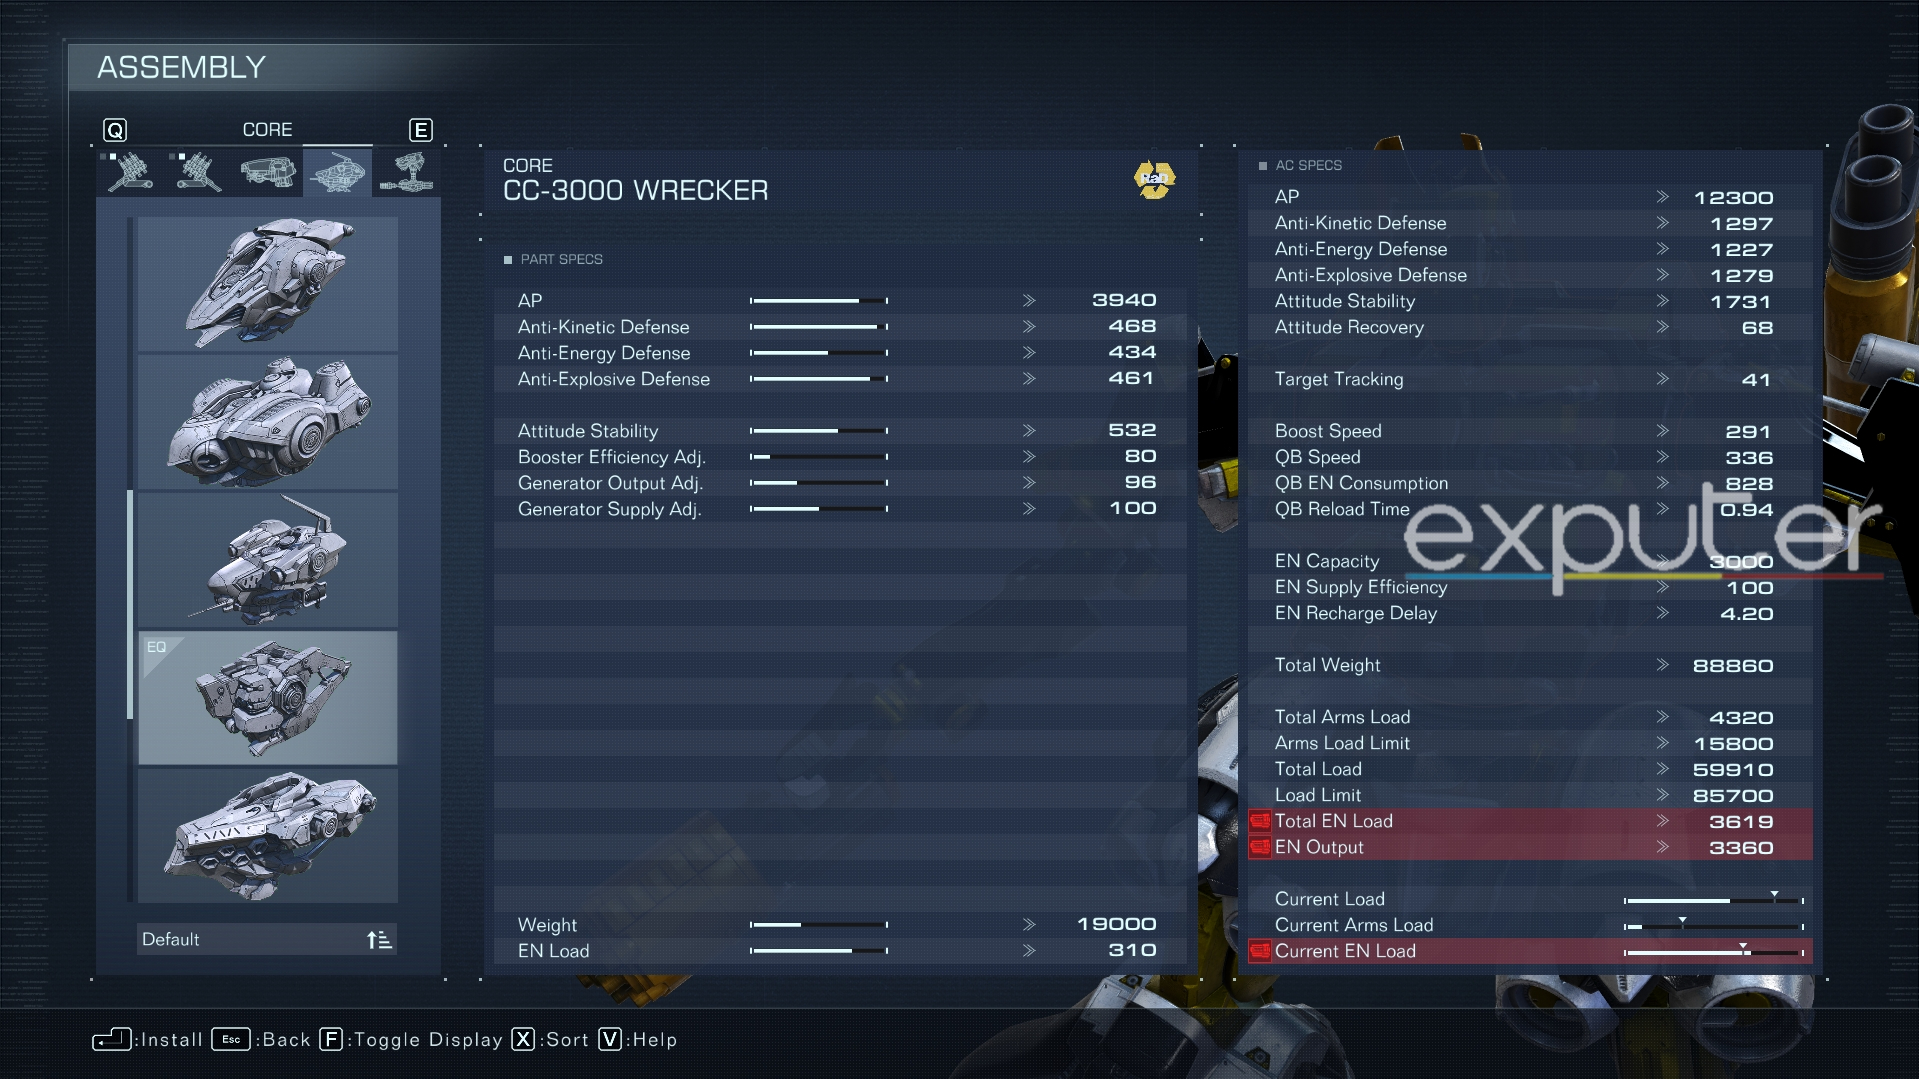
| AP | 3940 |
| Anti-Kinetic Defense | 368 |
| Anti-Energy Defense | 434 |
| Anti-Explosive Defense | 461 |
| Attitude Stability | 532 |
| Booster Efficiency Adj | 80 |
| Generator Output | 96 |
| Generator Supply | 100 |
Like the HC-3000, the CC-3000 is one of the defense-focused WRECKER parts with impressive AP and Anti-Kinetic, Anti-Explosive, and Anti-Energy Defense stats in Armored Core 6. However, this Core part gets outshined by another Core piece, the DF-BD-08, which excels in almost every category while only being heavier by 1000 units. But since every hidden part is free, you can reserve your COAM to get the DF-BD-08 later on and use the CC-3000 in the meantime.
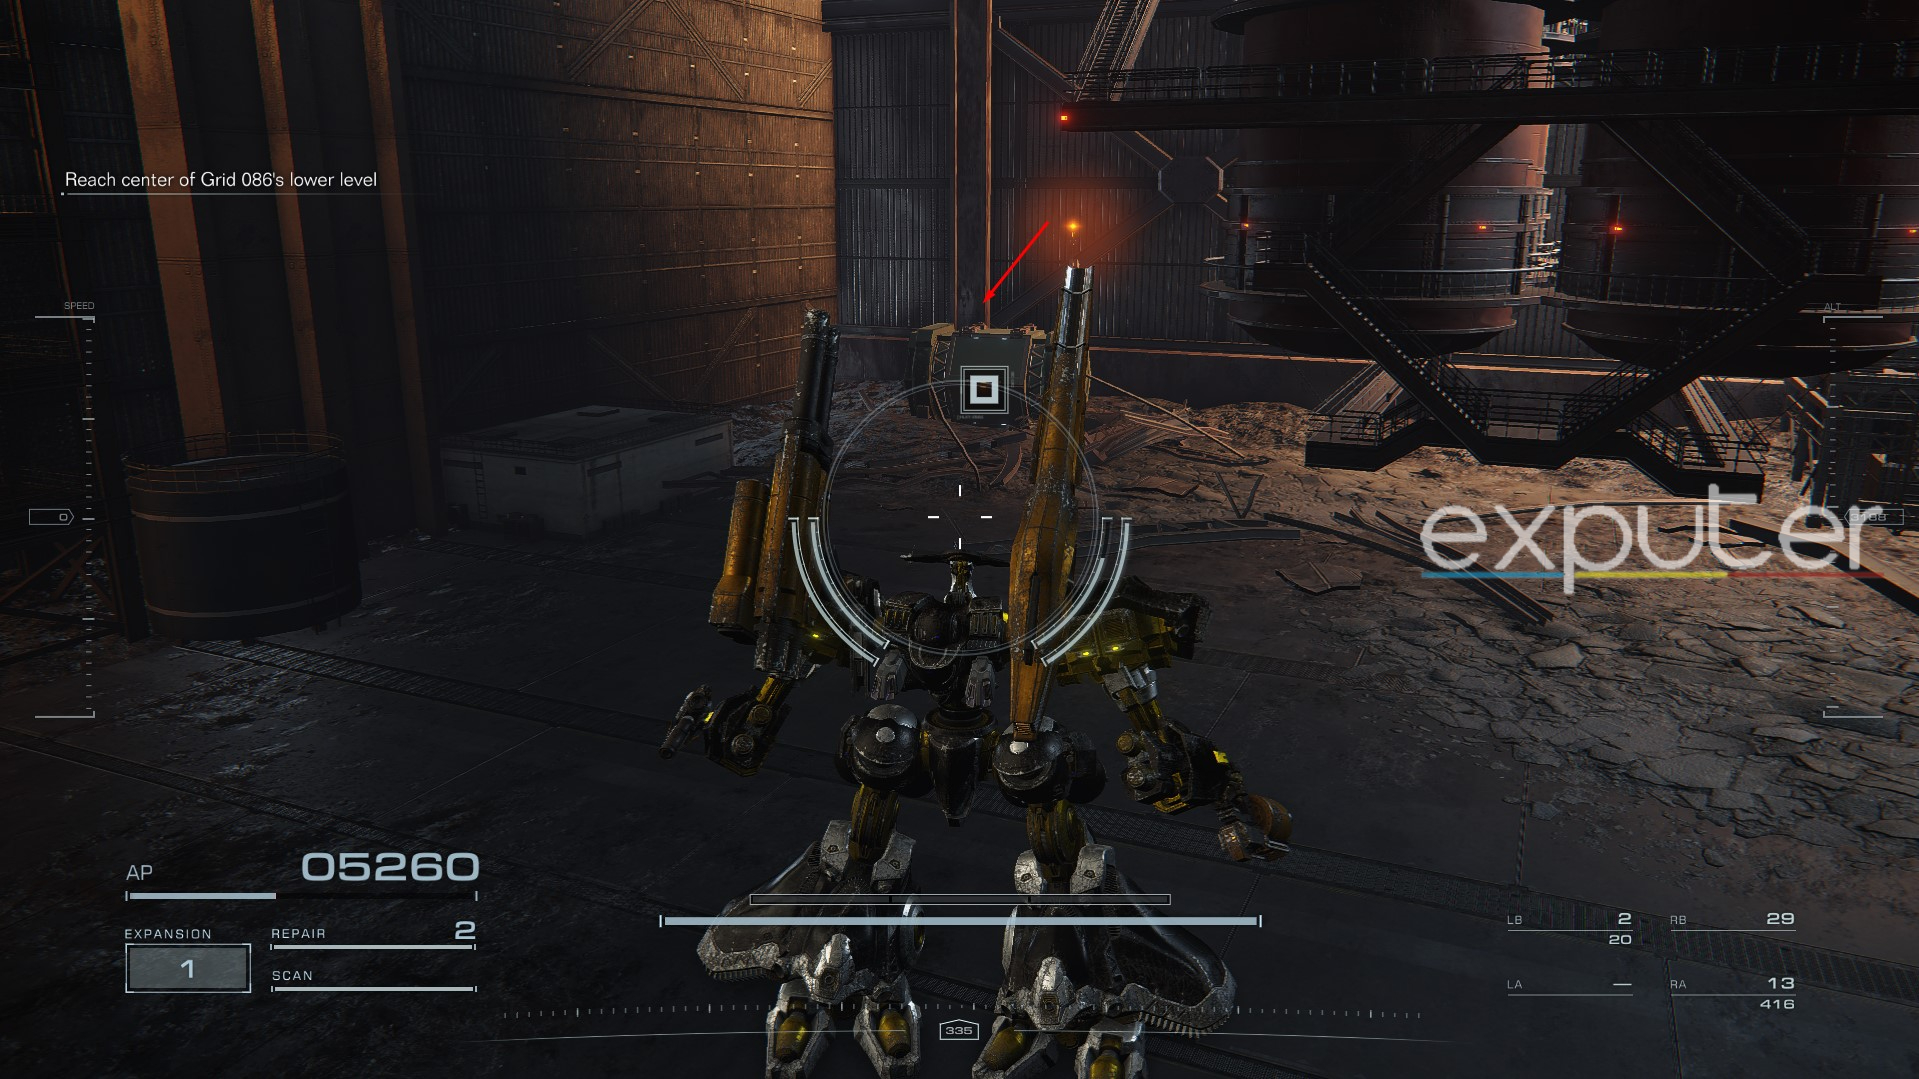
Here’s how to get the WRECKER’s Core component immediately after obtaining the HC-3000, as mentioned earlier:
- As you follow through the vents, you’ll reach a room with several hostile MTs, which you can avoid entirely and sprint to the area behind the molten lava chamber on your right.
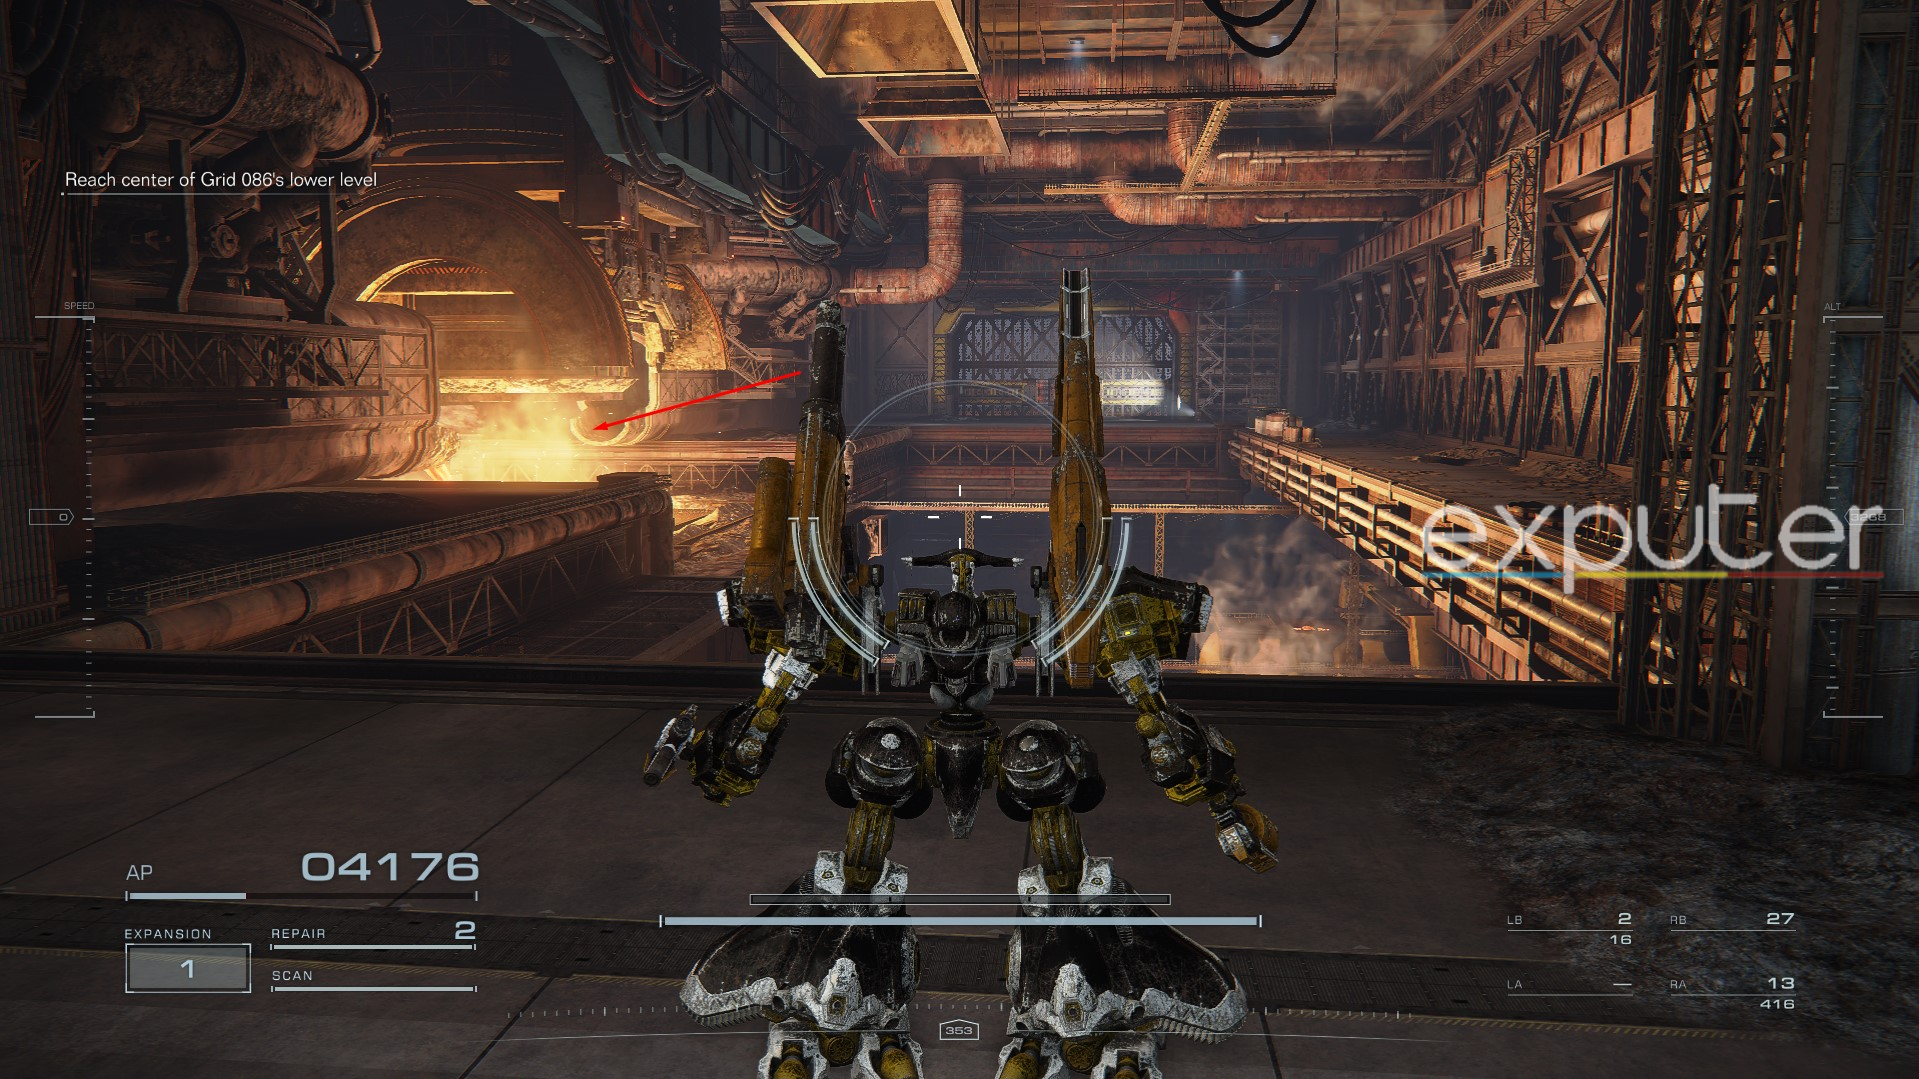
- Drop down to the ground floor here, and you’ll spot the CC-3000’s crate.
AC-3000 WRECKER
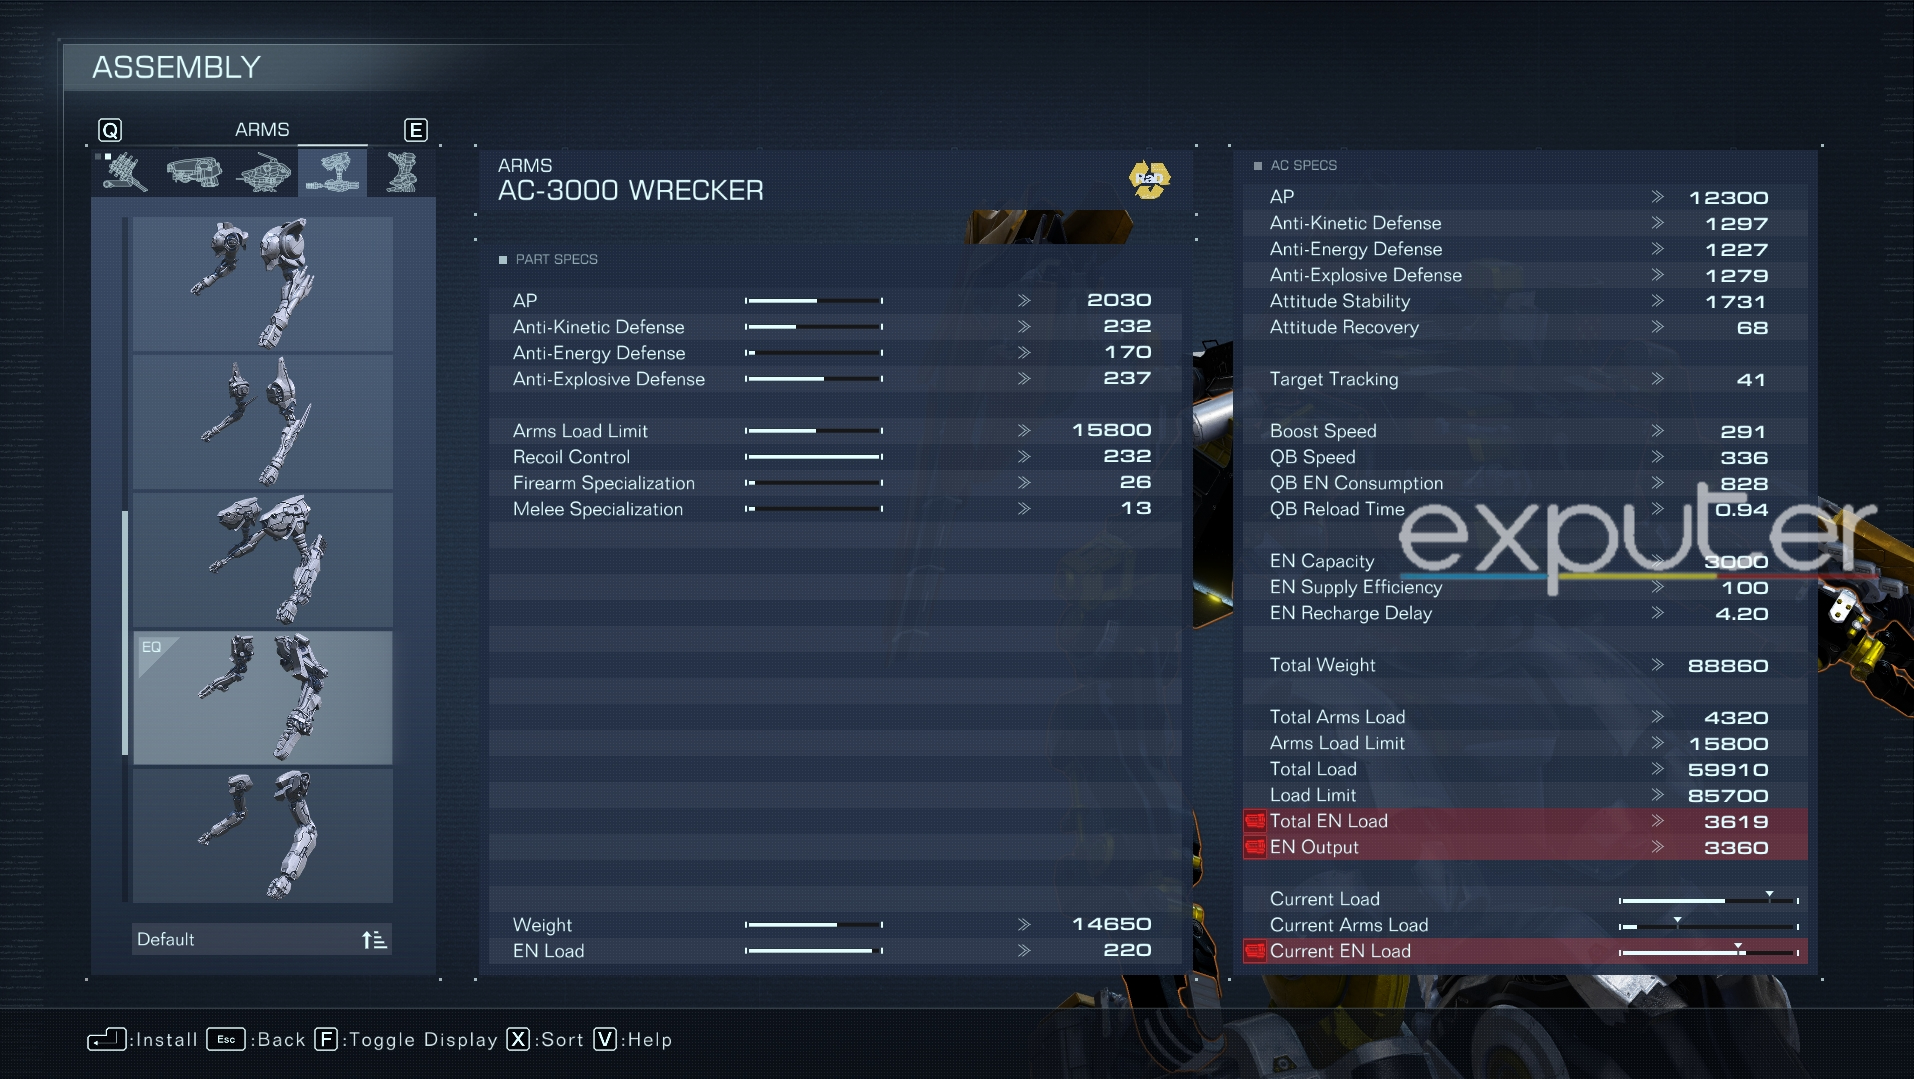
| AP | 2030 |
| Anti-Kinetic Defense | 232 |
| Anti-Energy Defense | 170 |
| Anti-Explosive Defense | 237 |
| Arms Load Limit | 15800 |
| Recoil Control | 232 |
| Firearm Specialization | 26 |
| Melee Specialization | 13 |
Out of all the arm parts in AC6, the AC-3000 WRECKER stands out with having the best Recoil Control in Armored Core 6. In fact, the lead in this category is so massive that it’s a no-brainer option for players who use Assault Rifles or Grenade Launchers as part of their weapons kit.
Following the CC-3000’s chest, here is the procedure to find the next Wrecker armor piece:
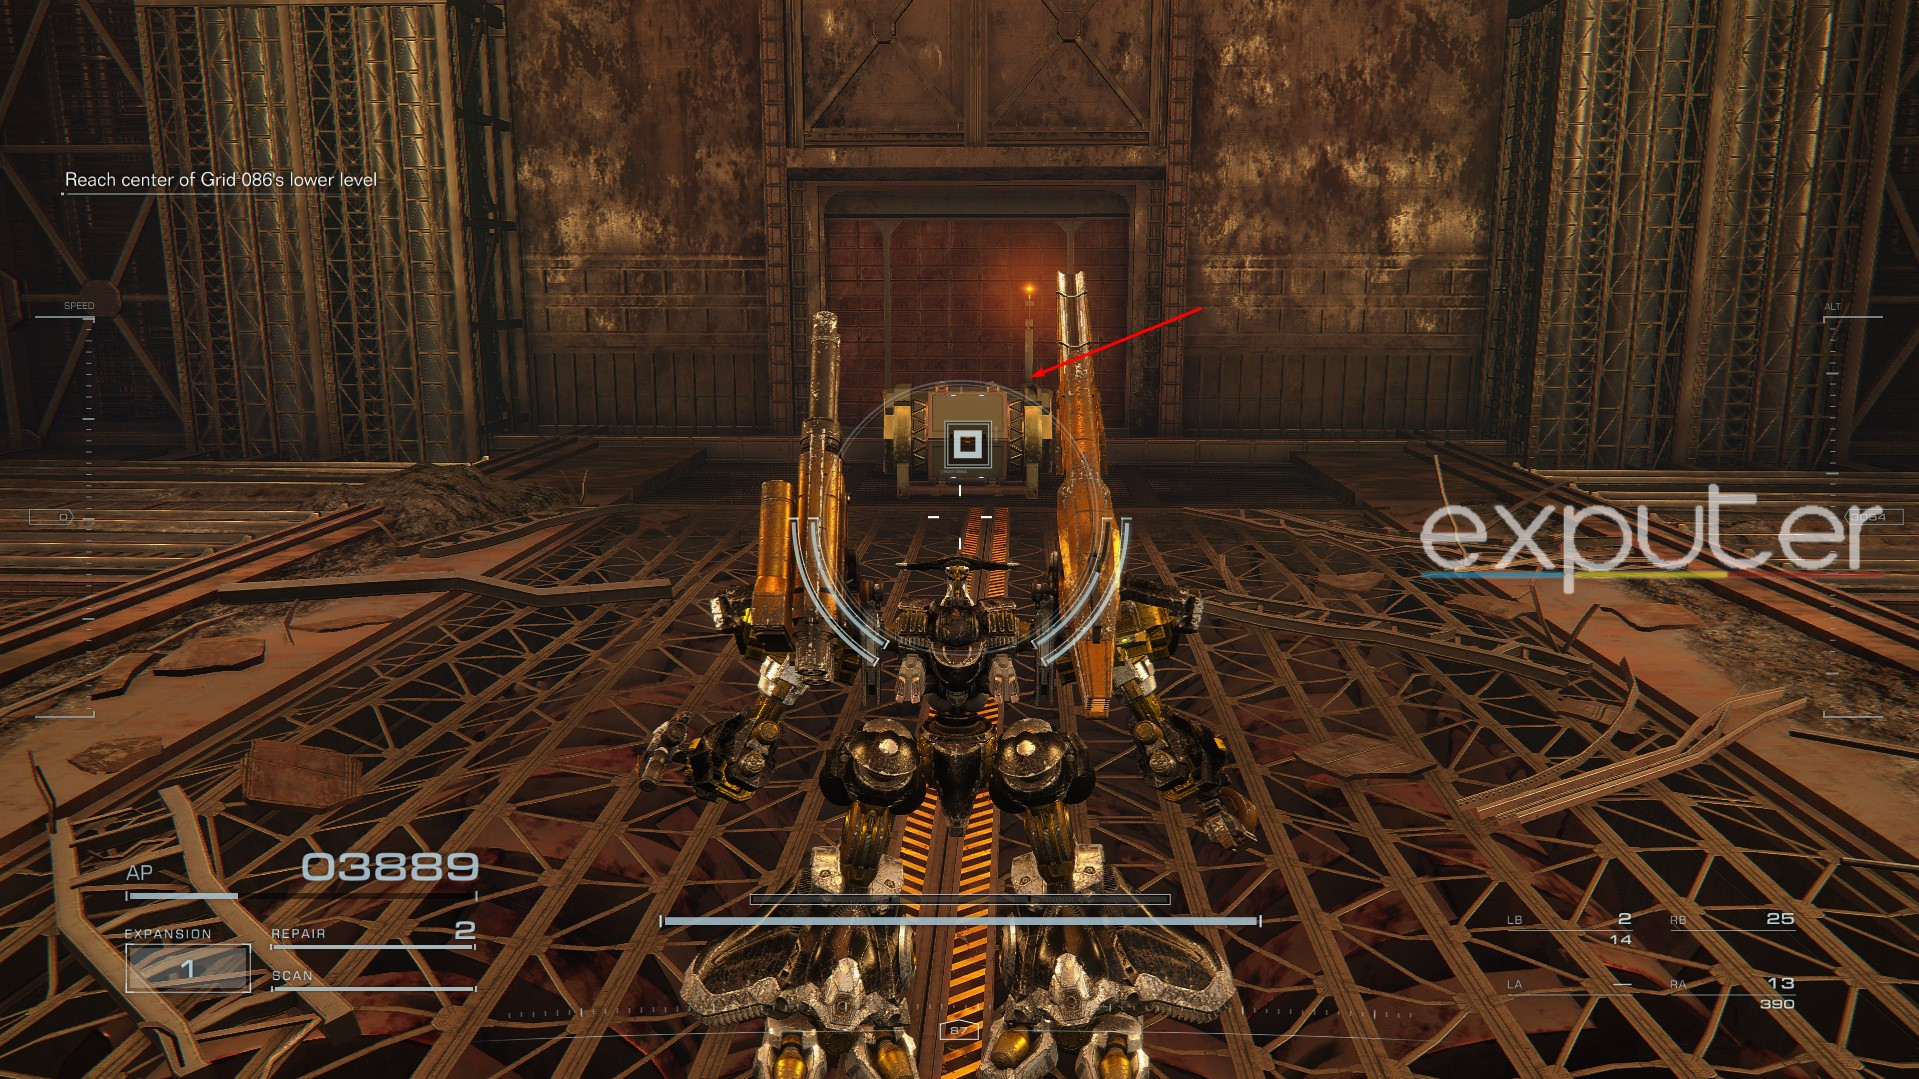
- From the ground floor, ascend back to the lava chamber, and you’ll see a large pipeline next to it.
- Enter the pipe, and as you follow it, you’ll eventually face Nosaac, an enemy AC defending the AC-3000.
2C-3000 WRECKER
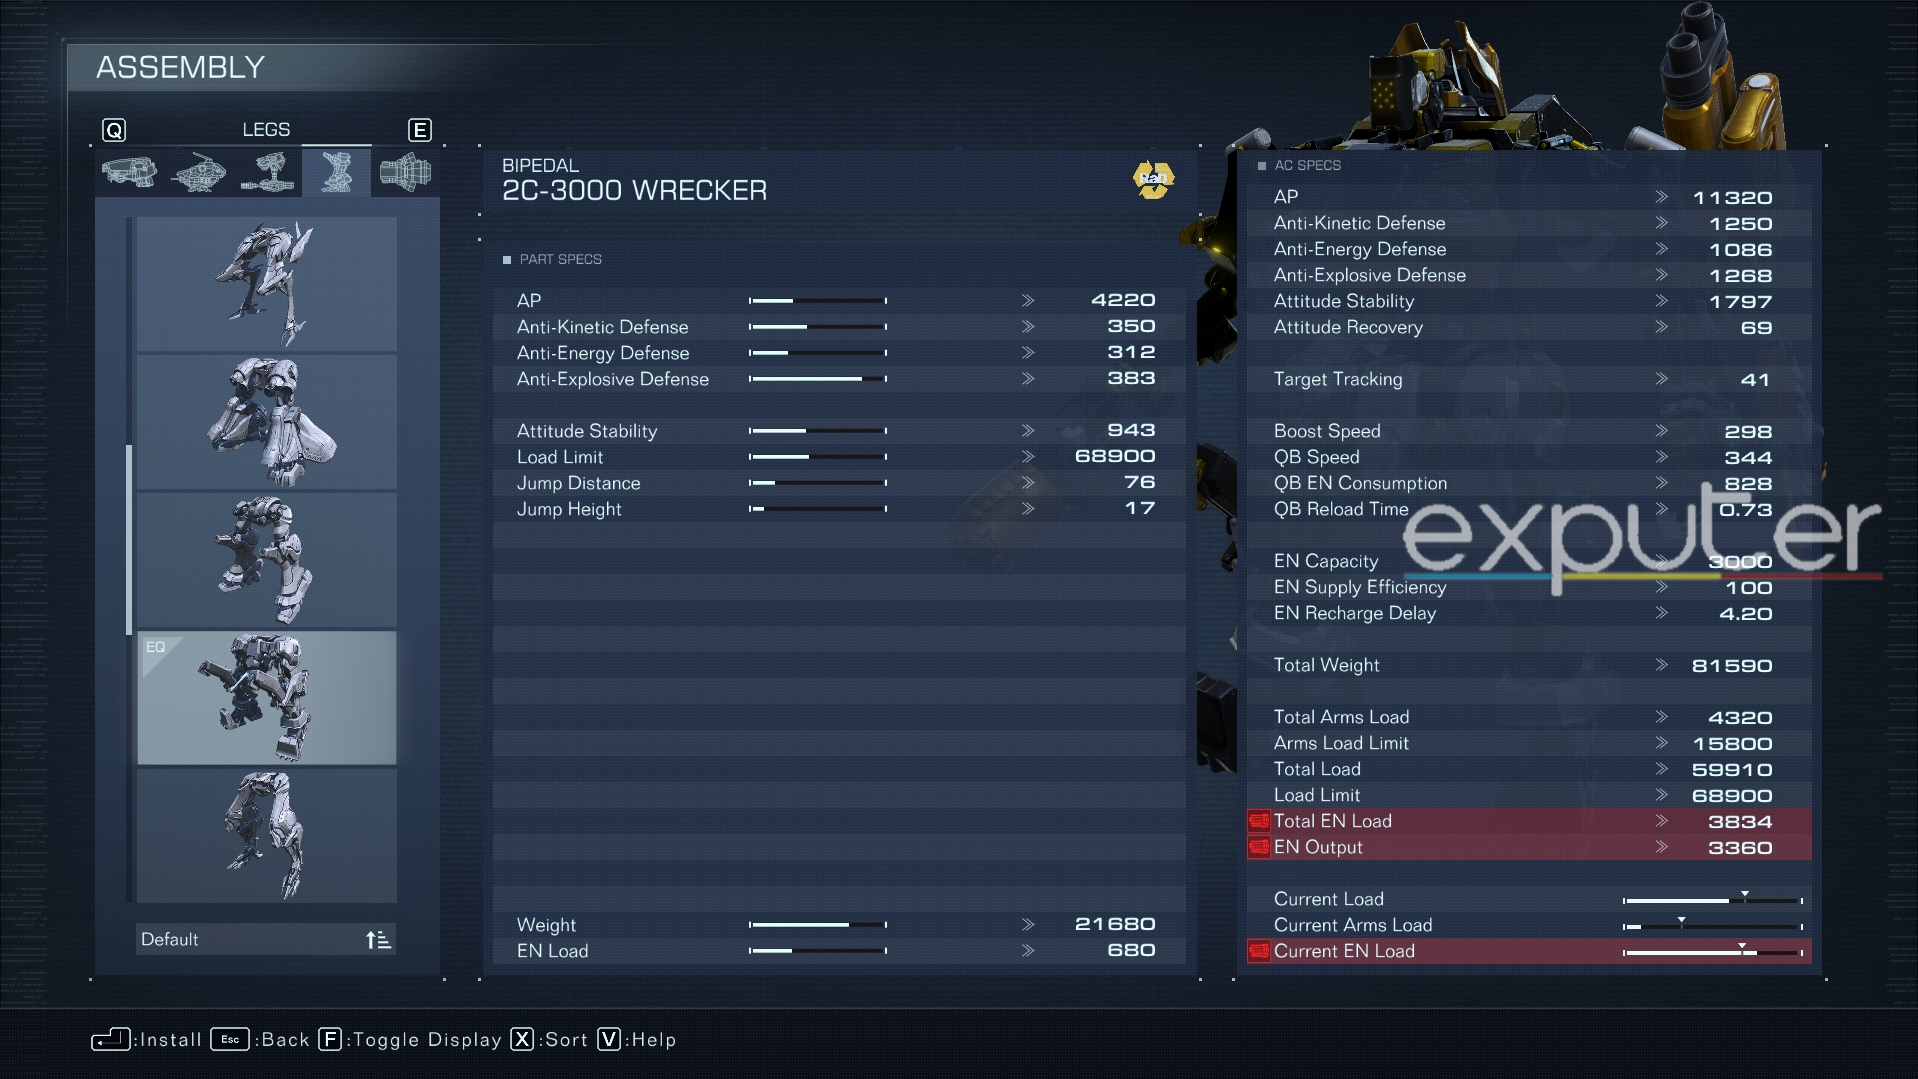
| AP | 4220 |
| Anti-Kinetic Defense | 350 |
| Anti-Energy Defense | 312 |
| Anti-Explosive Defense | 383 |
| Attitude Stability | 943 |
| Load Limit | 68900 |
| Jump Distance | 76 |
| Jump Height | 17 |
The WRECKER parts have generally been promising thus far, but the 2C-3000 Bipedal leg component is not an armor piece I would recommend in Armored Core 6. Mainly developed for mid-weight builds, the 2C-3000’s strong suit is its Anti-Explosive Defense. But aside from that, its weak Attitude Stability, Load Limit, Jump Height, and Jump Distance make the 2C-3000 a tough sell.
Use this procedure to get the final WRECKER piece after the AC-3000’s retrieval in the pipelines:
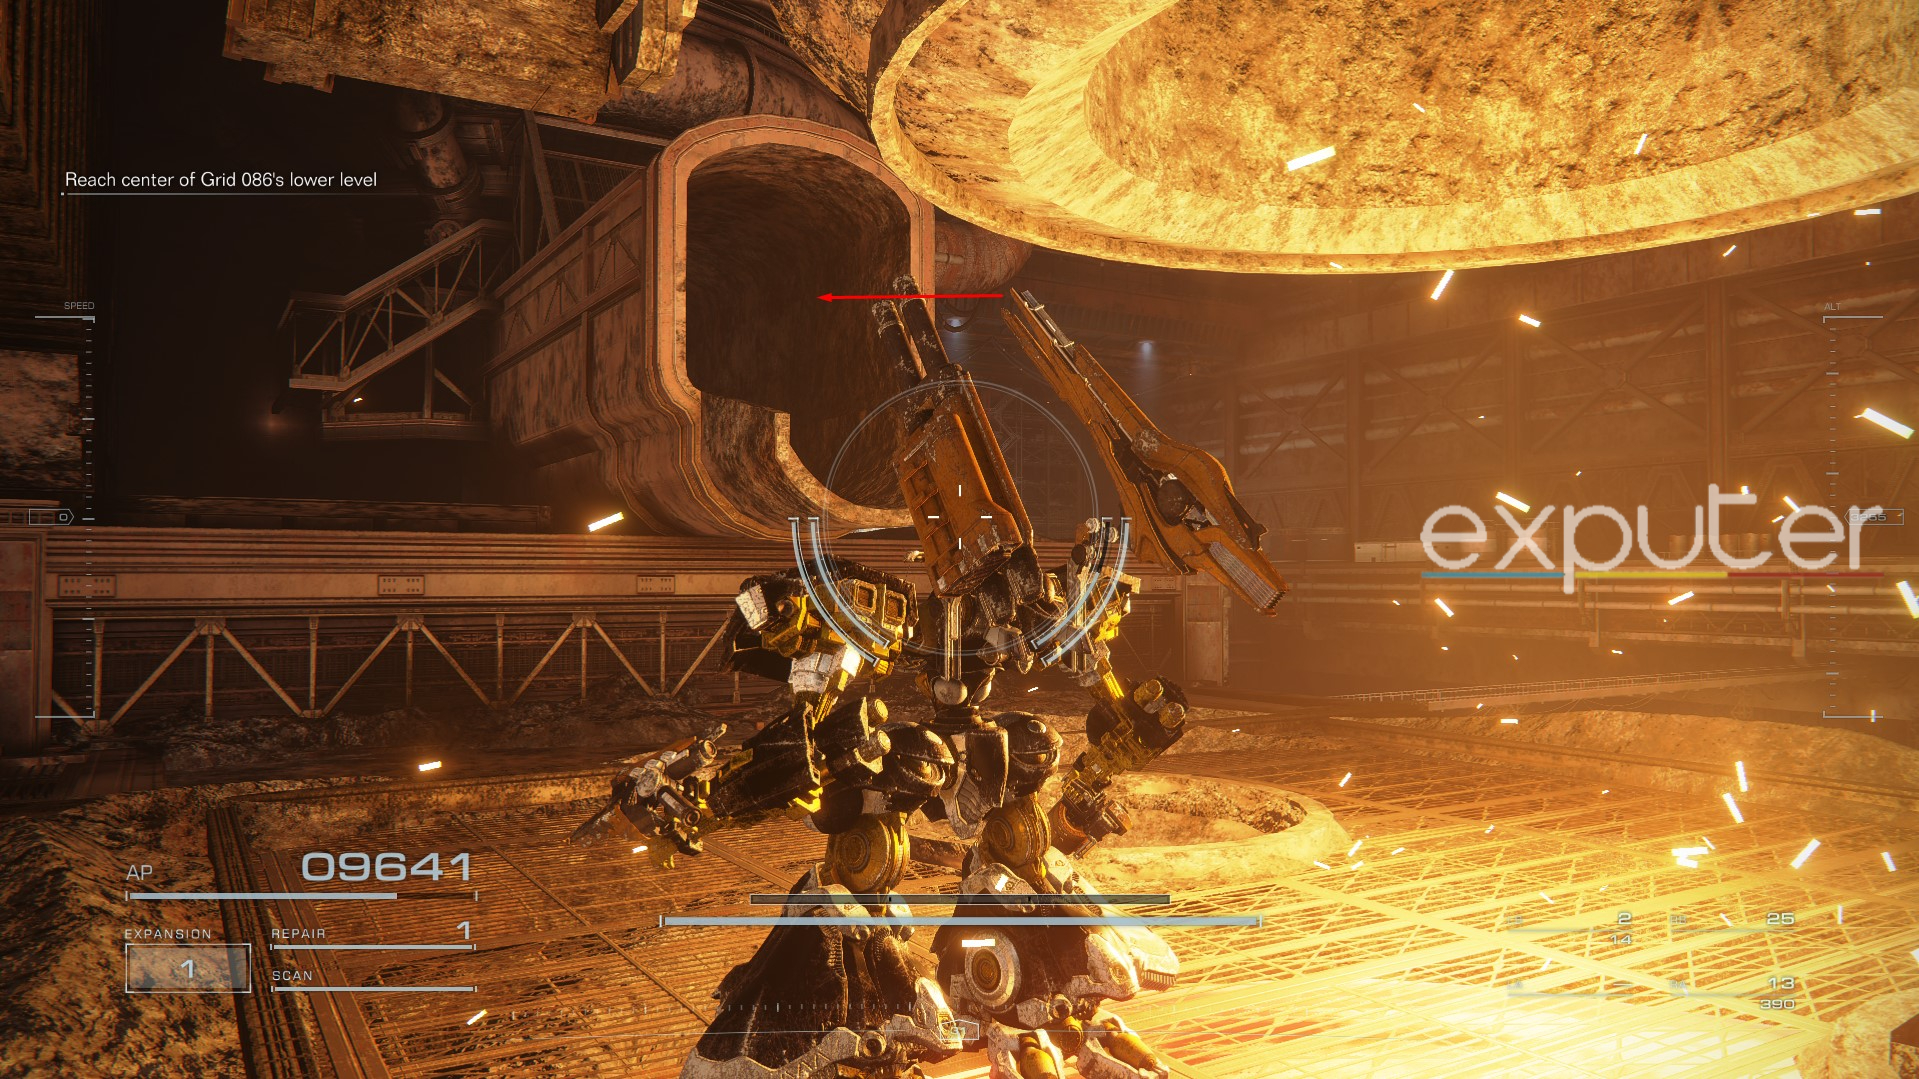
- Carefully maneuver back out of the pipe and access the main exit to continue the mission.
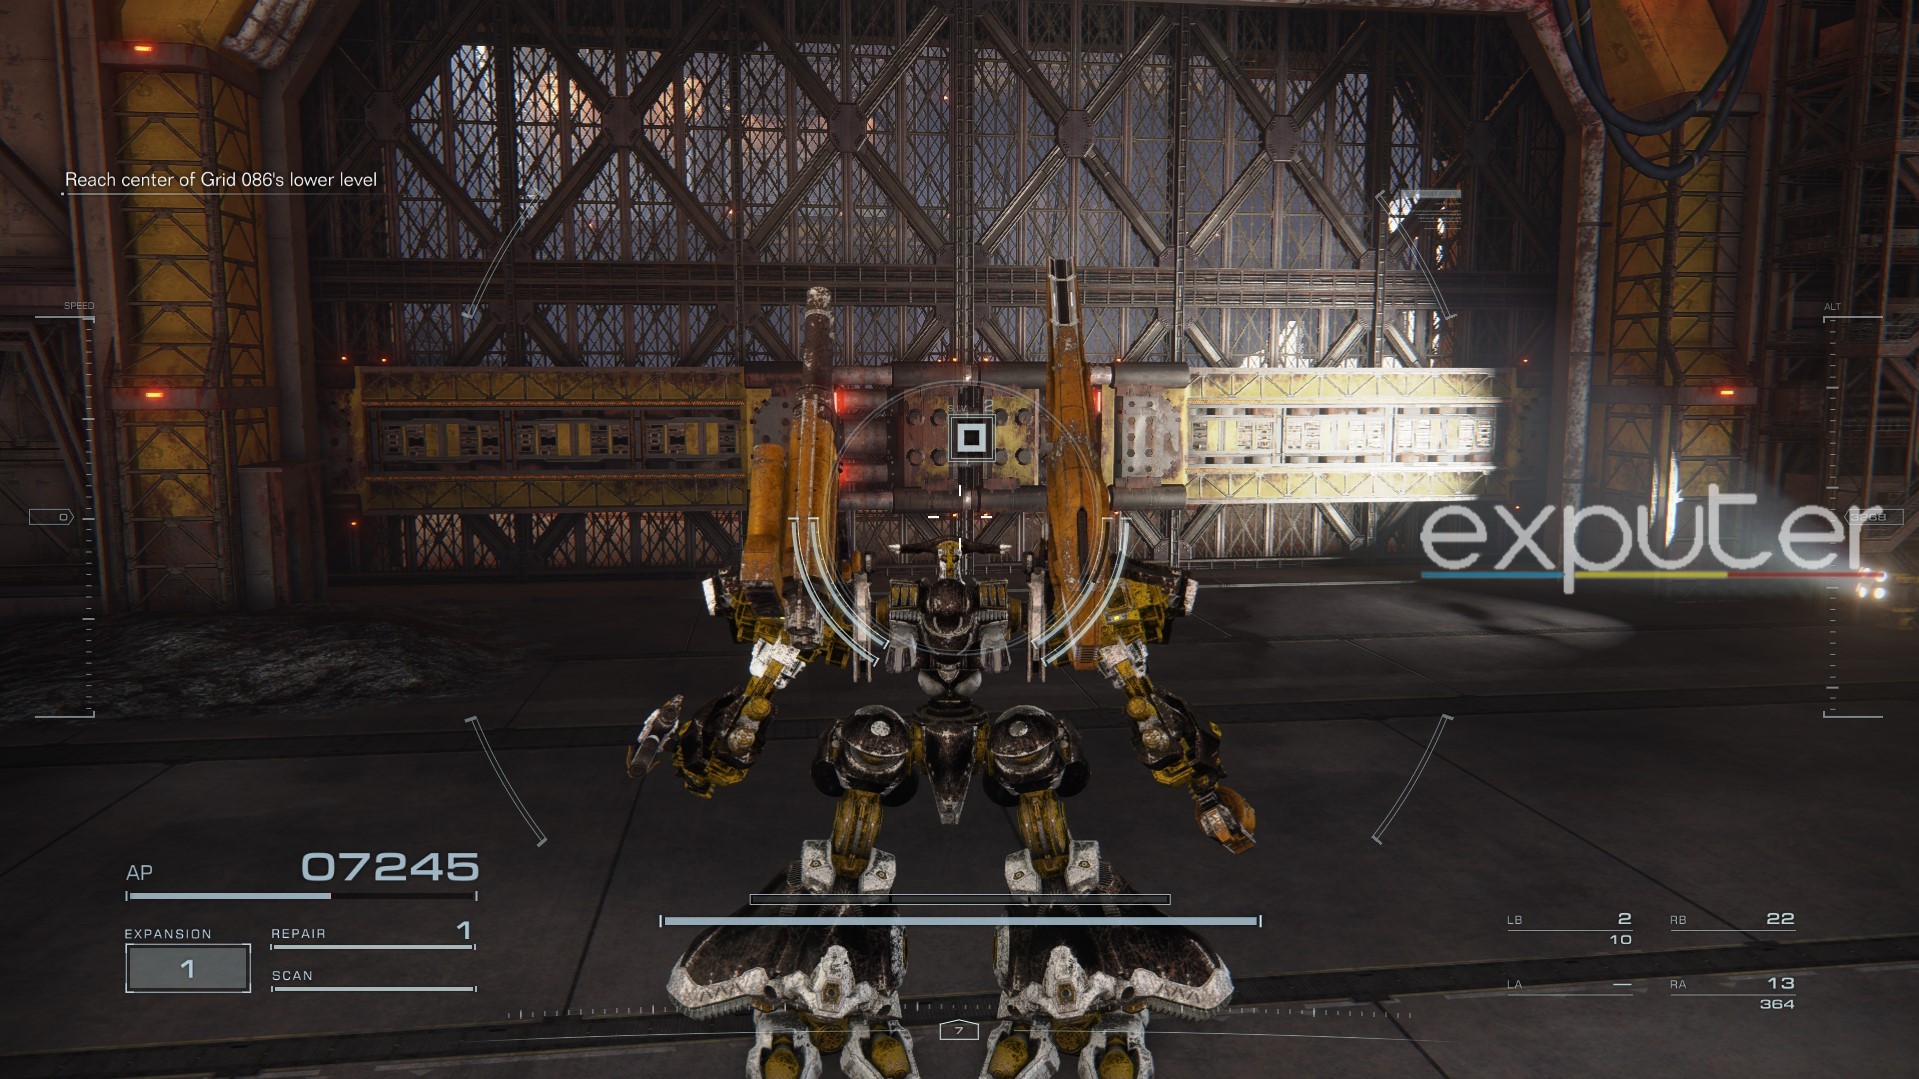
- Once you’re at the platform of your concurrent objective, follow the rails on the right from where you can see the RaD logo on the wall in the distance.
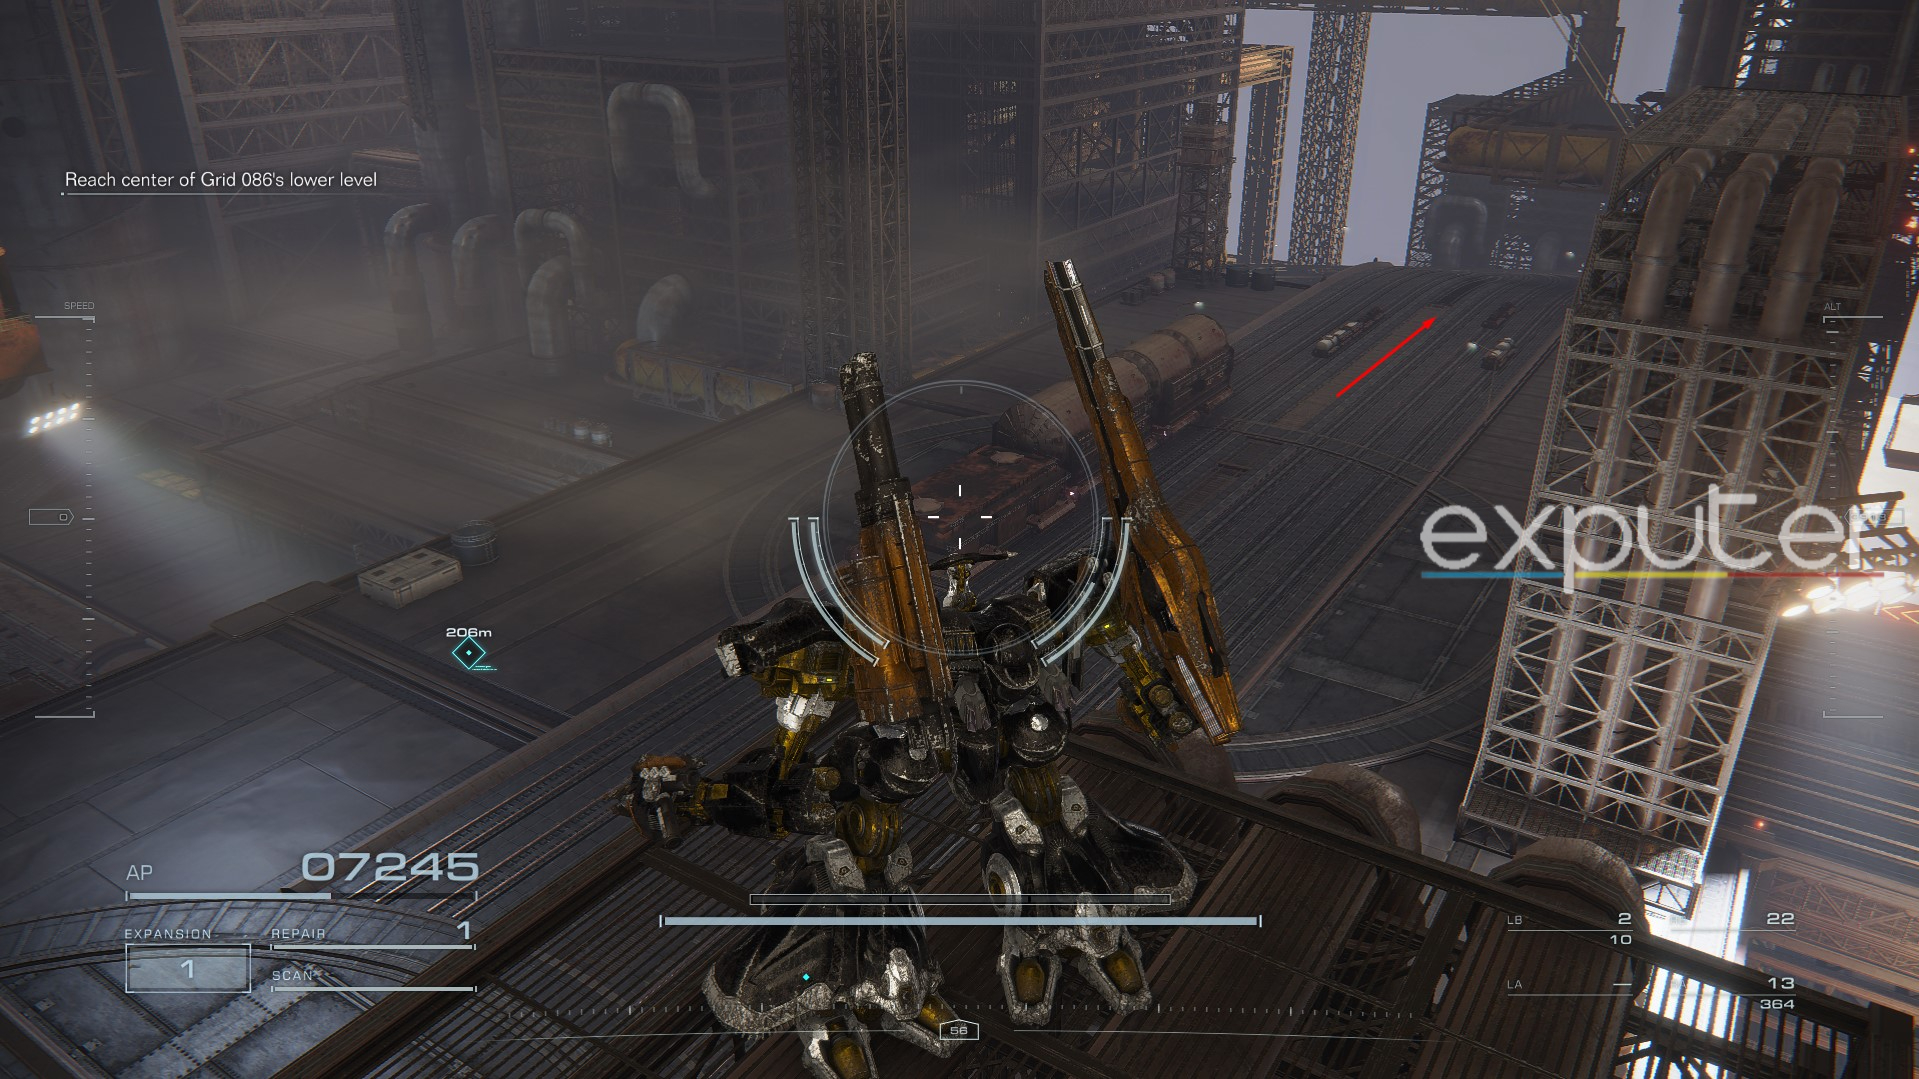
- These rails will take you directly to the 2C-3000, but you’ll encounter an ambush almost immediately after you pick the hidden part.

Tunnel Sabotage
Chapter 3 is home to several hidden weapons in Armored Core 6, and the first one you’ll get is in the Tunnel Sabotage, one of the earlier missions in this chapter. When going for the hidden part’s chest, I’d strongly recommend avoiding unnecessary battles since you’ll use most of your Repair Kits later.
IA-C01W1: NEBULA
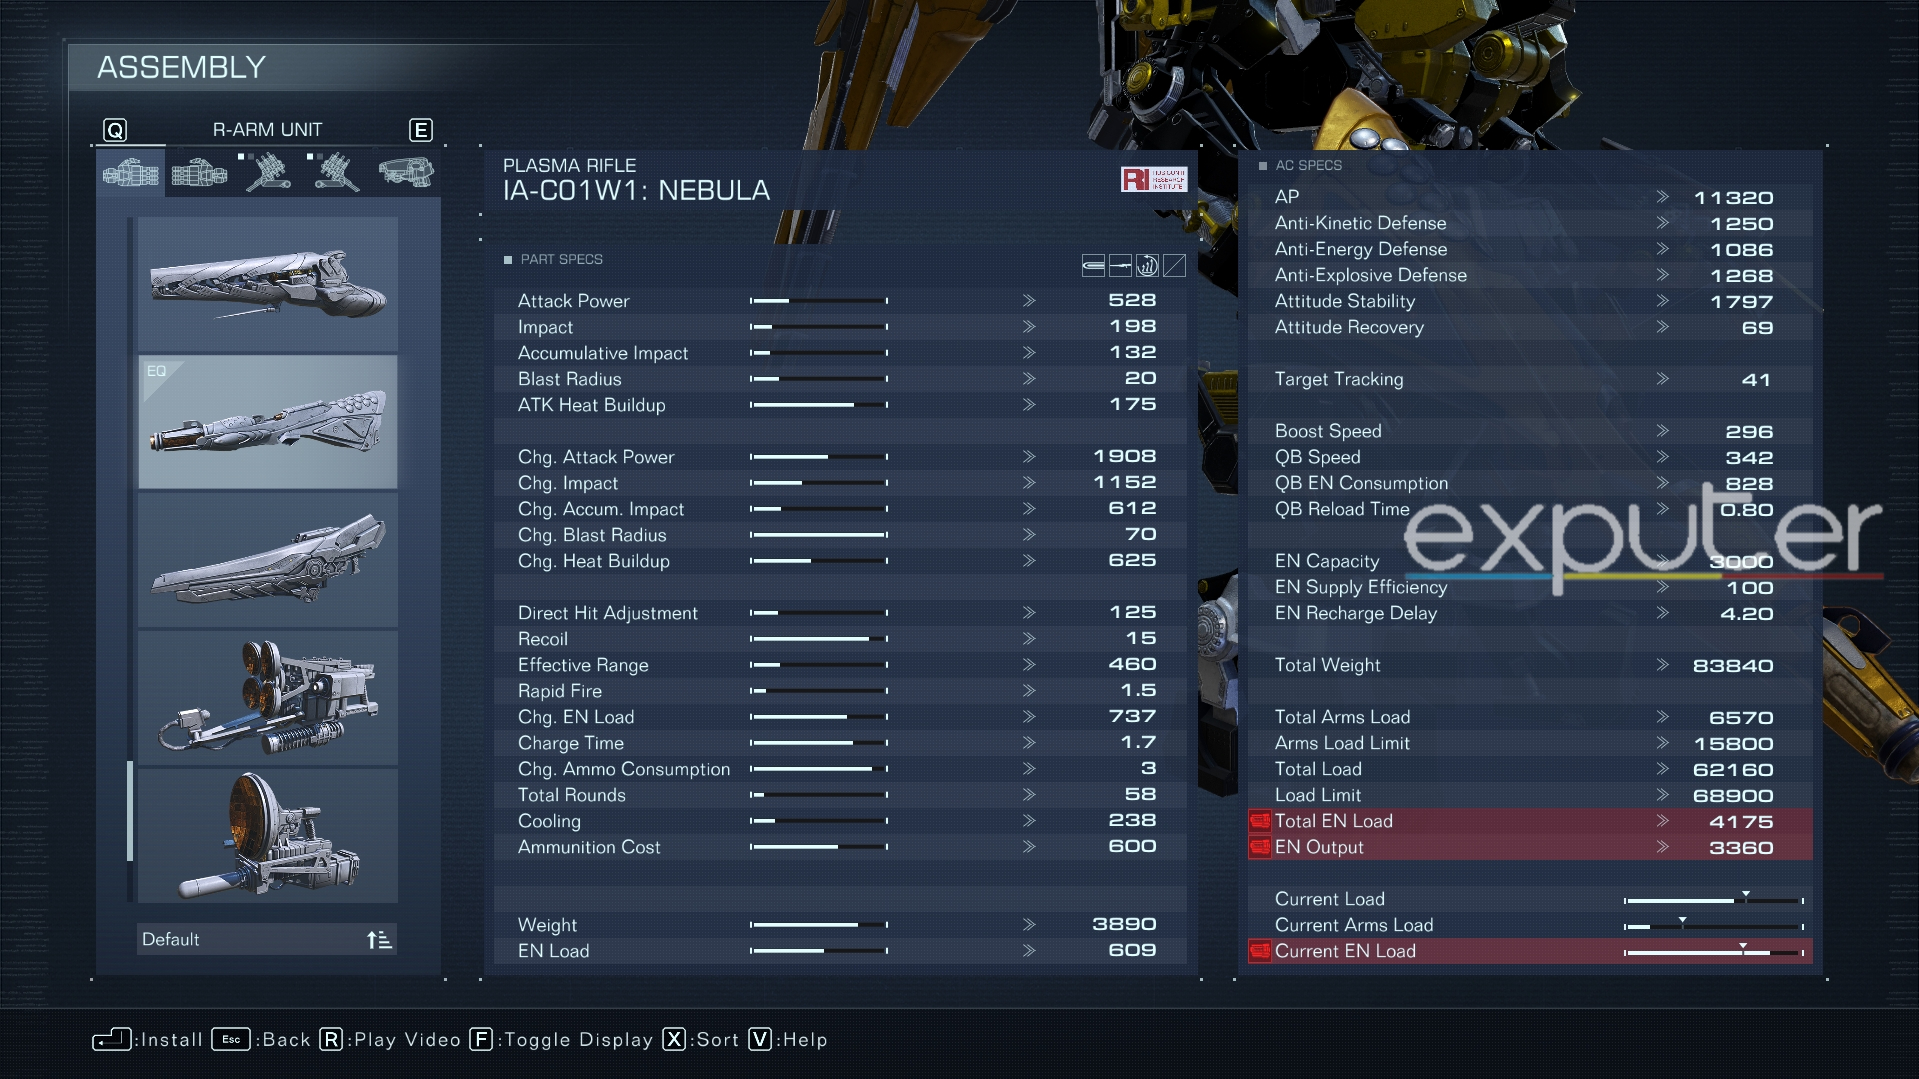
| Attack Power | 528 |
| Impact | 198 |
| Accumulative Impact | 132 |
| Blast Radius | 20 |
| Direct Hit Adjustment | 125 |
| Recoil | 15 |
| Effective Range | 460 |
| Rapid Fire | 1.5 |
As your first hidden weapon, the IA-C01W1 NEBULA is a right-handed plasma rifle that shoots continuous energy rounds with rapid fire. Like most energy-based weapons, you can charge the NEBULA’s shots for heavier damage output and a larger blast radius. Given its stat, the IA-C01W1 is a great weapon for long-range and close-quarters combat against hordes of weaker MTs and even against low-mobility bosses if you’re always charging up your attacks.
Once you boot up the Tunnel Sabotage mission, here’s what you need to do:
- Go into the underground tunnel and follow your objective markers until you reach a series of elongated runways.

- From here, get on the first runway and ascend to the upper runway labeled “DXRH-MU-59.”
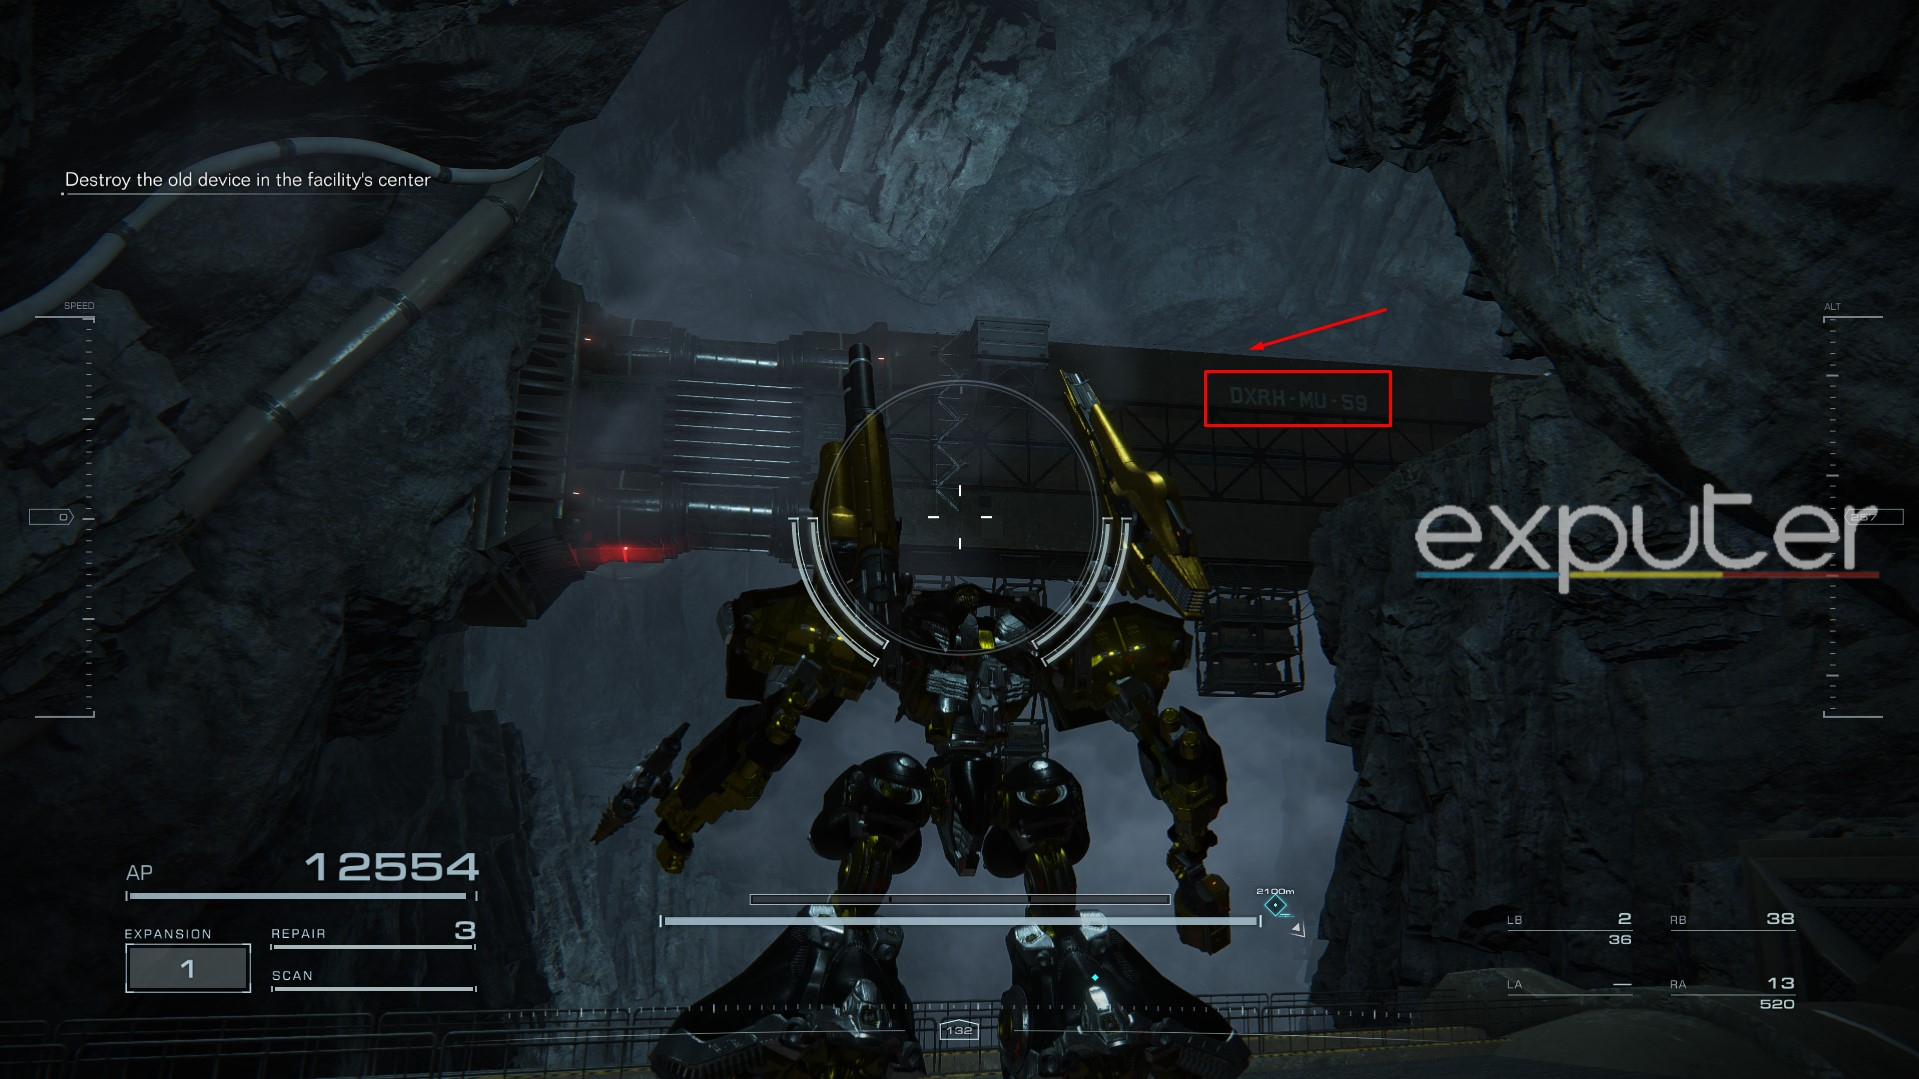
- Once you’re atop, head left and take out the enemy MTs, prioritizing the sniper MT at the back of the area.
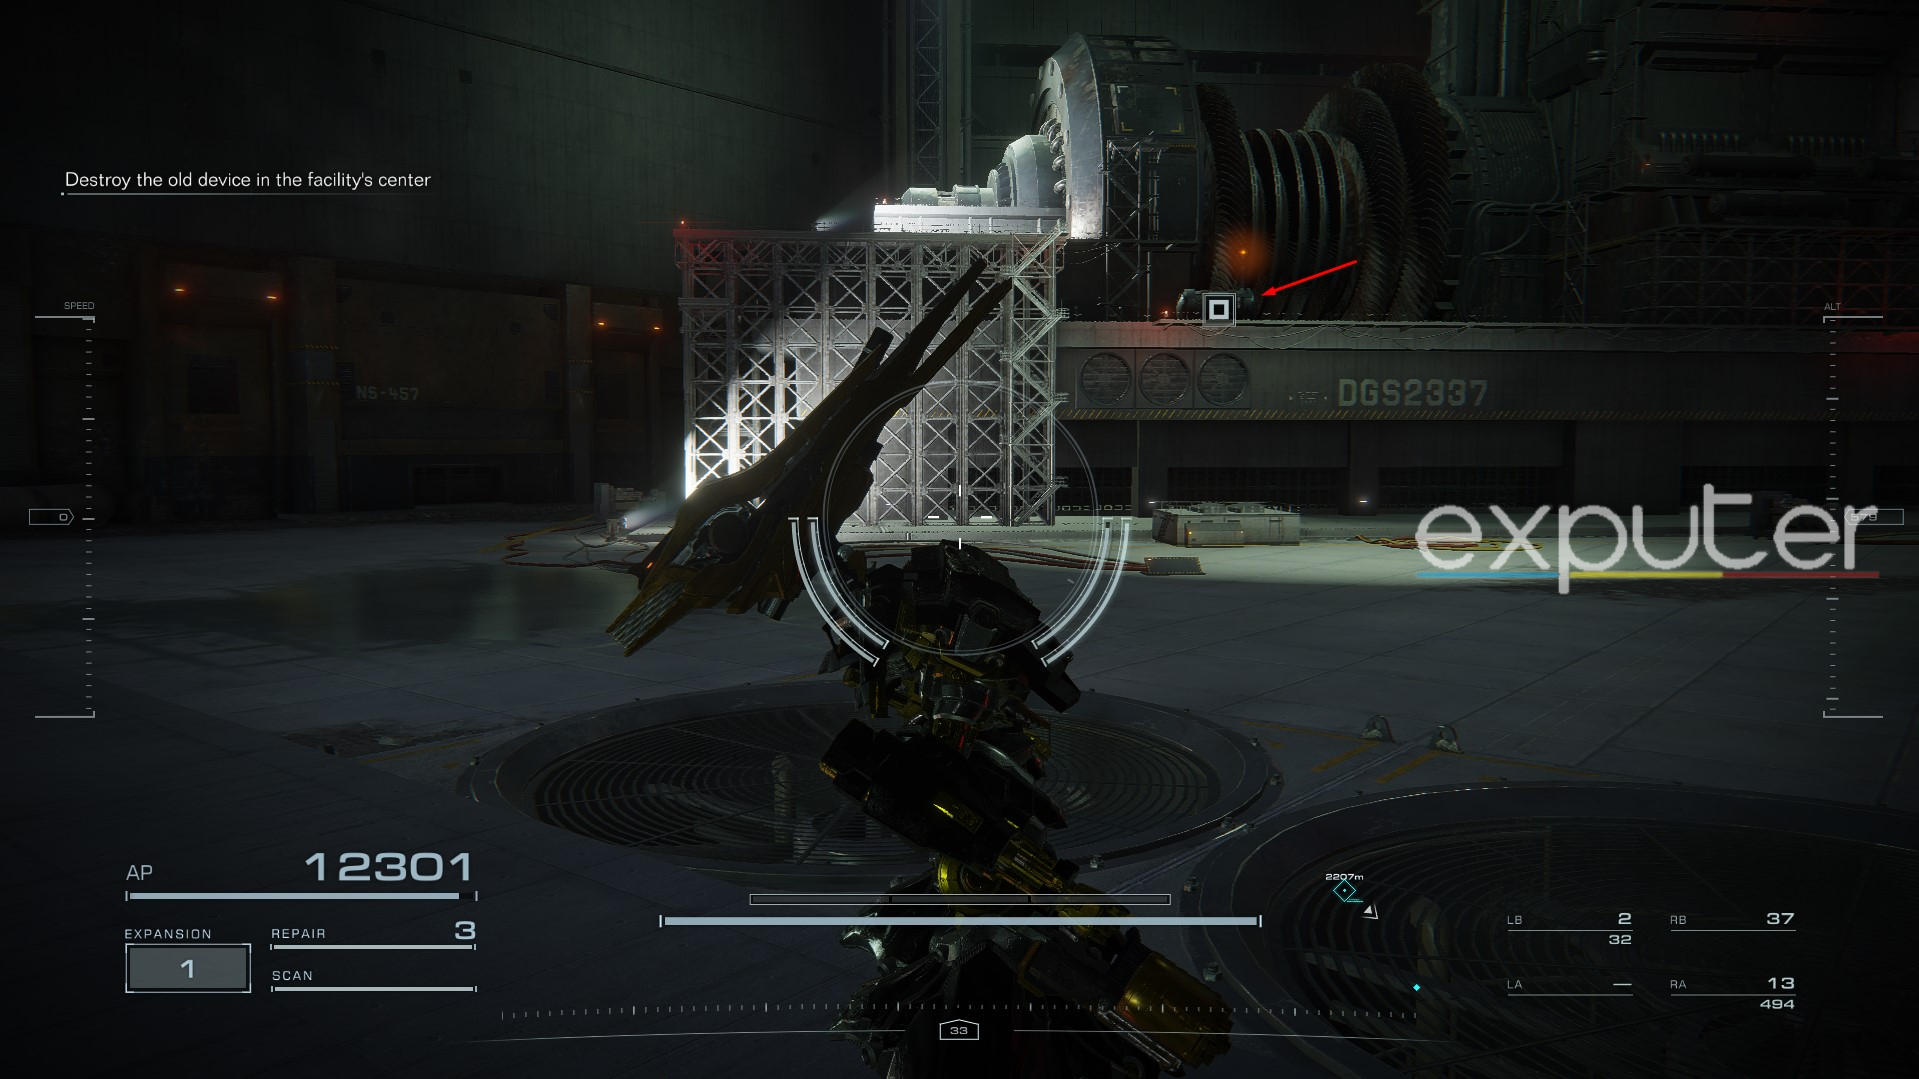
- After taking out the laser-shooting mech, you’ll see yet another runway behind it labeled “DGS2337,” carrying the chest you’re looking for.
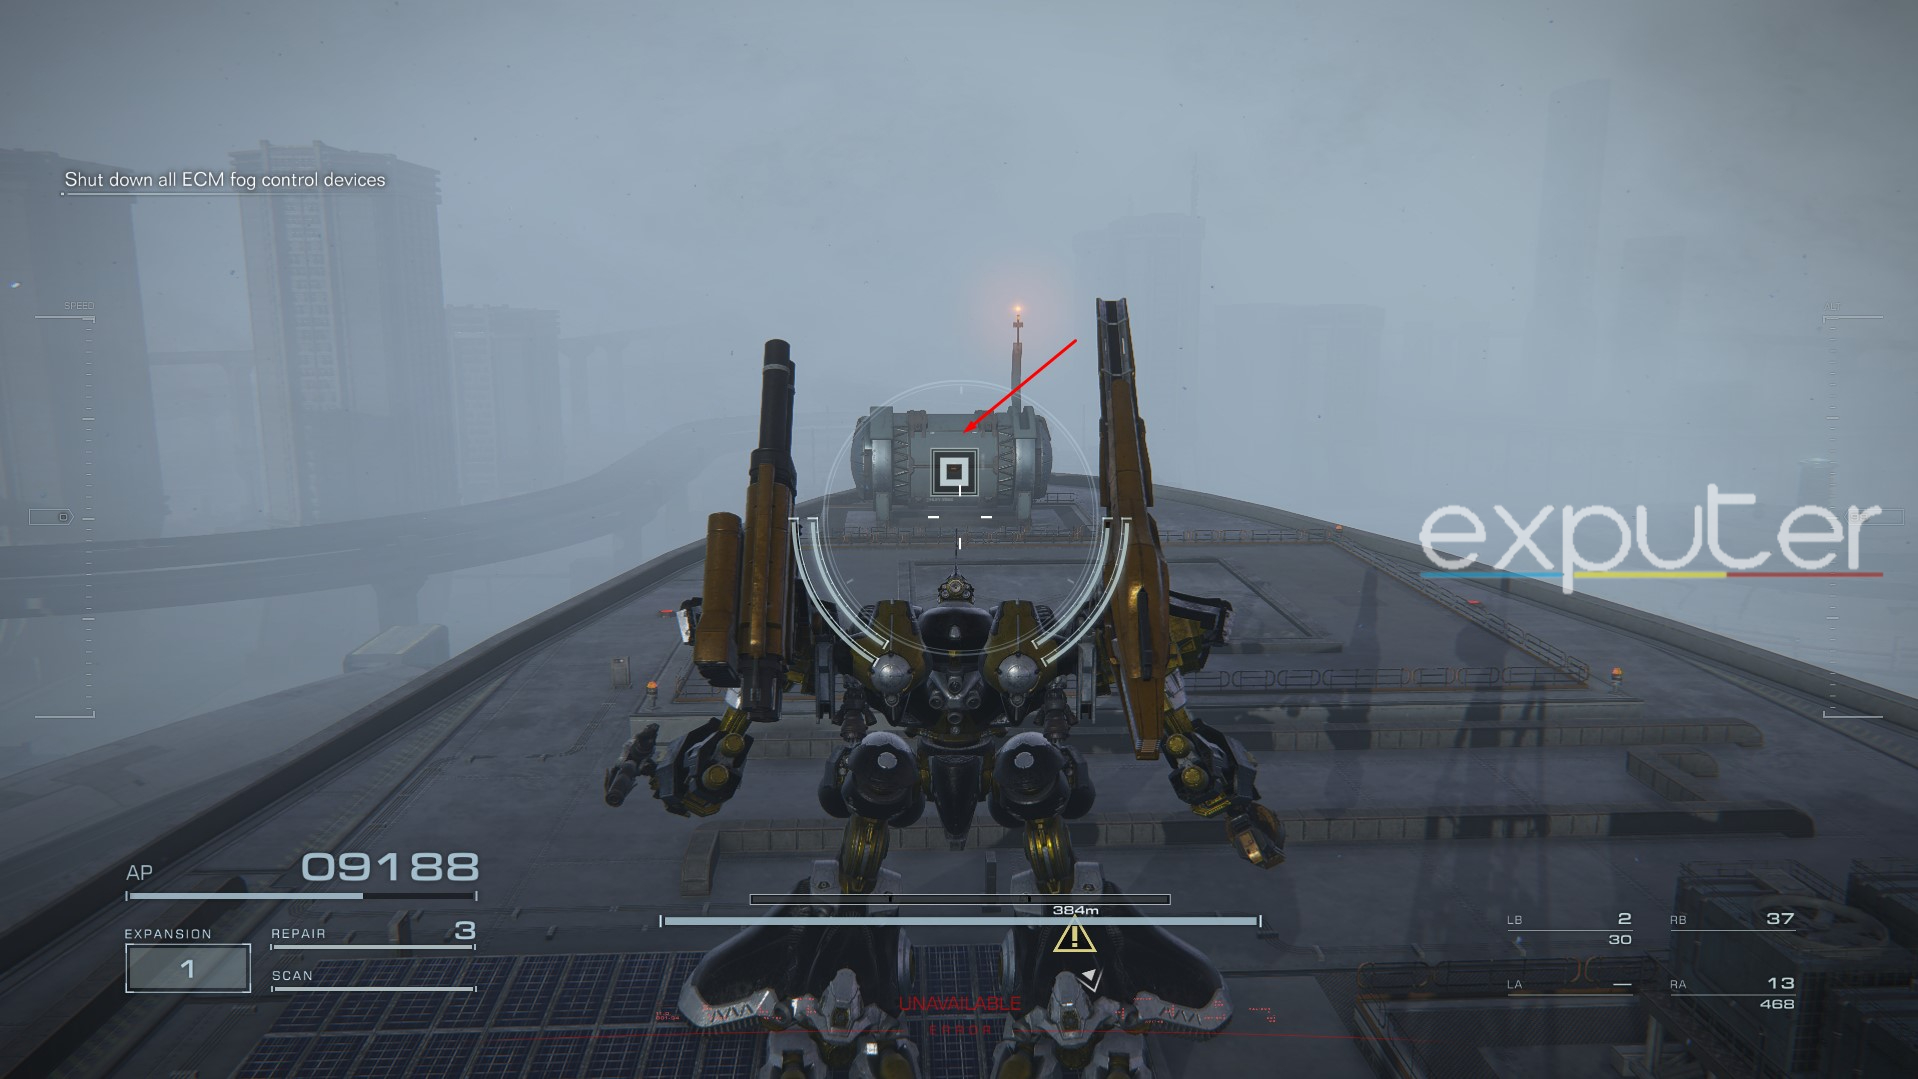
Survey The Uninhabited Floating City
For this mission later in Chapter 3, you’ll spend most of your time turning off the ECM fog control devices to make the area accessible. Since there are no objective markers here, you must follow the red pulsing beacons placed in succession. Fortunately, these beacons will help you to complete the mission quickly and obtain the hidden part here.
IA-C01G: AORTA
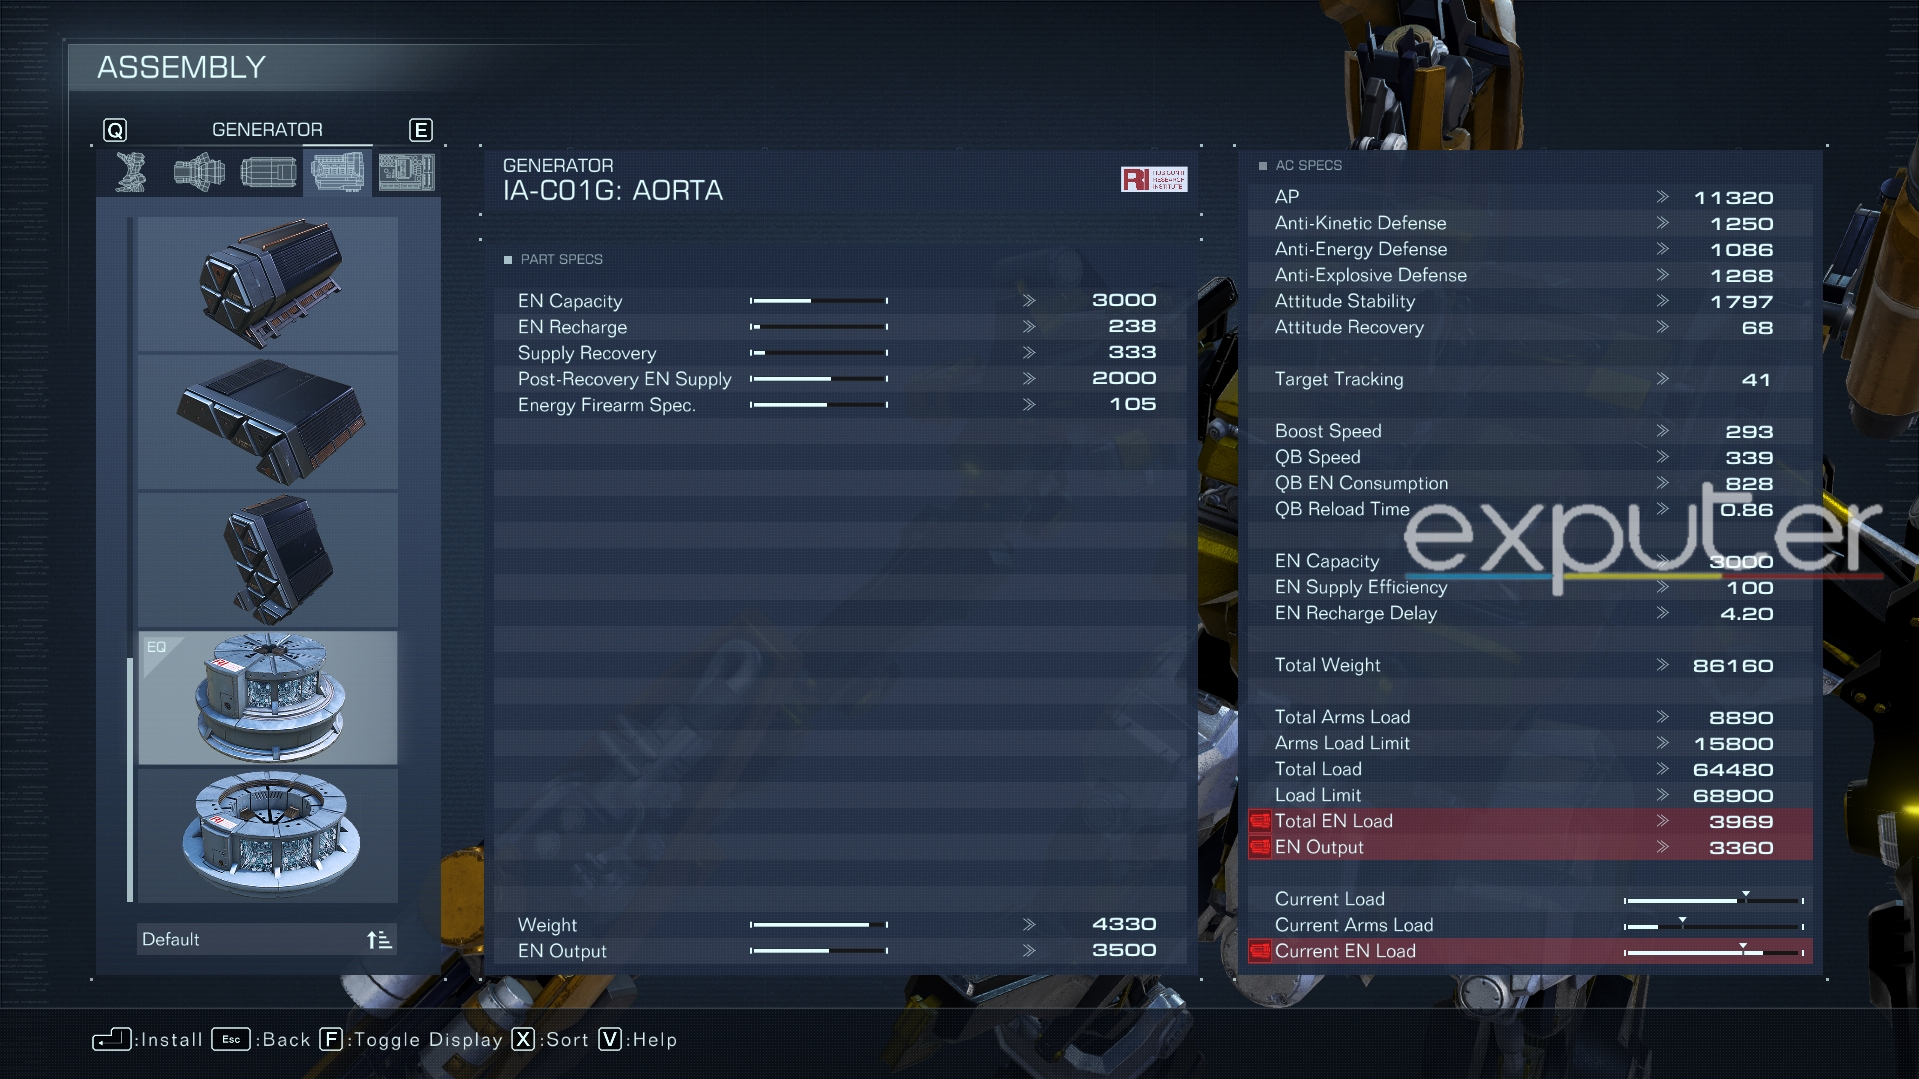
| EN Capacity | 3000 |
| EN Recharge | 238 |
| Supply Recovery | 333 |
| Post-Recovery EN Supple | 2000 |
| Energy Firearm Spec. | 105 |
As the name suggests, the IA-C01G AORTA is a capable Generator part for your mech in Armored Core 6. Despite its low Weight requirement, the AORTA packs one of the highest EN Capacities and Post-Recovery EN Supplies in-game. However, with its relatively low EN Recharge and Supply Recovery, I’d recommend this component to players who like to expend their stamina meter all at once rather than in small bursts.
Here’s a quick procedure to get the AORTA Generator in the Survey The Uninhabited Floating City mission:
- As mentioned earlier, follow the red beacons placed on the ground, which should take you to your first objective – an ECM Fog Control Device.
- After accessing and shutting down the device, follow the beacon path in the northwestern direction, leading you to an oval-shaped building just before the next Fog Device.
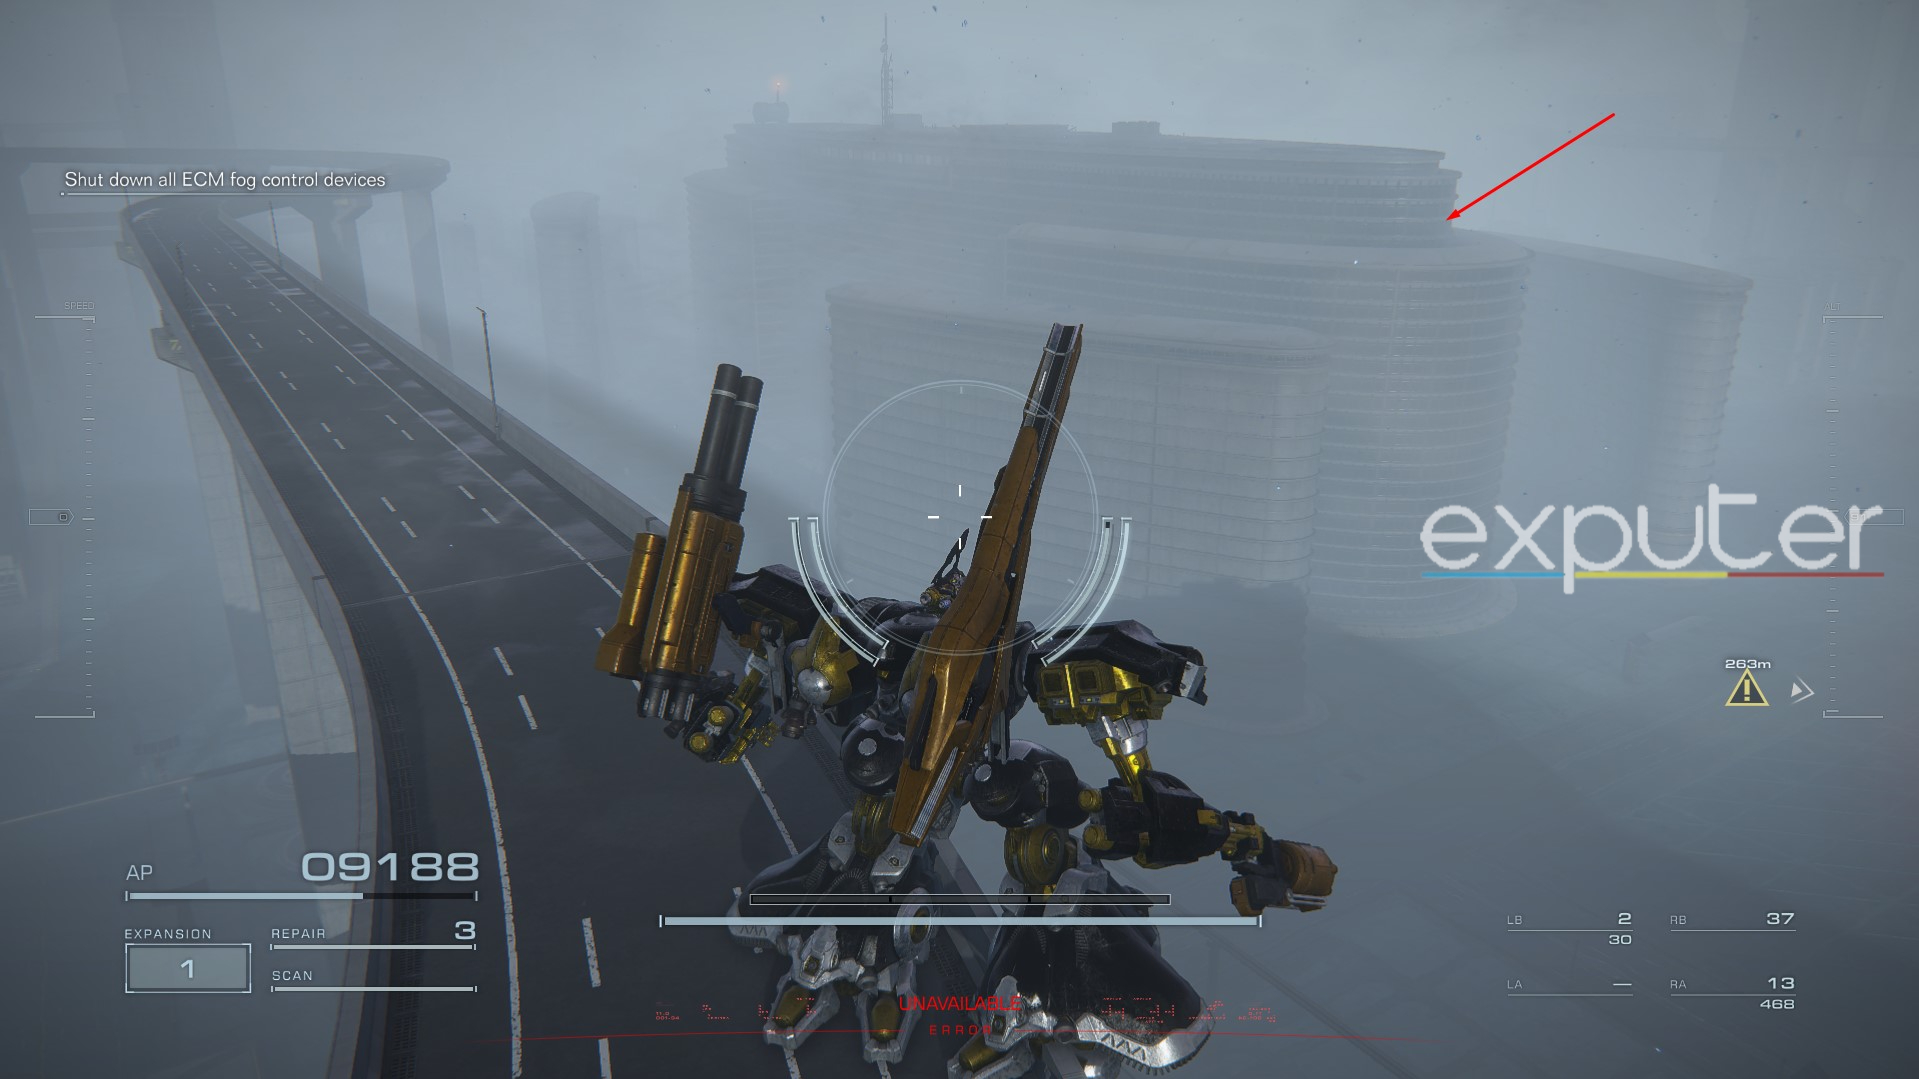
- Get onto the building, and your HUD will highlight the chest at the rooftop’s edge.
Eliminate “Honest” Brute
Taking down Honest Brute is a vital part of Chapter 3, as you’ll need the weapon he’s guarding to kill the Ice Worm. Besides that, however, you can also get some uniquely powerful hidden parts in various locations of this area, ranging from a chainsaw to a booster to the only flamethrower available in Armored Core 6.
WB-0010 DOUBLE TROUBLE
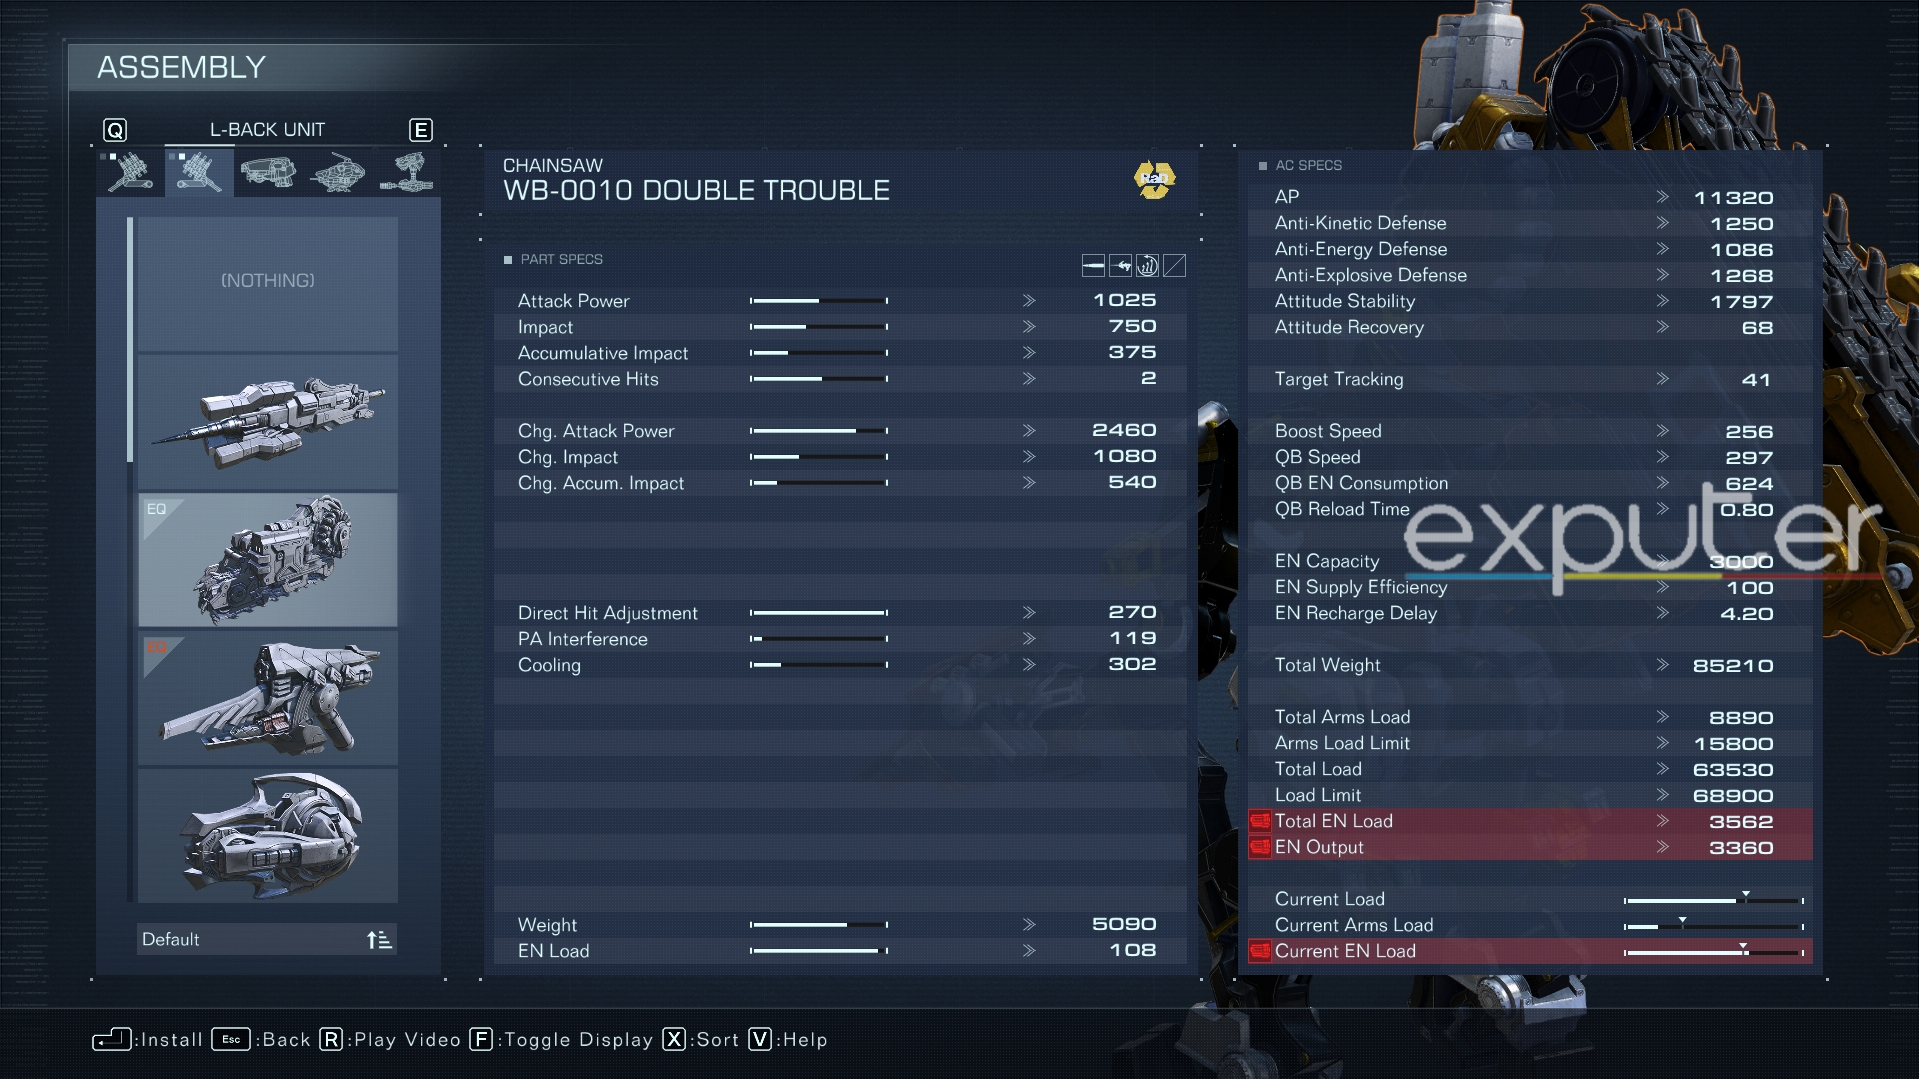
| Attack Power | 1025 |
| Impact | 750 |
| Accumulative Impact | 375 |
| Consecutive Hits | 2 |
| Direct Hit Adjustment | 270 |
| PA Interface | 119 |
| Cooling | 302 |
The DOUBLE TROUBLE is the only chainsaw melee weapon in AC6, which you can drill into an enemy for insane AP and Posture Damage. You can pre-emptively charge up the chainsaw for a better attack window, but dashing or sprinting during that time will cancel out the charge. As such, if you want to use the DOUBLE TROUBLE, it’ll be most effective for close-ranged builds against slow-moving bosses or staggered enemies.
Upon starting the mission, proceed as per the steps below:
- For the first half of this search, keep following the objectives and dropping down from platform to platform.
- Once you’re on the second subsequent floating platform, look below from different angles until you spot another platform infested with red-laser sensors.
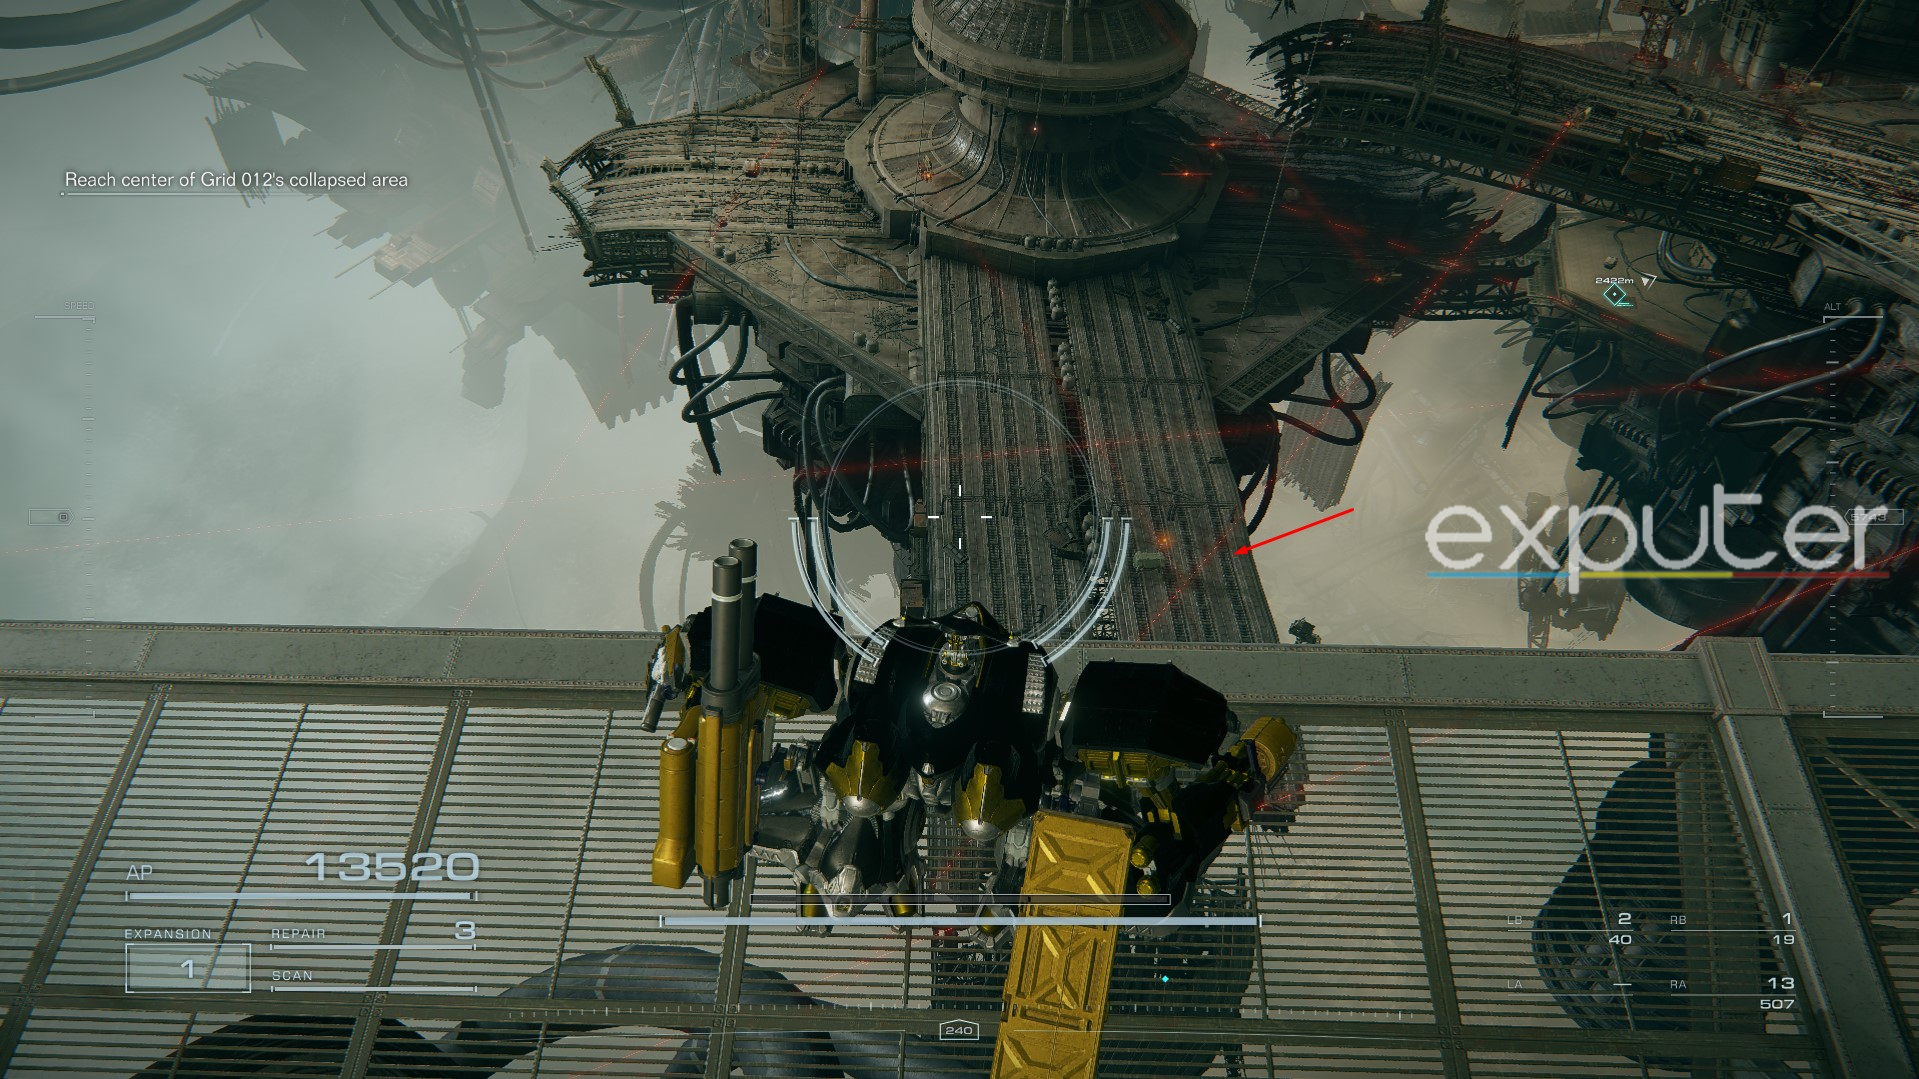
- Jump down to the targeted area while avoiding the sensors and access the chest on the far edge.
BC-0600 12345
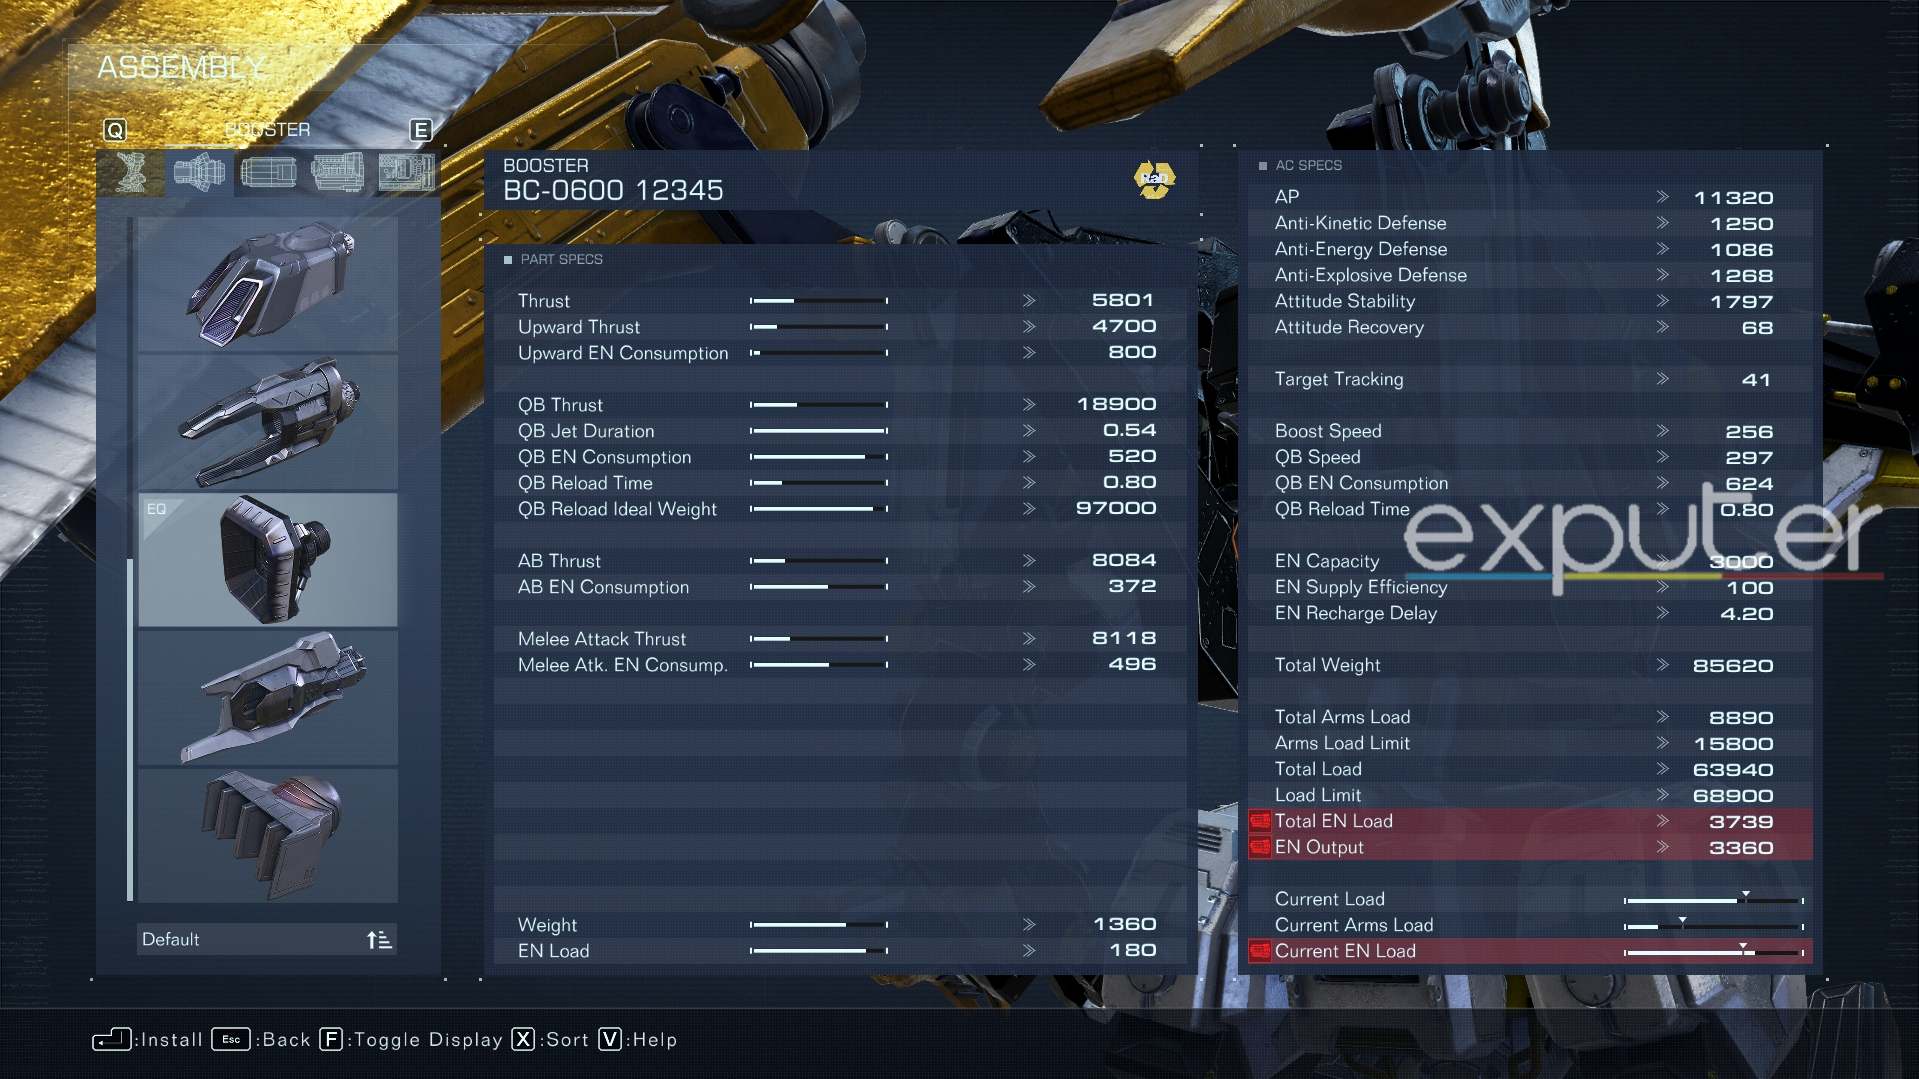
| Thrust | 5801 |
| Upward Thrust | 4700 |
| Upward EN Consumption | 800 |
| QB Thrust | 18900 |
| QB Jet Duration | 0.54 |
| QB EN Consumption | 520 |
| AB Thrust | 8084 |
| AB EN Consumption | 372 |
For using your Quick Boost and dashing around enemy attacks, the BC-0600 is your best bet. This is mainly thanks to its QB Jet Duration, QB EN Consumption, and QB Reload Ideal Weight, which are superior to any other in-game booster. As such, low-AP builds might want to consider the BC-0600 for these crucial advantages.
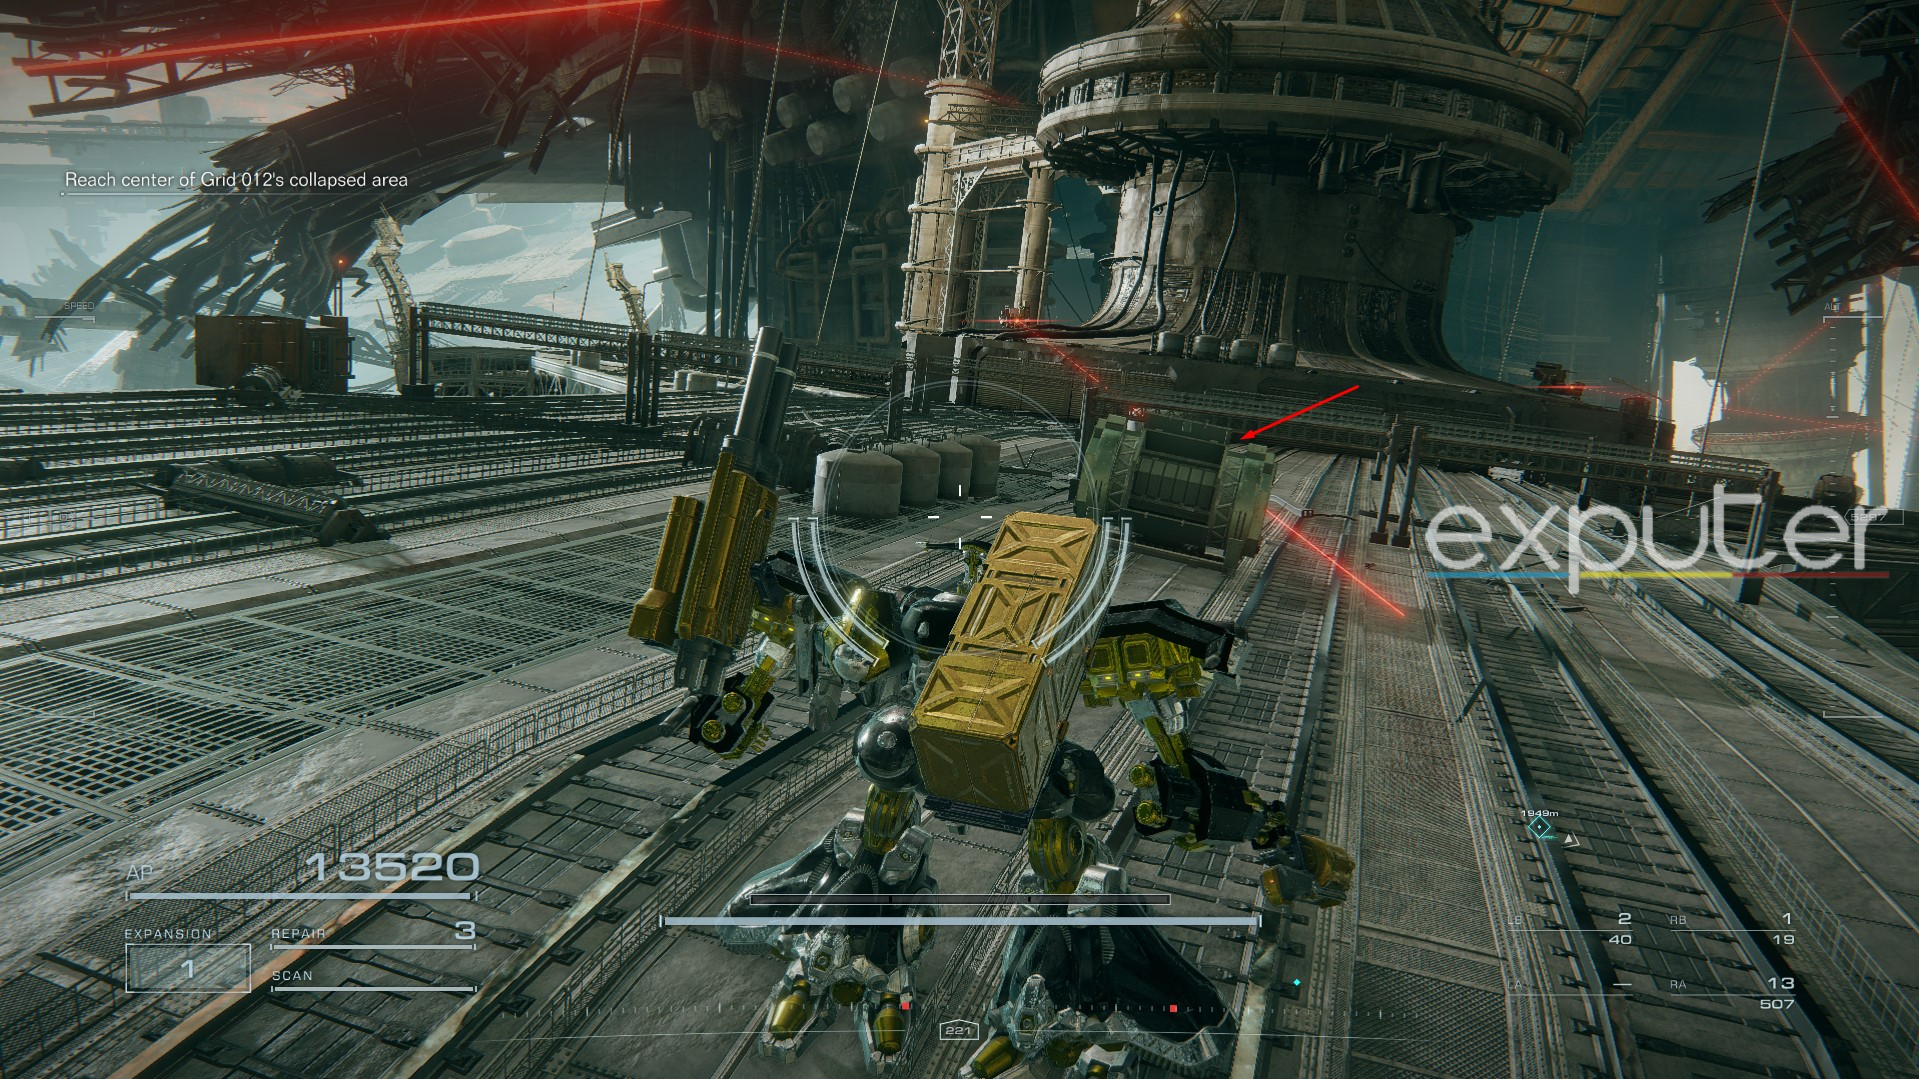
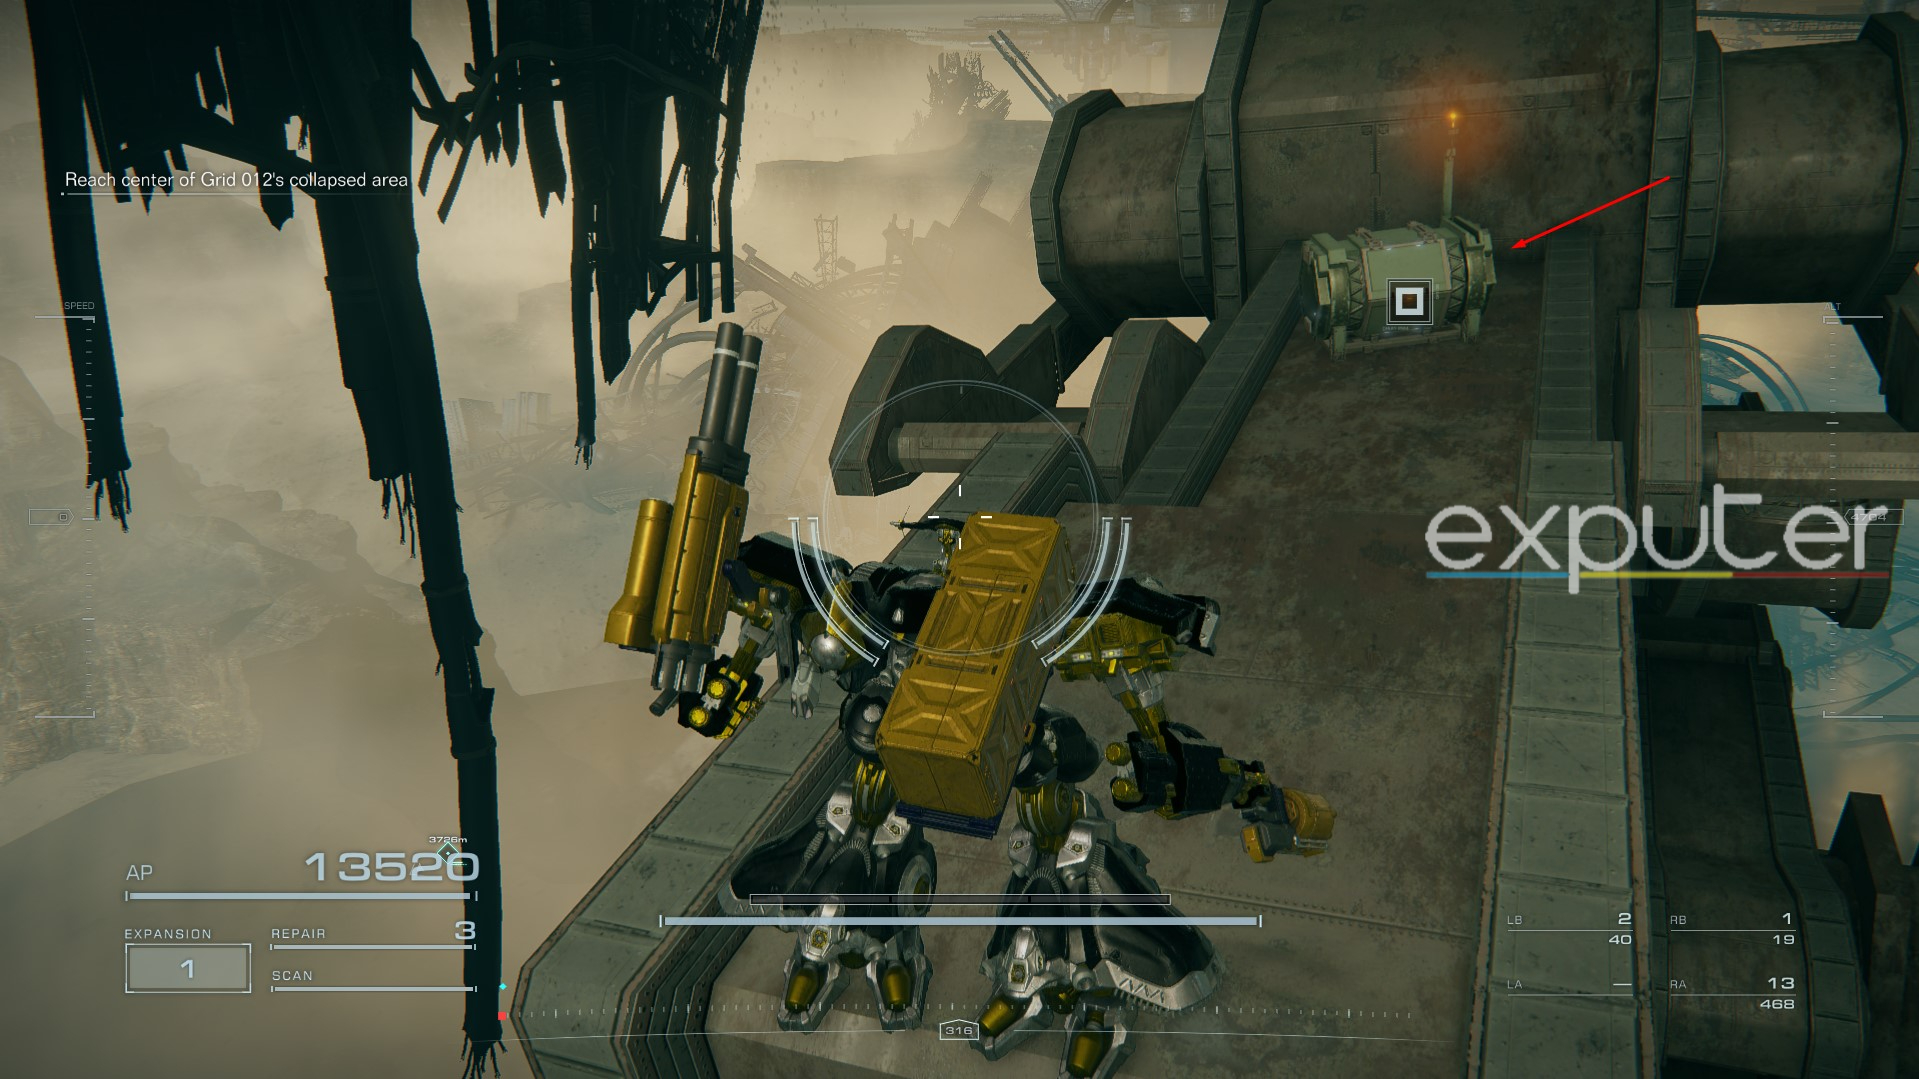
After picking up the DOUBLE TROUBLE, follow these instructions:
- Again, while avoiding the sensors, keep descending to the next objective marker below.
- Upon reaching the next platform, progress along the narrow path on your right, and you’ll end up with the booster’s chest atop a giant mechanism of the extreme edge.
WB-0000 BAD COOK
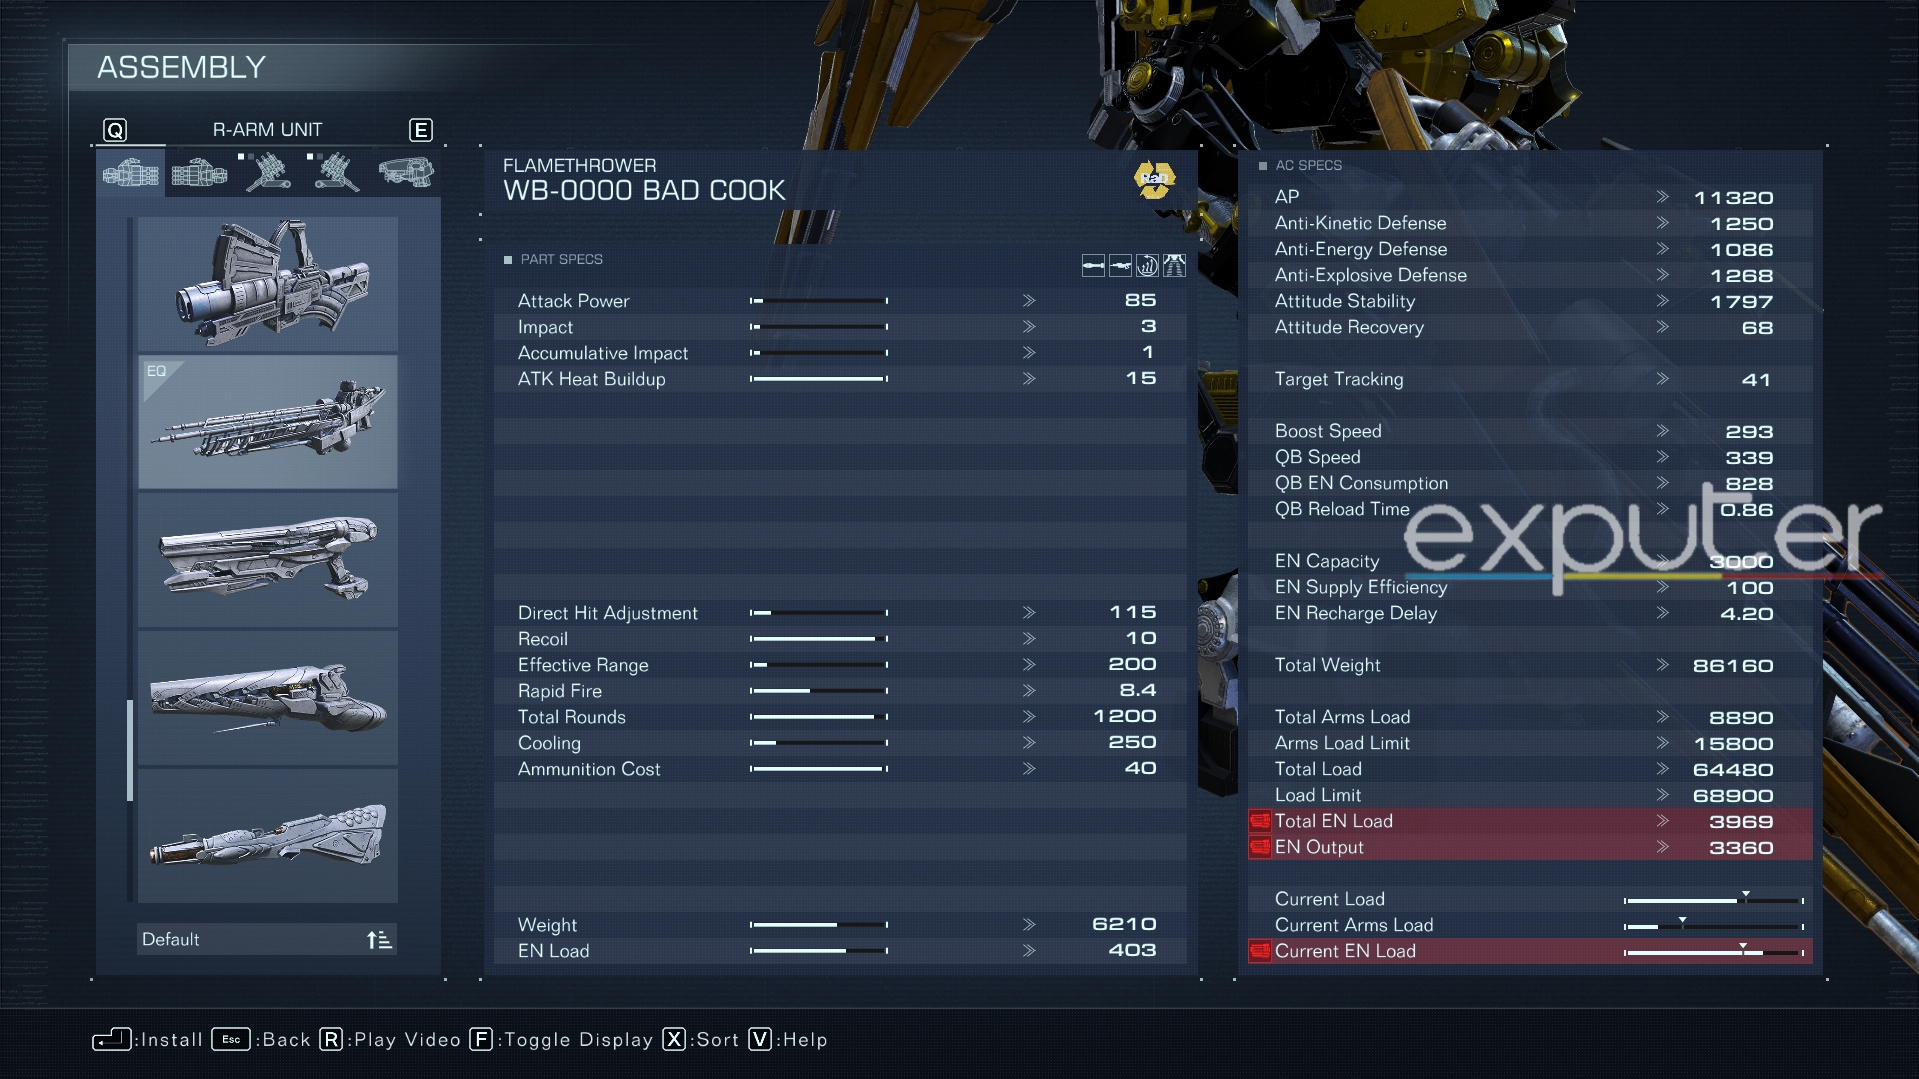
| Attack Power | 85 |
| Impact | 3 |
| Accumulative Impact | 1 |
| Blast Radius | 15 |
| Direct Hit Adjustment | 115 |
| Recoil | 10 |
| Effective Range | 200 |
| Rapid Fire | 8.4 |
The BAD COOK is a right-handed flamethrower weapon that, like the DOUBLE TROUBLE, can be highly lethal at close range. If you have a quick AC that can close the gap between you and hostiles, this is an ideal choice for that playstyle. However, it’s worth mentioning that the WB-0800 BAD COOK does not inflict any posture damage, so you’ll need to rely on your left-hand and shoulder weapons to create an ACS Overload.
Without further ado, here’s how to get this flamethrower after taking the BC-0600:
- As you advance through the mission, you’ll reach a tightly packed room with several red-laser sensors.
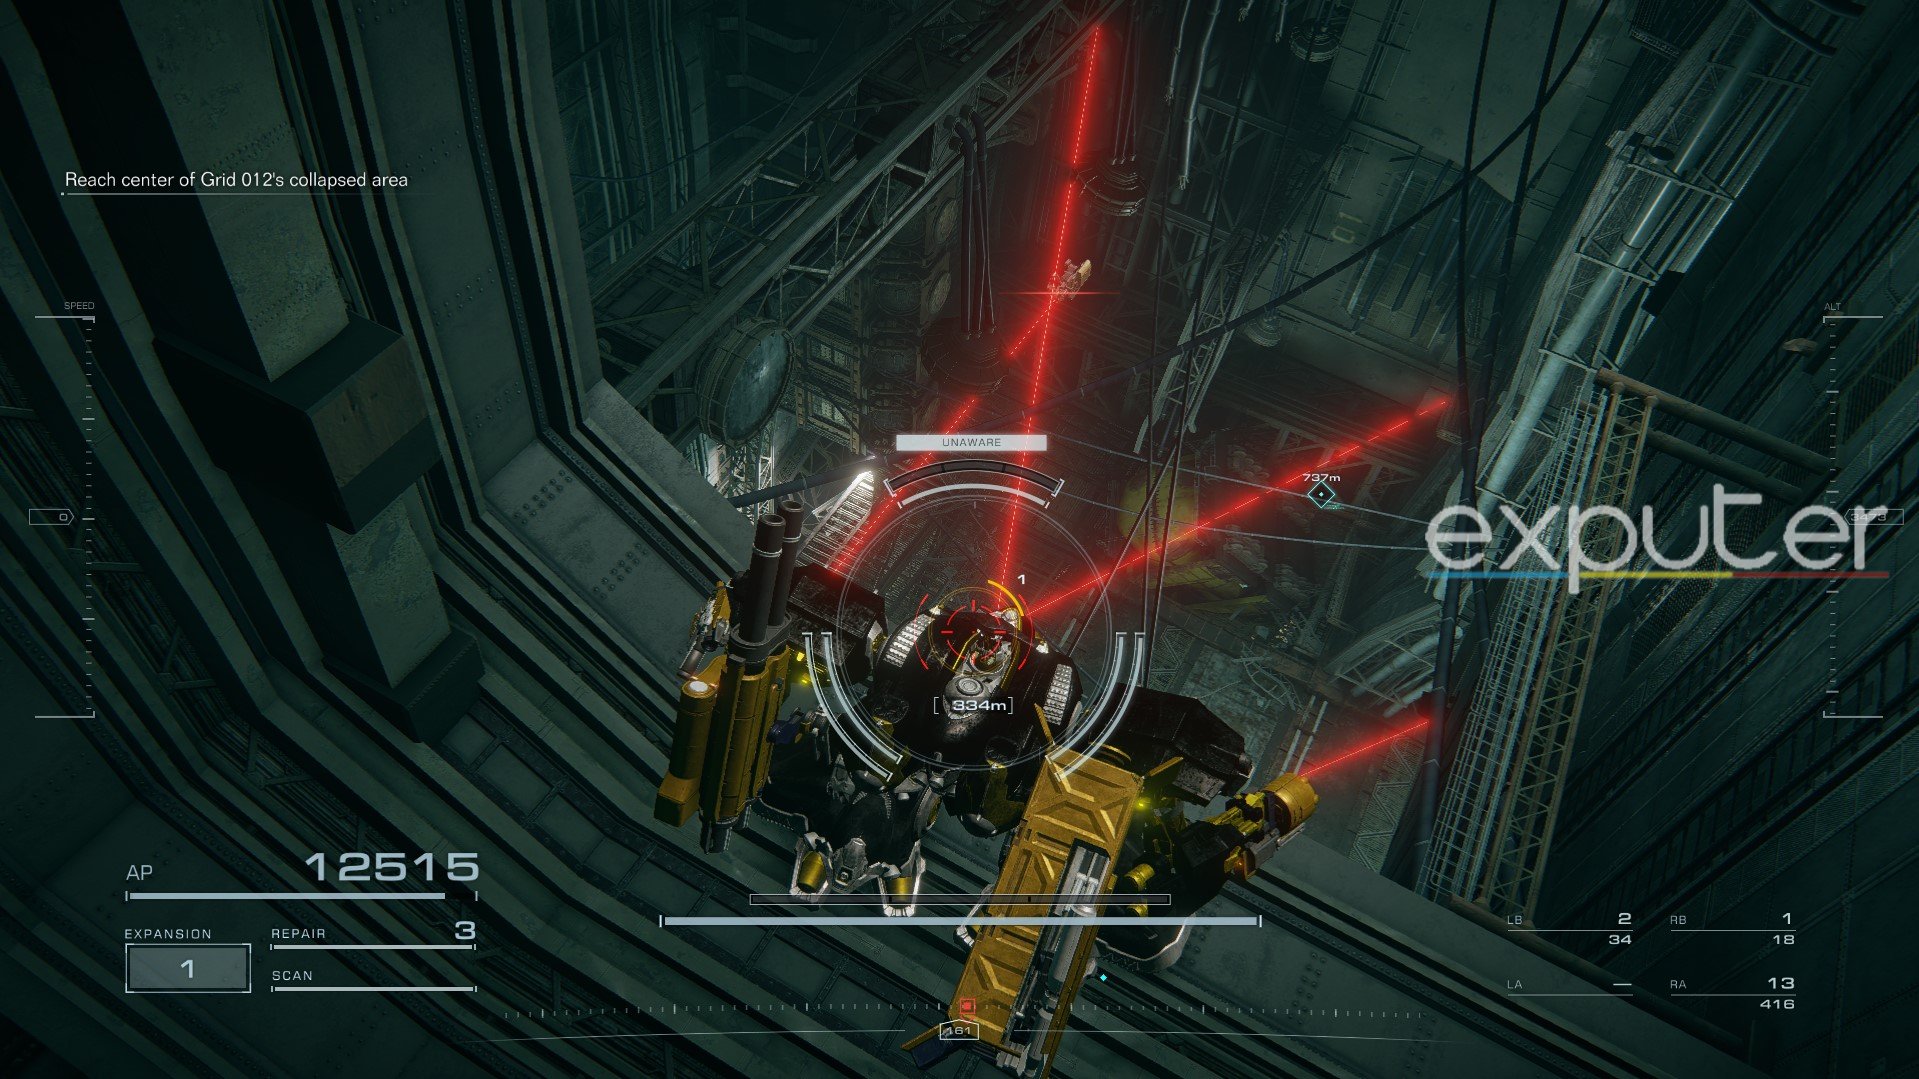
- Drop down and immediately remove all the sensory mechs and light MTs while dodging incoming attacks.
- Once the room’s clear, you can safely access the BAD COOK’s chest in the center.
Underground Exploration – Depth 1
Following the defeat of the Ice Worm boss that concludes Chapter 3, your subsequent few missions will primarily center around exploring a deep cave and retrieving further info on the Coral. Chapter 4 contains the complete Ephemera set in Armored Core 6 and additional hidden parts in distinct locations, like a pair of boosters.
IA-C01L Ephemera
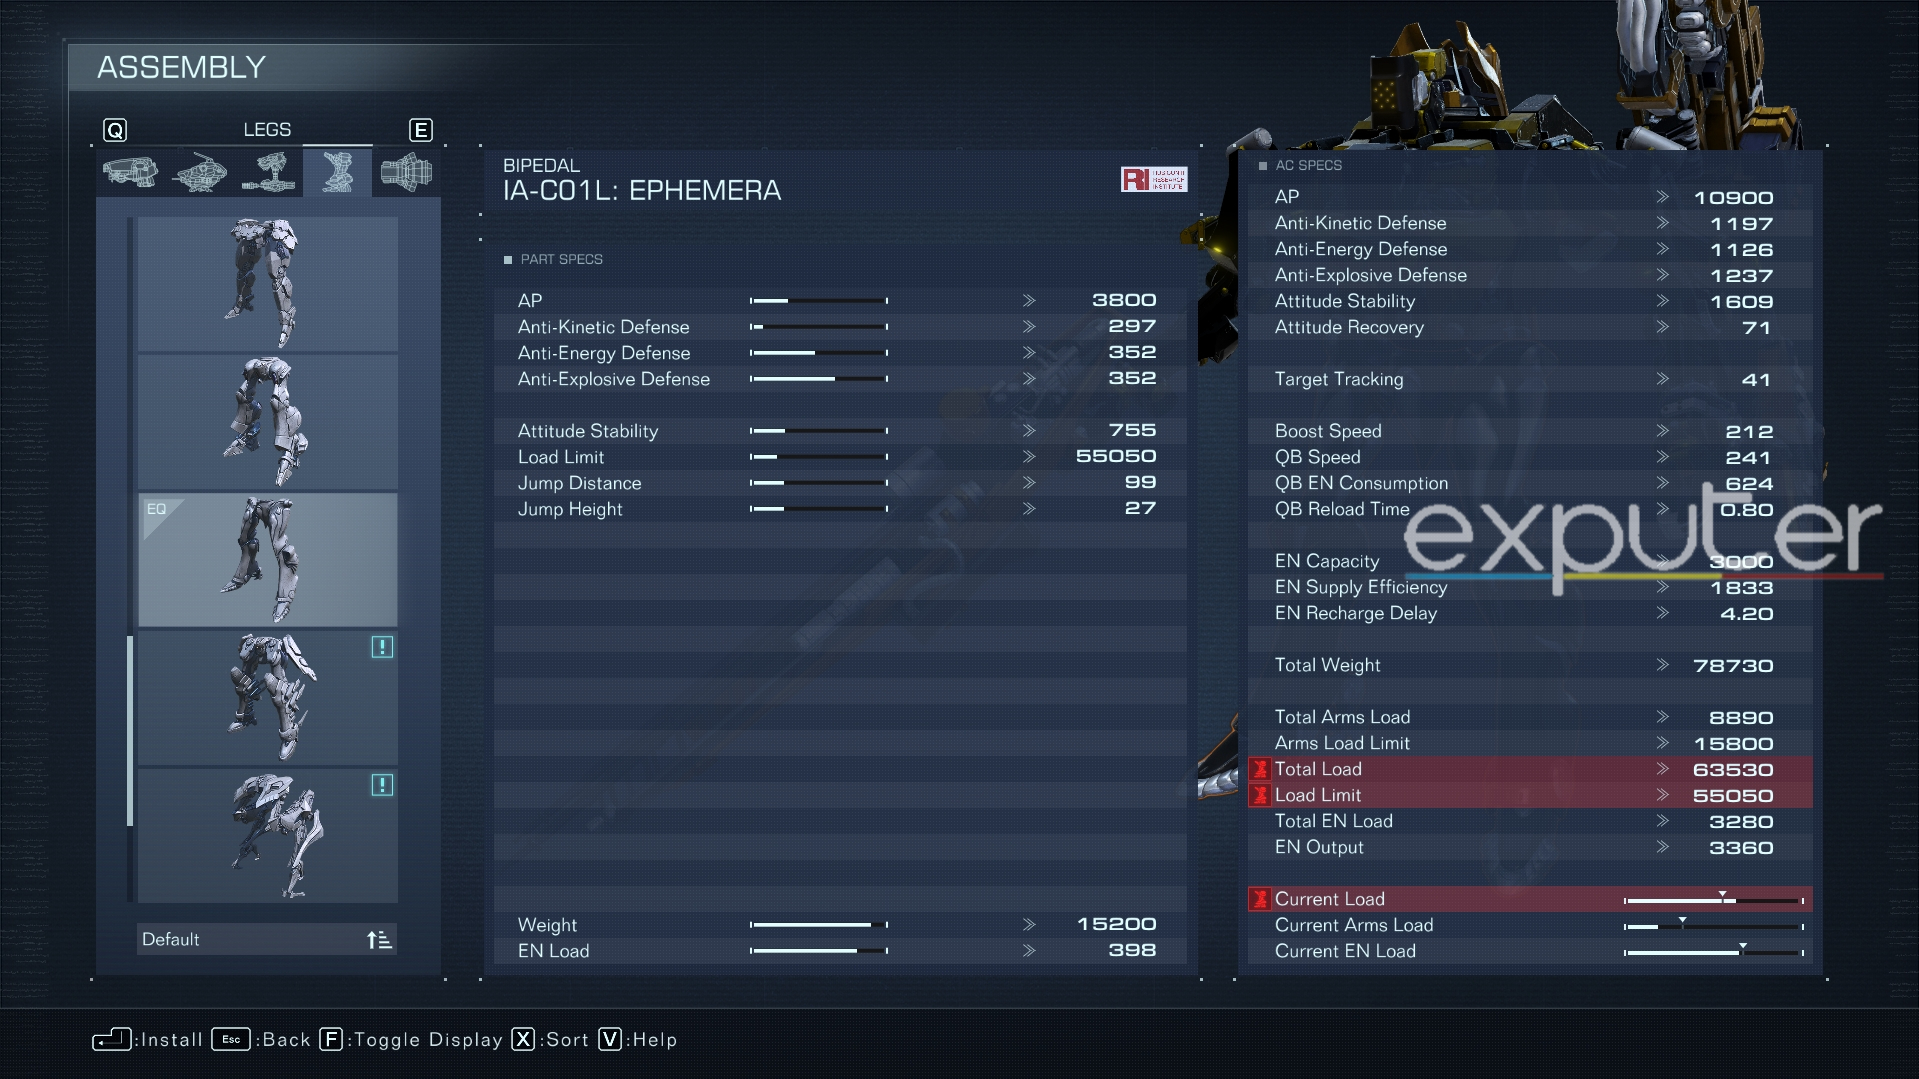
| AP | 3800 |
| Anti-Kinetic Defense | 297 |
| Anti-Energy Defense | 352 |
| Anti-Explosive Defense | 352 |
| Attitude Stability | 755 |
| Load Limit | 55050 |
| Jump Distance | 99 |
| Jump Height | 27 |
As the first part of the Ephemera collection, the IA-C01L is a great lightweight Bipedal Leg set, massively outperforming other Legs in its weight. It’s a great addition to builds that prefer solid maneuverability and responsive dashes. However, it slightly falls back on its Jumping Height and Distance and gets outshined by several similar Bipedal and Reverse-Jointed legs.
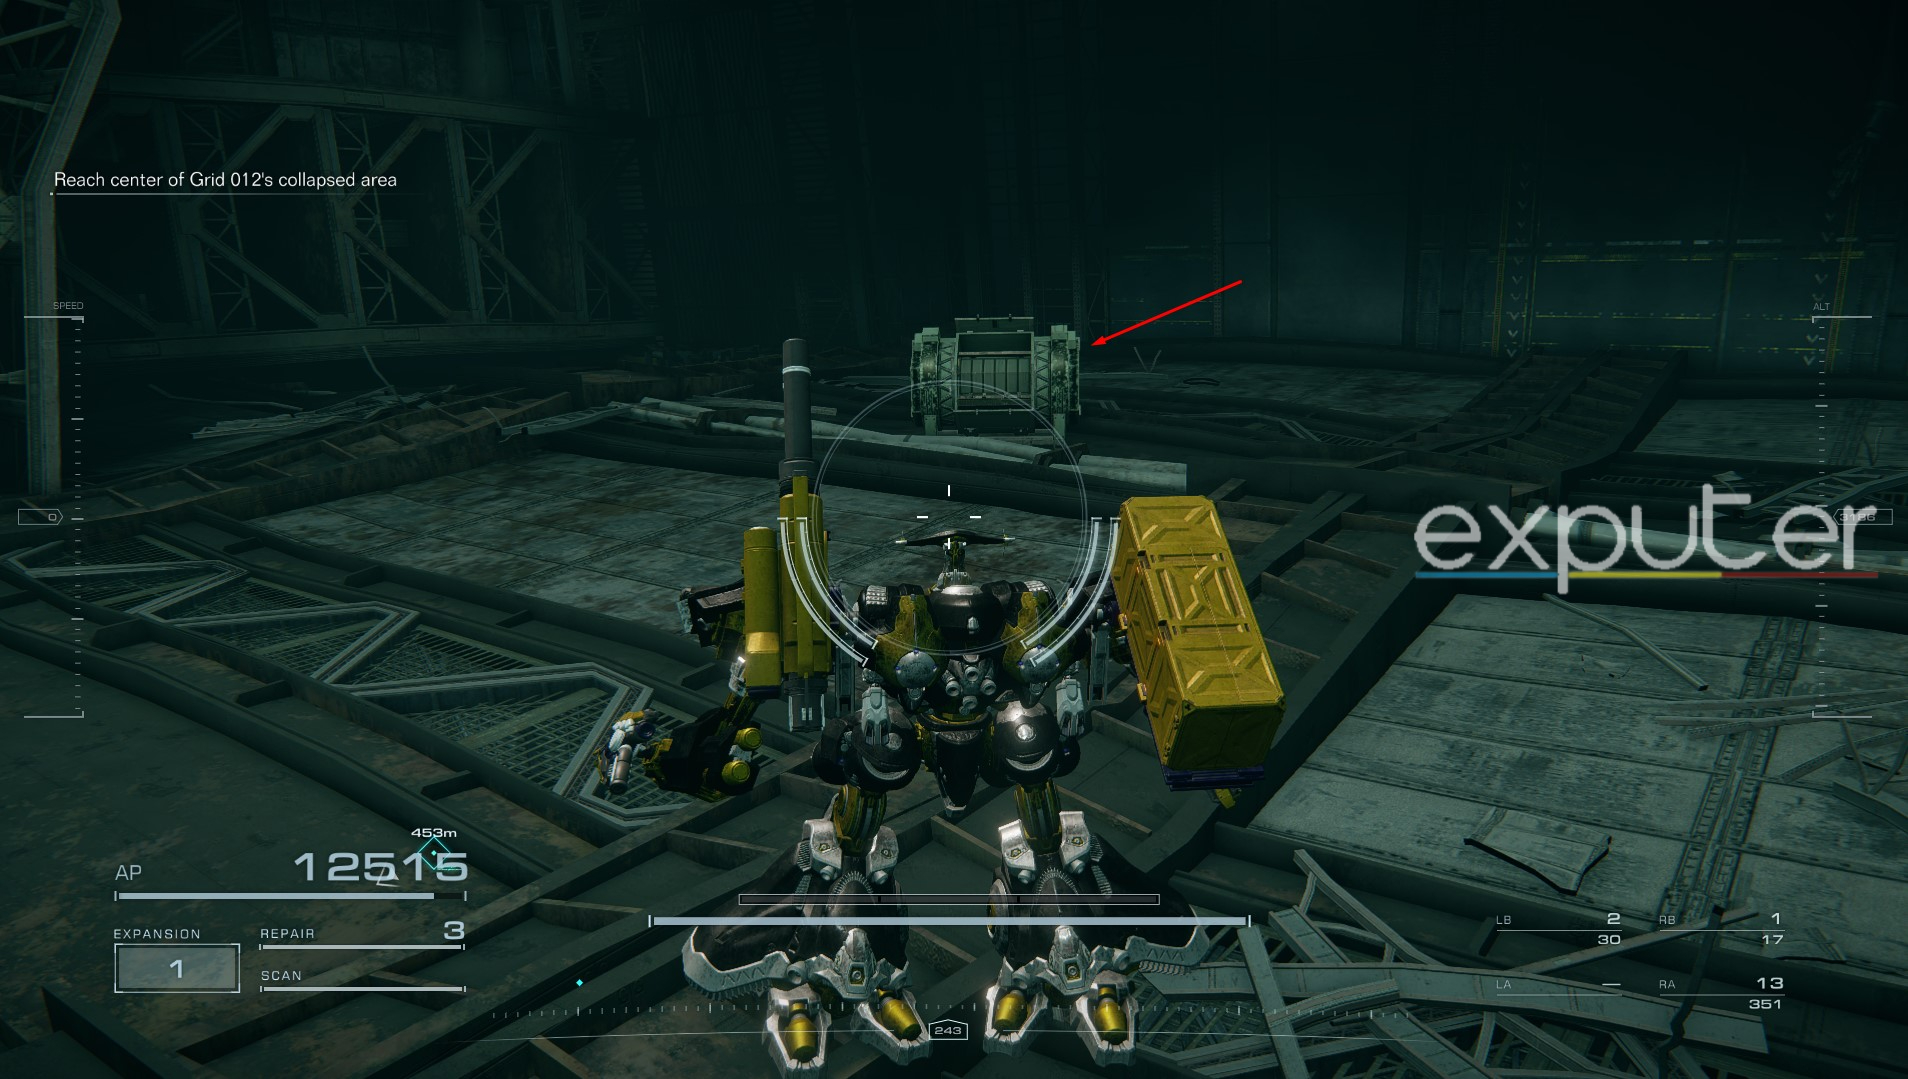
Players must reach the Underground Exploration – Depth 1 Mission after completing Chapter 3 and perform the following steps:
- Access the elevator at the beginning of the mission to descend to the site’s bottom.
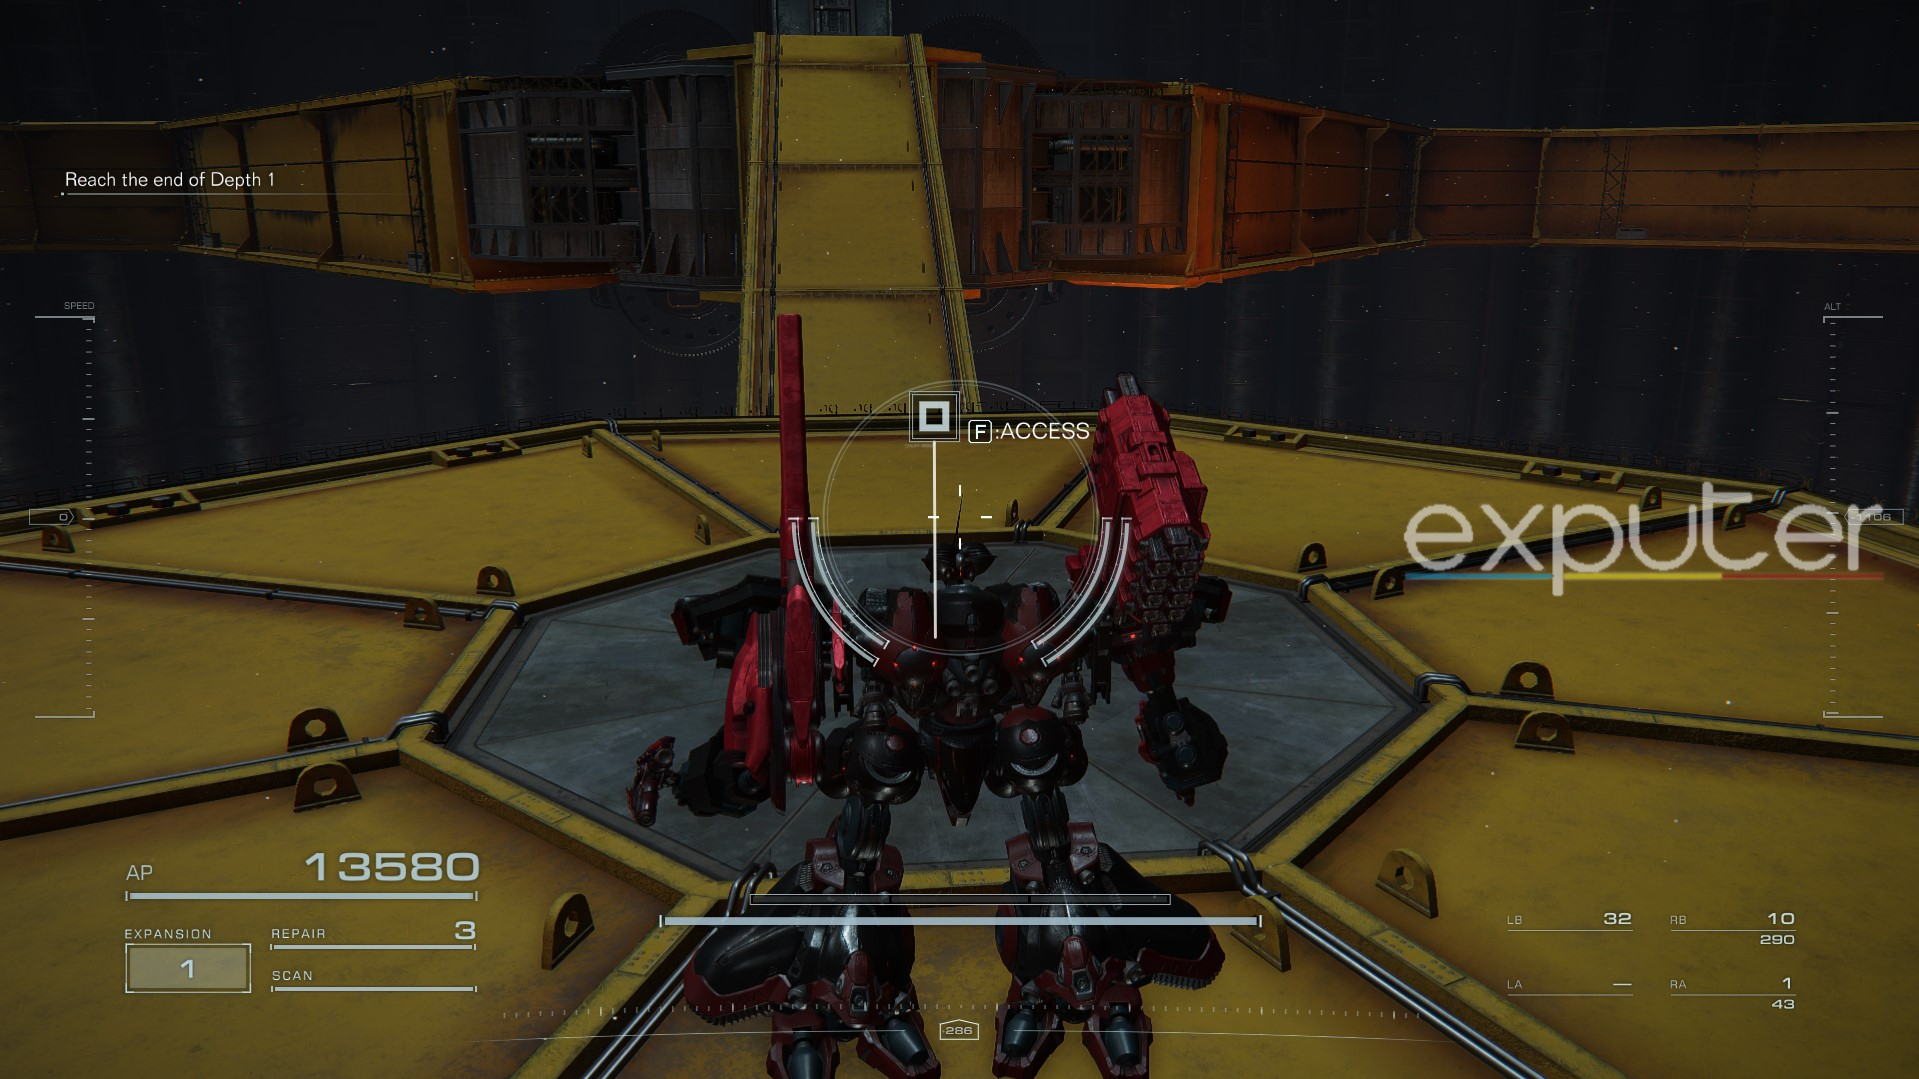
- Once the elevator stops, drop down to the nearest platform while avoiding enemy lasers shooting from below the site.
- After navigating through the area, you will be attacked by several enemy MTs, after which Ayre will guide you to the nearby Access Point, your next objective.
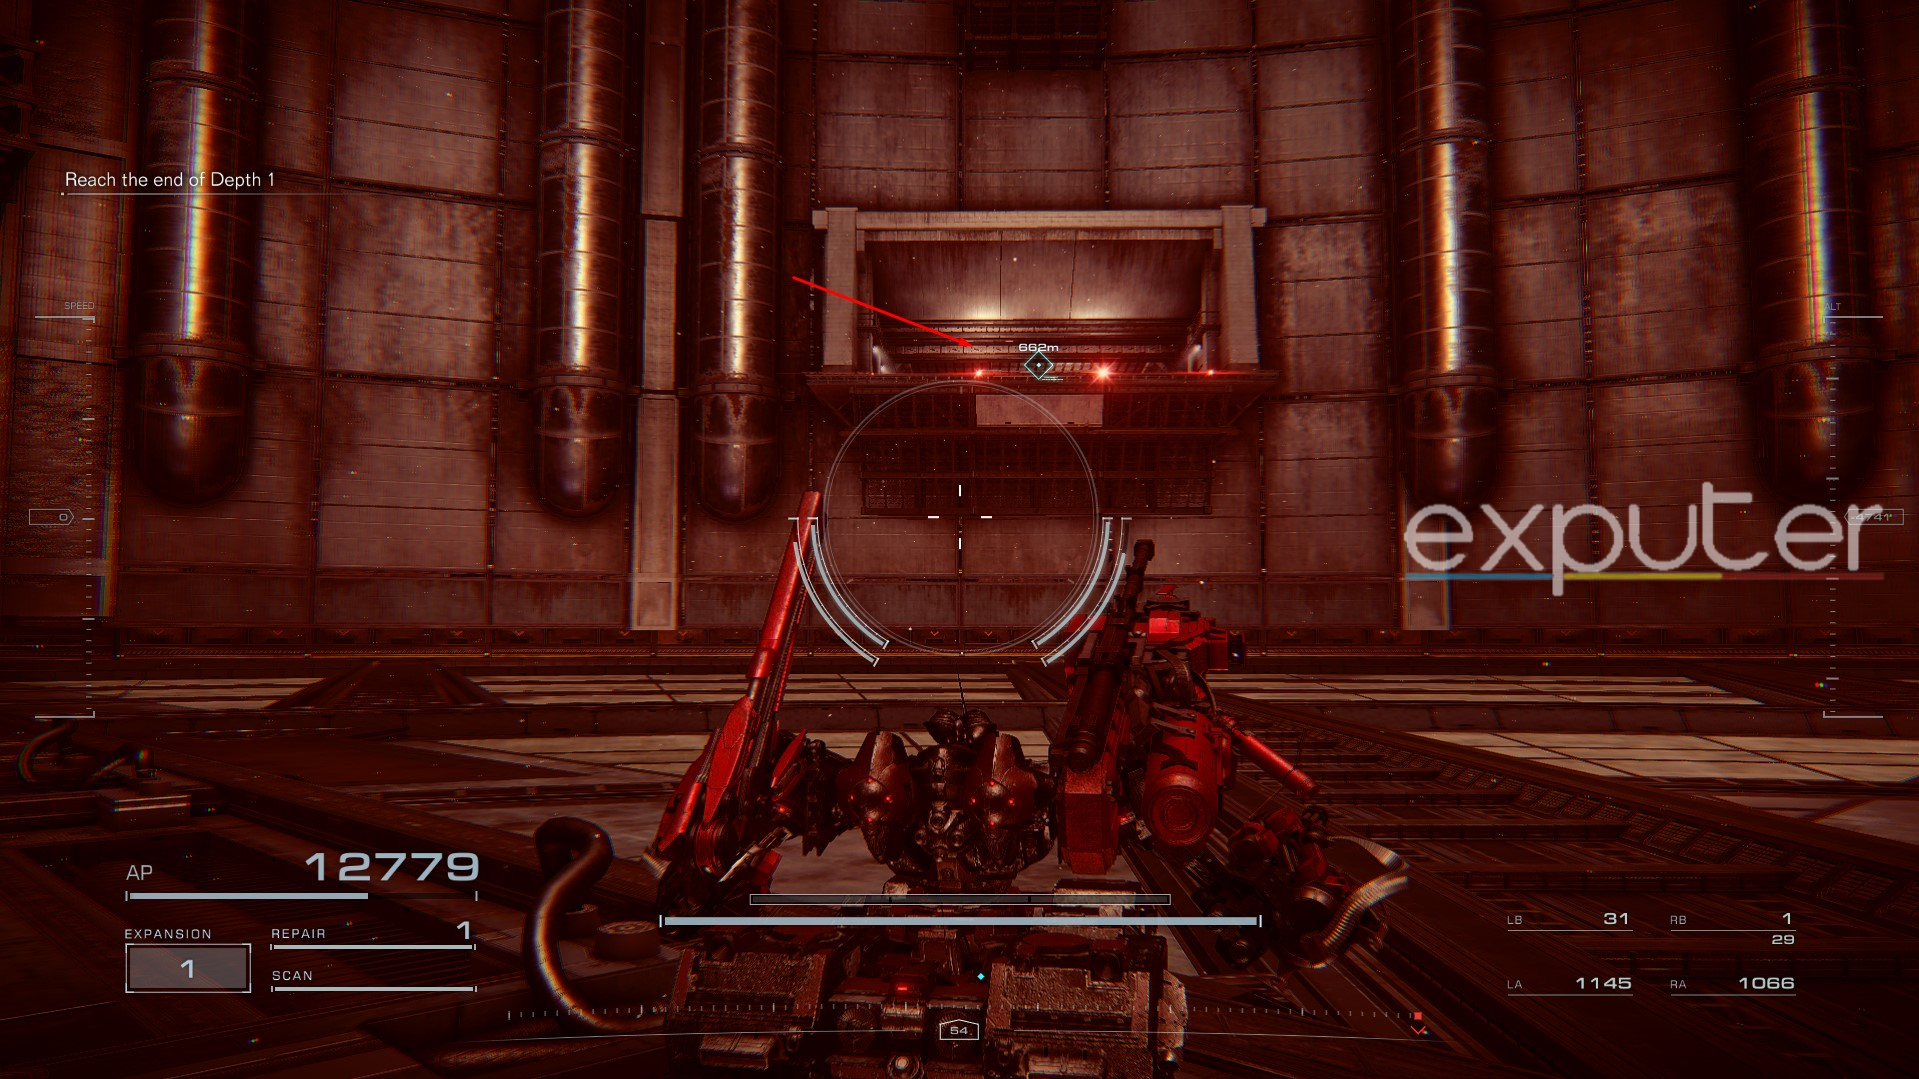
- Finally, you can access the chest at the far end of the window to obtain the IA-C01L Ephemera.

Underground Exploration – Depth 2
After getting the IA-C01L Bipedal Legs, you must proceed through Depth 1 and kill Nephentes, the giant mechanism at the bottom of the area. Target its neck by getting close to its head, and you’ll wipe out its reasonably low HP with a few attacks, prompting you to Depth 2.
IA-C01B Gills
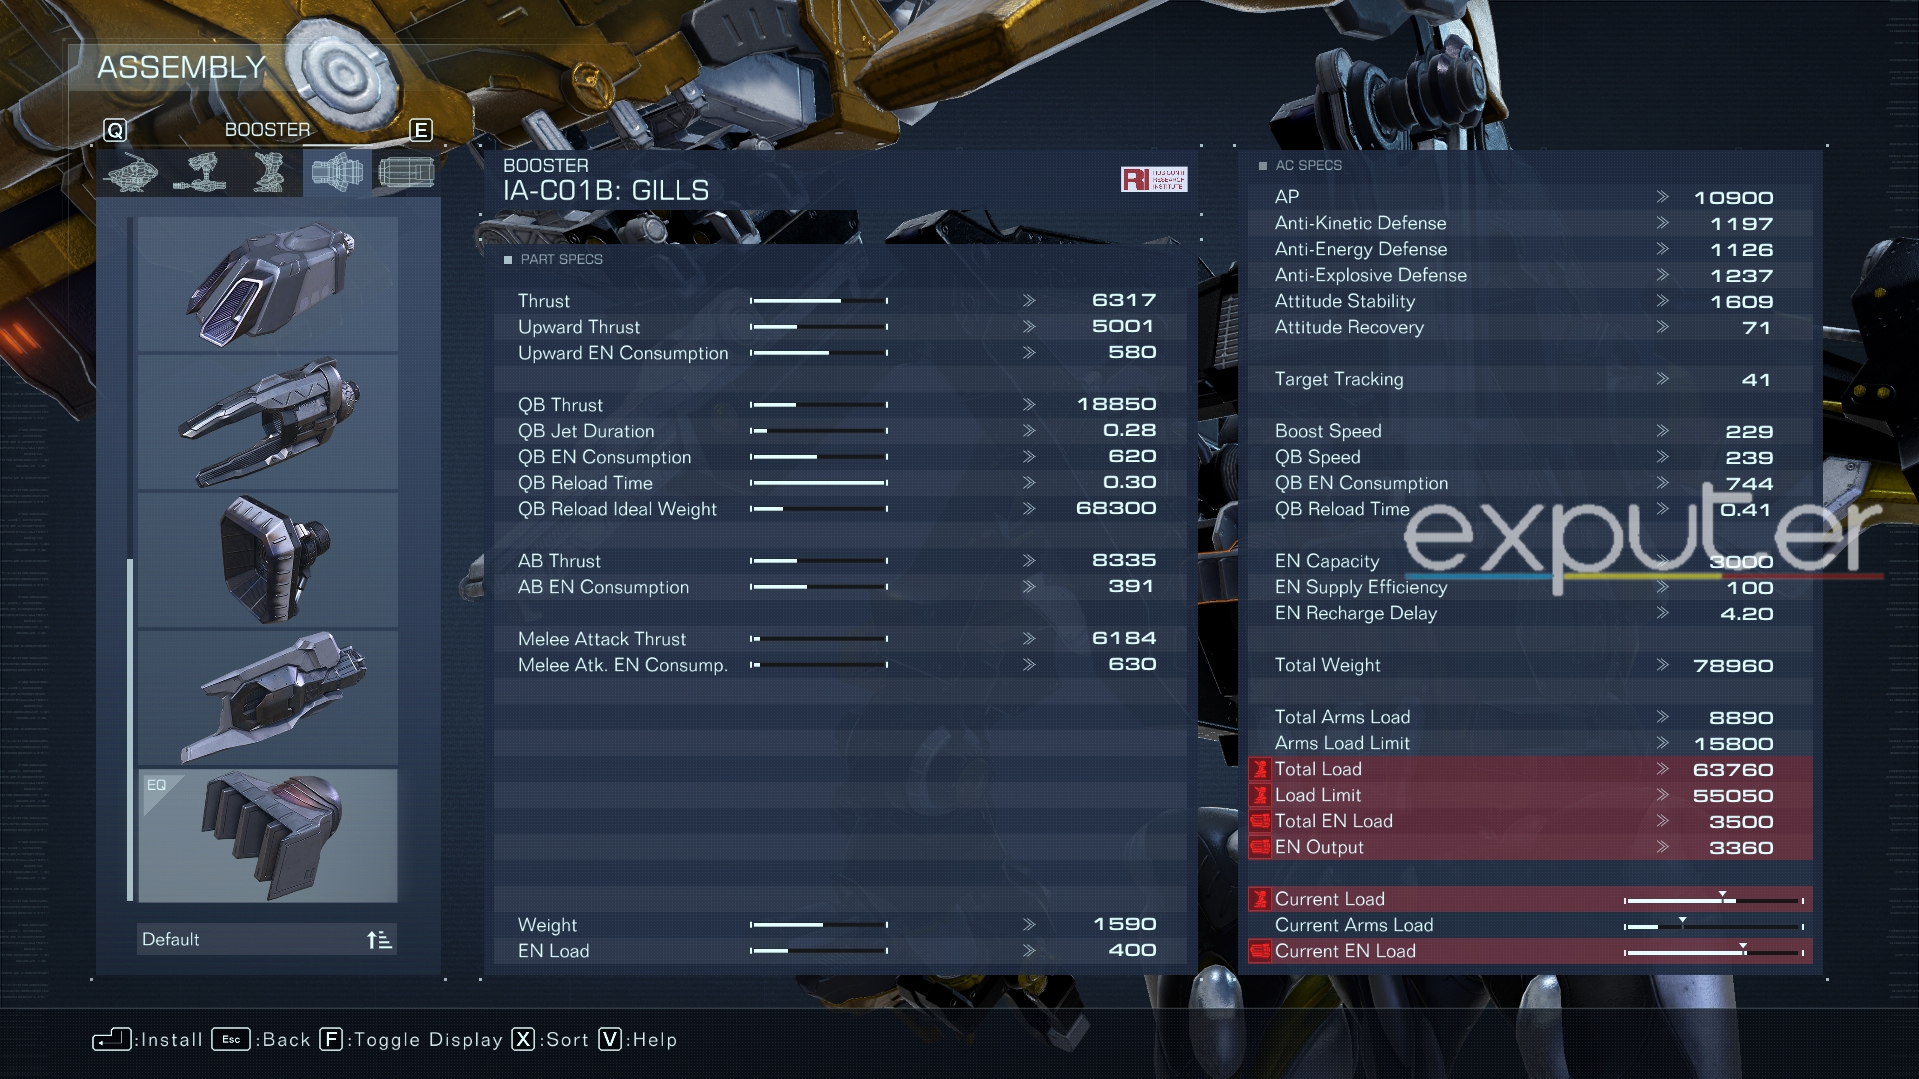
| Thrust | 6317 |
| Upward Thrust | 5001 |
| Upward EN Consumption | 580 |
| QB Thrust | 18850 |
| QB Jet Duration | 0.28 |
| QB EN Consumption | 620 |
| AB Thrust | 0.30 |
| AB EN Consumption | 68300 |
The Gills are some of the best lightweight boosters in AC6, providing the best stats for Upward-related thrust and mobility compared to other boosters in their weight. Despite the balanced toolset as its primary selling point, I would not recommend the IA-C01B for melee builds due to the extremely weak Melee Thurst.
Upon entering the second Depths, you can get the IA-C01B with this procedure:
- Start by accessing the door in front, slide down the shaft, and destroy the approaching MT.
- Now, go through the tunnel on your right and enter the small room on your left as you exit the tunnel.
- Drop down from the opening inside the room and kill the surrounding Balam MTs, then head outside and access the Control Panel.
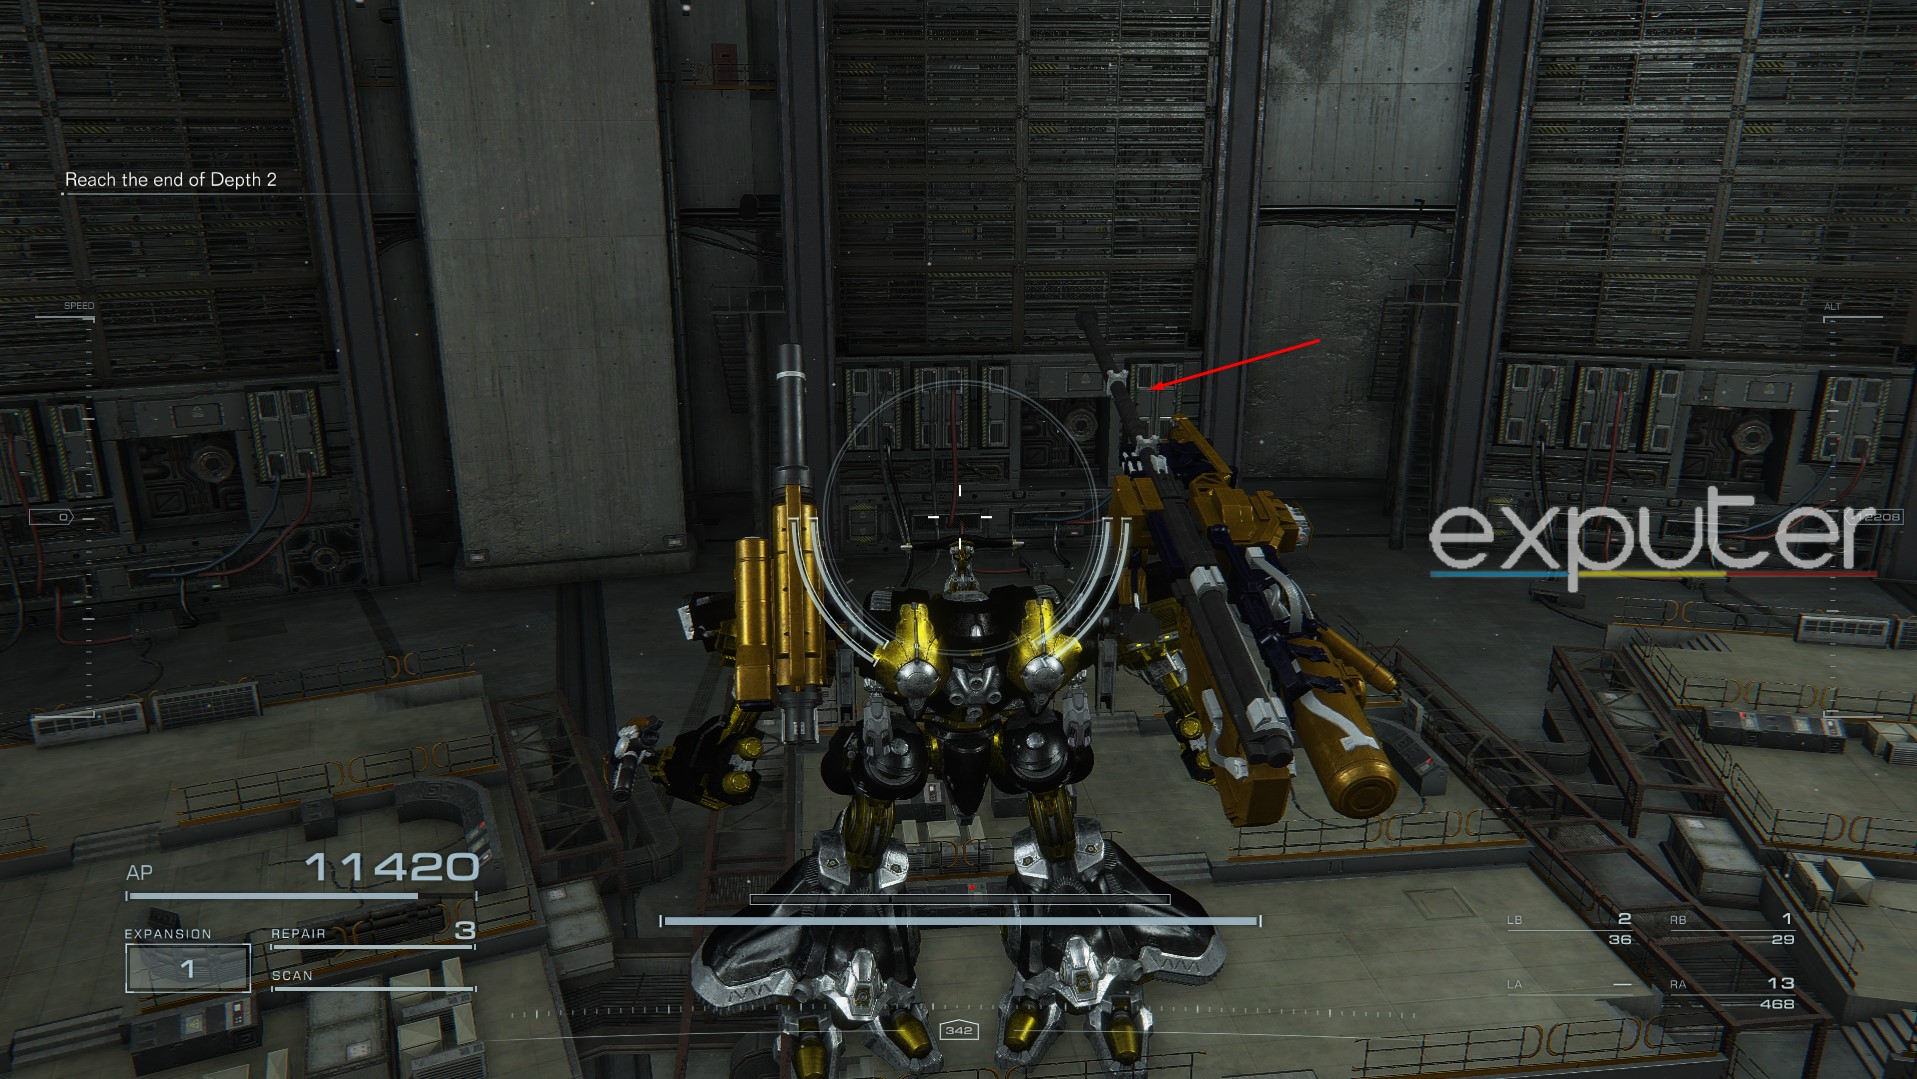
- Once the power’s back online, use the elevator beside you to ascend back up to unlock the locked door.
- Continue following the tunnel, and you’ll eventually face G5 Iguazu, a quick-moving AC miniboss from the Redguns.
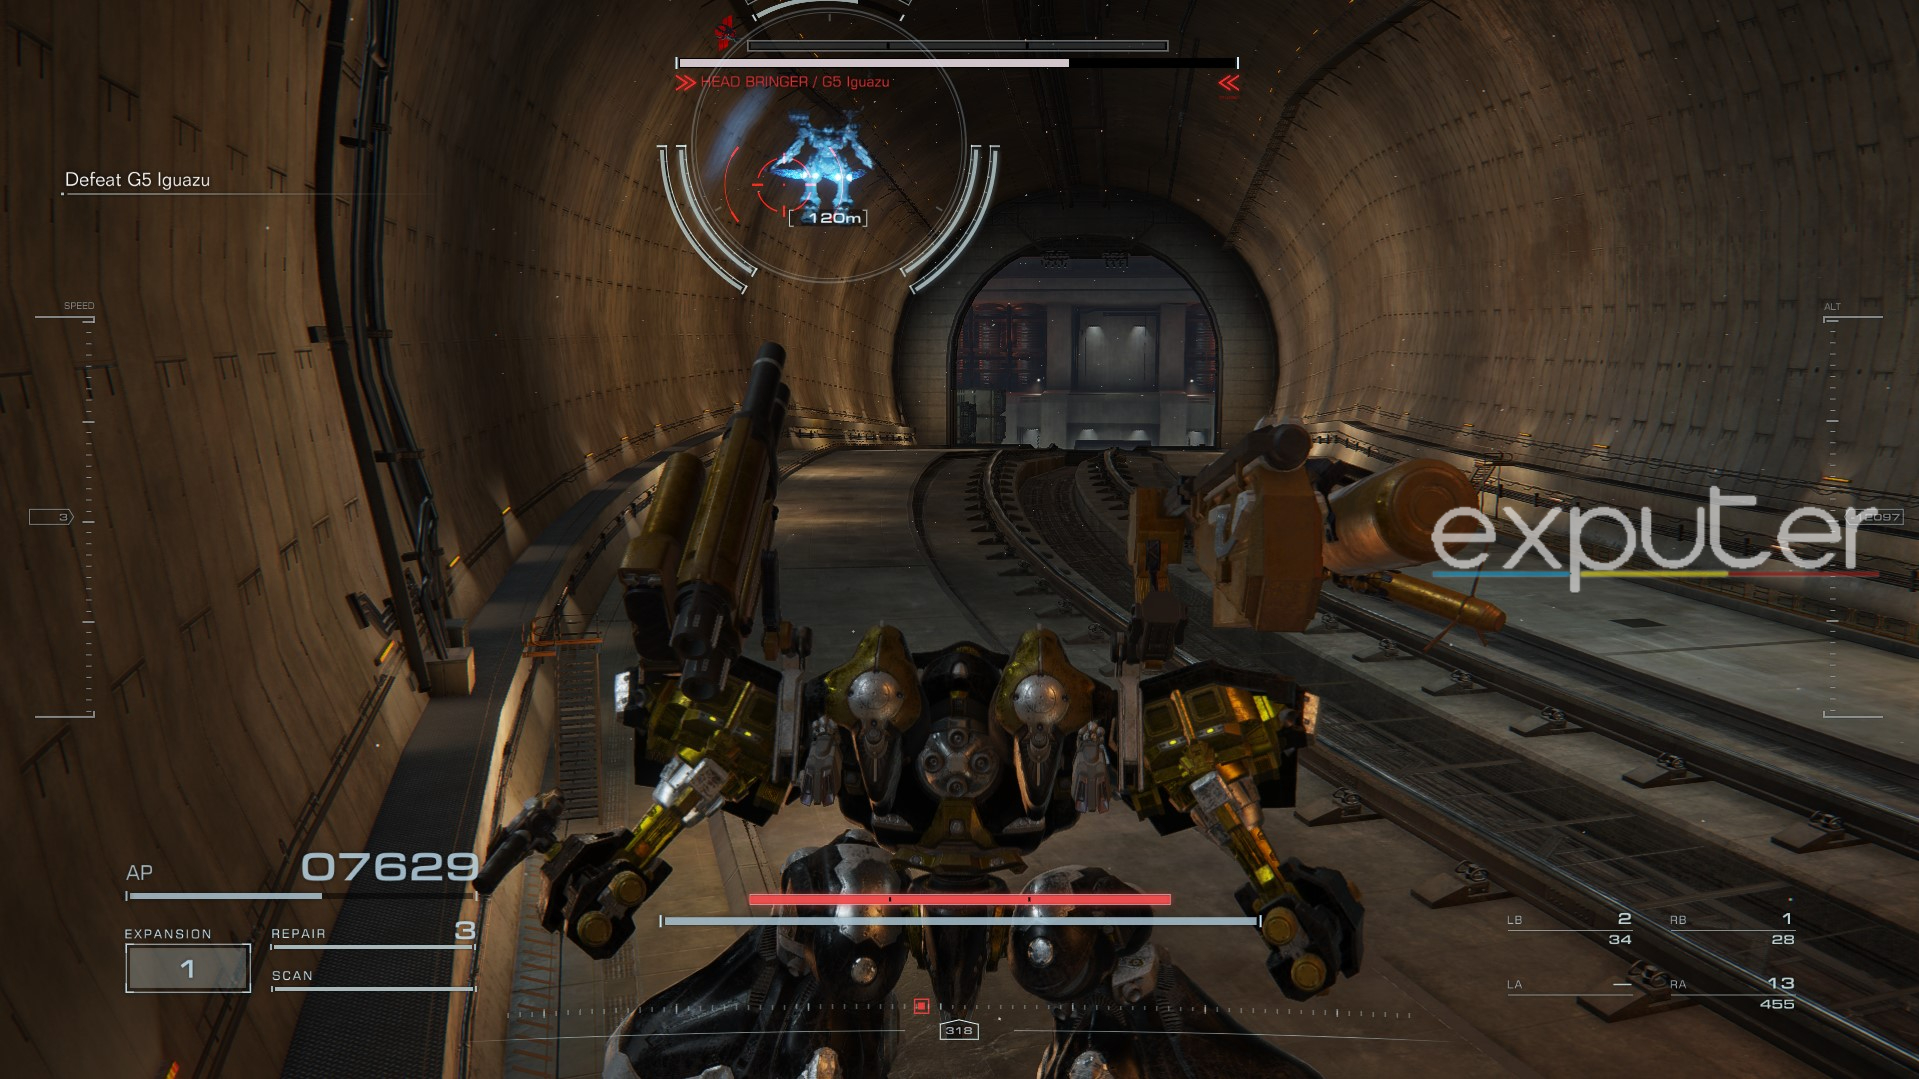
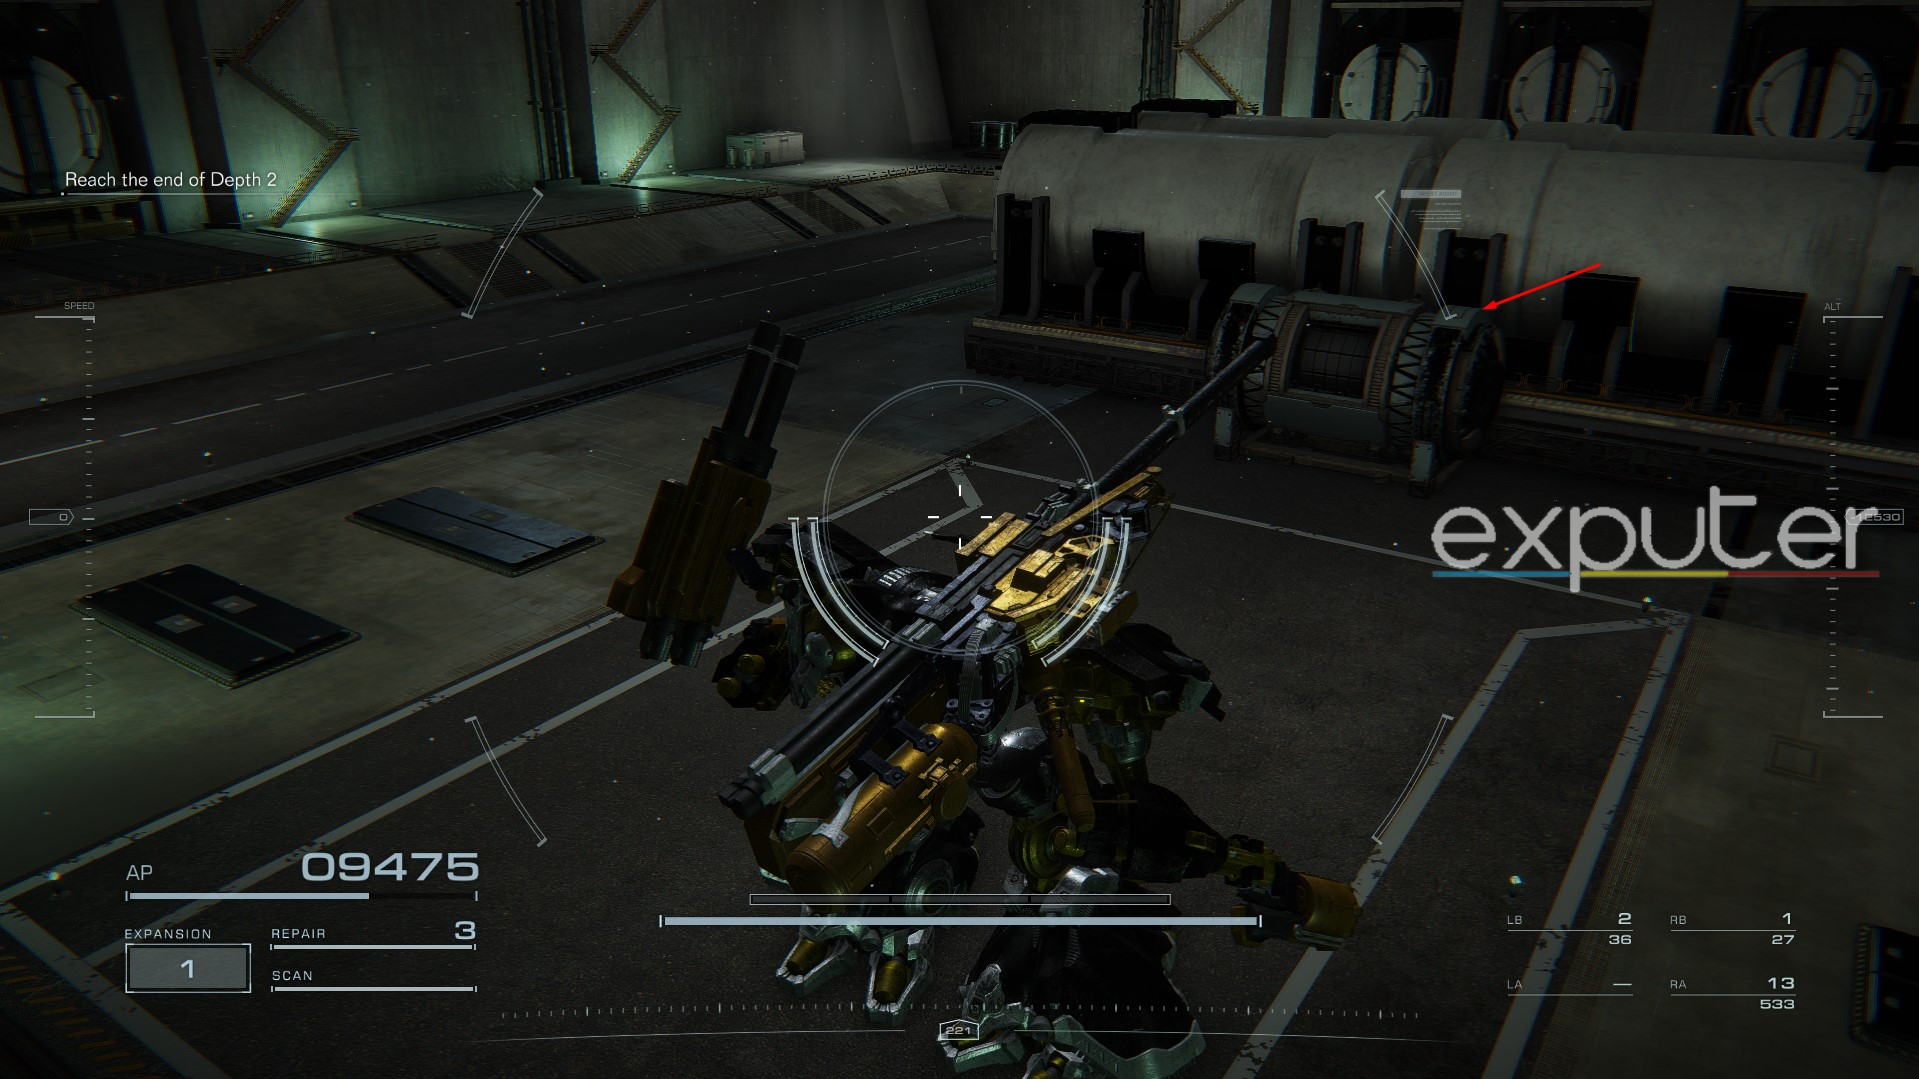
- After dealing with him, resupply and advance further in, after which you must chase after the laser-shooting MT into a tunnel.
- After you spot that MT again in the tunnel, go into the room on your right, and you’ll find the chest with the booster inside.
IA-C01A Ephemera
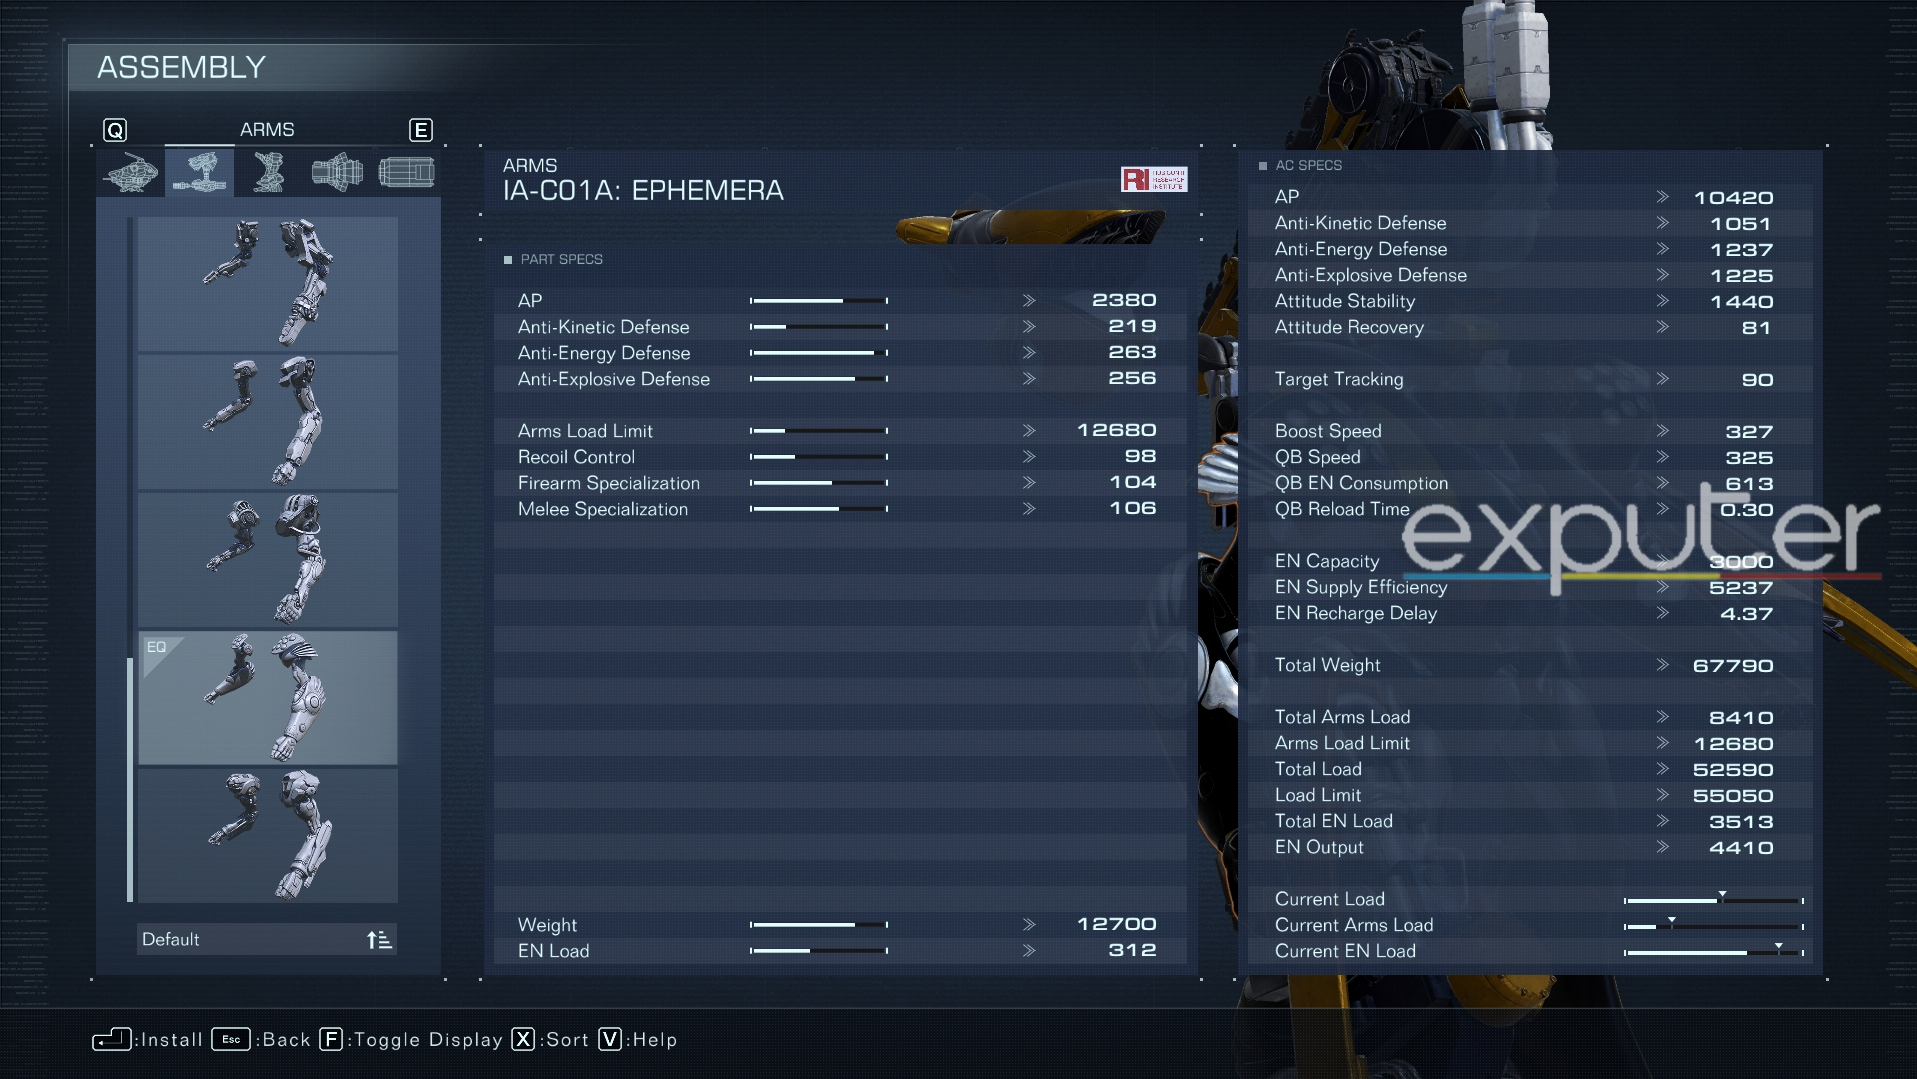
| AP | 2380 |
| Anti-Kinetic Defense | 219 |
| Anti-Energy Defense | 263 |
| Anti-Explosive Defense | 256 |
| Arms Load Limit | 12680 |
| Recoil Control | 98 |
| Firearm Specialization | 104 |
| Melee Specialization | 106 |
Designed for lightweight build users, the IA-C01A are great arm attachments if you can keep up with the high EN load requirements. It comes with great AP and Defenses, but I would suggest this component for its excellent Melee and Firearm Specializations, beating out some of the top heavyweight arms as well.
For the IA-C01A Ephemera, follow these steps after obtaining the Gills booster:
- Upon opening the chest, sprint back outside the tunnel and carefully drop to the rocky platforms near the entrance.
- Eventually, you’ll reach the Ventilation Duct and encounter some Electricity-Discharging drones.
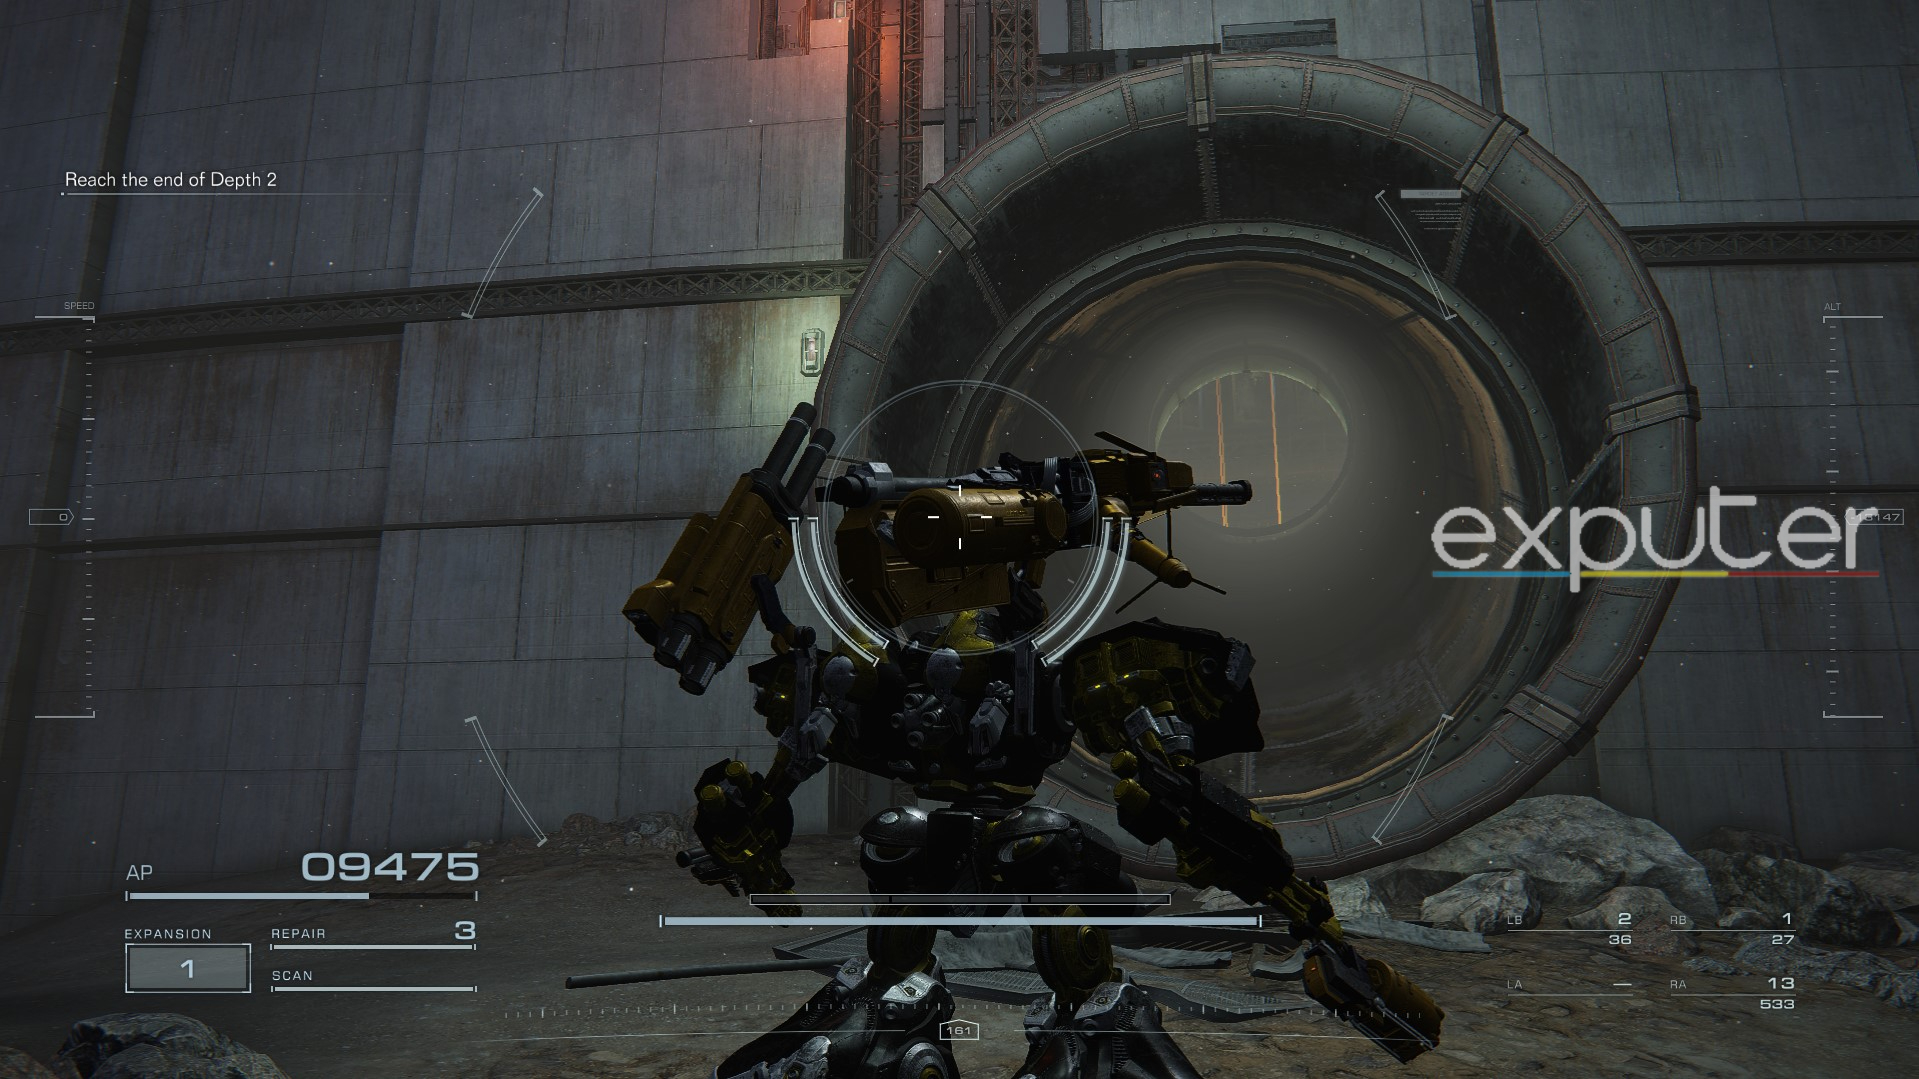
- Ignore these drones, use the launch pad in front, and then grab the arms’ chest after reaching the uppermost level.
Underground Exploration – Depth 3
With the arms in possession, continue through the series of tunnels in Depth 2 until you reach the Enforcer boss fight. This boss has several melee-oriented attacks, using laser slashes and sometimes creating an AoE blast with its weapon. You might need some additional attempts before you figure out its moveset, and once you do and kill it, you’ll advance to the final Depths mission.
IA-C01F OCELLUS
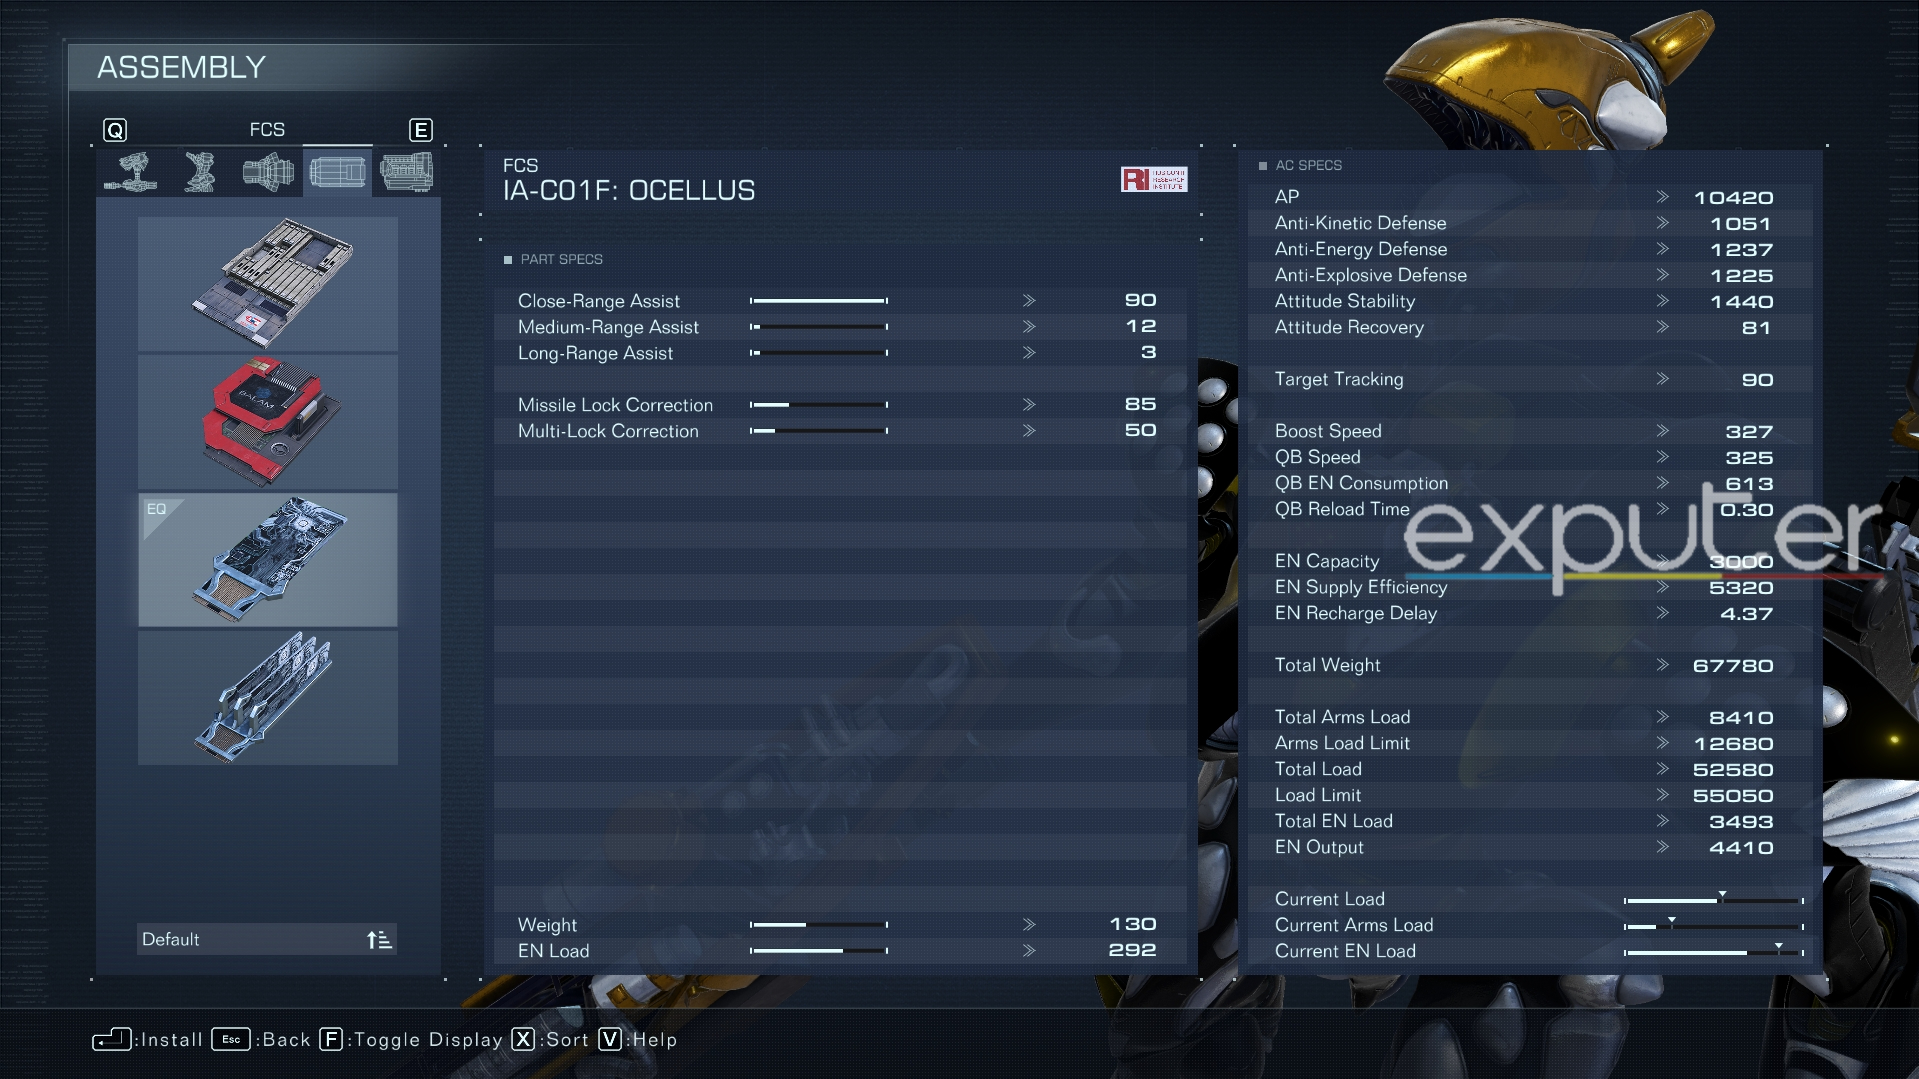
| Close-Range Assist | 90 |
| Close-Range Assist | 12 |
| Close-Range Assist | 3 |
| Missile Lock Correction | 85 |
| Missile Lock Correction | 50 |
Mainly on the heavier side regarding Weight and EN Load, the OCELLUS is an FCS as part of your mech’s Inner Components with the best close-range assist in Armored Core 6. The IA-C01F is the only FCS that’s a hidden part in-game and is the ideal pick for players who utilize shotguns, melee, and other lethal weapons at close range.
-
- Of course, this significant advantage has a noticeable drawback: the OCELLUS has the worst Medium-Range and Close-Range assists.
- Furthermore, its Missile-Lock and Multi-Lock corrections leave much to be desired, limiting the OCELLUS’s versatility and making it a suitable addition to particular builds and playstyles.
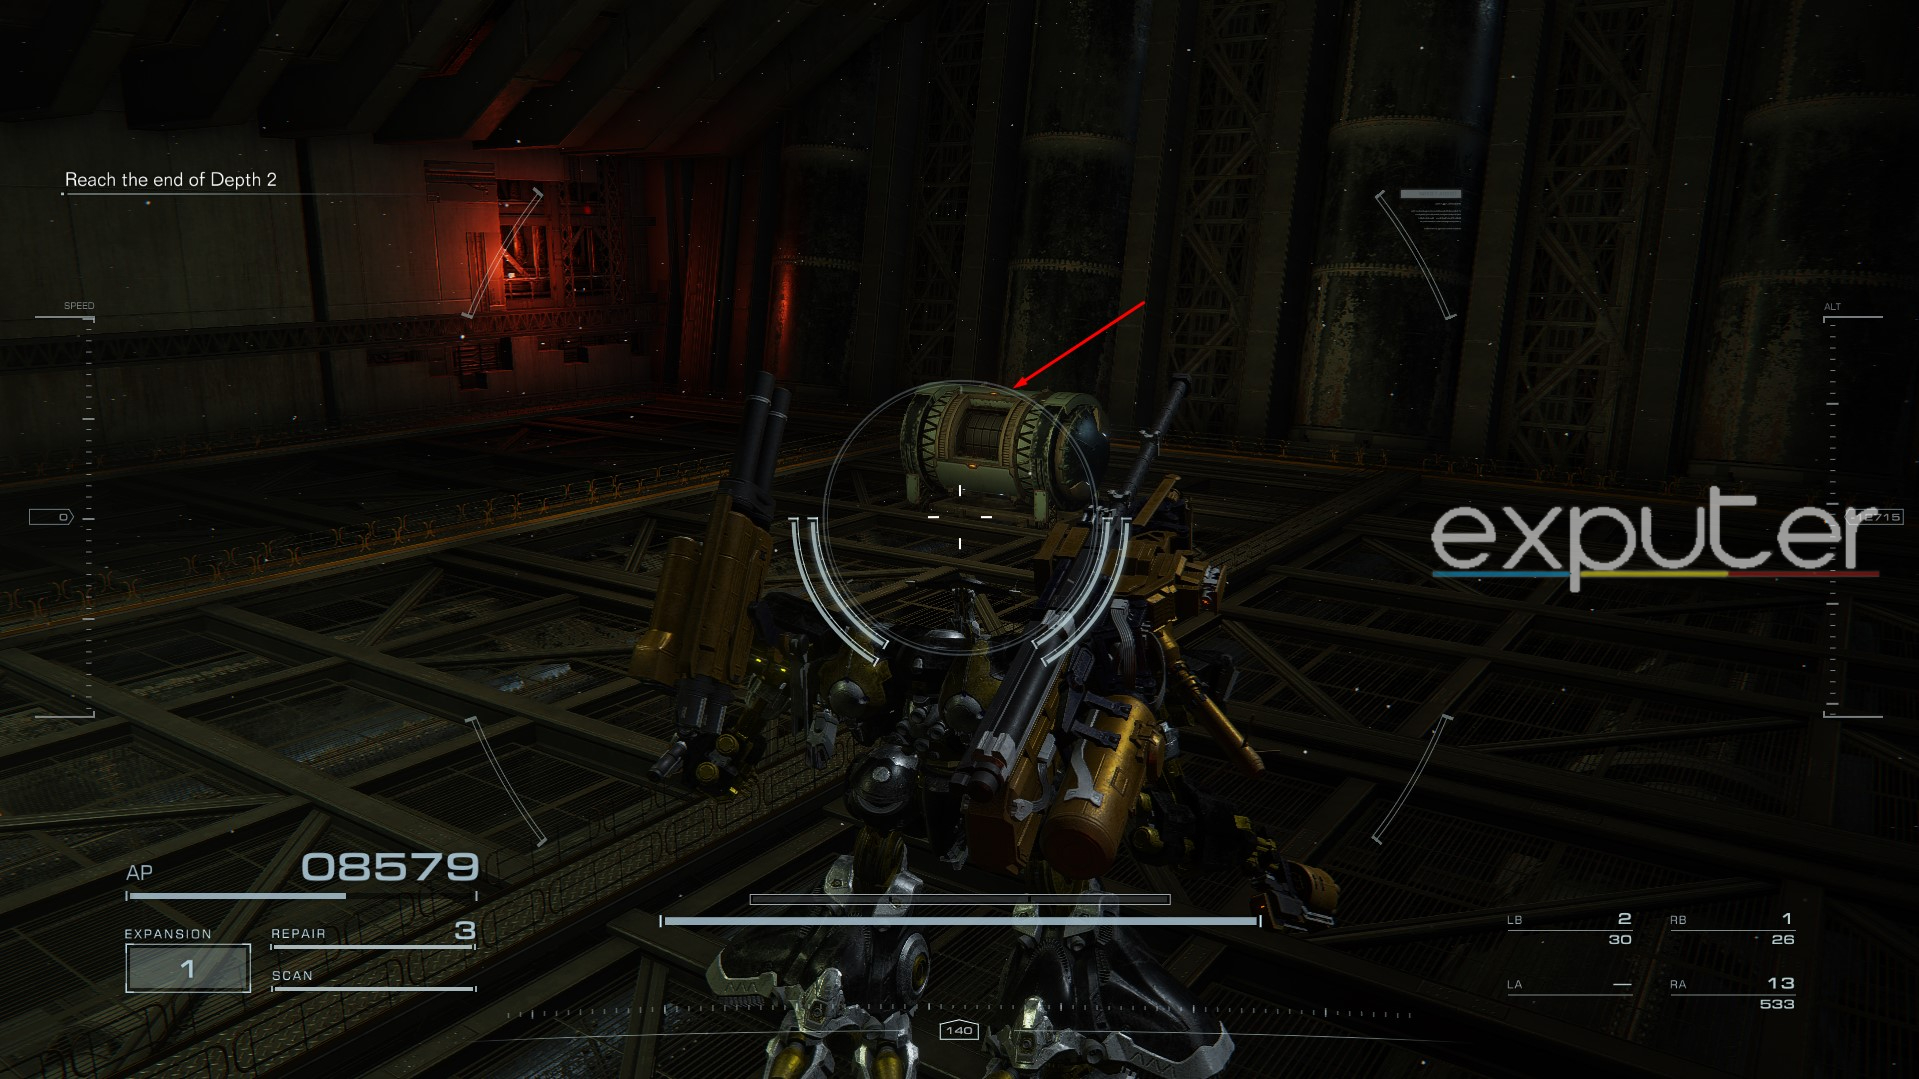
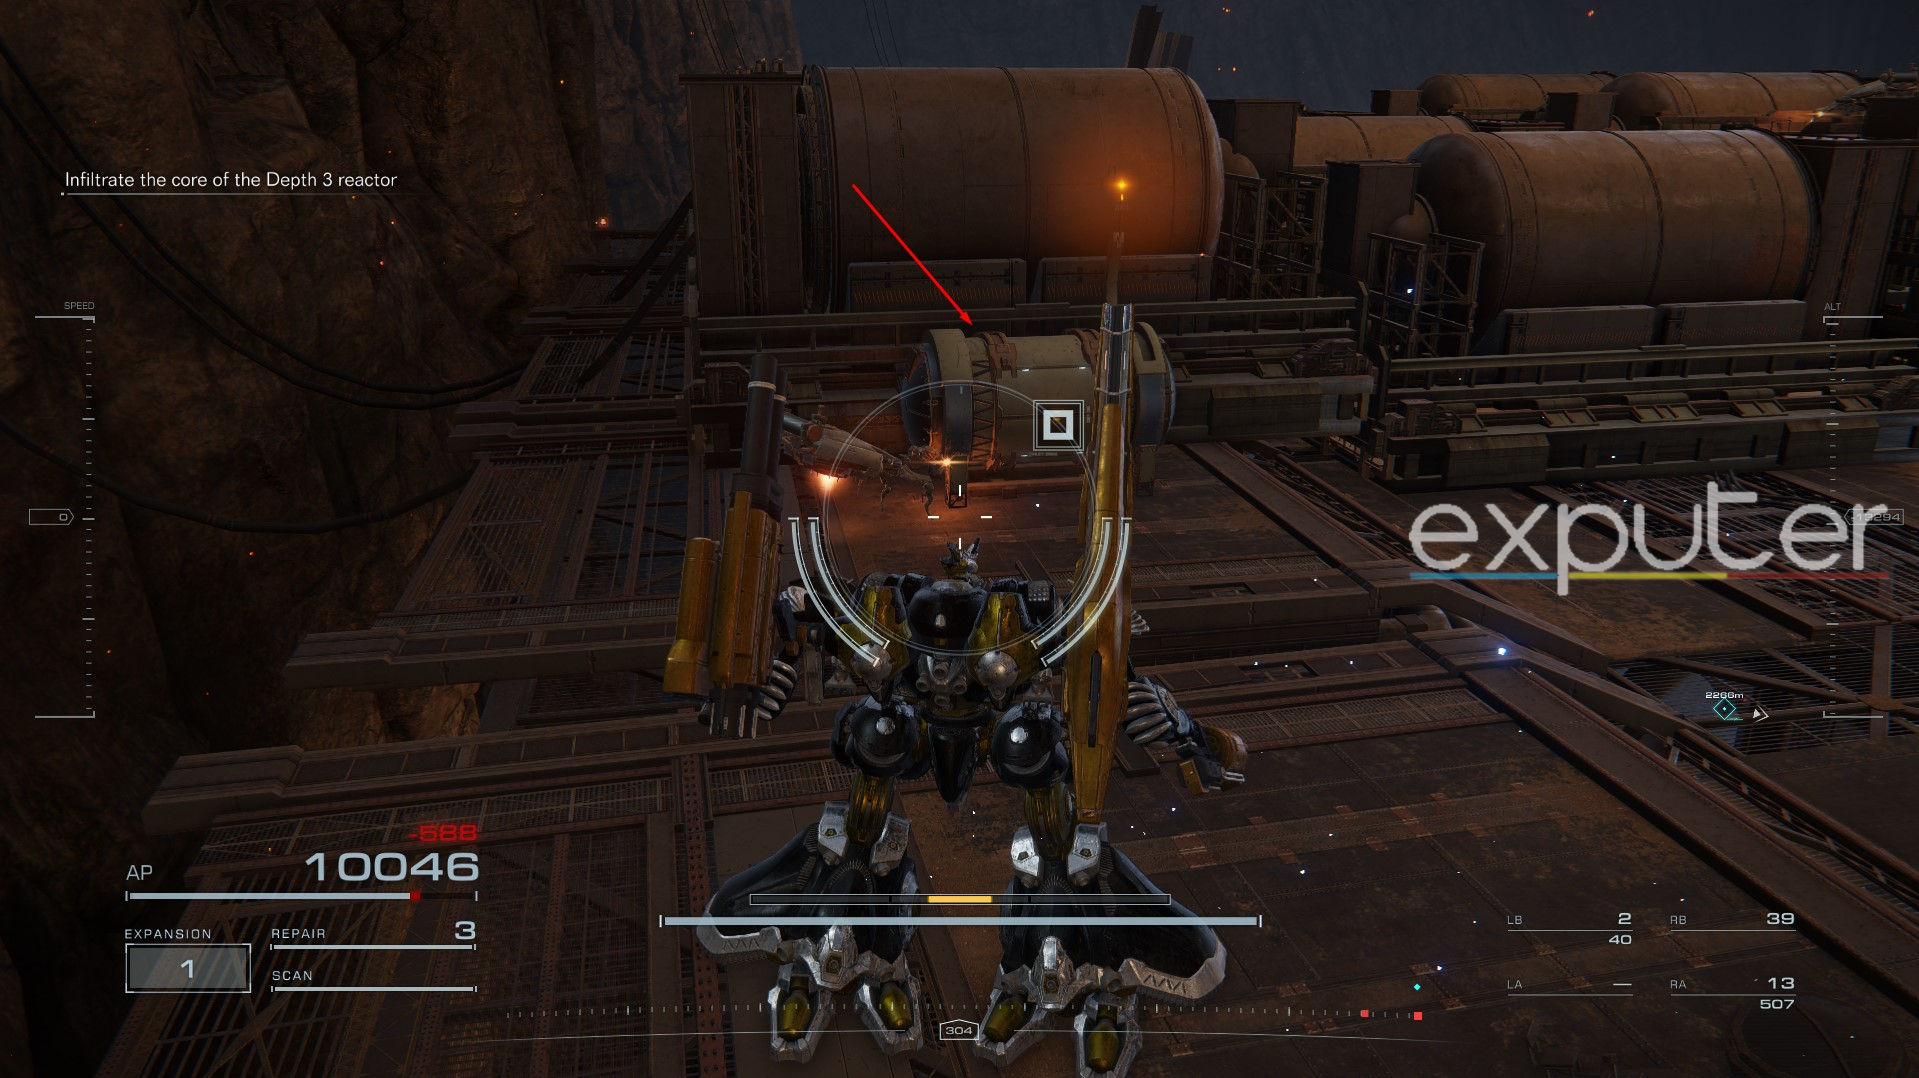
With the third Depths entered, proceed through the area for the OCELLUS in the manner below:
- After accessing the initial door, traverse the rocky platforms until you spot the circular Reactor.

- Follow the objective to the platforms below, then use the walls to avoid incoming lasers.
- Sprint to the next platform’s upper level on your right and go behind the artillery equipment to spot a chest with the IA-C01F inside.
IA-C01C Ephemera

| AP | 3110 |
| Anti-Kinetic Defense | 335 |
| Anti-Energy Defense | 452 |
| Anti-Explosive Defense | 430 |
| Attitude Stability | 363 |
| Booster Efficiency Adj | 101 |
| Generator Output | 126 |
| Generator Supply | 96 |
The IA-C01C is a Core and another lightweight hidden part from the Ephemera family, but it has a distinct quality that makes it an easy sell. This Core component has unmatched Generator Output Adj., which can boost your maximum EN Capacity by the widest margin. With it, you won’t have to use COAM on expensive Generator parts with massive EN capacities and can then utilize the Ephemera’s Core to prevent any EN Shortfall.
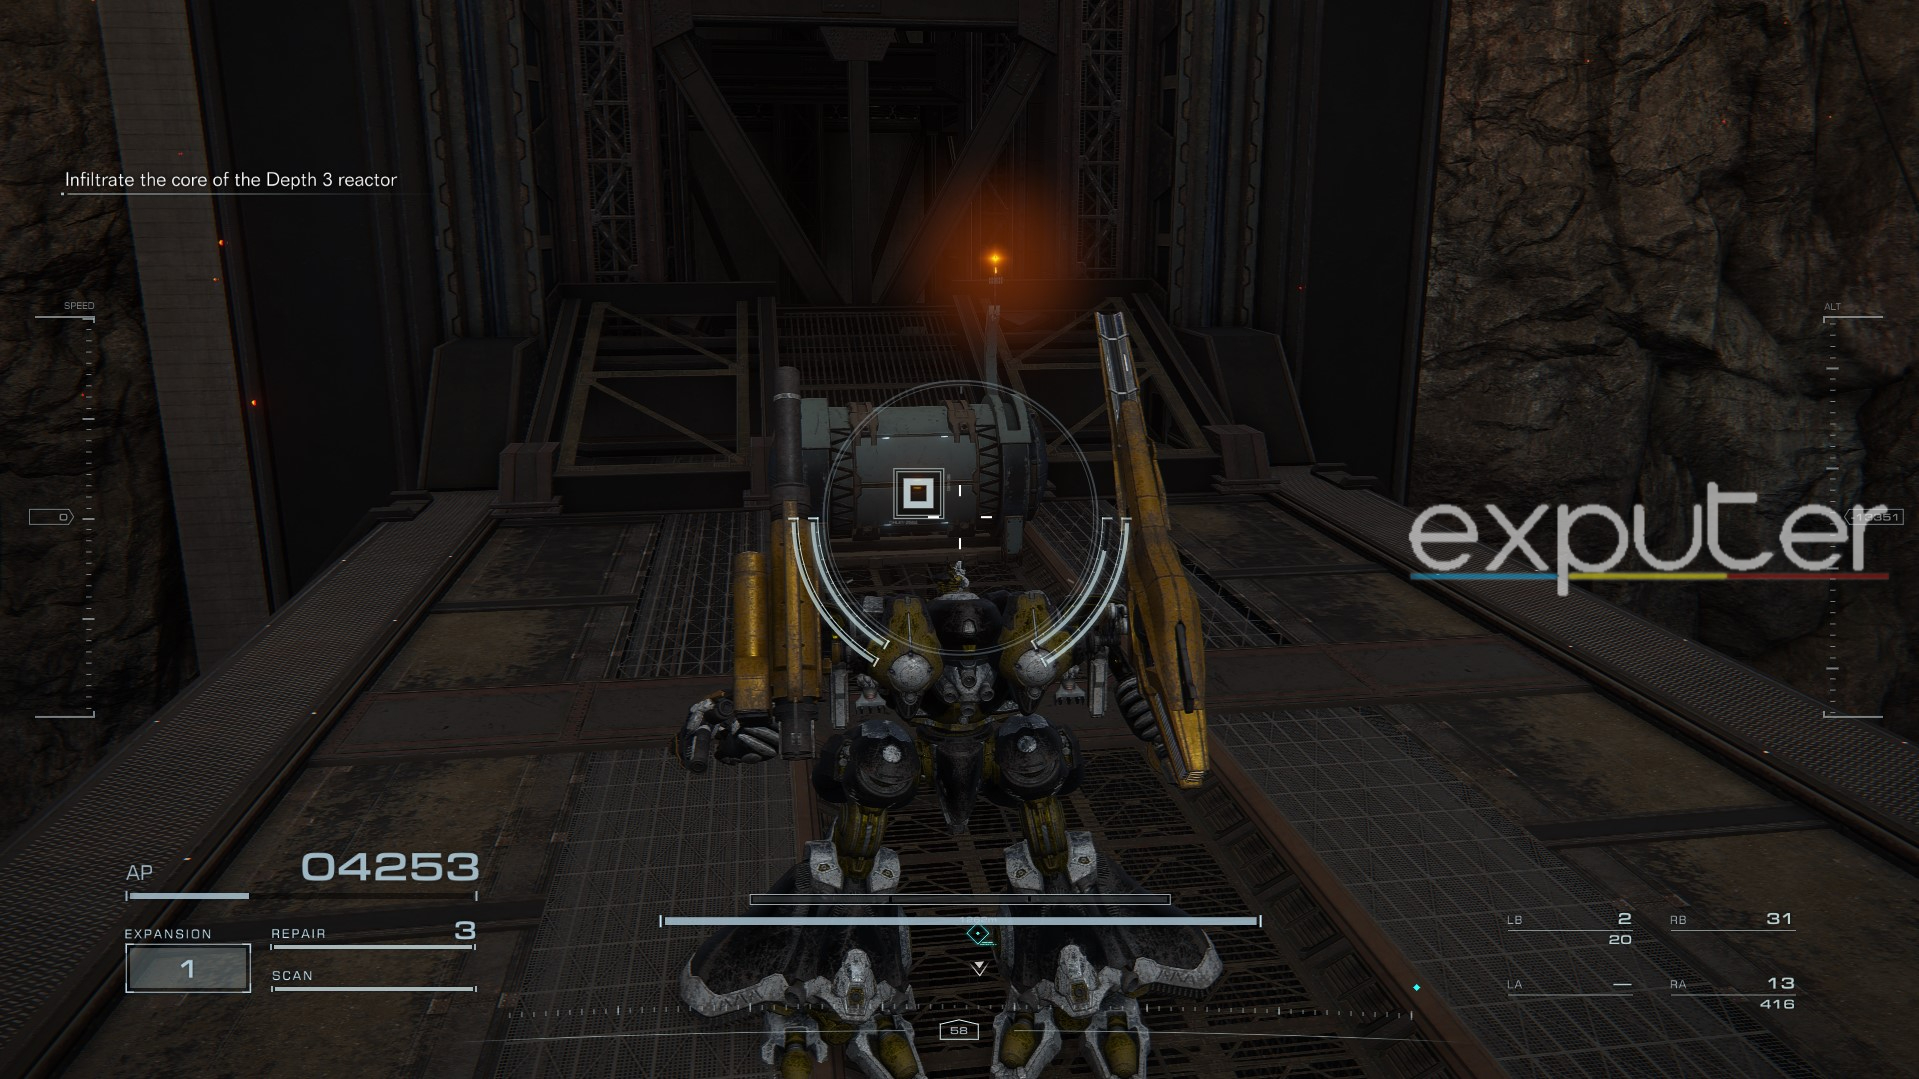
Starting from the OCELLUS’s chest, here’s how to get the Ephemera’s Core component:
- Drop down to the platform’s lower level and quickly make your way to the Reactor’s circular base, where the lasers are situated.
- Once you reach the base, destroy the laser-shooting artillery as quickly as you can to avoid taking any unnecessary damage.
- Next, go around the base from the right side until you spot the Ephemera’s crate at the end of a walkway.
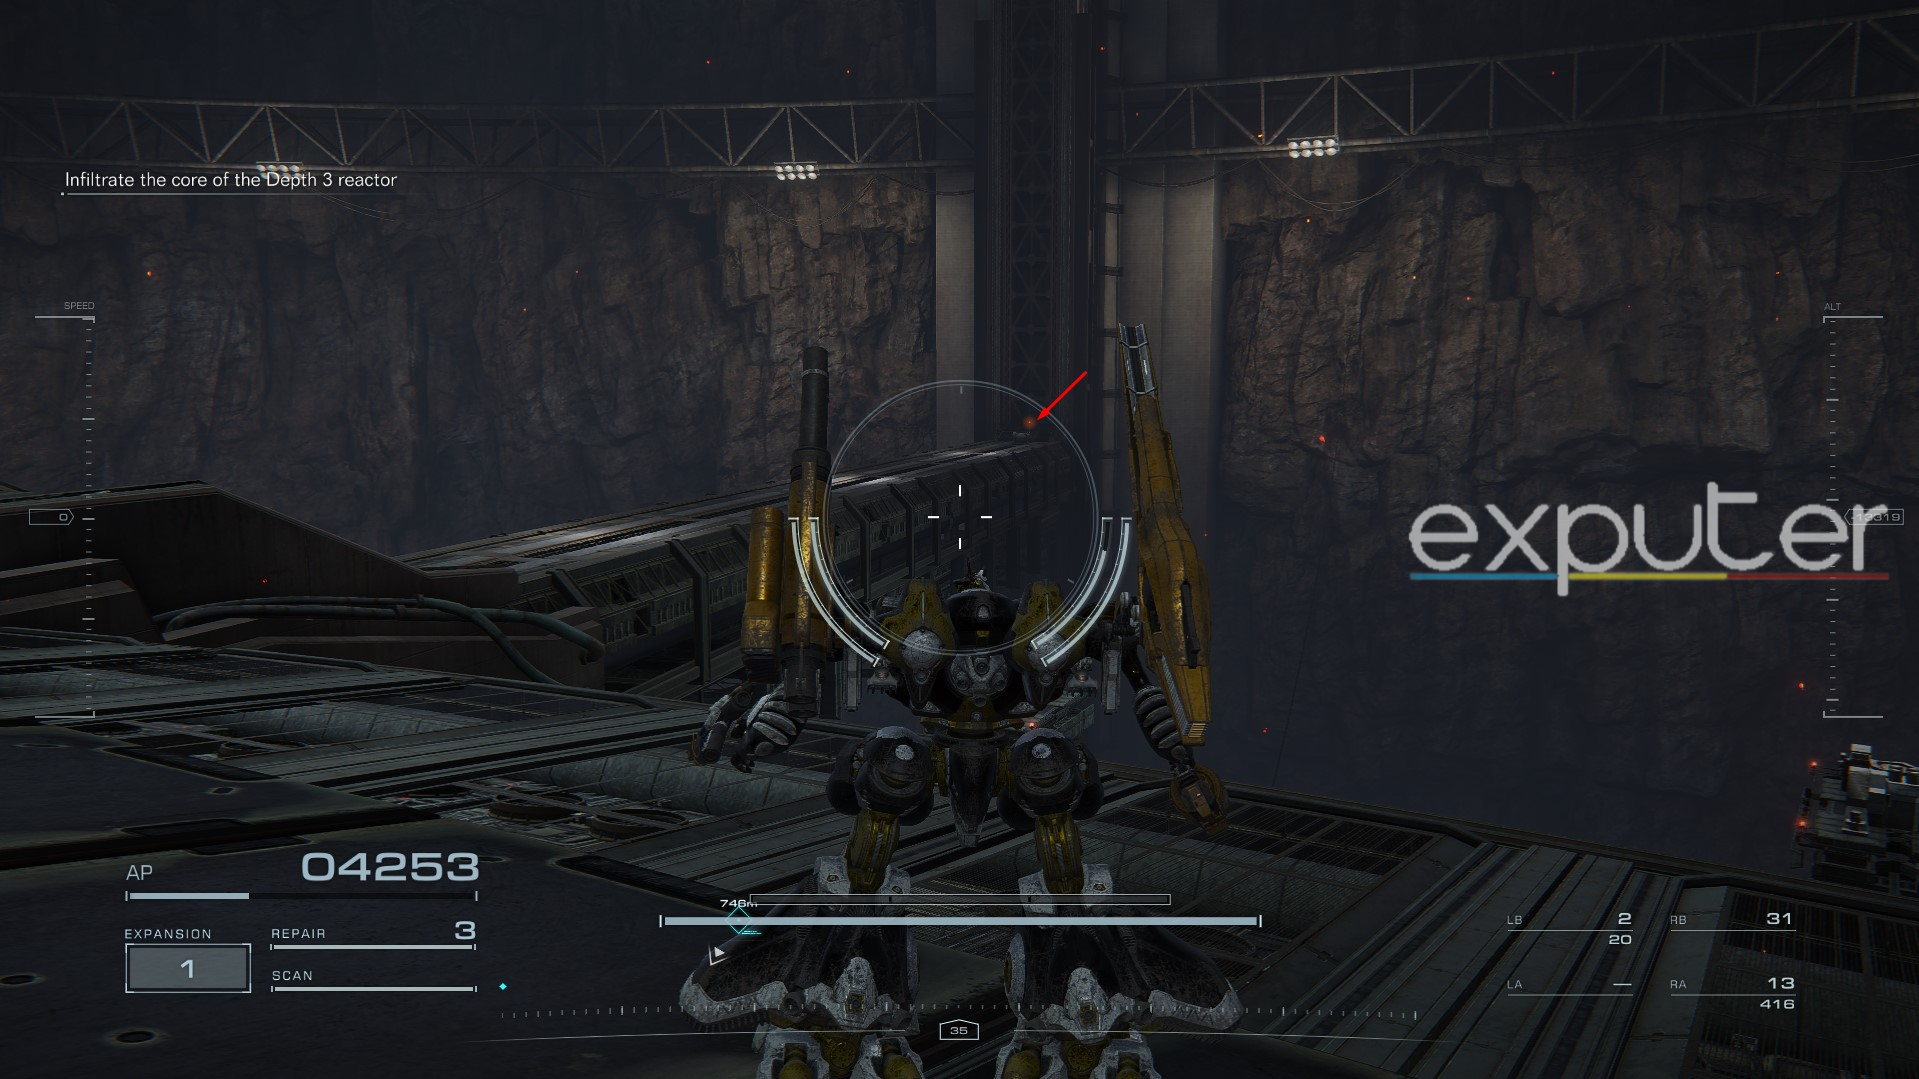
- Eliminate the PCA MT guarding the crate to get a Combat Log for your LogHunt program, and access the container itself to obtain its hidden part.
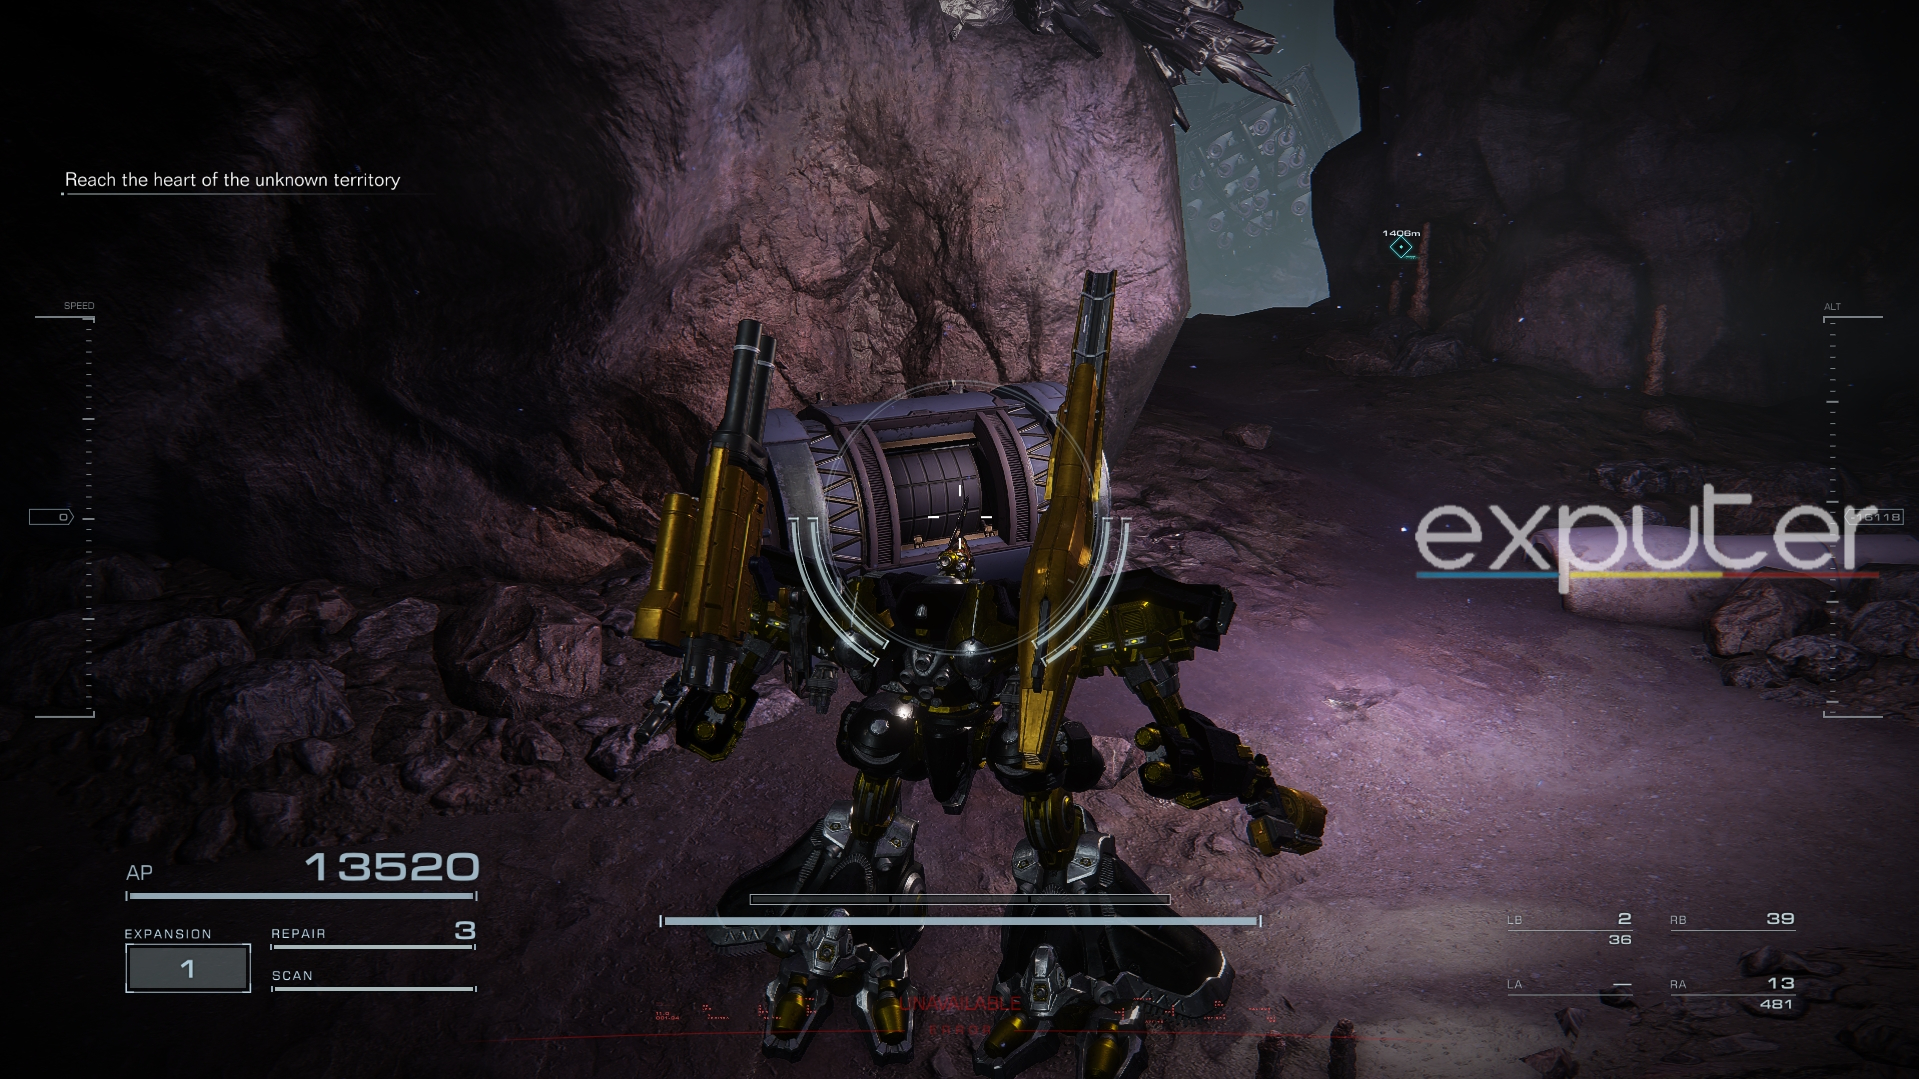
Unknown Territory Survey
Unknown Territory Survey is where you’ll complete the Ephemera set by getting its head armor. The mission itself is relatively easy, with little to no challenging enemies, including the boss and the new objective towards the end.
IA-C01H Ephemera
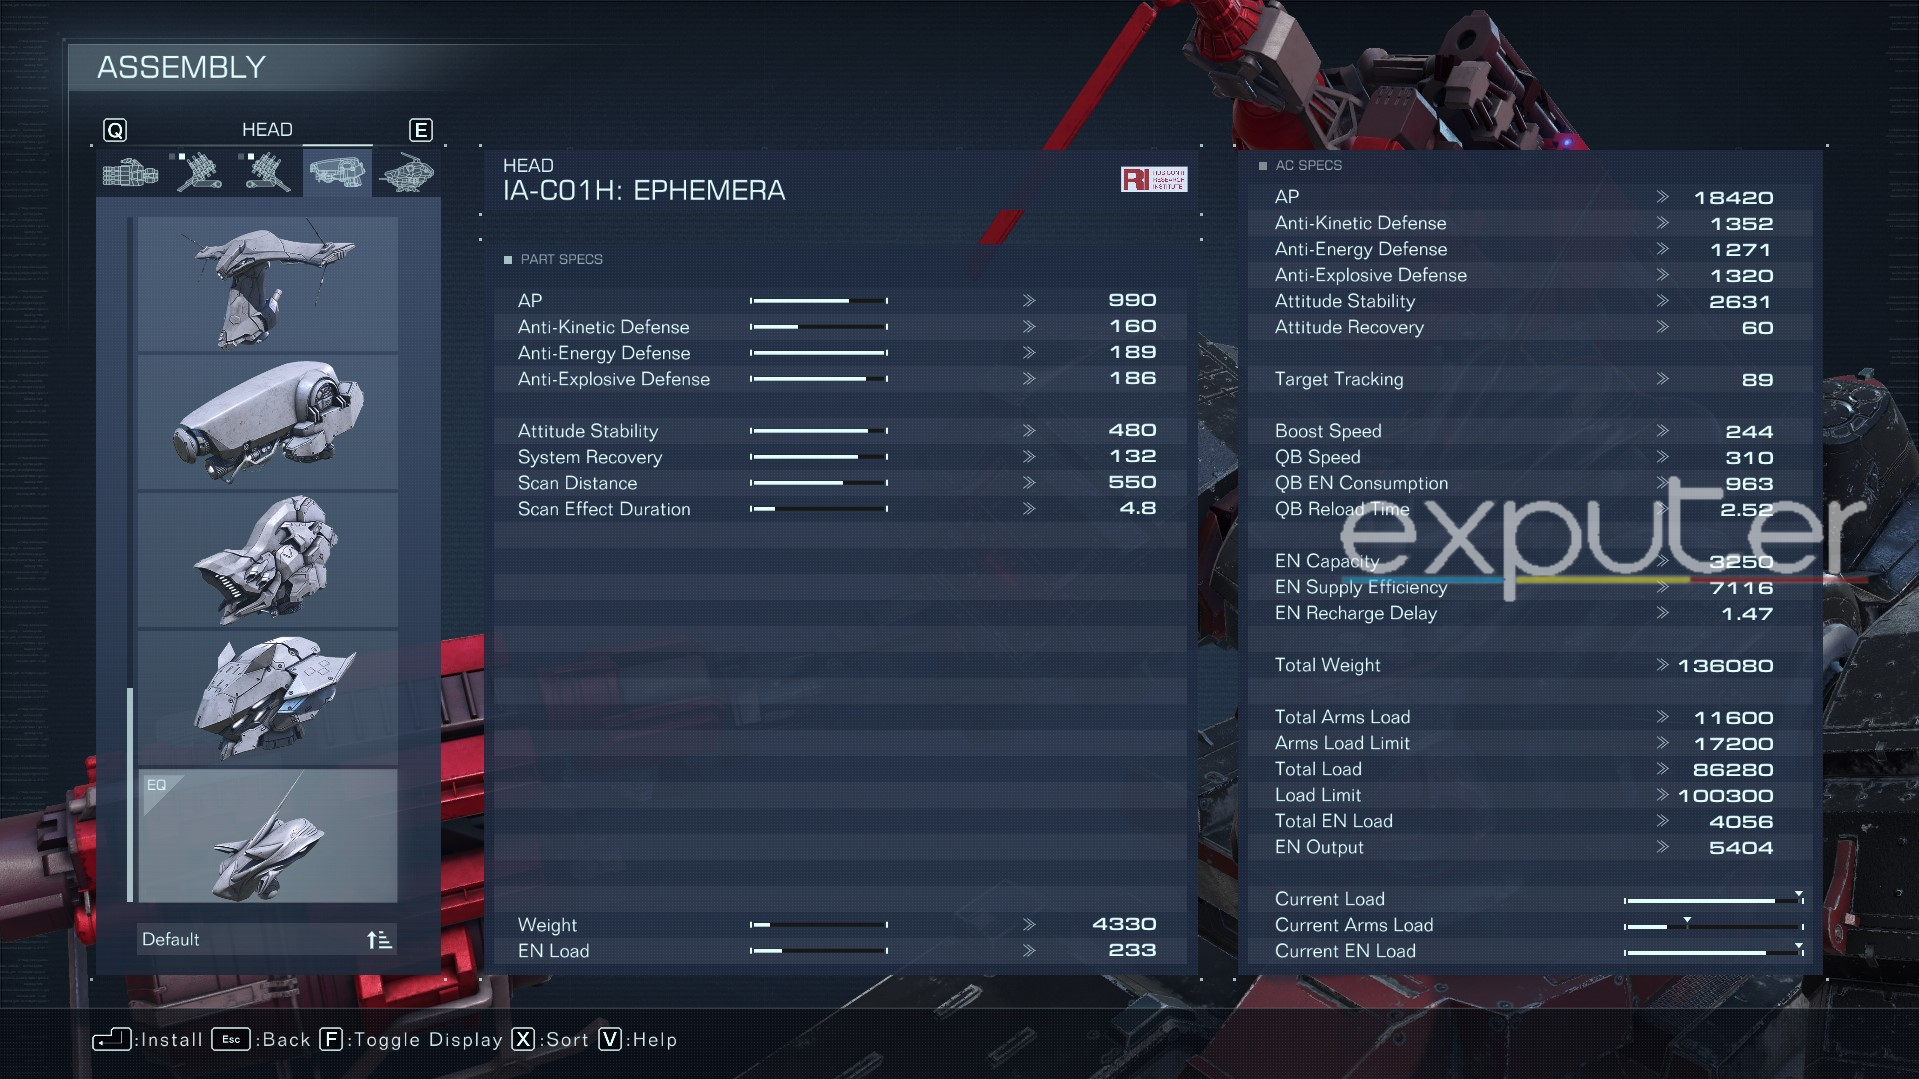
| AP | 990 |
| Anti-Kinetic Defense | 160 |
| Anti-Energy Defense | 189 |
| Anti-Explosive Defense | 186 |
| Attitude Stability | 480 |
| System Recovery | 132 |
| Scan Distance | 550 |
| Scan Effect Duration | 4.8 |
If you’re looking for a great all-around helmet with minimal drawbacks, the Ephemera is for you. This is largely considered one of the best heads in AC6 since it has unbeatable Anti-Energy and Anti-Explosive Defense. Besides that, it’s got solid AP and Attitude Stability, and since you get the Ephemera helmet for free, there’s no reason not to get it.
Once you’re at the Unknown Territory Survey Mission in Chapter 4, complete the steps below:
- Jump down from the Reactor base to the next Depths onto the waste-filled puddle below.
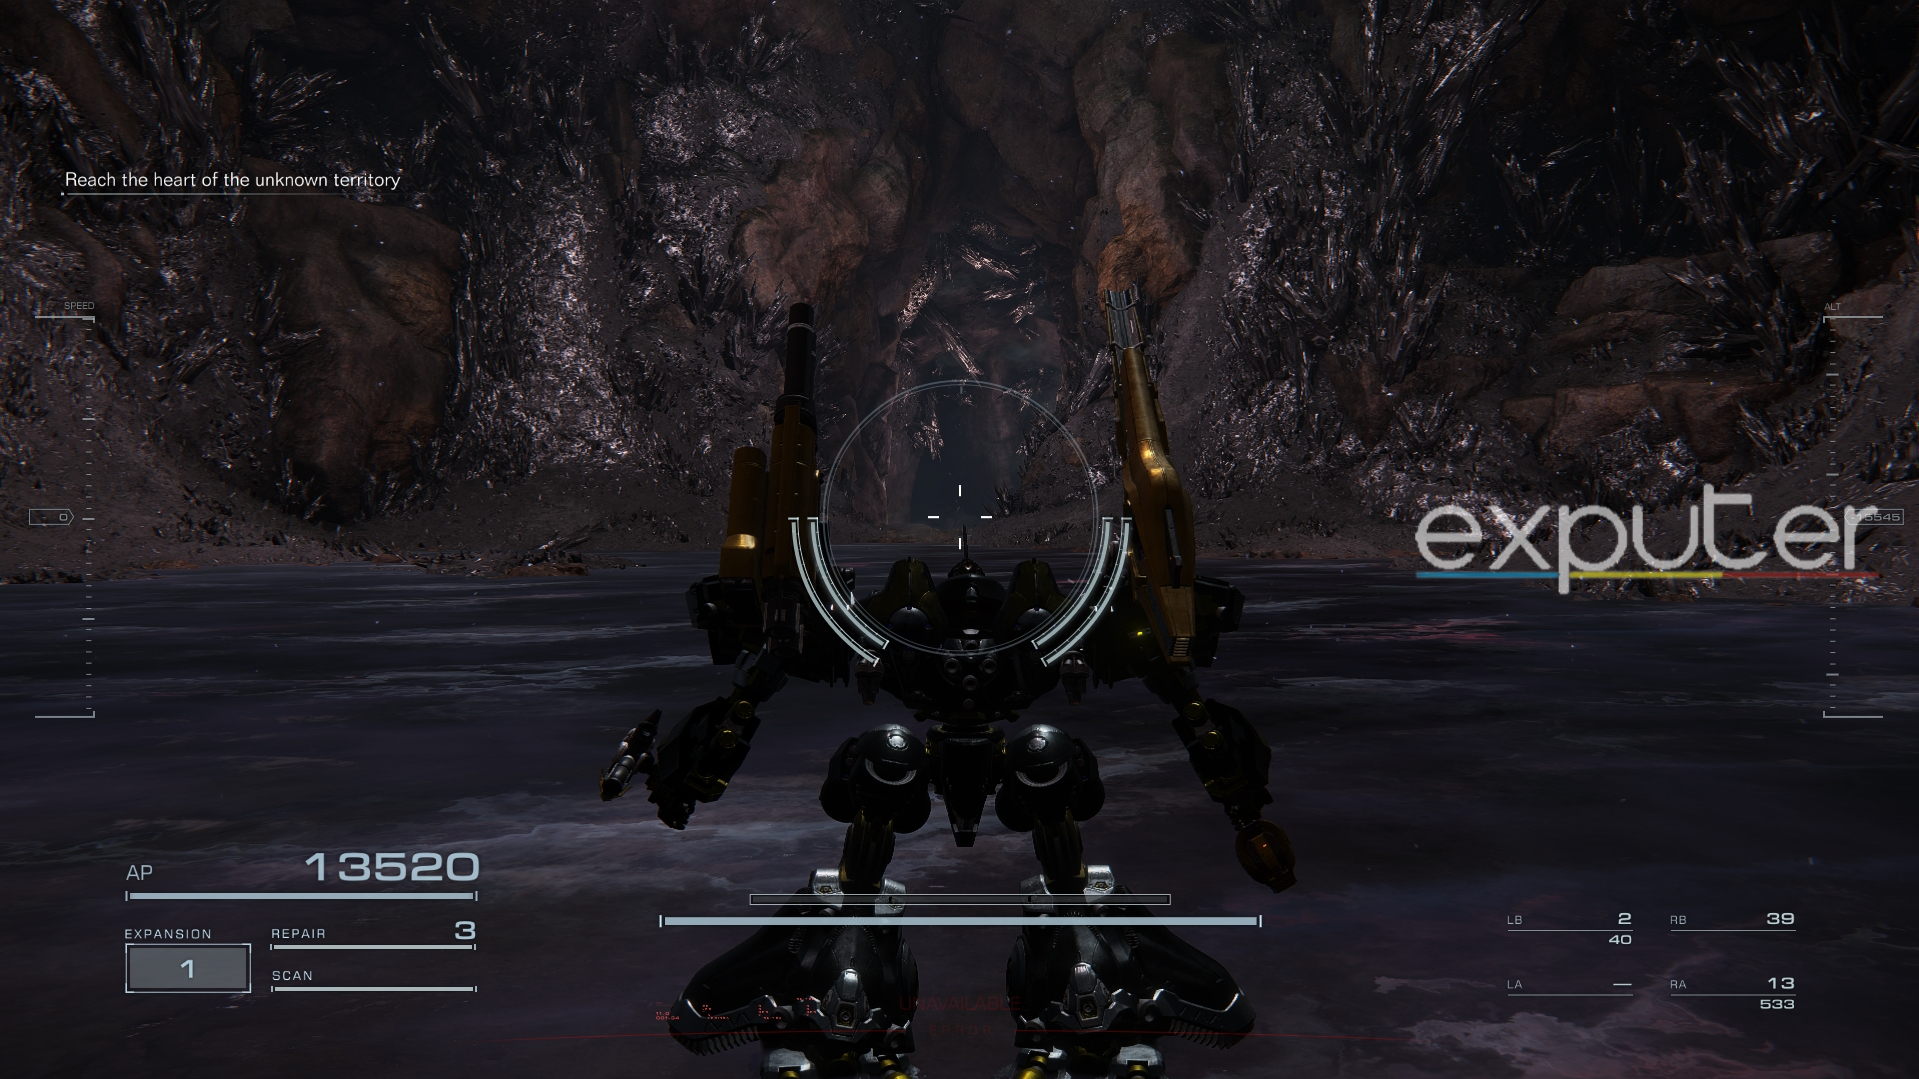
- Proceed down the unknown territory through the narrow path and avoid the Mealworms infesting the area.
- Maintain a safe distance from these creatures, as they explode almost instantly when you’re too close.
- After traversing further into the cave, you’ll spot a crate next to some Mealworms, opening which will give you the IA-C01H Ephemera.
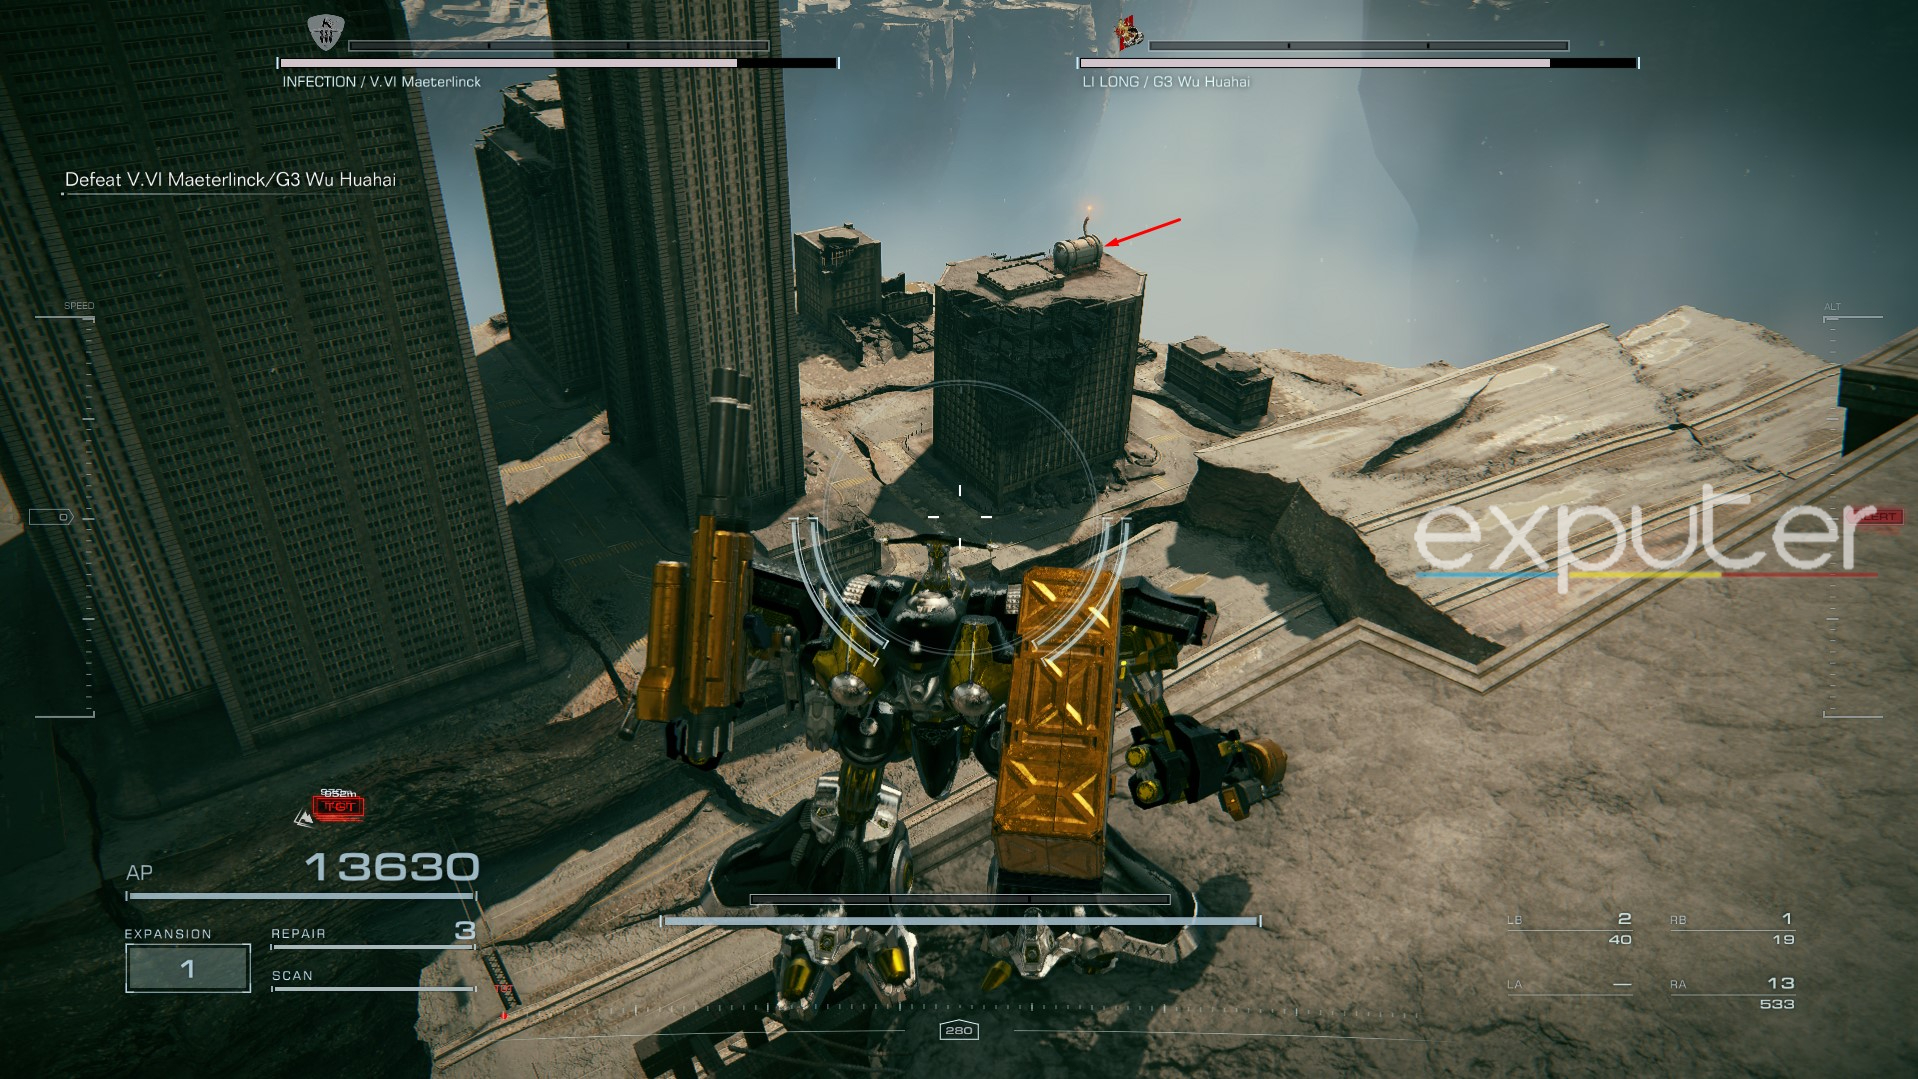
Reach The Coral Convergence
As the final mission in Chapter 4, reaching the Coral Convergence is also arguably the most challenging mission so far, mainly due to the Cel-240 boss fight at the end, largely considered the hardest boss in Armored Core 6. Fortunately, you can earn a hefty amount of COAM here, as well as a potent pair of weapons for your mech.
IA-C01W3: AURORA
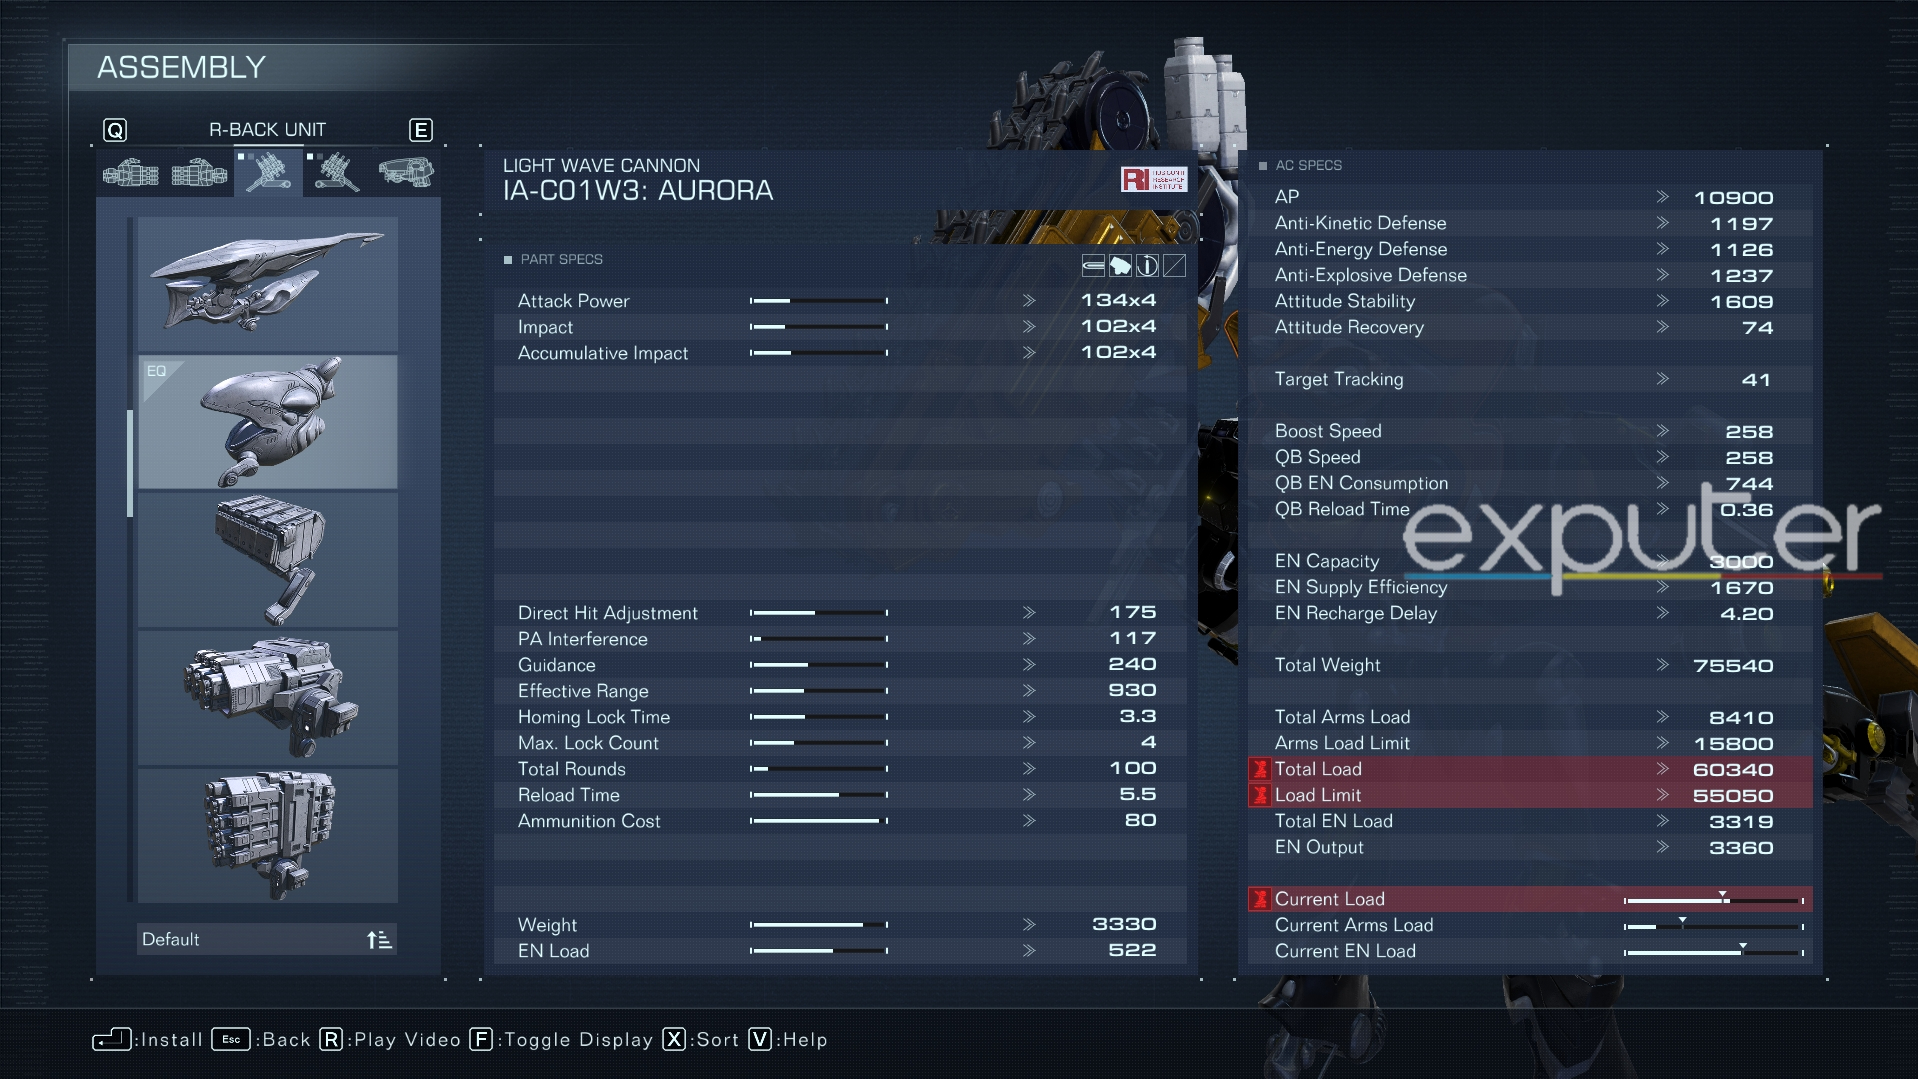
| Attack Power | 134×4 |
| Impact | 102×4 |
| Accumulative Impact | 102×4 |
| Direct Hit Adjustment | 175 |
| PA Interface | 117 |
| Guidance | 240 |
| Effective Range | 930 |
The IA-C01W3 AURORA is a right shoulder weapon that shoots four energy rays that converge to a single point. It comes with respectable damage, range, and reload time, making the AURORA an ideal weapon against fast-paced in-game bosses. To see how it fairs against other missile-like armaments, you can experiment with it in the AC Test section under the Sortie menu.
Here’s how to get the AURORA, starting from Chapter 4’s Reach the Coral Convergence mission:
- From your spawn point, move right until you’re next to the zone restriction barrier, and now head straight while sticking close to the border.

- Eventually, you’ll reach a broken-apart landmass adjacent to your current mission objective, where you’ll spot the AURORA’s chest on a small building.
IA-C01W2: MOONLIGHT
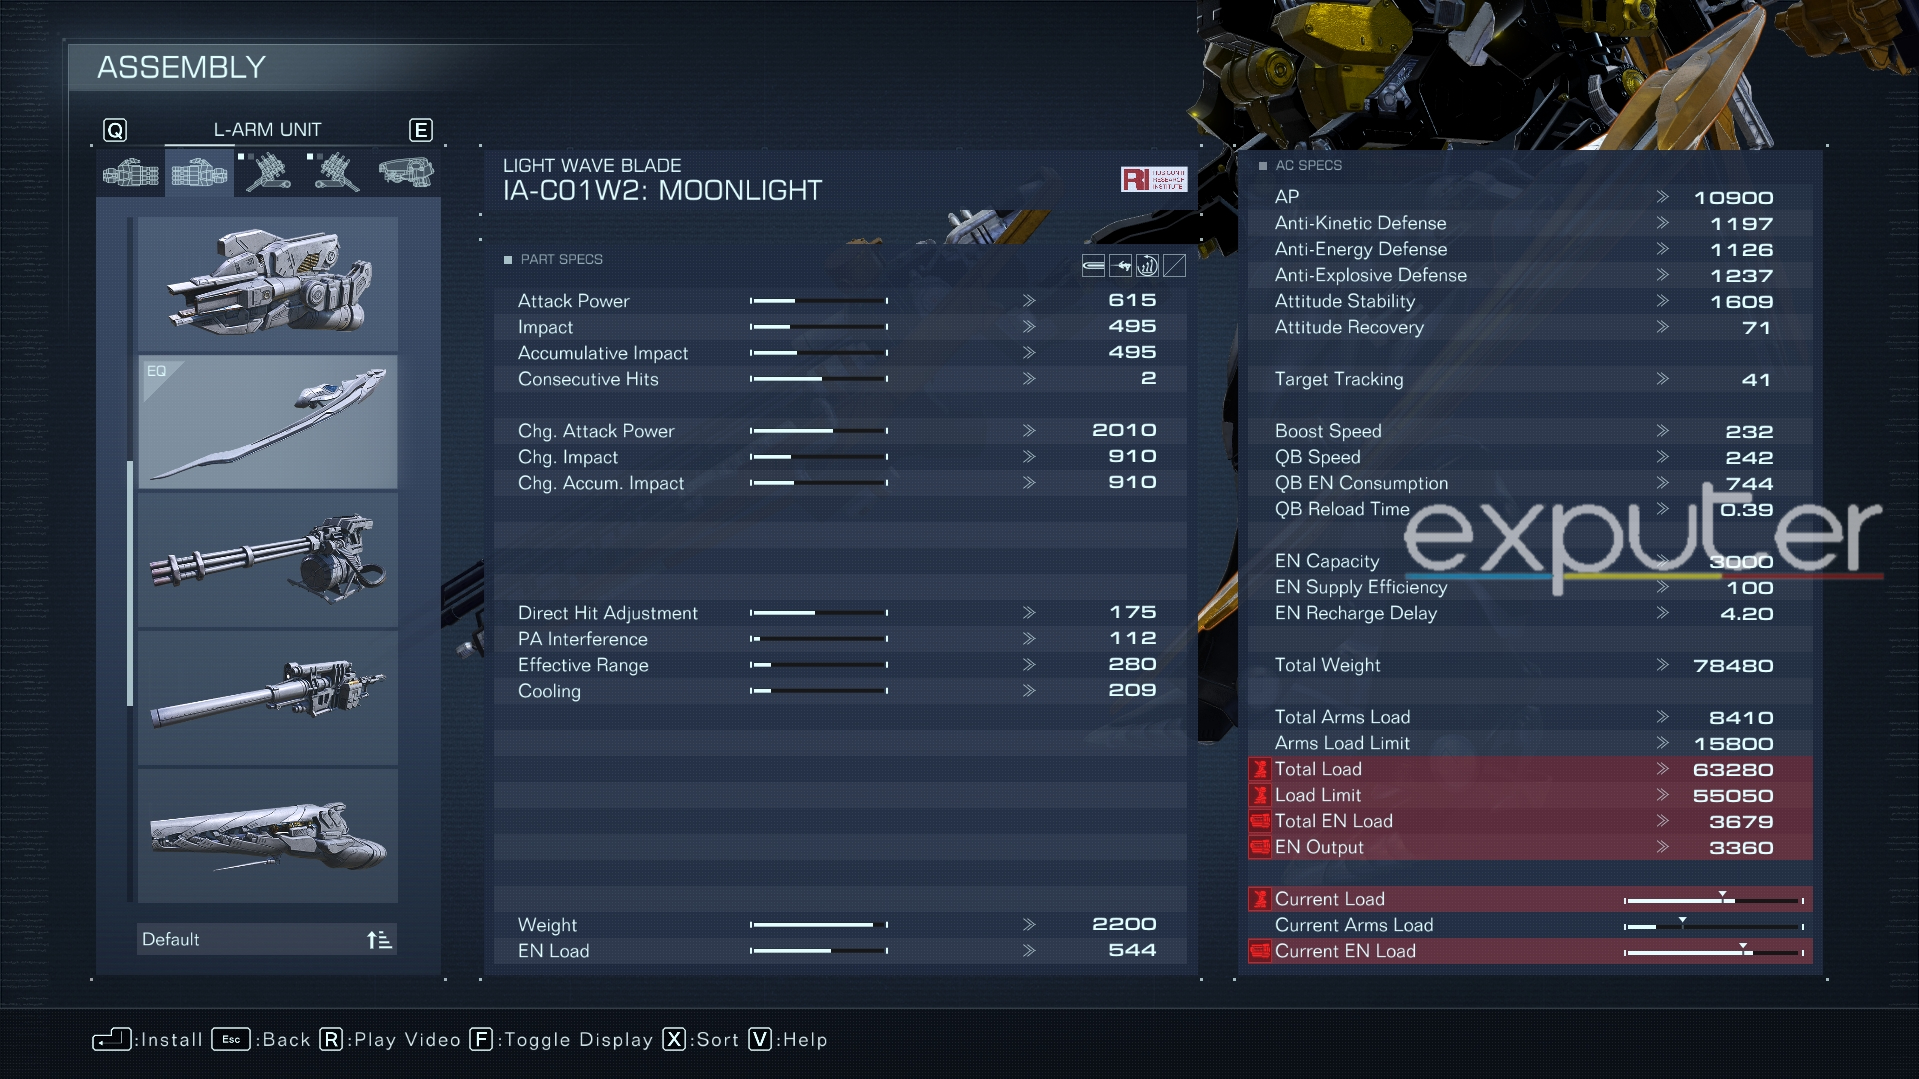
| Attack Power | 615 |
| Impact | 495 |
| Accumulative Impact | 495 |
| Consecutive Hits | 2 |
| Direct Hit Adjustment | 2010 |
| PA Interface | 910 |
| Cooling | 910 |
Custom to FromSoftware’s tradition, the “Moonlight Greatsword” makes an appearance in AC6 in the form of the IA-C01W2 Moonlight. This melee weapon shoots two diagonal slash attacks or can be charged to perform one massive horizontal wave of light. The IA-C01W2 is one of the most lightweight melee weapons you can use at a distance, but as a drawback from its weight, it also has mediocre damage output.
After killing G3 Wu Huahai and V.VI Maeterlinck, here’s how to get the Moonlight weapon:
- Move towards your next mission objective until you reach the end of the road and spot a bridge in the distance.
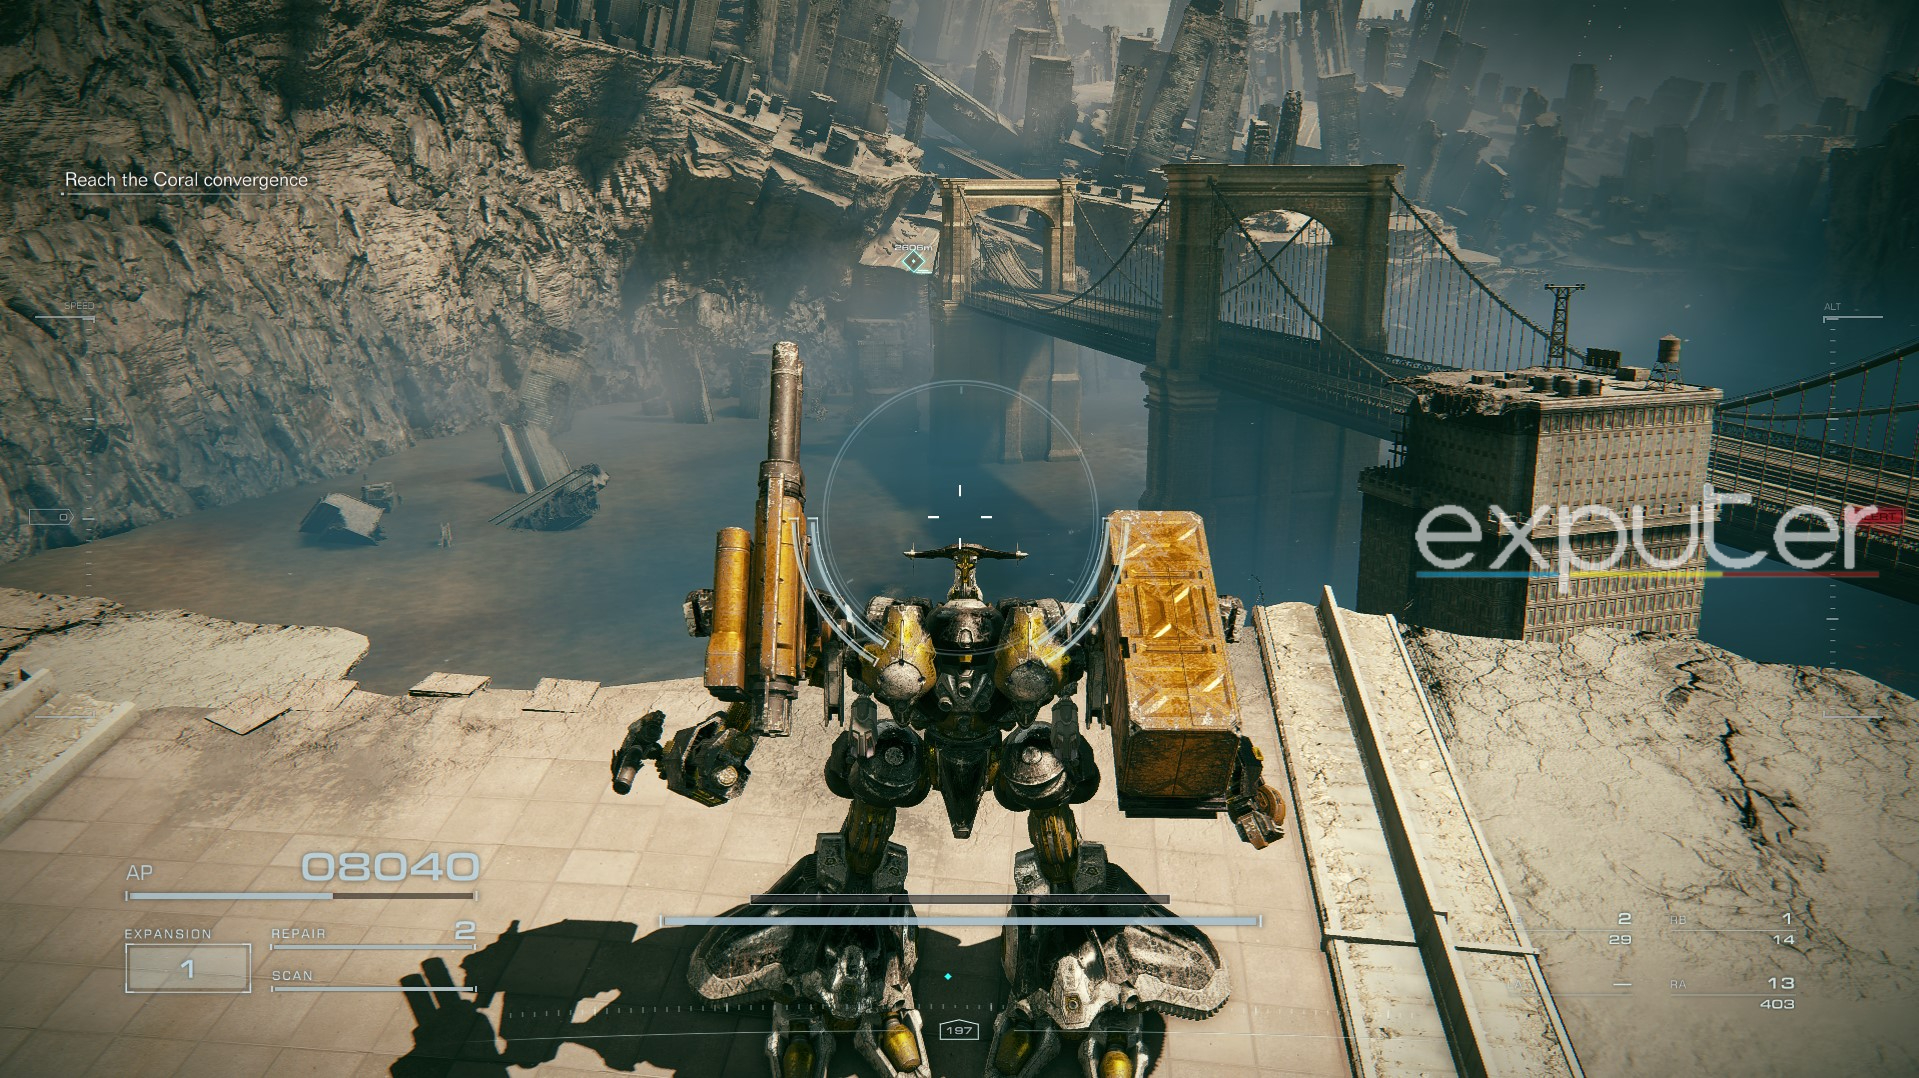
- Drop down to the shallow waters below and continue straight ahead to the next marker.
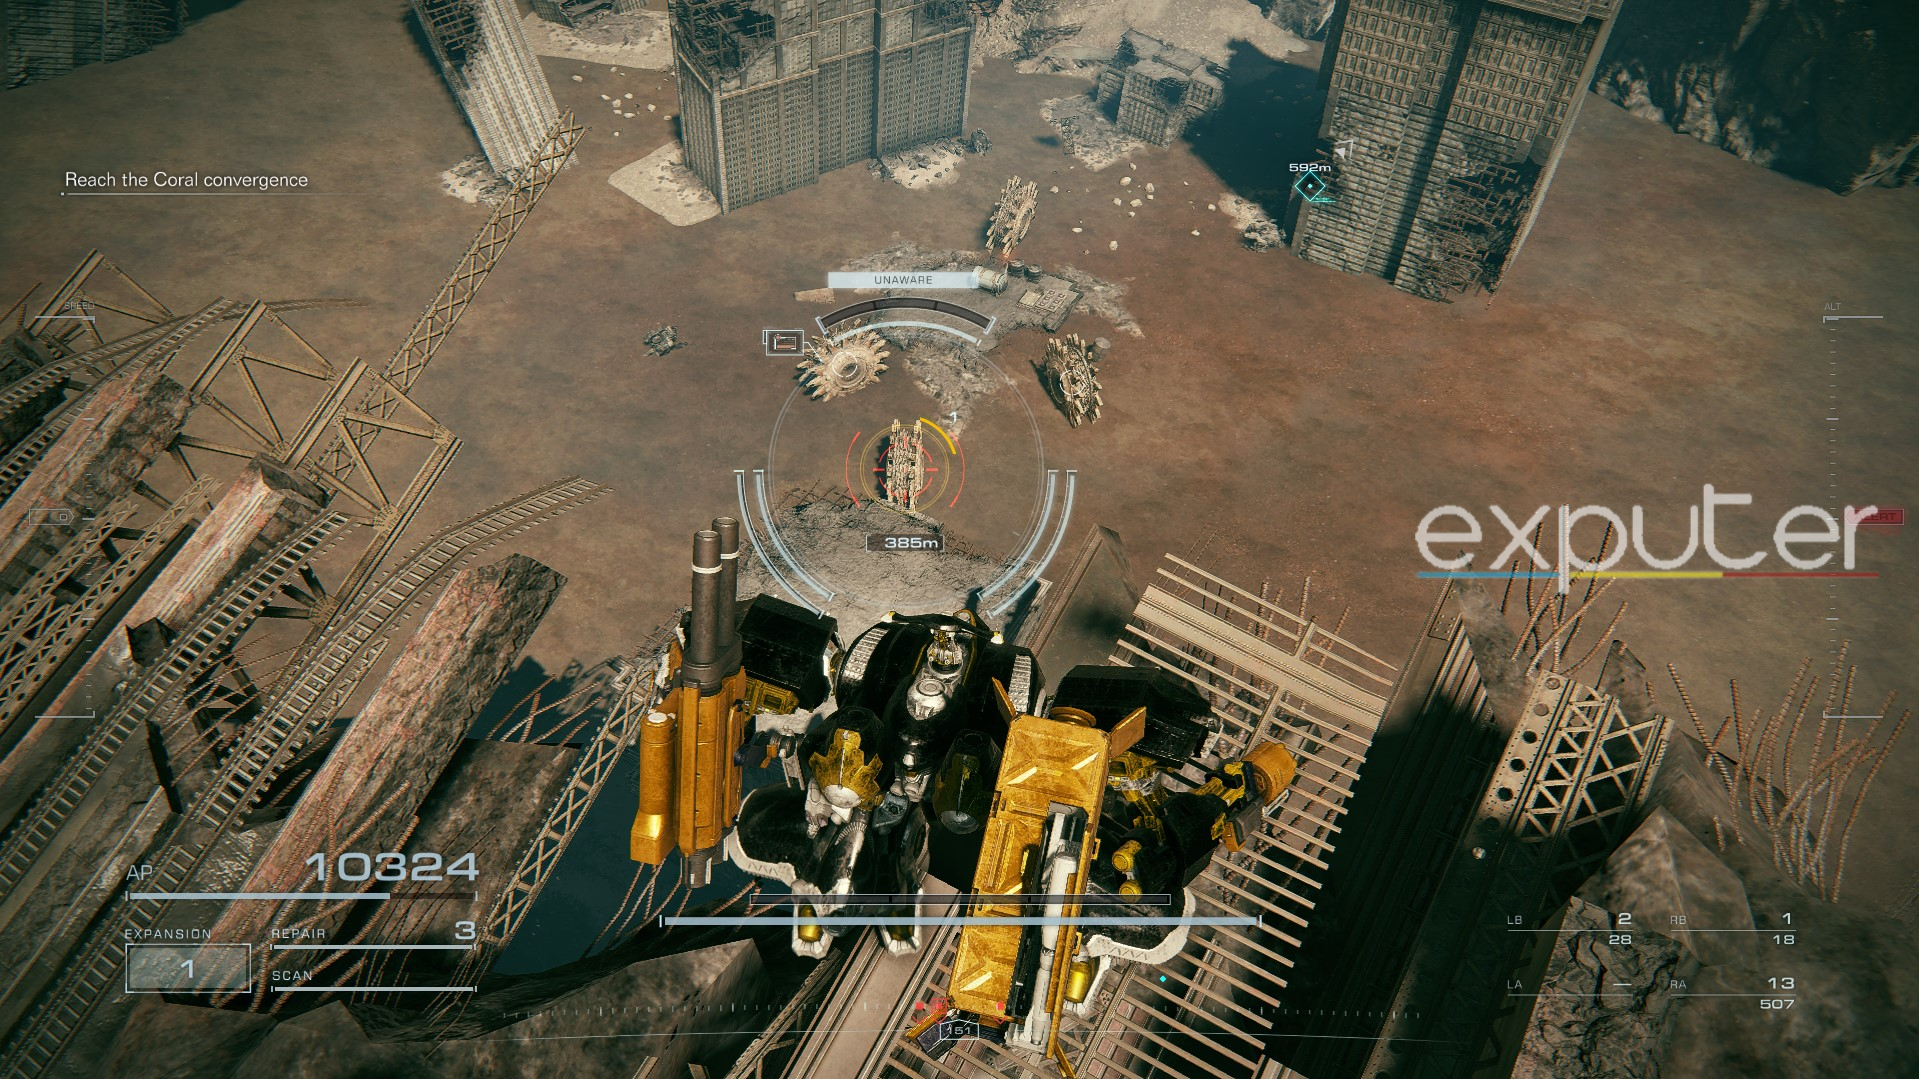
- Here, you can kill the wheel-like MTs covering your path to gain additional Combat Logs or ignore them entirely by staying at elevated ground.
- Near the end of the bridge’s foot, you’ll find the MOONLIGHT’s stash surrounded by 4 MTs.
Regain Control Of The Xylem
Regaining control of the Xylem is the last and only mission in Chapter 5 in Armored Core 6 with any hidden or secret parts, but unlike the other missions on the list, you’ll need to get to NG++ in order to access this mission in the campaign. Furthermore, there are some prerequisites to the Xylem mission, as you must choose the “Eliminate V.III” Decision Mission in Chapter 4 beforehand.
IB-C0W3: NGI 006
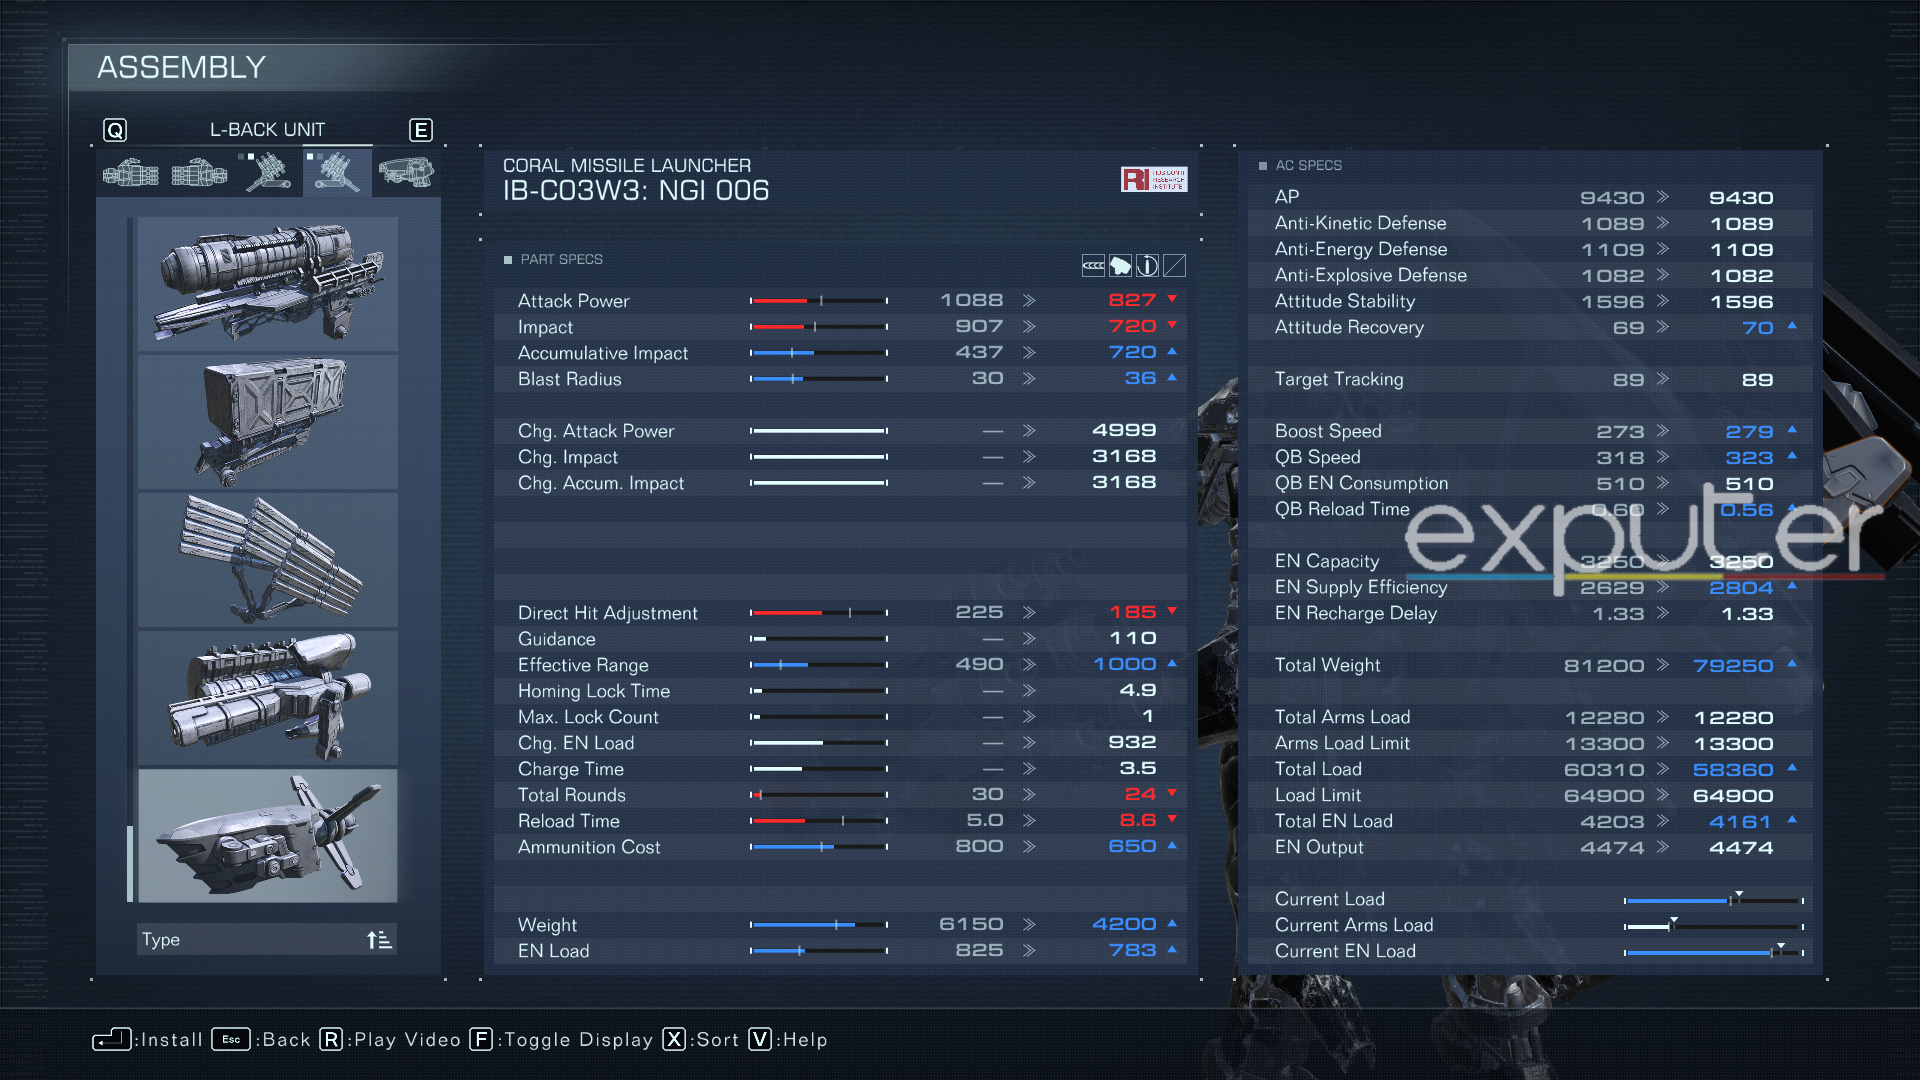
| Attack Power | 827 |
| Impact | 720 |
| Accumulative Impact | 720 |
| Blast Radius | 36 |
| Direct Hit Adjustment | 185 |
| Guidance | 110 |
| Effective Range | 1000 |
As one of the few left shoulder secret parts, the IB-C0W3 NGI 006 is an exceptionally powerful Coral Missile Launcher in Armored Core 6, launching a missile that tracks the enemy. It provides decent Attack Power and Reload time, but its primary specialty is the Effective Range, making it the recommended choice for most long-range ACs that utilize their arsenal from a safe distance.
Once you commence the mission, simply perform the following steps:
- Drop down from the slit on your left onto the ground floor.
- Head straight, and you’ll see the NGI 006 chest stashed in the corner and surrounded by two drones.
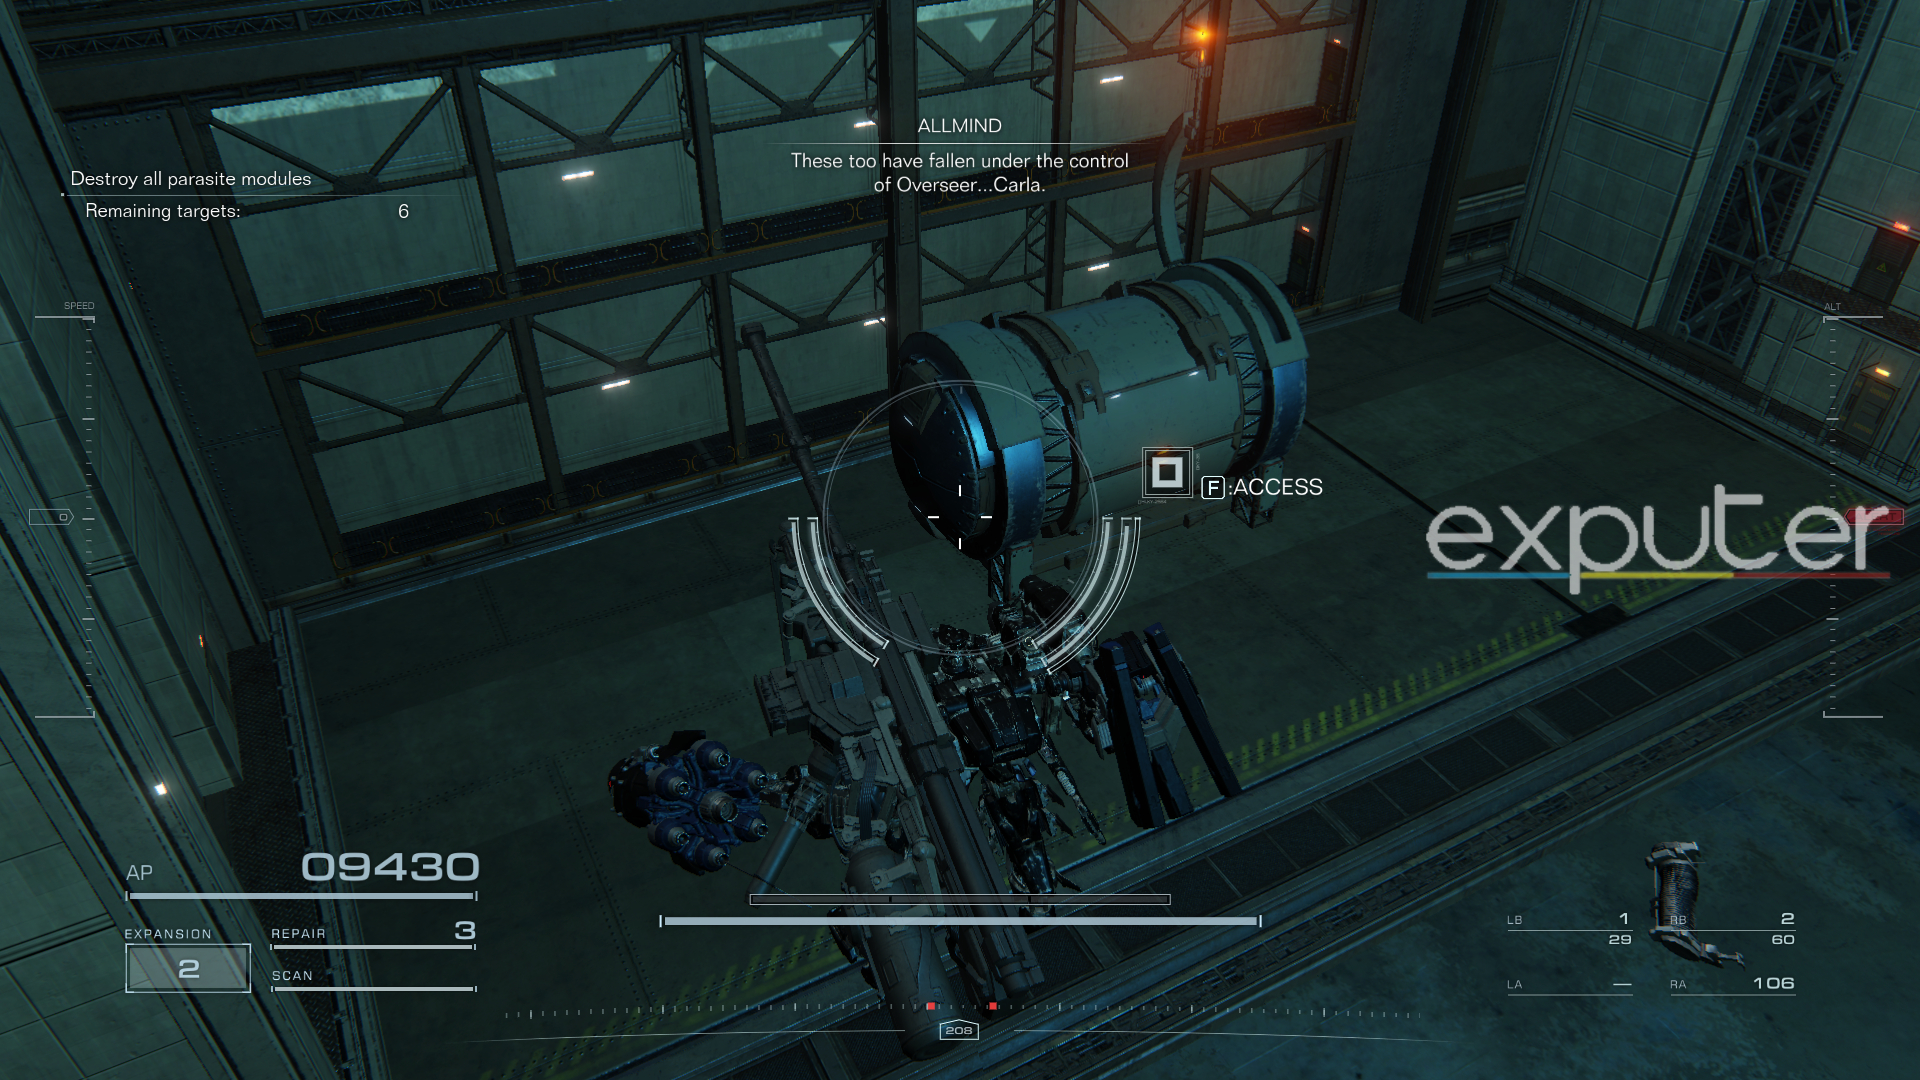
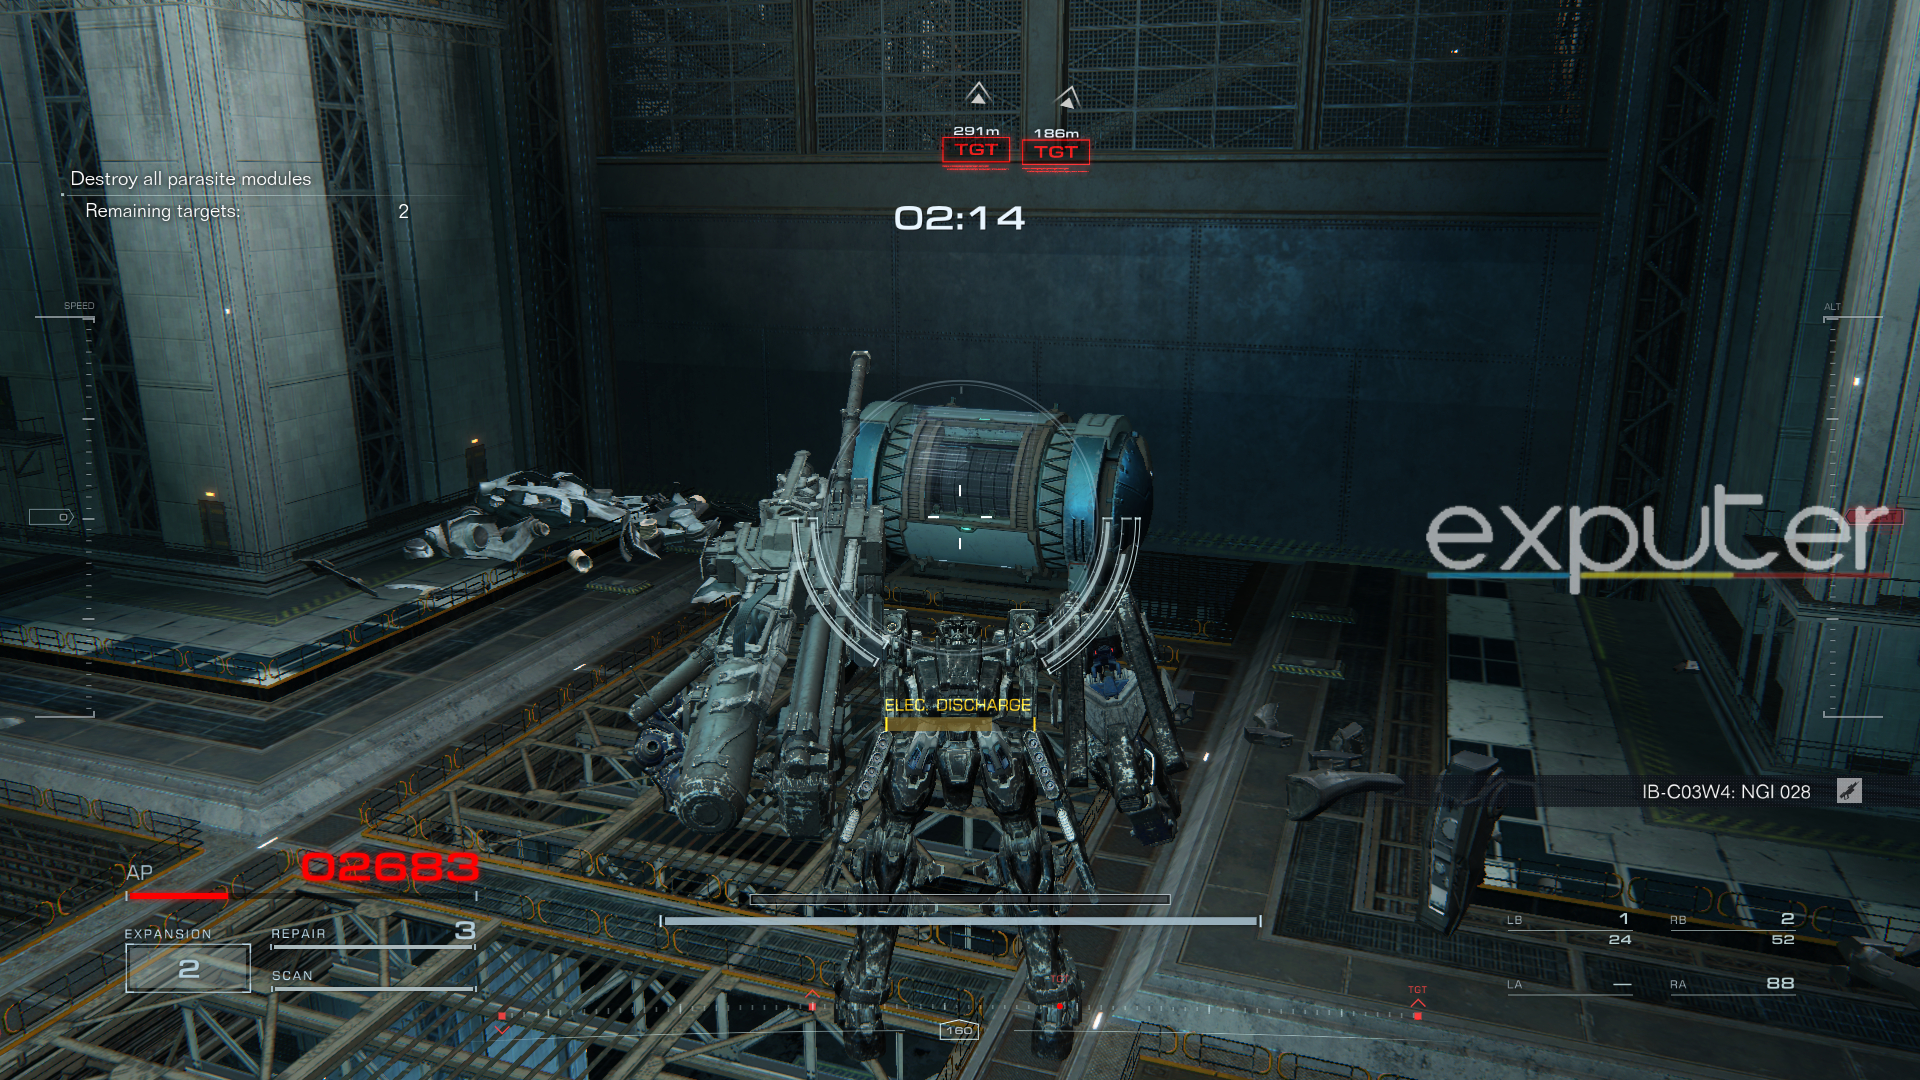
IB-C03W4: NGI 28
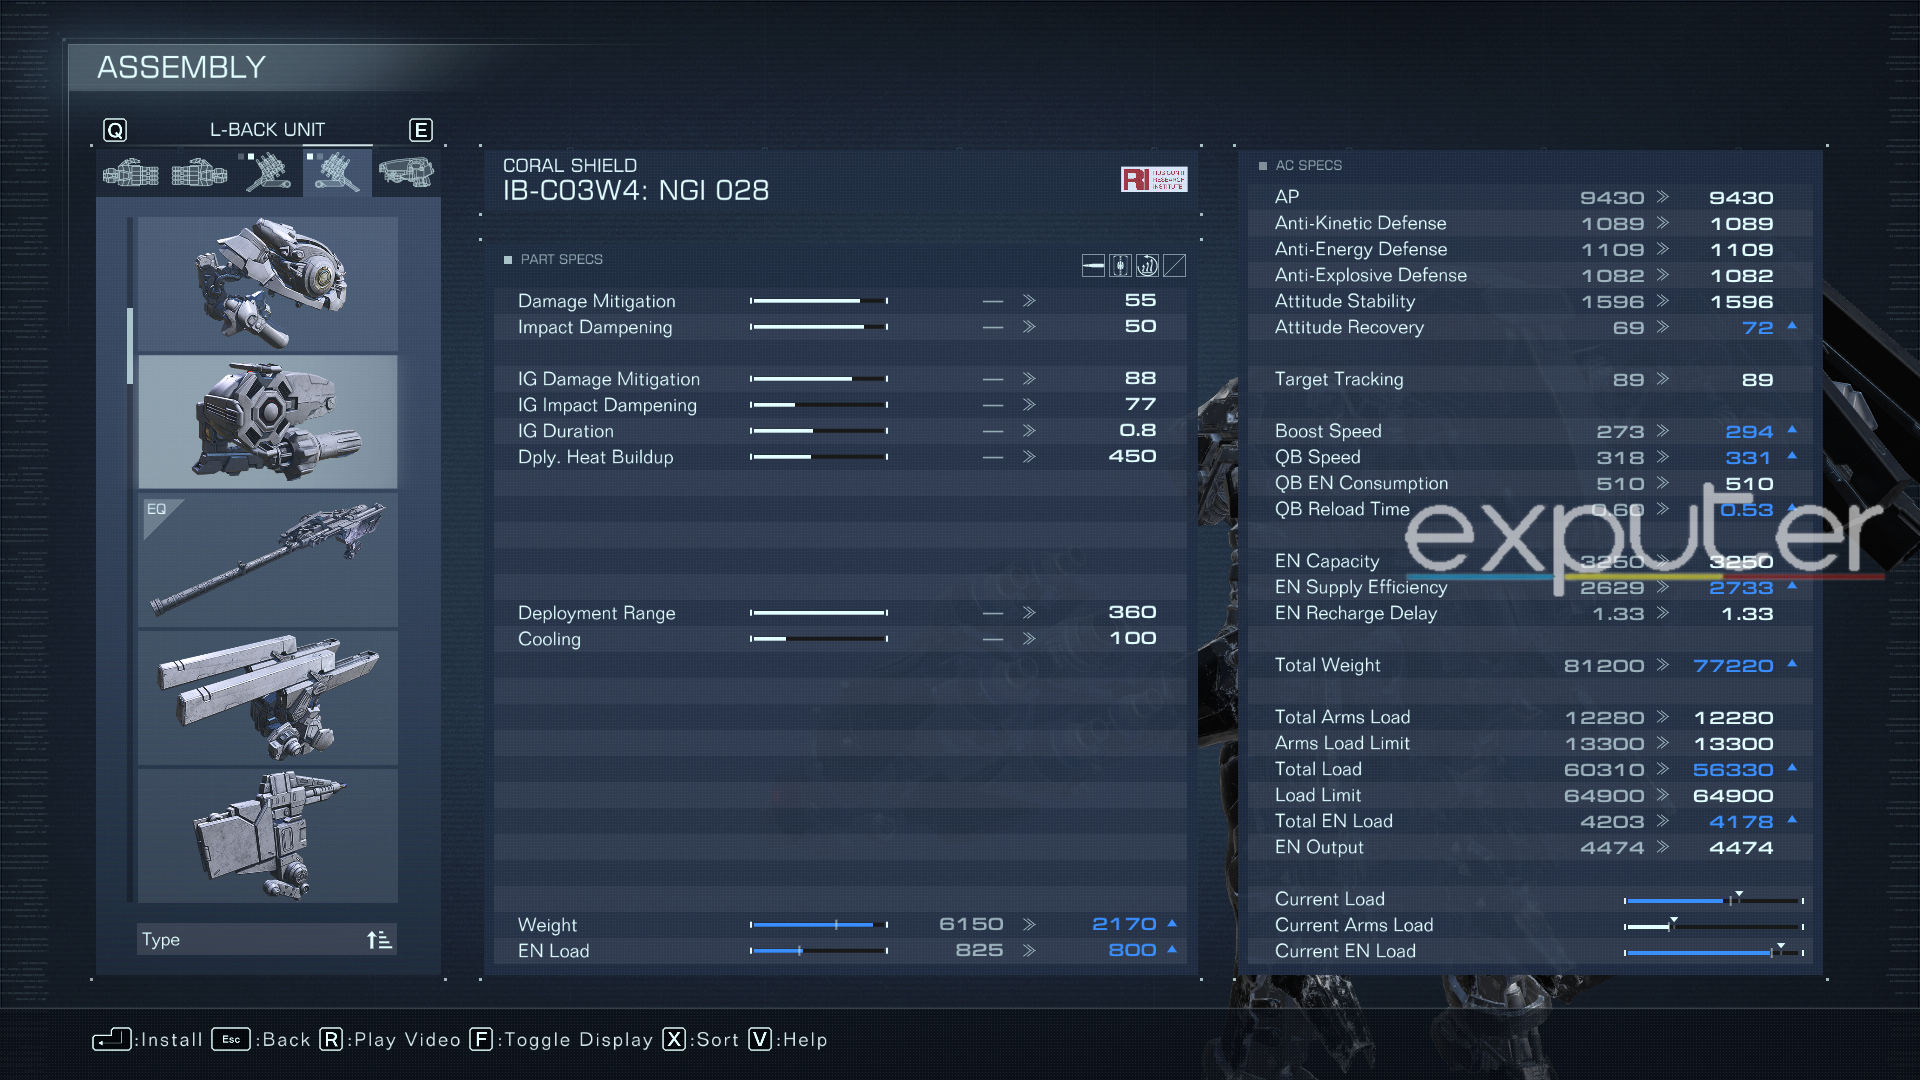
| Damage Mitigation | 55 |
| Impact Dampening | 50 |
| Deployment Range | 360 |
| Cooling | 100 |
The NGI 28 is another Coral Weapon found in the same mission, which you can use instead of the NGI 006 if you’re a defensive player. This unit deploys an effective Coral Shield, offering one of the best Deployment Ranges and Damage Mitigations over any shoulder-attaching shield in Armored Core 6. As a bonus, it’s also reasonably lightweight, making it versatile and accessible.
Upon getting the NGI 006, here’s the method to getting one of those secret Coral parts in Armored Core 6:
- Continue following your objective markers by taking down the parasite modules inside the Xylem ship.
- After killing the third module, you’ll go through a narrow pathway, where you must jump down to retrieve the chest on the ground floor near the ship’s center.
That wraps up this extensive guide on the Armored Core 6 hidden parts, detailing their pros, cons, and the locations within the missions they’re in. As seen, grabbing these free components is a great way to get access to some good mech enhancements, helping you reserve some COAM for significantly better parts or weapons. To satisfy your curiosity, you can see how the community investigates any undiscovered secret parts in Armored Core 6.
Customize your mech from this list of secret parts and test it out against the hardest bosses in Armored Core 6. To focus on the campaign instead, consider reading up on the true in-game ending to see the plot’s definitive conclusion. And here’s a guide on the well-popular AC6 Trainers to play around with.
Next:
- Armored Core 6: How To Beat Rusty
- Armored Core 6: How To Get S Rank In Missions
- Armored Core 6: How To Make Megas XLR
- Armored Core 6: How To Use The Assault Armor
Thanks! Do share your feedback with us. ⚡
How can we make this post better? Your help would be appreciated. ✍