It’s difficult to find video games these days that have no Easter Eggs in them, and Techland’s Dying Light 2 is no different. You can find several secret weapons and Easter Eggs throughout the map in the game. And our Easter Eggs guide is here to help you get your hands on these items. Some of the Easter Eggs are weapons, while others are just items you can keep in your inventory.
- Dying Light 2 developers are known for adding many fun easter eggs in their game for players to find and experience.
- Some easter eggs in the game give you very powerful weapons, and there are a total of 10 of them.
- Although not all of them are that powerful, some are just for players to have fun.
- Gaining these weapons is also no easy task. Most of these can take a lot of effort and time, but later, it becomes worth it.
Dying Light 2 All Easter Eggs
| Easter Egg/Secret Weapon | Description | How to Obtain |
|---|---|---|
| Korek Charm | Increases weapon durability by 500 | In Developer's Room |
| Flying Broom | Allows flying around during a specific challenge | VNC Tower, complete "Baba Yaga" challenge |
| Mistress Sword | An Easter Egg from The Legend of Zelda | Access the DOOM Room |
| Left Finger of gloVA | A finger gun, requires blueprint | Access the Developer Room, complete "Space Cock" side quest |
| Hoverboard | Tribute to Back to the Future 2 | Saint Paul Island, specific challenge |
| Pan of Destiny | A pan weapon found during post-game | Renegade complex, complete "Space Cock" side quest |
| Everyone Can Play Soccer Ball | Throwable item with stun ability | Trinity area, score goals on a soccer field |
| It’s Me… Marian! Sneakers | Increases jump height and allows a triple jump | Lower Dam Ayre area, inside a crate |
| Dying Force | Star Wars-inspired weapon | DOOM Room, secret area |
| Cyber Hands 2177 | Similar to Cyberpunk 2077's Mantis Blades | Top of VNC Tower, interact with an NPC |
The following list is based on the Easter Eggs and secret weapons I found while playing the game. I managed to discover a total of 10 hidden items. However, you can expect to see more of them if you further explore the game. So without any further ado, let’s look at all the Easter Eggs and secret weapons in Dying Light 2.
More From Exputer: Dying Light 2 Blueprint Locations
Korek Charm
The first, and perhaps one of the most useful hidden items in Dying Light 2, is the Korek Charm. This is a one-of-a-kind weapon charm that you can use to increase the durability of your weapons by 500. That’s right, with the Korek Charm attached to your weapon, you won’t have to ever worry about losing it again.
We have already curated a detailed guide on how to get Korek Charm in Dying Light 2, and you can follow it to acquire this amazing item.
Flying Broom
Techland couldn’t hold themselves back from adding a Harry Potter easter egg in Dying Light 2. For those who don’t know, there exists a Flying Broom in the game, thanks to which you can around the city. Acquiring is not a difficult task, so there isn’t any reason for you not to get it or try it. It is also one of the two Easter Eggs on our guide that you can not keep in your inventory forever.
To get the Flying Broom in Dying Light 2, head to the top of the VNC Tower. It is the same tower we mentioned at the beginning of the guide. You’ll need to use a lift to go to the top and once you’re there, look down the roof from the east edge of the building until you spot another rooftop with a crane on it. It is where you’ll be able to get the Flying Broom.
Mistress Sword
The Mistress Sword might sound like a high-damage output from its name, but it isn’t. The weapon isn’t even an actual sword; it’s a machete. Second, unlike every other weapon in the game, the Mistress Sword can do 0 damage with each hit. Yes, you read that right, 0 damage.
The only purpose of this weapon is to trigger your enemies and nothing else. If you ask why this weapon’s worth getting, it’s because the Mistress Sword is an easter egg from The Legend of Zelda. I don’t know about you guys, but if there’s an Easter Egg related to Zelda in the game, then that’s enough for me to go after it.
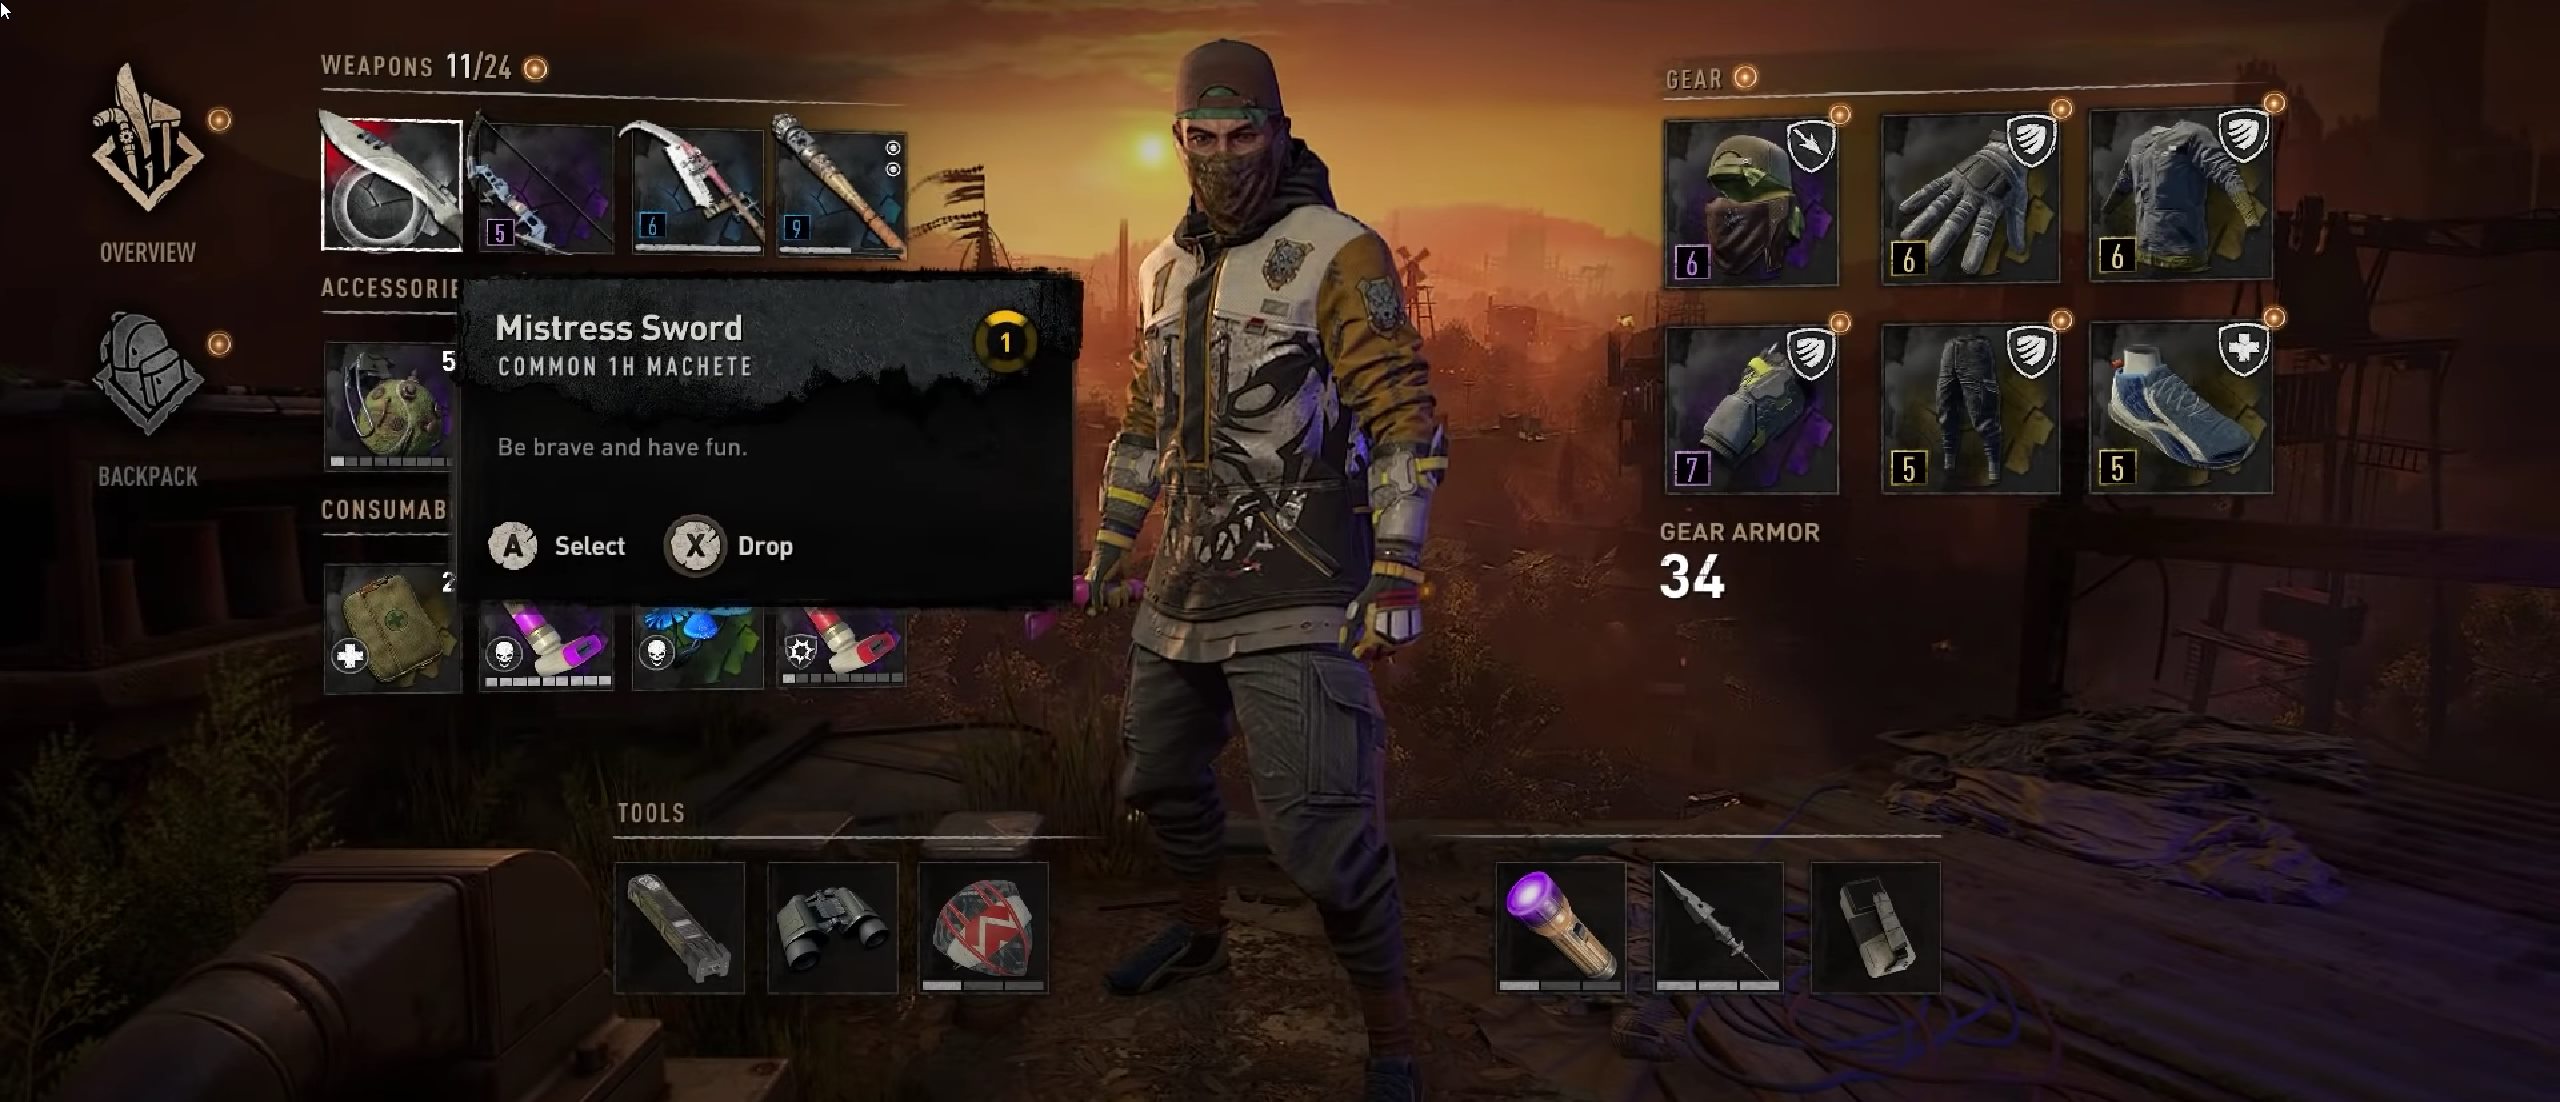
To get your hands on the Mistress Sword in Dying Light, you will need to access the DOOM Room. We have explained in our mistress sword secret weapon guide how you can access the hidden Doom Room, start the Hangar Challenge, and then get this secret weapon.
Hoverboard
Back to the Future 2 is one of the most popular films of all time, and how could Techland avoid adding an Easter Egg for it in their latest game? To pay tribute to the popular movie, the developers have added a Hoverboard to the game. Unfortunately, just like the Flying Broom, you won’t be able to keep this item in your inventory forever. You’ll only get access to it during a specific challenge, after which it will be gone forever.
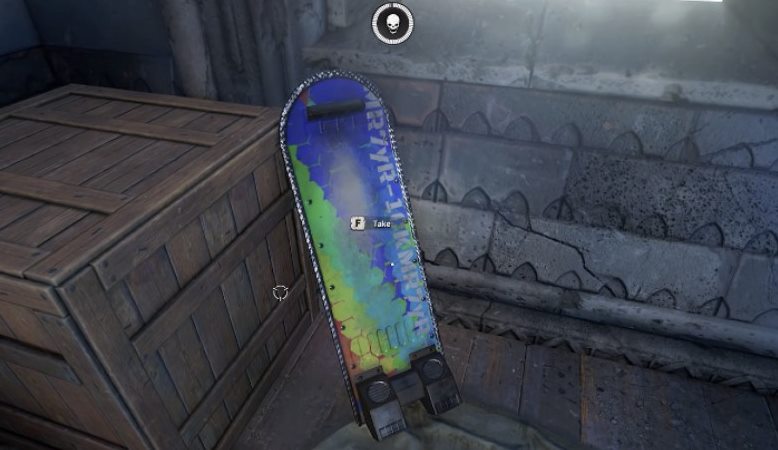
The Hoverboard in Dying Light 2 is one of the most difficult secret items to get in the game. You will need to get to the top of the church, next to a building with a military airdrop on its rooftop.
After you make your way into the church, you first need to get the power back on by connecting a wire. To do this, grab the power cord from the Electric Outlet and then take it to the top. Make sure to follow the route that involves climbing up the metal structures, as the cable won’t reach its destination otherwise. After you get to the top, you’ll be able to locate the Electric Outlet right next to the giant bell.
An Interesting Read: Dying Light 2 Safe Codes
Left Finger of gloVA
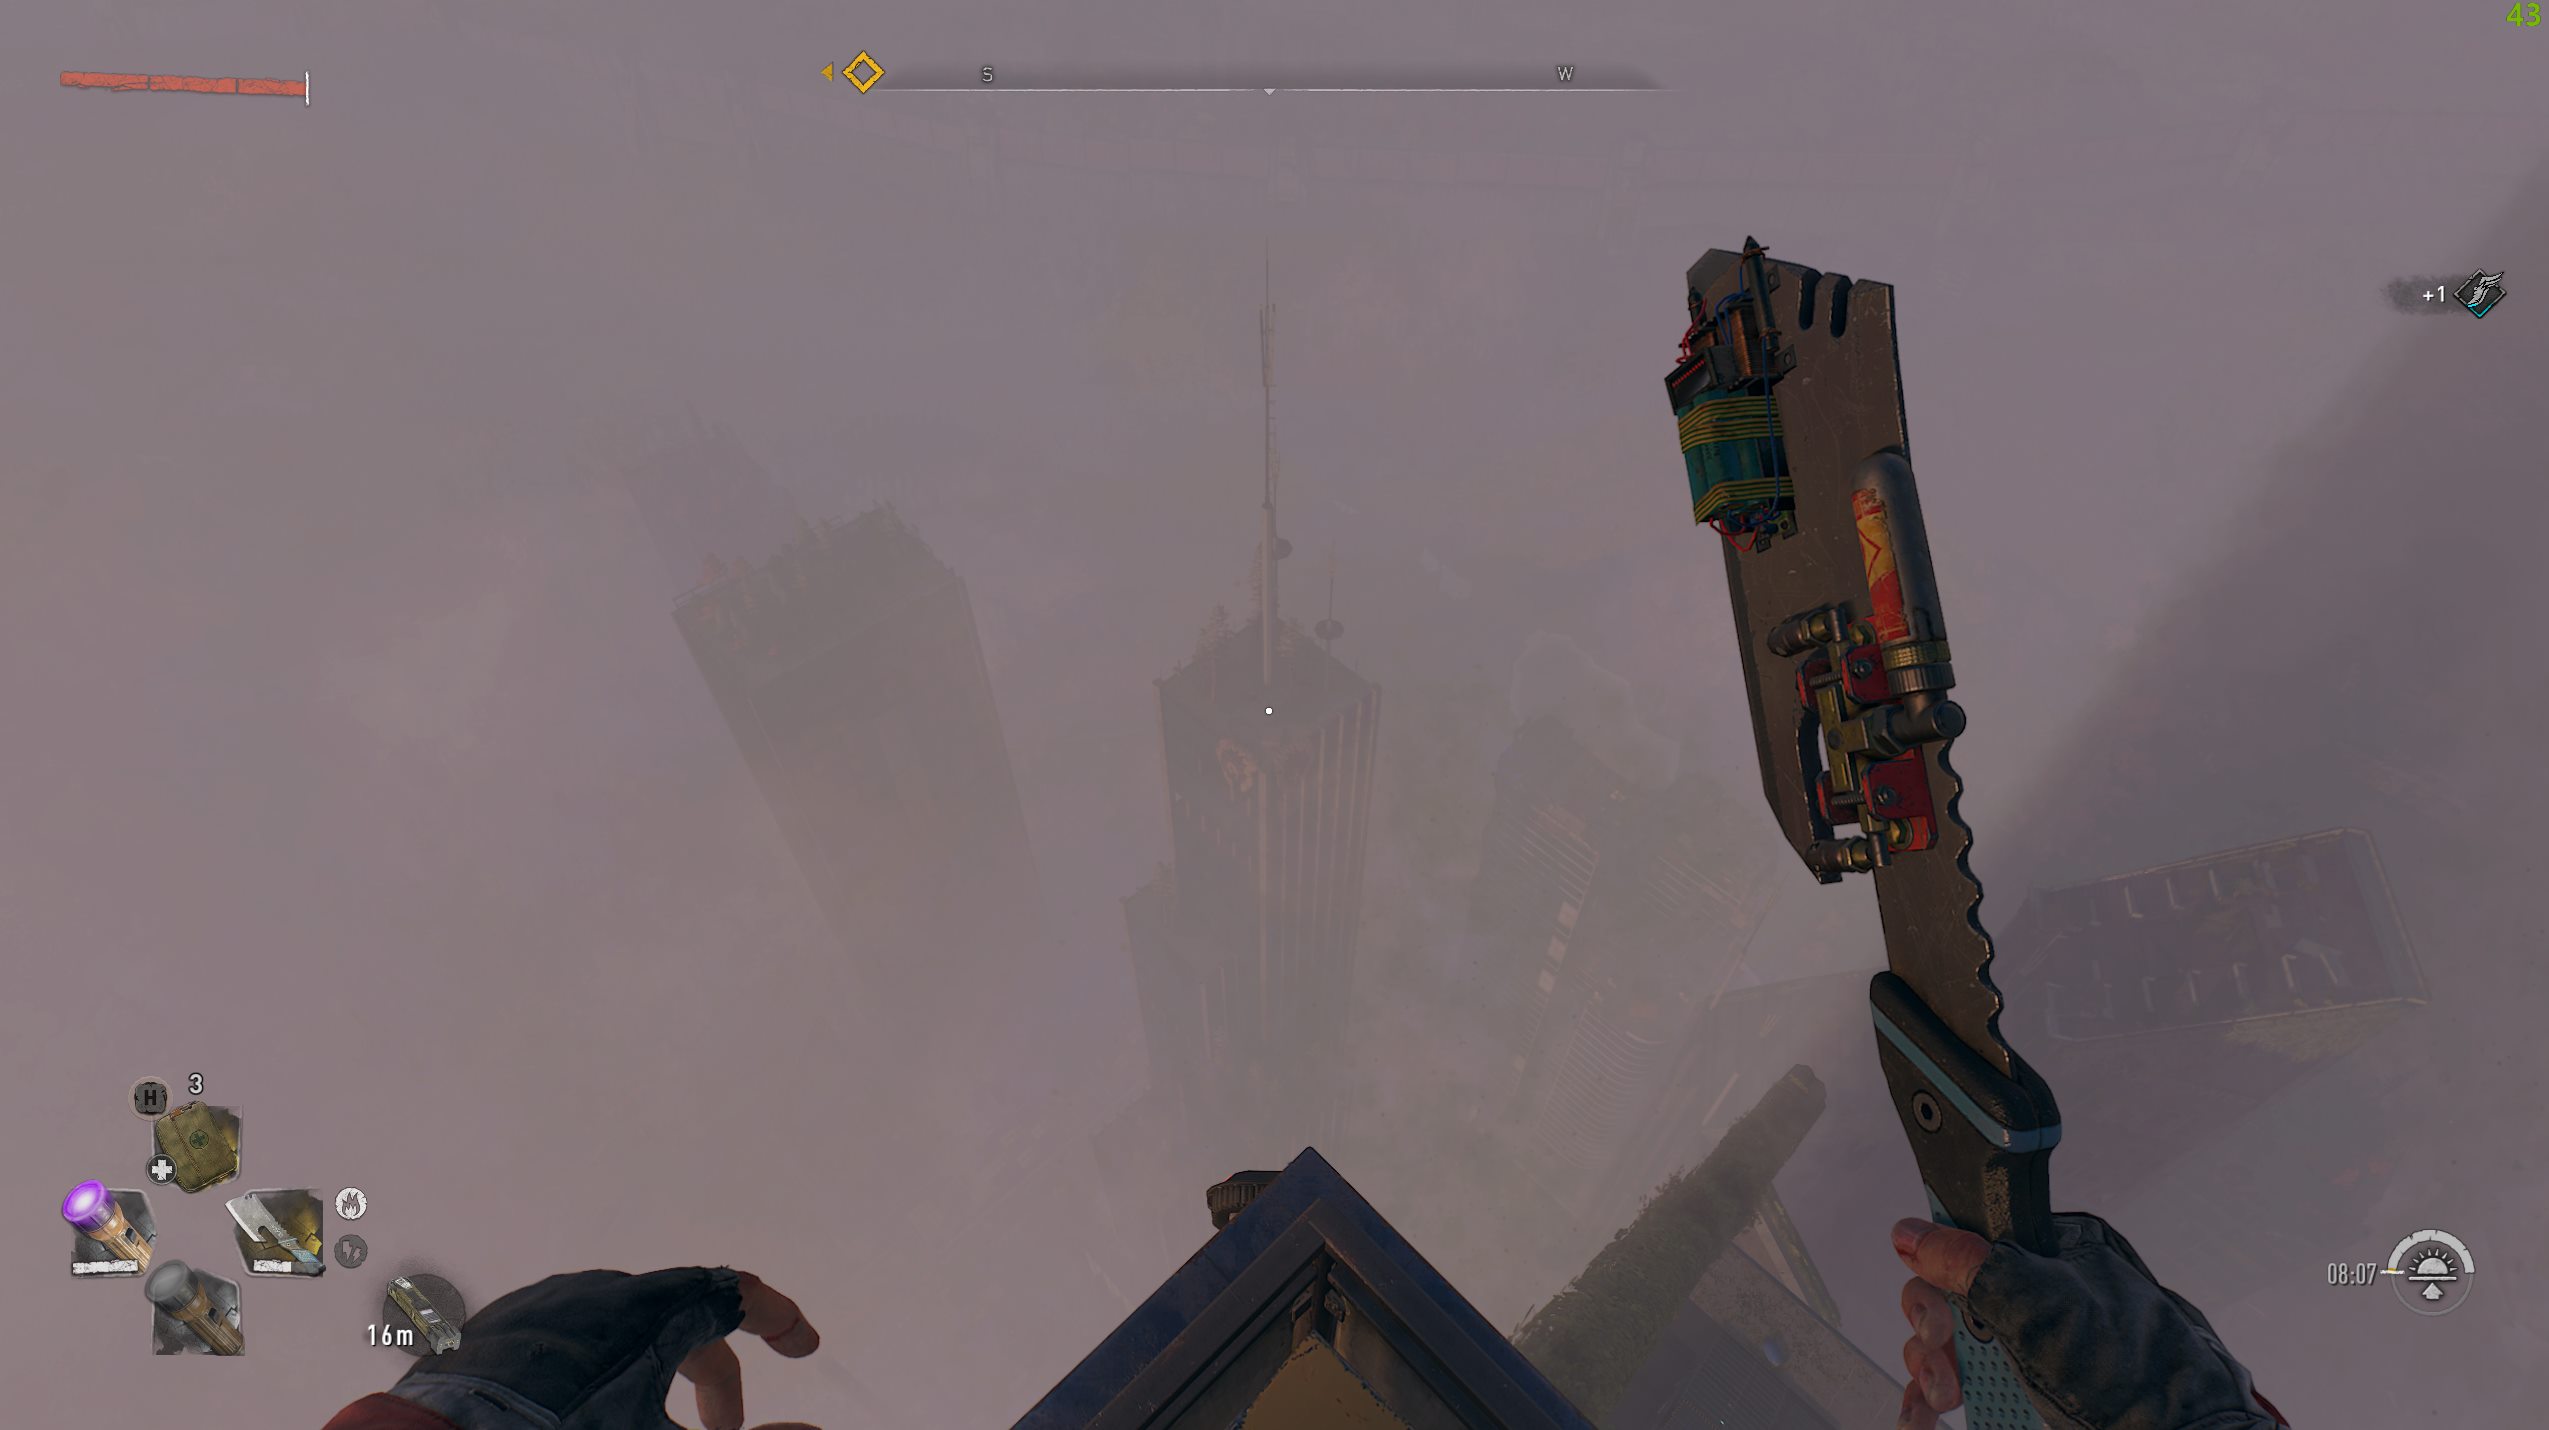
Next up in our Dying Light 2 secret weapons guide, we have the Left Finger of gloVA. For those who don’t know, this secret weapon happens to be a finger gun that you can use to take down your target quickly. After acquiring the blueprint for this weapon, you can craft it for 369 Scrap. Furthermore, the weapon comes loaded with 16 shots only, which is few considering you need a lot of scraps to craft this weapon.
Still, if you’re interested in getting this weapon, you’ll need to visit the Developer Room. The first thing you need to do is reach the top of the VNC tower. As we mentioned above, you’ll be able to use a lift for this purpose after you complete the Broadcast story mission. After you get to the top, you will once again need to make your way to the building southwest of the VNC tower with the antenna popping out of its rooftop.
Pan of Destiny
The Pan of Destiny is a pretty fun weapon to use. To get it, you will need to head to the Renegade complex you visit during the 2nd last story quest of the game.
A Similar Read: Dying Light 2 Secret Bicycle
To get your hands on the Pan of Destiny, make your way to the Renegade complex. During the Now or Never mission, you’ll encounter many enemies there. However, during your second visit, you won’t have to worry about facing them anymore as you will now only find Peacekeepers there.
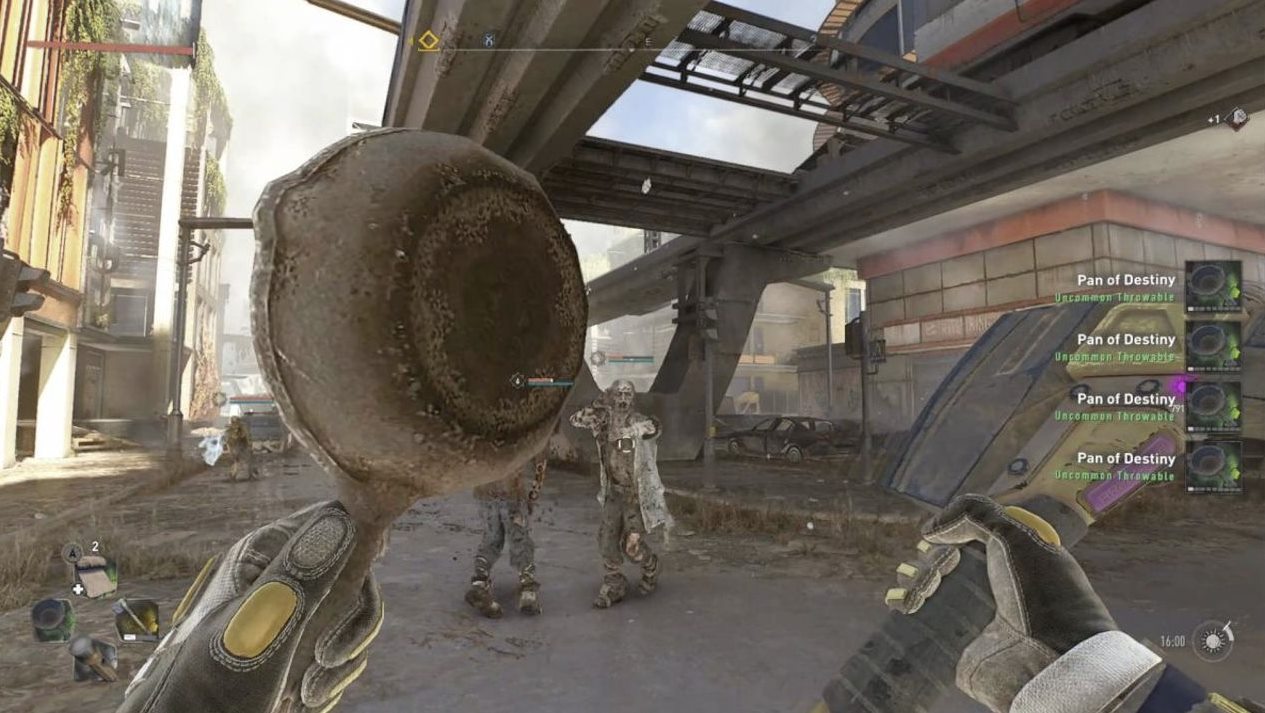
Once inside, complete the side quest called “Space Cock.” to acquire the blueprint for the Pan of Destiny. You’ll be able to craft the Pan of Density for 369 craps.
Everyone Can Play
Another interesting secret weapon that I would like to mention is the Everyone Can Play Soccer Ball. Just like the Pan of Destiny, this isn’t the kind of throwable item that can do wonders in combat, but it is still fun to use. Furthermore, the Soccer Ball also happens to have the ability to stun its target upon hitting them.
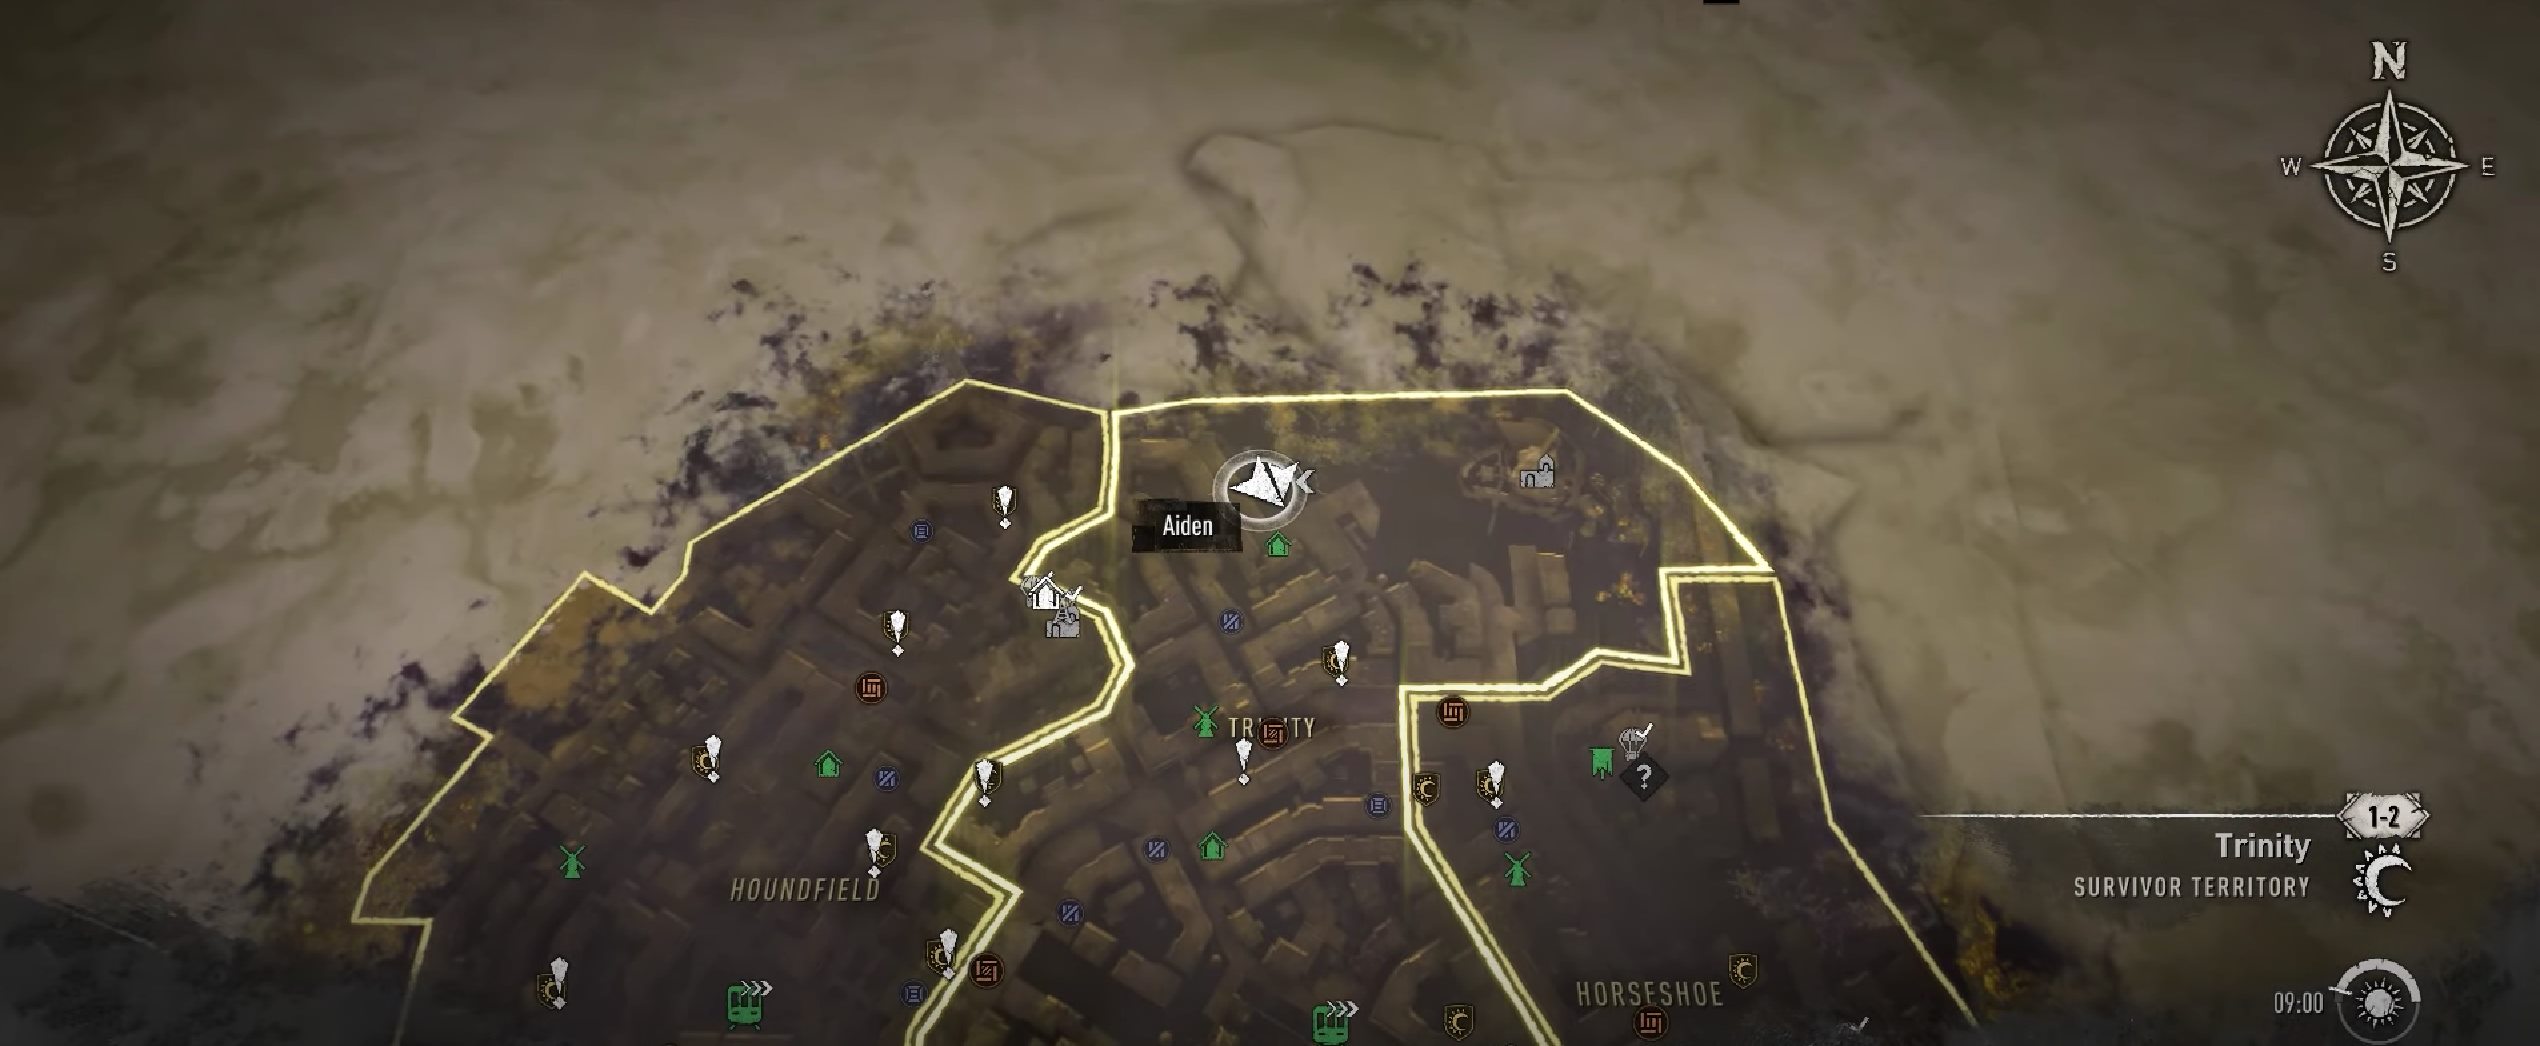
To acquire the throwable soccer ball, head to a Zombie-filled Soccer Field in the Trinity area. After clearing the area, find a soccer ball and score a goal. Fast-travel away and return to repeat the process nine times. A dancing zombie will then appear—defeat it to obtain the “Everyone Can Play” blueprint. Craft the Soccer Ball for 369 scraps. While the process is time-consuming, the joy of using the ball makes it worthwhile.
It’s Me… Marian! Sneakers
This is easily one of the best items in our Easter Eggs guide. This is because the “It’s Me… Marian!” shoes are not only made to make you look good. After you wear them, you will get the luxury to jump even higher. Furthermore, the shoes also allow their owner to perform a special triple jump, something that even some of the best skills in Dying Light 2 can’t help you do.
To get these cool sneakers, head to the Lower Dam Ayre area after progressing in the story. Find a crane with a lifted crate; the sneakers are inside. Unlock the crate with a lockpick, explore the room for a Kyle Crane tribute, and interact with a music player and cousin to get the “It’s Me… Marian” blueprint.
The effort is worth it for better parkour in the game and the Kyle Crane tribute.
Dying Force
Star Wars fans, rejoice! Our Dying Light 2 Easter Eggs guide reveals a special treat: a weapon that lets you lift and choke enemies, a perfect Darth Vader tribute. May the force be with you!
Similar Guides: Dying Light 2 XP Farming
To get your hands on this hidden weapon, you will again need to head to the DOOM Room, the same room you needed to access for the Mistress Sword blueprint. Once you’re in the DOOM level, look around for a room filled with green liquid. At the end of the room, you’ll be able to access another secret place by interacting with the wall. This is where you can find the Dying Force.
Cyber Hands 2177
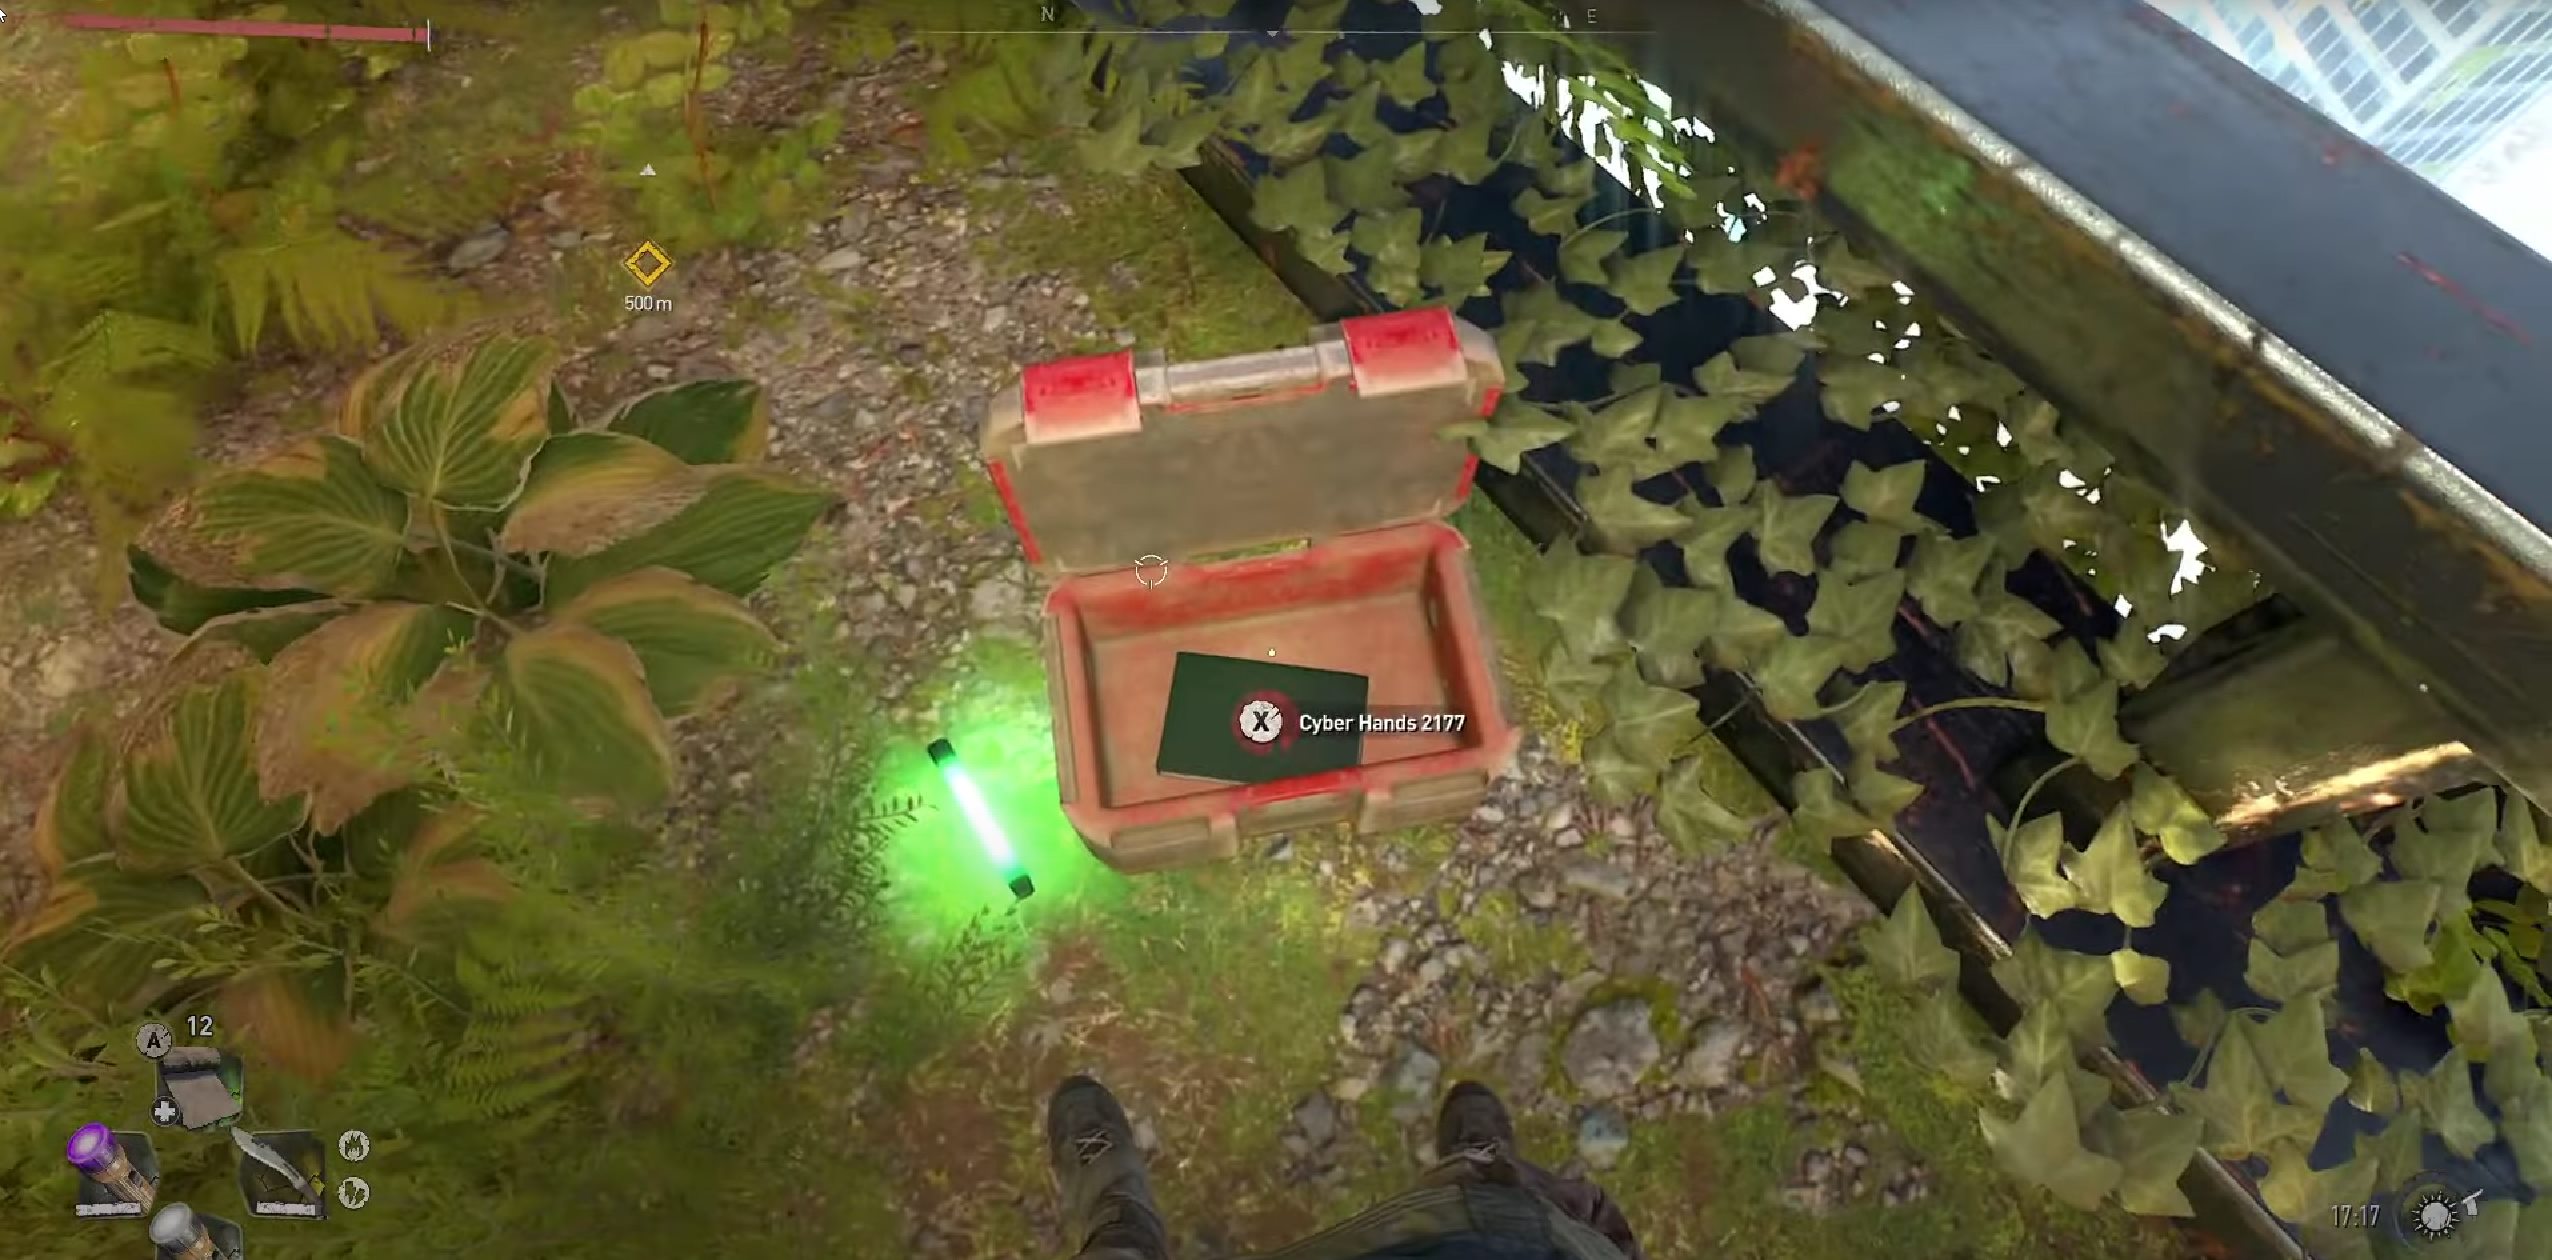
The final weapon that I would like to mention in our guide is the Cyber Hands 2177. If you’ve played CD Projekt Red’s Cyberpunk 2077, then you’ll instantly recognize this weapon. It’s because Cyber Hands 2177 is a complete ripoff of Cyberpunk 2077’s Mantis Blades. However, while they are fun to use, you shouldn’t expect them to be as powerful as the Mantis Blades.
Get the Cyber Hands 2177 for some decent single-hit damage against regular enemies, but it’s not ideal for group combat due to its low durability (40 points).
To obtain it, head to the top of the VNC Tower during the Broadcast mission. Glide to a building with an antenna and moss on the southwest side. Use ventilation ducts to reach the rooftop, spot an NPC on another building, and glide to them. Interact to start a conversation, and at the end, receive the blueprint for Cyber Hands 2177. Craft it with just 1x Scrap.
This was all regarding the Easter Eggs guide in Destiny 2. As you can see for yourself, acquiring all of them will be a time-consuming task, and some of them might not even look worth getting. But if you like to collect all Easter Eggs, we hope that our guide will help you acquire them easily and quickly.
Next:
Thanks! Do share your feedback with us. ⚡
How can we make this post better? Your help would be appreciated. ✍
Thanks for all that dude, I\'ve been playing so this helps a lot
Yesssssssssssssssssssssss!!!!!!!!
Great work helpfull