Risk of Rain 2 Artifacts [Unlock, Types, And Codes]
Here is an in-depth guide on the Risk of Rain 2 Artifacts, that have now been covered in 2024 after numerous Risk of Rain 2 Updates.
 Fact Checked By Irfan Ansari
Risk of Rain 2 artifacts are an example of the sheer ingenuity of the developers as they are hidden in different stages of the game in a way that you can complete the whole game without even noticing their existence. However, finding these artifacts requires a basic understanding of the Survivors so our guide of Ranking all the Characters in Risk of Rain 2 can be your accomplice.
How to Unlock Artifacts?
- Visit the Compound Generator: Find it below the Sky Meadow map, which may require Hopoo Feather items or the Artificer’s Ion Surge and hover ability to jump the gap.
- Locate the Laptop: At the Compound Generator, interact with the laptop in front of a cylindrical object.
- Enter the Artifact Code: Input the correct Artifact code into the laptop. The code will spawn a portal to the hidden realm, Bulwark Ambry.
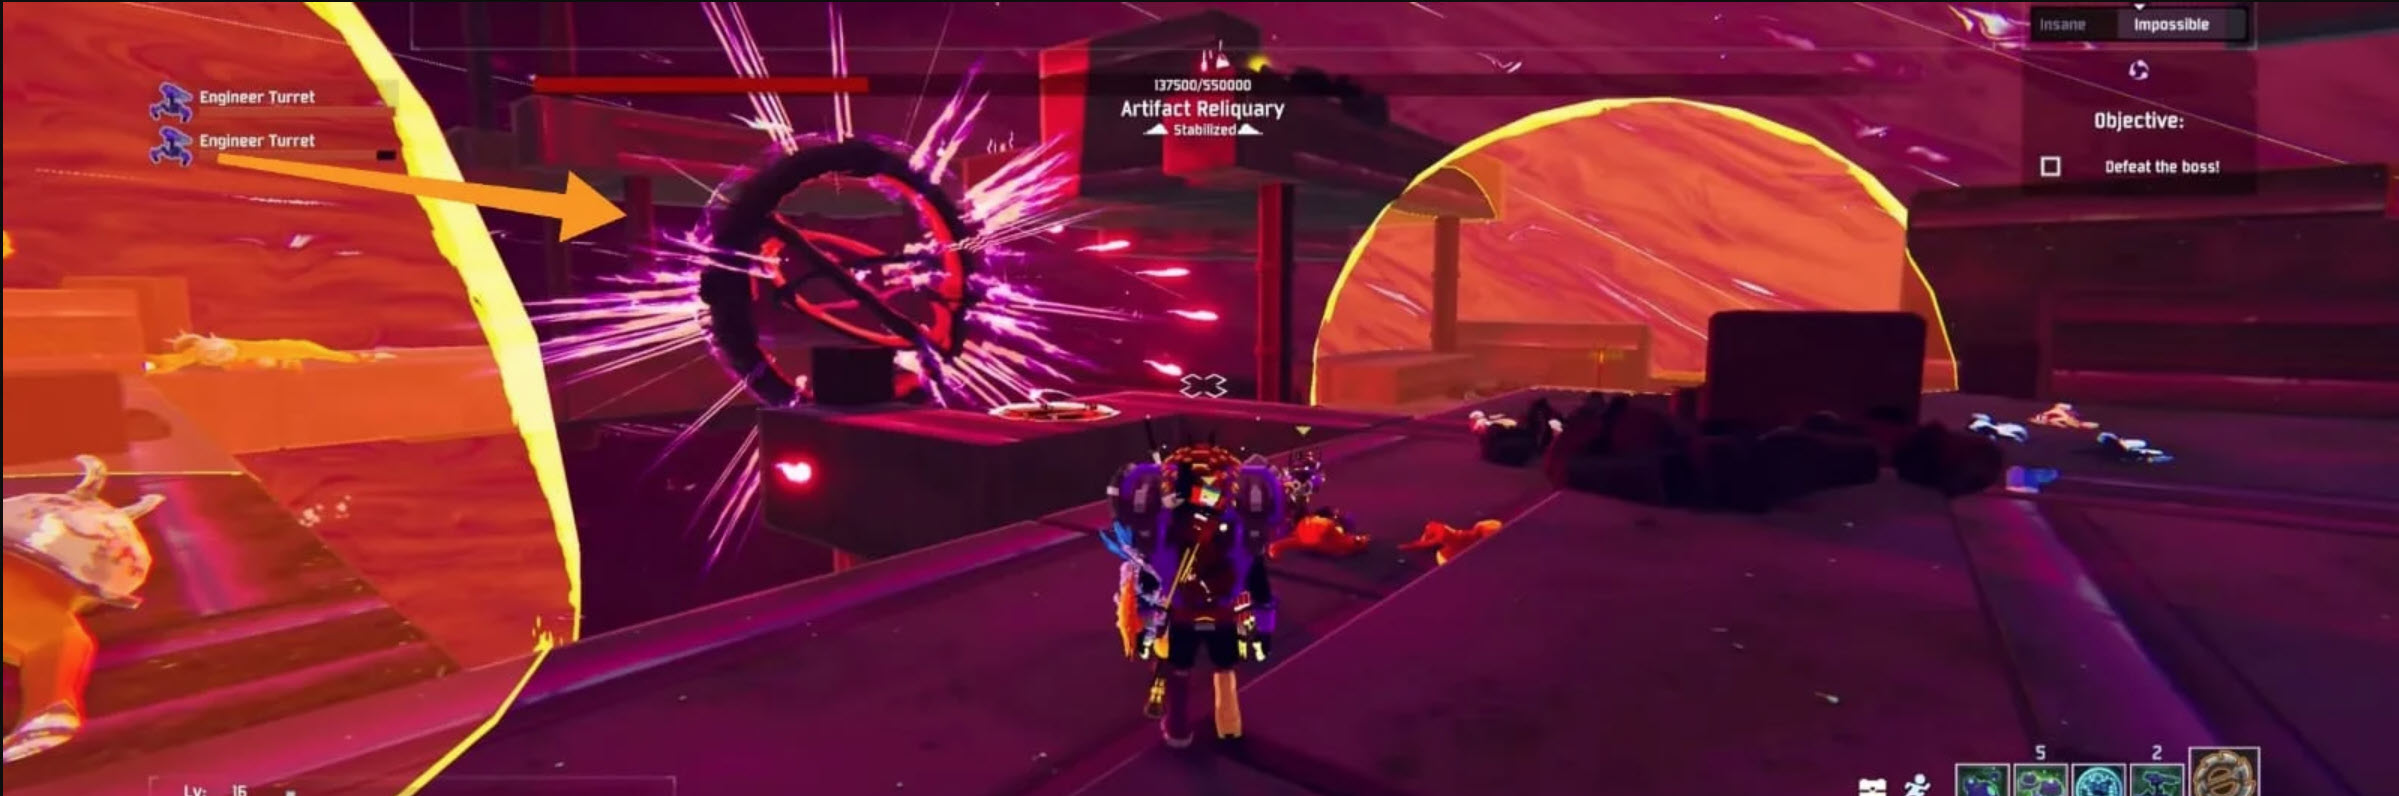
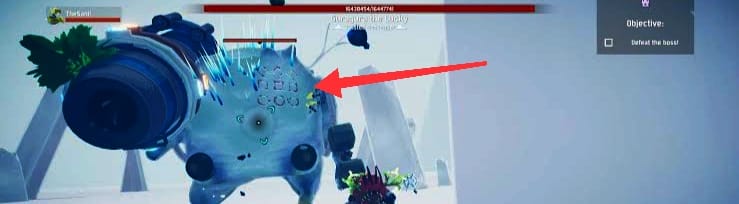
- Complete the Artifact Encounter: In Bulwark Ambry, you’ll encounter the Artifact Reliquary boss. Interact with it to trigger monster spawns, defeat enemies, and collect an Artifact key.

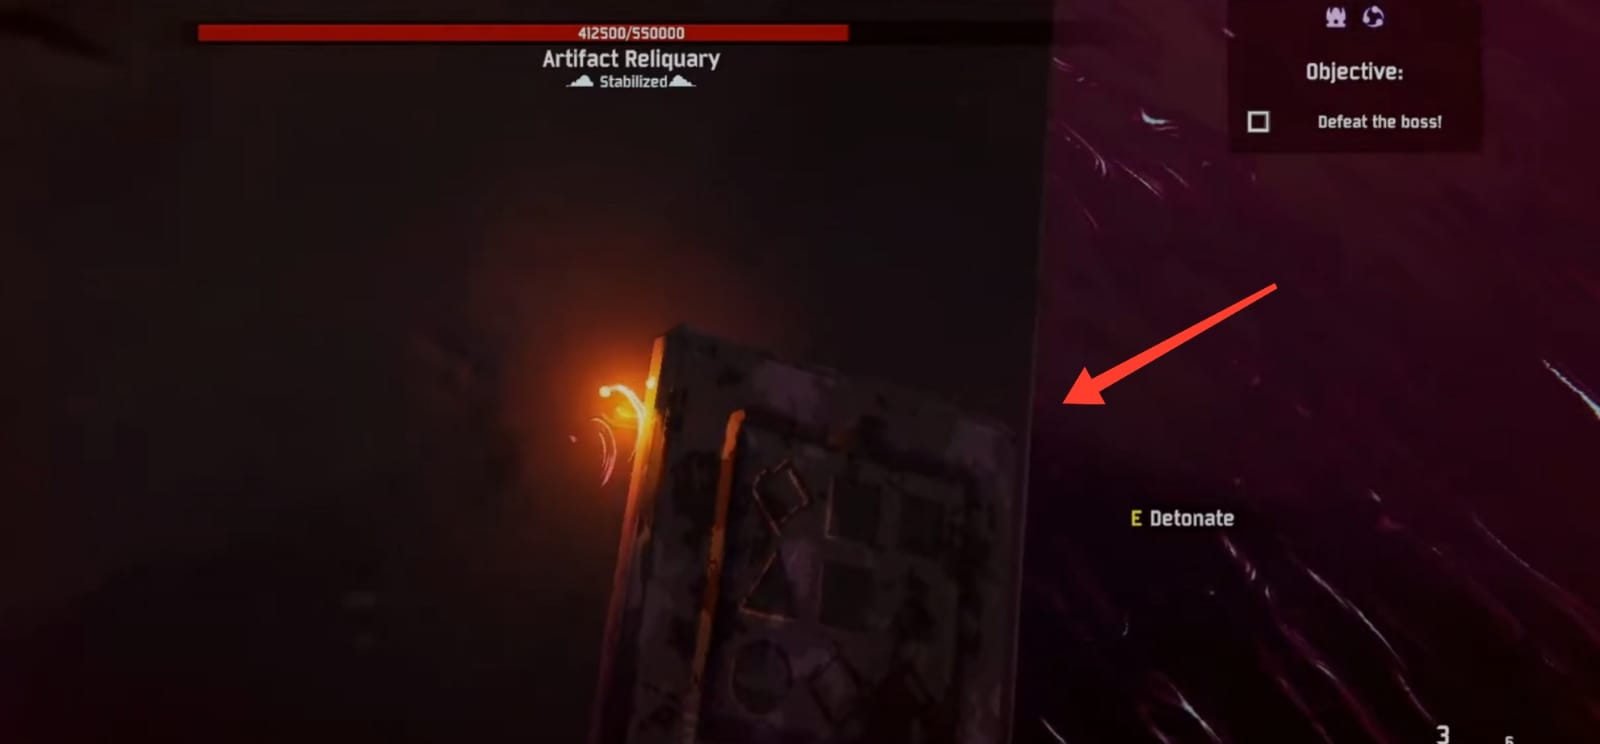
Artifact Reliquary - Equip the Artifact Key: The Artifact Reliquary boss is immune to damage, but you can hurt it by equipping the Artifact key you obtained by defeating enemies. This action wipes out all Artifact keys in the area and pushes survivors and enemies away.
- Repeat the Process: You need to repeat this process four times to defeat the Bulwark Ambry boss completely.
- Collect the Artifact: After defeating the boss, the Artifact item corresponding to the Artifact code you entered will drop for you to pick up.
- Use the Portal: A portal will appear upon defeating the boss, allowing you to exit Bulwark Ambry.
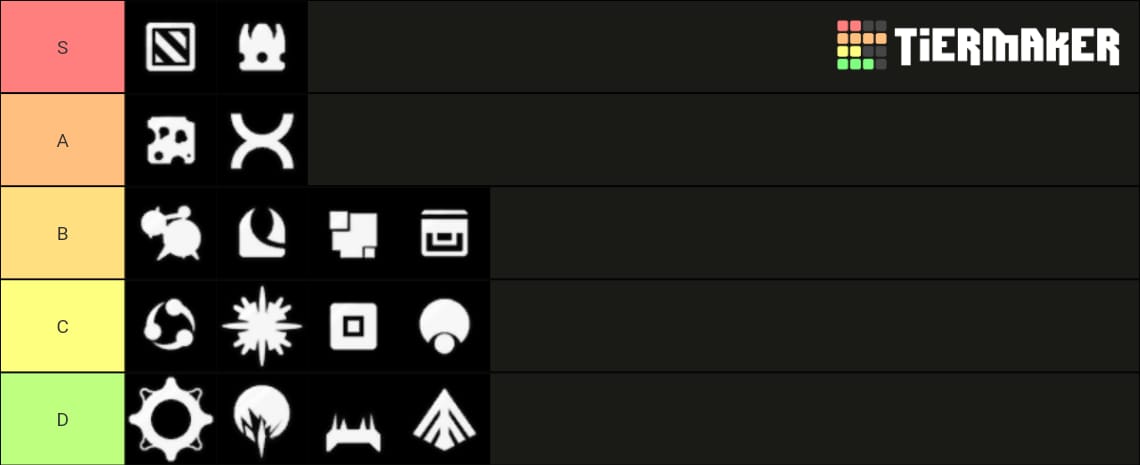
Tiers and Types of Artifacts:
| No. | Artifact Name | Tier | Description |
|---|---|---|---|
| 1 | Artifact Of Command | S Tier | Allows the player to choose their items |
| 2 | Artifact Of Glass | S Tier | Damage: +500 percent Base Health: 10 percent |
| 3 | Artifact Of Chaos | A Tier | - Additional Dmg while using explosives - Effects survivors as well as monsters |
| 4 | Artifact Of Sacrifice | A Tier | - Item drop after an enemy kill - Removal of chest spawning |
| 5 | Artifact Of Kin | B Tier | Monsters spawn of the same type |
| 6 | Artifact Of Metamorphosis | B Tier | Enter a game as a random survivor |
| 7 | Artifact Of Enigma | B Tier | Random equipment granted when spawned |
| 8 | Artifact Of Dissonance | B Tier | Any type of monster can be spawned anywhere |
| 9 | Artifact Of Honor | C Tier | Each enemy spawns as an Elite |
| 10 | Artifact Of Soul | C Tier | Dead enemies produce more lesser wisps |
| 11 | Artifact Of Swarms | C Tier | - 2x Enemy Spawned - Each with 50% health |
| 12 | Artifact Of Spite | C Tier | After each enemy kill different explosive bombs will appear |
| 13 | Artifact Of Death | D Tier | 1 teammate death leads to death of all |
| 14 | Artifact Of Evolution | D Tier | Random items get granted to monsters |
| 15 | Artifact Of Frailty | D Tier | 2x fall damage |
| 16 | Artifact Of Vengeance | D Tier | - After every 10 min a Copy of your player will spawn - Identical items and equipment |
Currently, there are sixteen Artifacts in Risk of Rain 2, and unlocking them allows you to toggle modifiers at the character selection screen. They alter the in-game scenario and may make a run extremely challenging or a breeze depending on what Artifact you enabled before starting the run.
The Artifacts Update has arrived on PC! The fourth content update for Risk of Rain 2 is available now to everyone on Steam!
Patch Notes: https://t.co/XKceElwRK5 pic.twitter.com/a8kAgd3cpn
— Risk of Rain 2 (@RiskofRain) March 31, 2020
Tier-D
Tier-D includes Artifact of Death, Evolution, Frailty, and Vengeance, which makes the game more challenging for the players. A brief explanation of all these artifacts is as follows:
Artifact of Death
If one player in your team dies, everyone dies.

This artifact is mocked as the most useless out of all the artifacts by the players. It can be used if you want to hone your skills to achieve next-level competence.
Artifact of Evolution
Monsters will get random items between stages.

This artifact can be pretty perilous, as monsters can obtain items that will deal damage. This artifact can be used if you are grinding at lower levels, but it can be annoying at higher difficulties. Monsters can’t get special items like Lunar and Boss items.
Artifact of Frailty
It doubles the fall damage, making it a lethal practice.

It’s one of those artifacts that makes the gameplay harder due to the irregular topography of the game, which includes rocky ridges and cliffs. Accidental falls can now be fatal, so it’s better to keep your distance from the edges of cliffs. However, few characters are capable of nullifying this effect due to their special abilities. For instance, Loader is immune to this damage due to its specific perk, which prevents fall damage. Huntress is also an effective survivor of this artifact. Hoopo Feather could come in handy as well if you jump just before striking the ground.
Artifact of Vengeance
An identical copy of the Player will spawn having the same items and pieces of equipment.

Another artifact that will prove challenging for you because a Copy of your Player will spawn after every 10 minutes. This can be a good artifact for practice as the AI of your Copy is pretty strong having the same number and variety of items. So, keep an eye on the timer as the AI will spawn automatically, once it hits the ten-minute mark.
Tier-C
The artifacts that belong to this category are Artifact of Honor, Soul, Swarms, and Spite. The concise details of Tier-C artifacts are explained below:
Artifact of Honor
Enemies spawn as Elites.

If this artifact is activated, it becomes difficult to fight all enemies because every foe will spawn as an Elite. Elites have extra abilities, and additional health buffs so defeating them can be troublesome. However, facing them will become easier if you use Old Guillotine (that we mentioned in our Risk of Rain 2 Item Tier List) because it can instantly kill an Elite if its health drops below 13%. Avoid the use of this artifact if you aren’t playing with a competitive survivor like Captain, Loader, Huntress, etc.
Artifact of Soul
Lesser Wisps will originate from dead enemies.

This artifact adds additional thorns in your venture as you have to deal with additional enemies, Lesser Wisps, given that you have already taken care of their predecessors. The number of Lesser Wisps might increase as time progresses.
Artifact of Swarms
The number of Enemy Spawns is doubled with 50% Health.

Each enemy will spawn with its Identical Twin or Clone but the health of both twins will be 50%. Each enemy and its Clone will drop an item if this artifact is paired with Artifact of Sacrifice. So using this artifact can be a decent approach if you want to loot a number of items of the same variety. Do keep in mind that each enemy and its clone will not drop different items as they are identical copies of each other.
Artifact of Spite
Bombs will spawn when enemies are killed.

This artifact seems dangerous but its harmful effects can be avoided easily. Enemies will now release several bouncy and exploding bombs that can deal damage. You can avoid them by staying away from their small explosion radius.
Tier-B
This category involves Artifacts of Kin, Metamorphosis, Enigma, and Dissonance. These are unpredictable artifacts that can either make the game easier or tougher due to their random characteristics.
Artifact of Kin
All Monsters will be of the same variety.

If you are using this artifact, you will encounter only one type of monster in that particular stage. It doesn’t matter if you are going up against a boss or a regular enemy, the effect of this artifact remains the same in both cases. For example, Lesser Wisps will appear as regular monsters as well as bosses.
Keep in mind, this artifact doesn’t work in the realm related to the Trial of the artifact, Bulwark’s Ambry. It can make your gameplay easier or harder depending on the type of monster that will spawn.
Artifact of Metamorphosis
You will spawn as a random Survivor.

By using this artifact, you can enter the game as a random Survivor. This arbitrary artifact can be a good opportunity for you to tinker with different Characters. Likewise, it will be challenging for you to face bosses. Use this artifact if you want to become the Jack of all Trades by playing with every character.
Artifact of Enigma
It gives you a piece of random equipment when you spawn.

This dynamic artifact can be a blessing or misery depending upon the piece of equipment that you’ll get. It includes Lunar types of equipment as well. Your equipment will change into another piece of equipment once it’s activated.
Artifact of Dissonance
Every variety of Monster can spawn at any stage.

This artifact breaks the barricades and you’ll have to get ready for facing enemies outside their usual habitat. You should avoid this artifact if you aren’t using a potent character because you can encounter a tougher enemy in the early stages.
Tier–A
This tier includes two artifacts, Artifact of Chaos and Sacrifice. These artifacts make the game relatively easier.
Artifact of Chaos
Enables Fire Damage to Survivors as well as Monsters.

As evident from the name, it brings chaos in the form of Fire Damage. You can get additional damage while using explosives, for instance, items like Gasoline, Whil-o’-the-Whisp, and Brilliant Behemoth should be avoided at any cost. You can read our guide of Items Tier List for a thorough understanding of these items.
Artifact of Sacrifice
Enemies will drop items on death, Chests will not appear.

This artifact allows you to enjoy extra loot after killing enemies because enemies will now drop items after getting killed but at the same time deprives you of regular loot as Chests will no longer appear. Nevertheless, you can still get Gold shrines and Blood shrines, etc.
Tier–S
Artifacts of Command and Glass are the most favorite and frequently used artifacts by the Risk of Rain 2 players.
Artifact of Command
It provides an effective way through which you can choose your items.

This artifact is arguably the favorite out of all the artifacts and makes the game hilariously easier. The items will drop in the form of small boxes called “Command Essence”. A separate interface will appear if you interact with this box which allows you to choose anything of the same rarity and category as the original item. Take Boss Items as an example, you can only choose from Regular Boss Items.
Artifact of Glass
You will deal 500% more Damage with 10% Base Health.

Yet another artifact that makes the game way easier by allowing you to deal a ridiculously huge amount of damage but its special Perk comes with a special Cost. You will have only 10% Base Health. Additionally, One-Shot Protection is disabled.
A Key Fact to consider here is that this Enhanced Damage applies to the base amount. Additional Perks will further bump up the digits. For example, if you’ll use a single Shaped Glass, you will deal 10 times more damage. Likewise, using two Shaped Glass will further increase your damage by 20X.
Please consider the fact that this list has been made after careful analysis of different artifacts. However, the rankings can vary extensively from person to person.
Location of Codes Related to Artifacts
| No. | Code Name | Location |
|---|---|---|
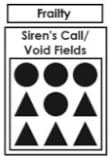
| 1 | Code Of Frailty | 1st Part => Void Fields 2nd Part => Siren's Call |
| 2 | Code Of Honor | On Top Of The Tombstone in the Sky Meadows |
| 3 | Code Of Kin | On A Cliff In Distant Root |
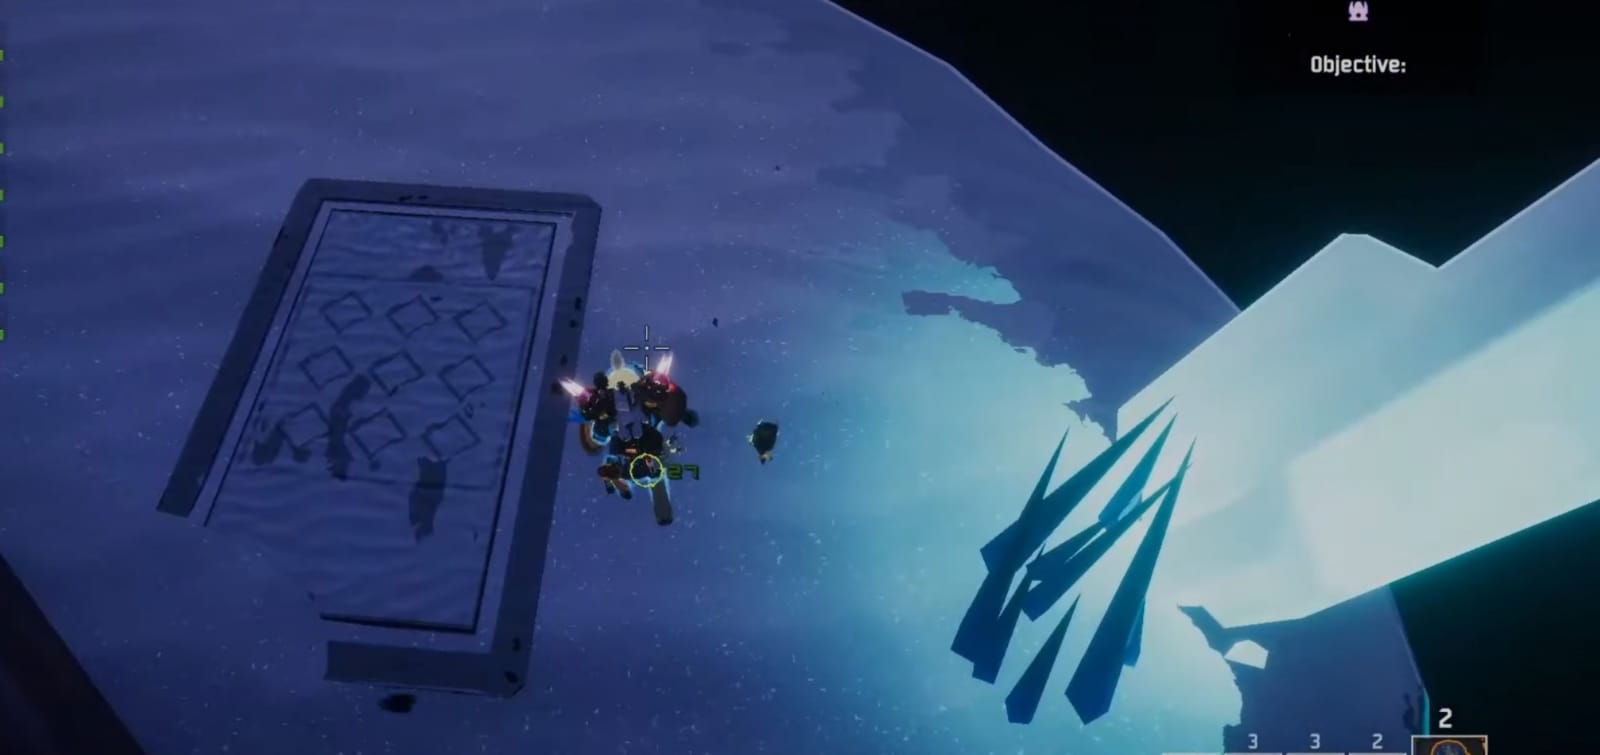
| 4 | Code Of Sacrifice | Can Be Found Underwater In The Gilded Coast Hidden Realm |
| 5 | Code Of Metamorphosis | On The Right Horn Of The Giant Sculpture in Titanic Planes |
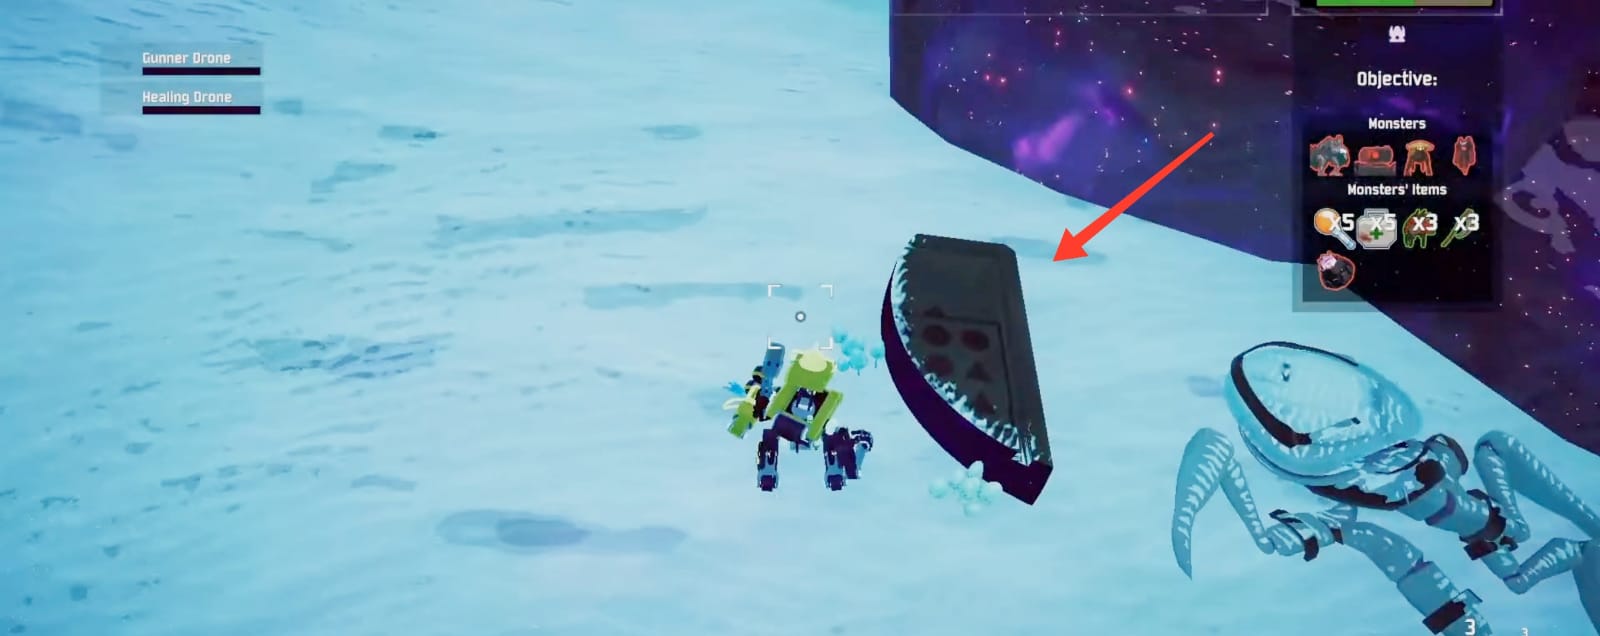
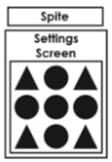
| 6 | Code Of Spite | Setting => Lod Bios Panel => Custom/Low => On The Stone Near The Wrecked Ship |
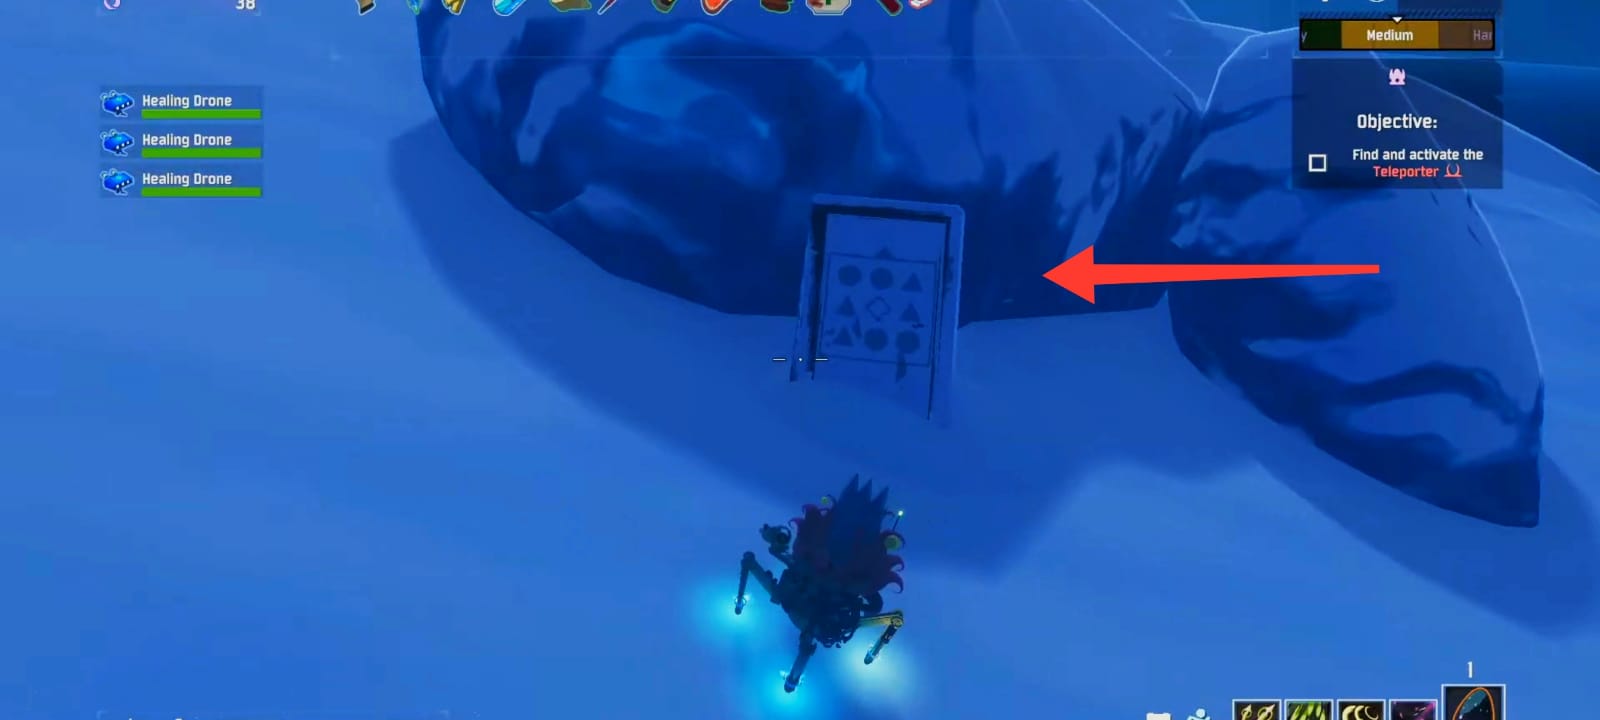
| 7 | Code Of Swarms | On An Island In Rallypoint Delta |
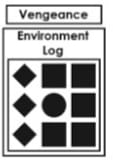
| 8 | Code Of Vengeance | Environment Section Of Log Book => Hidden Realm: A Moment Fractured => Zoom and Flip The Map |
| 9 | Code Of Evolution | In Moment, Whole as a tatto on twisted scavenger's body |
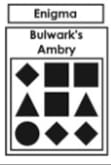
| 10 | Code Of Enigma | Can be found in Bulwark's Ambry |
| 11 | Code Of Dissonance | Can be found on a fallen stone in Abyssal Depths |
| 12 | Code Of Death | In N’Kuhana’s Altar that is in the Wetland's Aspect |
| 13 | Code Of Chaos | 1st Part => Abandoned Aqueduct => Stone Near The Entrance Of The Boss's Lair 2nd Part => Abandoned Aqueduct => Runald And Kjaro Gate Boss Fight Win |
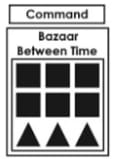
| 14 | Code Of Command | Behind The Sculpture Of The Shopkeeper in the Bazaar Between Time |
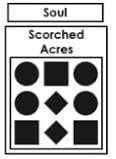
| 15 | Code Of Soul | In Scorched Acres A Pattern Formed By Stones |
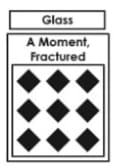
| 16 | Code Of Glass | Can be found in A Moment, Fractured |
Artifacts can be acquired through specific Codes scattered all over the Exoplanet, Petrichor V. Codes are in the form of a 3×3 Grid of different shapes that include Diamond, Square, Triangle, and Circle. They are usually inscribed on a Stone resembling Tombstones.
Each Artifact has a distinct Code located at different Locations, Stages, and in the Game Menu as well. Finding the perplexing codes of 16 different Artifacts can be a jaw-clenching journey as most of the Codes are hidden, and some are difficult to decipher due to their vague appearance. Nonetheless, this section provides easy directions that will lead you to these codes.
Code of Frailty
This code is divided into two parts. One Part is located in the Void Fields, near the bones of dead organisms, and the other part is located in Siren’s Call.
Here is another picture from the Siren’s Call perspective.
Code Array:
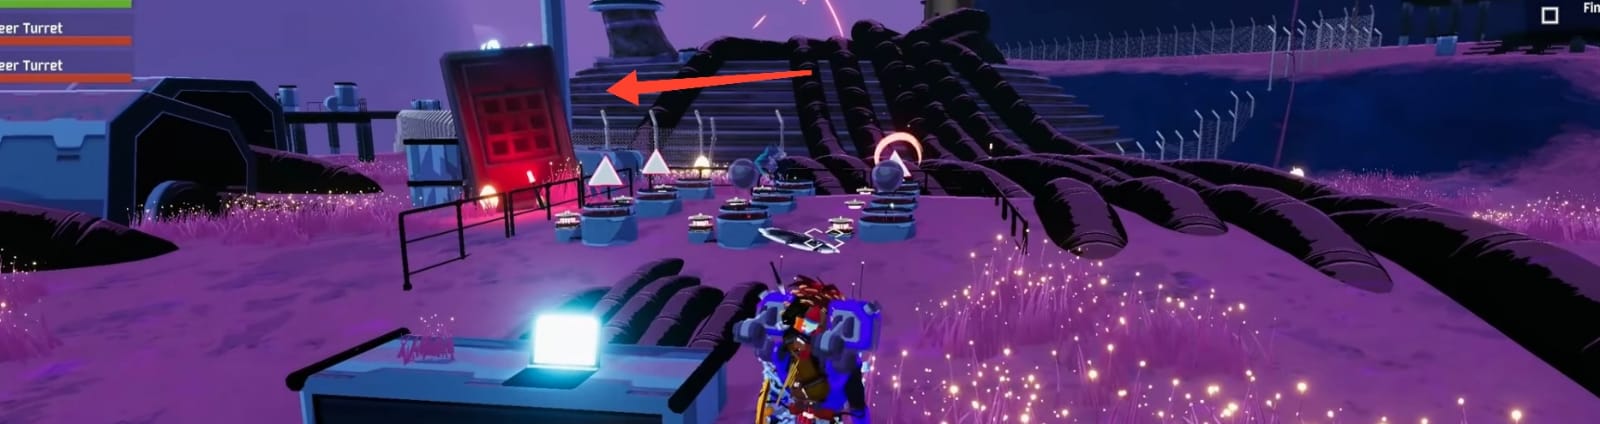
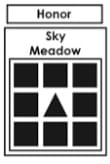
Code of Honor:
It’s inscribed on the Tombstone located near the Portal Generator in Sky Meadows.
Code Array:
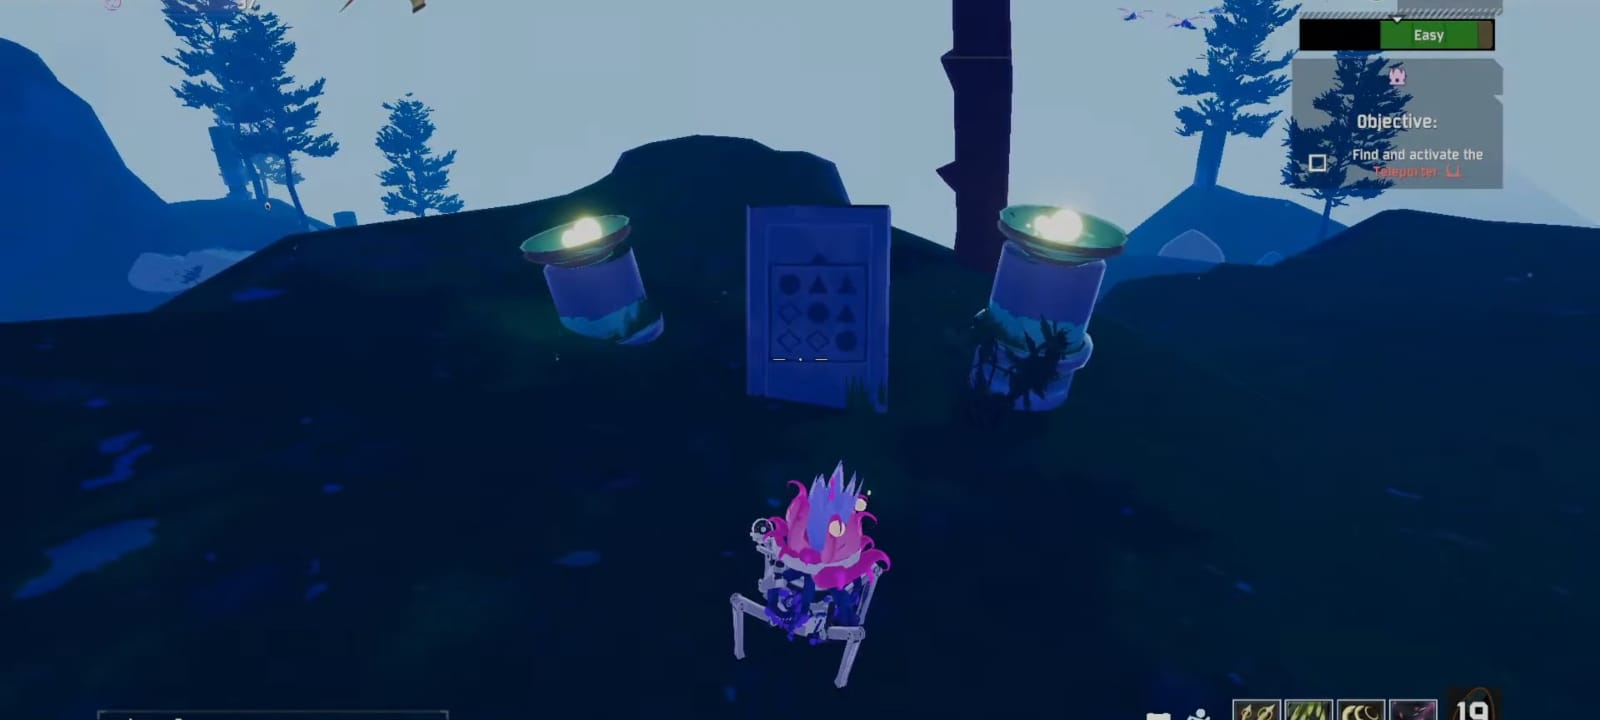
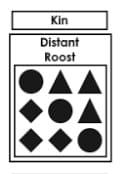
Code of Kin:
It can be found on the cliff of Distant Roost. You will get there by climbing the cliff.
Code Array:
Code of Sacrifice:
It’s located underwater in Hidden Realm: Gilded Coast. You have to use Gold Portal to reach there.
Code Array:

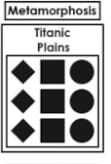
Code of Metamorphosis:
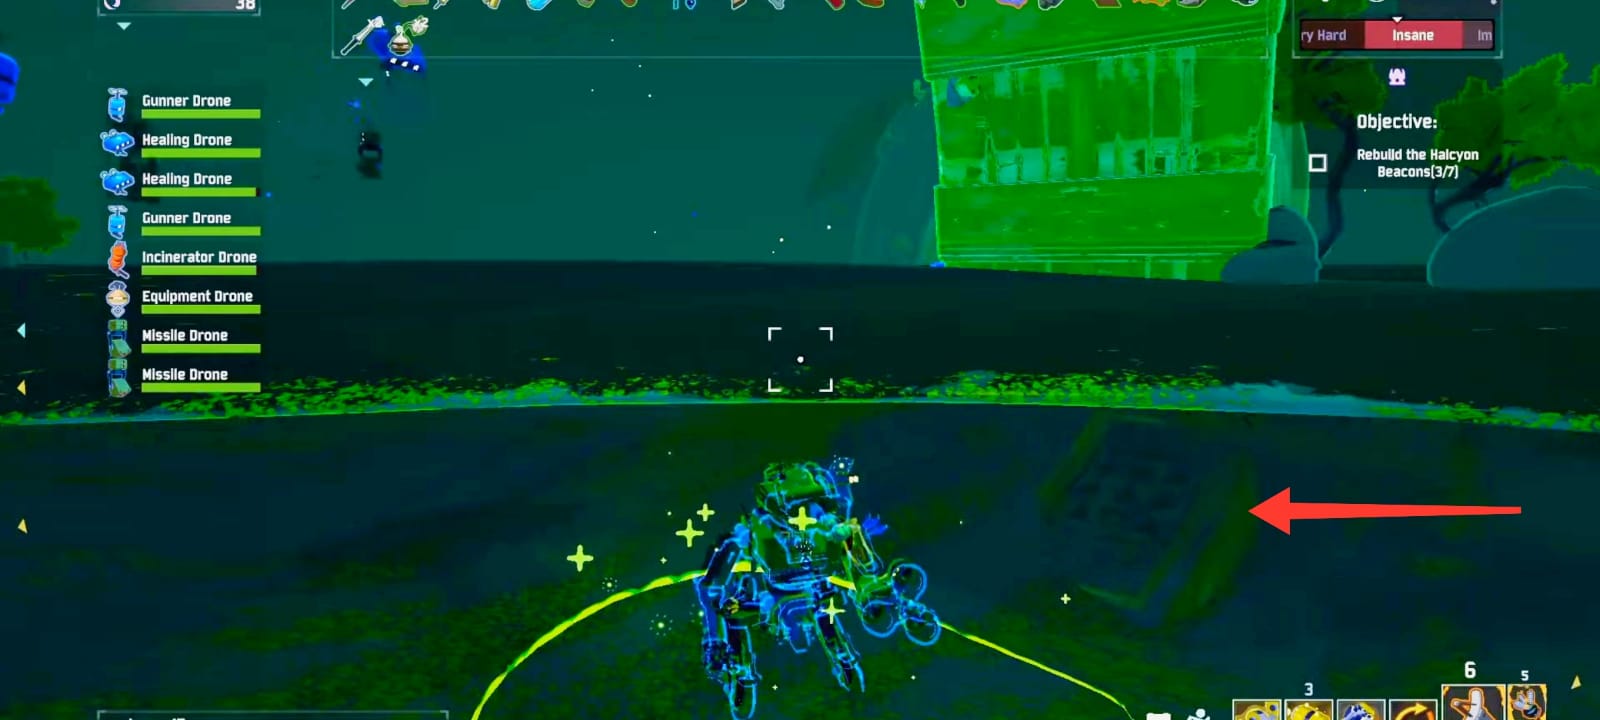
It’s rather hard to distinguish due to its murky appearance, however, it can be seen as a vague grid of different shapes on the Right Horn of Giant Sculpture which is present in Titanic Planes.
Code Array:
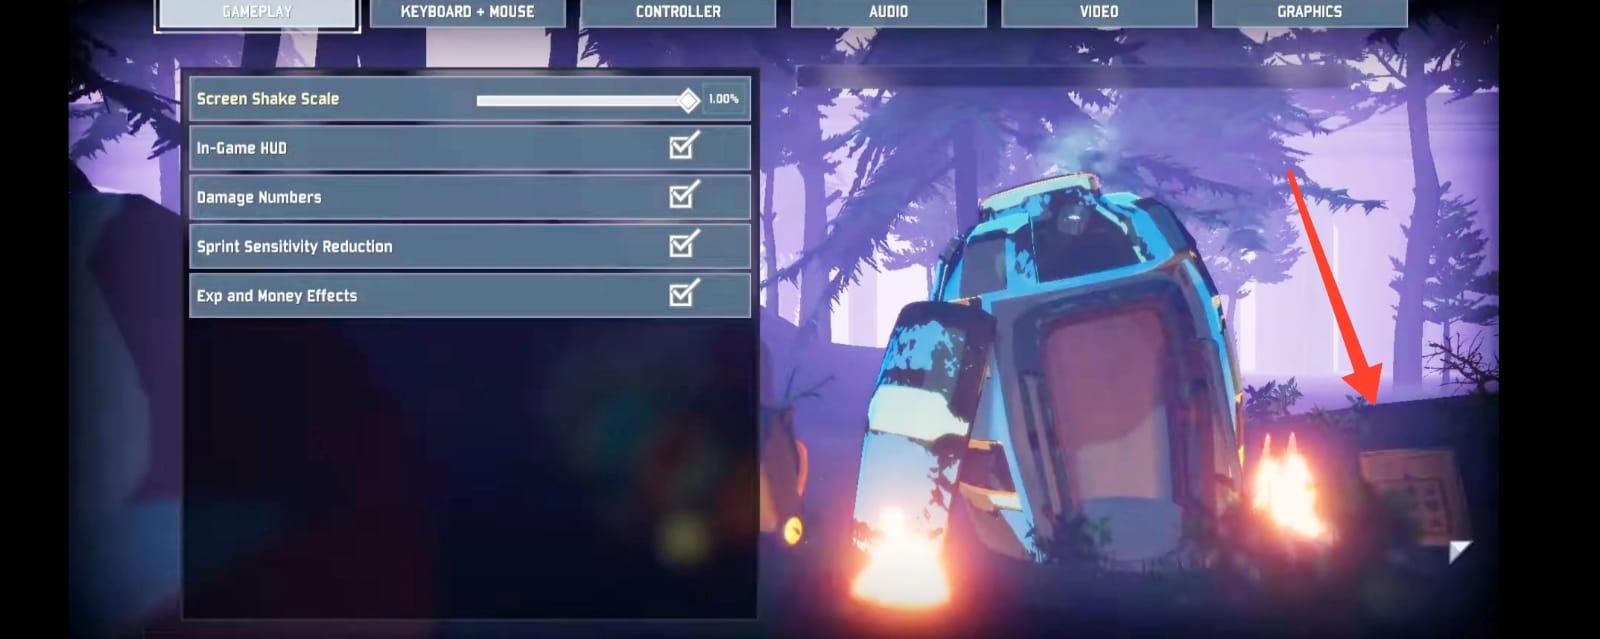
Code of Spite:
It can be found in Game Menu. Open Settings, Go to Lod Bios panel, change it to Custom or Low, Code will appear on the stone near the Wrecked ship.
Code Array:
Code of Swarms:
It is located on an Island which is present in Rallypoint Delta. You have to reach the island by crossing the river so it’s better to have a Character with decent Mobility Stats. However, if you don’t know how to unlock certain characters with decent agility our Character Unlock Guide will be of great help.
Code Array:
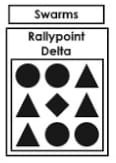
Code of Vengeance:
Open Environment section of the Logbook. Open Hidden Realm: A Moment, Fractured. Zoom and flip the map, and an obscure code will appear.
Code Array:
Code of Evolution:
It’s found in Moment, Whole on Twisted Scavenger’s body in the form of Tatto. Use Celestial Portal to reach there.
Code Array:

Code of Enigma:
It’s located in Bulwark’s Ambry. You can reach there by using the Artifact Portal. However, just like Artifact of Swarm, you should have a Survivor with decent mobility stats.
Code Array:
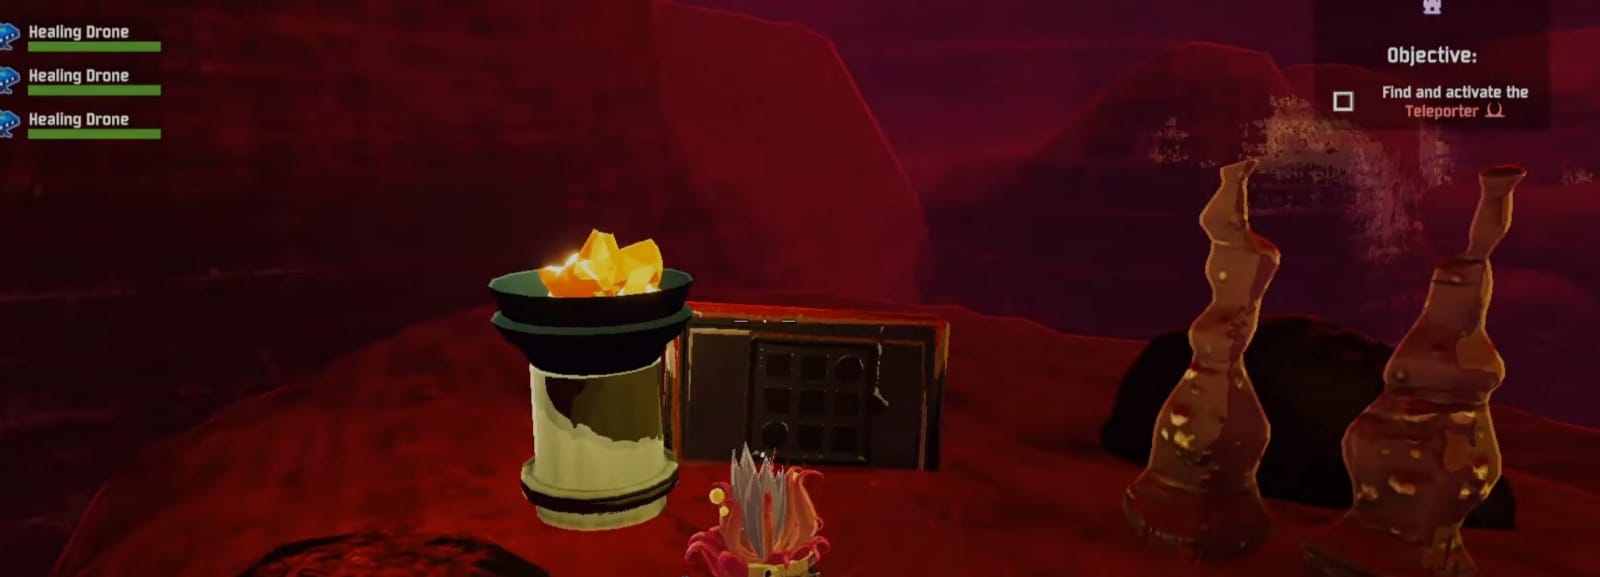
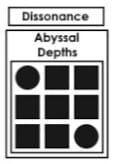
Code of Dissonance:
It’s located on a fallen stone in Abyssal Depths. The dimensions of this code are varied due to the fall so flip it on the right side from the bottom. For your convenience, I have also attached the picture of the actual code below.
Code Array:
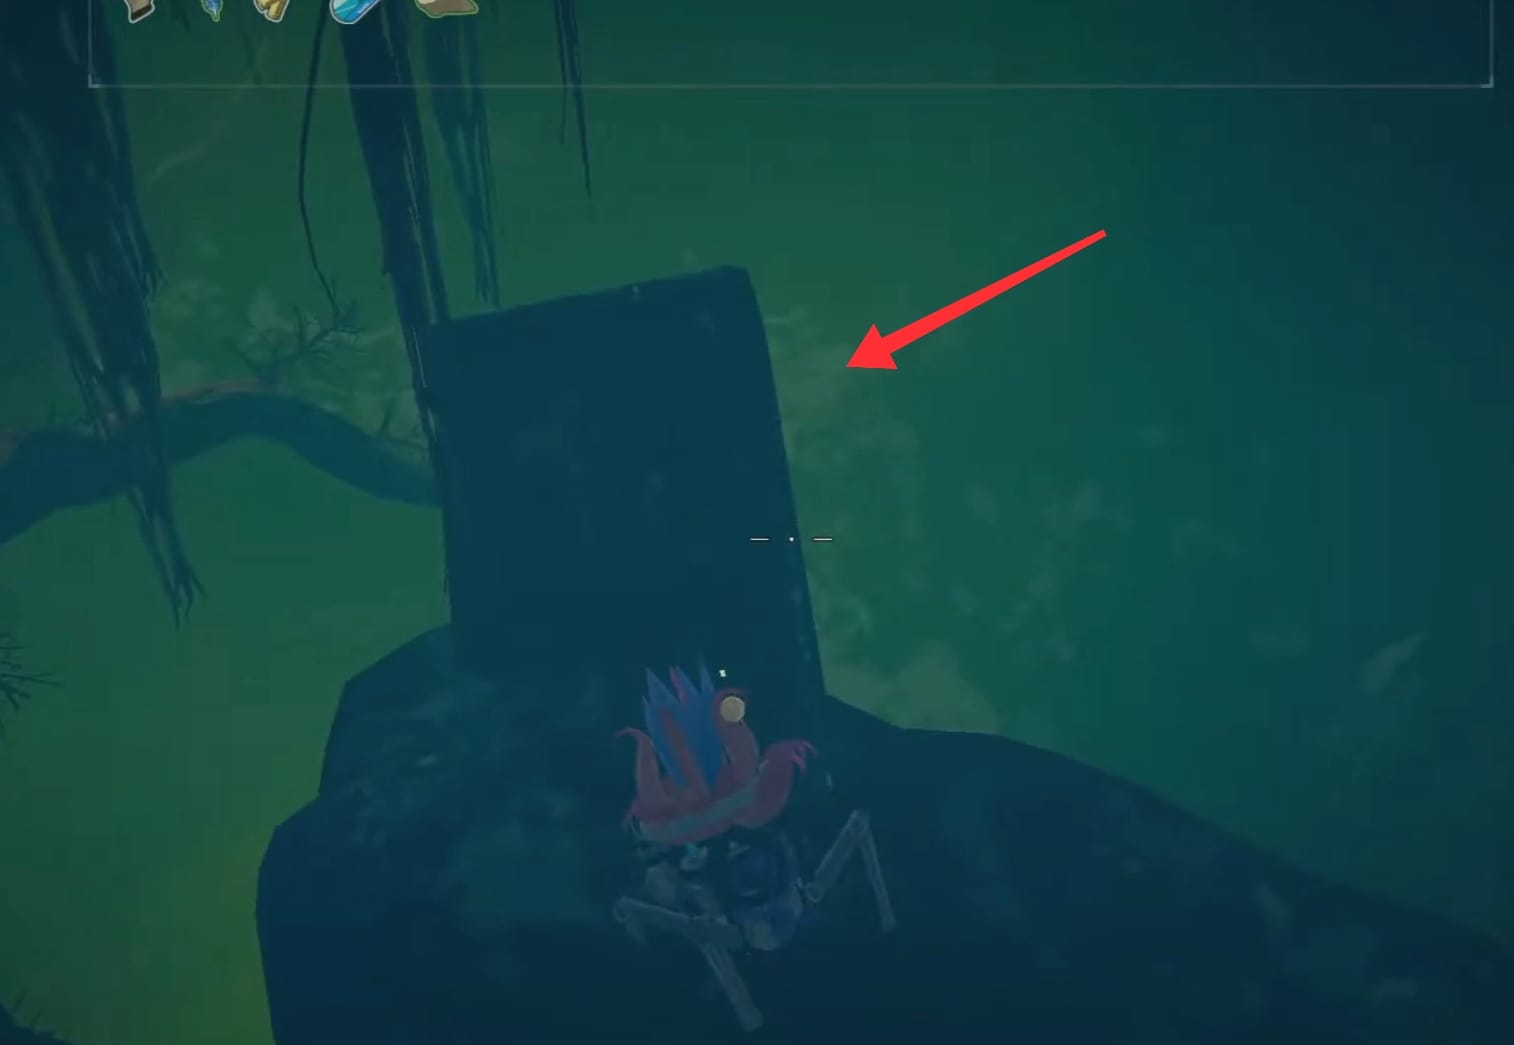
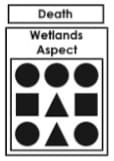
Code of Death:
It can be found in N’Kuhana’s Altar in Wetland’s Aspect.
Code Array:
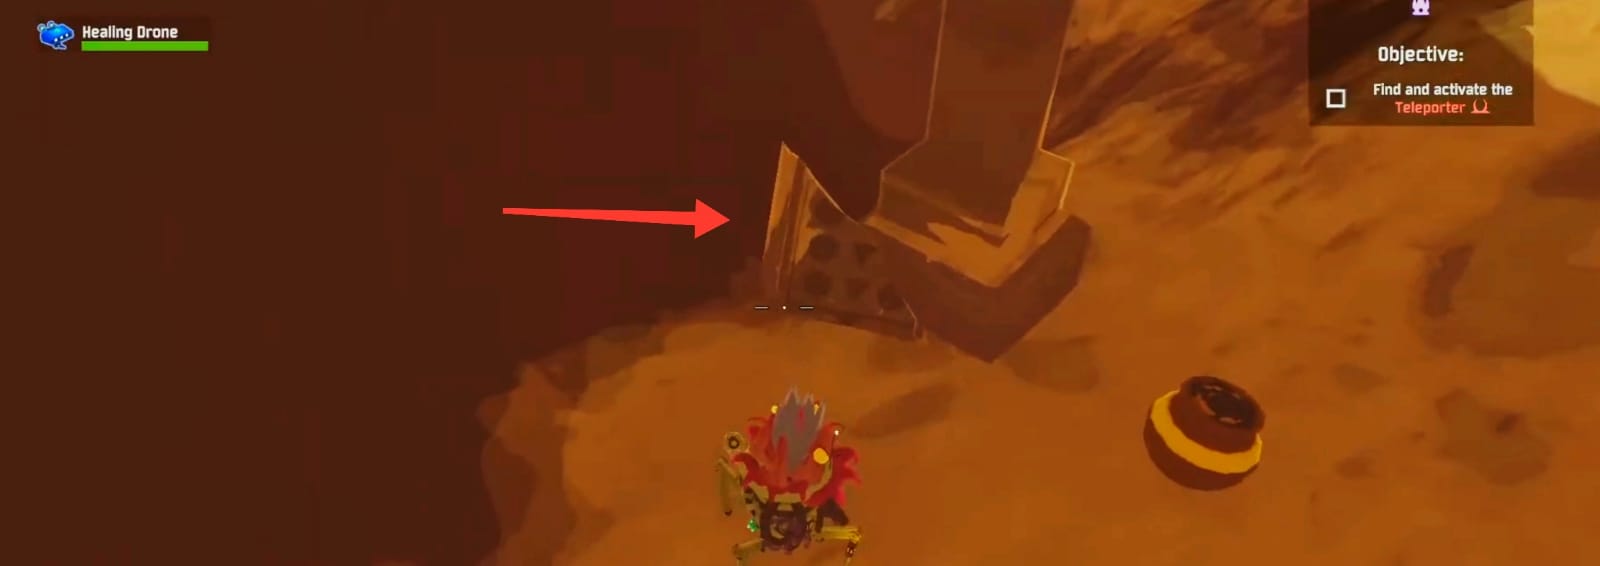
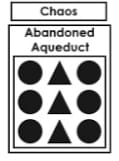
Code of Chaos:
This is again divided into two halves, both halves are located in Abandoned Aqueduct. The Flipped Piece or Top piece is located on a stone near the Entrance of the Boss’ Lair.
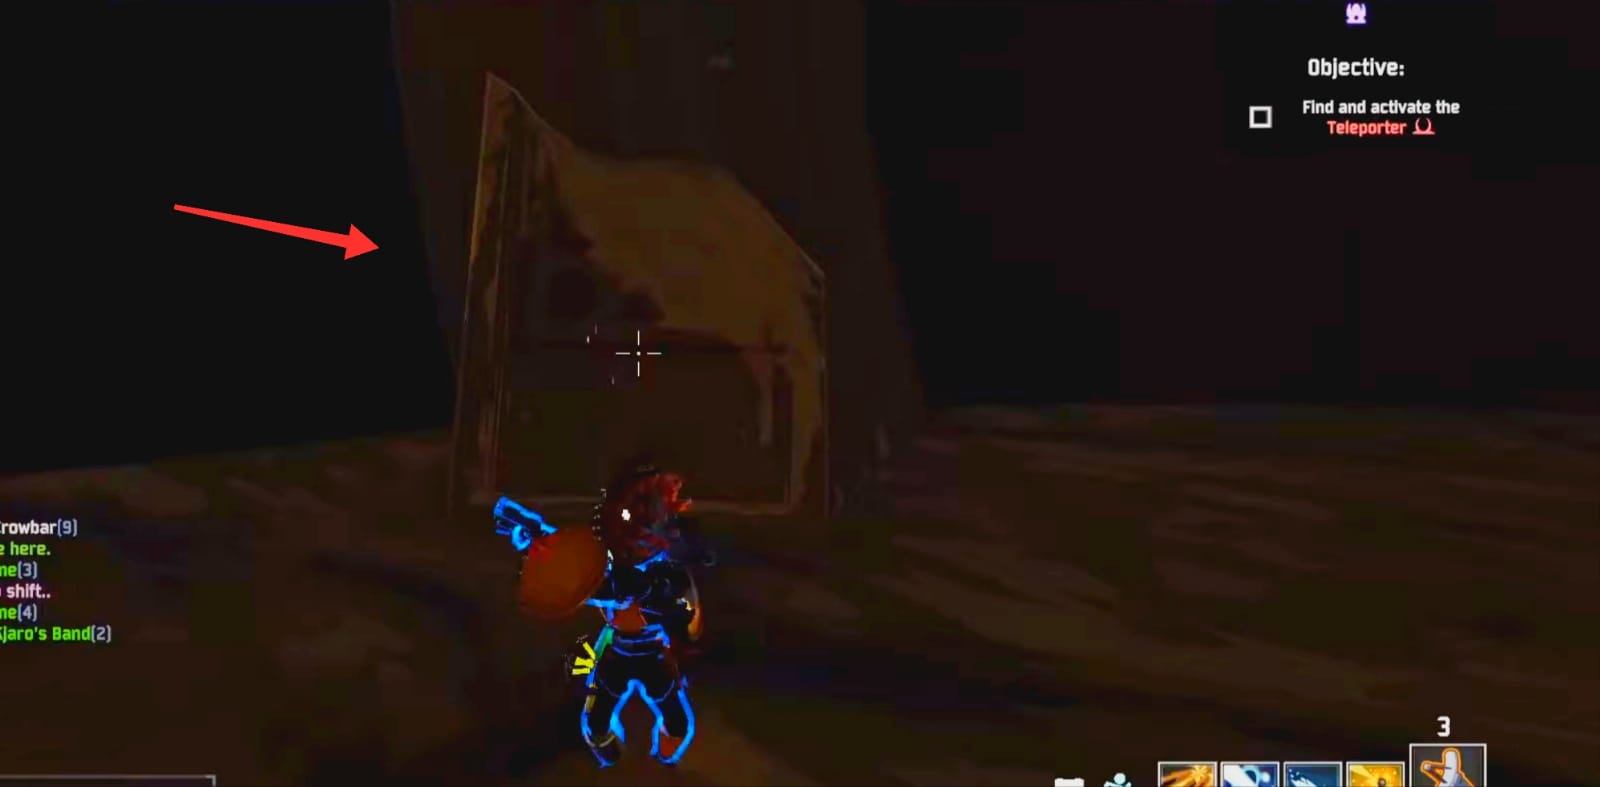
The bottom piece can be found if Runald and Kjaro Gate is opened. You have to fight the boss to get this piece.
Code Array:
Code of Command:
It can be seen as a fuzzy reflection in the fluid behind the sculpture of the shopkeeper in Bazaar Between Time. You can reach there through Blue Portal. You can have an idea about Blue Portals by going through our guide of Long Road Challenge.
Code Array:
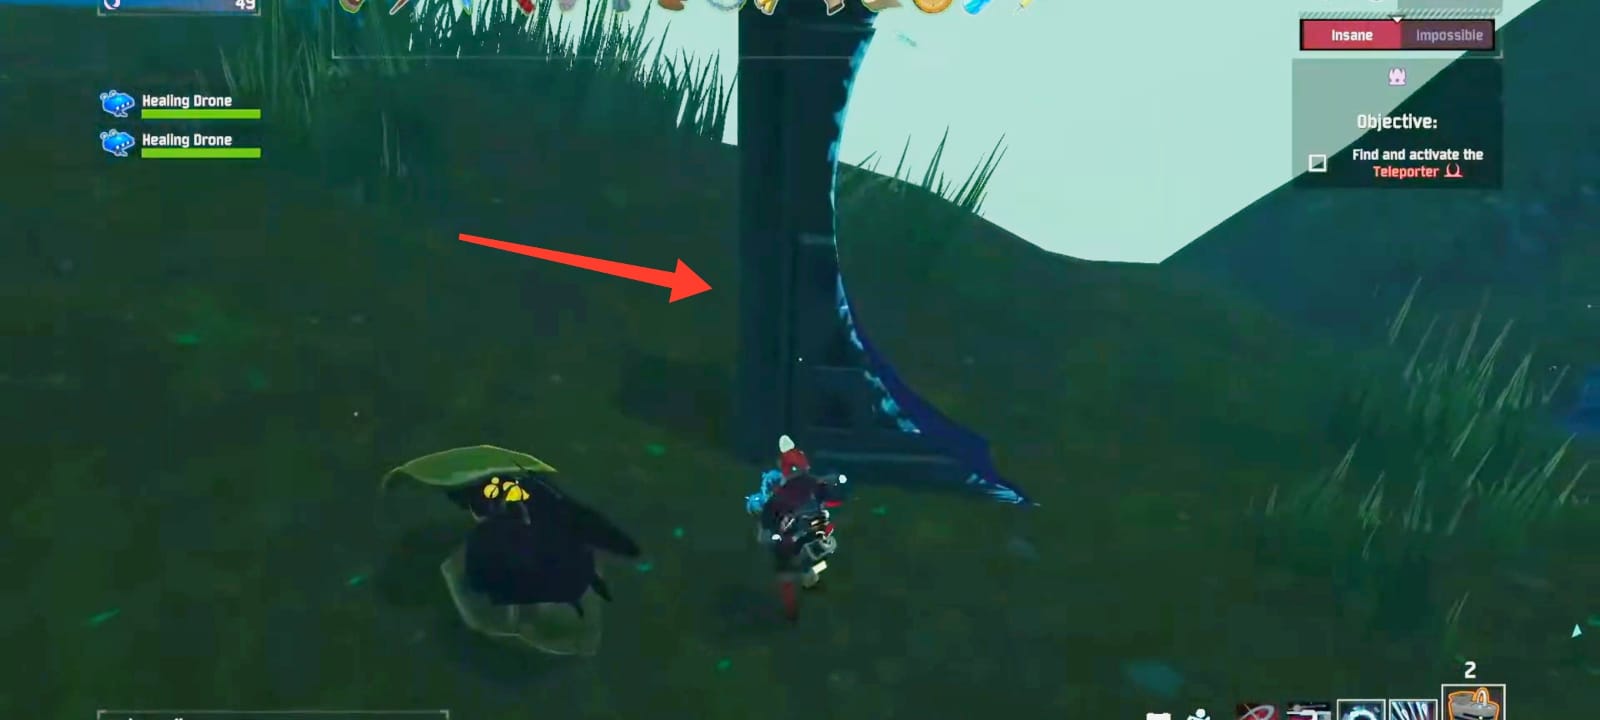
Code of Soul:
It’s located in the form of a Pattern formed by certain stones, the missing part is near the tree. This pattern is seen in Scorched Acres.

Code Array:
Code of Glass:
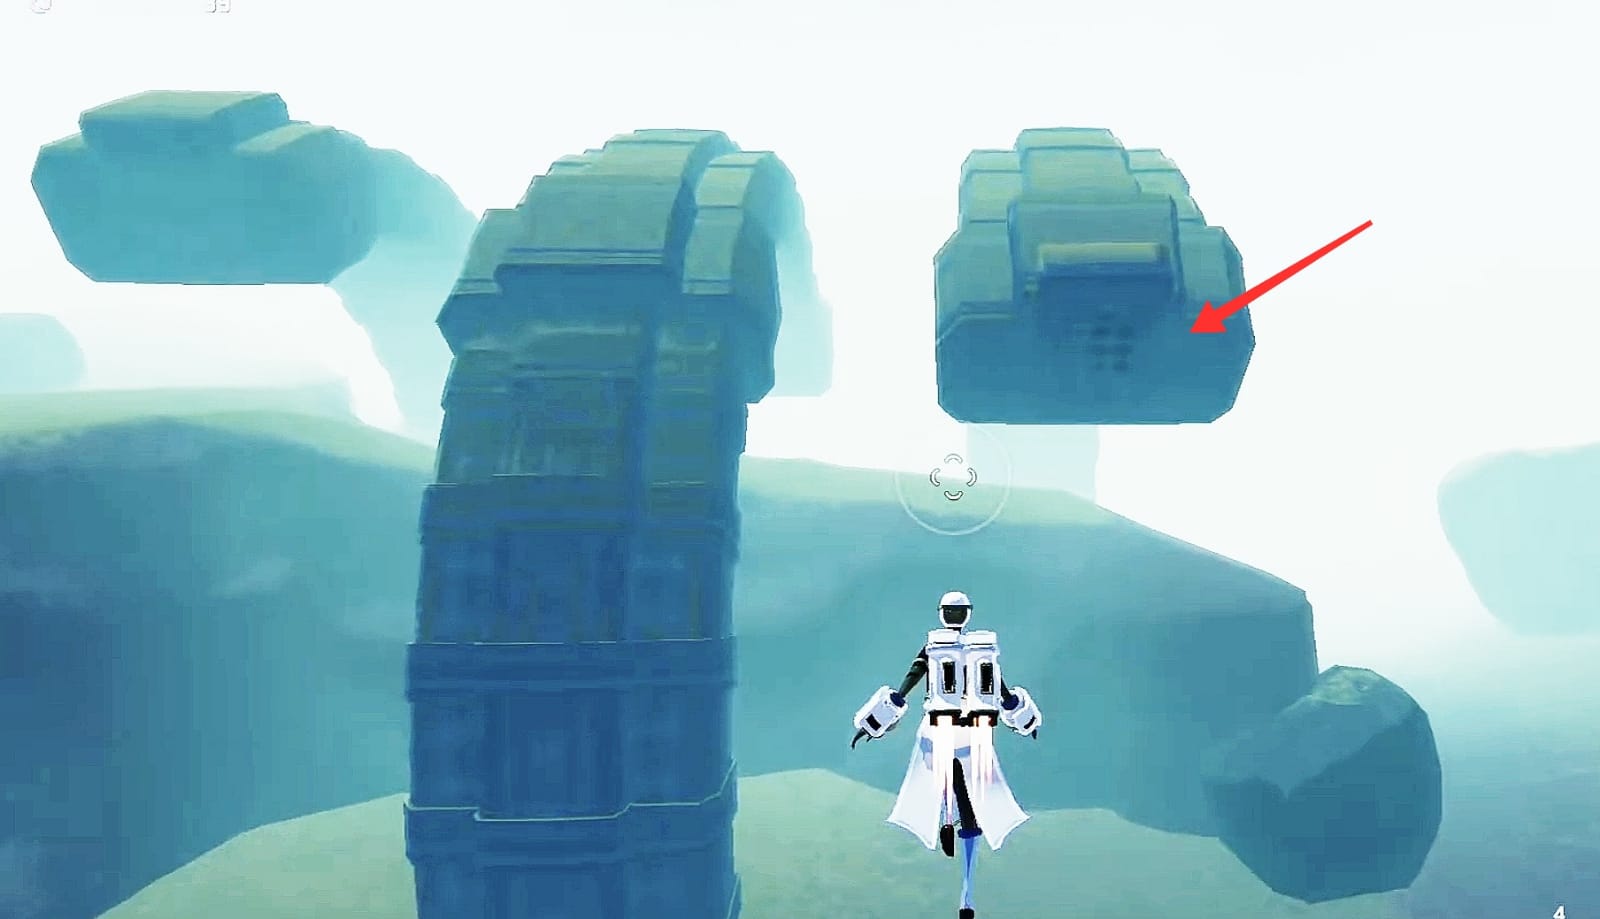
It is located in A Moment, Fractured. You can reach there by using the Celestial Portal. Make your way to the Obelisk by hopping through the floating rocks.
Code Array:
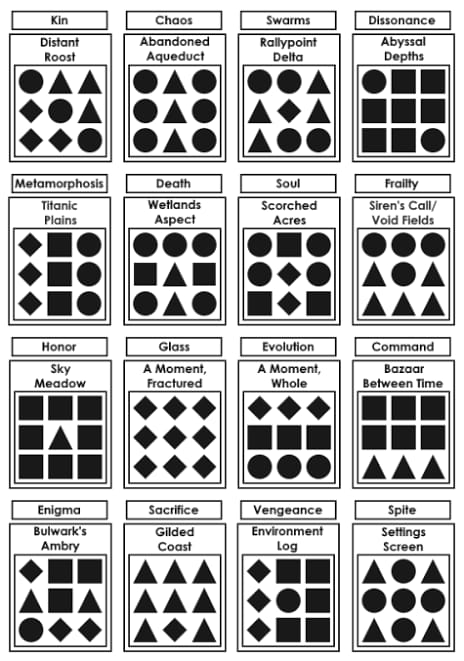
Conversely, The following image is the summary of the above section consisting of all artifact names with their code array and code locations.
In a nutshell, Artifacts are game alternatives that can change the gameplay notably. Artifacts can be attained by winning a one-stage trial in a separate realm, Bulwark’s Ambry. The portal to this Dimension can be opened by decoding the code of artifacts in a Compound Generator. These codes are hidden in different areas of Petrichor V or in Game Menu.
That’s all you need to know about artifacts. So, are you satisfied with our Tier List and brief guide? Don’t forget to share your valuable opinions in the comments section.
Thanks! Do share your feedback with us. ⚡
How can we make this post better? Your help would be appreciated. ✍
Fact Checked By Irfan Ansari