Remnant 2 players have discovered 11 Archetypes in Remnant 2, including the five secret Classes. Each of these Archetypes is unique in their Perks and Skills, as they were in the first game. I’ve gone through each of the Remnant 2 All Archetypes and discussed their Perks, Skills, and Archetype Traits.
- There are 11 Archetypes discovered in Remnant 2.
- Each of these has a unique playstyle and adds its own value to the team.
- Out of these classes, Challenger, Handler, Hunter, and Medic can be unlocked at the start.
- Gunslinger becomes available if you pre-ordered Remnant 2.
- Alchemist, Engineer, Explorer, Summoner, and Invader are unlocked as you progress.
All Remnant 2 Archetypes
There are a total of 11 Classes in Remnant 2 discovered until now. Each of these has a different playstyle. Challenger, Gunslinger, Handler, Hunter, and Medic are the starting classes. Whereas Alchemist, Engineer, Explorer, Summoner, and Invader become available later on.
Let’s go through each of them in the following brief summary table:
Archetype | Type | Brief Description |
---|---|---|
Alchemist | Buffing Allies, Support, Utility | Uses powerful buffing Vials and consumable Potency. |
Challenger | Close Range, Durable, Hard to Kill | Has hightened Survivability and is deadly in Close Range Combat. |
Engineer | Heavy Weapons, Support, Turrets | Uses Heavy Weapons that deal high damage. |
Explorer | Finding Loot, General, Utility | Can find Valuable items for the team and provides team utility. |
Gunslinger | Ammo, Fire Rate, Gun Handling | Has the highest DPS in all Archetypes. |
Handler | Pet Companion, Teamwork, Utility | Uses Pet Companion to provide benefits in both Solo and Co-op modes. |
Hunter | Long Range, Marking, Precision Damage | Marks down enemies and makes precision shots using ranged weapons. |
Medic | Healing, Support, Well-Rounded | Provides enhanced healing and increases Relic effectiveness. |
Summoner | Being Evil, Health Regen, Minions | Summons Minions to fight for them, and sacrifices them to gain buffs. |
Invader | Evasion, Shadow Decoys | Escapes tight situations uses its Decoys. |
1. Alchemist
The Alchemist focuses on improving the buffs and stats of the team. If your team of Remnant 2 all Archetypes have any consumables, the Alchemist will increase its duration. Using various vials and other benefits, the Alchemist revives you faster and helps you survive for a longer duration.

Perks
Alchemist’s perks ensure that you and the team will have better drops available, among many things. Different perks help the Alchemist get different buffs and, at times, transfer these buffs to the teammates.
Spirited
The Prime Perk of Alchemist is called Spirited. It unlocks as you unlock the Alchemist. Then, it upgrades when the Alchemist gets to Level 5 and later on further upgrades at Alchemist Level 10.
- With the Spirited Perk, you can have one more Concoction buff active at a time.
- At level 5, the number of Concoction buffs active changes to 2; at level 10, it becomes 3.
Liquid Courage
Liquid Courage is the Damage Perk of the Alchemist. It unlocks at Level 1 and upgrades at Level 6.
- With the Liquid Courage perk, the Alchemist gets a 2.5% increase in all their damages.
- When it gets upgraded, the Alchemist now gains a 25% increase in all damage and a 5% increase in Critical Chance.
Panacea
Team Perk of the Alchemist is known as Panacea. Unlocked at level 2, the Perk gets upgraded at Level 7.
- When you unlock the Perk, the Curative effects apply to all of the allies that are in the 15-meter range. It gives them an additional 15 Resistance.
- When upgraded, the allies that are within the range will get +10% Blight Resistance and Status.
Gold To Lead
The Alchemist’s Utility Perk is called Gold To Lead. It unlocks at Level 3 and gets upgraded when you reach Level 8.
- When the Alchemist picks up Scrap, it will have a 15% chance to give you Ammo.
- When upgraded, you will get an extra Ammo from Scrap and Metal.
Experimentalist
The Relic Perk of the Alchemist is called Experimentalist. It unlocks at level 4 and gets upgraded at level 9.
- With the Perk, when you use a Relic, the Alchemist will get a random buff. The buff lasts 30 seconds, and it can’t be overridden.
- When upgraded, the Perk will give Alchemist and their allies a buff within 20m. Now, the buff lasts for 60 seconds.
Skills
The Alchemist’s skills focus on giving benefits to the allies. They make the allies more durable by giving them different effects. One skill increases the fire rate while the other increases the healing factor of the team.
By pressing the skill button, the Alchemist will throw the vial on the ground. And if you were to hold the skill button and then release it, Alchemist would throw it at a distance. You can utilize the throwing feature to help your allies get the vial’s buffs.
SKILLS | DESCRIPTION | COOLDOWN |
Vial: Stone Mist | With the Stone Mist skill, the Alchemist creates a mysterious cloud. It lasts for 10 seconds while applying the Stoneskin effect. The Stoneskin effect reduces the damage received by 25%. In addition to that, it increases the Blight Buildup Decay Rate. It also makes the targets immune to any status effects while reducing the Stagger by 1. The effect lasts for 15 seconds. | 75 Seconds Cooldown |
Vial: Frenzy Dust | The Vial: Frenzy Dust will create a mysterious cloud. Anyone who enters the cloud will get Frenzied status. Frenzied Status increases the Movement Speed by 15%. With that, the player’s Reload Speed, Fire Rate, and Melee Speed all increase by 20%. It lasts for 15 seconds. | 75 Seconds Cooldown |
Vial: Elixir of Life | Like other skills, the Vial: Elixir of Life creates a mysterious cloud. But this time, it gives the effect of a Living Will. With the Living Will status, players get their Health regenerated at 5 HP per second. It saves them from any attacks that can be fatal as long as the status lasts. If there are any Downed players in the status, they will be revived If they get healed. It lasts for 20 seconds. One thing to note here is that if you have already Revived an ally, they won’t get Revived again by the Living Will effect for 180 seconds. | 90 Seconds Cooldown |
Archetype Trait
The Alchemist’s Archetype Trait is called Potency. It increases the duration of the consumables from 10% all the way up to 100%. That means any consumable the Alchemist takes to enhance their skills will now last much longer. Using it, the fights will be a lot more interesting with those consumable buffs.
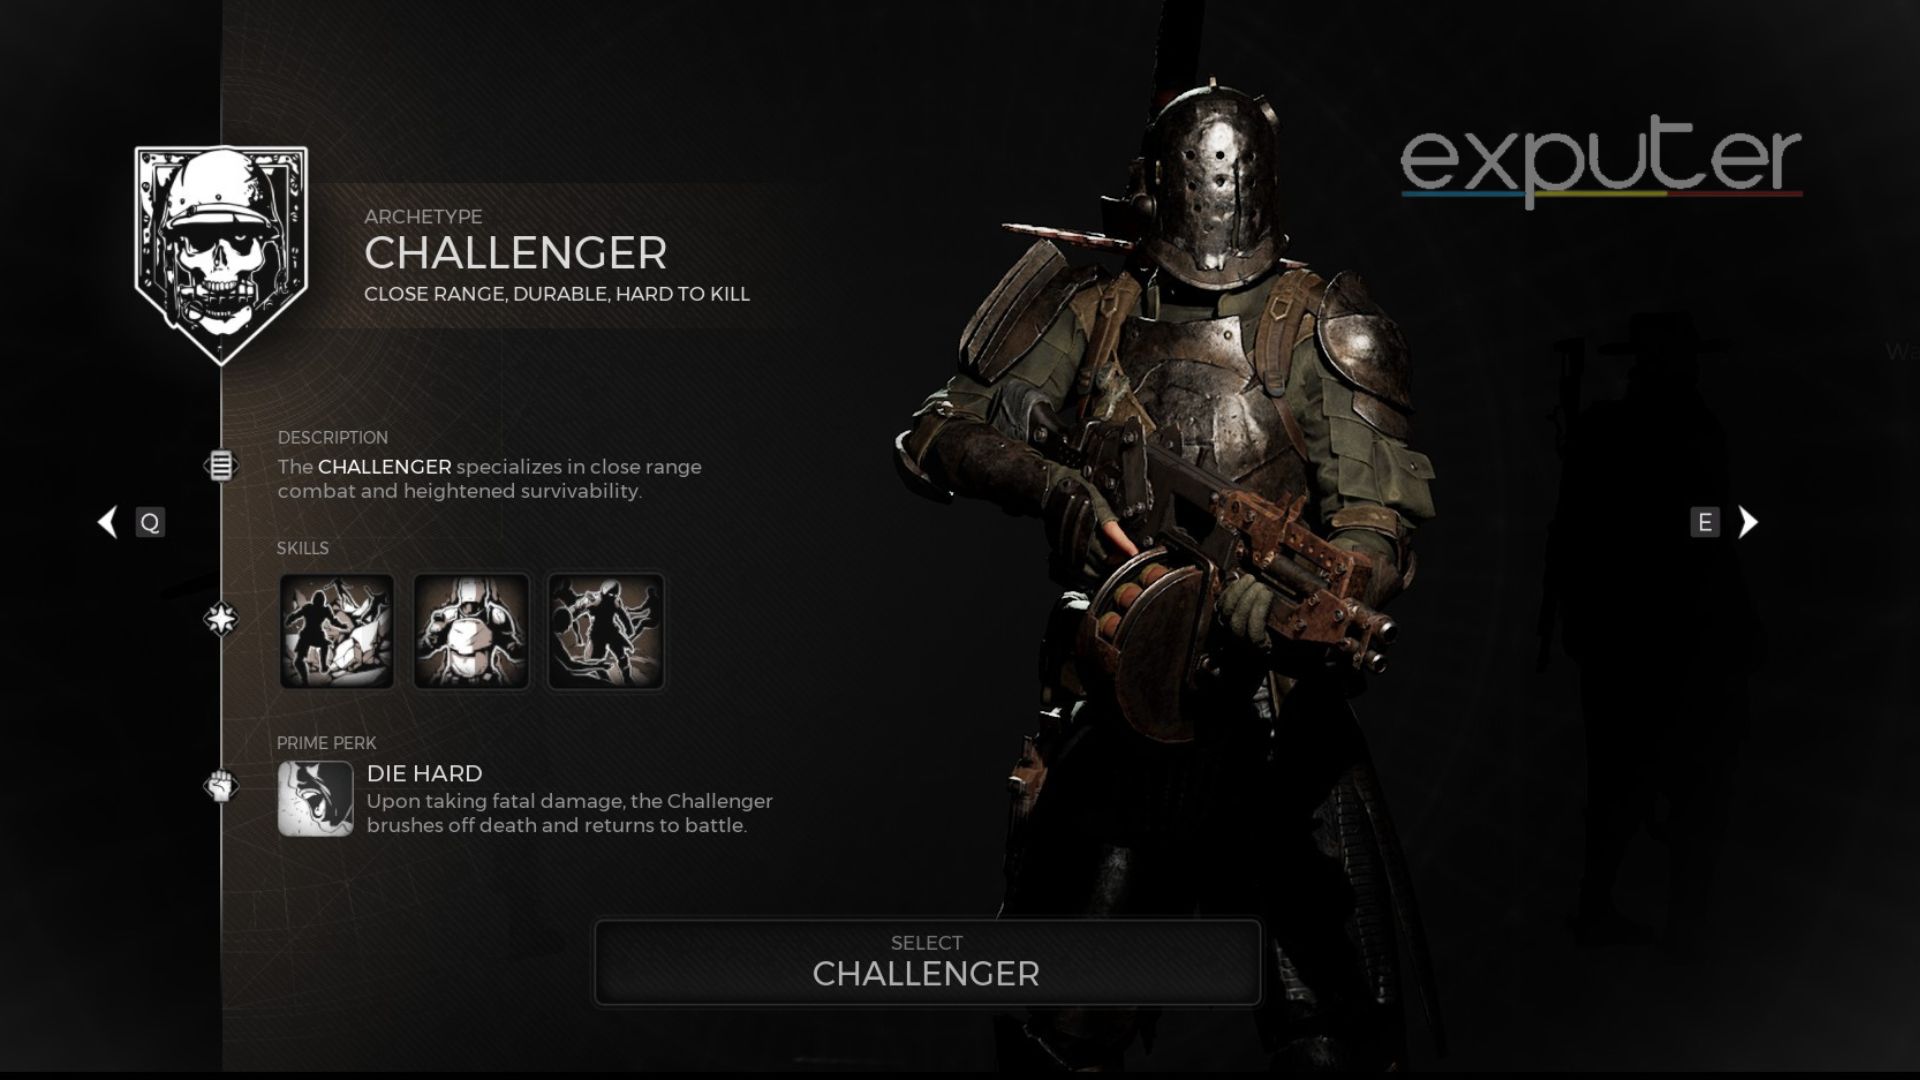
2. Challenger
If you have played with the Scrapper, then the Challenger is somewhat of a successor of it in the list of Remnant 2 All Archetypes. The Challenger is the go-to class for players who prefer close-range combat. It deals a ton of damage to enemies using its heavy attacks.

Perks
The Perks that you get with the Challenger are mentioned below. These Perks make the Challenger stronger as you level it up.
Die Hard
Die Hard is the Prime Perk of the Challenger. You’ll unlock it as soon as you unlock the Challenger Class. The Prime Perk is upgraded twice as the Archetype levels up. First time at level 5 and then at level 10. As for the Die Hard perk, here are its stats.
- When the Challenger receives Fatal damage, the Challenger becomes invulnerable for 2 seconds and regenerates 50% of Max Health. It has a 10-second Cooldown. The Cooldown resets if you are killed or at the Wordstone.
- At level 5, the Challenger will now become invulnerable for 2.5 seconds and regenerate 75% of their HP. Whereas on Level 10, the invulnerability becomes 3 seconds long, and the Challenger regenerates 100% of the HP.
Close Quarters
Then you have the Damage Perk ‘Close Quarters.’ It unlocks when the Challenger is at Level 1. The Perk gets further upgraded when the Challenger gets to level 6.
- The Perk will give you a 3.5% increase in damage to the enemies that are within 10 meters.
- At level 6, It will now have a 10% Critical Chance. In addition to that, you gain 40% Ranged and Melee damage to enemies within 7m.
Intimidating Presence
Intimidating Presence is the Team perk. Meaning your whole team will benefit from it instead of just you. It unlocks at Level 2 and gets upgraded at Level 7.
- When you activate one of the skills of the Challenger, enemies will deal 10% less damage within 10 meters. It lasts for 10 seconds.
- Upon upgrade, for each enemy, you and the allies will receive 2.5% less damage, up to 10%.
Powerlifter
The Utility Perk for the Challenger is called Powerlifter. It unlocks at level 3 and is upgraded at level 8.
- With the Powerlifter Perk, the Stamina cost increases for each weight bracket gets reduced by 50%.
- With the upgrade, the Stamina Regen Delay is shortened by 50%.
Face Of Danger
The Perk Face of Danger is a Relic Perk. It unlocks at level 4 and gets upgraded at level 9.
- When the Challenger uses a Relic within 10 meters of an enemy, you get two stacks of Bulwark for 10 seconds.
- Using a relic will give a 10% increase in damage when the Perk gets upgraded.
Skills
The Skills of the Challenger focus on dealing high amounts of damage at close range. They also ensure that the Challenger will stay durable. Here are all of the Challenger’s Skills.
SKILLS | DESCRIPTION | COOLDOWN |
War Stomp | The War Stomp skill will create a tremor. That stomp will deal 150 damage in all directions. The Challenger staggers enemies standing in a forward cone. | 50 Seconds Cooldown |
Juggernaut | With the Juggernaut skill, the Challenger will gain 3 Stacks of Bulwark. It increases the Movement Speed and Melee Speed by 15% each. Your Melee damage will be increased by 50%. Lastly, the Stagger Level is reduced by 1. The effect will last for 25 seconds. | 60 Seconds Cooldown |
Rampage | When the Rampage skill is used, the Challenger will enter a heightened state of battle. In that, the Movement Speed is increased by 10%, the Reload Speed increases by 20%, and the Fire Rate increases by 15%. It lasts for 10 Seconds. Dealing significant damage or getting a kill onto enemies will grant you one stack of Rage, up to 10 stacks. Each stack of Rage increases the damage by 2.5%. When you get ten stacks, the Challenger will go into Berserk mode. It reloads the current Weapon, and the Rampage effects double. The effect lasts for 15 seconds. | 90 Seconds Cooldown |
Archetype Trait
The Challenger’s Archetype Trait is called Strong Back. With each level, it reduces encumbrance by 1 point, all the way up to 10. What that does is it makes it easier for you to dodge attacks or roll around in fights. As Challenger is a Heavy Duty Archetype, the Strong Back Archetype Trait will be quite beneficial for it.
3. Engineer
The Engineer utilizes their knowledge and uses it to make heavy machinery. These Heavy Weapons are quite deadly against enemies as you can overclock them to make them much more deadly than they already are. It is surely one of the unique Remnant 2 All Archetypes.

Perks
The Engineer’s perks focus on making its Heavy Weapons easier to handle. The perks allow Engineers to recharge Heavy Weapons quickly and deploy them.
High Tech
High Tech is the Prime Perk of the Engineer. It gets unlocked as you unlock the Engineer. At level 5, it gets upgraded, and when the Engineer reaches Level 10, it again gets upgraded.
- Whenever you Hold the Skill button, it will Overclock a Heavy Weapon. Overclocking increases the weapon’s Fire Rate and increases the damage by 25%. The weapon now has infinite Ammo. The overlock effect lasts for 15 seconds.
- Upon upgrading to level 5, the Overclock effect lasts for 20 seconds. At level 10, it lasts for 25 seconds.
Metalworker
The Damage Perk of the Engineer is called Metalworker. It unlocks when the Engineer is at level 1 and gets upgraded as the Engineer gets to level 6.
- The Metalworker perk increases all Skill’s damage by 5%. Heavy Weapons now have 5% extra Ammo Capacity and 2.5% extra Max HP.
- When the Perk gets upgraded, the Skill damage increases by 50%, and your Skill now has a 10% Critical Chance. Heavy Weapons will have 50% extra Ammo holding capacity and 25% extra Max HP. They will have 25% extra Weakspot Damage.
Magnetic Field
The Team perk of the Engineer is known as Magnetic Field. It unlocks at level 2 and gets upgraded at level 7.
- With the Magnetic Field perk, the Heavy Weapons of the Engineer will give a 15% Reduction on damage received by allies in a 2.5m area.
- When the Perk gets upgraded, it will restore allies’ Ammo gradually, too.
Heavy Mobility
Heavy Mobility is the Utility Perk of the Engineer. It unlocks at level 3 and gets upgraded at level 8.
- With the Heavy Mobility Perk, the Engineer will move 35% faster while carrying a Heavy Weapon.
- Upon upgrade of the Perk, Evade Distance and Evade Speed will increase by 25%.
Surplus
The Relic Perk of the Engineer is called Surplus. It unlocks at level 4 and then gets upgraded when you reach level 9.
- Whenever the Engineer uses a Relic, it will refill 15% Ammo of their Heavy Weapons. If the Engineer has stowed the Heavy Weapon, the bonus will double. The overfilled Ammo will drop down.
Skills
The Engineer deploys a few different types of Heavy Weapons. They are quite robust and, at times, will deal a ton of damage to the enemies. The Engineer can deploy Heavy Weapons if they have 25% of their Ammo available.
By holding the Skill button, the Engineer will deploy the weapon in Heavy Carry mode. Double Pressing the skill button will recall the weapon back with 75% of its available Ammo.
SKILLS | DESCRIPTION | COOLDOWN |
Heavy Weapon: Vulcan | With the Skill, the Engineer will deploy a Vulcan Turret. It will last as long as its Ammo last. Whatever enemy you aim at, the Turret will prioritize those targets. By pressing the Skill button again, the Turret will now do autonomous targeting. | 25% Ammo Required |
Heavy Weapon: Flamethrower | By pressing the Skill button, the Engineer will now deploy a Flamethrower turret. It will stay on the battleground as long as the Ammo last, or you call it back. Like the Vulcan turret, it will prioritize the enemies that the Engineer is aiming at. If you press the skill button, it will now perform autonomous targeting. | 25% Ammo Required |
Heavy Weapon: Impact Cannon | With the skill button pressed, the Engineer will deploy a Cannon Turret. The Turret will be active as long as the ammunition lasts or if you call it back. Whatever enemy the Engineer is targeting, the Cannon Turret will target those enemies. | 25% Ammo Required |
Archetype Trait
Engineer’s Archetype Trait is called Fortify. As the name suggests, it makes the Engineer durable by increasing their Armor Effectiveness. At level 1, the Armor Effectiveness is 5%. It goes up as you level up the Trait, all the way up to 50% at level 10.
4. Explorer
The Explorer Archetype’s role is to find loot drops and items for the team. They get more material than Remnant 2, all Archetypes. Using that, you can farm items much more quickly as it has a higher drop rate compared to all other Archetypes.
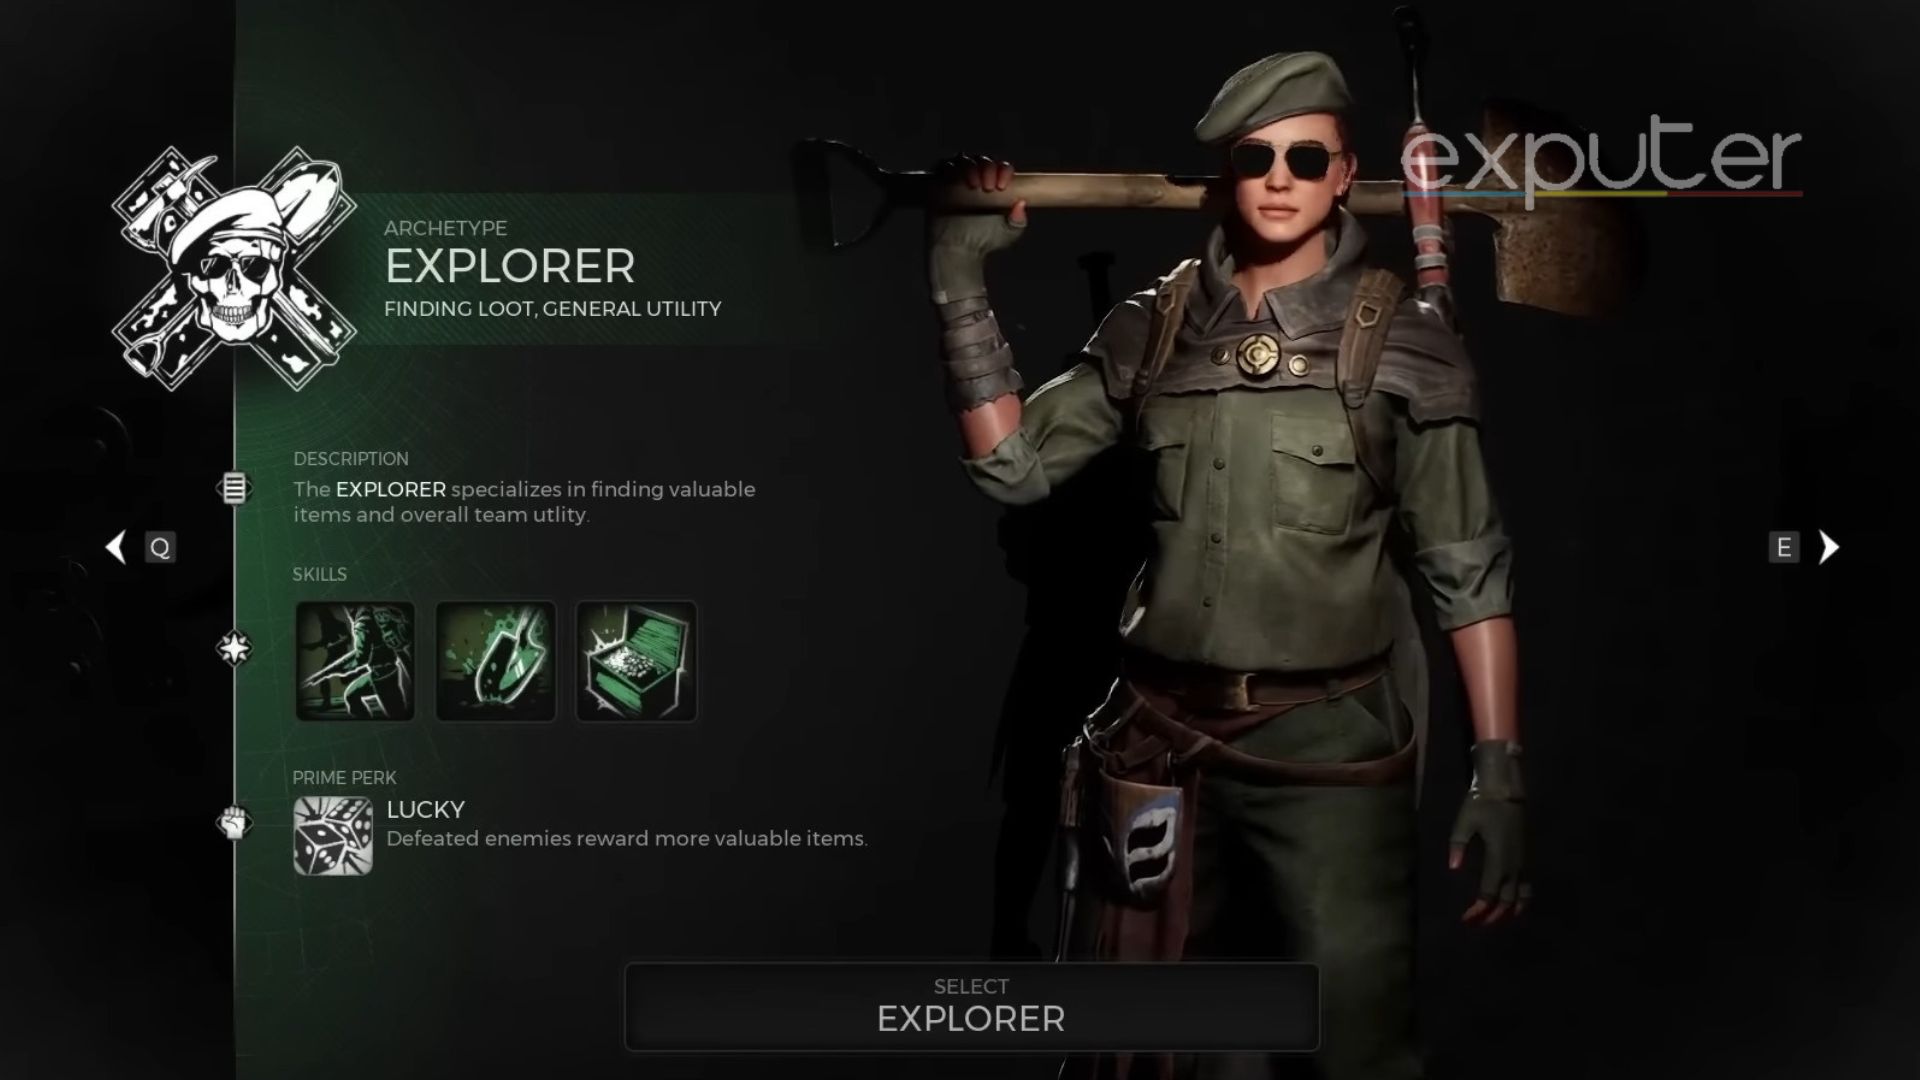
Perks
Explorer’s Perks ensures that it has a much higher drop rate than before. Using that, you can collect items and Ammo easily. Not only that, but The Explorer also increases the Drop rates of their teammates.
Lucky
The Prime Perk of the Explorer is called Lucky. It unlocks when you unlock Explorer. Later on, the Skill gets upgraded to Level 5 and later on to Level 10.
- The Lucky Perk grants a 10% chance to rare drops or additional items as loot if you defeat a stronger enemy.
- When upgraded at Level 5, the chance increases to 20%; later on, at Level 10, it increases to 30%.
Scavenger
Scavenger is the Damage Perk of the Explorer. It unlocks at level 1 and then gets upgraded at level 6.
- Every item you pick up will increase the Explorer’s damage by 0.5%. It lasts for 15 seconds. Each additional item you pick up will increase the duration all the way up to 60 seconds. The Explorer can get five stacks of Scavenger Perk.
- Upon upgrade, the Perk now grants a 5% Critical chance when it is activated.
Metal Detector
The Explorer’s Team Perk is called Metal Detector. Unlocked at level 2, the Perk gets upgraded at level 7.
- With the Perk unlocked, the whole party has a 10% extra chance of getting Ammo, Currency, or Metal as drops.
- When upgraded to Level 7, the Prospector Perk will have an increased chance to get consumables from chests.
Prospector
The Utility Perk of the Explorer is called Prospector. It unlocks at Level 3 and gets upgraded at Level 8.
- With the Prospector perk, the Relic Fragments that the Explorer discoverers now have a higher drop chance.
- With the Perk upgrade, the Explorer will now have an increased chance to pick up the same type or quality Gem as the one they just picked up.
Self Discovery
Self-discovery is the Relic Perk of the Explorer. The Perk gets unlocked at level 4, and it is upgraded when the Explorer gets to level 9.
- Whenever the Explorer uses a Relic, it will fill all of the stacks of Scavenger. It also prevents any Stack Decay for 15 seconds.
- With the upgrade, whenever you use a relic, the Self Discovery perk gets 30 Stacks. It prevents any Stack Decay for up to 10 seconds.
Skills
Explorer’s skills mainly focus on increasing the Movement speed or the drop rate of the teammates. Not only that, but the Explorer can also make a fountain that will buff all of the allies in an AoE.
SKILLS | DESCRIPTION | COOLDOWN |
Plainswalker | With the Plainswalker skill, the Explorer will now reduce Stamina’s cost for all allies by 80%. They also benefit from a 20% increase in their Movement Speed. It lasts for 30 seconds. | 60 Seconds Cooldown |
Gold Digger | Whenever you use the Gold Digger skill, the Explorer will dig into the ground to make a fountain. The Fountain made will last for 45 seconds and give a random buff to all allies. These buffs last for 15 seconds. Fountains can give any one of the following benefits: 15% Damage Reduction, 1.5 Health Regeneration per second, 10% Damage increase, and Haste. | 45 Seconds Cooldown |
Fortune Hunter | When you use the ability Fortune Hunter, it will sharpen Explorer’s senses. Explorer will now reveal special items within the 40m range for all allies. The reveal lasts for 60 seconds. | 90 Seconds Cooldown |
Archetype Trait
The Explorer’s Archetype Trait is called Swiftness. It increases all Movement speeds of the Explorer. The Movement Speed increase starts at 1% and goes up to 15%. It will give the Explorer a faster speed to scan around the area and locate drops for the Explorer to pick up.
5. Gunslinger
The Gunslinger is an Archetype that utilizes Mid-range. As the name suggests, the Gunslinger is a weapons expert who uses their mastery in weapons to deal high amounts of damage while efficiently using Ammo. It has the highest DPS among all Remnant 2 Archetypes.
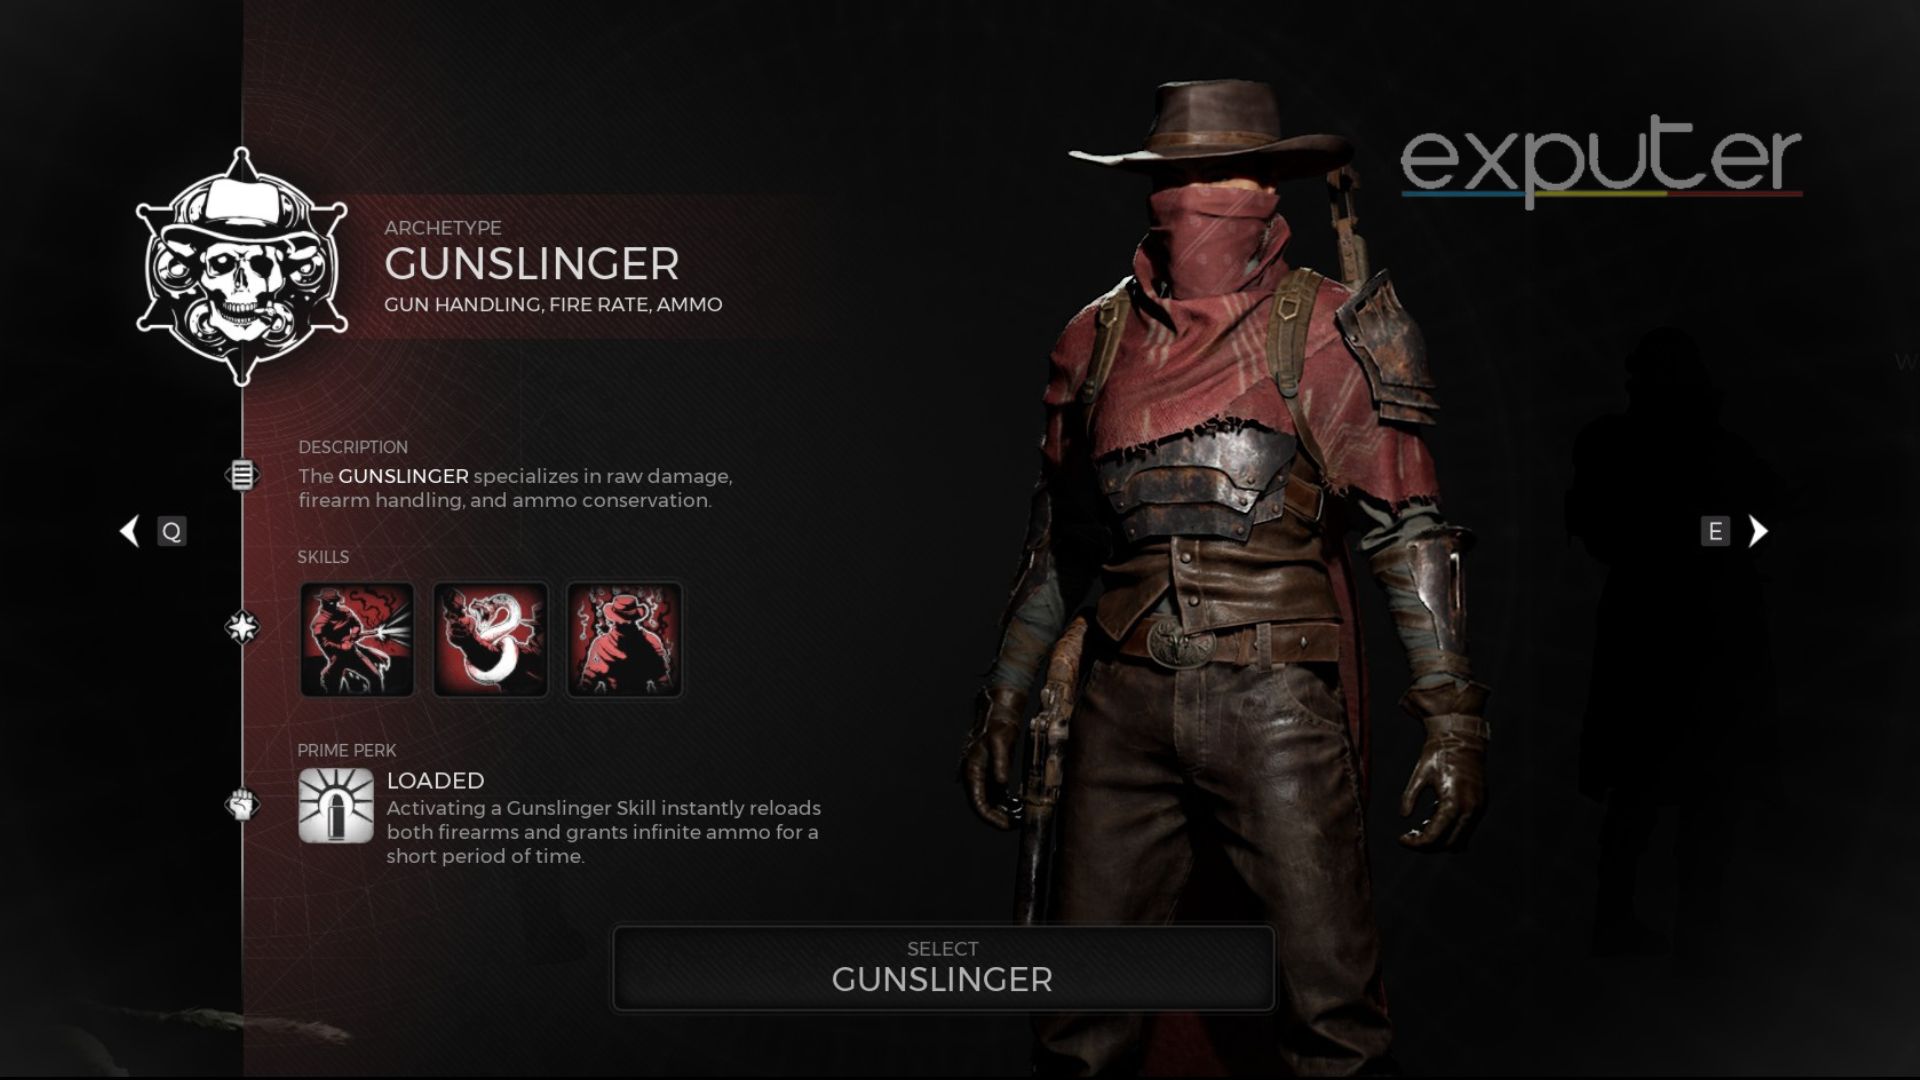
Perks
The Perks of the Gunslinger ensure that they never run out of Ammo unless they are not careful. All in all, the perks increase the weapon’s efficiency.
Loaded
Gunslinger’s Prime Perk is named Loaded. It unlocks automatically with the Gunslinger. And then, it upgrades at Level 5 and then at Level 10.
- Whenever you use any of the Gunslinger’s Skill, both of your weapons get reloaded. They get an infinite amount of reserved Ammo, too. The effect lasts for 5 seconds.
- Upon upgrading to level 5, the duration increases to 6.5 seconds. At level 10, the duration increases to 8 seconds.
Swift Shot
The Damage Perk of the Gunslinger is known as Swift Shot. It unlocks at level 1 and is upgraded at level 6.
- With the Swift Shot perk, the Gunslinger gets 2.5% Ranged damage with a 1.5% Fire Rate.
- At Gunslinger level 6, it changes to 25% Ranged Damage, 5% Critical Chance, and 15% Fire Rate.
Posse Up
Team Perk for the Gunslinger is Posse Up. It is unlocked at Level 2 and then gets upgraded at Level 7.
- The Posse Up perk gives 20% additional ammo to the player. The additional Ammo is divided among all teammates.
- When upgraded, it changes to 30% Ammo.
Quick Hands
Quick Hands is the Utility Perk of the Gunslinger. Unlocked at level 3, the Perk gets upgraded at level 8.
- The Gunslinger gains a 10% increase in Reload Speed.
- When upgraded, the bonus gets doubled if you reload an empty gun.
Sleight Of Hand
The Perk Sleight of Hands is the Relic Perk of the Gunslinger. It unlocks at level 4 and gets upgraded at level 9.
- When you use a Relic, the weapon in your hand gets reloaded.
- When upgraded, it gains an additional 15% increased Ranged Damage for 10 seconds.
Skills
The Gunslinger’s skills give it a higher fire rate while giving extra bullets or increased damage. Not only that, but the skills also increase Weapon’s Handling speed.
SKILLS | DESCRIPTION | COOLDOWN |
Quick Draw | Quick Draw is one of the skills of the Gunslinger. Using it, the Gunslinger draws a side piece with six shots. Each of these shots deals 35 base damage and has a double stagger value. If you Press the skill button, it will automatically shoot toward enemies within the 25m range. If you Hold the button and then release it, the Skill lets you manually aim and fire the bullets. | 40 Seconds Cooldown |
Sidewinder | Using the Skill Sidewinder, the Gunslinger increases their weapon Draw/Swap speed and ADS Movement Speed by 50%. When you cycle between weapons, the weapon you are cycling will get reloaded automatically. It lasts for 12 seconds. | 80 Seconds Cooldown |
Bulletstorm | With this ability, the Gunslinger increases Reload Speed by 50% and the Fire Rate by 20% of all of their ranged weapons. The effect lasts for 20 seconds. In addition to that, all of the single-shot weapons become fully automatic. When you get a Kill, the weapon gets reloaded. Crossbows and Bows get a 50% increased Projectile Speed and a 15% increased Critical Chance. | 60 Seconds Cooldown |
Archetype Trait
The Hunter’s Archetype Trait is called Ammo Reserves. The Ammo Reserves get increased by a certain percentage with each point invested into the Trait. It increases from 5% to 50% at Level 10. You will have more bullets to use in battles.
6. Handler
The Handler Archetype has a Dog companion with it that helps it in team fights. You can consider the Handler as the jack of all trades, thanks to its companion. It can deal a ton of damage while supporting the whole team.
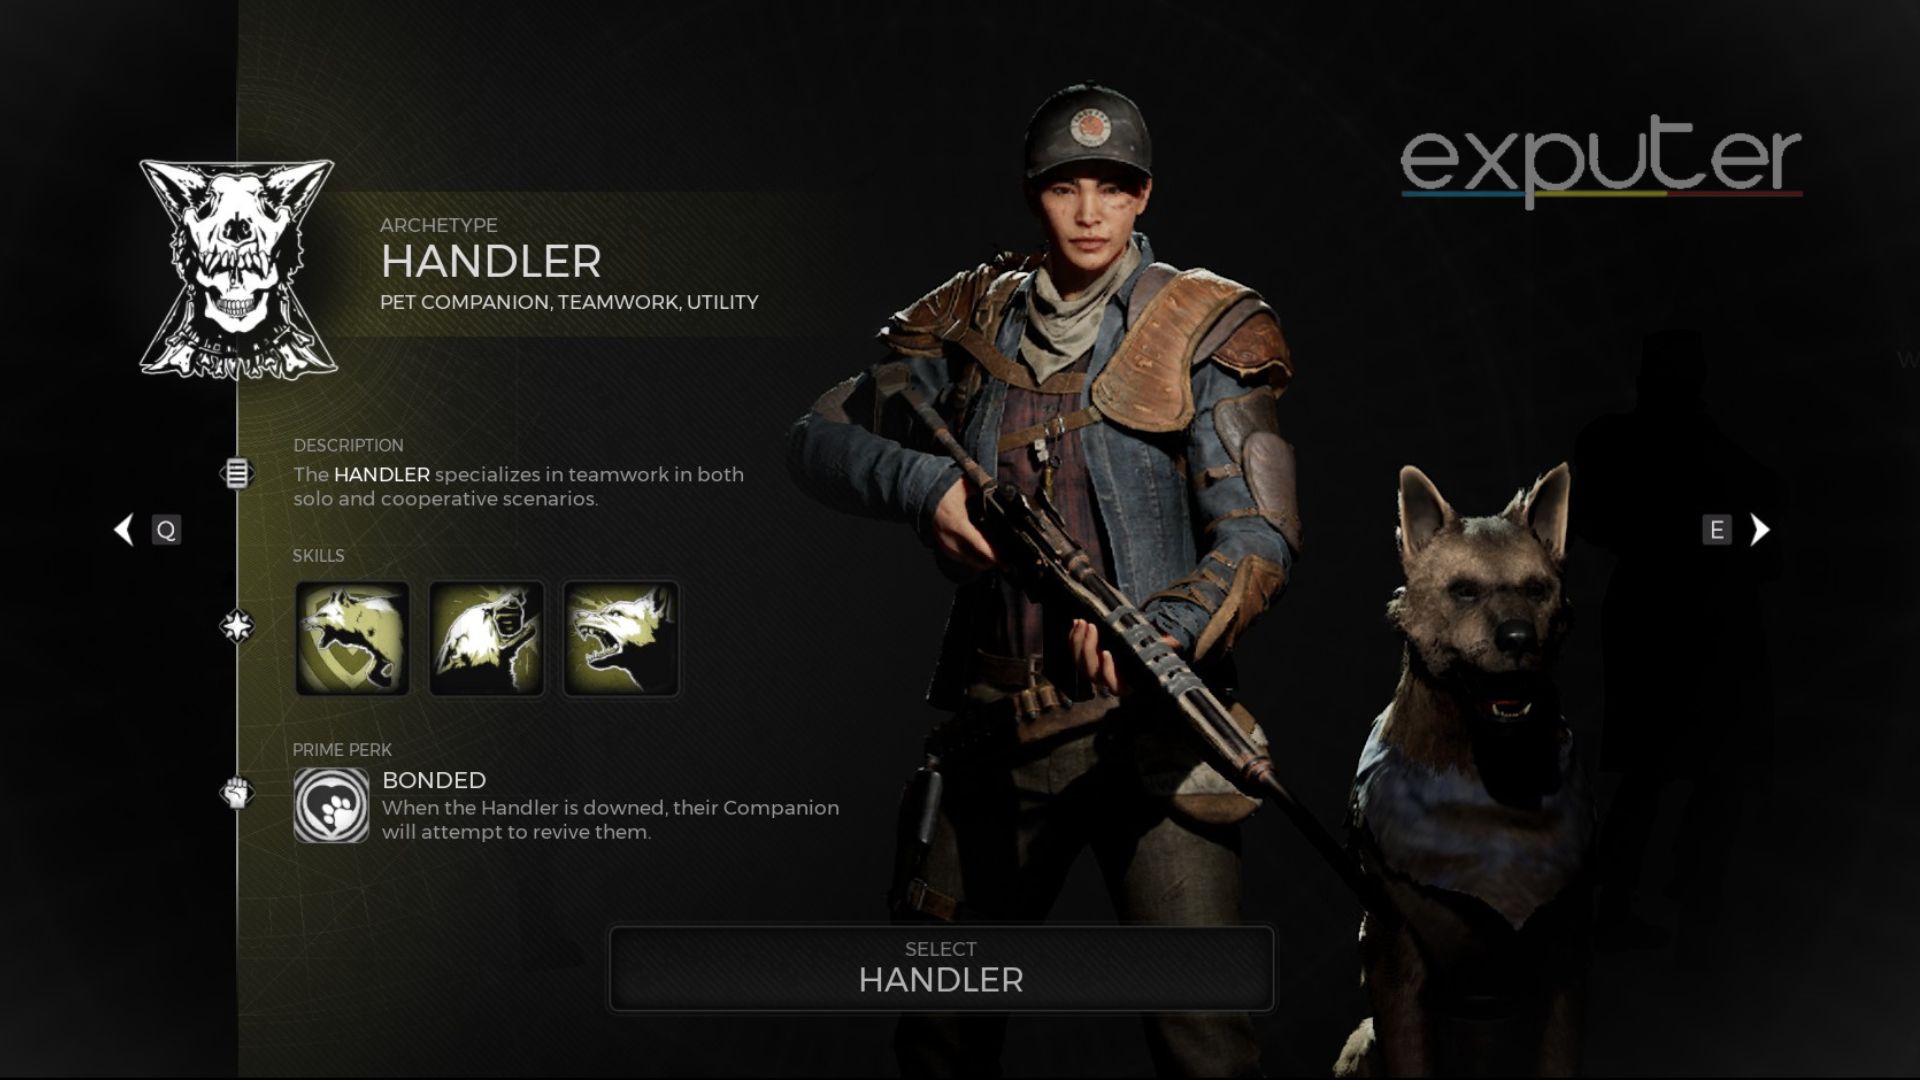
 Using the companion, the Handler can buff themselves or Remnant 2 all Archetypes.

Perks
The Handler’s perks mainly focus on utilizing its companion to support the team. Upgrading the Handler levels up the perks and makes the Handler more useful for the team.
Bonded
The Bonded Perk is the Prime Perk of the Handler. It is automatically unlocked. As the Handler levels up, the Perk levels up, too.
- If you get down, then your Companion will attempt to revive you. You will revive at 50% of Max Health. You can use it to revive downed Allies, too. They must have a Relic charge. It has a 120s cooldown.
- At level 5, the Cooldown reduces to 105 seconds. At level 10, it further reduces to 90 seconds.
Pack Hunter
The Damage Perk of the Handler is the Pack Hunter. It is unlocked at level 1 and further upgrades at level 6.
- With the Perk, the Handler gains 3% Skill and Ranged damage. It lasts as long as the Companion is within a 25m distance.
- The Ranged and Skill damage increases by 30%, and the Skill and Ranged critical chance increases by 5% on the upgrade of the Perk.
Spirit Of The Wolf
The Perk Spirit of the Wolf is the Team Perk of the Handler. Unlocked at level 2, the perk upgrades at Level 7.
- The Perk increases the Movement Speed of all of the teammates by 10%. The effect lasts as long as the teammates are within 10m of the Handler.
- With the upgrade on the Perk, the Stamina cost on actions is reduced by 15%.
Teamwork
The Utility Perk for the Handler is the Teamwork Perk. Players unlock it at level 3, and it is upgraded at level 8.
- Both the Handler and their Companion will Revive 5% faster.
- With the upgrade, the Companion and Handler revive 30% faster.
Best Friend
Lastly, the Relic Perk of the Handler is known as Best Friend. It unlocks at level 4 and is upgraded at level 9.
- When the Handler uses a Relic, it restores the Companion’s Health to the Max.
Skills
The Handler can utilize their companion to attract enemies and become more durable or to heal the teammates. Similarly, the Handler can use the Companion to increase their damage, too.
SKILLS | DESCRIPTION | COOLDOWN |
Guard Dog | The Companion follows the Handler and then Generates a 15% Threat to attract enemies towards it. Their damage taken is reduced by 20. Lasts for 20 seconds. Hold: The Companion will reduce damage taken by the Allies in a 20m area by 15% while generating Threat. | 90 Seconds Cooldown |
Support Dog | The Companion heals allies in a 4m radius of 0.25% of their Max HP every second. Hold: The Companion will Howl and grant 2% of the Max HP per second. It also increases the Movement Speed of all allies within a 20m area. | 90 Seconds Cooldown |
Attack Dog | The Companion will deal 20% more damage while following the Companion. Hold: The Companion increases all allies’ damage by 20% in a 20m area. | 20 Seconds Cooldown |
Archetype Trait
The Handler’s Archetype Trait is called Kinship. With each level, it reduces Friendly Dealt and Received damage by 1 point, all the way up to 10. That means that damage dealt to and by the Friendly Fire will be reduced with each point that you invest in it.
7. Hunter
The best class among Remnant 2 all Archetypes when you’re playing with a bunch of friends is the Hunter Archetype. It focuses on Long-range and uses its skills to track down enemies for the teammates. Dealing damage to the Weakspots can make the Hunter more useful for its teammates.
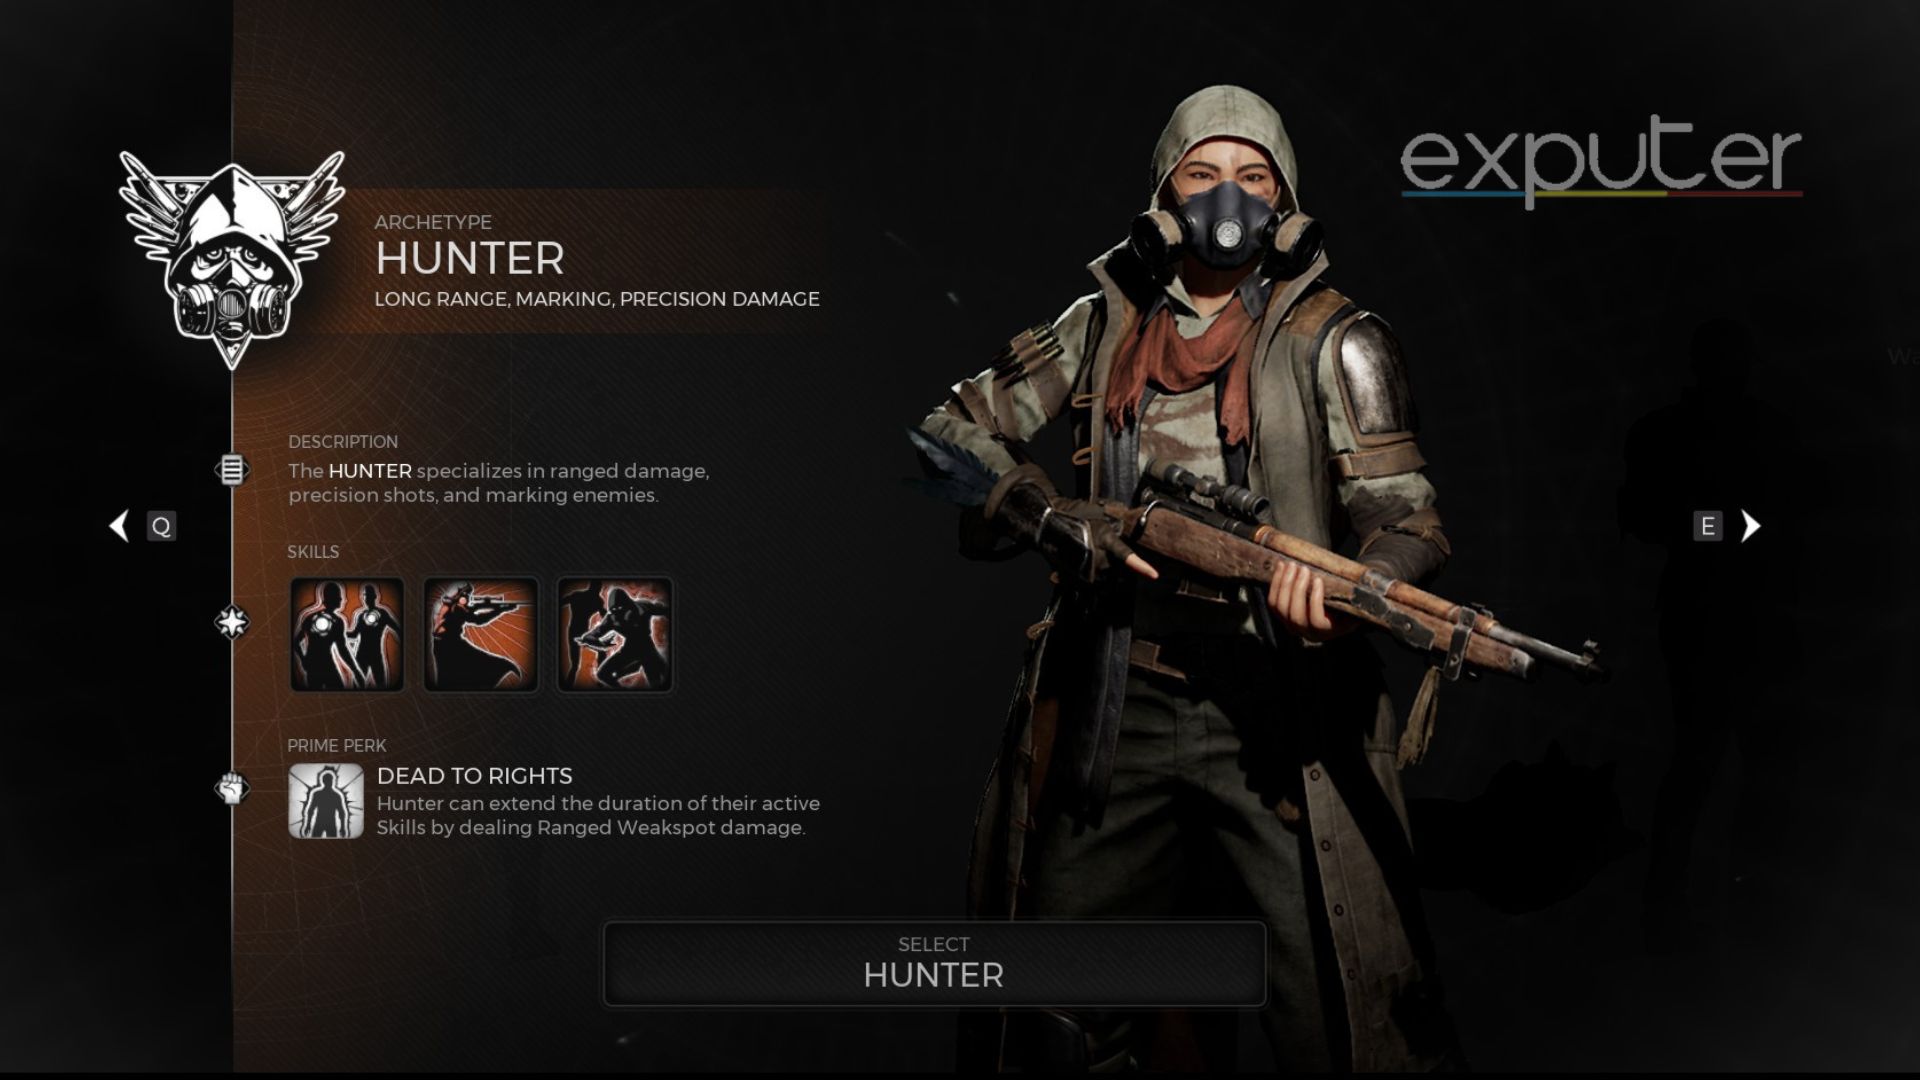
Perks
The Perks allow the hunter to use its damage dealt to the weak spots. The more it shoots the Weakspot or kills an enemy, the more powerful it becomes.
Dead To Rights
The Prime Perk of the Hunter is known as Dead To Rights. It is unlocked automatically and then upgrades at Level 5 and Level 10 of the Hunter.
- If the Hunter deals 55 Ranged damage at a weak spot, it will increase the active duration of skills by 2.5 seconds.
- Upon upgrade, the duration increases to 3 seconds and finally to 3.5 seconds.
Deadeye
Deadeye is the Damage Perk of the Hunter. It unlocks at level 1 and is upgraded at level 6.
- With the Perk, the Hunter will gain 1.5% Weakspot damage. And the Ranged Damage increases by 4%.
- When upgraded, the Weakspot Damage increases by 15%, and the Ranged Damage increases by 40%.
Return To Sender
Hunter’s Team Perk is called Return to Sender. The Perk unlocks at Level 2 and upgrades at Level 7.
- The Return to Sender perk ensures that every kill you get with Critical Hits or due to damage on Weakspot will give you 25% extra Ammo drops.
- If you upgrade the Skill, the Ammo drop increases to 50%, and it doubles the chance to drop Ammo.
Urgency
The Utility Perk is called Urgency. The Hunter unlocks it at level 3, and it further enhances at level 8.
- When the Hunter gets a Kill, the reload speed increases by 15%. The effect lasts for 5 seconds.
- With the upgrade, The Reload Speed and Movement Speed increased by 15%.
Intuition
Hunter’s Relic Perk is called Intuition. It unlocks at Level 4 and is further enhanced at Level 9.
- When the Hunter uses a Relic, it increases the duration of any active skill of the Hunter by 5 seconds.
- When the Perk is upgraded, the duration increases by 10 seconds.
Skills
The Hunter’s skills Mark down enemies to deal more damage to them. Marked targets are visible to the teammates, thus helping them shoot the enemies down, too. When an enemy is Marked, The Hunter and all teammates deal a 15% extra Crit Chance to these enemies.
SKILLS | DESCRIPTION | COOLDOWN |
Hunter’s Mark | With the Hunter’s Mark ability, the Hunter gets spatial awareness and marks all enemies within 35 meters. It also increases the Ranged and Melee damage by 15%. The effect lasts for 25 seconds. | 70 Seconds Cooldown |
Hunter’s Focus | Using the ability Hunter’s Focus strengthens the Huntter’s Senses. If you aim at an enemy for 0.01 seconds, it will apply a mark on that enemy. It lasts for 20 seconds. If the Hunter is in Aim Down Sight mode for 1 second without shooting, they will enter the Focused State. In the Focused state, the Hunter gains 25% Ranged weakspot and normal Ranged damage. Weapon Spread, Recoil, and Sway reduces by 75%, and Ranged Crit Chance increases by 10%. The Focused state will last for ten more seconds after the Hunter’s Focus ability expires. | 50 Seconds Cooldown |
Hunter’s Shroud | In the Hunter’s Shroud skill, the Hunter becomes Shrouded, making it harder for enemies to hit him. When the Hunter exits Shroud, it will apply Mark to all enemies within 10 meters and give the Hunter Ambush ability. It lasts for 15 seconds. The Ambush ability increases Ranged and Melee damage by 50%. Each of these attacks will apply Mark onto enemies. | 90 Seconds Cooldown |
Archetype Trait
The Hunter’s Archetype Trait is called Longshot. With each level, it increases the Weapon’s Ideal Range by 60 cm, all the way up to 600 cm or 6 meters. What it means is that with each point invested in it, the damage drop-off range will increase. And your damage will hit hard for a much longer range.
8. Medic
The Medic is the pure support among Remnant 2 all Archetype. Its main focus is on healing the teammates and providing support to them. Compared to all other Archetypes, the Medic is much better at healing its teammates.
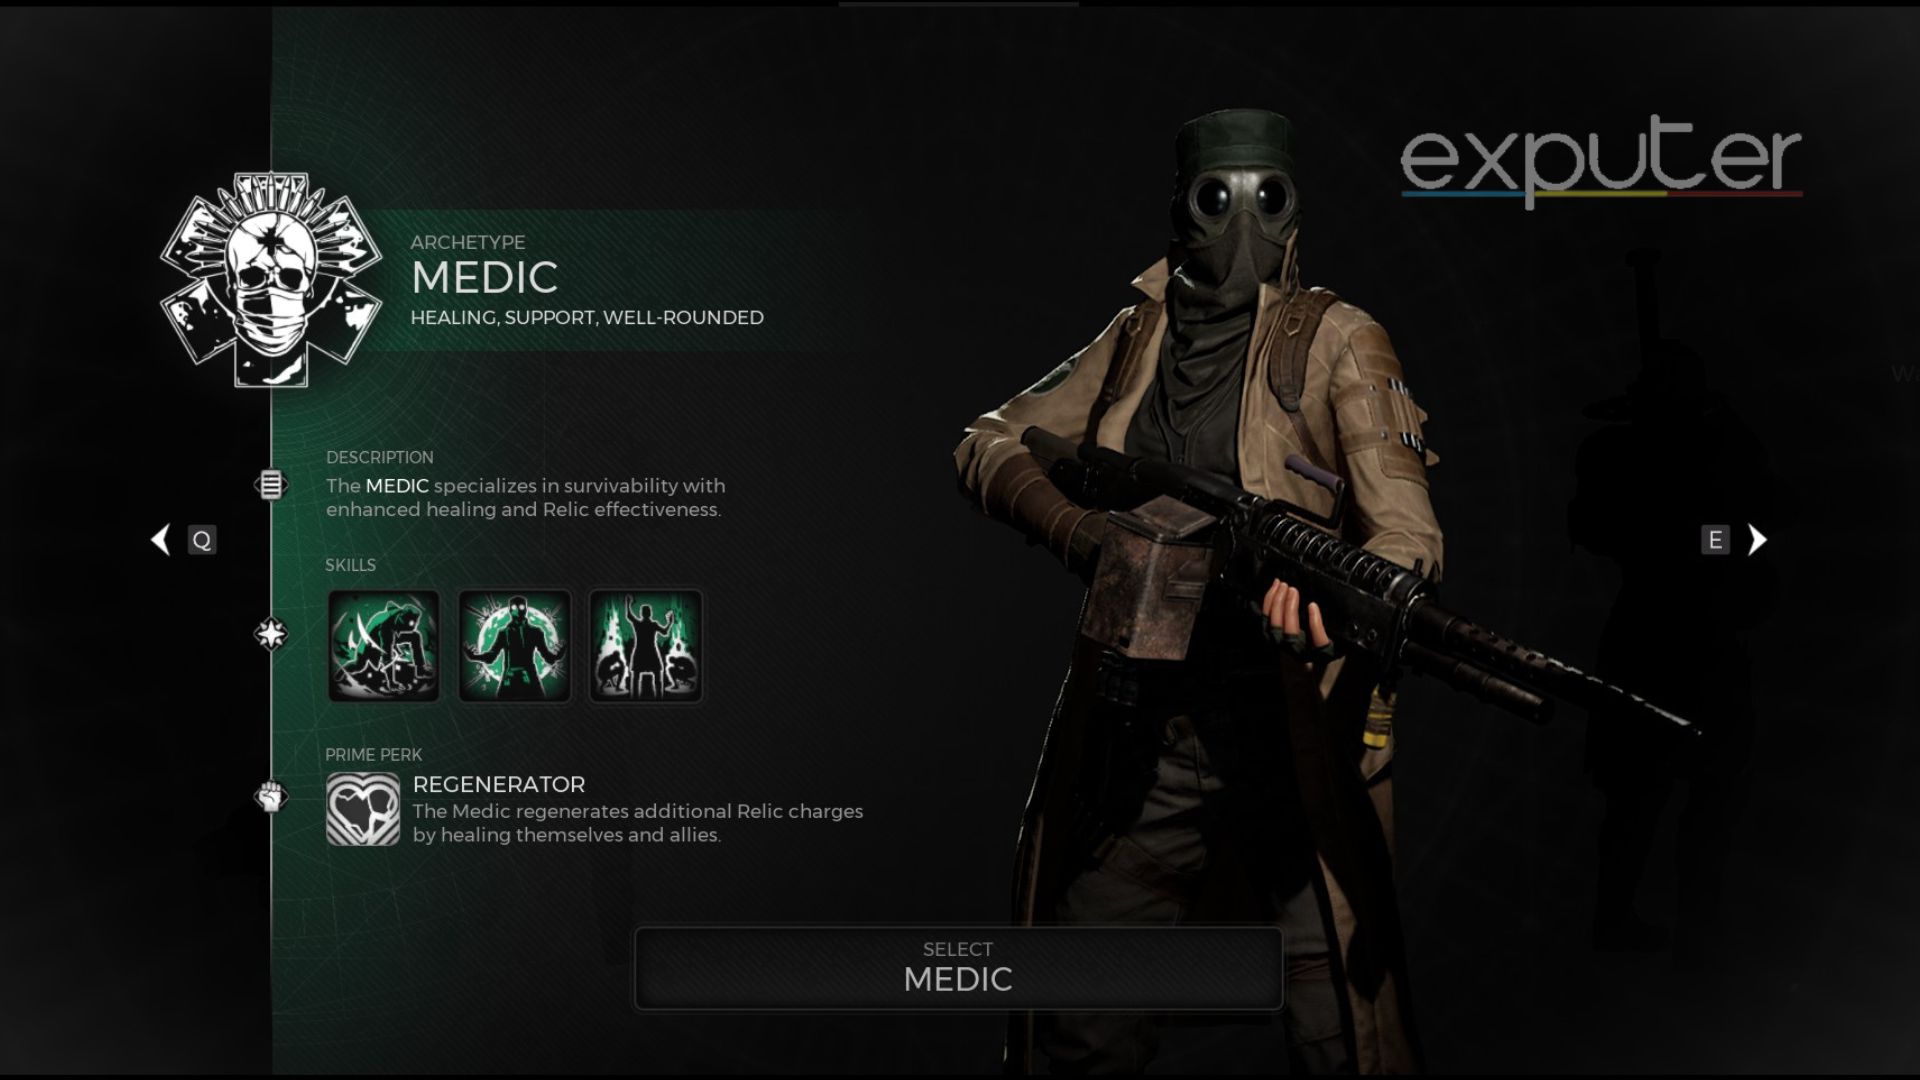
Perks
Medic’s perks are designed to benefit it as it heals the allies. Meaning that your Allies will now stay active in fights much longer. The Perks also make the Medic a bit more durable.
Regenerator
The Prime Perk of the Medic is the Perk Regenerator. It unlocks with the Medic and is upgraded at level 5 and then at level 10.
- When you restore a total of 350 Health of your allies, you regain a Relic charge that you’ve used. If you Rest or Respawn, the healing accumulation gets reset. For each additional ally, the healing requirements increase by 50%.
- When upgraded to level 5, the Total Healing requirement reduces to 300 Total Health. And at level 10, the requirement reduces to 250 Total Health.
Invigorated
The Damage Perk of the Medic is called Invigorated. It unlocks at level 1 and is upgraded at level 6.
- It increases all of the Damages by 2.5%.
- Upon upgrade, it increases to 25% Damage and gets an additional 5% Critical Chance.
Benevolence
Benevolence is the Team Perk of the Medic. The Medic unlocks it at level 2 and upgrades it at level 7.
- With the Benevolence perk, the Medic increases the efficiency of the Relics by 15%. Healing any nearby ally will heal them 30% of their max HP.
- When the Perk is upgraded, it heals allies with Health below 35% Max HP by 60% instead of the usual 30%.
Backbone
The utility Perk of the Medic is called Backbone. The Backbone perk is unlocked at Level 3 and gets upgraded at Level 8.
- It makes the Medic a bit more durable by increasing the hits Medic can take before they start to lose their Grey Health. The number of hits increases to 1.
- When the Perk is upgraded at Level 8, the number of hits increases by 2.
Benefactor
Lastly, the Relic Perk is named Benefactor. It unlocks at level 4 and gets upgraded when the Medic reaches level 9.
- With the Perk, the use speed of the Relic increases by 20%.
- When upgraded, the Relic use gives the Medic -1 Stagger.
Skills
The Medic’s skills mainly focus on healing their allies. They either heal allies using AoE effects or revive them. These skills can be quite beneficial if you have Remnant 2 All Archetypes in the team.
SKILLS | DESCRIPTION | COOLDOWN |
Wellspring | With the Wellspring skill, the Healer gathers all their healing abilities into their fist and punches them into the ground. That creates a Healing AOE that restores 10 Health per second. It lasts for 15 seconds. | 60 Seconds Cooldown |
Healing Shield | The Medic gives all of the allies in 25m a shield that is equal to 100% of their Max Health. It lasts for 10 seconds. During the duration, the Medic heals 21% of their ally’s Health. | 100 Seconds Cooldown |
Redemption | When used, the Medic releases a shockwave over a 30m area. If there are downed allies, they get revived and get 52.5% of their maximum health restored over the duration of 10 seconds. For up to 5 seconds, each second you hold the Skill button, Medic restores 52.5% additional health, up to 210% of Max Health. Once allies are revived, they won’t get revived by the Redemption Skill for another 180 seconds. | 120 Seconds Cooldown |
Archetype Trait
The Medic’s Archetype Trait is called Triage. It increases the Healing done by the Weapon Mods from 5% all the way up to 50%. That means the Medic can provide better Healing to their Teammates if they invest in the Archetype Trait.
9. Summoner
As the name suggests, the Summoner is a class that focuses on summoning minions to help it in battle. The Summoner can be used in bolo Solo and Co-op gameplays. Not only can the minions deal damage to enemies, but they can also take their attention away from you. And at times, you can sacrifice the minions to heal yourself up.

Perks
Perks of the Summoner give small buffs to the Summoner if they have a minion active. The Minions can heal, give life-steal, and other benefits to the Summoner.
Ruthless
The Prime Perk of the Summoner is called Ruthless. The Perk unlocks as soon as you unlock the Summoner. And it gets unlocked when you get to Level 5. The second upgrade happens when the Summoner gets to level 10.
- Whenever the Summoner damages their Minion, the Minions get enraged. Their Attack Speed, Movement Speed, and Damage increased by 30%. The effect lasts for 20 seconds.
- When the Summoner gets to level 5, it increases to 40%; at level 10, it increases to 50%.
Dominator
Summoner’s Damage Perk is known as Dominator. It unlocks at level 1 and gets upgraded at level 6.
- With the Dominator perk, you will gain an increase in your Skills and Mods damage whenever you have Minions active. If you sacrifice a Minion, you will gain an increase in your Melee and Range damage by 3%. The increase lasts for 30 seconds or until you summon a new minion.
- With the upgrade at level 6, you will gain an increased Skill Critical Chance of 5% when you have the Minion active. By sacrificing the Minion, your Melee and Ranged attacks will increase by 30% now. You will gain an additional 5% Ranged and Melee Critical Chance.
Residue
The Residue is the Team Perk of the Summoner. The Summoner unlocks it at level 2, and then it gets upgraded at level 7.
- Whenever a Minion expires, it will leave an Aura of 3m that will heal 2.5% health per second of everyone in it. It lasts for 10 seconds.
- When the Perk is upgraded, the Healing will increase by 20%.
Outrage
The Summoner’s Utility perk is called Outrage. At level 3, it gets unlocked, and at level 8, it gets upgraded.
- With the Outraged Perk, you will get 3% Lifesteal for every Minion sacrificed. It lasts for 10 seconds.
- When it gets upgraded, you will gain a 15% increase in Movement Speed too.
Incite
The Relic Perk of the Summoner is named Incite. The Incite perk gets unlocked at level 4 and upgraded at level 9.
- With the Incite perk, whenever you use a Relic, it will heal +5% health per second of the Minion. That will also increase the damage that the Minions deal by 15%. The effect lasts for 30 seconds.
- When the Perk gets upgraded, your minions will now have a 15% Crit Chance.
Skills
The Summoner summons three different types of minions. They all are different at fighting enemies. And if you were to sacrifice the minions, they would heal the Summoner.
SKILLS | DESCRIPTION | COOLDOWN |
Minion: Hollow | Pressing the skill button will summon a Root Hollow Minion by your side. Summoning the Minion will cost 15% of your Max Health. Summoning will not kill you. You can have up to 2 minions. Holding the Skill Button will explode your Root Hollow Minion. It will deal 150 damage in a 2m range. Sacrificing a Minion will reduce the cooldown of the Skill by up to 50%. The percentage of Cooldown depends on the Minion’s current Health. | 29.4 Seconds Cooldown |
Minion: Flyer | Pressing the skill button will summon a Root Flyer Minion. The Minion will consume 10% of your Max Health, but it won’t kill you. You can summon up to 2 minions. When you Hold the skill button, it will explode the Root Flyer Minion. The Flyer Minion will deal 50 damage in a 3m area. It will spawn three homing projectiles that follow the enemies. Upon impact, each projectile will explode and deal 150 damage. | 44.1 Seconds Cooldown |
Minion: Reaver | Pressing the skill button will Summon a Root Reaver Minion to help in your fights. Summoning the Reaver Minion will consume 35% of your Max HP. You can, at MaxMax, have 1 Reaver Minion. If you hold the skill button, it will explode the Root Reaver Minion. The explosion will deal 200 damage in a 6m area. It will spawn Spore Bombs that bounce and explode on contact. Each of these bombs will deal 200 damage. According to the Minion’s remaining Health, the explosion will reduce the Skill’s cooldown by 50%. | 120 Seconds Cooldown |
Archetype Trait
The Summoner’s Archetype Trait is called Regrowth. It increases Health Regeneration. The Health Regen increased by 0.15s on Level 1, all the way up to 1.5s on Level 10.
10. Invader
The Invader is one of the Secret Remnant 2 All Archetypes. It can cause disruption in the enemies by deploying decoys.
Perks
For now, I’ve only collected the names of the Invader Archetypes Perks in Remnant 2. As soon as I acquire additional knowledge on the class, I’ll update my guide.
- Shadow (Prime Perk)
- H.A.R.K. (Damage Perk)
- Loophole (Team Perk)
- Circumvent (Utility Perk)
- Override (Relic Perk)
Skills
The Skills of the Invader Archetype focuses on deploying decoys and other items to confuse the enemies. Once I’ve confirmed their descriptions, I will update the guide accordingly.
- Void Cloak
- Worn Hole
- Reboot
Archetype Trait
The Archetype Trait of the Invader allows it to evade attacks from enemies. It is quite helpful, as it will ensure that you can evade powerful attacks from higher-level enemies, too.
- Untouchable
11. Archon
The hardest Archetype to unlock in Remnant 2 is the Archon. For it, players had to data mine through Remnant 2’s files to know how to unlock it.
Perks
Here are the perks that you get as you level up the Archon Archetype in Remnant 2.
- Tempest (Prime Perk)
- Amplify (Damage Perk)
- Power Creep (Team Perk)
- Spirit Within (Utility Perk)
- Power Leak (Relic Perk)
Skills
Archon’s skills allow it to control space around it or buff its nearby allies. Here are the names of the skills.
- Reality Rune
- Chaos Gate
- Havoc Form
Archetype Trait
As for the Archetype Trait, it increases the Mod and Casting speed of the Archon by up to 50%.
- Untouchable
The guide lists all of the Archetypes discovered until now. I’ve listed their Perks and Skills along with their Archetypes, too. People from Reddit and other forums seem to ask which Classes in Remnant 2 are the best. The answer is any of these because they are all useful in their own sense.
More from eXputer:
Thanks! Do share your feedback with us. ⚡
How could we improve this post? Please Help us. ✍