The Fia Questline in Elden Ring is definitely one of the best side missions you can take on. What seems blatantly welcoming at first has quite a mystery hidden within. Read on and explore this special NPC’s story and let me walk you through the entire thing in-depth.
To trigger the “Age of Duskborn” ending in Elden Ring, follow these steps involving Fia and the Mending Rune of the Death-Prince:
- Meet Fia in Roundtable Hold, accept her hug, and obtain the Weathered Dagger from Altus Plateau after resting at a Site of Grace.
- Give the Weathered Dagger to D, Hunter of the Dead, in Roundtable Hold. Receive the Knifeprint Clue from Fia.
- Defeat Fia’s Champions near Godwyn’s corpse in Deeproot Depths during Ranni The Witch’s questline. Obtain the Cursemark of Death.
- Deliver the Cursemark of Death to Fia in Roundtable Hold to receive Radiant Baldachin’s Blessing. Defeat Lichdragon Fortiassax in the Deathbed Dream to obtain the Mending Rune of the Death-Prince from Fia.
- Progress through the game and, at Marika’s Statue, trigger the “Age of Duskborn” ending by using the Mending Rune of the Death Prince.
- Author’s Note: After going through Elden Ring for several weeks on Steam, I feel confident going into the topic with thorough experience.
Step-By-Step Guide On Fia Questline
I’m going to break down the questline of Fia into different sections. This will help keep things organized and allow you to simply replicate the guidelines outlined below.
Get Your First Hug From Fia
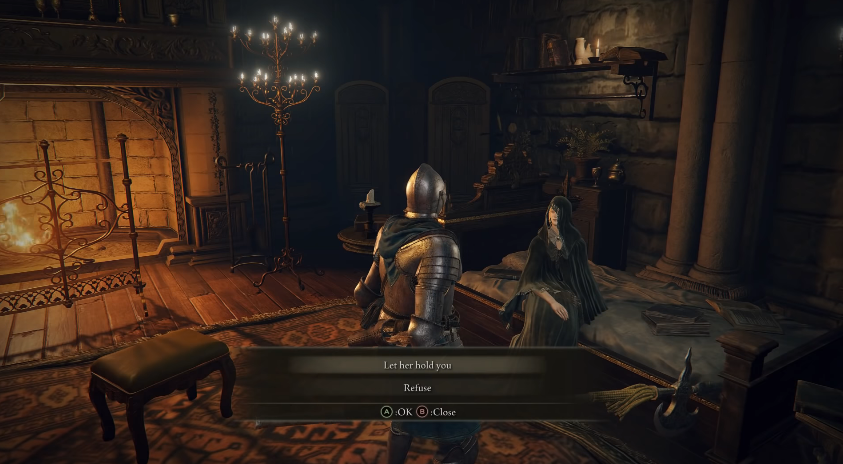
When you first start the game, Melina, the handy guide, takes you to the Roundtable Hold early. If you’re not the explorer type, you might have missed encountering Fia. If that is the case, you must make haste to Fia from wherever you are in the Lands Between right now and get your first hug from her.
You’ll find the NPC in a bedroom at the Roundtable Hold near the Site of Grace area or the Table of Grace. She’s pretty easy to find and located right beside Smithing Master Hewg. Go up to her and initiate the dialogue. As soon as you’re faced with an option, have some faith and choose “Let her hold you.” That should take you to the next step.
More From eXputer: Elden Ring Mohgwyn
As the act ends, you’ll receive an item called Baldachin’s Blessing. This consumable will help you boost poise by consuming your Focus Points or FP. However, little do many people know that keeping Baldachin’s Blessing in the inventory given by Fia reduces the Vigor attribute by a factor of 1. With that said, the downgrade diminishes when you consume the poise-boosting item.
She’ll top the first encounter off by saying, “Come back to me, should you require another. I will take you in my arms as often as you need.” Great stuff! You’ve just completed the very first step of the Fia questline. Let’s advance to the next stage now.
- The path is dangerous ahead. Make sure you’re well-versed with the best weapons in the Elden Ring to dominate the opposition.
Find D, Hunter of the Dead
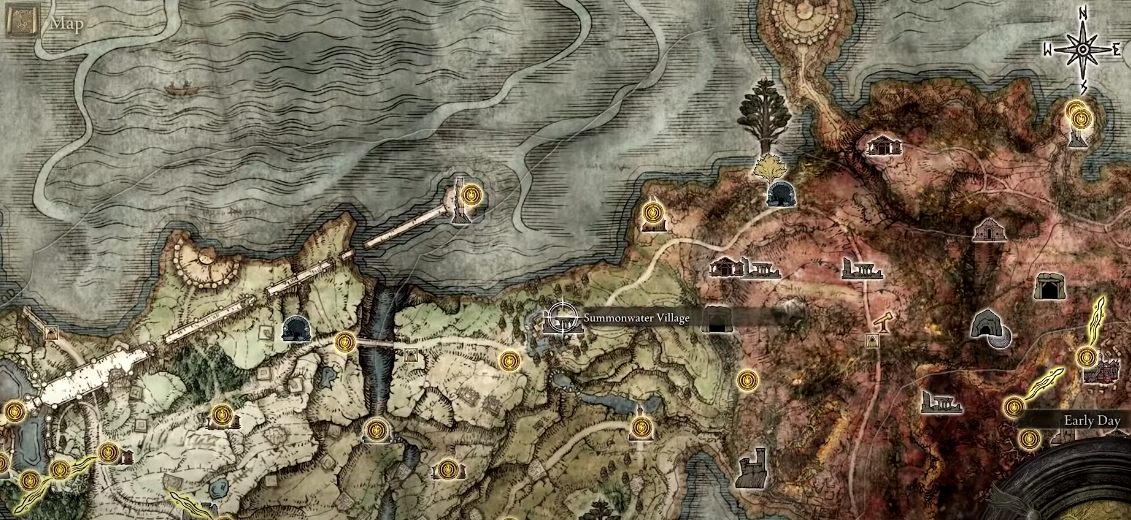
To continue with the Fia questline Elden Ring, you have to touch base with another character called D, Hunter of the Dead. The seemingly noble warrior can be first found in Limgrave, which is the starting region in the game. To be more precise, he’ll be standing in an open field northeast of the Summonwater Village Outskirts Site of Grace in Limgrave.

Similar Read: Elden Ring Jerren Quest
He’ll introduce himself as someone who “hunts down those Who Live in Death and weeds their Deathroot.” In addition, he’ll warn you that Summonwater Village has been cursed and you should pay heed to his warning. That’s about it for finding and meeting up with D. Let’s get to the next part of Fia’s questline now.
Obtain Deathroot From the Tibia Mariner Boss
Not far from where you locate D, Hunter of the Dead for the first time will reside a boss called Tibia Mariner. This distorted skeleton-like creature rides a mythical boat and summons skeletons to attack you. This is obviously an optional boss fight and you don’t have to put with it to unlock any endings of the game, say, such as the Age of Absolute Elden Ring ending.
Tibia Mariner can be found in many areas across the Lands Between, but the one most relevant to use right now is Summonwater Village, close to where you located D. Simply head to the northeastern part of Limgrave and find the boss in the flood-ridden areas of Summonwater Village.
As soon as you locate this undead sloth, kill him to get Deathroot. You’ll be needing this key item to further the Fia questline Elden Ring.

- Recommended Read: Elden Ring Item Tier List
Talk to D at the Roundtable Hold
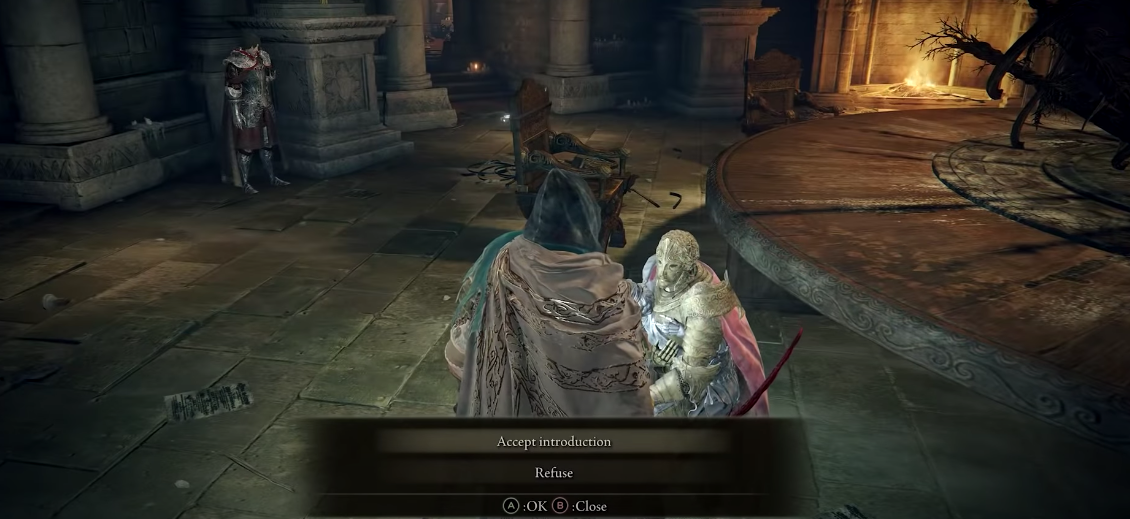
It’s time you meet up with our Hunter of the Dead friend again after acquiring the Deathroot item. The purpose of this will be to get introduced to another entity of interest, called Gurranq, Beast Clergyman. You’ll find D sitting in close proximity to the main Table of Grace area at the Roundtable Hold.
He’ll say that he has “matters of his own to attend to” and follow up with an offer to get you to meet with Gurranq. Accept it to hand over your map to D so he can mark the area where you can locate said NPC.
An Interesting Read: Elden Ring Rivers of Blood Build
Good job on making it this far! You’re all set now to proceed to the next stage.
Get Fia to Ask You for a Favor
Now, there’s no broad consensus as to what is it exactly that triggers Fia to ask for her designated favor. You’ll find opinions all over the Elden Ring community, with one person saying that you need to do this and the other saying you have to complete that in order to allow Fia to open up.
From what you were able to gather in my experience, there are about two different scenarios that can possibly unlock the next phase of the Fia questline:
- Gathering at least two Great Runes from defeating major Elden Ring bosses, or in other words, demigods.
- Collecting the Dectus Medallion in full and gaining access to the Altus Plateau.
First Possibility
If it’s the first possibility that gets Fia to ask you for a favor, then I’m afraid you’ll have to slay the first two main bosses of Elden Ring: Godrick, the Grafted; and Rennala, Queen of the Full Moon. Exploring the vast stretches of the Lands Between and subsequently increasing your character’s attributes is bound to make you powerful enough to take these two demigods on.
Killing off the latter, therefore, rewards you with the Grafted Blade Greatsword and there’s just no beating this excellent starter weapon. Anyhow, I believe you do get the point that I’m trying to make here. Coming back to the topic at hand, Godrick, the Grafted is the final boss of the Stormveil Castle region.
Although he is an optional boss and doesn’t need to be defeated to end the game, Godrick does drop a Great Rune and you need at least two of these to advance Fia’s questline. Stormveil Castle isn’t too further out from Limgrave, so you should be able to get to it without too much of a challenge.
As for the second main boss we have to dispatch, Renalla, Queen of the Full Moon is definitely one of the easier ones to deal with out of this couple. Read our Rennala cheese method guide and learn the exploit to beat the boss easily.
As soon as you’ve acquired both Great Runes dropped from these great enemies, make your way to Fia to see if she wants you to do a favor. If not, consider the second possibility.
Second Possibility
The second potential trigger for getting Fia to ask you for a favor is gaining access to Altus Plateau. This is one of the major parts of the Lands Between that players will get to brave and tour. It houses its own range of secrets, as does every other section in the game, and is definitely a scenic area to gallop around with your horse in Elden Ring.
Now, there’s a variety of ways that one can approach to arrive at the Altus Plateau. However, the most straightforward out of them all revolves around gathering the halves of a singular Dectus Medallion. This key item’s two unique shards have been dispersed in different parts of Elden Ring, and you have to collect both of them before you can proceed.
Luckily for you, there’s an entire guide on the left and right pieces of the Dectus Medallion and how you can obtain them. Do check it out if you’re after a step-by-step guide on the topic at hand. If the first possibility for furthering the Fia questline didn’t bear fruit, then perhaps this will do.
As soon as you have the Dectus Medallion in full, hoist the item at the Grand Lift of Dectus and you’ll shortly find yourself arriving at the Altus Plateau. That’s quite about it for the second possibility as well. You now have to make your way back to Fia and talk to her. See if it’s achievable to complete her favor now.
- The Dectus Medallion isn’t the only key item that gets you through different locations in Elden Ring. Consider reading Elden Ring Haligtree Secret Medallion and collect it to enter a secret area in the game.
Complete Fia’s Favor by Handing the Weathered Dagger to D
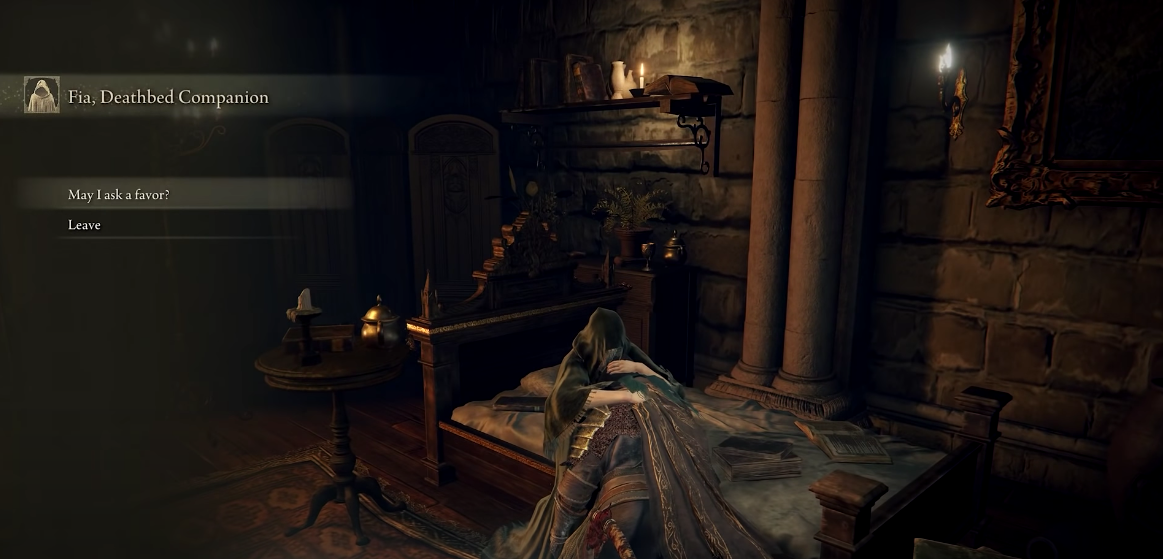
When you go up to Fia, let her hug you again, and proceed to exhaust the rest of her dialogue. You’ll then see an option called, “May I ask a favor?” Select it on your end to proceed.
More from eXputer: Elden Ring Erdtree Greatshield Location
Fia will then give you the Weathered Dagger and ask you to return the item to its original owner. Funnily enough, the owner of this weapon sits nearby you. It turns out that D, the Hunter of the Dead will willingly take the Weather Dagger from you and further Fia’s questline.
Approach D as he’s sat around the roundtable in the center of the Table of Grace and interact with him. Choose “Give the Weathered Dagger” from the subsequently appearing menu to proceed.
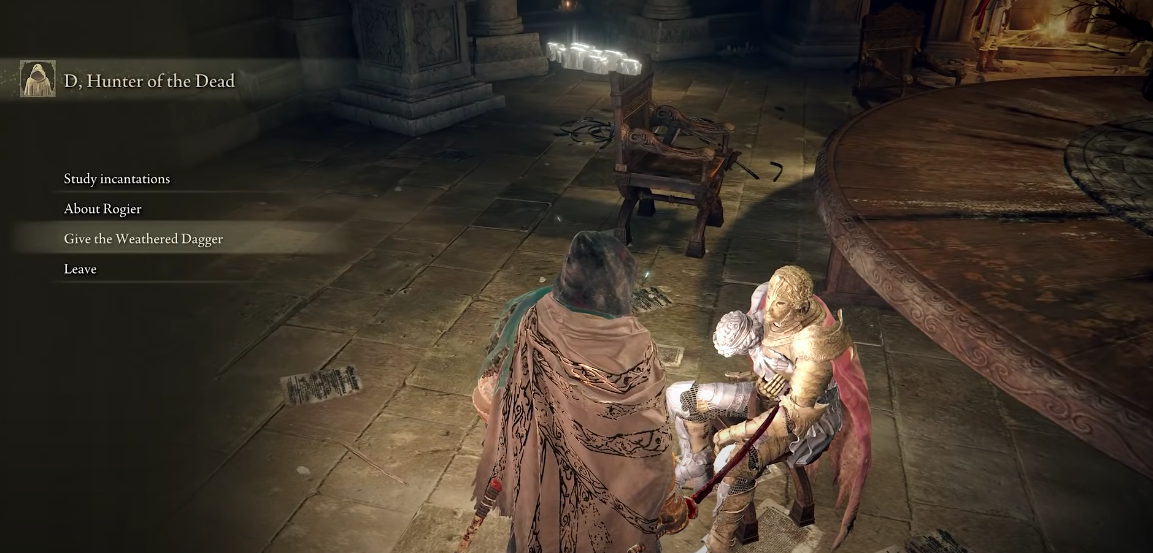
Unfortunately, this will be the last of what you’ll ever see of D. Continue reading from the next section when you’ve exhausted the dialogue.
Rest at the Table of Grace and Find Fia
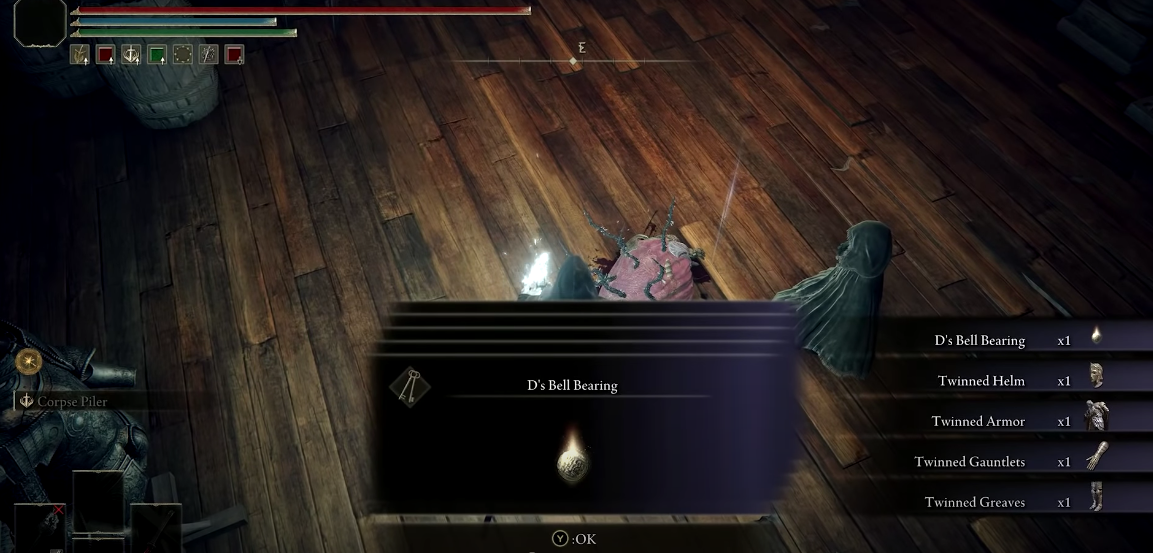
After handing over the dagger to D, go forward with the Fia questline by resting at the Roundtable Hold Table of Grace. This will give the area a refresh and allow you to find Fia straight ahead from the doorway near Hewg the blacksmith. You guessed it right. This pathway wasn’t unlocked before.
After going inside the room, you’ll find Fia sitting nearby the corpse of D, Hunter of the Dead. Our noble warrior has seemed to perish, although leaving his belongings behind.
Now that you’ve gone past one half of Fia’s questline in Elden Ring, a lot more is still left to cover I’m afraid, so let’s continue the journey from the next section.
Embark on Ranni’s Questline
The Fia questline in Elden Ring is a lengthy side quest, intertwined with another NPC named Ranni the Witch. To obtain the Cursemark of Death, a key item required for Fia’s quest, you need to progress through Ranni’s questline. Here’s a concise overview of the steps to complete Ranni’s quest and acquire the Cursemark of Death:
- Find Ranni in Ranni’s Rise and agree to serve her.
- Talk to Ijii, Blaidd, and Seluvis.
- Defeat Starscourge Radahn to unlock the pathway to Nokron, Eternal City.
- Enter Nokron, Eternal City, and find the Fingerslayer Blade.
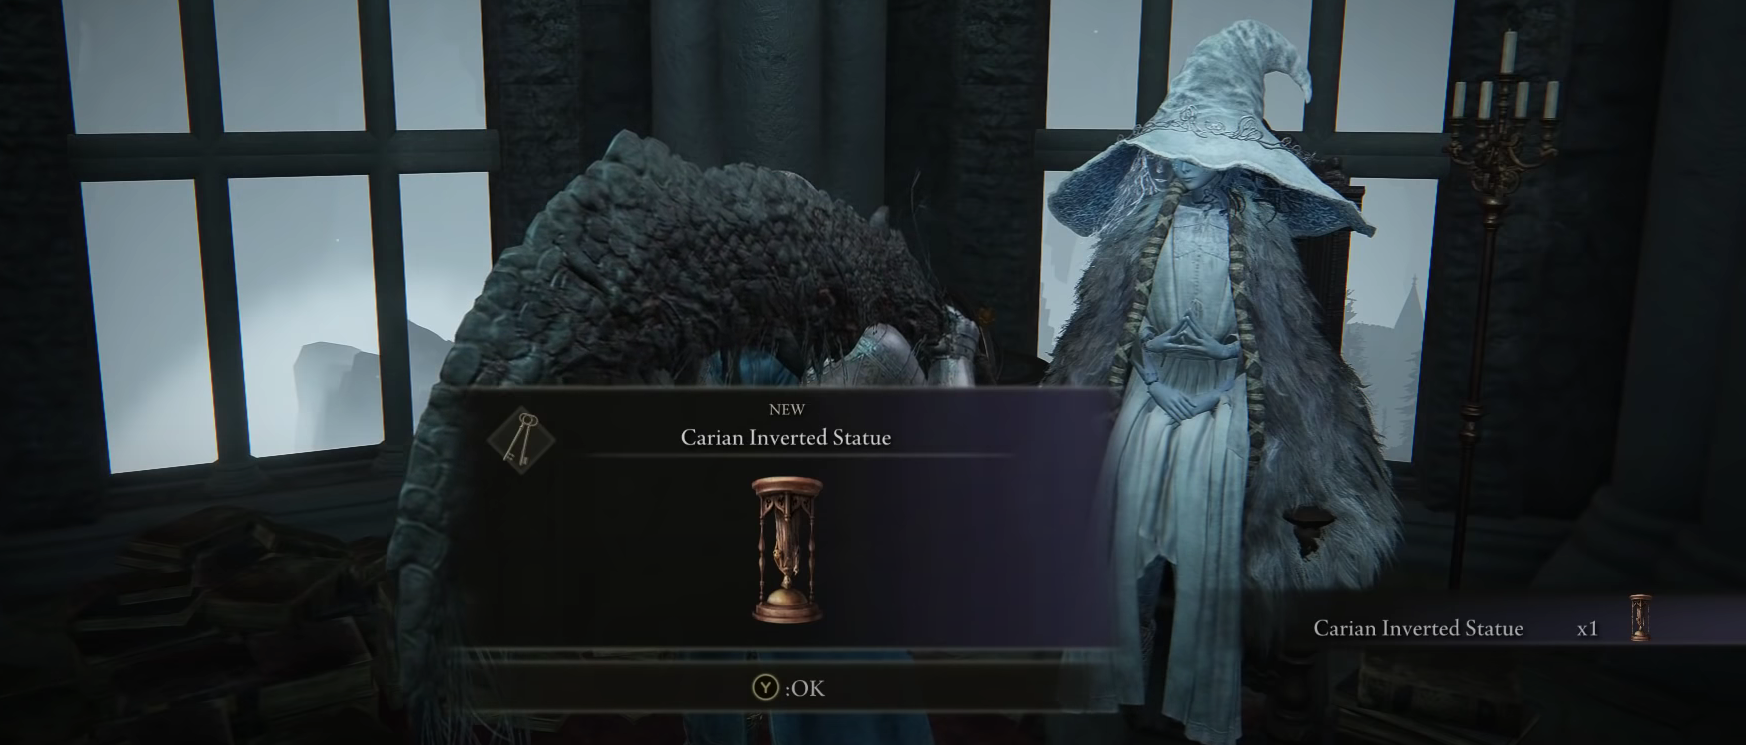
- Give the Fingerslayer Blade to Ranni and obtain the Carian Inverted Statue.
- Place the Carian Inverted Statue in the Carian Study Hall.
- Traverse the Divine Tower of Liurnia and acquire the Cursemark of Death.
If you genuinely want to make things a lot easier for you up until the last phase of finding the Cursemark of Death, I recommend following our specialized guide on Ranni’s questline in Elden Ring for step-by-step instructions. For now, though, let’s shortly get into the walkthrough of the aforementioned 7 sections.
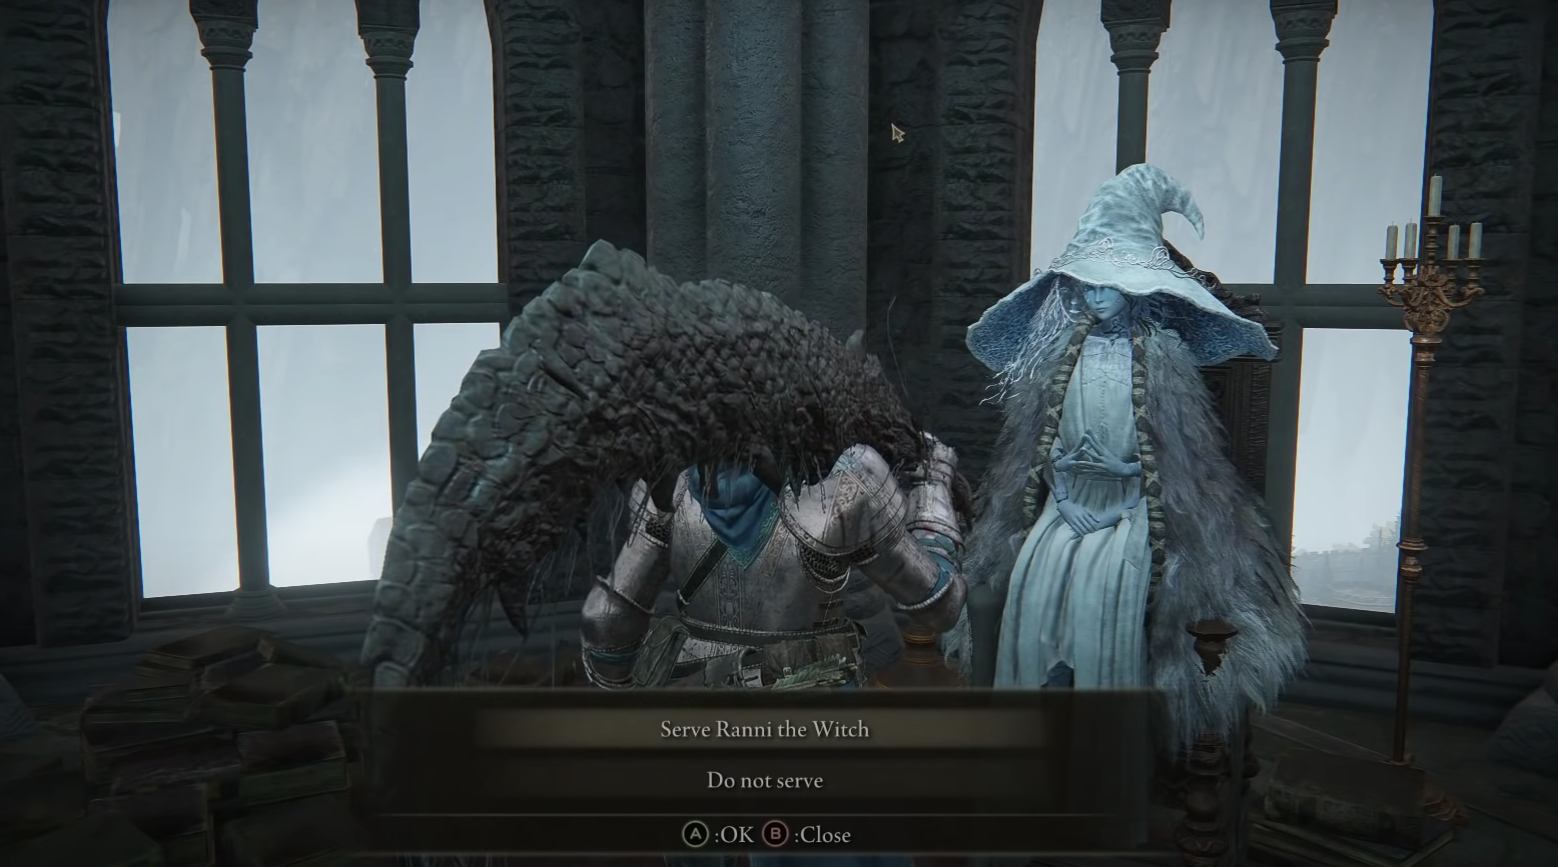
Finding Ranni and Initiating the Questline
After your initial encounter with Ranni at the very start of the game where the witch inquires about Torrent, you’ll next find her in a dedicated subregion of Liurnia called Three Sisters. This area is in the northwest corner of the Liurnia of the Lakes section in the Lands Between.
When you’ve arrived at Three Sisters, head west until you find a distinct tower called Ranni’s Rise. Go up to the top of the tower to find Ranni. Talk to the NPC, agree to serve her, and make your way outside the tower to get to the next step.
Talking to the Three Hirelings
The next step is to talk to three hirelings of Ranni who are supposedly helping her embark on the dark path of the Empyrean. The first one—Ijii, the war counselor—is just down on the first floor from where you started climbing the stairs and went up the tower.
After interacting with him a total of two times, make your way out of the tower to find Blaidd near the exit. Engage with him once toward the exit of the tower. You’ll find the last hireling—Seluvis—standing near the entrance. Speak to the sorcerer twice and go back to Ranni at the top of the tower.
She’ll say that it’s time for her to sleep and say that “this doll’s body is not without its hindrances.” Time to get to the next part of the questline.
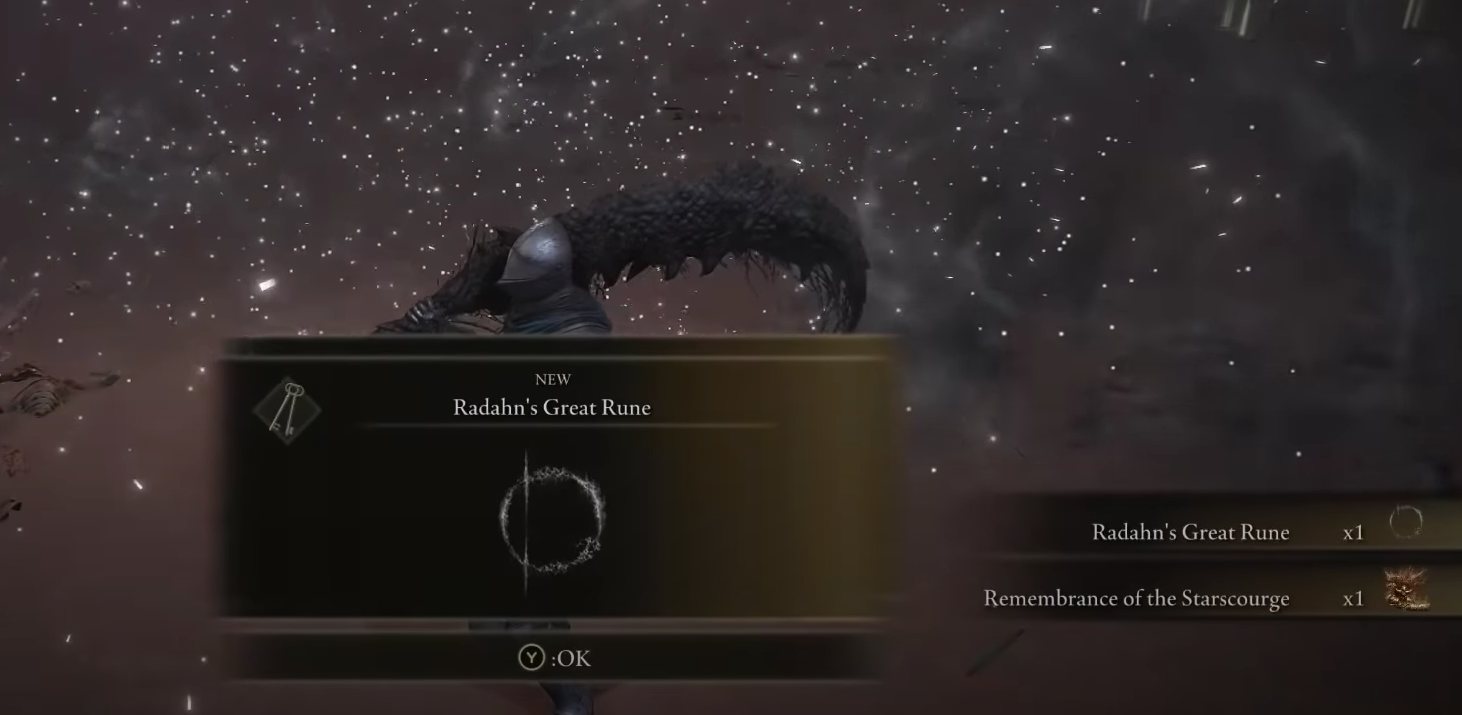
Defeating Starscourge Radahn
Fast-forwarding to a couple of errands after, your next major task in the Elden Ring Ranni quest is to find and kill Starscourge Radahn—the menacing General who has seemingly disrupted the constellation of the Lands Between. Laying him to waste will finally open the pathway to Nokron, Eternal City, and allow you to acquire Ranni’s treasure, which is actually the Fingerslayer Blade.
Radahn is the major boss of an area called Redmane Castle. If you haven’t been to this area already, you’ll need to get to the Impassable Greatbridge in southern Caelid and use the Waygate there. This should instantly take you to Redmane Castle.
- The best way to explore any region in Elden Ring is to obtain its relevant map fragment(s) first. I recommend you read our Caelid map guide and gather the two map fragments.
Once you’re there, make your way to the main area where the announcer is alerting the combatants about this gruesome Radahn festival. From there on out, it’ll be easy to spot one more Waygate and get teleported straight to Starscourge Radahn himself.
If you find the boss giving you an awful lot of trouble, then read our Elden Ring Radahn cheese method guide that I recommend following and disposing of Radahn. After you finally make him kick the bucket, a cutscene will appear, affirming that the motion of stars has started to take flight. You’ve now practically unlocked Nokron, Eternal City.
Entering Nokron, Eternal City to Find the Fingerslayer Blade
East of Limgrave is a place called Mistwood.
- After defeating General Radahn, head east from Mistwood.
- Look for a giant hole in the ground caused by a fallen star.
- Follow the path south from Mistwood Ruins to reach Nokron, Eternal City.
- Traverse Nokron, Eternal City to find the Fingerslayer Blade.
- Once you have the treasure, return to Ranni in Ranni’s Rise to advance the Fia and Ranni questlines.
Acquiring the Carian Inverted Statue
Bestowing the Fingerslayer Blade upon Ranni back in Ranni’s Rise will delight our eerie NPC and prompt her to reward you with the Carian Inverted Statue. This doesn’t seem like much at the beginning, but believe me when I say it’s the key to obtaining the Cursemark of Death.
Utilizing the Carian Inverted Statue
 Carian Study Hall Location
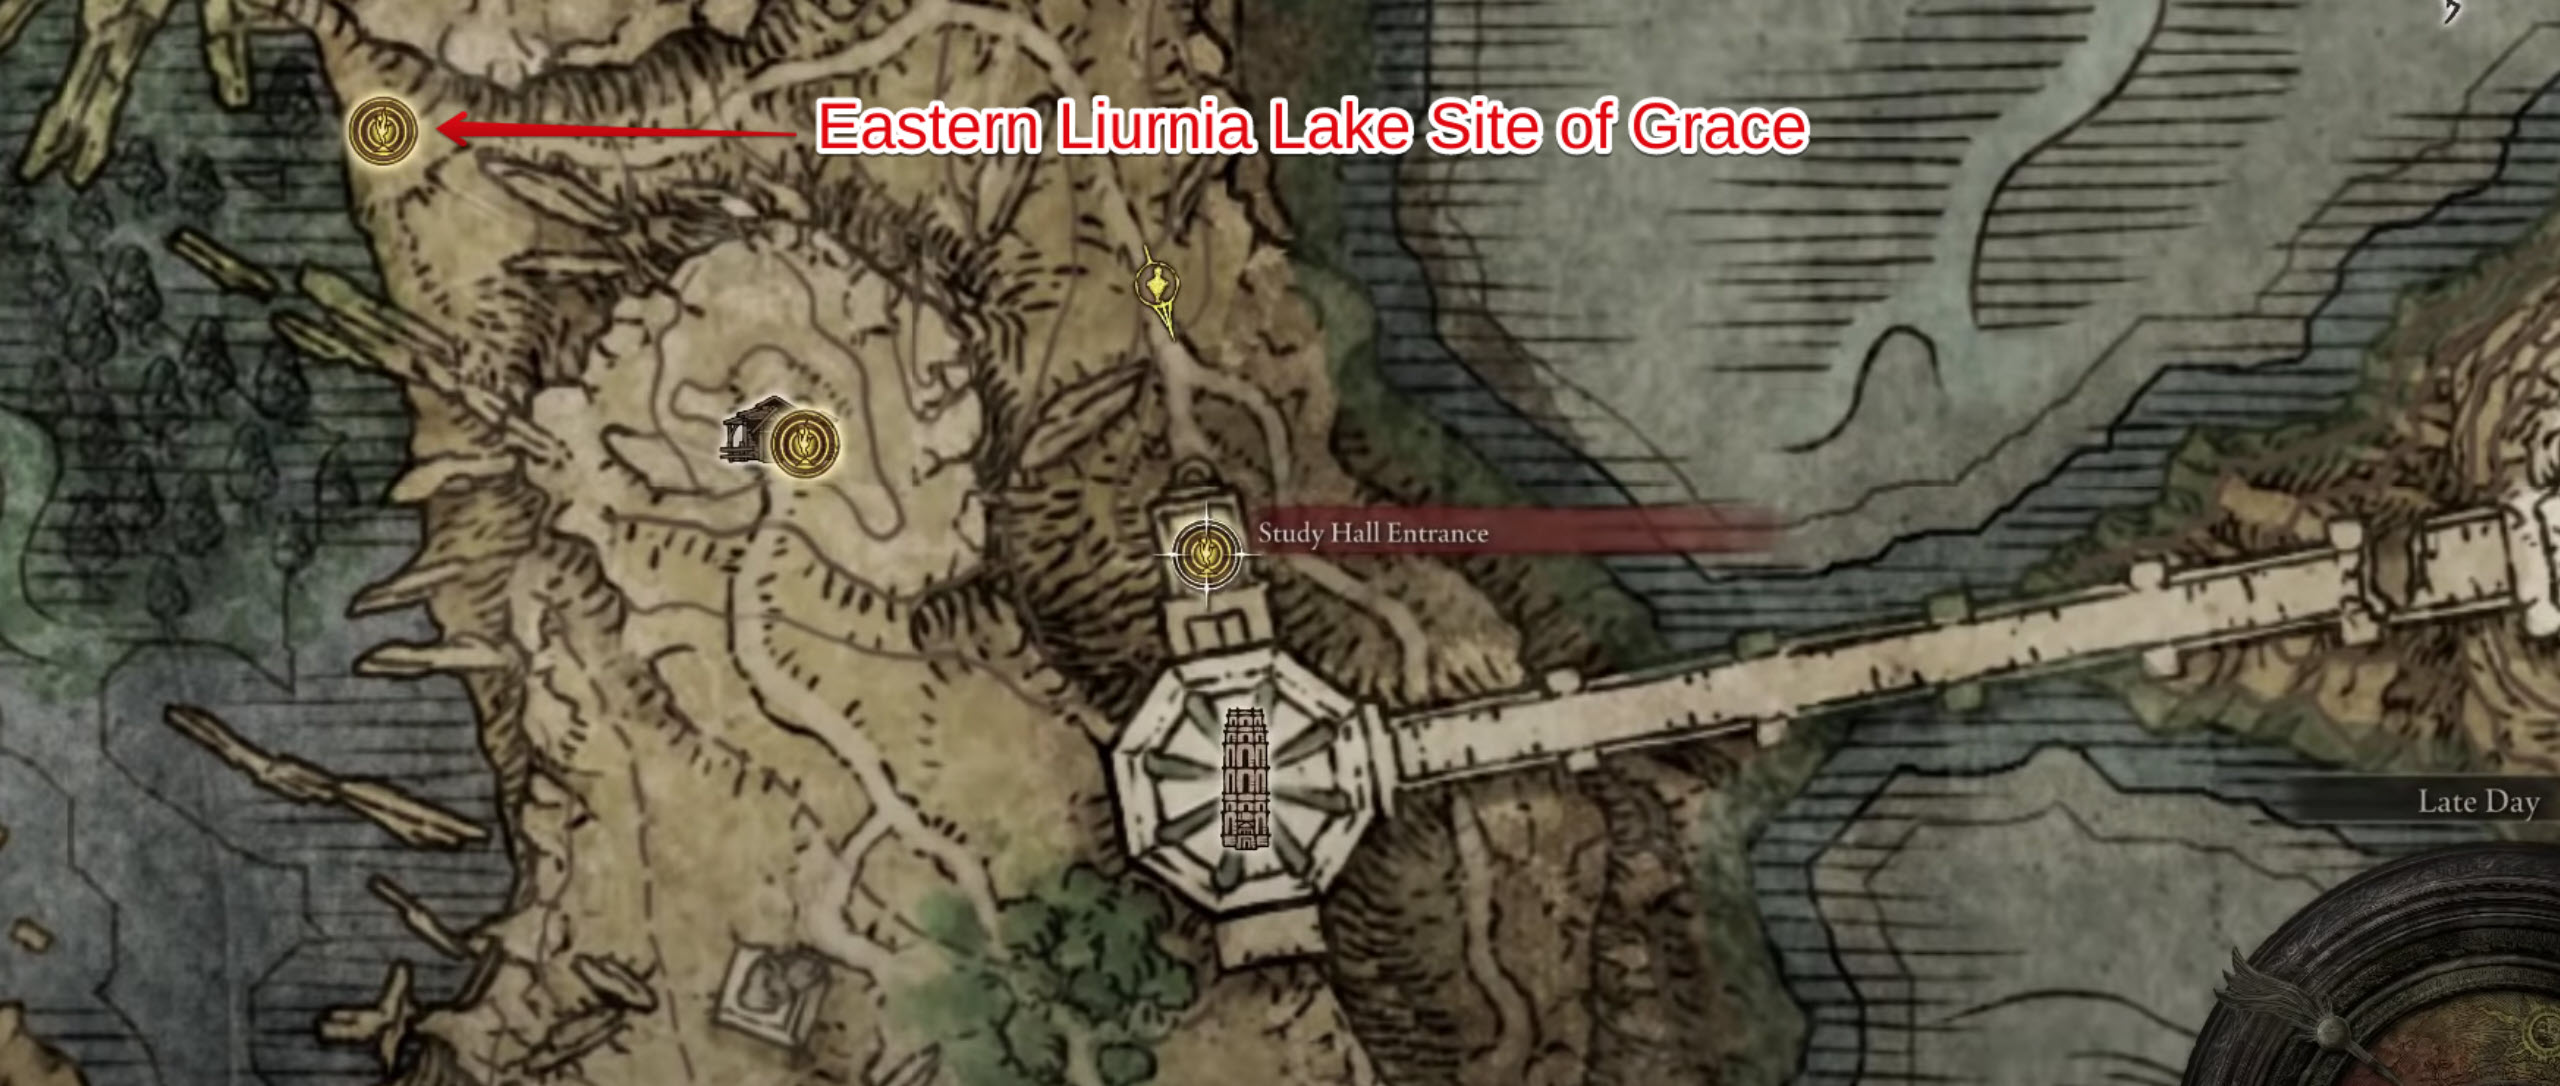
You now possess the Carian Inverted Statue, and the next step is to use it in the Carian Study Hall, which is located in the Liurnia of the Lakes region. To reach this location, follow these steps:
- Head east from the Eastern Liurnia Lake Site of Grace.
- Continue south until you reach the entrance of the Carian Study Hall.
Enter the Carian Study Hall and locate the pedestal at the front. Interact with it by pressing the “Event Action” button on your platform. This action will trigger a cutscene, indicating that something significant has been set in motion, allowing you to access the Divine Tower of Liurnia.
Obtaining the Cursemark of Death in the Divine Tower of Liurnia
The final step in this specific section of the Fia questline is to get your hands on the Cursemark of Death in the Divine Tower of Liurnia.
- Use the Carian Inverted Statue to open a pathway on the left in the Divine Tower of Liurnia.
- Traverse this distinct room, descend, and use chandeliers to reach a lift.
- Take the lift down to find a large doorway and interact with it to trigger a cutscene highlighting the Divine Tower.
- Proceed to the Divine Tower, either on foot or horseback, and reach the top.
- At the top, you’ll find the Cursemark of Death on a corpse. Acquire it to continue your mission for Fia.
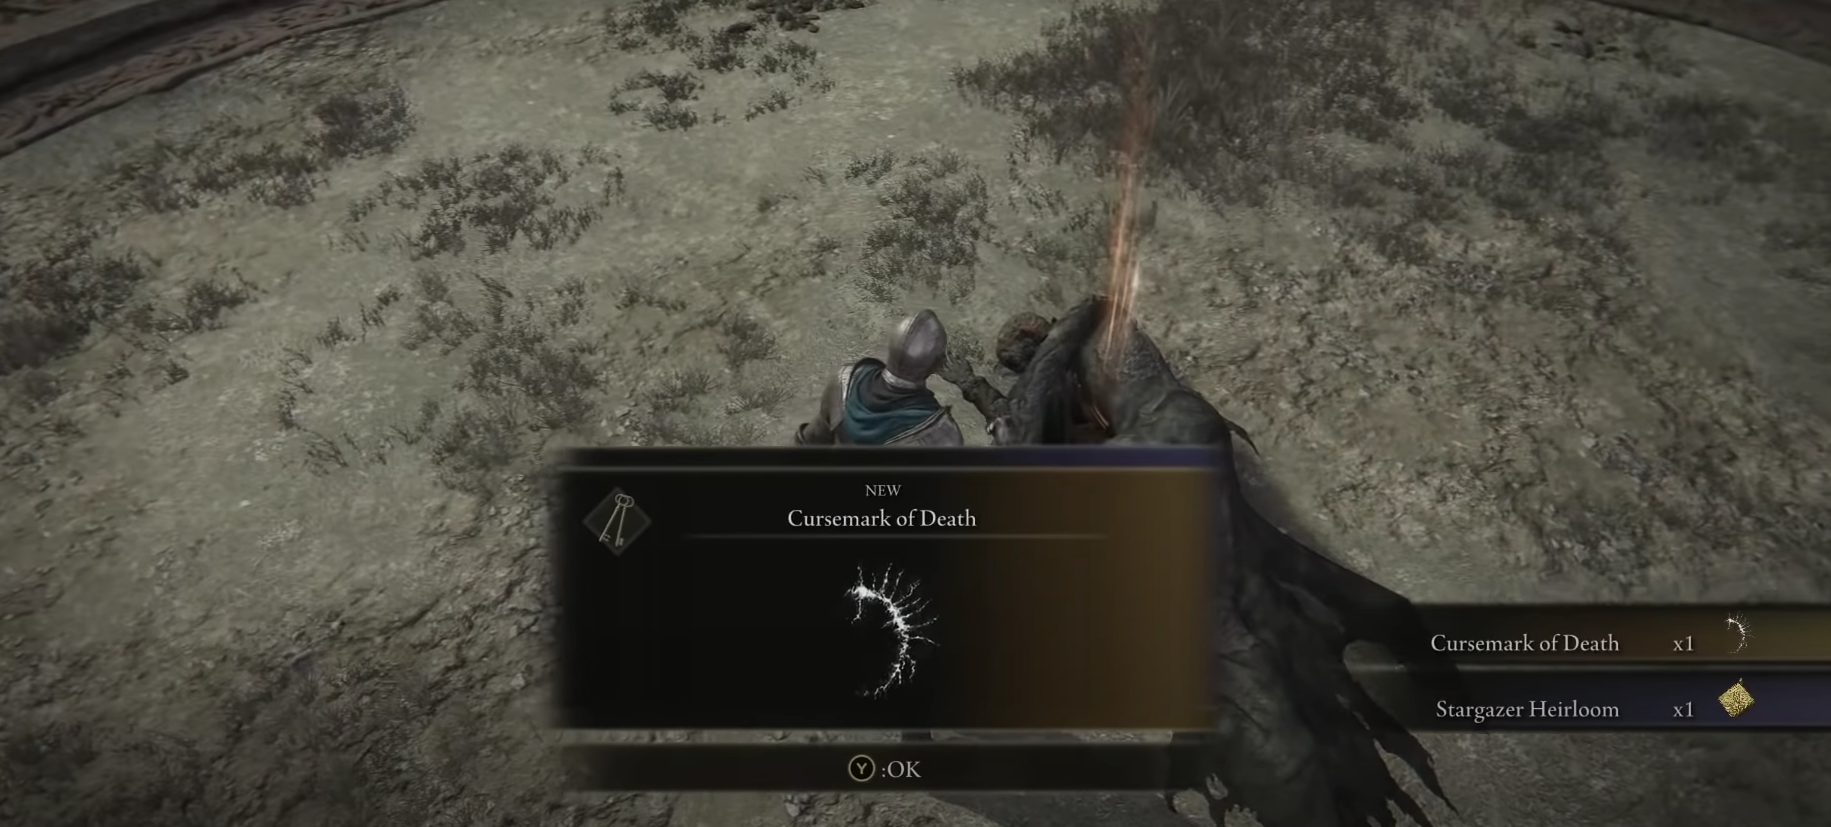
You’ve successfully obtained this centipede-like item and can now approach the next level in the Fia questline Elden Ring. Let’s get to it now.
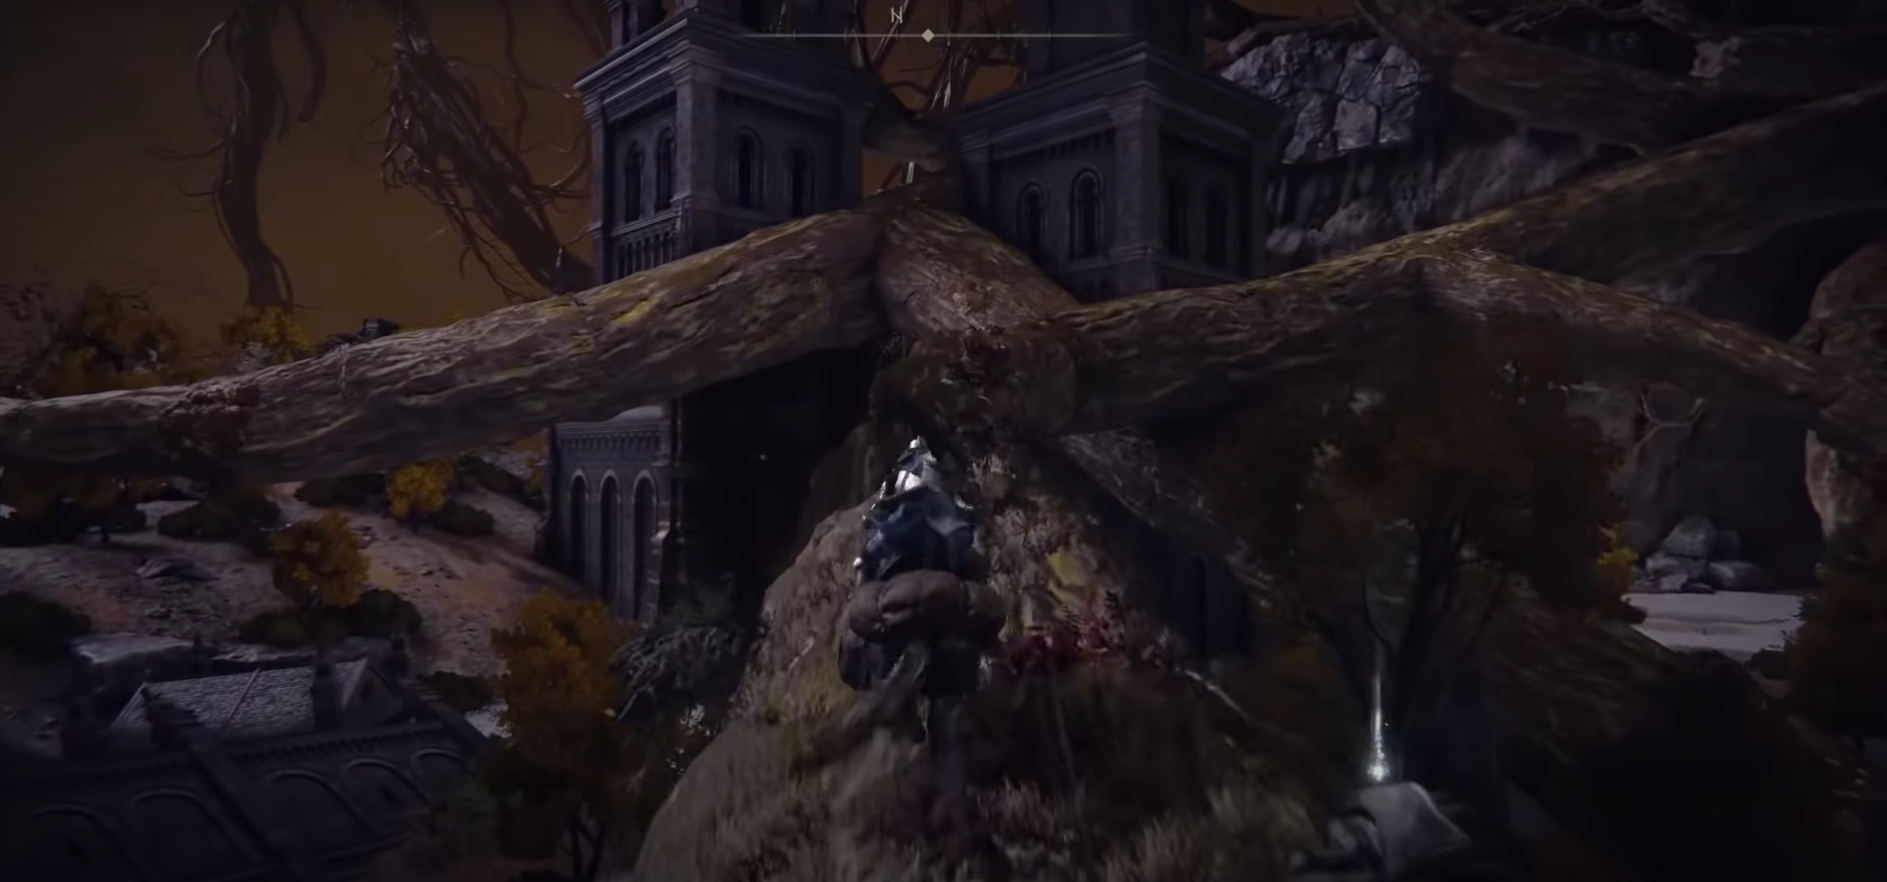
Enter Deeproot Depths
You’re slowly approaching the latter half of Fia’s questline in Elden Ring. To continue the journey, you now have to get to another highly distinct location called Deeproot Depths. You’ll reach this place from the aforementioned Nokron, Eternal City.
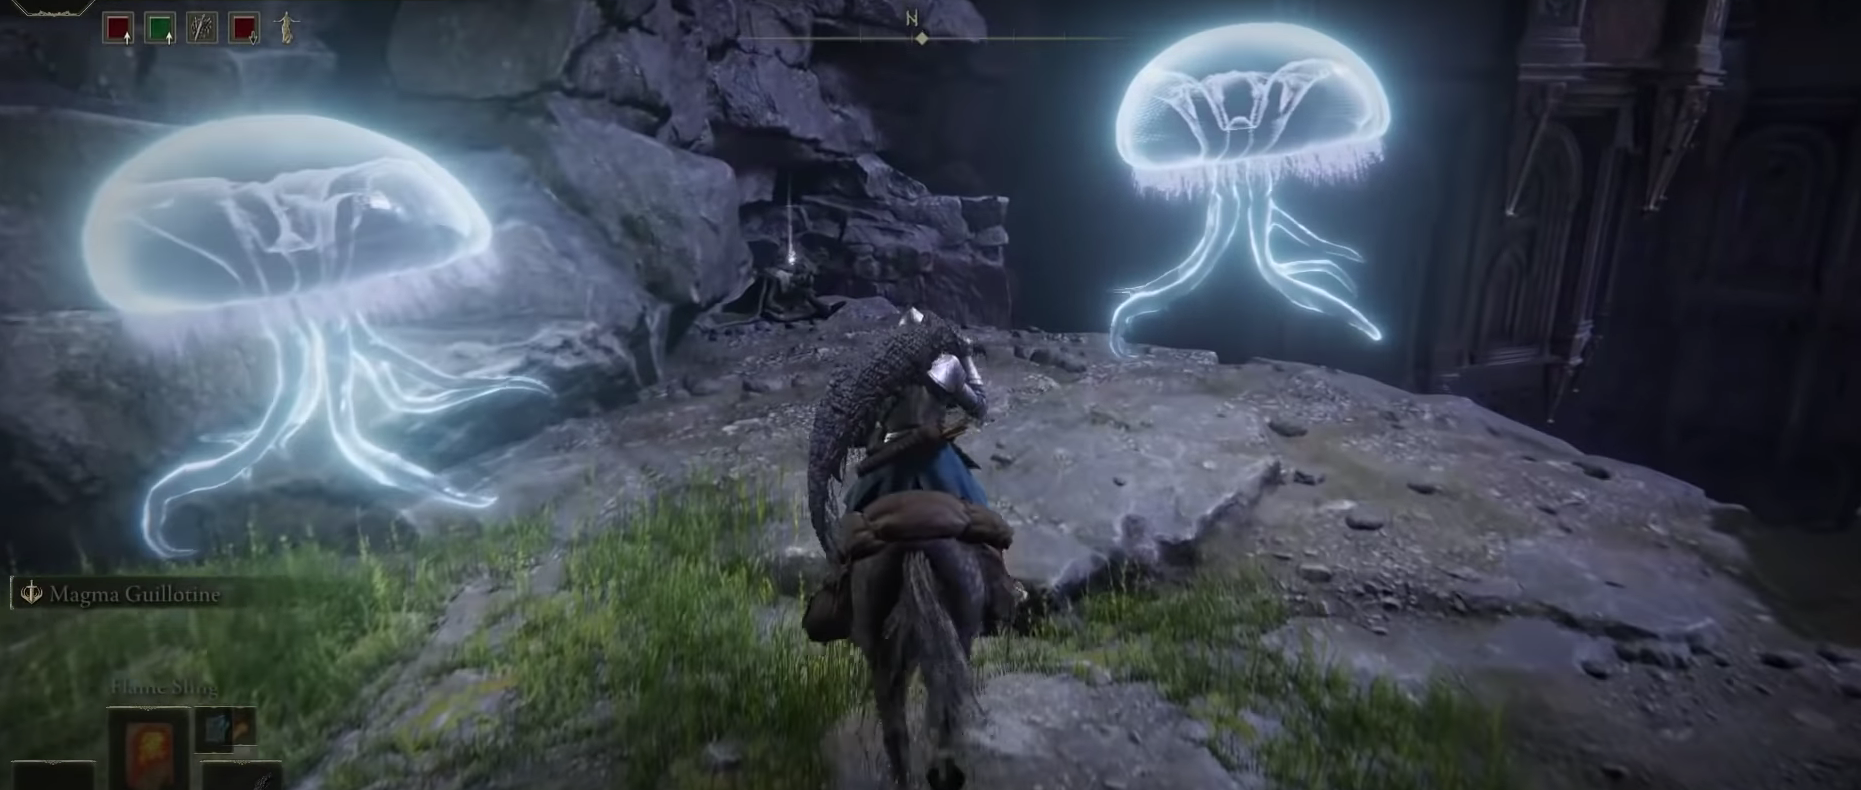
- Head north on your horse, Torrent, encountering Chanting Winged Dames along the way.
- Look for sizable jellyfish creatures and go toward the body on the left-hand side. Jump down to the platform below and proceed through a cavernous tunnel until you find the Aqueduct-Facing Cliff Site of Grace.

Approaching the Jellyfish Area - Rest at the Site of Lost Grace and continue east through the gap.
- Navigate to a tower with a guard circling it, and find a ledge that allows you to jump down to the opening of the tower.
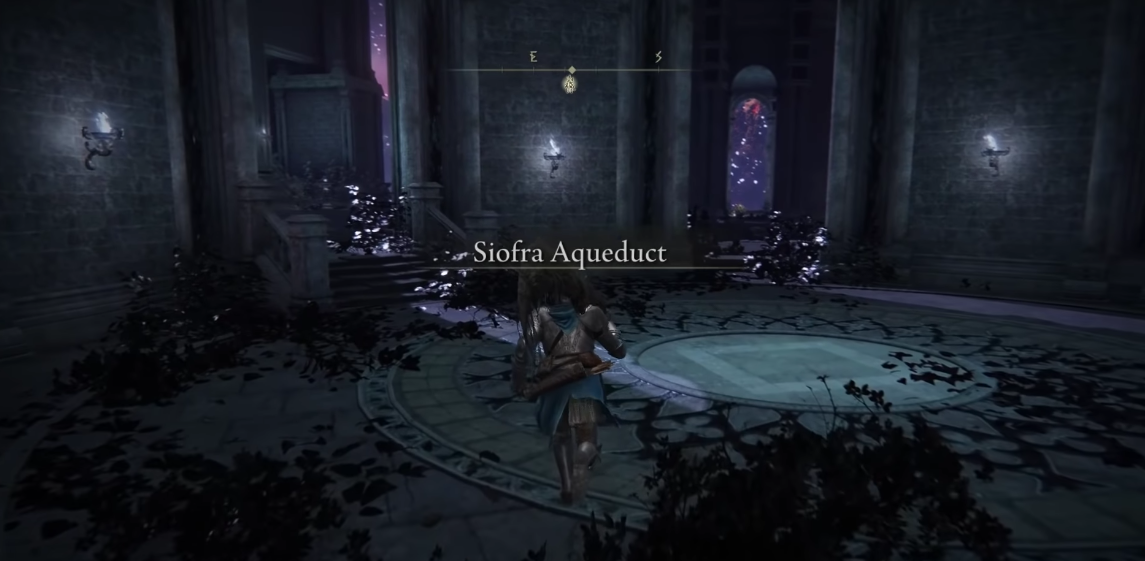
- You will arrive at Siofra Aqueduct, as indicated by the on-screen title.

Arriving at Siofra Aqueduct - Head northeast, take the first right, go left, and you’ll spot a waterfall structure. Head right to the balcony, then take the stairs on the left.
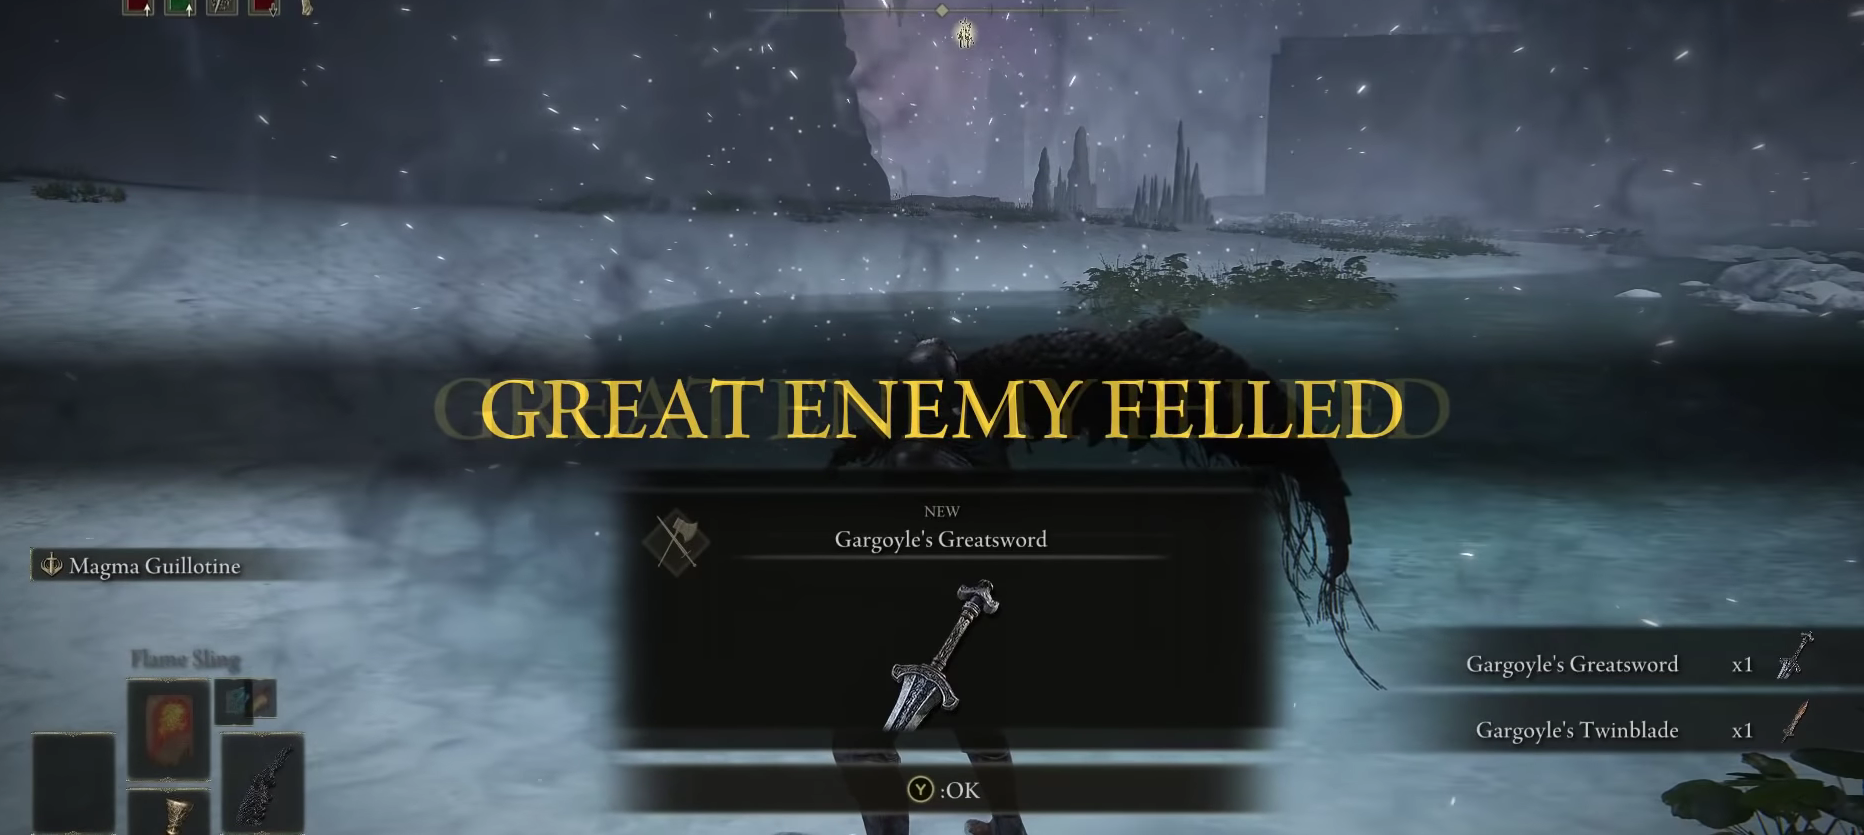
- Ascend the stairs to reach a huge waterfall area where you’ll face the Valiant Gargoyle boss fight. Defeat both Valiant Gargoyles to proceed.

Felling the Two Gargoyles - Approach the Great Waterfall Basin Site of Lost Grace near the waterfall to save your progress.

Entering the Coffin at the Grand Waterfall Basin

- In moments such as these, the Bloodhound’s Step Ash of War can help you profoundly with its quick and agile movement. Find out how to obtain this terrific weapon art here.

Get Rid of the Champions of Fia
We recommend activating the Site of Grace as soon rights after reaching Deeproot Depths.
- After the Starscourge Radahn boss fight, respawn at a Site of Grace south of your landing point.
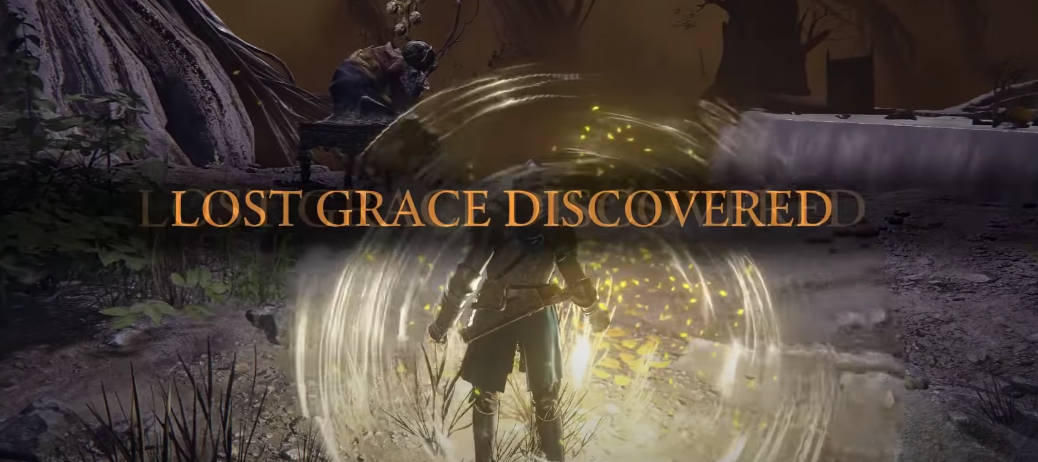
- Head west, use tree branches to navigate, and reach Deeproot Depths Site of Grace.
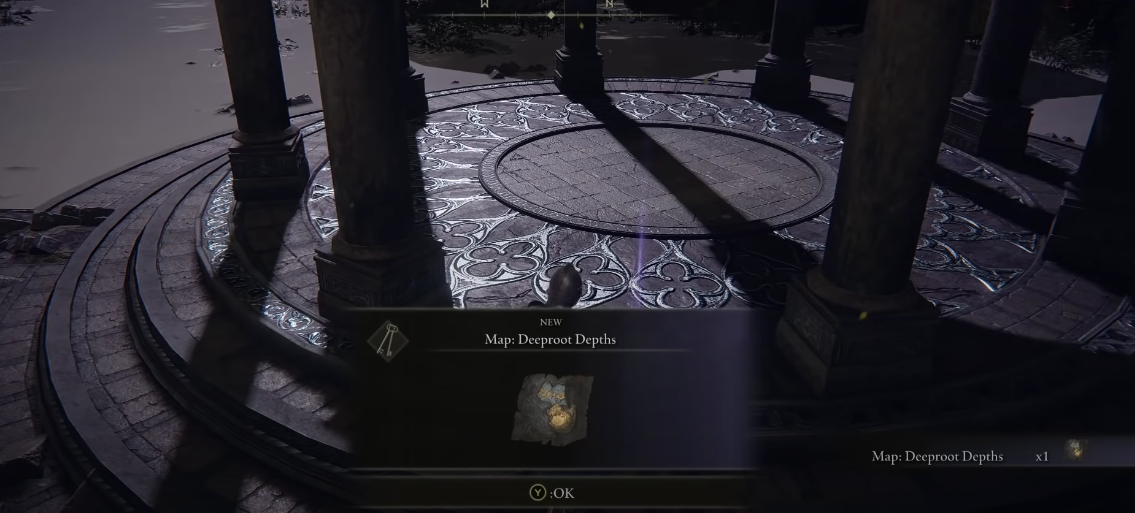
- Collect the map fragment.

Deeproot Depths Map Fragment Obtained - Head to The Nameless Eternal City Site of Grace.
- Ascend the tree branches to the Across the Roots Site of Grace.

Using the Tree Branches - Defeat the Champions of Fia in a nearby area.

Jumping to the Lower Level - Return to Fia and give her the Cursemark of Death to progress her questline.

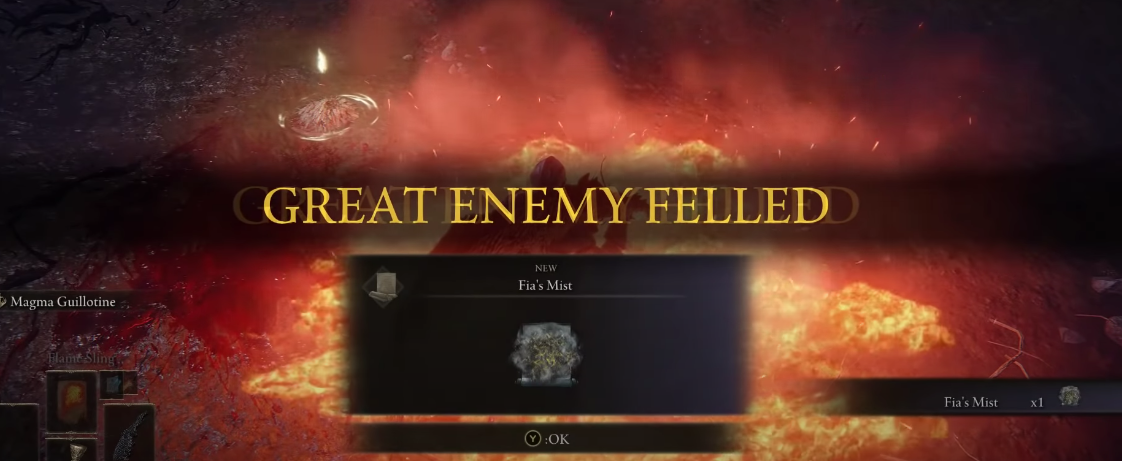
That’s about it for this stage of the Fia questline. It’s time to talk to Fia and bestow upon her the Cursemark of Death.
- You’ll find the Champions of Fia similar to fighting against other players online. This is why it’s worth looking into the Elden Ring Deathblight Build to prepare yourself for PvP invasions and the Champions of Fia alike.
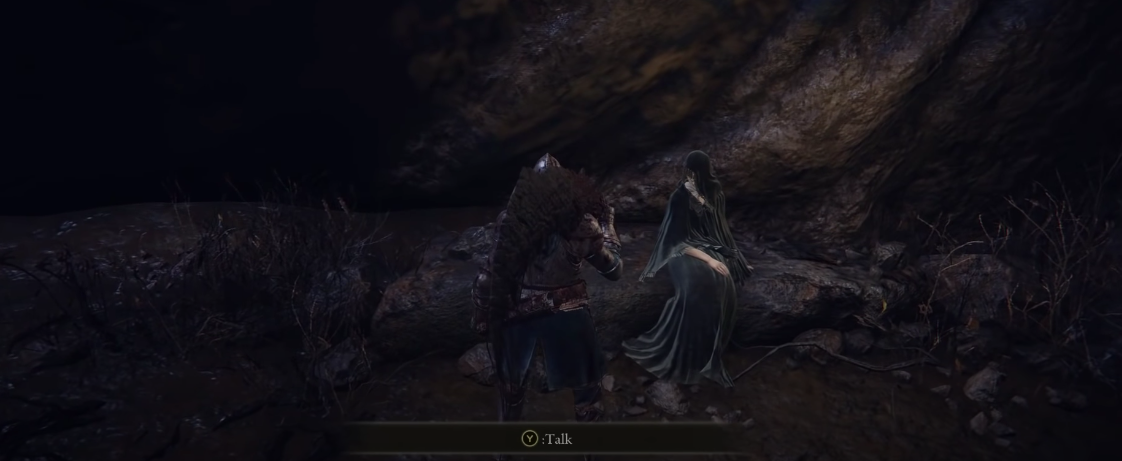
Granting Fia the Cursemark of Death
Fia is sitting in close vicinity to the Site of Grace in the boss fight arena. Head northeast from the latter to find the deathbed companion and talk to her.
- Find Fia northeast of the Site of Grace in the boss fight arena.
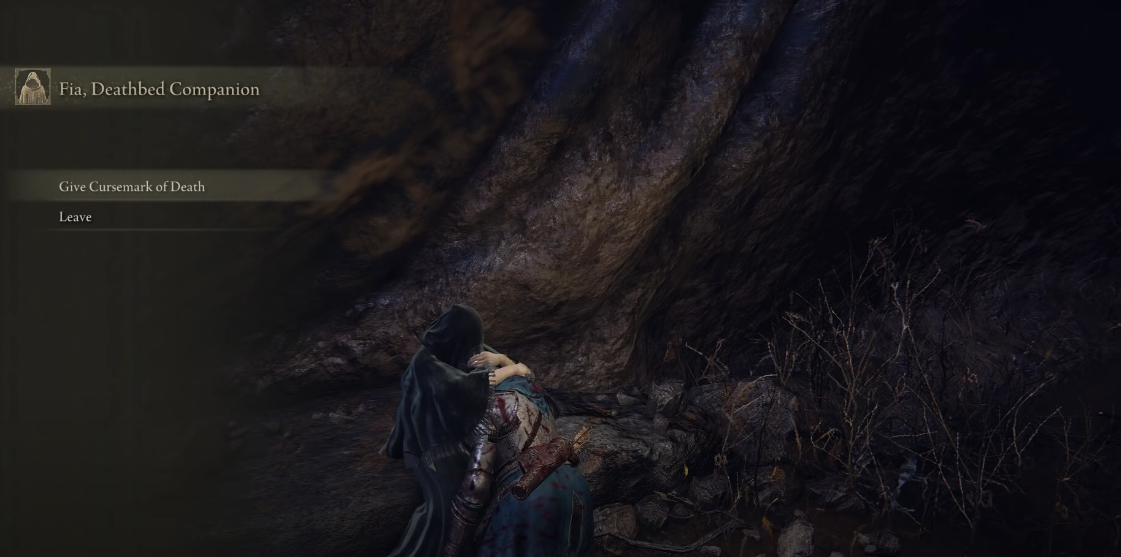
Talking to Fia - Initiate a dialogue with Fia and choose the option “No, I want to be held.”
- Continue talking to her in secret until you have the option to give Fia the Cursemark of Death.

Giving Fia the Cursemark of Death - Give her the Cursemark of Death to receive Radiant Baldachin’s Blessing.
- Talk to Fia in secret until she asks you to become the Elden Lord.
- Leave and rest at a nearby Site of Grace to make Fia fall asleep.
- Interact with Fia, choose “Yes” to enter the Deathbed Dream, and proceed with the quest.

Defeat Lichdragon Fortissax
You’re in for a surreal surprise. Fia isn’t dreaming anything sweet. You’ll find the Lichdragon Fortissax inside the deathbed companion’s slumber with no way out. Unless, of course, you happen to slay the creature in front of you. I highly encourage looking into the best talismans in the game to build resistance against Fortissax’s attacks.
- Prepare by using the best talismans, shields, and armor sets that provide resistance against lightning and physical attacks.
- Familiarize yourself with dragon attack patterns by facing other dragons in the game.
- Focus on dodging and rolling to avoid the dragon’s lightning-based attacks.
- Target the hindlegs of the Lichdragon for effective damage.
- Consider using powerful melee weapons if you have a melee build.
- Be patient during the fight and take your time to avoid getting hit.
- After defeating the Lichdragon, you’ll receive the Remembrance of the Lichdragon, which you can trade with Enia at the Roundtable Hold for Runes or a powerful armament.

Great going! You’ve now killed off Lichdragon Fortisaxx and can now easily make your way back to the realm of the living. Let’s talk about what to do next in the Fia questline in the following section.
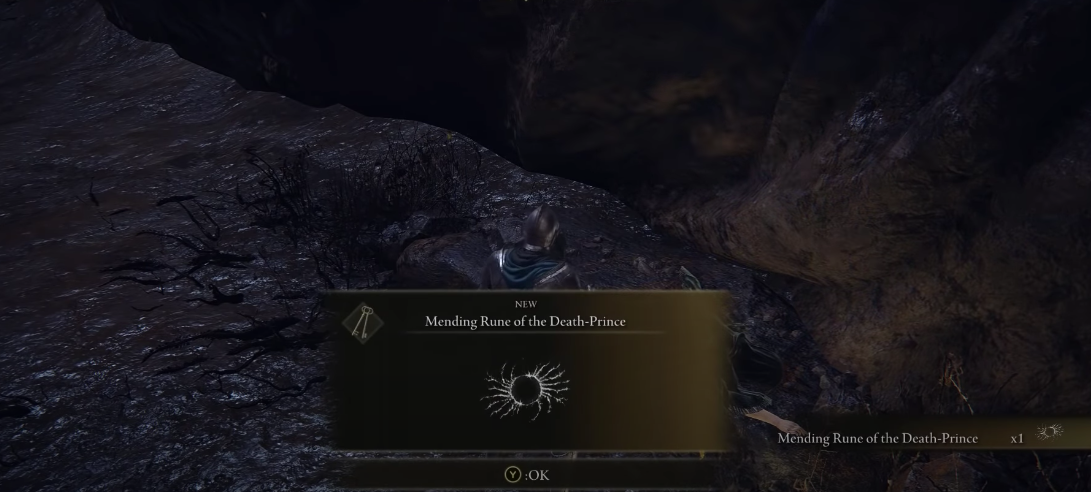
Get the Mending Rune of the Death-Prince
You’re almost at the end of this whole affair now. As soon as you get back to the normal environment of Deeproot Depths, particularly where you last met Fia, approach the deathbed companion. To our sad surprise, she won’t be alive anymore. However, she will do you one last service and grant the Mending Rune of the Death-Prince.
This is one of the many Great Runes in Elden Ring. Since it cannot be equipped or consumed in any way, players might think that they’ve made all this effort for nothing. However, the truth couldn’t be further from this. You’ll be utilizing the Mending Rune of the Death-Prince to achieve the Age of the Duskborn ending of Elden Ring.
For now, though, pick up the key item to finalize Fia’s questline.
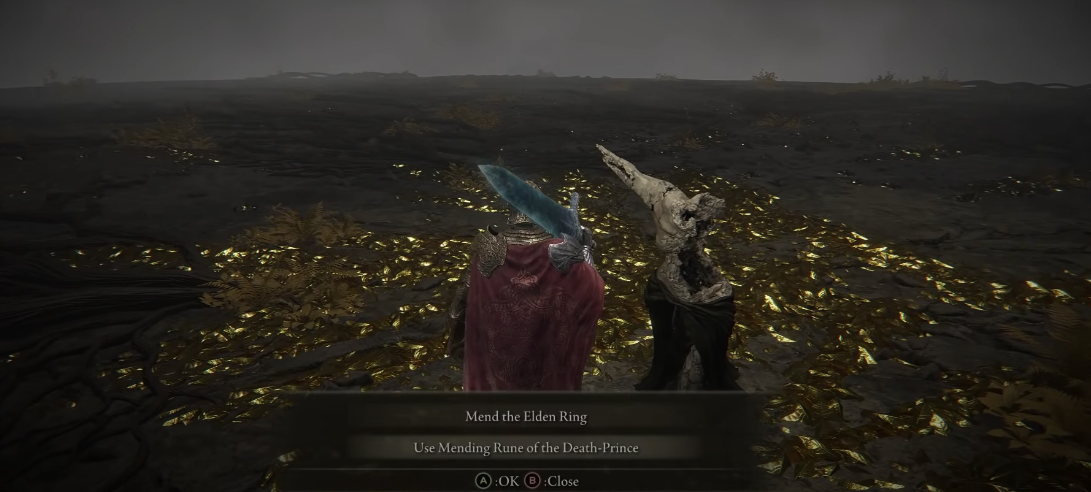
Selecting Mending Rune of Death-Prince Elden Ring Ending
The title truly says everything there is to it now. If you want to make all of your efforts come to fruition, you have to play through the rest of the game until you reach the final boss, which is initially Radagon of the Golden Order and then the Elden Beast.
- Progress through the game until you reach the final boss, Radagon of the Golden Order, and then the Elden Beast, in the Elden Throne area.
- Defeat these bosses.
- After defeating the Elden Beast, you’ll be presented with multiple endings. Choose the “Age of the Duskborn” ending by approaching Fractured Marika with the Mendine Rune of the Death-Prince.
- Select the “Use Mending Rune of the Death-Prince” option to end the game and Fia’s questline.
The Hug Debuff From Fia
Hugging Fia in Elden Ring can result in a persistent debuff that lowers your total HP by 5%. While hugging her multiple times may lead to new dialogue options and storylines, as well as blessings. The debuff does not disappear upon death or resting at a Site of Grace, and restorative items will not remove it either. Therefore, think carefully before deciding whether to hug Fia multiple times in the game.
How To Remove The Debuff
There is an easy way with which you can get rid of the Total Health Debuff. Just use the Blessing that Fia gives you and it will increase your Poise. As soon as the blessings effects are gone the debuff will leave you as well.
Make sure that you should only accept Fia’s Request when you are up for the challenging fight and you use it as soon as possible. The longer the debuff sits in your inventory, the more health you will lose.
My Experience With Fia’s Questline

In my experience, the highlight and awe-inspiring part of Fia’s questline in Elden Ring is definitely the Lichdragon Fortissax fight toward the end. Unfortunately, the reskin ending using the Mending Rune of Death is extremely underwhelming, which is why I only completed Fia’s quest once over my plethora of playthroughs.
Like with Ranni and Dung Eater, Fia has one of the longest in-game questlines, and I had to constantly visit several Sites of Grace since it was never clear where I had to go. However, all things considered, I found the lore bits and boss fights here much better than most major NPC questlines like Dung Eater, Goldmask, or even Ranni.
In this guide, I have talked about Fia Questline Elden Ring and everything related to this eerie NPC. She welcomes you at first, offering you solace in the form of a heartwarming hug, but little do you know at that time the ulterior motives of Fia.
Next:
- Elden Ring: Seppuku Location
- Elden Ring: Raya Lucarian Sorcerer Set Location
- Elden Ring: Mountaintops of the Giants Location
- Elden Ring: Godrick’s Great Rune Location
- Elden Ring: Golden Scarab Talisman Location
Thanks! Do share your feedback with us. ⚡
How can we make this post better? Your help would be appreciated. ✍